1
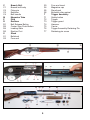
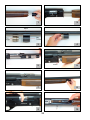
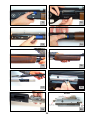
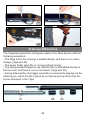
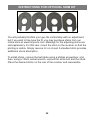
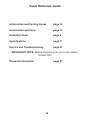
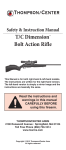
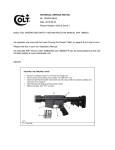
Sporter
Instruction Manual
12 & 20 ga
2
ALWAYS KEEP THIS MANUAL WITH YOUR FIREARM. INCLUDE IT WITH
THE FIREARM WHEN IT CHANGES OWNERSHIP.
WARNING: ALL FIREARMS CAN BE DANGEROUS AND CAN CAUSE
SERIOUS INJURY, DAMAGE TO PROPERTY OR DEATH. THE
FOLLOWING SAFETY RULES ARE AN IMPORTANT REMINDER THAT
FIREARM SAFETY IS YOUR RESPONSIBILITY.
WARNING: READ THE ENTIRE MANUAL CAREFULLY BEFORE USING
THIS FIREARM. MAKE SURE THAT ANY PERSON USING OR HAVING
ACCESS TO THIS FIREARM READS AND UNDERSTANDS THIS ENTIRE
MANUAL PRIOR TO USE OR ACCESS.
WARNING: ALWAYS ENSURE THAT THE SAFETY IS FULLY ENGAGED
UNTIL READY TO FIRE!
NOTICE: The Manufacturer and/or its Official Distributors assume no liability for
product malfunction or for physical injury or property damage resulting in whole
or in part from criminal or negligent use of the product, improper or careless
handling, unauthorized modifications, use of defective, improper, hand loaded,
reloaded or remanufactured ammunition, customer misuse or neglect of the
product, or other factors beyond manufacturer’s direct and immediate control.
In addition to the Basic Safety Rules, there are other Safety Rules pertaining to
the loading, unloading, disassembly, assembly and use of this firearm, located
throughout this manual.
WE RECOMMEND THE USE OF ORIGINAL SPARE PARTS AND ACCESSORIES. THE USE OF OTHER MANUFACTURERS’ SPARE
PARTS AND ACCESSORIES COULD CAUSE MALFUNCTIONS AND/
OR BREAKAGES THAT WILL NOT BE COVERED BY THE SILVER EAGLE
WARRANTY.
3
CONTENTS
Page
BASIC SAFETY RULES 4
NOMENCLATURE 7
DESCRIPTION 9
TECHNICAL FEATURES AND SPECIFICATIONS 10
OPERATION 10
AMMUNITION 12
DISASSEMBLY 16
ROUTINE MAINTENANCE 18
SPECIAL MAINTENANCE 21
20 GAUGE DIFFERENCES
25
OPTIONAL SHIM KIT INSTRUCTIONS
26
WARRANTY INFORMATION 27
4
BASIC SAFETY RULES
CAUTION: READ THIS MANUAL CAREFULLY BEFORE USING THE
SHOTGUN.
CAUTION: FIREARMS CAN BE DANGEROUS AND CAN CAUSE SERIOUS
INJURY, DAMAGE TO PROPERTY OR DEATH, IF HANDLED IMPROPERLY.
THE FOLLOWING SAFETY RULES ARE AN IMPORTANT REMINDER THAT
FIREARM SAFETY IS YOUR RESPONSIBILITY.
1. NEVER POINT A FIREARM AT SOMETHING THAT IS NOT SAFE
TO SHOOT.
Never let the muzzle of a firearm point at any part of your body or at another
person. This is especially important when loading or unloading the firearm.
When you are shooting at a target, know what is behind it. Slugs and shot can
travel farther than their intended range. If you miss your target or if a projectile
penetrates the target, it is your responsibility to ensure that the shot does not
cause unintended injury or damage.
2. ALWAYS TREAT A FIREARM AS IF IT WERE LOADED.
Never assume that a firearm is unloaded. The only certain way to ensure
there are no cartridges in a firearm is to open the chamber and visually
and physically examine the inside to see if a round is present. Removing or
unloading the magazine will not guarantee that a firearm is unloaded or cannot
fire. Shotguns can be checked by cycling or removing all rounds and by then
opening and inspecting the chamber so that a visual inspection of the chamber
for any remaining rounds can be made.
5
3. STORE YOUR FIREARM SO THAT CHILDREN CANNOT GAIN
ACCESS TO IT.
It is your responsibility to ensure that children under the age of 18 or other
unauthorized persons do not gain access to your firearm. To reduce the risk
of accidents involving children, unload your firearm, lock it and store the
ammunition in a separate locked location. Please note that devices intended
to prevent accidents - for example, cable locks, chamber plugs, etc., - may
not prevent use or misuse of your firearm by a determined person. Firearm
storage in a steel gun safe may be more appropriate to reduce the likelihood of
intentional misuse of a firearm by a child or unauthorized person.
4. NEVER SHOOT AT WATER OR AT A HARD SURFACE.
Shooting at the surface of water or at a rock or other hard surface increases the
chance of ricochets or fragmentation of the bullet or shot, which can result in
the projectile striking an unintended or peripheral target.
5. KNOW THE SAFETY FEATURES OF THE FIREARM YOU
ARE USING, BUT REMEMBER: SAFETY DEVICES ARE NOT A
SUBSTITUTE FOR SAFE HANDLING PROCEDURES.
Never rely solely on a safety device to prevent an accident. It is imperative
that you know and use the safety features of the particular firearm you
are handling, but accidents can best be prevented by following the safe
handling procedures described in these safety rules and elsewhere in the
product manual. To further familiarize yourself with the proper use of this
or other firearms, take a Firearms Safety Course taught by an expert in
firearms use and safety procedures.
6. PROPERLY MAINTAIN YOUR FIREARM.
Store and carry your firearm so that dirt or lint does not accumulate in the
working parts. Clean and oil your firearm, following the instructions provided
in this manual, after each use to prevent corrosion, damage to the barrel
or accumulation of impurities which can prevent use of the firearm in an
emergency. Always check the bore and chamber(s) prior to loading to ensure
that they are clean and free from obstructions. Firing with an obstruction
in the barrel or chamber can rupture the barrel and injure you or others
nearby. In the event you hear an unusual noise when shooting, stop firing
6
immediately, engage the manual safety and unload the
firearm. Make sure the chamber and barrel are free from
any obstruction, such as part of a cartridge stuck inside the
barrel due to defective or improper ammunition.
7. USE PROPER AMMUNITION.
Use only factory-loaded, new ammunition manufactured to industry
specifications: CIP (Europe and elsewhere), SAAMI® (U.S.A.). Be certain that
each round you use is in the proper gauge and type for the particular firearm.
The caliber or gauge of the firearm is clearly marked on the barrel. The use
of reloaded or remanufactured ammunition can increase the likelihood of
excessive cartridge pressures, case-head ruptures or other defects in the
ammunition that can cause damage to your firearm and injury to yourself or
others nearby.
8. ALWAYS WEAR PROTECTIVE GLASSES AND EARPLUGS WHEN
SHOOTING.
The chance that gas, gunpowder or metal fragments will
blow back and injure a shooter who is firing a gun is rare,
but the injury that can be sustained in such circumstances
can be severe, including the possible loss of eyesight. A
shooter must always wear impact resistant shooting glasses
when firing any firearm. Earplugs and other high-quality
hearing protectors help reduce the chance of hearing
damage from shooting.
9. NEVER CLIMB A TREE, FENCE OR OBSTRUCTION WITH A
LOADED FIREARM..
Open and empty the chamber(s) of your firearm and engage the manual safety
before climbing or descending a tree or before climbing a fence or jumping
over a ditch or other obstruction. Never pull or push a loaded firearm toward
yourself or another person. Always unload a firearm, visually
and physically check to see that the magazine, loading
mechanism and chamber are unloaded, and action is open
before handing it to another person. Never take a firearm
from another person unless it is unloaded, visually and
physically checked to confirm it is unloaded, and the action is
open.
7
10. AVOID ALCOHOLIC BEVERAGES OR
JUDGEMENT/REFLEX IMPAIRING MEDICATION
WHEN SHOOTING.
Do not drink and shoot. If you take medication that can
impair motor reactions or judgement, do not handle
a firearm while you are under the influence of the
medication.
11. NEVER TRANSPORT A LOADED FIREARM.
Unload a firearm before putting it in a vehicle (chamber
empty, magazine empty). Hunters and target shooters
should load their firearm only at their destination, and only
when they are ready to shoot. If you carry a firearm for
self-protection, leaving the chamber unloaded can reduce
the chance of an unintentional discharge.
12. LEAD WARNING.
Discharging firearms in poorly ventilated areas, cleaning firearms, or handling
ammunition may result in exposure to lead and other substances known to
cause birth defects, reproductive harm, and other serious physical injury. Have
adequate ventilation at all times. Wash hands thoroughly after exposure.
CAUTION: It is YOUR responsibility to know and abide by federal, state and
local laws governing the sale, transportation and use of firearms in your area.
WARNING: This firearm has the capability of taking your life or the life of
someone else! Always be extremely careful with your firearm. An accident is
almost always the result of not following basic firearm safety rules.
For information about Firearm Safety Courses in your area, please visit the
National Rifle Association’s web site at www.nra.org.
A
Action Group
A1
Action bar
A2
Power link
A3
Power buffer
A4
Gas piston with ring
A5
Action spring
BBarrel
NOMENCLATURE
B1
B2
B3
B4
B5
B6
B7
8
Index lug
Barrel breech
Locking cove
Gas cylinder
Ventilated rib
Fiber optic bead
Muzzle
C
Breech Bolt
C1
Breech bolt body
C2
Firing pin
C3
Extractor
C4
Bolt handle
M
Magazine Tube
PPlug
RReceiver
R1
Bolt Release Button
R3
Carrier Stop Push Button
R4
Loading Gate
R5
Ejection Port
SStock
S1
Buttstock
S2
Fore end
S3
S4
S5
S6
T
T1
T2
T3
T4
T5
T6
T7
9
Fore end insert
Magazine cap
Recoil pad
Buttstock sling swivel
Trigger Assembly
Safety button
Trigger
Trigger guard
Hammer
Carrier
Trigger Assembly Retaining Pin
Retaining pin screw
GENERAL DESCRIPTION
HIGH CHROME-MOLY BARREL
Barrel is bored from state-of-the industry solid bar C4140 German steel. Plated
with hard chrome, it is fully compatible with steel and heavy shot.
ANTI-GLARE RIB
A full 10mm-wide rib promotes fast target acquisition. Reverse concave-ridged
surface prevents glare, and fiber-optic front sight stands out in a wide variety of
lighting conditions.
STOCK
Buttstock and fore-end are of beautiful Turkish walnut (wood-stocked models)
with a matte (oil) or gloss finish. Deep ventilated recoil pad has a hard polished
rubber heel to prevent hanging up on clothing for quick shouldering.
GAS SYSTEM
Simplified single-piston gas system is easily maintained, and reliably cycles
loads from 1oz to 1 3/4 oz.
TRIGGER ASSEMBLY
Trigger plate and guard are all-metal, enhancing durability and avoiding the
problem of parts becoming brittle in extremely cold weather. Large trigger guard
permits quick hand positioning even while wearing gloves.
PITCH AND CAST ADJUSTMENT
A set of shim kits (not included - available through our online store) permits the
raising or lowering of stock pitch, and right or left cast.
ACCESSORIES
A number of useful replacements and add-ons are available for your Sporter,
including: extra barrels from 20” (slug barrel with rifle sights) to 30”; extra choke
tubes; replacement stocks, walnut and synthetic; additional shim kits for stock
adjustment; convenient gun cases. See your dealer or www.trimports.com.
10
TECHNICAL FEATURES AND SPECIFICATIONS
Gauge
Barrel Chamber
Barrel
Rib
Front Sight
Operation
Locking System
Receiver
Safety
Magazine Capacity
Stock
Length of Pull
Drop
Weight
12
76mm; accepts 23/4 and 3 inch shells
Steel with chrome-plated bore
Ventilated, 10mm anti-glare
Fiber optic
Semi-automatic, gas operated
Elevated locking block
Lightweight alloy
Cross-bolt, uni-directional
4 shells, removable-plug-restricted to 2
Turkish Walnut
14.5 inches, + or - 1/4 inch
DAC: 1.5” DAH: 2.25”
6lb 15oz (varies with barrel length and wood density)
OPERATION
NOTE: numbers listed in the text refer to illustrations beginning on page 22.
OBSTRUCTION & CHOKE TUBE CHECK
Check the barrel to ensure there are no obstructions in the chamber and bore.
This is extremely important because serious injury can result to the user or to
nearby persons if a cartridge is fired in an obstructed barrel or chamber.
Check the inside of the barrel prior to completely assembling the firearm and
before use; if the firearm is already assembled the following procedure should
be followed:
• Follow the instructions in the “Disassembly” section and remove the barrel
from the shotgun.
• After removing the barrel, look right through the barrel from the rear and make
sure there are no obstructions, even minor ones.
• If an obstruction in the barrel is detected, a competent gunsmith must remove
the obstruction. Reinspect the shotgun before firing.
• Remount the barrel, following the instructions in the “Reassembly”
section.
11
Check the condition of the choke tubes:
• Make sure there is a choke tube installed! Shooting without a choke tube
installed may irreparably damage the barrel!
• Always check the appearance and cleaning of the choke tubes before using
the shotgun.
• Check correct tightness in the barrel with the wrench provided.
• Never use choke tubes that show signs of defects, warping or incrustation.
• Make sure that the choke tube inserted is appropriate for the intended use
and shot type to be used (steel or lead). See “Ammunition”, below.
• The application of a light coat of gun grease will make the tube easier to
remove, and reduce the deposition of carbon between the tube and barrel.
MOUNTING THE BARREL
Your shotgun may be packed with the barrel separate from the stock/receiver/
fore-end assembly.
WARNING: All assembly, disassembly and maintenance procedures should
be carried out with the firearm unloaded (magazine tube empty, receiver
empty and barrel chamber empty). Check that the firearm is unloaded by
looking through the ejection port, the loading gate and the chamber.
WARNING: During the assembly, disassembly and maintenance procedures,
never point a firearm at someone or at hard and flat surfaces. Treat the
firearm as if it were loaded. (See paragraphs 1, 2, and 4 of the BASIC
SAFETY RULES).
CAUTION: If the breech bolt is open and the barrel is not installed, avoid pressing the breech bolt release button and keep your fingers away from the ejection
port. Should the breech bolt release button be pressed in this condition, the
breech bolt will slam forward and the bolt handle will forcefully strike the forward edge of the ejection port. This may damage the handle and the receiver.
• Check the barrel. The bore and chamber must be clean and free of
obstructions.
• Unscrew the fore-end cap from the magazine tube. (fig 1)
• Pull the fore-end off the magazine tube. (fig 2) Keep the metal fore-end insert
together with the fore-end. (See “Nomenclature,” above.)
• If the piston is on the magazine tube, slide it off. Inspect it carefully for
general condition and the proper installation of the piston ring. (fig 3)
• Insert the piston into the gas cylinder. (fig 4)
WARNING: Never attempt to shoot the firearm without a properly installed
gas piston. The action will not cycle and excessive gas pressure may damage
12
the fore-end and injure the shooter or bystanders. When changing barrels,
always ensure the piston is in the gas cylinder of the barrel to be installed
Assemble the barrel with the stock/receiver/fore-end assembly as follows:
• Partially slide the barrel breech into the receiver, ensuring that the piston and
gas cylinder slide over the end of the magazine tube. (fig 5)
• Allow the barrel breech to push past the breech bolt and seat fully. When the
barrel is seated fully, the bolt will be closed.
• Slide the fore-end over the gas cylinder and magazine tube. Check that the
fore-end is fully seated in the bracket on the face of the receiver. The fore-end
is correctly assembled when there is no space between the parts. (figs 6 & 7)
• Screw the magazine cap onto the magazine tube and tighten completely.
You will feel a ratcheting as the cap engages the spring-loaded retaining pin
permanently installed in the fore-end insert. (fig 8)
• There should be no play in the fore end. If there is play, remove the cap and
fore end. Make sure the fore end insert is installed. (see Nomenclature, above.)
AMMUNITION
WARNING: The manufacturer and distributor assume no liability for physical
injury or property damage resulting from the use of defective, improper, handloaded, reloaded or remanufactured ammunition. Serious damage or injury,
even death, may be caused by the use of ammunition that is not suitable,
loaded with force, or loaded with obstructions in the barrel.
WARNING: Never use cartridges that do not correspond to the indications on
the barrel.
WARNING: Only use cartridges with a length equal to or less than the
chamber length indicated on the barrel.
WARNING: To avoid using improper ammunition, always check the
characteristics stamped on the cartridge box and on the cartridge. Be sure to
use the right cartridge gauge and length for your firearm.
STEEL SHOT
The barrel and choke tubes are designed for use with factory steel shot
cartridges loaded to international standard specifications. When steel shot
cartridges are fired, the best results are obtained by using open chokes (C, IC,
M). Tighter choke constrictions (IM, F) when using steel shot, do not increase
pattern density and will accelerate wear and tear. The use of reloaded or
remanufactured ammunition can increase the likelihood of excessive pressure,
case rupture or other defects in the ammunition.
13
Your Silver Eagle Sporter is chambered for 3” and shorter shells. You will find
markings for the gauge and chamber length on the side of the barrel. The
Sporter has been tested with special proof test ammunition in accordance with
government quality control standards.
NOTE: Because of the precise CNC machine tolerances of the parts in your
Sporter, a break-in period may be required before you shotgun will cycle
consistently with light (1oz) loads. If you experience a failure to cycle with
these loads, we recommend that you fire 200-300 normal field loads (11/8oz or
greater) to allow for proper wear-in.
MAGAZINE CAPACITY
To ensure compliance with Federal and state laws governing the hunting of migratory birds, your Sporter ships with a magazine plug restricting the magazine
capacity to two shells (see Nomenclature, above). Removing the plug permits a
total capacity of five shells (four in the magazine and one in the chamber).
CHOKE TUBES
Silver Eagle choke tubes are similar to the popular “mobil chokes” used by
many manufacturers, although compatibility with other brands cannot be
assured. In addition to the choke tubes supplied with your gun and available
from T R Imports as accessories, we recommend Trulock tubes (www.trulock.
com) which have been manufactured in the USA to our exact thread pitch
specifications, and which are available in a wide variety of flush and extended
models.
CHOKE TUBE IDENTIFICATION
Included tubes range from Cylinder (least restricted) to Full (most restricted).
Choke is designated by index notches cut into the rim (separate from the larger
notches engaged by the choke tube wrench).
Rim Notches
I
II
III
IIII
IIIII
Standard Designation
F (Full)
IM (Improved Modified)
M (Modified)
IC (Improved Cylinder)
C (Cylinder/Skeet)
14
LOADING THE FIREARM
WARNING:Before loading the firearm, it is a good idea to practice the
following handling procedures without the use of ammunition. Never handle a
loaded firearm until you are fully familiar with the loading procedures. Always
inspect the ejection port, the loading gate and the cartridge chamber to make
sure they are empty. Check that there are no cartridges in the magazine tube.
Before loading the firearm, ensure that the safety is engaged. Always keep
the firearm pointed in a safe direction. (See1, 2 and 4 of the BASIC SAFETY
RULES.)
WARNING: The shooter and all bystanders must always wear protective
eyewear and ear protection during shooting. Residue from gunpowder,
lubricant or metal fragments may be projected backwards and cause injury.
Noise-reducing earplugs or earmuffs will reduce the risk of damage to hearing
caused by prolonged shooting activity.
WARNING: Always keep your finger off the trigger and avoid contact of other
objects with the trigger if you don’t intend to fire.
• Pull the bolt handle rearward until it latches in the OPEN position. (fig 9)
NOTE: if the firearm has been left cocked, the bolt will not latch open unless
the carrier stop push button is first pressed. (See Nomenclature, above.)
• Engage the safety by pushing the button until the red ring disappears. (fig 10)
WARNING: When the red ring on the safety button is visible, the firearm is in
the FIRE position.
• Introduce the first cartridge into the cartridge chamber through the ejection
port (Fig. 11).
• Keeping your hands away from the ejection port, press the release button and
gently guide the breech bolt to lock. (fig 12)
• CAUTION: Never allow the bolt to “slam” closed on a chambered cartridge!
WARNING: The firearm is now loaded and ready to fire after the manual
safety is disengaged. Always keep your finger off the trigger and avoid
contact with the trigger by other objects if you don’t intend to fire. Never point
a firearm at something that is not safe to shoot. (See points 1, 2 and 4 of the
BASIC SAFETY RULES).
• Insert additional shells into the magazine by pushing each shell against the
carrier and forward until it engages the stop pawl (fig 13)
• To fire, disengage the safety and pull the trigger.
• After firing, release the trigger completely to reset the trigger for the next shot
• The gun will fire the shell in the chamber, and automatically feed the next
shell from the magazine
15
• When the last shell has been fired, the breech bolt remains open, indicating
that the magazine is empty.
• Engage the safety.
WARNING: After pulling the trigger, if the shotgun doesn’t fire, engage the
safety, wait at least one minute and unload the shotgun as described in
“UNLOADING THE FIREARM,” below. Never attempt to fire ammunition that
did not fire the first time. Dispose of misfire or faulty ammunition properly in
accordance with the cartridge manufacturer’s instructions.
UNLOADING THE FIREARM
WARNING: The firearm is loaded and ready to fire. Always keep your finger
off the trigger and avoid contact with the trigger by other objects if you don’t
intend to fire. Never point the firearm at someone or at hard, flat surfaces.
(See points
1, 2 and 4 of the BASIC SAFETY RULES.)
• Keeping the firearm pointed in a safe direction, check that the safety is
engaged (red ring not visible).
• Press in on the carrier, push the cartridge lightly into the magazine tube and
at the same time press in the bolt release button, guiding the cartridges out of
the magazine tube. (fig 14)
• After confirming that the magazine is empty, press the carrier stop button,
which will drop the carrier and allow the bolt to lock open in the next step.
• Holding the firearm upright, firmly pull back the bolt handle to eject any live
shell that may remain in the chamber. With the bolt locked open, you can visually inspect the chamber to confirm that no shell is present.
The above steps constitute the LOAD CHECK, which should always be
performed prior to using or transporting the firearm!
• When the firearm is available for use or is being transported, the bolt should
always be locked open.
• When accepting the firearm or handing it to someone else, ALWAYS perform
the load check!
• For storage, it is recommended that tension be released from the hammer
spring. Using the following steps:
• After performing the Load Check to confirm that the gun is unloaded, press
the bolt release button while guiding the bolt closed.
• Keeping the firearm pointed in a safe direction, disengage the safety and pull
the trigger. (It is recommended that a “snap cap” or dummy round be used to
reduce wear on the firing pin.)
• Engage the safety.
16
DISASSEMBLY
WARNING: Always check that the shotgun is unloaded (empty cartridge
chamber, empty receiver, empty magazine). Inspect the firearm by looking
through the ejection port, the loading gate and the chamber. If it is not empty,
unload it as instructed in “Unloading the Firearm”, above. Ensure the hammer
is decocked.
BARREL
• Ensure the bolt is closed.
• Unscrew the magazine cap (fig 15).
• Holding the shotgun by the barrel, pull the fore-end straight out toward the
muzzle and set it aside(fig 16).
• Pull the barrel out of the stock-receiver assembly keeping the piston inside
the gas cylinder (fig 17).
BOLT GROUP
(Includes bolt, action bar, power bushing and power link)
Note: this procedure need be accomplished only when necessary for cleaning
and inspection.
• Having removed the barrel, press gently on the face of the bolt to center the
semi-circular recess on the bolt handle (fig 18)
• Holding the bolt in this position, pull the bolt handle straight out. It may be
necessary to use pliars. (Wrap them to avoid scratching the metal of the bolt
handle.
• Slide the entire assembly forward until the bolt clears the receiver (fig 19).
• Inspect the bolt for cleanliness and integrity. The locking block should move
freely. When pressed from the rear, the firing pin should extend beyond the bolt
face and retract fully when released. (fig 20)
• If desired, the other components may be slid off the magazine tube to
facilitate cleaning. Note carefully the order of disassembly, paying special
attention to the connecting of the power link with the action bar.
TRIGGER GROUP
• Remove the short screw from the left side of the receiver (fig 21).
• Using a suitable punch, lightly tap the trigger group retaining pin until it is
clear of the receiver. (fig 22).
• Grasping the trigger guard, pull forward and down. (fig 23).
NOTICE: Further disassembly is not require for routine maintenance, and
should be performed only by a qualified gunsmith.
17
REMOVAL OF CHOKE TUBES
• Unscrew the choke tube by turning it counterclockwise using the supplied
choke tube wrench (fig 24) and pull it out of the muzzle.
WARNING: Always check that the shotgun is unloaded (empty cartridge
chamber, empty receiver, empty magazine). Inspect the firearm by looking
through the ejection port, the loading gate and the chamber. If it is not empty,
unload it as instructed in “Unloading the Firearm”, above. Ensure the hammer
is decocked.
WARNING: Never look into the muzzle or change the tube of a loaded gun,
even with the safety engaged.
CLEANING OF CHOKE TUBES
WARNING: Always check that the shotgun is unloaded (empty cartridge
chamber, empty receiver, empty magazine). Inspect the firearm by looking
through the ejection port, the loading gate and the chamber. If it is not empty,
unload it as instructed in “Unloading the Firearm”, above. Ensure the hammer
is decocked.
WARNING: Never look into the muzzle or change the tube of a loaded gun,
even with the safety engaged.
• The choke tube interior is best cleaned by leaving it in place while cleaning
the barrel, as described under ROUTINE MAINTENANCE, below.
• After removing the choke tube, carefully clean the choke tube recess using
a suitable solvent and, if necessary, a barrel brush. Dry it using a suitable gun
cleaning patch.
• Make sure the choke tube is perfectly clean inside and outside. It may be necessary to use a metal brush to remove heavy carbon deposits on the outside of
the choke tube.
INSTALLATION OF CHOKE TUBES
WARNING: Always check that the shotgun is unloaded (empty cartridge
chamber, empty receiver, empty magazine). Inspect the firearm by looking
through the ejection port, the loading gate and the chamber. If it is not empty,
unload it as instructed in “Unloading the Firearm”, above. Ensure the hammer
is decocked.
WARNING: Never look into the muzzle or change the tube of a loaded gun,
even with the safety engaged.
• Apply a thin coat of gun grease to the outside of the choke tube and its
18
threads. NOTE: using gun grease rather than oil will provide a better seal
between the tube and the choke tube recess, minimizing carbon buildup and
reducing the chance of a seized choke tube.
• Insert the desired choke tube into the muzzle. Using the choke tube wrench
provided, turn it clockwise until it has fully bottomed into the recess.
WARNING: Periodically check that the choke tube is tightened correctly,
ensuring that the shotgun is unloaded (empty cartridge chamber, empty
receiver and empty magazine) and breech bolt in the open position. If
necessary, firmly tighten the choke tube with the supplied choke tube wrench.
Correct tightening of the choke tube will avoid the occurrence of shotgun
damage or injury.
WARNING: The choke must be kept correctly tightened in the barrel at all
times,even during storage and cleaning. Cleaning the barrel without the
choke tube installed may lead to dirt becoming lodged in the barrel thread and
preventing the choke tube from screwing in properly, or to the formation of
rust or obstructions. Keeping a choke tube installed at all times also improves
the impact resistance of the muzzle end.
WARNING: Never shoot without inserting a choke tube. Shooting without a
choke tube in the barrel is very dangerous, as residues of lead or debris may
become lodged in the thread creating an obstruction within the barrel. Also,
not using a choke tube will damage the threading of the barrel irreparably and
result in irregular shot spread.
ROUTINE MAINTENANCE
Clean and lubricate your shotgun any time combustion residue, grease or dirt
have built up in any of the mechanisms. Cleaning and lubrication of the firearm
after each use is the best way of ensuring that the components are protected
against corrosion resulting from combustion residues or use in humid or salty
environments.
At the end of a shooting day, carry out the Routine Maintenance as described below.
WARNING: Always check that the shotgun is unloaded (empty cartridge
chamber, empty receiver, empty magazine). Inspect the firearm by looking
through the ejection port, the loading gate and the chamber. If it is not empty,
unload it as instructed in “Unloading the Firearm”, above. Ensure the hammer
is decocked.
19
WARNING: Excess oil or grease in the bore are dangerous when firing, and
may damage the shotgun or injure the shooter or bystanders. Never apply
lubricants to shotshells.
BARREL
• Carefully clean the inside of the barrel with a suitable gun cleaning patch
and solvent to remove fouling and plastic residue deposited by shot cups. For
heavy deposits, it may be necessary to use a bronze bore brush.
• Thoroughly clean the locking cove of the barrel breech.
• When you believe you have removed all deposits, push a clean patch through
the barrel. A clean barrel will have a mirror-like appearance.
• Because the bore is plated with hard chrome, it is not necessary to oil it.
• Check the barrel. The barrel and cartridge chamber must be clean and free
of obstructions.
GAS PISTON AND CYLINDER
See fig 3.
• Remove the gas piston from the gas cylinder.
• Clean the inside and outside of the piston with a suitable solvent. If necessary,
use a brush to remove heavy deposits.
• Clean the inside of the gas cylinder in the same manner.
• Inspect the gas piston carefully to ensure it is undamaged and the piston ring
is in place.
CAUTION: DO NOT OIL THE GAS PISTON OR CYLINDER.
WARNING: Never shoot with a damaged gas piston. Never shoot without a
gas piston in place; the action will not function, and damage to the gun and
injury to the shooter or bystanders may result.
BREECH BOLT and TRIGGER ASSEMBLIES
• Thoroughly clean accessible parts with a suitable solvent and small brush.
• Dry with a soft cloth and lightly oil.
RECEIVER
• Maintain as described for the breech bolt and trigger assemblies. Lightly oil
the slide rails of the breech bolt inside the receiver.
MAGAZINE TUBE
• Clean the outside of the magazine tube with a suitable solvent.
• Dry and then lightly oil it.
Every 3000-5000 shots (depending on type of ammunition used) and always before storing the gun for a long period, in addition to Routine
20
Maintenance, perform the Special Maintenance, described later in this
manual.
REASSEMBLY
Reassemble by reversing the previous steps, with special attention to the
following points:
Trigger Group
Insert the rear of the trigger group into receiver, and then rotate the trigger
group into place, maintaining rearward pressure. Ensure the trigger group is
fully seated rearward. If you meet resistance before the holes in the receiver
align with the holes in the trigger group, press the bolt release button while
working the trigger group into proper position. You should be able to tap the
trigger group retaining pin gently into position. If excessive force seems to be
required, the holes are not completely aligned.
Bolt Group
When the bolt has been reassembled on the action bar and slid back into the
receiver, make sure the semi-circular recess on the bolt is again centered on
the bolt handle slot. Reinserting the bolt handle should require only hand force.
Barrel
Always insert the gas piston into the gas cylinder before installing the barrel.
This prevents the threads on the magazine tube from damaging the O-ring,
which is installed in the gas cylinder forward of the gas ports. A damaged or
missing O-ring will prevent proper cycling of the action during shooting.
Consult the Nomenclature diagram for proper order of assembly; note that
the power buffer is installed on the magazine tube before the barrel, and that
the fore end insert is installed after the fore end is in place. Firmly tighten the
magazine cap without using excessive force, which may damage the fore end.
21
SPECIAL MAINTENANCE
Every 3000-5000 shots (depending on type of ammunition used) and always
before storing the gun for a long period, in addition to Routine Maintenance,
perform the following Special Maintenance.
WARNING: Always check that the shotgun is unloaded (empty cartridge
chamber, empty receiver, empty magazine). Inspect the firearm by looking
through the ejection port, the loading gate and the chamber. If it is not empty,
unload it as instructed in “Unloading the Firearm”, above. Ensure the hammer
is decocked.
BREECH BOLT ASSEMBLY
• Remove the breech bolt assembly as described in DISASSEMBLY,
above.
• Thoroughly clean all components with a suitable solvent and small
brush.
• Dry and then lightly oil the surfaces of the bolt and all accessible parts.
• Inspect the firing pin and extractor for cleanliness and freedom of
motion. When pressed, the firing pin should extend beyond the face of
the bolt. When released, it should retract fully.
• Inspect the locking block and other parts for freedom of motion and
absence of damage and excessive wear.
TRIGGER ASSEMBLY
• Remove the trigger assembly as described in DISASSEMBLY, above.
CAUTION: if the hammer is cocked, restrain it while pulling the
trigger and allow it to uncock slowly.
• Thoroughly clean all components with a suitable solvent and small
brush.
• Dry and then lightly oil all accessible parts.
• Inspect all moving parts for cleanliness, freedom of motion, and the
absence of damage and excessive wear.
22
1
2
3
4
5
6
7
8
9
10
23
11
12
13
14
15
16
17
18
19
20
24
21
22
23
24
20 Gauge Differences
The foregoing description and figures apply to the 20ga Sporter with the
following exceptions:
• The 20ga action bar employs a welded design, and there is no power
linkage (12ga part A2).
• The power buffer (part A3) is correspondingly longer.
• The spring-loaded magazine cap retention pin is embedded directly in
the fore end, and there is no fore end insert (12ga part S3).
• During disassembly, the trigger assembly is removed by tapping out the
retaining pin, which is held in place by an internal spring rather than the
screw employed in the 12ga
25
INSTRUCTIONS FOR OPTIONAL SHIM KIT
You will probably find that your gun fits comfortably with no adjustment,
but if you wish to fine-tune the fit, you may purchase shims from our
online store at www.trimports.com. Markings for the adjusting shims are
self-explanatory. For RH cast, mount the shim on the receiver so that the
printing is visible. Simply reverse for a LH cast. A standard shim provides
additional shock absorption.
To install shims, remove the butt plate using a phillips screwdriver, and
then, using a 13mm socket wrench, remove the stock bolt and the stock.
Place the desired shims on the rear of the receiver and reassemble.
26
WARRANTY INFORMATION
Firearms distributed by TRI carry a two-year limited warranty to the original
purchaser for defects in materials or workmanship. If the original purchaser
registers his firearm with TRI, he automatically receives an additional three years
of warranty coverage for a total of five years. For more detailed information,
please visit www.trimports.com/support. If you do not have access to the internet,
call and we will assist you in registering your gun.
HOW TO OBTAIN SERVICE
For fastest service, contact us directly:
T R Imports Inc Telephone: 817-750-2291
5778 Park Vista Circle 866-419-6271
Suite 302 Fax: 817-581-4222
Fort Worth, TX 76244 Email: [email protected]
Web: trimports.com
For questions, suggestions, or to discuss anything not covered in this manual,
please call us, 9am-5pm Central, Monday-Friday. We thank you for the confidence
you have shown in our products, and we look forward to hearing from you.
Thank you!
27
Quick Reference Guide
Ammunition and Cycling Issues
page 14
Accessories and Parts
page 10
Assembly Orderpage 9
Specifications
page 11
Service and Troubleshooting:
page 27
IMPORTANT NOTE: Before returning your gun to the retailer,
contact TRI!
Warranty Information
28
page 27