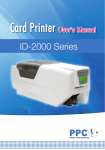
1
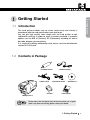
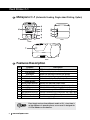
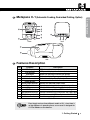
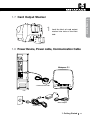
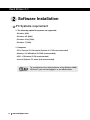
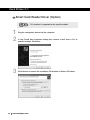
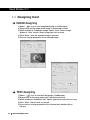
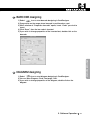
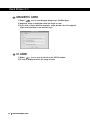
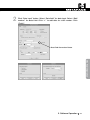
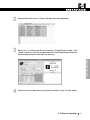
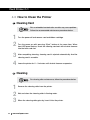
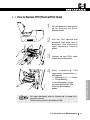
Contents
Contents ............................................................................................................................................ 03
Caution ....................................................................................................................... 04
1. Getting Started
1.1 Introduction .......................................................................................................... 07
1.2 Contents in Package ........................................................................................... 07
1.3 Product Features ................................................................................................. 08
1.4 Loading Ribbon ................................................................................................... 10
1.5 Loading Cleaning Rollers ................................................................................... 11
1.6 Card Feeding Hopper .......................................................................................... 12
1.7 Card Output Stacker ............................................................................................ 13
1.8 Power Device, Power cable, Communication Cable ......................................... 13
2. Software Installation
2.1 Installing Driver / Application .............................................................................. 15
2.2 Installing USB Device Driver ............................................................................... 18
2.3 Removing Driver / Application ............................................................................ 22
2.4 Removing USB Device Driver ............................................................................. 22
2.5 Updating a driver for hardware that isn’t work properly .................................... 24
2.6 Printing with C-1 ................................................................................................... 26
2.7 Printer Driver Settings .......................................................................................... 29
2.8 Network Configuration Settings (Option) ........................................................... 36
2.9 Scanner Software Settings (Option) .................................................................... 37
3. Printer Operation
3.1 Getting Started ..................................................................................................... 39
3.2 Description on Features ....................................................................................... 39
3.3 Designing Card .................................................................................................... 40
3.4 Tools ..................................................................................................................... 43
3.5 Configuration ....................................................................................................... 44
3.6 Data Synchronizing ............................................................................................. 45
3.7 Card Printing ........................................................................................................ 50
4. Instructions on Maintenance
4.1 Maintenance of Product ....................................................................................... 52
4.2 How to Replace Ribbon ...................................................................................... 53
4.3 How to Clean the Printer ..................................................................................... 54
4.4 How to Replace TPH (Thermal Print Head) and Consumables .......................... 55
4.5 Troubleshooting .................................................................................................. 56
4.6 Technical Specifications ...................................................................................... 58
3
Card Printer C-1
CAUTION
User should read caution information and keep in mind before using. Different icons remind
important information as to safety. Metapace is not responsible for physical harm to body or
physical damage to the product occurred by user`s careless use.
Warns user of risk of losing life or being seriously
injured.
Warns user of risk of being seriously or slightly
injured, or damage to product.
Warns user of slight damage to body.
Indicates information that supplements detailed
information.
4
www.metapace.com
Warns user of risk of losing life or being
seriously injured.
POWER
•
•
•
•
•
Do not use damaged power cord, plug or socket.
Do not pull plug with power cord.
Do not touch power plug with wet bare hand.
Do not bend power cord or put heavy things on the power cord.
Unplug during thunder and lightning or storage.
INSTALLATION
•
•
•
•
Do not put the printer in wet, dirty place.
Do not put lightings on the printer. Put the printer away from heat source.
Unplug while moving the printer.
Put the printer away from flammable source.
CLEANING
• Clean the wet and dirty plug.
• Unplug the printer before cleaning. Do not use water or chemical cleanser.
MISCELLANEOUS
• Do not put water bowel, medicine, metal on the printer.
• In case of abnormal situation in the printer, unplug the printer immediately and
contact your dealer.
• Make sure that you use adequate power adaptor.
CAUTION
5
Card Printer C-1
Warns user of slight damage to body.
INSTALLATION
• Do not put the printer on unstable place.
• Avoid direct sunlight that may cause trouble.
CLEANING
• Do not disassemble cover or protection parts.
• When you put hand inside the printer, do not operate it.
• Make sure that you perform cleaning and maintaining according to the instructions.
MISCELLANEOUS
• Do not disassemble, repair, modify.
• Do not put heavy things on the printer.
6
www.metapace.com
1. Getting Started
Getting Started
1.1 Introduction
This card printer enables user to create cards easily and shortly in
accordance with the card specifications you wish to get.
You can get high quality color image with the card printer of dye
sublimation printing. In order to meet customers demand, it provides
options such as M/S, IC (Contact), RF (Contactless) encoding as well as
bar code, diagram, picture printing.
It is useful for creating membership card, bonus card and identification
card on PET, PVC card.
1.2 Contents in Package
- CLEANING ROLLER
- POWER CABLE
- POWER ADAPTOR
- USB PRINTER CABLE
- STACKER
- SOFTWARE CD
- USER MANUAL
Metapace C-1
Please make sure that printer and all the accessories are in good
order. If any items are missing, please contact your dealer.
1. Getting Started
7
Card Printer C-1
Metapace C-1 (Automatic Feeding, Single-sided Printing, Option)
Rear
Front
Side
Features Description
No
Features
1
LED Display
2
LCD Display
3
Card Eject
4
Ribbon Load
5
Mobile Connector
6
Power Button
7 Card Output Stacker
8
Printer Lid
9
Flipper
10
USB Socket
11 USB Communication Port
12 RS232C Communication Port
13
Power Socket
Description
LED shows the status of printer
LCD panel displays the status of printer
Button for ejecting card from the printer
Button for replacing or repositioning ribbon
Socket for mobile chip (Option)
Power on and off
Stacker for released output cards
Open for replacing ribbons and cleaning rollers
Used for Dual sided printing (Option)
Used for memory stick or USB connecting
Used for connecting PC and printer with USB cable
Used for connecting PC and printer with RS232C
Used for supplying power
Even though we have three different models of C-1, since there is
no big difference in operating them, user manual is designed for
C-1 Dual Sided as main reference.
8
www.metapace.com
Metapace C-1 (Automatic Feeding, Dual-sided Printing, Option)
1. Getting Started
Front
Rear
Side
Features Description
No
Features
1
LED Display
2
LCD Display
3
Card Eject
4
Ribbon Load
5
Mobile Connector
6
Power Button
7 Card Output Stacker
8
Printer Lid
9
Flipper
10
USB Socket
11 USB Communication Port
12 RS232C Communication Port
13
Power Socket
Description
LED shows the status of printer
LCD panel displays the status of printer
Button for ejecting card from the printer
Button for replacing or repositioning ribbon
Socket for mobile chip (Option)
Power on and off
Stacker for released output cards
Open for replacing ribbons and cleaning rollers
Used for Dual sided printing (Option)
Used for memory stick or USB connecting
Used for connecting PC and printer with USB cable
Used for connecting PC and printer with RS232C
Used for supplying power
Even though we have three different models of C-1, since there is
no big difference in operating them, user manual is designed for
C-1 Dual Sided as main reference.
1. Getting Started
9
Card Printer C-1
1.4 Loading Ribbon
1
2
3
Unpack ribbon carton box.
Open printer lid by pressing
Cover Release Button and raise
it fully.
Make sure that ribbon on is
placed in right position and the
printer lid is closed.
Please note that improper closing lock of the printer lid may cause
bad printing. (Check out lock of the printer lid)
10
www.metapace.com
1.5 Loading Cleaning Rollers
1. Getting Started
1
Open printer lid by pressing
Cover Release Button and raise
it fully.
U-shaped Slot
2
Slide the cleaning roller into the
loading part and insert roller bar
into U-shaped slots until it
locks in place.
Cleaning Roller
1. Getting Started
11
Card Printer C-1
1.6 Card Feeding Hopper
1
Open the card feeding lid.
Card thickness
adjustment controller
2
Rotate card thickness adjustment
controller in the card feeder to
synchronize it with the cards you
wish to print.
Card feeding weight
3
Lift the card feeding weight.
Card thickness
adjustment controller
Card thickness
adjustment controller
4
After stacking card into the card
feeding hopper, put the weight on
the stack of the cards.
Card feeding weight
12
www.metapace.com
1.7 Card Output Stacker
1. Getting Started
1
Lock the latch of card output
stacker into slots of the front
side.
1.8 Power Device, Power cable, Communication Cable
Metapace C-1
• Communication cable
• PC
• Power adaptor
• Power cable
1. Getting Started
13
Card Printer C-1
Software Installation
PC Systems requirement
1. The following operation systems are supported:
- Windows 2000
- Windows XP (32bit)
- Windows Vista (32bit)
- Windows 7 (32bit)
1. Computer:
- CPU: Pentium III 1Ghz above (Pentium IV 1.5Ghz recommended)
- Memory: 128 MB above (512 MB recommended)
- HDD: 1 GB above (5 GB recommended)
- Internet Explorer 5.5 above (6.0 recommended)
To install/remove the driver/software using Windows 2000/
XP/Vista/7, you must be logged in as the administrator.
14
www.metapace.com
2.1 Installing Driver / Application
Close all windows in operation (Recommended)
Install program copies the files necessary for the
installation of USB device driver to the computer.
3
Putting the installation CD in the CD-ROM Drive of the computer, the
installation window will open automatically. Or click Install.exe.
2. Software Installation
1
2
The initial window of Metapace C-1 installation program like the following
will automatically open. Click Start to start installation process.
Select the software you wish to install. Click Next.
2. Software Installation
15
Card Printer C-1
4
5
16
After reading license agreement for the software installation, select
Approval and then click Next.
Select the port type you wish to install. Click Next.
www.metapace.com
When installation is completed, please click Exit.
7
Check out the selected software is installed.
2. Software Installation
6
(1) Check out Metapace Card Designer installation.
- Check Start --> All Programs --> Metapace C-1 --> Card Designer
(2) Check out Metapace C-1 Driver installation
- Check Start --> All Programs --> Metapace C-1 --> Printer
- Check Metapace C-1 in Printers folder
(3) Check out Network software installation
- Check Start --> All Programs --> Metapace C-1 --> Network
(4) Check out Scanner software installation
- Check Start --> All Programs --> Metapace C-1 --> Scanner
2. Software Installation
17
Card Printer C-1
2.2 Installing USB Device Driver
Close all windows in operation. (Recommended)
Explanation below is based on Windows XP.
The Picture and sequence can be different in Windows 2000 /
Vista / 7.
USB Device Driver
1
2
3
18
Plug the card printer device into the computer.
In the Found New Hardware dialog box choose Install from a list or
specific location. Click Next.
Click Browse to search the installation CD location as follow. Click Next.
www.metapace.com
In the Hardware Installation dialog box, click Continue Anyway.
5
Click Finish.
6
2. Software Installation
4
Check out the installation of USB Device Driver.
Click Start --> Control Panel --> System --> Hardware --> Device Manager
Check out “Metapace C-1” installed in Universal Serial Bus controllers.
2. Software Installation
19
Card Printer C-1
Smart Card Reader Driver (Option)
This function is supported on the specific models.
1
2
3
20
Plug the card printer device into the computer.
In the Found New Hardware dialog box choose Install from a list or
specific location. Click Next.
Click Browse to search the installation CD location as follow. Click Next.
www.metapace.com
In the Hardware Installation dialog box, click Continue Anyway.
5
Click Finish.
6
2. Software Installation
4
Check out the installation of Smart Card Reader Driver.
Click Start --> Control Panel --> System --> Hardware --> Device Manager.
Check out “Smart Card Reader” installed in Smart card readers.
2. Software Installation
21
Card Printer C-1
2.3 Removing Driver / Application
1
2
Click Start --> All Programs --> Metapace C-1 --> Printer --> Uninstall.
And then click Yes.
When uninstallation is complete, click OK.
2.4 Removing USB Device Driver
USB Device Driver
1
2
3
22
Open Device Manager.
Click Start, Control Panel, System, Hardware and Device Manager.
Double-click the Universal Serial Bus Controllers you want to uninstall.
Right-click the Metapace C-1, and then click Uninstall.
www.metapace.com
4
2. Software Installation
5
In the Confirm Device Uninstall dialog box, click OK. The device is
uninstalled successfully.
If you install this device again, turn off the printer and turn on again.
Smart Card Reader Driver (Option)
1
2
3
4
5
Open Device Manager.
Click Start, Control Panel, System, Hardware and Device Manager.
Double-click the Smart Card Readers you want to uninstall.
Right-click the Smart Card Reader, and then click Uninstall.
In the Confirm Device Uninstall dialog box, click OK. The device is
uninstalled successfully.
If you install this device again, turn off the printer and turn on again.
2. Software Installation
23
Card Printer C-1
2.5 Updating a driver for hardware that isn’t work properly
You must be logged on as an administrator to perform these steps.
1
2
Plug the card printer device into the computer.
Open Device Manager.
If you are prompted for an administrator password or confirmation,
type the password or provide confirmation.
Windows XP: Click Start --> Control Panel --> System--> Hardware
--> Device Manager.
Windows Vista: Click Start --> Control Panel --> System --> Device
Manager.
Windows 7: Click Start --> Control Panel --> Hardware and Sound
--> Device Manager.
3
Double-click the Other devices or Universal Serial Bus controllers you
want to update.
4
Right-click the Metapace C-1 (or USB Device). And then click Update
Driver Software.
OR
24
www.metapace.com
5
Follow the instructions in the Update Driver Software wizard.
1) Click Browse my computer for driver software.
2. Software Installation
2) Click Browse to search the driver location as follows. And then click Next.
3) Click Install this driver software anyway.
2. Software Installation
25
Card Printer C-1
4) Click Close.
6
Check the updated device.
Check out “Metapace C-1” installed in Universal Serial Bus controllers.
2.6 Printing with METAPACE C-1
Setting up as the default printer
1
2
Click Start, point to Settings, and click Printers and Faxes.
Right-click the Metapace C-1, and select Set as default printer.
Changing the printer port
1
2
26
Click Start, point to Settings, and click Printers and Faxes.
Right-click the Metapace C-1, and select Properties (or Printer Properties).
www.metapace.com
3
4
Select the Ports (or Details) Tab.
Click the Print to the following port to find the port and select the printer
port. Click OK.
- Printing to USB Port: CITUSB
- Printing to Network Port: IP_192.168.0.31
(For example - Refer to 2.8 Network Configuration Settings)
2. Software Installation
Printing a document
1
2
3
Open file of the Windows application software you wish to print.
Select the Print in the File menu.
- Make sure that you choose Metapace C-1.
Select the printer settings you wish to print. Click Print or OK.
- Ensure that the printing image is oriented in same direction
(vertical, horizontal) as that of paper. Preview function of software will
help you check it out.
Canceling Print
There are two ways to cancel printing:
- Canceling in application software and canceling in spool in
a queue.
- If card is jammed on the way of printing, you have to cancel
it, which costs ribbon and card.
2. Software Installation
27
Card Printer C-1
Canceling in Spool
Spooled files queue up for being sent to printer.
1
2
Double click printer icon in menu bar in bottom right.
If user wishes to change settings, right click on the printer icon.
Spool program resume when printing in operating again, even
though you have already terminated it.
- About: Shows the information of the spooler program.
- Information: Shows the spooler window.
- Hide after printing: If the printing is complete, the spooler window will be
disappeared.
- Always on top: Set the spooler window on the top always.
- Display while printing: Display the spooler window when starting the
printing.
- Exit: Exit the spool program.
3
28
Set up all spooled file prior to printing.
www.metapace.com
- Right click button on the printing
standby. You can select one of All
Document Pause, All Document Start
and All Document Cancel.
4
Set up of spooled file in printing.
- Click right button on spooled file in
printing. You can select one of
Pause, Resume and Cancel.
2. Software Installation
If you stop the document printing, the
file in printing can be mixed up with
other spooled file.
2.7 Printer Driver Settings
User can set up own printing environment with various
functions the printer provides.
Opening in printer folder
You can modify the printer settings for all applications.
1
2
3
4
Click Start, point to Settings, and click Printers and Faxes.
Right-click Metapace C-1, select Properties(or Printing Preferences) and
make the desired modifications.
Click each tab and window will open.
Upon completing settings, click OK.
2. Software Installation
29
Card Printer C-1
Opening Printing Preferences on application software
The values input in printing program will get back to previous one when
current operating program terminates.
1
2
3
4
Execute printing order in application program.
Click Printing Preferences.
Click each tab and windows will open.
Upon completing settings, click OK.
Printing Preferences
1
Card tab
Items
Copies
Orientation
Hopper Source
Card Size
Using Spooler
Print Color Adjust
30
www.metapace.com
Descriptions
Set the number of copies: 1 to 999.
Set the card orientation.
Set the source of the card supply in printer.
Set the size of card.
Set the method of transmitting data to printer.
Set the color adjustment when printing.
2
Output tab
2. Software Installation
Items
Sticker
Print same image in sticker format for 1, 2, 4 sheets.
During printing, it is the print mode for color ribbon movement.
Printing Method
- 1 pass print: Transfer all data of YMCKO and then print.
- 3 pass print: Transfer corresponding data of each color and then print.
Reverse Print
Reverse RGB and print.
Mirror Print
Mirror the printing data and print.
Duplex Print
It prints the contents of a document on both sides.
Ribbon Type
Set the type of ribbon.
Dithering
Color Level
Black Panel
180 Rotation
Dithering is applied to only the data transmitted to black ribbon
when printing on the black ribbon of color ribbon.
When printing, it decides the number of colors.
This is an option to select K panel for the printing black colored
text and black image included in the printing file.
It prints the contents of output data by rotation in a 180 degree.
It sets up overlay panel for protect a printed card.
Overlay Panel
- Full Overlay / No Overlay / Selected Area / Use Image File
- Smart Card ISO / Smart Card AFNOR / Magnetic Card
2. Software Installation
31
Card Printer C-1
3
Image tab
Items
Descriptions
Intensity
Set the whole brightness of a printing document.
Contrast
Set a dark place as darker and a bright place as brighter.
Red
Set the intensity of red color and print.
Green
Set the intensity of green color and print.
Blue
Set the intensity of blue color and print.
Image Application
Mode
Set the image application mode.
- Only Image: Half toning applicable only to image.
- Whole output page: Half toning applicable whole data.
Sharpening
Diffusion
32
www.metapace.com
It increases the contrast of the neighboring pixels and it makes the
blurred image sharply.
Mixes the pixel of the image and does make seem like the blurred image.
4
Magnetic tab
You can write or read track information in the magnetic strip.
2. Software Installation
Items
MS Format
MS Coercivity
Descriptions
Set the encoder format of the magnetic strip.
Set the coercivity type of magnetic strip.
Enable macro processing Send a data to the magnetic strip.
Encoding
Write the data of selected track to the magnetic strip.
Decoding
Read the data of selected track from the magnetic strip.
Card Eject
Eject a card when the card remains inside the printer.
2. Software Installation
33
Card Printer C-1
5
Control tab
It controls remotely all of the function related with printer.
Items
Card Margin Setting
Intensity
Print Count(Color)
desired, you should set the card margin to change the location.
Set the intensity of ribbon.
It reads print counts from a printer.
Print count increases one by one per each panel for a color ribbons.
TPH Resistance
Set the TPH resistance from 2400 to 3600.
Mono Print Mode
Set the printing speed during printing with K ribbon.
TPH Model
34
Descriptions
It sets card margin (X, Y value). If the printing is not located as you
www.metapace.com
Set the model of TPH.
6
About tab
It shows version and other information.
If you click the image, the website of our company will be opened on internet
browser.
2. Software Installation
2. Software Installation
35
Card Printer C-1
2.8 Network Configuration Settings (Option)
This function is supported on the specific models.
Network Configuration
1
2
Click Start --> All Program --> Metapace C-1 --> Network --> Network
Setting.
The network configuration window will open.
Items
Board List
F/W Version
It shows F/W version of the selected network board.
IP Address
It shows IP address of the selected network board.
Subnet Mask
It shows subnet mask address of the selected network board.
Gateway
It shows gateway address of the selected network board.
Local Port
It sets a printing port through network printer. Please select C-1.
DHCP Mode
If the network system supports DHCP, IP is automatically set. If
not, you should directly change IP address after being assigned.
And then you set it in order to use network printer.
Search button
Setting button
Exit button
36
Descriptions
It lists the searched network printers.
www.metapace.com
Search network of a card printer.
It saves the changed network information. After change, a card
printer will be reset. You can use this after 10 seconds.
Exit the program.
2.9 Scanner Software Settings (Option)
This function is supported on the specific models.
Select Scanner
Open the graphics program into which you wish to scan.
2. Software Installation
1
2
3
Choose the command Select Scanner in the File menu.
Select as source the Card Scanner driver and choose the command to
acquire an image.
Scanning a card
1
2
3
Click Start --> All Program --> Metapace C-1 --> Scanner --> Scan Software.
Choose the command Scan New in the File menu.
The Card Scanner window will open.
2. Software Installation
37
Card Printer C-1
Items
Descriptions
Location
It selects location of a card. - Front Scan / Back Scan / Both Scan
Card Type
It sets type of a card. - Identity Card / Driving License / Other
Card Size
It sets size of a card. - Card 85 x 54 mm
Card Eject button
Initialize button
Scan button
It scans a card.
It closes the scanner dialog box.
Scan Mode
You can select the resolution.
- 100, 200, 300, 400 DPI are supported by software.
You can select the saving mode of scan image.
- 1 bit black-white and 8 bit grey are supported by software.
Brightness
You can set the brightness of a scan image.
Threshold
You can set the threshold. ? 0 to 255. Default: 240
Image Process
You can upgrade the quality of a scan image.
Get button
It gets the set values from a card printer.
Put button
It saves the new values on a card printer.
Type
Location
Calibration Start
38
It initializes the scanner.
Close button
Resolution
4
5
It ejects a card.
You can select the type of correction.
It selects location of CIS. - Both CIS / Front CIS / Rear CIS
It starts the correction.
Click Scan.
Once the scanning procedure is completed, the image of the card can be
stored.
www.metapace.com
Software Operation
3.1 Getting Started
CardDesigner 1.0 is software that allows user to design and issue cards.
Follow the steps below to create cards.
Select Start --> All Programs --> Metapace C-1 --> Card Designer
3. Software Operation
3.2 Description on Features
- NEW : Design new card. Up to 10 windows can be created at the
same time.
- OPEN : Read a saved card design.
- SAVE : Save a card design.
- ISSUE : Print a card.
- EXIT : Terminate the window.
3. Software Operation
39
Card Printer C-1
3.3 Designing Card
IMAGE designing
1) Select
icon to start image designing in CardDesigner.
2) Drag mouse on the range where image is positioned on card.
3) When window of “Properties-Image” opens, Click “Select Image”
button or “Cam” button. Select image you wish to insert.
4) Click “Save”, then the selected image is inserted.
5) You can change properties of the inserted image.
TEXT designing
1) Select
icon to start text designing in CardDesigner
2) Drag mouse on the range where text is positioned on card.
3) When window of “Properties-Text” opens, type the text you wish to insert.
4) Click “Save”, then the text is inserted.
5) If you wish to change properties of the inserted text, double click on
the text.
40
www.metapace.com
BARCODE designing
1) Select
icon to start barcode designing in CardDesigner.
2) Drag mouse on the range where barcode is positioned on card.
3) When window of “Properties-barcode” opens, insert “Code” you wish to
insert.
4) Click “Save”, then the bar code is inserted.
5) If you wish to change properties of the inserted text, double click on the
barcode.
3. Software Operation
DIAGRAM designing
1) Select
icon to start diagram designing in CardDesigner.
2) You can draw Diagram; Circle, Rectangle, Oval.
3) If you wish to change properties of the diagram, double click on the
diagram.
3. Software Operation
41
Card Printer C-1
MAGNETIC CARD
1) Select
icon to start diagram designing in CardDesigner.
2) Magnetic stripe is displayed within the range of card.
3) If you wish to input data into magnetic stripe, double click the magnetic
stripe and input data in the relevant track.
IC CARD
1) Select
icon to start ic job left of the ISSUE window.
2) IC chip is displayed within the range of card.
42
www.metapace.com
3.4 Tools
Magnetic card
After input of data to be written on magnetic track, click “Write”.
Click “Read” to read the saved data on each track.
3. Software Operation
IC CARD
Select “IC” and click “Read” button.
Progress bar will show communication status with IC chip.
RF CARD
Click “Card Read”. The progress will show communication status with
RF card.
3. Software Operation
43
Card Printer C-1
3.5 Configuration
Configure
When issuing card, user can set the type of ribbons, the card orientation
and dithering for black ribbon. When issuing IC card or RF card, user can
set the external program necessary.
Printer Information
You can change set-up of a printer at configure by clicking Printer Setup.
44
www.metapace.com
3.6 Data Synchronizing
Data Synchronizing will help user to synchronize data
created in Microsoft Excel or Microsoft Access with what
will be used in card issuing software for card creation. User
can make card effectively in shorter time.
Data Connect Wizard
1
3. Software Operation
2
CardDesigner “Tool” --> “Data Connect” --> “Data Connect wizard”
Select target database to synchronize.
(Select Excel Worksheet if target DB is in Excel Copy&Paste method.)
If you select “Microsoft Excel worksheet (Copy&Paste)”, you should input
the numbers of column you will use.
3. Software Operation
45
Card Printer C-1
3
Choose Sheet to be used in database.
Synchronizing data on the card with database
(ex.Staff number)
1
Double click Barcode on database to synchronize.
Article for DataField1:
Double click
46
www.metapace.com
2
Click “Data input” button. Select “Data field” for data input. Select “Staff
number” for data field. Click “+” to add data for staff number. Click
“Finish”.
Data Field Connection Button
3. Software Operation
3. Software Operation
47
Card Printer C-1
1
Synchronizing data on the card with database
(ex. Staff name)
Double click Name on database to synchronize.
Article for DataField 2:
Double click
2
Click “Data input” button. Select “Data field” for data input. Select “Staff
Name” for data field. Click “+” to add data for staff number. Click “Finish”.
And Click “Save”.
Data Field Connection Button
48
www.metapace.com
1
Synchronizing data on the card with database
(ex. Staff picture)
Double click Picture on database to synchronize.
Artcle for DataField 3:
Double click
3. Software Operation
2
Click “Data input” button. Select “Data field” for data input. Select “Staff
Name” for data field. Click “+” to add data for staff number. Click “Finish”.
And Click “Save”.
Data Field Connection Button
3. Software Operation
49
Card Printer C-1
3.7 Card Printing
Card Issue (Normal)
1
2
3
If you click “Issue” on CardDesigner, window below will open.
Select the type of printer (Driver or Direct).
Make a print with “Issue” button after finishing the setup of ribbon and
other details.
Card Issue (Data Field Connection)
1
50
If you click “Issue” on CardDesigner, window below will open.
www.metapace.com
2
3
Execute Microsoft excel --> Select the data area and copy them.
When you use Microsoft Excel worksheet (Copy&Paste) mode, click
“Paste” button or click the marked area with mouse right button and click
Paste at pop-up menu, then data will show up.
3. Software Operation
4
Check at the left of data which you will print and Click “issue” to make a print.
3. Software Operation
51
Card Printer C-1
Instructions on Maintenance
4.1 Maintenance of Product
Never use card below
- Heavy damaged card
- Card with heavy dirt
- Card with scratch
- Bended or deformed card
Cleaning
- Place the printer power switch in the OFF position and pull out the plug
and power adaptor. Cleanse the surface of the printer with wet soft cloth.
- Do not let water inside the printer.
- When the printer gets dry, turn power on.
52
www.metapace.com
4.2 How to Replace Ribbon
1
Open printer lid by pressing the
Cover Release button.
2
Hold the used ribbon and pull it
out from the printer.
3
4. Instructions on Maintenance
4. Instructions on Maintenance
Make sure that supply ribbon
and rewinding ribbon placed in
right position. Close the printer
lid.
53
Card Printer C-1
4.3 How to Clean the Printer
Cleaning Card
Dirt or embedded contamination on roller may cause problem.
Follow the recommended maintenance procedures below.
1
2
3
4
Turn the power off and remove card and ribbon cartridge.
Turn the power on with pressing “Eject” button at the same time. When
front LED panel flashes, insert the cleaning card wet with alcohol cleanser
into the front card slot.
After completing cleaning, cleaning card is ejected automatically. And the
cleaning card is reusable.
Leave the printer for 2 ~ 3 minutes until alcohol cleanser evaporates.
Cleaning
For cleaning roller maintenance, follow the procedures below.
1
2
3
54
Remove the cleaning roller from the printer.
Wet and clean the cleaning roller in flowing water.
When the cleaning roller gets dry, insert it into the printer.
www.metapace.com
4.4 How to Replace TPH (Thermal Print Head)
1
2
3
4
Turn the power off. Open printer
lid by pressing the Cover
Release button.
Pull the TPH upward and
backward, then head cover is
detached. And disconnect
cable connectors from the
printer.
Connect the new TPH’s cable
connectors to the printer.
4. Instructions on Maintenance
After completing TPH
replacement, execute Start -->
All Programs
--> Metapace C-1 --> Printer
--> Printer Setting.
In control program, set the
resistant value of new TPH.
Click the “Set Property”
button.
For more information, refer to “Control tab” on page 34 in
the user’s manual.
TPH resistance value is described on TPH.
4. Instructions on Maintenance
55
Card Printer C-1
4.5 Troubleshooting
1. In case front LED keeps on flashing or always on all the time.
Error Code
Solution
10
TPH Module open
- Check TPH module is closed
11
TPH Up/Down failure
- With TPH module opened, check printer inside and
turn power off and on. Perform module Up/Down.
12
Card jammed
- Remove the jammed card inside the printer
13
- Check that temperature is within the operating
temperature range.
TPH temperature trouble
- Open TPH module and check that cable is
correctly connected.
14
Encoder trouble in
ribbon control part
- Check that ribbon is cut
- Check that ribbon run out.
- Check that encoder in ribbon control part is
correctly assembled and operates normal.
15
Medium trouble
- Check that size of the medium meets specification
- If same trouble repeats, contact dealer.
16
EEPROM trouble
- Turn power on again.
- If same trouble repeats, contact dealer.
17
IC Contact Module not
correctly positioned
- Check that IC Contact Module is correctly positioned
- If not correct, turn power off and on.
- If same trouble repeats, contact dealer.
50~51
Flipper module
communication trouble
- After remove card, turn power on.
- If same trouble repeats, contact dealer.
52~56
Flipper module
mechanism trouble
- After remove card, turn power on.
- If same trouble repeats, contact dealer.
57
Flipper improperly
- After remove card, turn power on.
positioned or Card inside
After the trouble above is resolved, perform one of three
below to get printer into normal operation.
1) Press reset button with ribbon cartridge correctly loaded.
2) Press"EJECT" button
3) Place power switch in OFF position, and ON position.
56
www.metapace.com
2. Other troubles
Trouble
Solution
Found frequently ribbons cut
in the front edge of card when
printing
- In printer driver or CardDesigner settings, increase
Print Start Position.
Found frequently ribbons cut
in the rear edge of card when
printing
- In printer driver or CardDesigner settings, increase
Print End Position.
Printer not found in CardDesigner
or application software
- Check that printer driver is correctly installed.
- Check that communication cable is properly connected
- Reboot your PC.
Other than power LED,
4 Front LEDs continuously flash
in sequence
- Check out www.metapace.com for firmware download.
- Download the latest version of firmware for the printer.
- Perform install using firmware install program.
Firmware installation not
performed
- With pressing “EJECT”, “RIBBON SET” switch at the
same time, place power switch in the ON position.
- Check that front 4 LEDs flash in sequence, install
firmware using firmware install program.
4. Instructions on Maintenance
4. Instructions on Maintenance
57
Card Printer C-1
4.6 Technical Specifications
Print
Thermal Ink
Sublimation
TPH
Color
1) Printing: Dye Sublimation
2) Printing Speed: Color single sided 26-27 sec,
3) Printing side: Single or Dual sided (Option)
1) Resolution: 12 dots/mm (300 dpi)
2) Pulse Life: 1x10⁸, Abrasion: 50km
Full color
Ribbons Cartridges
Color (YMCKO)
200 cards / roll
Electrical
CPU
16 Bit Processor
RAM
16 Mb
User inferface
LCD, LED, Switch
Power adaptor
Input: 100 ~ 240V / 50 ~ 60Hz, Output: 24V / DC
Cards
PVC Card
53.98(W) x 85.7(H) x max. 0.77(T)
Encoding
Magnetic Stripe
Contact (IC)
1) ISO7811 (Track1,2,3) (Option)
2) HiCo/LoCo (Option)
ISO7816 (Option)
Contactless (RF)
ISO14443 A,B, Mifare (Option)
Interface
USB
USB1.1, USB2.0
Environmental
Operating Temperature
5°C ~ 45°C, 20 ~ 70% RH
Storage Temperature
-25°C ~ 70°C
Dimension
LxHxW
403x 202 x192
Driver
Windows 2000, XP (32bit), Vista (32bit), 7 (32bit)
Warranty
Printer
Print head
58
www.metapace.com
24 Months
24 Months (100.000 prints maximum)