1
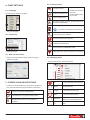
Part no 6159939231
Issue no 03
SeriesDate02/2014
Page
1 / 16
CVI ANALYZER
V 1.1.3.X
User manual
www.desouttertools.com
CO NTE NTS
1 - STATEMENT OF USE............................ 4
9 - FILTER.................................................. 10
9.1 - Create your own filters..................................... 10
9.2 - Use standard filters...........................................11
9.2.1 - Factory / Assembly line / Working area /
Controller.............................................................11
2 - INSTALLATION...................................... 4
2.1 - Recommended system requirements................ 4
9.2.2 - Controller type..........................................11
2.2 - Installation.......................................................... 4
9.2.3 - Filter on type of tightening result..............11
2.3 - Any help?........................................................... 4
2.3.1 - Read the user manuals............................. 4
9.2.4 - Filter on status..........................................11
9.2.5 - Filter on Pset............................................11
2.3.2 - Contact us................................................. 4
9.2.6 - Filter on date............................................11
2.4 - How to register................................................... 4
9.3 - One-shot filtering...............................................11
2.5 - How to activate the software.............................. 5
2.6 - How to uninstall the software............................. 5
10 - CURVES DISPLAY............................. 12
3 - OVERVIEW............................................. 6
11 - REPORTS DISPLAY........................... 12
4 - FIRST SETTINGS................................... 7
4.1 - Language........................................................... 7
12 - BACKUP / EXPORT........................... 13
4.2 - Torque unit......................................................... 7
4.3 - Date and time format.......................................... 7
12.1 - Save a database............................................ 13
12.2 - Load a backup................................................ 13
5 - CREATE YOUR ARCHITECTURE......... 7
12.3 - Purge database.............................................. 13
12.4 - Recent files.................................................... 13
5.1 - Factory tool bar.................................................. 7
12.5 - Export to CSV file........................................... 13
5.2 - Managing items.................................................. 7
13 - INFORMATION................................... 14
6 - UPLOAD RESULTS AND CURVES....... 8
13.1 - Controller........................................................ 14
6.1 - Scanning the network......................................... 8
13.2 - Factory / Assembly line / Working area.......... 14
6.2 - Adding a controller............................................. 8
6.3 - Uploading a controller database........................ 8
14 - SOFTWARE VERSION....................... 14
7 - TIGHTENING RESULTS DISPLAY........ 9
8 - PROFILE............................................... 10
6159939231_03 - 02/2014
-3-
Original instructions
2.3 - Any help?
© Copyright 2014, Desoutter HP2 7SJ UK
2.3.1 - Read the user manuals
All rights reserved. Any unauthorized use or copying of
the contents or part thereof is prohibited. This applies in
particular to trademarks, model denominations, part numbers
and drawings. Use only authorized parts. Any damage or
malfunction caused by the use of unauthorised parts is not
covered by Warranty or Product Liability.
•• Click this icon to display the literature
available.
1 - STATEMENT OF USE
This product is intended to analyze tightening data with
results, curves, filters, profiles & import/export.
No other use permitted.
2.3.2 - Contact us
For professional use only.
• Click "Contact us" to display the following
screen.
2 - INSTALLATION
2.1 - Recommended system requirements
------
Windows XP operating system
150 Mo available on hard disk
Monitor resolution 1280 x 1024
Administrator rights required for installation
Connection to an Ethernet network
•• Contact your Desoutter representative for support.
• Click the link to visit our website.
2.2 - Installation
2.4 - How to register
• Insert the supplied USB key or CDrom and follow the
instructions.
• Launch the software (CVI CONFIG for example).
• Go to the main menu and click "Registration".
• If the installation does not start automatically, go
to the explorer at the root of the USB or CDrom
and launch the file "setup.exe".
•• Enter the serial number
• Enter the license number.
You will find them on the
label of the packaging box.
•• Click this icon to copy the "Public key" and put it
on the Clipboard.
• Go to the website "www.desouttertools.com/licensing"
• Click "Install software" and then this
icon to launch the set up wizard.
•• Click "Create an account", fill in the form and click "Submit".
•• You will receive a confirmation by e-mail.
-4-
6159939231_03 - 02/2014
• Click "Register" to validate.
• Check your mail and follow the instructions.
•• Go back to the website "www.desouttertools.com/licensing".
• Enter your login and password and click "Submit".
In this example, the software is to be used for 1
user. If you buy 5 licences, you will have to register
the software once and activate the registration code
on 5 different PCs.
•• Click this icon to display the
following screen.
•• In case of any problem, login to the
website "www.desouttertools.com/
licensing" and click this icon to contact
Desoutter support.
2.6 - How to uninstall the software
•• Enter the serial number
• Enter the license number.
•• From your PC desktop, go to "Start/Control Panel\
Programs\Programs and Features"
•• Double-click the program that you want to remove.
•• If you are prompted to confirm the removal of the program,
click Yes.
•• Once the software removed, you will be asked to unregister
your licence.
• Login to the website "www.desouttertools.com/licensing".
You will find them on the
label of the packaging box.
• Click "Submit" to validate.
2.5 - How to activate the software
• Login to the website "www.desouttertools.com/licensing".
•• Click this icon to display the
following screen.
•• Click this icon to display the
following screen.
• Click "Add" to get your registration code.
• Click "Delete" to suppress your installation.
zzzzzzzzzzzzz
zzzzzzzzzzzzz
•• At the bottom of the screen, paste your public key, enter a
name for customizing the PC name (up to 40 characters)
and click "Submit".
• You will get then the registration code.
• Copy/paste the uninstall key that you will find in
"C:\CVI CONFIG_uninstallKey.txt" and click "Submit".
•• Launch the software (CVI CONFIG for example).
• In the Menu area, click "Registration".
• In case of PC crash, tick "Other reason" and add a
comment to explain why you want to uninstall your licence.
• Click "Submit" to validate.
• Please wait for a message from Desoutter support
confirming that your license has been unregistered. You will
then be able to reactivate the license on a new PC.
•• Copy / paste the registration code
6159939231_03 - 02/2014
-5-
3 - OVERVIEW
1
11
2
3
10
4
5
6
7
9
8
Legend
1 Menu area
2 Tool bar
3 Tabs for Results/Curves/Reports
4 Factory tool bar
5 Results display area
6 Tree view area
7 Details per result
8 Profile and filter areas
9 Curve display area
10Filter icon
11Alphabetical sort
-6-
6159939231_03 - 02/2014
5.1 - Factory tool bar
4 - FIRST SETTINGS
to create a factory.
4.1 - Language
•• Double-click the item to
rename it.
to add an assembly line.
• Create as many items
as you want.
The language by default is "English".
to add a working area.
to scan the network. All CVI3 controllers present in
the network will be listed.
to add any type of controller.
A controller is identified by its IP address.
•• Tick your language.
to add results from a database.
4.2 - Torque unit
to view information about the item.
to delete the selected item.
to sort the items in alphabetical order.
•• Select the format.
to filter per factory and/or component of the factory.
4.3 - Date and time format
5.2 - Managing items
• Select one format in the list below and click "Apply" to
update the results.
• Right-click any item in the tree view area.
5 - CREATE YOUR ARCHITECTURE
Info
to view information about the item.
• Create your own architecture by sorting the controllers in a
tree view that match their physical position in the factory.
Update
to update the results and curves of
the selected item.
Collapse
to view the main items only.
Delete
to delete the selected item.
Update last
to update the last 10,000 results
and curves of the selected item.
Alphabetical
sort
to sort the items in the tree view
area.
A factory is a group of assembly lines
An assembly line is a group of working areas
A working area is a line segment where a specific
assembly action is done. It is composed of
controllers.
6159939231_03 - 02/2014
-7-
6.2 - Adding a controller
6 - UPLOAD RESULTS AND CURVES
•• In the factory tool bar, click this icon to add any
type of controller.
Tightening results and curves can be collected:
-----
by scanning the network
by adding a controller via its IP address
by uploading a controller database via a USB stick
by loading a CVI ANALYZER backup
When the maximum size of the database is
reached, a pop-up will show up asking you to
backup the database.
•• Click "Purge the database" in the menu area.
Results and curves will be automatically saved in
a database in the software directory "C:\Program
Files (x86)\Desoutter\CVIAnalyzer" but controllers
will stay in the same place.
6.1 - Scanning the network
•• Select where to add the controller: factory/assembly line/
working area.
•• Enter the maximum number of results per controller to
upload (10,000 by default per tightening unit).
•• Enter a valid controller IP address.
•• Click "Select" to start.
• Click "Exit" to quit the screen.
•• Click this icon to start the scan.
All CVI3 controllers present in the network will be
listed.
6.3 - Uploading a controller database
• Plug the USB stick into the PC.
•• In the factory tool bar, click this icon to start.
•• In the tree view area, select the "Factory/Assembly line/
Working area" where to add the controllers.
• Enter the maximum number of results per controller to
upload (10,000 by default per tightening unit).
• Select where to add the new controller: factory/assembly
line/working area.
• Enter the controller name (40 characters).
•• Click this icon to scan this controller.
•• Click this icon to display the directory where you
have saved the database.
•• Click this icon to update the results of this
controller in CVI ANALYZER.
• Press OK to validate.
• Click "Select all" to have them all in the tree view.
•• Click "Connection" to start.
•• Click "Start scan" to start a new scan.
• Click "Exit" to quit the screen.
-8-
6159939231_03 - 02/2014
7 - TIGHTENING RESULTS DISPLAY
• Each time you click this icon, a new tab is
created (up to 5 different tabs).
•• Apply profiles and/or filters to sort and customize columns
and rows.
• From the list of results, select one result and click its row.
The details of the result are displayed. The associated
curve is also displayed if available.
CVI ANALYZER is able to display multiple steps when the
user has chosen to store the results of each Pset step.
•• To set this option, refer to chapter 10 - Step programming/
General in the CVI CONFIG user manual.
CVI ANALYZER is also able to display results with multiple
tools like below with a TWINCVI3 controller.
6159939231_03 - 02/2014
-9-
8 - PROFILE
9 - FILTER
Profiles are used to customize the columns of the result view.
The user can define the columns he is interested in.
The filters are used to sort the results. A filter can contain
several search criteria.
• Click "Profile" on the bottom left of the screen. The default
profile is displayed:
9.1 - Create your own filters
• Click "Filter" on the bottom left of the screen.
•• Click this icon to create a new profile (up to 10).
•• Click this icon to create a new filter (up to 10)
•• Customize the name.
•• Tick "All steps" or "Only last".
• Tick the information to display.
••
••
••
•
The profile is automatically saved.
Customize the name.
Add one or more filters by ticking them one by one.
Untick the filter you want to suppress: the line will turn grey.
Click "Apply" to execute the process and display the
results.
The filter is automatically saved.
•• Click this icon to delete the filter.
• See below an example of filtering:
- 10 -
6159939231_03 - 02/2014
9.2 - Use standard filters
9.2.5 - Filter on Pset
9.2.1 - Factory / Assembly line / Working area /
Controller
•• From the factory tool bar, click this icon to filter by
name.
• Use the following shortcuts:
n-m
from n to m results
n-
all numbers ≥ to n
a;b;c
results a, b, c
•• Tick "Apply" to valid the selection.
9.2.6 - Filter on date
•• Enter the text in the "Contains" field and tick "Apply" to valid
your selection.
•• Repeat the same for the other filters.
9.2.2 - Controller type
•• From the factory tool bar, click this icon and go to
the "Controller type" tag.
•• Select an already existing configuration (today, yesterday,
last week, etc...) or create your own.
•• Enter the start/end dates.
•• Click "Apply" to valid the selection.
9.3 - One-shot filtering
• Go to the results display area.
• Click the filter icons to sort the results as you want.
For example:
•• Tick the type of controller to view.
9.2.3 - Filter on type of tightening result
•• From the Results display area, click this icon
below each column header.
9.2.4 - Filter on status
6159939231_03 - 02/2014
- 11 -
10 - CURVES DISPLAY
11 - REPORTS DISPLAY
• Each time you click this icon, a new tab is
created (up to 5 different tabs).
The number of curves to upload is 20 as a
maximum per Tightening Unit.
• Select any item of the tree.
• Click this icon to create a tab (up to 1).
Example of display:
• Select the result in the list.
3
1
1
4
2
2
3
4
1
2
3
4
5
Distribution of tightenings OK/NOK
Tightening stop source condition histogram
Reasons for monitoring NOK
Details on Monitoring OK
• Tick the "Filter" tab on the left side of the screen and select
one or more filters. The filters will limit the size of the results
sample.
Legend
1 Angle min.
2 Torque min.
3 Curve type
4Slope
5Markers
It is not possible to change the display.
to print the curve.
to show the Control markers.
to show the Monitoring markers.
to zoom out and return to the initial display.
to activate the zoom.
-- use the mouse wheel to move on the screen.
-- zoom in by sliding the mouse
-- right-click to zoom out
to draw the slope and display slope values (per
tool).
to reset the curve view.
• Use the mouse to follow the points of the curve.
••
----
Select a type of curve:
Torque vs angle
Torque vs overall angle
Time curves
•• Select all steps or step by step.
- 12 -
6159939231_03 - 02/2014
12.5 - Export to CSV file
12 - BACKUP / EXPORT
This function enables you to export the results to a
"CVIAnalyzer_Results.csv" file in "C:\Program Files (x86)\
Desoutter\CVIAnalyzer" by default.
12.1 - Save a database
• Select a controller in the tree view area.
Backup is used to save a complete database (controllers +
results) in the software directory "C:\Program Files (x86)\
Desoutter\CVIAnalyzer".
• Click "File / Export to CSV file" or press "Ctrl+W".
The name is "datas_dd_mm_yyyy_hh_mm_ss.db" by default.
Only results present in the results view will be
exported ; the filters applied are taken into account.
• Click "File" then "Save" in the menu area or press "Ctrl+S".
12.2 - Load a backup
Pre-requisite: you already have saved databases
by using CVI ANALYZER.
•• Click "File" then "Load a backup" in the menu area or press
"Ctrl+B".
12.3 - Purge database
•• Click "File" then "Purge database" in the menu area.
All results and Psets will be deleted.
Controllers will stay in the same place.
12.4 - Recent files
This function enables you to open the last files you have
saved.
• Click "File" then "Recent files" in the main menu.
• Click "Default" to load the CVI ANALYZER database.
Below is the path leading to the software databases location.
6159939231_03 - 02/2014
- 13 -
13 - INFORMATION
14 - SOFTWARE VERSION
13.1 - Controller
• Click "About" in the main menu to display the software
version.
• Select a controller in the tree view area.
•• Click this icon to display information about the
selected item .
• Change the IP address if required.
•• Click this icon to undo your last edit.
13.2 - Factory / Assembly line / Working area
• Select an Assembly line for example.
•• Click this icon to display information about the
selected item .
• Type a comment to customize the assembly line.
- 14 -
6159939231_03 - 02/2014
More Than Productivity
www.desouttertools.com
© Copyright 2014