1
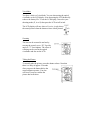
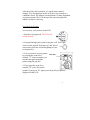
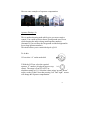
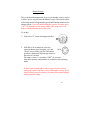
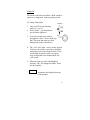
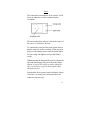
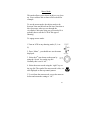
Digital Stills Camera
User Guide
Contents
Basic operation
Switch on…………………3
Shooting modes…………..3
Viewfinder………………..4
Zooming…………………..4
Taking the picture…………4
Viewing the picture……….5
Deleting a picture…………6
Advanced operation
Exposure compensation………………7
Eposure compensation - examples…8
Aperture priority……………………………8
Depth of field – examples…….…….9
Shutter priority………………………….….10
Shutter speeds – examples…..……..11
Flash options
Auto………………………12
Forced…………………….12
Anti Redeye………………12
Off………………………...13
Fill in flash – examples…...14
Focus……………………………...15
Macro mode………………………16
Miscellaneous…………………….17
2
These instructions are for the Olympus C-2000
digital stills camera.
Basic Operation
Switch on
1. TAKE OFF THE LENS CAP!!!! This must be done before
switching on the camera. DAMAGE WILL OCCUR IF THE
LENS CAP IS NOT REMOVED WHEN THE CAMERA IS
SWITCHED ON.
2. Switch on the camera by pressing the “power” button.
3. The lens will extend and the camera is now ready for use.
Shooting Modes
There are 3 different shooting modes, they are
Programmed (P), Aperture Priority (A) and
Shutter Priority (S). The mode is selected by
moving the ring of the mode dial to indicate the
required shooting mode. For general use, set the
camera to (P). This means that the camera will try to work out
everything for you. All you have to do is compose and shoot!.
3
Viewfinder
You have a choice of viewfinder. You can shoot using the optical
viewfinder or the LCD display. Note that using the LCD drastically
reduces the battery life. To use the LCD display, first select your
shooting mode (P, A or S) then press the LCD on/off switch.
The LCD display will now show a Preview; it only shows
the actual picture when the shutter release is half pressed.
Zooming
The lens can be zoomed in and out by
moving the zoom lever to “W” for wide
angle or “T” for telephoto. The effect of
zooming can be seen in the optical
viewfinder and also on the LCD.
Taking the Picture
To actually take the picture, press the shutter release. Note that
there is a delay of approx 2 seconds
after you press the button before the
camera shutter operates. You also
will hear 2 beeps to confirm the
picture has been taken.
4
After the picture has been taken, it is saved in the camera’s
memory. It is also displayed on the LCD for a few seconds as a
confidence check. The memory can hold about 15 shots, dependent
on picture content. The LCD on top of the camera displays the
number of frames remaining.
Viewing Your Pictures
You can view your pictures on the LCD
1.Switch to viewing mode. The LCD will
switch on itself.
2. Navigate through your pictures using the “left” and “right”
arrows on the jog dial. Note that “up” and “down”
arrows take you to the end and beginning of your
set respectively .
3. You can zoom in to your picture
by pressing the zoom lever
towards “T”. Once zoomed in you
can then navigate around the
picture using the jog dial.
4. If you press the zoom lever
towards “W” you will return to
normal. If you press “W” again you will get all your pictures
displayed on the LCD.
5
5. If you wish to delete any shots, just display on LCD in viewing
mode then press the LCD on button.
6. You will then be asked for confirmation; if you are sure then
press OK.
7. To turn off the LCD screen you must come out of
viewing mode and back to a shooting mode (P, A or S). It
is very easy to delete a picture by pressing the LCD
on/off button and “OK”.
6
Advanced Operation
There are several options available to you to become more creative
in your picture taking. These options include exposure override,
aperture control, shutter control, focus and flash.
Exposure Compensation
This would be used when you know that the meter on the
camera could be fooled. An example of this would be
when shooting into the sun, or on a brightly lit snowfield.
Exposure compensation can be applied to any of the
shooting modes (P,A or S). To engage exposure
compensation:
1. Turn on LCD
2. Press “left ” or “right“ on jog dial.
3. The LCD display will show in green the amount of exposure
compensation in increments from –2 to +2.
4. The control panel on top will show this symbol to
show that the exposure compensation is still activated.
To cancel you need to bring the value back to “0.0”.
7
Here are some examples of exposure compensation:
-2
0
+2
Aperture Priority (A)
This is another shooting mode which gives you more creative
control. You would use this to throw a background out of focus
whilst keeping the subject sharp (small aperture number).
Alternatively you can have the foreground and the background in
focus (large aperture number).
This mode allows you to control the depth of field.
To do this:
1.First select “A” on the mode dial.
2.With the LCD on, select the required
aperture “F” number ( displayed in green- top
centre). The range is from F2.0 (F2.8 at
telephoto setting) to F11 Selection is done using “up and “down”
arrows on the jog dial. Note that pressing “left” and “right” arrows
will change the exposure compensation.
8
If there is not enough light to take a picture at your selected setting,
the camera will warn you by flashing the settings in red when you
half press the shutters. You must select either another mode or
aperture setting.
Remember: Small “F” number: Small depth of field
Large “F” number: Large depth of field
Here are some examples of aperture control.
Small F
number.
Small
depth of
field.
Large F
number.
Large
depth of
field.
9
Shutter Priority
This is the third shooting mode. It gives you another creative tool as
it allows you to vary the time the shutter is open. This has the effect
of freezing motion at high shutter speeds and blurring motion at low
shutter speeds. If you are hand holding the camera, you must select
1/60th of a second to avoid camera shake. This needs to be even
higher if at the telephoto end of the zoom.
To do this.
1. First select “S” on the shooting mode dial.
2. With the LCD switched on, select the
required shutter speed using the “up” and
“down” arrows on the jog dial. The shutter
speeds are displayed (in green-top centre) as
fractions of a second.
The range is from ½ a second to 1/800th of a second.
Note that exposure compensation is available in this shooting
mode.
If there is not enough light to take a picture at your selected
setting, the camera will warn you by flashing the settings in red
when you half press the shutters. You must select either another
mode or shutter setting.
10
Here are some examples of different shutter speeds.
Slow Shutter speed
Fast shutter
speed
11
Flash Options
The camera has a built in flash which is
controlled by the camera itself. The flash has
several modes, but the amount and the duration
of the flash are automatic. The modes available
are Auto, Forced (fill in), Anti Red Eye and off.
The different flash modes are available in each of
the shooting modes (P, A and S). All flash modes
are selected on the LCD display
Auto
This mode means that the flash will come on as
and when needed. This is the default setting.
There is no indication in the top control panel
(this means that auto is set).
Forced (fill in)
This mode would be used when you are shooting
with enough available light, but perhaps the
subject is in shade.
Anti Redeye
This mode attempts to avoid the “devil eye”
effect. The camera gives out a burst of rapid
flashes followed by a larger, longer flash. This
burst of flashes could be a problem with people
suffering from epilepsy.
12
Flash Off
This mode would be used where a flash would be
intrusive or dangerous, such as sporting events.
To change flash mode:
1. Turn on LCD in any shooting
mode ( P, A or S).
2. Press “Menu” , you should now
see the menu displayed.
3. Select the second menu item by
pressing the “down” arrow on the jog
dial. The menu line turns to a blue
background on the selected line.
4. The “ left” and “right “ arrows on the jog dial
will move the cursor (a green box) along the
menu line to select the required mode. If you
accidentally go past the item you require,
keep pressing the arrow button and it will
cycle round.
5. When the item you want is highlighted,
pressing “OK” will change the mode. These
are the symbols:
AUTO
Automatic (not displayed on top
control panel).
13
Forced flash (fill in)
Anti Redeye
Flash off
6. Once the you are happy, you press “Menu”
again to lose the menu. You can then switch
off the LCD. You will also get a confirmation
symbol on the top control panel.
Noflash
flash
No
Forced flash
14
Focus
This camera has an automatic focus system. It will
focus on whatever is in the crosshairs on the
viewfinder.
This means that if the subject is not in the centre of
the screen, it will not be in focus.
To combat this you must first frame up the shot so
that the subject is in the crosshairs. Then you must
half press the shutter release until the green light is
lit. (the orange one lights to tell you the flash is
ready).
Whilst keeping the shutter half pressed, reframe the
shot and when happy fully press down the shutter
release. If you let the release go before taking the
shot, you will have to get the focus again before
taking the picture.
Note that the focus system can be fooled by objects
which are very shiny, have horizontal lines, low
contrast or fast moving.
15
Macro Mode
This mode allows you to shoot an object very close
up. You would use this to shoot a flower head for
example.
To use the macro mode, the subject needs to be
between 20cm and 80cm from the lens. Note that at
this close range, what you see through the
viewfinder is not quite what you get recorded. It is
probably best to use the LCD for this type of
shooting.
To engage macro mode:
1.Turn on LCD in any shooting mode ( P, A or
S).
2. Press “Menu” , you should now see the menu
displayed.
3. Select the 4th item down on the menu by
using the “down” key on the jog dial.
Normally this is set to “AF”.
4. Select the macro mode using the “right” key on
the jog dial. The symbol for macro mode is this, it is
also displayed on the top control pattern.
5.To exit from the macro mode, access the menu as
before and return the setting to “AF”.
16
Miscellaneous
If this symbol
starts to flash, then the
batteries need changing. Please take note of the
orientation of the batteries (there is a schematic
diagram under the camera).
The camera will go into standby mode if not
operated for more than 3 minutes. After 4 hours the
camera will switch off. You just press the power
button to switch back on.
All changes to the “modes” of the camera that you
make are saved during power off. These include
exposure override, flash settings etc.
Andrew Thorpe January 2003
17