1
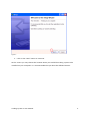
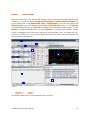
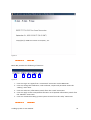
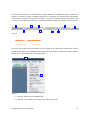
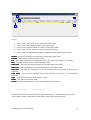
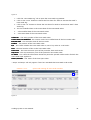
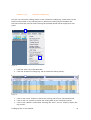
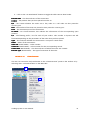
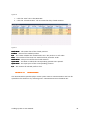
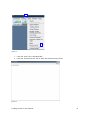
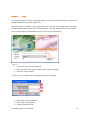
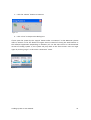
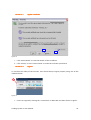
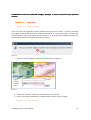
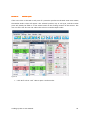
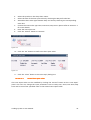
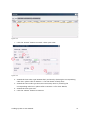
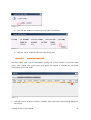
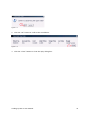
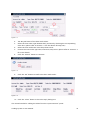
Trading Station User Manual
Trading System 2 User Manual
1
Table of Contents
Section 1.
Before Start................................
Start ................................................................
................................ ..............................................................
................................ .............................. 4
Section 1.1.
What’s new in trading system .................................................................................................. 4
Section 1.2.
System Requirement ............................................................................................................... 5
Section 1.3.
Getting trading system............................................................................................................ 5
Section 1.4.
Installation ............................................................................................................................. 5
Section 1.5.
Section 2.
JAVA Virtual Machine .............................................................................................................. 9
System Overview ................................................................
....................................................................................
................................ .................... 13
Section 2.1.
Toolbar ................................................................................................................................ 13
Section 2.2.
Workspace ........................................................................................................................... 14
Section 2.3.
Real-time Price Viewer .......................................................................................................... 15
Section 2.3.1.
Real-time Quote Panel ................................................................................................. 15
Section 2.3.2.
Real-time Advanced Quote Panel.................................................................................. 16
Section 2.4.
Market Order panel............................................................................................................... 18
Section 2.5.
Account Summary panel........................................................................................................ 19
Section 2.6.
Real-time chart .................................................................................................................... 21
Section 2.7.
Real-time news .................................................................................................................... 23
Section 2.8.
Menu Bar ............................................................................................................................. 25
Section 2.9.
Status Bar............................................................................................................................. 25
Section 2.10.
Limit Order panels....................................................................................................... 26
Section 2.10.1.
Limit Open .................................................................................................................. 26
Section 2.10.2.
Limit Open Log............................................................................................................ 27
Section 2.10.3.
Limit Settle.................................................................................................................. 28
Section 2.10.4.
Limit Settle Log ........................................................................................................... 29
Section 2.10.5.
Split mode viewing of Limit Order window..................................................................... 30
Section 2.11.
Trading Log panels...................................................................................................... 31
Section 2.11.1.
Trading Journal ........................................................................................................... 31
Section 2.11.2.
Historical Trading Log.................................................................................................. 32
Section 2.12.
Closed Position ........................................................................................................... 33
Section 2.13.
Announcement ............................................................................................................ 34
Section 2.14.
Portfolio Summary panel .............................................................................................. 36
Section 2.15.
Product Facts panel ..................................................................................................... 37
Section 2.16.
World Clock ................................................................................................................ 38
Section 3.
Section 3.1.
System Settings................................
Settings ................................................................
................................ ......................................................
................................ ...................... 40
Setting ................................................................................................................................. 41
Section 3.1.1.
General config............................................................................................................. 41
Section 3.1.2.
Advanced Quote config................................................................................................ 42
Section 3.1.3.
Order Entry config ....................................................................................................... 43
Section 3.1.4.
Chart config ................................................................................................................ 44
Section 3.1.5.
Quote config ............................................................................................................... 44
Section 3.1.6.
News config ................................................................................................................ 47
Section 3.1.7.
Look And Feel ............................................................................................................. 47
Section 3.1.8.
Layout ........................................................................................................................ 47
Section 3.1.9.
Confirm Setting ........................................................................................................... 49
Section 3.1.10.
Reply ticket setting...................................................................................................... 50
Section 3.1.11.
Change Password & Change Service Pin ........................................................................ 50
Section 3.2.
Windows .............................................................................................................................. 50
Section 3.2.1.
Go To ......................................................................................................................... 51
Section 3.2.2.
Tiled Window .............................................................................................................. 51
Section 3.2.3.
Cascade ...................................................................................................................... 51
Section 3.2.4.
Minimize All ................................................................................................................ 52
Trading System 2 User Manual
2
Section 3.2.5.
Section 4.
Close All ..................................................................................................................... 53
Login
Login ................................................................
................................ ................................................................
................................ ....................................
................................ .... 54
Section 4.1.
Applet Certificate.................................................................................................................. 56
Section 4.2.
Logout ................................................................................................................................. 56
Section 4.3.
Login Alert ........................................................................................................................... 58
Section 4.3.1.
Improper Logout ......................................................................................................... 58
Section 4.3.2.
Login Override ............................................................................................................ 58
Section 5.
Section 5.1.
Section 5.2.
Limit Order Type ................................................................
....................................................................................
................................ .................... 60
Daily/GTF............................................................................................................................. 60
Limit Price/Stop Price/OCO ................................................................................................... 60
Section 6.
Market Open ................................................................
................................ ..........................................................
................................ .......................... 62
Section 7.
Market Settle................................
Settle................................................................
................................ ..........................................................
................................ .......................... 64
Section 7.1.
Market order settle ............................................................................................................... 64
Section 7.2.
Combine Settle ..................................................................................................................... 65
Section 7.3.
Market order settle and custom reduce its limit settle order .................................................... 66
Section 8.
Limit open ................................................................
................................ .............................................................
................................ ............................. 69
Section 8.1.
Add limit open ticket ............................................................................................................ 69
Section 8.2.
Amend limit open ticket........................................................................................................ 70
Section 8.3.
Section 9.
Cancel limit open ticket ........................................................................................................ 72
Limit Settle ................................................................
................................ ............................................................
................................ ............................ 74
Section 9.1.
Add Limit Settle ticket........................................................................................................... 74
Section 9.2.
Amend Limit Settle ticket ...................................................................................................... 78
Section 9.3.
Cancel Limit Settle ticket ....................................................................................................... 79
Section 10.
RealReal-time Chart ................................................................
................................ .....................................................
................................ ..................... 81
Section 10.1.
Chart Currency ............................................................................................................ 81
Section 10.2.
Chart Type .................................................................................................................. 82
Section 10.3.
Time Scale .................................................................................................................. 82
Section 10.4.
Studies ....................................................................................................................... 85
Section 10.5.
Draw/View .................................................................................................................. 88
Section 10.6.
Zooming ..................................................................................................................... 91
Section 10.7.
Open / Settle by chart.................................................................................................. 93
Section 11.
Account................................
Account ................................................................
................................ ................................................................
................................ .................................
................................ . 95
Section 11.1.
Change Password ........................................................................................................ 95
Section 11.2.
Account Summary ....................................................................................................... 96
Section 11.2.1.
Show Statement........................................................................................................... 97
Trading System 2 User Manual
3
Section 1.
Before Start
Section 1.1.
What’s new in trading system
New features make trading system an increasingly approachable application that maximizes
usability and efficiency for clients to trade bullion in the Global market 24 hours a day.
Menu Bar
The new Menu Bar includes additional selections that provide a more central and convenient
way to select the many functions available on the trading platform.
Configuration
Configuration
This function allows you to select the rows of products and the information columns that
you would like to see in the Quote panel. It also permits front style and size setting for the
information shown in this panel.
Layout
Trading system allows you to select, resize and position the different information panels that
are most suitable for your use. You can save your preferred layout settings and load them
back the next time you logon on to trading system.
Confirm Setting
This function gives you the option of whether you would like the system to reconfirm your
orders before placing it.
Reply Ticket Setting
This function gives you the option to choose the kind of system reply message you would
like to receive.
View
All available information panels can be selected from “View” which is located on the Menu
Bar. Each information panel is independent and can be resized or positioned according to
your preference.
Windows
This menu provides you with the common manipulation abilities that can be apply to any
opened information panels.
Trading System 2 User Manual
4
Section 1.2.
System Requirement
Platform: Windows
Windows
•
Windows 98 SE or above
•
600 MHz Intel Pentium III processor or above
•
128 MB RAM or above (256 MB recommended)
•
JAVA virtual machine version 1.4 or above
Section 1.3.
Getting trading system
There is a way to login to the trading system platform by download software version.
Download version
A. Download trading system for Window
B. Download trading system for MacOS
Please follow the link “Forgotten Password?” if your password is lost.
Download the Java JRE
*Please refer to Section 3 for login details.
Section 1.4.
Installation
Locate the downloaded installation package of trading system and double click on it. This
will begin the installation.
Figure 1
1. Begin installation automatically after clicking the download link.
Trading System 2 User Manual
5
Figure 2
2. Click on the “Next” button to continue.
At this screen you may choose the location where you would like trading system to be
installed on your computer. It is recommended that you leave the default location.
Trading System 2 User Manual
6
Figure 3
3. Click the “Next” button to continue.
Here you may choose the folder in which you want the program shortcuts to be put. Again it
is recommended that you leave the default folder name.
Trading System 2 User Manual
7
Figure 4
4. Click the “Next” button to continue.
Figure 5
Trading System 2 User Manual
8
5. Tick this check box if you would like to create a trading system icon on your desktop.
It is recommended that you select this option.
6. Click on the “Next” button to complete the installation.
Figure 6
7. Click “Finish” to exit setup.
The icon should appear on your computer desktop once installation is completed.
Section 1.5.
JAVA Virtual Machine
Before the start up of trading system, the system will check for the presence of JAVA virtual
machine (Java VM). If it is not installed, the system will automatically install the Java VM into
the computer.
Trading System 2 User Manual
9
Figure 7
A dialog box will appear tracking the software ‘unpacking’ process. After briefly displaying a
logo splash screen, the installer presents the license agreement as shown below.
Figure 8
1. Read the displayed license agreement before checking the “I accept the terms in the
license agreement” radio box to agree the sun Microsystems agreement.
2. Click the “Next” button to continue.
Trading System 2 User Manual
10
Figure 9
The installer then displays a Setup Type screen that allows you to choose either a typical or
custom setup. We recommend that you choose the Typical option (the default selection)
unless you are an advanced user who wants more precise control over the components that
will be installed.
3. Check the “Typical” installation radio box.
4. Click “Next” to continue.
Figure 10
Trading System 2 User Manual
11
A Progress box tracking the installation process will then appear. A few brief dialogs confirm
the final steps of the installation process, and a concluding message should appear with the
confirmation "Installation Completed OK”
Trading System 2 User Manual
12
Section 2.
System Overview
After successful login, user will see the trading system main page with eight default panels
displayed. (1) On the top left is the RealReal-time Price Viewer – Advanced Quote and Quote.
Quote (2)
On the bottom left is the Market Order panel – Open Positions.
Positions (3) On the top right is the
RealReal-time chart.
chart (4) On the bottom right window is RealReal-time news panel. (5) The Menu Bar
is situated across the top. (6) Status Bar is situated across the bottom of the window. (7) The
Toolbar is situated under Menu Bar. (8) The Workspace
Workspace is situated under Toolbar. Trading
system is designed to be easily used and fast to execute orders. User can watch the realtime price, examine his / her current portfolio and enter new orders almost simultaneously
with a touch of a few buttons.
5
7
8
1
3
2
4
6
Figure 11
Section 2.1.
Toolbar
The Toolbar allows user to access functions by a shortcut.
Trading System 2 User Manual
13
Figure 12
1. Click on the button to show “Quote” panel.
2. Click on the button to show “Advanced Quote” panel.
3. Click on the button to show “Open Position” panel.
4. Click on the button to show “Trading Journal” panel.
5. Click on the button to show “Closed Position” panel.
6. Click on the button to show “Pending Orders” panel.
7. Click on the button to show “Portfolio Summary” panel.
8. Click on the button to show “Limit Order” panel.
9. Click on the button to show “Account Summary” panel.
10. Click on the button to show “Historical Trading Log” panel.
11. Click on the button to show “Chart” panel.
12. Click on the button to show “News” panel.
13. Click on the button to show “Product Facts” panel.
14. Click on the button to show “Announcement” panel.
15. Click on the button to tile all opened window.
16. Click on the button to cascade all opened window.
17. Click on the button to minimize all opened window.
18. Click on the button to close all opened window.
19. Click on the button to show “Preferences” panel.
Section 2.2.
Workspace
Trading system introduced a workspace function to allow user to management viewing
window into different panel by tab.
Figure 13
Trading System 2 User Manual
14
Section 2.3.
RealReal-time Price Viewer
Section 2.3.1. Real-time Quote Panel
The Real-Time Price Viewer panel should be loaded on default. Alternatively it can be found
on the Toolbar or by selecting View Quote on the Menu Bar.
Figure 14
20. Click the “View” tab on the Menu Bar.
21. Click the “Quote” tab to open the Real-Time Price Viewer.
The Real-time Price Viewer provides the user with automatic price information of different
products. Momentary RED or GREEN color is used to highlight the change of price level. If the
market price of a particular currency rises, its background color will change to green. If the
market price of a particular currency falls, its background color will change to red. The
Previous Bid, Previous Ask, Highest Bid and Lowest Bid are valuable information for the
user’s reference.
The product items displayed on the viewer are all tradable on the system. The user can
activate the Market Order by clicking on the Bid or Ask price box.
Trading System 2 User Manual
15
Figure 15
1. Click on the “Bid” price box to open market sell order.
2. Click on the “Ask” price box to open market Buy order.
Product – The name of the product.
BID – The ‘sell’ price. This price is dynamic and will fluctuate tick by tick according to market
conditions of that time.
ASK – The ‘buy’ price. This price is dynamic and will fluctuate tick by tick according to
market conditions of that time.
* Please refer to Section 6 for the details of Market Open.
Section 2.3.2. Real-time Advanced Quote Panel
The Real-Time Advanced Quote Price Viewer panel can be found on the Toolbar or by
selecting View Advanced Quote on the Menu Bar.
Trading System 2 User Manual
16
1
2
Figure 16
1.
Click the “View” tab on the Menu Bar.
2.
Click the “Advanced Quote” tab to open the Real-Time Advanced Quote Price Viewer.
~
Figure 17
1.
Figure 18
Click the pull-down Menu Bar to choose a product.
2.
Enter the order size.
3.
Click on Bid box or Ask box to make Market sell or buy order respectively.
The Real-time Advanced Quote Price Viewer provides the user with automatic price
information of a particular product only. Momentary RED or GREEN color is used to highlight
the change of price level. If the market price of a particular currency rises, its background
Trading System 2 User Manual
17
color will change to green. If the market price of a particular currency falls, its background
color will change to red.
The product item displayed on the Advanced Quote panel is tradable on the system. The
user can activate the Market Order by clicking on the Bid or Ask price box after entering the
order size.
Section 2.4.
Market Order panel
The user can review any Open Positions on the “Open Positions” panel which is loaded on
default. Alternatively this panel can be found on the Toolbar or by selecting View Open
Positions on the Menu Bar.
1
2
Figure 19
1.
Click the “View” tab on the Menu Bar.
2.
Click the “Open Positions” tab to review the Open Positions.
In the Open Position panel, details of all open positions, such as floating profit & loss, can be
viewed.
Trading System 2 User Manual
18
Figure 20
1. Click on the “Settle” button to settle an open position. (please refer to Section 7 for
the market settle details)
2. Click on the “Add” button to add a limit settle order on a particular outstanding
position. (please refer to Section 9 for limit settle details)
3. Click on the “To Detail Mode” button to toggle the table view to detail mode.
Product – The product that you have placed an order on.
B/S – This states whether the position is a buy order or a sell order on that particular
product.
Size – The number of lots that was placed on that particular currency pair.
Open Price – The price of the currency pair when you placed your order, whether it is a buy
order or a sell order.
Floating P/L – The profit / loss for each of your orders. This number is dynamic and will
fluctuate depending on the parameters of the order that you have placed.
Order No. (Detail Mode) – Order Number
Execute Date (Detail Mode) – The date and time on which the open order was executed
Execute Type (Detail Mode) – This indicates the type of order by which the order was
executed, this can be market auto, market manual, Limit Daily or Limit GTF.
Section 2.5.
Account Summary panel
The user can review his current portfolio and account information on the “Account Summary”
panel on the Toolbar or by selecting View Account Summary on the Menu Bar.
Trading System 2 User Manual
19
1
2
Figure 21
1. Click the “View” tab on the Menu Bar.
2. Click the “Account Summary” tab to open the Account Summary panel.
3
4
5
6
2
1
Figure 22
1. Click the “Trading Date” box to activate the Calendar window if necessary.
2. Click to view simple mode to hide some account information
3. Click to show the printable account statement.
4. Click to show a particular period account statement
5. Click to withdraw margin from account
6. Click to adjust setting for “Margin Alert” config
Trading System 2 User Manual
20
Trading
Trading Date – The date of the displaying account summery.
Base Currency – The base currency of the account.
Previous Balance – The account balance at the end of the previous trade day.
Margin Deposit – The amount of money deposited into the account in the stated trade day.
Withdraw Margin – The amount of money withdrew from the account in the stated trade day.
Profit / Loss – The realized profit / loss in the stated trade day.
Commission – The amount of commission charged.
Adjustment – Other adjustments made to the account.
Balance – The actual amount of money in the account.
Floating P/L – The total floating profit / loss of all outstanding positions.
Effective Margin – The equity of the account
Necessary Margin – The amount of margin required for all outstanding positions.
Variation Margin – The maximum available margin for trading.
Current Margin Percentage - The current margin level
* Please refer to Section 11.2 for the details of Account Statement.
Section 2.6.
RealReal-time chart
The Real-time chart is loaded on default. Alternatively this panel can be found on the
Toolbar or by selecting View Chart on the Menu Bar.
1
2
Figure 23
1. Click the “View” tab on the Menu Bar.
Trading System 2 User Manual
21
2. Click the “Chart” tab to open the Real-time chart.
The real-time chart shows the trend and movement of the price of the selected product, A
light-blue vertical and horizontal line will be shown which will follow the position of the
mouse cursor on the chart, the corresponding figures and price level represented by both of
these lines are displayed on the top right of the chart and also on the y-axis on the right of
the chart. The menu on the top of the chart allows you to choose product, chart type and
scale. In addition, multiple technical analyses and indicators can be added to the chart.
Please refer to Section 10 for further details on chart usage.
Figure 24
Product – Simply select the desired product in the menu for viewing on the chart.
Settings
Settings – Select the Look & Feel that applies to the whole chart.
Chart Type – Select the type of line to be used on the chart.
Time Scale:
Min – Select the time scale represented by each OHLC Bar or Candle Stick (selected
on Chart Type) on the chart.
Points – Select the period of interest to be shown on the chart (e.g. 100 Points will
show the last 100 OHLC Bar or Candle Stick on the chart).
Studies – Select from a large range of technical analysis functions that can be applied on the
chart.
Trading System 2 User Manual
22
Draw / View – Select the type of manipulative functions to be applied on the chart.
The unit for the horizontal x-axis is time/ date, and the unit for the vertical y-axis is the
value/ pips of the product. It should be noted that the range shown on both of these axes
will depend on the time frame and number of points specified under the “Time Scale” menu
item.
Section 2.7.
RealReal-time news
news
The Real-time news is loaded on default. Alternatively this panel can be found on the
Toolbar or by selecting View News on the Menu Bar.
1
2
Figure 25
User can view the real time news header in the real-time news panel.
Trading System 2 User Manual
23
1
Figure 26
1. Click the “Language” button to choose the news language.
Time – Date and time of news.
News – The headline of the actual news.
User can retrieve the real time news details by double clicking the news header in the news
panel.
Trading System 2 User Manual
24
Figure 27
Section 2.8.
Menu
Menu Bar
Menu Bar provides the following 5 functions:
Figure 28
1. User can Login or Logout from “Connection” menu item on the Menu Bar.
2. User can change the Preference, Look and Feel, Layout and password under the
“Setting” menu item.
3. User can select any information panels from this “View” menu item.
4. User can apply certain manipulative functions to all opened information panels from
the “Window” menu item.
5. User can review the trading system system version from the “Help” menu item.
Section 2.9.
Status Bar
Trading System 2 User Manual
25
The status bar shows the 1) current time, 2) login duration, 3) effective margin, 4) necessary
margin, 5) variation margin, 6) floating profit/loss, 7) balance, 8) current margin percentage,
9) connection indicator (Green color indicates a normal connection between the applet and
our server, while Red color indicates a connection failure between the applet and our server).
Figure 29
Section 2.10.
Limit Order panels
Section 2.10.1.
Limit Open
The user can review limit open orders on the Toolbar or by clicking the “Limit Open” tab on
the Menu Bar. Details of all effective limit open ticket are shown on this panel. Please refer to
Section 8 for more details on Limit Open Order.
Figure 30
1. Click the “View” tab on the Menu Bar.
2. Click the “Limit Order” tab to open the Limit Order panel.
Trading System 2 User Manual
26
Figure 31
1. Click on the “Limit Open” tab to view Limit Open panel
2. Click on the “Add” button to add a Limit Open order.
3. Click on the “Amend” button to amend a Limit Open order.
4. Click on the “Cancel” button to cancel a Limit Open order.
5. Click on the “To Detail Mode” button to toggle the table view to detail mode.
Amend – Click on this button to amend the existing limit open order.
Product – The product of the limit open order.
B/S – This states whether the existing limit open order was a buy order or a sell order.
Size – The total number of lots in the limit open order.
Limit Price – The limit execution price of the particular limit open order.
Stop Price – The stop execution price of the particular limit open order.
Stop Loss –The price for stopping loss of the particular limit open order if that order is
executed.
Take Profit - The price for taking profit of the particular limit open if it that order is
executed.
Type – Type of the limit open order (Daily or GTF).
Status – The status of the limit order.
Cancel – Click on this button to cancel the existing limit open order.
Section 2.10.2.
Limit Open Log
The user can review the limit open order log by clicking the “Limit Open Log” tab on the
“Limit Order” window. The details of the weekly limit open order are shown.
Trading System 2 User Manual
27
Figure 32
1. Click the “Limit Open Log” tab on the “Limit Order” window.
2. Click on the “From” button to choose the first date of a week to retrieve that week’s
limit open log.
3. Click on the “To” button to choose the last date of a week to retrieve that week’s limit
open log.
4. The last modified date or the create date of the Limit Open ticket.
5. * The modified date of the Limit Open ticket.
6. * The create date of the Limit Open ticket.
Ticket No. – The ticket number of the limit open order
Create Date/Last Modified – the creation order last modified date of the limit open order
Execute Date – The execution date of the limit order
Product
Product – The product of the limit open order.
B/S – This states whether the limit open order is/was a buy order or a sell order.
Size – The total number of lots in the limit open order.
Limit Price – The limit execution price of the particular limit open order.
Stop Price – The stop execution price of the particular limit open order.
Type – Type of the limit open order (Daily or GTF).
Status/Remark
Status/Remark – The status of the limit open order.
* Step 4 and step 5 will only appear if user has amended that limit open order ticket.
Section 2.10.3.
Limit Settle
The user can review the limit settle orders by clicking the “Limit Settle” tab under “View” on
the “Limit Order” window. Details of the effective limit settle ticket are shown on this panel.
Please refer to Section 9 for more details on Limit Settle order.
Trading System 2 User Manual
28
Figure 33
1. Click on the “Limit Settle” tab on the “Limit Order” window
2. Click on the “Add” button to add a Limit Settle order.
3. Click on the “Amend” button to amend a Limit Settle order.
4. Click on the “Cancel” button to cancel a Limit Settle order.
5. Click on the “Detail Mode” button to toggle the table view to detail mode.
Amend – Click on this button to amend the existing limit settle order.
Product – The product of the limit settle order.
B/S – This states whether the existing limit settle order was a buy order or a sell order.
Size – The total number of lots in the limit settle order.
Limit Price – The limit execution price of the particular limit settle order.
Stop Price – The stop execution price of the particular limit settle order.
To Settle – The information of the corresponding opened position.
Status – The status of the limit settle order.
Cancel – Click on this button to cancel the existing limit settle order.
Section 2.10.4.
Limit Settle Log
The user can review the limit settle order log by clicking the “Limit Settle Log” tab on the
“Limit Order” window. The details of the weekly limit settle order are shown.
Trading System 2 User Manual
29
Figure 34
1. Click the “Limit Settle Log” tab to open the limit settle Log window.
2. Click on the “From” button to choose the first date of a week to retrieve that week’s
limit settle log.
3. Click on the “To” button to choose the last date of a week to retrieve that week’s limit
settle log.
4. The last modified date or the create date of the Limit Settle ticket.
5. * The modified date of the Limit Settle ticket.
6. * The create date of the Limit Settle ticket.
Ticket No. – The ticket number of the limit settle order
Create Date/Last Modified – the creation order last modified date of the limit settle order
Execute Date – The execution date of the limit order
Product – The product of the limit settle order.
B/S – This states whether the limit settle order is/was a buy order or a sell order.
Size – The total number of lots in the limit settle order.
Limit Price – The limit execution price of the particular limit settle order.
Stop Price – The stop execution price of the particular limit settle order.
To Settle – This show the information about the particular opened market order of which the
limit settle order applies to.
Status/Remarks – The status of the limit open order.
* Step 4 and Step 5 will only appear if user has amended that limit Settle order ticket.
Section 2.10.5.
Split mode viewing of Limit Order window
Figure 35
Trading System 2 User Manual
30
Section 2.11.
Trading Log panels
Section 2.11.1.
Trading Journal
The user can review his daily trading history on the “Trading Journal” panel which can be
found on the Toolbar or by selecting View Trading Journal on the Menu Bar. Both open
and settled positions of the current trading day will be displayed on this panel.
Figure 36
1. Click the “View” tab in the Menu Bar.
2. Click the “Daily Trading Log” tab to review the daily trading history.
Figure 37
1. Click on the “To Detail Mode” button to toggle the table view to detail mode.
Trading System 2 User Manual
31
Section 2.11.2.
Historical Trading Log
The user can review his trading history on the “Historical Trading Log” panel which can be
found on the Toolbar or by selecting View Historical Trading Log on the Menu Bar.
Histories of both buy and sell orders during the selected period will be displayed on this
panel.
1
2
Figure 38
1. Click the “View” tab in the Menu Bar.
2. Click the “Historical Trading Log” tab to review the trading history.
Figure 39
1. Click on the “From” button to choose the starting date of your interested period.
2. Click on the “To” button to choose the ending date of your interested period.
3. Click on the “Refresh” button after selecting the “From” and “To” dates to display the
log records.
Trading System 2 User Manual
32
4. Click on the “To Detail Mode” button to toggle the table view to detail mode.
Execute Date – The date and time of the transaction.
Product – The product that you have placed an order on.
B/S – This states whether the order was a buy order or a sell order on that particular
currency pair
Size – The number of lots that was placed on that particular currency pair.
Price – The execution price of the transaction
To Settle – For Closed Position, this indicate the information of the corresponding open
position.
P/L – The floating profit / loss for each of your orders. This number is dynamic and will
fluctuate depending on the parameters of the order that you have placed.
Type – This indicates whether the transaction is an open or settle order.
Status – Status of the transaction.
Order No. (Detail Mode) – Order number.
Ticket No. (Detail Mode) – Ticket number for the corresponding record.
Create Date (Detail Mode) – The date and time of which the order was created.
Execute Type (Detail Mode) – The type of execution of the order.
Section 2.12.
Closed Position
The user can review his daily settlement on the “Closed Position” panel on the Toolbar or by
selecting View Closed Position on the Menu Bar.
Trading System 2 User Manual
33
Figure 40
1. Click the “View” tab in the Menu Bar.
2. Click the “Closed Position” tab to review the daily Closed Position.
Figure 41
Settle Date – The settle date of the closed position.
Product – Name of the settled product.
B/S – This states whether the settled order was a buy order or a sell order.
Size – The number of lots that was settled on that particular order.
Settle Price – The price used for the Closed Position.
Open Date – The date on which the corresponding position was opened.
Open Price – The open price of the corresponding position.
P/L – The amount of realized profit or lost.
Section 2.13.
Announcement
The Announcement panel displays recent system news or announcements and can be
opened on the Toolbar or by selecting View Announcement on the Menu Bar.
Trading System 2 User Manual
34
1
2
Figure 42
1. Click the “View” tab in the Menu Bar.
2. Click the “Announcement” tab to open the Announcement panel.
Figure 43
Trading System 2 User Manual
35
Section 2.14.
Portfolio Summary panel
A summary of all outstanding position is shown on this panel, this can be found on the
Toolbar or by selecting View Portfolio Summary on the Menu Bar.
1
2
Figure 44
1. Click the “View” tab in the Menu Bar.
2. Click the “Portfolio Summary” tab to open the Portfolio Summary panel.
Figure 45
Product – The product occurring in your Open Positions.
Trading System 2 User Manual
36
B/S – This states whether the particular order was a buy order or a sell order.
Size – The total number of lots outstanding for the particular product.
Average Price – The average execution price for all orders
Floating P/L - The sum of floating profit / loss for all orders with the same product.
Section 2.15.
Product Facts panel
Interest Swap of all products is listed in the Product Facts panel. You can open this panel on
the Toolbar or by View Product Facts in the Menu Bar.
1
2
Figure 46
1. Click the “View” tab in the Menu Bar.
2. Click the “Product Facts” tab to open the Product Facts panel.
Trading System 2 User Manual
37
Figure 47
1. Click on the “Server Trade Date” button to choose the date.
2. Click on the “Refresh” button to display the interests applied on the selected date.
Effective Date – The date of the displayed interest that applies to.
Expiry Date (CFD Only) - The date of when the product will be expiry.
Currency – The product of the stated interest applies to.
Closing Price – The closing price on that “Server Trade Date”
Contract Size – Size of one lot.
Buy Interest – The interest that applies to a Buy order of a particular product.
Sell Interest – The interest that applies to a Sell order of a particular product.
Interest Type – Whether it is a swap or interest rate.
Section 2.16.
World Clock
User can view the time of most major cities in the world for better reference.
Figure 48
Trading System 2 User Manual
38
A world clock screen will be shown after pressing the clock area.
Figure 49
Trading System 2 User Manual
39
Section 3.
System Settings
All user-side system settings, such as looks, reply formats and the passwords can be found
under both the “Setting” and the “Windows” menu item on the Menu Bar.
Figure 50
Figure 51
Trading System 2 User Manual
40
Section 3.1.
Setting
Section 3.1.1. General config
1
2
3
5
4
Figure 52
1. To show or hide Toolbar on main window
2. To show or hide Account Summary Bar on main window
3. To naming user own Workspace
4. Click to restore default setting for General config
5. Click to save user-defined setting for General config
Trading System 2 User Manual
41
Section 3.1.2. Advanced Quote config
1
2
4
3
5
6
7
8
Figure 53
1.
To show or not show Confirm Box for ordering on Advanced Quote
2.
To show or not show Reply Dialog for ordering on Advanced Quote
3.
User can choose the Latin text font of the words being displayed.
4.
User can choose the font style of the words being displayed.
5.
User can choose the font size of the words being displayed.
6.
Preview of font will be displayed on Advanced Quote
7.
Click to restore defaults setting for Advanced Quote
8.
Click to save user-defined setting for Advanced Quote
Trading System 2 User Manual
42
Section 3.1.3. Order Entry config
Figure 54
1.
The preset value of Lot Size
2.
The preset Order Type of Limit Order
3.
To show or not show Confirm Box for ordering
4.
To show or not show Reply Dialog for ordering
5.
Click to restore defaults setting for Advanced Quote
6.
Click to save user-defined setting for Advanced Quote
Trading System 2 User Manual
43
Section 3.1.4. Chart config
Figure 55
1.
Look And Feel of Chart panel
2.
Menu Mode of Chart panel
3.
To show or not show Toolbar/Outstanding Order on Chart panel
4.
Click to restore defaults setting for Advanced Quote
5.
Click to save user-defined setting for Advanced Quote
Section 3.1.5. Quote config
Quote configuration could be managed according to the user preferences. This is a function
that allows the user to define the information to be displayed on the Quote panel (Real-Time
Price Viewer).
Trading System 2 User Manual
44
Figure 56
1.
Click on the “Quote” tab
2.
User can tick the products which they prefer to be displayed.
3.
Click the “Select All” button to select all currencies shown.
4.
Click the “Select None” button to deselect all currencies shown.
5.
User can tick the columns which they prefer to be displayed.
6.
Click the “Select All” button to select all available information columns.
7.
Click the “Select None” button to deselect all available information columns.
8.
User can choose the Latin text font of the words being displayed.
9.
User can choose the font style of the words being displayed.
10. User can choose the font size of the words being displayed.
11. Restore defaults quote configuration
12. Click the “OK” button to complete and exit.
Alternatively, this Quote config function can also be accessed by right-clicking the mouse on
the Quote panel as shown in the figure below.
Trading System 2 User Manual
45
Figure 57
1.
Click to config setting showing preferred products for Quote panel.
2.
Click to config setting for ordering
3.
Click to config Font setting for Quote panel
Trading System 2 User Manual
46
Section 3.1.6. News config
Figure 58
Section 3.1.7. Look And Feel
Figure 59
Section 3.1.8. Layout
Trading System 2 User Manual
47
Figure 60
1. User could open the saved layout.
2. User could open the recent layout.
3. User could save the current layout.
4. User could save the current layout under a different file name.
5. Select this to allow auto save layout on exit.
6. User could load the default system layout.
Both “Load Layout” and “Save Layout” operates on the same default file. However, user can
also save more than one preferred layout settings using the “Save Layout As” function as
shown below.
Figure 61
Trading System 2 User Manual
48
1. Type in the file name for the layout setting to be saved.
2. Click the “Save” button to save the file.
Figure 62
3. Click the “Close” button to close the layout saving success message dialog box.
To load back the saved layout settings, use the “Load Layout” function as shown below.
1
2
Figure 63
1. Locate and click on the saved file or type in the file name.
2. Click the “Open” button to load the saved layout.
Section 3.1.9. Confirm Setting
Trading System 2 User Manual
49
User could choose whether he or she wants the system to show Confirm pop-up notice or
not.
If user chooses “Show Confirm Box”, a reconfirming dialog box such as the one shown below
will be displayed when you perform changes or actions on the trading system 2 system.
Section 3.1.10.
Reply ticket setting
This function gives you the option to choose the kind of system reply message you would
like to receive.
Choosing “Don’t show all reply” to limit all system reply messages.
Choosing “Don’t show successful reply” to limit all success system reply messages.
Choosing “Show all reply” to display all system reply messages.
Section 3.1.11.
Change Password & Change Service Pin
Figure 64
* Please refer to section 11 for further details.
Section 3.2.
Windows
The “Window” item on the Menu Bar provides manipulative functions that can be applied to
any opened information panels. User can use this function to view the panels in different
ways.
Trading System 2 User Manual
50
Section 3.2.1. Go To
Figure 65
1. Select “Go To” and choose from the opened panel list to go directly to that panel.
Section 3.2.2.
Tiled Window
Figure 66
User can choose this function to tiled all opened information panels.
Section 3.2.3.
Cascade
Figure 67
Trading System 2 User Manual
51
User can use this function to reorganize the arrangements of all opened panels as shown
below.
Figure 68
Section 3.2.4. Minimize All
Figure 69
User can use this function to minimize all the opened panels as shown below.
Trading System 2 User Manual
52
Figure 70
Section 3.2.5. Close All
Figure 71
User can use this function to close all the opened information panels.
Trading System 2 User Manual
53
Section 4.
Login
If it is the first time you login to trading system 2 System, please click “Always” to trust the
applet certificate as shown in Section 4.1
After the system is loaded, a login page will appear. User will be provided with a valid login
ID and password after opening an account with our company. Please contact our customer
service personnel for more details on how to open an account with us.
Figure 72
1. Enter your Login ID and Password.
2. Click the drop down menu to select your system language.
3. Click the “Login” button.
* Step 5 to step 14 below are only required for first time login.
Figure 73
4. Enter your current password.
5. Enter your new password.
6. Confirm new password.
Trading System 2 User Manual
54
7. Click the “Submit” button to continue.
8
Figure 74
8. Click “Close” to dispose the dialog box
If user quits the system by the “Logout” button under “Connection” on the Menu Bar (please
refer to Section 4.2 for the details of Logout action) instead of closing the web browser or
the software application (depending on whether you use the web version or the download
version of trading system 2), the system will jump back to the front screen. User can login
again by clicking “Login” in the same “Connection” menu.
Figure 75
Trading System 2 User Manual
55
Section 4.1.
Applet Certificate
2
1
Figure 76
1. Click “More Details” to view the details of the Certificate.
2. Click “Always” to trust “XXX Limited” to make the assertion permanent.
Section 4.2.
Logout
To increase the safety of the account, user should always logout properly using one of the
methods below.
Figure 77
1. Users can logout by clicking the “Connection” in Menu Bar and then choose “Logout”.
Trading System 2 User Manual
56
Figure 78
2. Click the “OK” button to confirm the logout action.
Figure 79
3. Click the “Close” button to close the dialog box indicating a successful logout.
On the other hand, users can logout by clicking the “Cross” button on the top right corner,
either on the web browser or the application window depending on which version of trading
system 2 you are current using.
Figure 80
Any logout actions that are not included above will be considered as improper logout. For
example, computer hang, network connection lost. For these situations, it is likely that Login
Alerts would appear the next time you try to login to the trading system 2 system. Please
refer to section 4.3 for further details.
It is critically important that you logout your account when it is not being use or when you
are not present at your logged in computer. Never
Never leave your account login session
Trading System 2 User Manual
57
unattended to avoid any unwanted changes; damages or losses occurred to your personal
account.
Section 4.3.
Login Alert
Section 4.3.1. Improper Logout
If the user did not logout the system properly during the last session, a warning message
will appear and user will need to re-enter the password to confirm the Login. To avoid this
situation and to ensure the safety of the account, it is strongly recommended that the user
should always perform the logout procedure properly.
Figure 81
1. Click the “Close” button to dispose the information dialog box.
Figure 82
2. Check the “Override” check box to override the last session.
3. Ensure your login information is supplied then click the “Login” button.
Section 4.3.2. Login Override
Trading System 2 User Manual
58
If the following dialog box popped up when you are using trading system, it means another
party has logged in using your account information, and therefore terminating your current
login session.
Such situation is possible with a shared account. However if this happens to a personal
account where no other person other than the account owner should have the account
access, then it is important for the user to contact his/ her account provider or customer
service agent immediately to understand the situation and ensuring the safety of your
personal account.
Figure 83
Trading System 2 User Manual
59
Section 5.
Limit Order Type
Before completing a limit order, user must provide the following information.
1) Daily/GTF and
2) Limit Price/Stop Price/OCO.
Section 5.1.
Daily/GTF
If user chooses the “Daily” radio box, the limit order will be effective within the current trade
date. If the user chooses the “GTF” (Good-Till-Friday) radio box, the limit order will be
effective till the coming Friday. Limit orders will be cancelled by the system automatically
once they are not effective (i.e. when the chosen effective period has expired). User can
always review all limit orders in the “Limit Open Log” (please refer to Section 2.10.2) or “Limit
Settle Log” (please refer to 0).
Figure 84
Section 5.2.
Limit Price/Stop Price/OCO
Price/OCO
Limit Price is used when the user wants to wait until the market goes into more favorite
condition. When the market price hits the limit price, the corresponding limit order will be
executed.
For an effective Buy (Sell) Limit Order, the limit price must be at least a certain number of
pips below (above) the current market Ask (Bid) price – Pips differentials.
Stop Price is used to close out a position in order to stop loss or profit, or to wait until the
market goes into more extreme condition in order to open a new position if the price moves
in the opposite direction by a certain amount of pips. When the market price hits the stop
price, the corresponding stop order will be executed.
For an effective Buy (Sell) Stop Order, the stop price must be at least a certain number of
pips above (below) the current market Ask (Bid) price – Pips differentials.
The interpretations of the Limit Price and the Stop Price depend on whether your Limit Open
is a Buy Order or a Sell Order, and they can be summarized below.
For a Buy Order
•
Limit Price must be lower than the current Ask price.
•
Stop Price must be higher than the current Ask price.
For a Sell Order
Trading System 2 User Manual
60
•
Limit Price must be higher than the current Bid price.
•
Stop Price must be lower than the current Bid price.
OCO (One-Cancel-Other) order type is the combination of both limit order and stop order.
The user needs to input both the limit price and the stop price for this kind of order. When
the market price hits either the limit price or the stop price, the corresponding order will be
executed. However, the remaining order at the other price level will be cancelled
automatically. In addition to the pips differentials requirement mentioned above, the price
difference between the OCO limit price and the OCO stop price must also be greater than
certain number of pips.
When user wants to enter the limit price only, he can check the limit price radio box and
enter the limit price.
Figure 85
When user wants to enter the stop price only, he can check the stop price radio box and
enter the stop price.
Figure 86
When user wants to create an OCO limit order, user can check the “OCO” checkbox. Users
are required to enter both the limit price and stop price.
Figure 87
A default price will be shown in the input box when the Limit/ Stop radio button or the OCO
check box is checked. You may change your Limit Price or Stop Price by typing into the text
box or by clicking the up / down arrows next to the text box.
If the number in the text box is shown in green, this means that the inputted Limit or Stop
Price is valid according to specified conditions. However if the number is shown in red, this
means such Limit or Stop Price is not valid or no longer available. In this case you will need
to adjust the number accordingly.
Trading System 2 User Manual
61
Section 6.
Market
Market Open
Open
If the user clicks on the Bid or Ask price of a particular product on the Real-time Price Viewer,
the Market Order Ticket will appear. The selected product, buy or sell type, and the market
price will already be filled in on the ticket based on the clicking location of the mouse. The
user can fill in the lot size and submit the ticket as a Market Open Order.
Figure 88
1. Click “Bid” side or “Ask” side to open a market order.
Trading System 2 User Manual
62
Figure 89
2. * Check “Add Limit Settle” if you want to add limit settle order on this outstanding
position.
Figure 90
3. * Select the Limit Order type Daily/GTF. (please refer to Section 5.1 for the details of
Daily/GTF)
4. * Click the “OCO” checkbox. (please refer to Section 5.2 for the details of Limit
Price/Stop Price/OCO)
5. Enter the open size.
6. Click “Submit” to continue.
Figure 91
Trading System 2 User Manual
63
7. Click the “OK” button to confirm.
Figure 92
8. Click “Close” to dispose the dialog box after market open order is completed
successfully.
* Steps 2, 3 and 4 are only required if you want to add a limit order on this open position.
Section 7.
Market Settle
Settle
Section 7.1.
Market order settle
1
Figure 93
1. Click the “Settle” button to settle an open position. The following dialog box will pop
up requesting the settle information.
Figure 94
Trading System 2 User Manual
64
2. Choose the settle size in the drop down menu.
3. Click the “Submit” button to confirm the order.
Figure 95
4. Click the “Close” button to close the reply dialog box.
Section 7.2.
Combine Settle
If the user clicks on the Bid or Ask price of a particular product which has an outstanding
open position in opposite side, the Market Settle Ticket will appear and user can settle the
previously opened order.
Figure 96
1. Click the “Bid” side or “Ask” side button in the Real-time price viewer which has an
outstanding open position in the opposite side.
Trading System 2 User Manual
65
Figure 97
2. Choose the settle size.
3. Click the “Submit” button to continue.
Figure 98
4. Click the “OK” button to confirm.
Figure 99
5. Click the “Close” button to close the reply dialog box.
Section 7.3.
Market order settle and custom reduce its limit settle order
When the user tries to settle an open position which has limit settle order placed on it, it is
possible that the desired settlement size would cause an insufficient remaining lot size to
cover the already placed limit settle order. When this occurs, user can choose
Trading System 2 User Manual
66
Figure 100
1) Auto reduces the limit order size.
2) Custom reduces the limit order size.
When user choose to custom reduces the limit order size, the following dialog box will pop
up requesting for the custom reduce size instructions.
Figure 101
1. This indicates the total number lot size that the user needs to reduce in order to
complete the outstanding market settle order.
2. Choose the particular limit settle order to reduce size. User can freely reduce the
limit order size among all limit order tickets. However, the total reduce size needs to
be equal to number specified in (1).
3. Click the “Submit” button to continue.
Figure 102
4. Click the “OK” button to confirm.
Trading System 2 User Manual
67
Figure 103
5. Click the “Close” button to close the reply dialog box.
Trading System 2 User Manual
68
Section 8.
Limit open
Section 8.1.
Add limit open ticket
Adding limit open ticket can be done by choosing “Limit Open” through the “Limit Order”
window.
1
3
2
Figure 104
1.
Select “Limit Open” tab.
2.
Click the “Add” button in the Limit Open panel.
3.
Click the “To Detail Mode” to view full detail of each Limit Order
Figure 105
Trading System 2 User Manual
69
4.
Select the product in the drop down menu.
5.
Select the side of the limit open ticket by checking the Buy/Sell radio box.
6.
Amend the limit order type between daily and GTF by checking the corresponding
radio box.
7.
Choose the Limit order type OCO/Limit Price/Stop Price. (please refer to Section 5.2
for more details)
8.
Enter the limit open size.
9.
Click the “Submit” button to continue.
Figure 106
10. Click the “OK” button to confirm the limit open order.
Figure 107
11. Click the “Close” button to close the reply dialog box.
Section 8.2.
Amend limit
limit open ticket
The Limit Open Order can be modified by clicking the “Amend” button on the “Limit Open”
panel. The user can change the input parameters such as Daily/GTF, OCO/Limit Price/Stop
Price and lot size of the specified order in the Amend Limit Open ticket.
Trading System 2 User Manual
70
Figure 108
1. Click the “Amend” button to amend a limit open order.
Figure 109
2. Amend the limit order type between daily and GTF by checking the corresponding
radio box. (please refer to Section 5.1 for the details of Daily/GTF)
3. Amend the Limit order type OCO/Limit Price/Stop Price by checking the
corresponding radio box. (please refer to Section 5.2 for more details)
4. Amend the limit open size.
5. Click the “Submit” button to continue.
Trading System 2 User Manual
71
Figure 110
6. Click the “OK” button to confirm the limit order amendment.
Figure 111
7. Click the “Close” button to close the reply dialog box.
Section 8.3.
Cancel limit open ticket
The Limit Open Order can be cancelled by clicking the “Cancel” button on the Limit Open
panel. Once clicked, the Cancel Limit Open Reply will appear to indicate the successful
cancellation of the limit order.
Figure 112
1. Click the “Cancel” button to cancel a particular limit open ticket. The following dialog box
will pop up.
Trading System 2 User Manual
72
Figure 113
2. Click the “OK” button to confirm the cancellation.
Figure 114
3. Click the “Close” button to close the reply dialog box.
Trading System 2 User Manual
73
Section 9.
Limit Settle
Section 9.1.
Add Limit Settle ticket
There are two methods to add a limit settle ticket on an open position. The first method is
adding the ticket from the “Limit Settle” panel.
Figure 115
1.
Select “Limit Settle” tab in “Limit Order” window.
2.
Click the “Add” button to continue.
Figure 116
3.
Click the “Add” button to open the Add Limit Settle Ticket.
Trading System 2 User Manual
74
Figure 117
4.
The Buy/Sell sides of the limit settle ticket.
5.
Select the limit order type between daily and GTF by checking the corresponding
radio box. (please refer to section 5.1 for the details of Daily/GTF)
6.
Select the limit settle size in the drop down menu.
7.
Choose the Limit order type OCO/Limit Price/Stop Price. (please refer to section 5.2
8.
Click the “Submit” button to continue.
for more details)
Figure 118
9.
Click the “OK” button to confirm the limit settle order.
Figure 119
10. Click the “Close” button to close the reply dialog box.
The second method is adding the ticket from the “Open Positions” panel.
Trading System 2 User Manual
75
1
2
Figure 120
1. Select “View” from the Menu Bar.
2. Click “Open Positions”.
Figure 121
3. Click the “Add” button to open the Add Limit Settle Ticket.
Trading System 2 User Manual
76
Figure 122
4. The Buy/Sell sides of the limit settle ticket.
5. Select the limit order type between daily and GTF by checking the corresponding
radio box. (please refer to section 5.1 for the details of Daily/GTF)
6. Select the limit settle size in the drop down menu.
7. Choose the Limit order type OCO/Limit Price/Stop Price. (please refer to section 5.2
for more details)
8. Click the “Submit” button to continue.
Figure 123
9. Click the “OK” button to confirm the limit settle order.
Figure 124
10. Click the “Close” button to close the reply dialog box.
Trading System 2 User Manual
77
Section 9.2.
Amend Limit Settle ticket
The Limit Settle Order can be modified by clicking the “Amend” button on the Limit Settle
panel. The user can change the input parameters of the specified order such as Daily/GTF,
lot size, OCO/Limit Price/Stop Price in the Amend Limit Settle ticket.
1
Figure 125
1. Select “Limit Settle” tab in “Limit Order” window
2. Click the “Amend” button to open the Amend Limit Settle Ticket and amend a limit
settle on a particular outstanding position.
Figure 126
3. The Buy/Sell sides of the limit settle ticket.
4. Amend the limit order type between daily and GTF by checking the corresponding
radio box. (please refer to section 5.1for the details of Daily/GTF)
5. Amend the limit settle size.
6. Amend the Limit order type OCO/Limit Price/Stop Price. (please refer to section 5.2
for more details)
7. Click the “Submit” button to continue.
Trading System 2 User Manual
78
Figure 127
8. Click the “OK” button to confirm the amendment.
Figure 128
9. Click the “Close” button to close the reply dialog.
Section 9.3.
Cancel Limit Settle ticket
The Limit Settle Order can be cancelled by clicking the “Cancel” button on the Limit Settle
panel. The Cancel Limit Settle Reply will appear to indicate the order cancellation is
completed on the system successfully.
Figure 129
1. Click the “Cancel” button to cancel a particular limit settle ticket. The following
dialog box will pop up.
Trading System 2 User Manual
79
Figure 130
2. Click the “OK” button to confirm the cancellation.
Figure 131
3. Click the “Close” button to close the reply dialog box.
Trading System 2 User Manual
80
Section 10.
RealReal-time Chart
The real-time chart shows movement of the current price. The menu on the top allows you
to choose currency pair, chart type and scale. Multiple technical indicators can be added to
the chart. When you move the mouse pointer over the chart, a vertical and a horizontal line
will appear on the chart. The corresponding values for the vertical line such as Trade Date,
Trade Time, High Bid, Low Bid, Open Price and Close Price are display automatically across
the top. The corresponding price value for the horizontal line is displayed on the y-axis on
the right of the chart.
You can open more than one Real-time Chart panel for multiple viewing on other currencies.
Details can be found on section 2.4.
Section 10.1.
Chart Currency
Currency
Simply select the desired currency pair in the menu for viewing on the chart.
2
1
3
4
Figure 132
Trading System 2 User Manual
81
1.
Print the current chart.
2.
Save the current chart to a picture file
3.
Copy the current chart to clipboard.
4.
Choose the desired currency to be displayed on the chart.
Section 10.2.
Chart Type
There are total of 3 different chart types to choose from:
Figure 133
1.
Line Chart.
2.
OHLC Bar Chart.
3.
Candle Stick (As shown on Figure 128).
Section 10.3.
Time Scale
Scale
Available time scales include tick chart, 1 Minute, 5 Minutes, 15 Minutes, 30 Minutes, Daily
and Weekly charts. Available points range is from 100 to 2000 points. By default 60 minute,
100 points chart is selected. User can obtain a more precise view on the chart data if they
choose smaller time scale like Tick or one minute, however more data can be displayed on
Trading System 2 User Manual
82
the chart if they choose a larger points scale such as 1500 points or 2000 points. The scale
on both the x-axis and y-axis is therefore determined by the selected time and point scales.
Figure 134
For example, 60 minutes 100 points chart is a chart which shows 100 points. The data is
collected every 60 minutes. The following is a 60 minutes 100 points chart.
Trading System 2 User Manual
83
Figure 135
Trading System 2 User Manual
84
For example, 60 minutes 1000 points chart is a chart which shows 1000 points. The data is
collected every 60 minutes. The following is a 60 minutes 1000 points chart.
Figure 136
Section 10.4.
Studies
To select a technical analysis (TA) indicator, simply click on the indicator in the menu. To
delete any indicator from the chart, simply click on Delete, a pop up dialog will be available
for selecting the indicator to be deleted. You can also click on Delete All to remove all
indicators.
Trading System 2 User Manual
85
Figure 137
For example, user is going to add the Technical Analysis Average True Range (ATR). The
following dialog box will pop up and ask for the interval and color representing ATR in the
chart. Click “OK” to add the TA.
Figure 138
Trading System 2 User Manual
86
Figure 139
Second, user adds the Technical Analysis MACD, the following dialog box will pop up and
ask for the interval and color representing MACD in the chart. Click “OK” to add the TA.
Figure 140
Trading System 2 User Manual
87
Figure 141
User can add at most 2 Technical Analysis to the chart. (Please noted that user can add
various line on the chart with particular TA like Moving Average)
On the other hand, user can delete the TA that was added to the chart. If user clicks the
“Delete All Studies” in the “Studies” menu, all TA will be deleted. If user clicks “Delete Study”,
the pop up dialog below will appear and user can choose which the TA he or she wants to
delete.
Figure 142
Choose the TA to be deleted in the drop down menu and then click “OK”.
Section 10.5.
Draw/View
Trading System 2 User Manual
88
Figure 143
1. “Delete Selected Tool”, User can remove a particular tool applied on the chart.
2. “Delete All Tools”, User can delete all applied tools on the chart.
3.
“Horizontal Grid”, horizontal grid line will be displayed.
4. “Vertical Grid”, vertical grid line will be displayed.
5. “Cross Hair”, cross hair line will add to the chart.
6. “Turn Off Line-Tool”, select this radio button to turn off the chosen tool from No.8 to
No.16.
7. “Select Drawn Line”, select this function then click on any line-tools drawn on the
chart to edit it.
8. “Zoom In”, user can zoom in on the chart.
9. “Zoom Out”, user can zoom out on the chart.
10. “Draw Trend Line”, you can draw trend lines on the chart area, the lines are in grey
color.
11. “Draw Horizontal Line”, once selected and clicked on the chart area, a dialog will pop
up as shown in Figure 150 below.
12. “Draw Parallel Line”, select to draw parallel lines on the chart.
13. “Draw Arcs”, user can draw arcs on the chart.
14. “Draw Retracements”, user can draw retracements on the chart.
15. “Draw Fans Line”, user can draw fans line on the chart.
16.
“Draw Cycles”, user can draw cycles on the chart.
Trading System 2 User Manual
89
Figure 144
User can choose the “Price Value” and “Color” of the horizontal line and then click “OK”,
the line will be drawn on the chart as shown below.
Figure 145
Trading System 2 User Manual
90
Section 10.6.
Zooming
Figure 146
First, choose “Zoom In” in the Draw / View Chart menu.
Trading System 2 User Manual
91
Figure 147
Click and hold the left mouse button on the chart where you want your zoom to start, and
then drag over the chart area where you want to zoom and release the left mouse button.
Trading System 2 User Manual
92
Figure 148
The selected area is zoomed in.
To zoom out, select “Zoom Out” in the Draw / View Chart menu to zoom out.
Section 10.7.
Open / Settle by chart
Apart from the steps mentioned in Section 6/ Section 8 for placing market/ limit open, and
in Section 7/ Section 9 for placing market/ limit settle, it is also possible for the user to
perform these functions from the chart by right-clicking the mouse button on the chart.
Trading System 2 User Manual
93
Figure 149
1. Check and ensure it is the right chart for the product that you are interested.
2. Click on the required function you wish to perform.
* Please note that both Market Settle and Limit Settle button will not be active on the menu
unless there are open position(s) on that product in the account.
Once a function is selected, the corresponding forms or tickets for that function will be
shown. For further information, please refer to the relevant sections in this menu.
Trading System 2 User Manual
94
Section 11.
Account
Section 11.1.
Change Password
Users are encouraged to change his / her password regularly and to use hard-to-guess
passwords (i.e. mixture of letters and digits) to increase the password security.
Figure 150
Select “Settings” then click on “Change Password”.
The follow dialog box will pop up:
Figure 151
1. Enter your current password.
2. Enter new password.
3. Confirm the new password.
4. Click the “Submit” button to continue.
Figure 152
Trading System 2 User Manual
95
5. Click the “Close” button to close the dialog box after the password is changed
successfully.
Section 11.2.
Account Summary
The user can review his / her current portfolio and account information in the “Account
Summary” tab under View on the Menu Bar.
1
Figure 153
1. Choose View then Account Summary.
Figure 154
Trading System 2 User Manual
96
2. Click the “Server Trading Date” box to activate the Calendar dialog.
Figure 155
3. Choose the year.
4. Choose the month.
5. Choose the date.
Once the date information is selected, the account summary of that date will be shown on
the Account Summary panel.
Section 11.2.1.
Show Statement
Figure 156
Trading System 2 User Manual
97
1. Click the “Show Statement” icon to display the account statement of the specified
trading date.
Figure 157
2. You can click on the “Print” button if you want to print out the account statement.
Trading System 2 User Manual
98