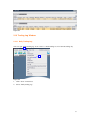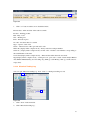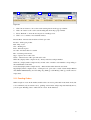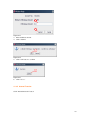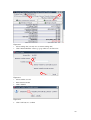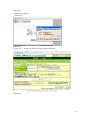
1
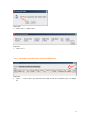
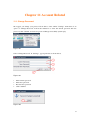
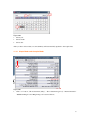
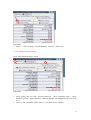
User Manual
1
Index
Chapter 1
1.1
1.2
1.3
1.4
1.5
Chapter 2
2.1
2.2
2.3
2.4
2.5
2.6
2.7
2.8
2.9
Before Use of Platform ................................................................................................. 5
What is new about Horizon Pro III ........................................................................... 5
System requirements ................................................................................................. 7
Download Horizon Pro III trading platform.............................................................. 7
Install Horizon Pro III trading platform .................................................................... 8
Java program ........................................................................................................... 11
System Overview ........................................................................................................ 14
Quote Window ........................................................................................................ 14
Outstanding Orders ................................................................................................. 16
Liquidation .............................................................................................................. 17
Charting................................................................................................................... 18
News........................................................................................................................ 19
Menu Bar................................................................................................................. 21
Status Bar ................................................................................................................ 21
Workspace ............................................................................................................... 21
Limit Order ............................................................................................................. 22
2.9.1
Place Limit Open............................................................................................. 23
2.9.2
Limit Open ...................................................................................................... 24
2.9.3
Limit Open Log ............................................................................................... 25
2.9.4
Amend Limit Open ......................................................................................... 26
2.9.5
Cancel Limit Open .......................................................................................... 27
2.9.6
Place Limit Settle ............................................................................................ 28
2.9.7
Limit Settle ...................................................................................................... 31
2.9.8
Limit Settle Log .............................................................................................. 31
2.9.9
Amend Limit Settle ......................................................................................... 32
2.9.10 Cancel Limit Open .......................................................................................... 33
2.9.11
Limit Open and Limit Settle show simultaneously ......................................... 34
2.10
Trading Log Window .............................................................................................. 35
2.10.1 Daily Trading Log ........................................................................................... 35
2.10.2 Historical Trading Log .................................................................................... 36
2.11
Pending Orders ........................................................................................................ 37
2.12
Portfolio Summary .................................................................................................. 38
2.13
Account Summary................................................................................................... 39
2.14
Product Facts ........................................................................................................... 41
2.15
Advance Quote ........................................................................................................ 42
Chapter 3 System Settings ........................................................................................................... 43
3.1
Settings .................................................................................................................... 43
3.1.1
Preferences ...................................................................................................... 43
(i) General ............................................................................................................ 44
(ii) Advanced Quote ............................................................................................. 46
2
(iii) Order Entry.................................................................................................... 49
(iv) Chat ............................................................................................................... 53
(v) Quote .............................................................................................................. 55
(vi) News .............................................................................................................. 56
3.1.2
Look and Feel .................................................................................................. 57
3.1.3
Layout ............................................................................................................. 58
3.1.4
Change Password and Service Pin .................................................................. 59
3.1.5
SMS Notification…………………………………………………………….60
3.2
Window ................................................................................................................... 60
3.2.1
Go To ............................................................................................................... 61
3.2.2
Tiled Window .................................................................................................. 61
3.2.3
Cascade ........................................................................................................... 61
3.2.4
Minimize All ................................................................................................... 62
3.2.5
Close All.......................................................................................................... 63
Chapter 4 Account ....................................................................................................................... 64
Chapter 5 Login and Logout ........................................................................................................ 65
5.1
Safety Certificate ..................................................................................................... 67
5.2
Logout ..................................................................................................................... 67
5.3
Login Warning......................................................................................................... 68
5.3.1
Illegal Logout .................................................................................................. 68
5.3.2
Override Login ................................................................................................ 69
Chapter 6 Limit Order Type......................................................................................................... 70
6.1
Daily/GTF/GTC ...................................................................................................... 70
6.2
Limit/Stop loss/OCO/If done .................................................................................. 70
Chapter 7 Market Order ............................................................................................................... 73
Chapter 8 Market Settle ............................................................................................................... 75
8.1
Market Settle Order ................................................................................................. 75
8.2
Complex Settle ........................................................................................................ 76
8.3
Market Settle and Customize Reduce Limit Settle Size .......................................... 77
8.4
Market Settle and Hedge Settle ............................................................................... 78
Chapter 9 Hedge Settle ................................................................................................................ 80
Chapter 10 Chart............................................................................................................................ 82
10.1
Product .................................................................................................................... 82
10.2
Setting ..................................................................................................................... 83
10.3
Chart Type ............................................................................................................... 83
10.4
Time Scale ............................................................................................................... 84
10.5
Studies ..................................................................................................................... 85
10.6
Draw/View .............................................................................................................. 89
10.7
Zoom In ................................................................................................................... 90
10.8
Chart Order ............................................................................................................. 92
10.9
Chart Shortcut ......................................................................................................... 93
Chapter 11 Account Related .......................................................................................................... 94
11.1
Change Password .................................................................................................... 94
11.2
Change Service Pin ................................................................................................. 95
3
11.3
Account Summary................................................................................................... 96
11.3.1
Simple Mode and Complex Mode .................................................................. 97
11.3.2
Show Statement (daily) ................................................................................... 98
11.3.3
Show Statement (periodl) ................................................................................ 99
11.3.4
Withdraw Margin .......................................................................................... 100
11.3.5
Internal Transfer ............................................................................................ 101
11.3.6
Quick Margin In…………………………………………………………….103
4
Chapter 1 Before Use of Platform
1.1
What is new about Horizon Pro III
The new functions had make Horizon Pro III even more user friendly, this has ensured that
Horizon Pro III trading platform can provide you with 24 hours non-stop trading service based on
the global investment market, which is more practical and operational efficient.
SMS Notification
From Settings “SMS Notification”, To receive mobile phone is now available that execution all
limit orders(Stop order/ OCO / if Done) and loss cut.
Quick Margin In(new function) ( Resident of Japan only)
From “Account Summary”, by using the quick margin function, this is more convenient to use.
Projected Margin(%)
Projected Margin(%) has been newly added at “Account Summary” and bottom left of system
interface. It is renewed instantly, very convenient to use.
Limit order integration
By using the “Limit order” function, limit open order and limit settle order are displayed in one
window. This is more convenient to use.
Show time interval on account statement
By selecting specified time period on the account summary, then time interval account statement
can be shown.
Transaction speed optimization
Order execution speed has been improved through “Advanced quote” function, this has made
trading more convenient. Through “Personalize setting” function in the menu bar, multiple
functions can be set off at one time.
Switch account
Switch accounts in between FX, CFD and Commodity CFD has been added to the menu bar.
Because you can freely switch between accounts, the trading opportunity can be taken more
effectively.
Inter-transfer of fund
Account summary menu has added a new function of fund transfer, the fund can be now
transferred internally.
5
Independency of the trading price
In the top left of trading window, marketing price window, right click, “Always on top” option
will show. Marketing price window can be independent of system interface, this has increased the
convenience. Trade can be made by just click on the price.
Personalize setting
“Personalize setting” function has been added to the menu bar, through this function, multiple
functions can be set off at one time.
Workspace
The trading windows of client can be divided to 5 areas at the most. (no windows can be opened
more than once other than advanced quote window and chart window)
Account summary
Can display account summary at the bottom of the system interface, you can then clearly review
your equity (including margin percentage).
News setting
News setting can be arranged according to your own requirements.
World Time display
Double click on the current time, time of 15 world main cities will appear.
Network connection status
The status bar color-coded by the network connection status, green indicates the connection
between the procedure and the server is normal, yellow indicates it is connecting, red indicates
connection lost.
Display bar
On the top of the trading window, display bar has been newly added.
Toolbar
Through pop-up toolbar on top of the trading window, make the necessary functions easy access.
Export chart data
Opening price, closing price, highest and lowest price can be exported in the csv format.
Trend line projection, horizontal line projection
Projection method can be used on trend lines and horizontal lines, other than manually added.
Current time display
Current date and time will show on the bottom right corner of the chart window.
New size of chart
6
×
Other than current display size, now you can save chart in 800 600 or 1024
copy the chart to clipboard, 800 600 or 1024 768 can also be selected.
×
1.2
×
×768. Also, when
System requirements
Operating system: Windows
Windows 98 SE or above operating system
600 MHz Interl Pentium III or above CPU
128MB or above Memory (256MB Memory is recommended)
Java version 1.6 or above
Operating system: MacOS
MAC OSX or above operating system
600 MHzG3, G4, or G5 CPU
128MB or above Memory (256MB Memory is recommended)
Java version 1.6 or above ( http://developer.apple.com/java/)
1.3
Download Horizon Pro III trading platform
You can access Horizon Pro III trading platform through the following two ways: web version or
desktop version.
Figure 1
Web version:
1. Select the language you prefer to use.
2. Click “start” button to login to Horizon Pro III trading platform
Desktop version:
A. Download Horizon Pro III install program for Windows operating system
B. Download Horizon Pro III install program for MacOS operating system
7
If you forgot password, please click “Forgot password” button and follow the instruction.
If your computer has not installed Java, please then download and install Java JRE first
in order for Horizon Pro III trading platform run smoothly.
Before switch to Integrated trading account, please click “Horizon FX Historical Trading
Log”
*For detailed login operation please refer to Chapter 5.
1.4
Install Horizon Pro III trading platform
Find Horizon Pro III installation file, double click and install.
Figure 2
1. Click “Open” to install
8
Figure 3
2. Click “Next”
In this interface, you can choose where you want to install Horizon Pro III on your computer,
we would suggest you to follow the default route.
Figure 4
3. Click “Next”
Here, you can choose where you want to save the shortcut of Horizon Pro III program. We
still recommend you to use the default folder name.
9
Figure 5
4. Click “Next”
Figure 6
5. Tick in the box to setup a shortcut of Horizon Pro III on destops. We recommend you to do so.
6. Click “Next” to complete the setup.
10
Figure 7
7. Click “Finish” to exit the setup.
Complete the installation, a shortcut icon
1.5
will show on your computer desktop.
Java program
Before Horizon Pro III to start, system will check whether JAVA program (JAVA TM) has been
installed or not. If not, system will automatically prompted to install.
Figure 8
11
1. Click “Run” button, install Java program of Sun Microsystems. Inc.
Figure 9
Dynamic progress bar shows the progress of installation.
Figure 10
2. Click “Run” to install.
12
Figure 11
3. Read the license agreement, click on “Accept”.
Figure 12
When progress bar shows “Installation complete” means Java program has been successfully
installed to your computer.
13
Chapter 2 System Overview
When you sign in successfully, you will see the main interface of Horizon Pro III, it is formed by
11 default windows. (1) Quote window on top left; (2) Outstanding Orders window on middle left;
(3) Liquidation window on bottom left; (4) Chart window on top right; (5) News on bottom right;
(6) Menu bar on main interface; (7) Status bar at the bottom; (8) Workspace, below the menu bar;
(9) Account number and account type on top right; (10) View panel above the chart window; (11)
Current margin percentage at the bottom left. Horizon Pro III is purposely designed for simply
functionality and rapid implementation. To follow the market price, check your position or place a
trade, simply one click away.
6
9
8
10
1
4
2
5
3
7
Figure 13
2.1
11
Quote Window
Under the default setting, quote window will pop up automatically when Horizon Pro III starts up.
If not, you can find quote window in “View”.
14
1
2
Figure 14
1. Click “View” on menu bar.
2. Click “Quote” to open a quote window.
Quote window provides various products price, also included previous bid price, previous ask
price, highest bid price and lowest bid price for your reference.The color of arrow shows the
current trend of price.If the current bid price is higher than previous bid price,it shows green up
arrow. But if the current bid price is lower than previous bid price,it shows red down arrow.
All price listed in quote window can be traded through Horizon Pro III trading platform. If you
wish to make a trade using the quote window, simply click on the bid or ask price button for the
product you wish to trade.
1
2
Figure 15
15
Product – The Product can be traded.
Bid – Sell price.It changes according to real time rate.
Ask – Buy price. It changes according to real time rate.
Prev Bid – previous bid price.
Prev Ask – previous ask price.
High Bid – The highest sell price in current trading day.
Low Bid – The lowest sell price in current trading day.
Time – The last time bid or ask price changed.
Please refer to chapter7 for detail about market open.
﹡
2.2
Outstanding Orders
All your outstanding orders will be listed in the outstanding orders window. Under the default
setting, outstanding orders window will pop up automatically when Horizon Pro III starts up. If
not, you can find1 quote window in “View”.
2
Figure 16
1. Click “View” on menu bar.
2. Click “Outstanding orders” to open a outstanding orders window.
This window shows you the details of all outstanding position that you currently have,such as
Floating P/L.
3
1
2
Figure 17
1. Click “Settle” button next to the position you wish to close.(Please refer to Chapter8 for
16
details)
2. If you wish to add a limit or stop loss level, simply click the “Add” button.(Please refer to
Chapter2.9.7 for details)
3. Click “>>” button will brings up a more detailed window.
Products – Products that have outstanding orders.
B/S – Buy or sell
Size – Lot size
Open price – Trading price, regardless of long position or short position
Floating P/L – Real time P/L according to real time exchange rate
Order No. – Every Order have a unique number
Execute Date – Time and date when the trade was made
Execute Type – Order types. It contains Market Auto, Market Manual, Daily Limit Order, GFT or
GTC Limit Order.
2.3
Liquidation
You can find liquidation window in “View”, here reviews all the liquidation records.
1
2
Figure 18
1. Click “View” on menu bar.
2. Click “Liquidation” to open a liquidation window.
Figure 19
17
Settle date – Settled date and time
Product – Product to settle
B/S – Buy or sell
Size – Lot size
Settle price – Trading price
Open Date – Date and time when the trade was made
Open price – Price when the trade was made
P/L – Real time P/L according to real time exchange rate
2.4
Chart
Under the default setting, charting window will pop up automatically when Horizon Pro III starts
up. If not, you can find chart window in “View”.
1
2
Figure 20
1. Click “View” on menu bar.
2. Click “Chart” to open a chart window.
Chart shows the trend and variation of product’s market price. When mouse move on the chart,
there will be a set of blue vertical and horizontal line follow to indicate your position.You can use
the chart windows and tools for technical analysis studies and research. Charts also allow you to
place a trade by right clicking on the level you with to enter the market. For detailed explanation
please refer to chapter 10.
18
Figure 21
Product – Product that you want to show on the chart
Settings – Setup of chart’s appearance and display
Chart type – Choose the type of the chart
Time scale
Time scale setting – Select the time length of every turning point or OHLC or candle stick
Point – Select the time scale sample point of chosen chart
Studies – Provide number of technical analysis tools for you
Draw/View – Select the lines you wish to apply to the chart
:
In the chart, x-axis represent time/date, y-axis represents price/points. Note that, the scale and
value range of x and y axes depends on what time scale and value of sample points you have
chosen in the “time scale” menu.
2.5
News
Under the default setting, news window will pop up automatically when Horizon Pro III starts up.
If not, you can find news window in “View”.
You can read real time news title in the news window.
19
Figure 22
1. Click on drop down menu to select the language you want.
Time – Time and date of news
News – Real time news title
Double click on the news title, you will be able to read the whole news story.
Figure 23
1. You can choose font size, print or save the news article.
20
2.6
Menu Bar
The menu bar is formed by six sub-menus.
Figure 24
1. In “Connection”, you can sign in and out of the trading platform.
2. In “Account”, you can switch in between FX or Securities CFD or Commodity CFD accounts.
3. In “Setting”, you can personalize your trading platform, and change password and service pin
etc.
4. In “View”, you can open any window you wished.
5. In “Window”, you can list and arrange the windows that you have opened.
6. In “Help”, you can check the system information of Horizon Pro III.
2.7
Status Bar
The status bar provides the following information: 1) current time and date, 2) login time, 3)
network connection status.
Figure 25
You can view the current time and date of the world main cities by click on “Current time and
date” of the status bar (1).
Figure 26
2.8
Workspace
The trading interface can be divided to 5 workspaces at the most.
21
1
2
3
4
5
Figure 27
Through workspace 1-5, there are at most 20 advanced quote and chart can be displayed.
2.9
Limit Order Window
You can place limit order through “Limit order” in “View”.
1
2
Figure 28
1. Click “View” on menu bar.
2. Click “Limit order” to open a limit order window.
22
3
Figure 29
3. Shows the whole limit order window.
2.9.1
Place Limit Open
You can place a new limit order through “Limit open”.
1
Figure 30
1. Click “Add” button.
2
3
4
5
6
7
Figure 31
2. Choose the product in drop down menu.
23
3. Click buy or sell to select the type of position you would like to open.
4. Choose the valid period for limit open by select Daily, GTF or GTC.
5. Choose the limit type: OCO/limit/stop/if done Refer to Chapter6.2 for details .
enter the limit price in the empty space. As shown above, reference price is (<=1.24874), i.e.
valid for price below 1. 24874. If invalid, the value will be shown in red.
6. Enter the trading size.
7. Click “Submit”.
(
)
8
Figure 32
8. Click “Ok”.
9
Figure 33
9. Click “Close”.
2.9.2
Limit Open
4
1
2
3
Figure 34
1.
2.
3.
4.
Click “Add” to place a limit open.
Click “Amend” to change settings of an existing limit open.
Click “Cancel” to delete an existing limit open.
Click “>>” to switch to more detailed window.
Amend – to change settings of an existing limit open.
Product – product of limit open.
B/S – Buy or sell
Size – Contract size
Limit Price – Execute limit price
Stop Price – Execute stop price
24
Stop Loss – Stop loss price of if done order. This stop loss price is only valid when your first limit
or stop open order has been executed.
Take Profit – Take profit price of if done order. This take profit price is only valid when your first
limit or stop open order has been executed.
Type – Valid period of limit open: Daily (end of trading day), GTF (good till Friday), GTC (good
till cancel).
Status – Current status of the limit open order
Cancel – Delete the limit open order
Create Date (Display in complex mode) – The date and time when Limit Open was placed
Ticket No. (Display in complex mode) – Every limit open order has a unique number
2.9.3
Limit Open Log
You can review the details of past weeks limit open order by open “Limit open log”.
2
1
3
Figure 35
1.
2.
3.
4.
4
Click “From” button to choose the search starting date from the pop up calendar.
Click “To” button to choose the search ending date from the pop up calendar.
The create date and last modified date of the limit open order.
Other time and date of when the limit open order was amended.
Ticket No. – Every limit open order has a unique number.
Create Date/Last Modified – Create date and last modified date of the limit open order.
Execute Date – Execute date and time of limit open order
Product – Limit open product
B/S – Buy or sell
Size – Trading size
Limit Price – Execute limit price
Stop Price – Execute stop price
Stop Loss – Stop loss price of if done order. This stop loss price is only valid when your first limit
or stop open order has been executed.
Take Profit – Take profit price of if done order. This take profit price is only valid when your first
limit or stop open order has been executed.
Type – Valid period of limit open: Daily (end of trading day), GTF (good till Friday), GTC (good
till cancel).
Status/Remark – Current status of the limit open order
25
2.9.4
Amend Limit Open
Modify existing limit open order by click “Amend” button, you can modify the valid period, type
size etc.
1
Figure 36
1. Click “Amend” button for the limit open that you wish to modify
2
3
4
5
Figure 37
2. Change the valid period by select appropriate type (Daily, GTF, GTC).(Refer to Chapter6.1
for details)
3. Change the limit open type by select OCO/limit/stop/if done. (Refer to Chapter6.2 for details)
4. Change size
5. Click “Submit”
26
Figure 38
6. Click “Ok” to confirm the modifications.
7
Figure 39
7. Click “Close”.
2.9.5
Cancel Limit Open
Click “Cancel” button can delete the selected limit open order. The system will prompt to confirm.
1
Figure 40
1. Click “Cancel” button next to the limit open order that you wish to delete, the system will
prompt to confirm.
Figure 41
2. Click “Ok” to confirm cancel
27
3
Figure 42
3. Click “Close”
2.9.6
Place Limit Settle
There are two ways to place Limit Settle Order. The first is to place limit settle order in “Limit
settle” window.
1
Figure 43
1. Click “Add” button.
2
Figure 44
2. Click “Add” button on the left of product.
3
4
5
6
Figure 45
3. Select Daily, GTF or GTC to set up the valid period of limit settle order.
4. Choose size in the drop down menu.
28
5. Choose the type of limit settle order: OCO/limit/stop.( Refer to Chapter6.2 for details)
6. Click “Submit”
Figure 46
7. Click “Ok” to confirm settings.
8
Figure 47
8. Click “Close”
The second method is to click “Outstanding orders” in “View”.
1
2
Figure 48
1. Click “View” in menu bar.
2. Click “Outstanding orders”.
29
3
Figure 49
3. Click “Add” button on the left of product.
4
6
5
7
Figure 50
4. Select Daily, GTF or GTC to set up the valid period of limit settle order. (Refer to Chapter6.1
for details)
5. Choose size in the drop down menu.
6. Choose the type of limit settle order: OCO/limit/stop. (Refer to Chapter6.2 for details)
7. Click “Submit”
Figure 51
8. Click “Ok” to confirm settings.
9
30
Figure 52
9. Click “Close”
2.9.7
Limit Settle
1
4
2
3
Figure 53
1.
2.
3.
4.
Click “Add” button to place a limit settle order
Click “Amend” button to modify the settings of existing limit settle order
Click “Cancel” button to delete an existing limit settle order
Click “>>” to view more detailed window
Amend – to change settings of an existing limit open.
Product – product of limit open.
B/S – Buy or sell
Size – Contract size
Limit Price – Execute limit price
Stop Price – Execute stop price
To Settle – Products that to be settled
Status – Current status of the Limit Settle Order
Cancel – Delete the Limit Settle Order
Create Date (Display in complex mode) – The date and time when Limit Settle Order was placed
Ticket No. (Display in complex mode) – Every Limit Settle Order has a unique number
2.9.8
Limit Settle Log
You can review the details of past weeks limit settle order by open “Limit settle log”.
2
1
3
4
Figure 54
1. Click “From” button to choose the search starting date from the pop up calendar.
2. Click “To” button to choose the search ending date from the pop up calendar.
3. The create date and last modified date of the Limit Settle Order.
4.
Other time and date of when the Limit Settle Order was amended.
Term4 will exist only if the Limit Settle Order was amended.
Ticket No. – Every Limit Settle Order has a unique number.
﹡
﹡
31
Create Date/Last Modified – Create date and last modified date of the Limit Settle Order.
Execute Date – Execute date and time of Limit Settle Order.
Product –Limit settle product
B/S – Buy or sell
Size – Trading size
Limit Price – Execute limit price
Stop Price – Execute stop price
To Settle – Status of relevant outstanding position
Type – Valid period of limit open: Daily (end of trading day), GTF (good till Friday), GTC (good
till cancel or expiry date).
Status/Remark– Current status of the Limit Settle Order.
2.9.9
Amend Limit Settle
Modify existing limit settle order by click “Amend” button, you can modify the valid period, type
size etc.
1
Figure 55
1. Click “Amend” button for the limit settle that you wish to modify
2
4
3
5
Figure 56
2. Change the valid period by select appropriate type (Daily, GTF, GTC).(Refer to chapter6.1 for
details about Daily, GTF, GTC)
3. Change size
4. Change the Limit Settle type by select OCO/Limit price/Stop price.
5. Click “Submit”
32
Figure 57
6. Click “Ok” to confirm the modifications.
7
Figure 58
7. Click “Close”.
2.9.10 Cancel Limit Settle
Click “Cancel” button can delete the selected Limit Settle order. The system will prompt to
confirm.
1
Figure 59
1. Click “Cancel” button next to the Limit Settle Order that you wish to delete, the system will
prompt to confirm.
33
Figure 60
2. Click “Ok” to confirm cancel
Figure 61
3. Click “Close”
2.9.11 Limit Open and Limit Settle show simultaneously
1
Figure 62
Λ
1. Click “ ” button, limit open and limit settle window will show simultaneously as in Figure
63.
34
Figure 63
2.10 Trading Log Window
2.10.1 Daily Trading Log
You can open “Daily trading log” from “View” to check trading record of current trading day.
1
2
Figure 64
1. Click “View” in menu bar.
2. Select “Daily trading log”.
35
1
Figure 65
1. Click “>>” button switch to more detailed window.
Execute date – Time and date of the trade was made
Product – Trading product
B/S – Buy or sell
Size – Trading size
Price – Execution price
To settle – Products that to be settled
Type – Open or settle order
Status – Current status of the open and settle order
Ticket No.(display under complex mode) – Every trades has a unique number
Order No. (display under complex mode)– Limit order or market order number corresponding to
the establishment of the time
Create date(display under complex mode) – Time and date when the trade was made
Type(display under complex mode) – Valid period of open order or settle order.It maybe Market
Auto,Market Manual,Daily (end of trading day), GTF (good till Friday), GTC (good till cancel or
expiry date).
2.10.2 Historical Trading Log
You can open “Historical trading log” from “View” to check past trading records.
1
2
Figure 66
1. Click “View” in the menu bar.
2. Click “Historical trading log”.
36
1
2
3
4
Figure 67
1.
2.
3.
4.
Click “From” button to choose the search starting date from the pop up calendar.
Click “To” button to choose the search ending date from the pop up calendar.
Select “Refresh” to show the chosen period of trading record.
Click “>>” to switch to more detailed window.
Execute Date – Execute date and time of limit open order
Product – Limit open product
B/S – Buy or sell
Size – Trading size
Price – Execution price
To settle – Products that to be settled
P/L – real time profit and lost
Type – Open order or settle order
Status – Current status of the open and settle order
Ticket No.(display under complex mode) – Every trades has a unique number
Order No. (display under complex mode)– Limit order or market order number corresponding to
the establishment of the time
Create date(display under complex mode) – Time and date when the trade was made
Type(display under complex mode) – Valid period of open order or settle order.It maybe Market
Auto,Market Manual,Daily (end of trading day), GTF (good till Friday), GTC (good till cancel or
expiry date).
2.11 Pending Orders
When exception occurs in the market, market orders can not be performed in automatic mode, but
to be confirmed (only at extreme cases), pending order window will prompt automatically. If not,
you can open “Pending orders” window from “View” in the menu bar.
37
1
2
Figure 68
1. Click “View” in menu bar
2. Select “Pending orders”
3
Figure 69
3. Click “>>” to switch to more detailed window.
Product – Product to trade
B/S – Buy or sell
Size – Trading size
Price – Price wish to be executed
To settle (Only for settle order)– Products that to be settled
Type – Open or settle order
Ticket No. – Every trades has a unique number
Order No. – Limit order or market order number corresponding to the establishment of the time
Create date – Time and date when the trade was made
Execute date – Time and date when the trade was executed
2.12 Portfolio Summary
You can open “Portfolio summary” from “View” in menu bar. Here you can review
38
1
2
Figure 70
1. Click “View” in menu bar.
2. Select “Portfolio summary”.
Figure 71
Product – Product of outstanding position
B/S – Buy or sell
Size – Trading size
Average price – The average price of the open prices of all the outstanding orders with the same
product and same trading type.
Floating P/L – Sum of floating P/L based on real time exchange rates of the outstanding orders
with the same product and same trading type.
2.13 Account Summary
You can open “Account summary” from “View” in menu bar.
39
1
4
3
5
2
6
7
Figure 72
1.
2.
3.
4.
Click “Trading date” button, you can then choose the enquiry date from the pop up calendar.
Click “>” for advanced function.
The options shown after click a “Advanced function”.
Click “Show statement(daily)” and “Show statement(period)”button to view and print account
detail.
5. Click “Internal transfer” for transfer.
6. Click “Withdraw Margin” for withdraw fund application.
7. Click “Margin Deposit” for quick margin in.
Account name – Account holder’s name
Trading date – Current trading date
Base currency – The base currency of the account
Previous balance – Account balance of previous trading day
Margin deposit – Deposit amount within the trading day (include quick margin in)
Withdraw margin – Withdraw amount within the trading day
Profit/Loss – Actual profits and losses incurred within the trading day
Service commission – Total service charge incurred within the trading day (i.e. additional agency
fee for telephone trading)
Adjustment – Other adjustments to the account balance occurred
Balance – Actual fund amount in the client’s account, i.e. total margin of the client’s account.
Floating P/L – Sum of floating P/L based on real time exchange rates of the outstanding orders.
Effective margin – Trading equity of the account, it is calculated by balance plus or minus floating
profit or loss.
Necessary margin – Margin required holding existing orders.
Variation margin – Margin remained to place new order
Current Margin Percentage – The percentage devide Effective margin by Necessary margin.
Projected Margin – The percentage devide Effective margin by Necessary margin, reevaluate all
outstanding position according to current price.
For more detail about statement, Please refer to Chapter11.3.2 and Chapter11.3.3.
﹡
40
2.14 Product Facts
You can open “Product facts” from “View” in menu bar, here you can check swap interest of
trading products.
1
2
Figure 73
1. Click “View” in menu bar
2. Select “Product facts”
3
Figure 74
3. Click on “Sever trading date” button to choose the enquiry trading date.
Effective date –Interest shown for the specific date
Product - Interest shown by the appropriate product
Contract size – Contract unit of product
Buy interest – Interest received/paid by contract buyer
Sell interest – Interest received/paid by contract seller
Interest type – Appropriate interest type
41
2.15 Advance Quote
1
2
Figure 75
1. Click “ View” in the menu bar
2. Select “Advance quote”
3
5
4
6
Figure 76
3.
4.
5.
6.
Select appropriate product from the drop down menu.
Enter size
Click “Bid” button prompt market order window
Click chart button prompt chart (Refer to Chapter10 for detail about chart)
Figure 77
7. Click “Ok” to confirm
42
8
Figure 78
8. Click “close”
Chapter 3 System Settings
You can change the system settings, interface, password etc. by select “Preferences” and
“Window” in the menu bar.
Figure 79
Figure 80
3.1
3.1.1
Settings
Preferences
“Preferences” is form by “General”, “Advanced quote”, “Order entry”, “Chart”, “Quote” and
“News” six parts, through them you can personalize Horizon Pro III trading platform.
43
1
Figure 81
1. Click “ Settings” and select “Preferences”.
Figure 82
1. Click “General” tab, you can set “Toolbar” and “Account summary bar” to be “Show” or
“Hide”, you can also change the name of workspaces.
2. Click “Advanced quote” tab, “Confirm setting”, “Reply dialog setting” and “Font” can be
changed here.
3. Click “Order entry” tab, “Lot size”, “Order type”, “Confirm setting” and “Reply dialog
setting” can be changed here.
4. Click “Chart” tab, the interface of chart can be changed, also toolbar or outstanding order can
be chosen to show or hide.
5. Click “Quote” tab, can pick the display content and the font size etc.
6. Click “News” tab, can change the font and font size.
(i) General
Toolbar
44
Figure 83
1. Select “Show” in “Toolbar”
2. Click “Save”
3. Toolbar will be displayed below menu bar.
Figure 84
Account Summary
Figure 85
45
1. Select “Show” option in “Account summary”
2. Click “Save”
3. Account summary will be shown at the bottom of the trading platform
Figure 86
Workspace Name
Figure 87
1. Change workspace name
2. Click “Save”
3. Name change complete
Figure 88
(ii) Advanced Quote
Confirm Setting
46
Figure 89
1. Select “Show Confirm Box”
2. Click “Save”
If you have chosen “Show confirm box”, then when you place a trade on Horizon Pro III trading
platform, a confirmation window will pops up.
Figure 90
Reply Dialog Setting
By using this function, you can choose whether to receive system reply or not.
47
Figure 91
1. Select “Show all reply” to receive all system reply
2. Click “Save”
Font
Figure 92
1.
2.
3.
4.
Select font
Select type
Select size
Click “Save” and exit the setting window
48
(iii) Order Entry
Lot Size
1
2
Figure 93
1. Change contract size
2. Click “Save”
3. The contract default size in market order will be changed according to your setting.
3
Figure 94
49
Order Type
1
2
Figure 95
1. Select order type
2. Click “Save”
3. The order type in “Add limit open ticket” window will be changed according to your setting.
3
Figure 96
Confirmation Setting
You can choose whether you want the system pop-up confirmation window.
50
1
2
Figure 97
1. Select “Show Confirm Box”
2. Click “Save”
After you have chosen “Show confirm box”, then confirmation box will pop up when you place
trade on Horizon Pro III trading system.
Figure 98
Reply Dialog Setting
Using this function, you can choose whether to receive system reply or not.
51
1
2
Figure 99
Select “Show all reply” to receive all system reply.
1
2
Figure 100
Select “Don’t show successful reply” to not receive any successful system reply.
52
1
2
Figure 101
Select “Don't show all reply” to receive none of the system reply.
(iv) Chat
Look and Feel
You can choose different style of the chart.
Figure 102
Select “Dark”, the chart will be shown as below.
53
Figure 103
Show
You can choose whether to display toolbar or outstanding order, as shown in figure 105.
Figure 104
54
Figure 105
(v) Quote
Product
You can pick the products shown in the quote window.
Figure 106
1.
2.
3.
4.
Tick on the product you wish to shown
Click “Select All” to show all products
Click “Select None” to not show any products
Tick before the wanted information
55
5. Click “Select All” button to select all the information
6. Click “Select None” button to cancel all information
7. Click “Save” button to confirm setting and exit
Font
You can change market order window’s font and size.
Figure 107
1.
2.
3.
4.
Select font
Select type
Select size
Click “Save” to confirm change and exit
(vi) News
You can change news font and size in the news tab.
56
Figure 108
1.
2.
3.
4.
Select font
Select type
Select size
Click “Save” to confirm change and exit
3.1.2
Look and Feel
Figure 109
Through “Look and feel”, you can change your interface to “Elegant” or “Window”.
57
3.1.3
Layout
1
2
3
4
5
Figure 110
1.
2.
3.
4.
5.
Load layout
Save layout
Save layout as
Save layout on exit (if it is ticked)
Default layout
If you have “Save layout”, then next time you login to system it will automatically open up. “Save
layout as” function allows you to save more than two layouts.
Figure 111
1. Name the saved layout
2. Click “Save” button to save the layout
58
Figure 112
3. Click “Close” to complete
You can open saved layout by select “Load layout” option
Figure 113
1. Find the saved layout, click on the name of the layout or enter the name in the file name box.
2. Click “Open File” to load the layout.
3.1.4
Change Password and Service Pin
Figure 114
59
Figure 115
3.1.5
SMS Notification
From Settings “SMS Notification”, To receive mobile phone is now available that execution all
limit orders (Stop order/ OCO / if Done) and loss cut. Because it is already checked, if you do not
need to receive to your mobile phone, please remove the check. If the mobile number is not
registered, you cannot use this service.Also be delivered to the e-mail address already registered.
SMS mail is not a feature of all the corresponding mobile phone.
Figure 116
Figure 117
*
Because it is already checked, if you do not need to receive to your mobile phone, please remove
the check.
3.2
Window
“Window” provides you numbers of option so that you have various way to view.
60
3.2.1
Go To
Figure 118
1. Select “Go to” and select from the sub menu the window that you wish to be on top of others
3.2.2
Tiled Window
Figure 119
Using the function, all the opened window can be arranged automatically
3.2.3
Cascade
Figure 120
Using this function, you can cascade all the windows as shown below.
61
Figure 121
3.2.4
Minimize All
Figure 122
As shown below you can minimize all the information windows.
62
Figure 123
3.2.5
Close All
Figure 124
1. You can use this function to close all the windows.
63
Chapter 4 Account
You can switch in between FX, CFD or Commodity CFD account using “Account” in menu bar.
Figure 125
Click “Switch Account”
Figure 126
Select “Forex”, “Commodity” or “Index”
Figure 127
Click “Switch”
Figure 128
Click “Close” button
64
Chapter 5 Login and Logout
If it is the first you login to Horizon Pro III trading platform, as shown in figure 135, then click
“Accept” on the pop up security message window. This means you always trust the safety of data
transfer.
Run Horizon Pro III, login window will pops up. After you have opened a trading account with us,
we will send you login username and password. For more information, please fell free to contact
our customer service team.
Figure 129
. Enter your Login ID and password
2. Choose the preferred language in the drop down menu
3. Select which account you wish to login from trading account (1), trading account (2), trading
1
4
.
account (3) and demo account. If network problem incurred cannot login through (1), then
please try connection (2) or (3).
Click “Login” button
For the first time login, please follow step 5-14 to reset your password.
Figure 130
65
. Enter current password
6. Enter the new password
7. Re-enter the password
8. Click “Submit”
5
Figure 131
9
. Click “Close” button, reply window shows “Password changing complete”.
Figure 132
. Enter current service password
11. Enter the new service password
12. Re-enter the new service password
13. Click “Submit”
10
Figure 133
. Click “Close” button, reply window shows “Service pin changed successfully”
15. If you logout of the system from Logout under “Connection” menu(Refer to Chapter5.2 for
14
logout detail) rather than close the browser or program window(It depends on web version or
desktop version you use) , then the trading platform will switch to initial login window. You
can re-login to Horizon Pro III trading system by click “Login” in “Connection”.
Figure 134
66
5.1
Safety Certificate
Figure 135
1. Click “Accept” to trust the safety network data transfer from TOGAKU Securities Co., Ltd.
(Previous name: Easthill Japan Company Limited).
2. Click “More information” to receive more information on safety certificate.
5.2
Logout
If you did not logout the trading platform follow the correct procedure, next time you login, the
system will ask you to confirm your password. We would recommend you logout by using
“Logout” option in “Connection” to avoid such problem.
Figure 136
1. Click “Logout” option in “Connection”
67
Figure 137
2. Click “Ok” to confirm logout.
Figure 138
3. Click “ Close”
Χ
Otherwise, you can logout of the trading platform by click “ ” button.
Figure 139
Any methods other than mentioned above will be considered as illegal logout. Next time you login
to Horizon Pro III trading platform, warning message may appear.(Refer to Chapter5.3 for detail)
When you leave your computer or not using the trading platform, please make sure you have
logged out, this is prevent you from unnecessary lost by others.
5.3
5.3.1
Login Warning
Illegal Logout
If you logged out without follow the normal procedure, then password will be asked to confirm
when you login next time. We strongly recommend you to follow the normal procedure to sign
out.
68
Figure 140
1. Click “Close”
Figure 141
2. Tick “Override” to override last login detail
3. Re-enter the username and password and click “Login” button.
5.3.2
Override Login
If the following window pops up while you are using Horizon Pro III trading platform, it means
that your current trading account has been replaced by another new trading platform and has been
forced to logout.
This may occur in joint account. For individual account, if such situation occurs, we would
strongly recommend you to contact our client service team to ensure account security.
Figure 142
69
Chapter 6 Limit Order Type
To set up a limit order, you need to choose from
1) Daily/GTF/GTC (Daily/Good till Friday/Good till cancel or expiry date)
2) Limit/Stop loss/OCO/If done
6.1
Daily/GTF/GTC
Select “Daily” to set the limit order valid till the end of trading day. Select “GTF” to set the limit
order valid till the end of Friday. Select “GTC” to set the limit order valid till cancel or expiry date.
System will automatically cancel expired order(The order didn’t done until expiry date), but you
still can check them from “Limit Open Log”(refer to chapter2.9.3) or “Limit Settle Log” (refer to
chapter2.9.8).
Figure 143
6.2
Limit/Stop loss/OCO/If done
Limit is to buy at price lower than current price or sell at price higher than current price. When the
market price reach the set price the order will automatically execute.
Limit order must be 100 pips or above away from the current price.
Stop Loss order is to sell at price lower than current price or buy at price higher than current price.
When the market price reach the set price the order will automatically execute.
Stop loss order must be 100 pips or above away from the current price.
Limit and stop loss order is also relevant to buying or selling order.
If you are buying
● Lower than the current market price then use the Limit Price box
● Higher than the current market price then use the Stop Price box
If you are selling
● Higher than the current market price then use the Limit Price box
● Lower than the current market price then use the Stop Price box
OCO (One Cancel Other) is a combination of limit and stop loss order. To set an OCO order you
need to set both limit and stop prices. One order execute, the other one will be cancelled. Limit
70
and stop loss order must be set 100 pips or above away from the current price, also limit price and
stop prices must have 300 pips or above interval.
If Done order is a combination of limit open or stop loss orders with limit settle order. Only the
first limit open or stop loss order has been executed, the limit settle order will be then valid.
You can setup a If Done order in the following situation. For example, your trading strategy is to
short sell EURUSD at higher price, but current price 1.46500 is not your ideal price, you can then
set a limit open order at 1.47000. When market price goes up to 1.47000, your limit open order
will be executed. If you are worried the market will move again you and you want to keep the loss
in a reasonable range, you can then set up a stop loss settle order at 1.47300. Or if your judgment
is correct, you wish to take profit at 1.46200. This If Done order is only valid when your first limit
open order has been executed.
Your first limit open order must be set at 100 pips or above away from the current market price,
your second stop loss settle order or take profit order must be set at 100 pips or above away from
the limit open order price.
If you only want to set a limit price, then just tick “Limit Price” and enter the price you wish to set.
Figure 144
Enter price take the price in bracket as reference. As shown above, reference price is (>=1.25120),
i.e. valid for price above 1.25120, invalid price will be indicated in red.
If you only want to set a stop price, then just tick “Stop Price” and enter the price you wish to set.
Figure 145
Enter price take the price in bracket as reference. As shown above, reference price is (<=1.24909),
i.e. valid for price below 1. 24909, invalid price will be indicated in red.
If you want to set an OCO order, then just tick “OCO” and enter the limit price and stop price you
wish to set.
Figure 146
Enter price take the price in bracket as reference. As shown above, reference price is (>=1.25117,
<=1.24817), i.e. valid for price above 1.25117 and price below 1.24817, invalid price will be
indicated in red.
If you want to set an If Done order, then select limit price or stop price and enter price you wish to
71
set. Tick “If Done” and enter take profit or stop loss price.
Figure 147
Enter price take the price in bracket as reference. As shown above, reference price is (limit
price>=1.25123, take profit<=1.25050, stop loss>=1.25250), i.e. valid for price as set above,
invalid price will be indicated in red.
Figure 148
When you have selected Limit/Stop/OCO/If done order, reference price box will appear. You can
either manually enter reference price or use the up and down arrow to alter the price.
If the price you enter is green,it means the price is valid. Contrary,if the price is red,it means the
price you enter is invail,you should adjust it.
72
Chapter 7 Market Order
Click Bid or Ask button of the trading product in the quote window, market order will prompt.
Product, B/S type and current market price will show. You only need to enter the trading size and
submit the order.
1
Figure 149
1. Click “Bid” or “Ask” button on the appropriate product, market order window will prompt.
2
Figure 150
2. If you wish to set a limit settle order, then tick the box before “Add Limit Settle for New
Open Order”.
73
3
4
5
6
Figure 151
3. Set valid period of limit order: Daily/GTF/GTC (Valid for the trading day/Good till
Friday/Good till cancel or expiry date) Refer to Chapter6.1 for detail about Daily/GTF/GTC
4. Tick the box before limit or stop or OCO to select the limit order type Refer to Chapter6.2 for
detail about limit / stop / OCO
5. Enter trading size
6. Click “Submit”
(
)
)
(
7
Figure 152
7. Click “Ok” to confirm
8
Figure 153
8. Click “Close” to close the window.
*Only when you need to add limit settle for new open order, you then need to follow step 2, 3 and
4.
74
Chapter 8 Market Settle
8.1
Market Settle Order
1
Figure 154
1. Click “Settle” button on the outstanding order window.
2
4
3
Figure 155
2. Select trading size in the drop down menu.
3. If the outstanding order has related limit settle/stop loss order, and you wish to settle at the
market price, you can then choose from the following two options, auto reduce limit settle
size or custom reduce limit settle size
4. Click “Submit”
5
Figure 156
5. Click “Ok” to confirm
75
6
Figure 157
6. Click “Close”.
8.2
Complex Settle
If the product you choose to buy or sell at quote window already has opposite order, then prompt
market order will have the option of new market order and market settle order. You can open a
new position or settle your exiting position.
1
Figure 158
1. Click “Buy” or “Sell” button to settle existing position.
3
2
4
Figure 159
2. Select trading size
3. If the outstanding order has related limit settle/stop loss order, and you wish to settle at the
market price, you can then choose from the following two options, auto reduce limit settle
size or custom reduce limit settle size
4. Click “Submit”
76
Figure 160
5. Click “Ok” to confirm
6
Figure 161
6. Click “Close”
8.3
Market Settle and Customize Reduce Limit Settle Size
Settle existing order at market price, if existing order has limit settle or stop loss order, and after
order execution, remaining outstanding order is less than limit settle or stop loss order, then you
can choose auto reduce limit settle size or custom reduce limit settle size.
1
2
Figure 162
1. Follow the principle of “exit first enter last”, let the system to automatically reduce the size of
limit settle/stop loss order
2. Customize reduce the size of limit settle/stop loss order
If you choose to costomize reduce the size of limit settle/stop loss order, then “Custom Reduce
Limit Settle” window will pop up, you can select and change preset orders.
77
2
1
Figure 163
3
1. In order to execute market settle order, size of preset limit settle/stop loss order must be
reduced.
2. You can choose any orders that you want to cancel, but the total number of reduction order
size must be equal to the size set at (1).
3. Click “Submit”
Figure 164
4. Click “Ok” to confirm
5
Figure 165
5. Click “Close”
8.4
Market Settle and Hedge Settle
Because hedge settle require less margin than market open. So when you choose to settle part of
the orders, you may appear to have insufficient margin and therefore settle order can not be
executed. You can now choose to,
78
Figure 166
1. Select “Hedge Settle”(Refer to Chapter9 for detail about Hedge Settle)
Figure 167
2. Reduce the settle size
79
Chapter 9 Hedge Settle
Click “Hedge Settle” button in Outstanding Order, from the pops up window you can review all
the existing hedge settle orders. Click on the “Hedge Settle” button next to the product, “Hedge
Settle Ticket” will pops up. To use the hedge settle function, you must have hedge settle order.
This function applies to FX, CFD and Commodities CFD.
1
Figure 168
1. Click “Hedge Settle” button. If there are any hedge settle order exist, then hedge settle
window pops up
2
Figure 169
2. Click “Hedge Settle” button next to the product
3
4
5
Figure 170
80
3. Select settle size in the drop down menu. Note that size of buy order must be equal to the sell
order size.
4. If the outstanding order has related limit settle/stop loss order, and you wish to settle at the
market price, you can then choose from the following two options, auto reduce limit settle
size or custom reduce limit settle size(Refer to Chapter8.3 for detail)
5. Click “Submit”
Figure 171
6. Click “Ok” to confirm
81
Chapter 10 Chart
Chart shows the real time market movement. You can use the menu bar on top of the chart to
select the product, chart type and time interval, you can also add numbers of technical indictors to
the chart. When mouse move on the chart, there will be a set of blue vertical and horizontal line
follow to indicate your position. Vertical line shows time scale and relevant data, i.e. time, highest
price, lowest price, open price and close price, at the same time, date will be shown on the x-axis.
Horizontal line shows price, you can fine relevant price on the right y-axis.
You can open maximum 20 charts at the same time.(Refer to Chapter2.4 for detail)
10.1 Product
You can click “Product” button to open the chart of the product.
1
2
3
4
5
6
Figure 172
1.
2.
3.
4.
Print current chart
Save current chart. You can choose the size from 800 600, 1024 768
Copy current chart to clipboard. You can choose the size from 800 600, 1024 768
Export chart data. You can export the open price, close price, highest price and lowest price in
csv format.
5. Select the desired product to show on chart
6. Current time and date will show at the bottom right corner
×
×
×
×
82
10.2 Setting
You can choose “Dark”, “Light” or “Customize Color” to personalize chart interface. You can also
tick before “Show Toolbar” and “Show Outstanding Order” to show relevant toolbar on chart and
show outstanding orders.
Figure 173
10.3 Chart Type
There are three chart types that you can choose.
1
2
3
Figure 174
83
1. Line
2. OHLC Bar
3. Candle Stick (as shown in figure 174)
10.4 Time Scale
You can choose the time scale to be tick, 1 min, 5 min, 15 min, 30 min, hourly, daily or weekly.
Time sample point can be in the range of 100-2000 points, 100 points is the default setting. Select
smaller time scale (for example 100 points or 1 min), you can get more precise chart data.
However, by selecting bigger time scale (i.e. 1500 points or 2000 points), you can get broader
chart data. X and Y axes data range depends on time scale and sample point.
Figure 175
For example, 100 points hourly chart shows 100 sample points, every points provided price
changes within 60 min. As shown below:
Figure 176
84
For example, 1000 points hourly chart shows 1000 sample points, every point provide price
change within 60 min. As shown below:
Figure 177
10.5 Studies
To add technical indicator, you just need to select the appropriate indicator in the drop down menu
of “Studies”. If you choose “Delete All Studies”, you can choose to cancel technical analysis tools
in the pop up window. If you choose “Edit Study”, you can then alter the parameter of any
technical indicator.
Figure 178
85
If you want to add Average True Range (ATR) to the chart, you can alter the parameters and
display color in the pop up window, and click “Ok”, ATR will be added to chart.
Figure 179
Figure 180
If you want to add MACD to the chart, you can alter the parameters and display color in the pop
up window, and click “Ok”, MACD will be added to chart.
Figure 181
86
Figure 182
You can add the maximum of 4 technical indicators below the chart. (But some indicator is added
to the chart directly, such as moving average)
Figure 183
You can alter the height of technical indicator’s window. As shown in figure 183 and 184.
87
Figure 184
You can also delete added technical indicators. Click “Delete All Studies” in “Studies”, all
indicators on the chart will be removed. If you click “Delete Study”, you can select which
indicator you wish to delete.
Figure 185
Select the indicator you wish to delete in the drop down menu and click “Ok” to remove it.
Figure 186
88
10.6 Draw/View
1
2
3
4
5
6
7
8
9
11
10
12
13
14
15
16
17
18
19
Figure 187
. Delete Selected Tools: delete the tools selected on the chart
2. Delete All Tools: Delete all the tools on the chart
3. Horizontal Grid: Show horizontal grid.
4. Vertical Grid: Show vertical grid.
5. Cross Hair: Mouse over display relevant data
6. Shift Left: Show the 20 point future time.
7. Turn Off Line-Tool: Turn off tool function
8. Select Drawn Line: Gray box shown on top of lines when line has been selected successfully.
9. Zoom In: Select some area and zoom in.
10. Zoom Out: Select some area and zoom out.
11. Draw Trend Line: Draw trend line on chart, the color of the trend line is grey
12. Draw Projected Trend Line: Draw trend line on chart, the color of the projected trend line is
1
13
grey
Draw Horizontal Line: After select this option, left click on anywhere of the chart, a pop up
window like figure 189 will show
Draw Parallel Line: Add parallel line on chart
Draw Projected Parallel Line: Add projected parallel line on chart
Draw Arcs: Add arcs on chart
Draw Retracements: Add retracements on chart
Draw Fan Lines: Add fan lines on chart
Draw Cycles: Add cycles on chart
.
.
15.
16.
17.
18.
19.
14
89
Figure 188
You can change preset price and select the color of horizontal line, click “Ok” to add line to chart.
Figure 189
10.7 Zoom In
Figure 190
90
First select “Zoom in” in “Draw”.
Figure 191
Move mouse to start point of zoom in area, left hold the mouse.
Figure 192
On desired zoom in area drag mouse, then release the mouse.
91
Figure 193
Selected area will be zoomed in.
You can follow the same way to zoom out the chart.
10.8 Chart Order
Right click on the chart will pops up short cut menu, here you can place market order or set limit
order.
Figure 194
You can also set the chart to show outstanding order of the relevant product or not.
92
10.9 Chart Shortcut
1
2
3
Figure 195
. Click “Settings”
. Select “Show Toolbar” to show tools shortcut button
3. Click on the button for relevant function
1
2
93
Chapter 11 Account Related
11.1 Change Password
We suggest you change your password from time to time. Under “Settings” menu there is an
option of “Change Password”. Follow the instruction to enter the current password and new
password, click “Submit” and wait for password change successfully system reply.
Figure 196
Select “Change Password” in “Settings”, pops up window as shown below,
Figure 197
. Enter current password
2. Enter new password
3. Re-enter new password
4. Click “Submit”
1
Figure 198
94
5
. Click “Close”
11.2 Change Service Pin
Service pin is used for give authorization to customer service to place trade on your behalf.
Customer service can only login to your account by enter your service pin to trading platform.
Without your service pin, customer services will not able toe place trade on your behalf.
Figure 199
Select “Change Service Pin” in “Settings”, pops up window as shown below,
Figure 200
1.
2.
3.
4.
Enter current service pin
Enter new service pin
Re-enter new service pin
Click “Submit”
Figure 201
5. Click “Close”
95
11.3 Account Summary
Click “Account Summary” on “View”, you will be able to check current and past account
information. Click “Trading Date” button to choose the enquiry date from the pop up calendar.
1
Figure 202
1
. Select “Account Summary” in “View”
2
Figure 203
2
. Click “Trading Date” button, calendar pops up
96
Figure 204
. Select year
4. Select month
5. Select date
3
After you have selected date, account summary will automatically updated to the require date.
11.3.1 Simple Mode and Complex Mode
1
Figure 205
1. Click “>>” button, “Show Statement (daily)”, “Show Statement (period)” “Internal Transfer”
“Withdraw Margin” and “Margin Deposit” button will show.
97
2
Figure 206
∨
2. Click “ ” button to change “Account Summary” window to simple mode.
11.3.2 Show Statement (daily)
Click “Show Statement (daily)” button
1
2
Figure 207
1. Select trading date and click “Advanced Function”, “Show Statement (daily)”, “Show
Statement (period)” “Internal Transfer” “Withdraw Margin” and “Margin Deposit” button will
show.
2. Click top “Show Statement (daily)” button to view daily account summary
98
Figure 208
3. Click “Print” to print current information
11.3.3 Show Statement (time interval)
1
2
Figure 209
1. Select trading date and click “Advanced Function”, “Show Statement (daily)”, “Show
Statement (period)” “Internal Transfer” “Withdraw Margin” and “Margin Deposit” button will
show.
2. Click top “Show Statement(period)” button to view period account summary
Figure 210
99
3. Select time interval and click “Retrieve” button
Figure 211
4. Click “Print” to print current information
11.3.4 Withdraw Margin
Click “Withdraw Margin” button
1
2
Figure 212
1. Select trading date (can only choose current trading date)
2. Click “Withdraw Margin” button, pops up window as shown below
100
3
4
Figure 213
3. Enter withdraw amount
4. Click “Submit”
Figure 214
5. Click “Ok” button to confirm
Figure 215
6. Click “Close”
11.3.5 Internal Transfer
Click “Internal Transfer” button
101
2
1
Figure 216
. Select trading date (can only choose current trading date)
2. Click “Internal Transfer” button, pops up window as shown below
1
4
3
5
Figure 217
. Select transfer account
4. Enter transfer amount
5. Click “Submit”
3
Figure 218
6
. Click “Ok” button to confirm
102
7
Figure 219
7
. Click “Close”
11.3.6 Quick Margin In ( Resident of Japan only)
Click “Margin Deposit” button for quick margin in.
1
2
Figure 220
1. Select trading date (can only choose current trading date)
2. Click “Margin Deposit” button, pops up window as shown below
3
4
103
Figure 221
3. Enter trading amount
4. Click “
”
送信
5
Figure 222
はい” button , The bank screen will render as figure221.
5. Click “
Figure 223
104
6
Figure 224
6. The quick margin in is finish if “Margin Deposit” same with trading amount.
105