1
SCDMH EMR USER MANUAL
(revised 07/23/10)
Table of Contents
Introduction
Page
2
Getting Started: How to Log on to the EMR
3
The EMR Home Screen: How to Navigate the System
3
Electronically Signing Forms
5
Client: Selecting a client
Client: Consent Forms
Client: Import Link
6
9
10
Plan of Care: Working with the POC
15
Progress Summary: Working with the Progress Summary
20
Reviewer Selection: Providing for Reviewer Signatures
21
Revoking a POC or Progress Summary submission
22
Caseload Management
Reviewing POC Records: Records to Review Queue
Staff Module: Administering EMR Users
22
23
24
Clinical Notes:
Clinical Notes:
Clinical Notes:
Clinical Notes:
Clinical Notes:
Clinical Notes:
Clinical Notes:
Clinical Notes:
Clinical Notes:
27
29
30
31
35
40
43
45
48
Entering Clinical Documentation
Group Forms
Clinical Service Note (CSN) Form
Initial Clinical Assessment (ICA)
Initial PMA (H012 Initial)
Follow up PMA (H012)
Medical Management Program (MMP)
Medication Monitoring Form (H021)
Telepsychiatry ED Module
Appendix A – Sample Clinical Forms
Appendix B – Sample Consent Forms
Introduction
Electronic medical records (EMR) are a fundamental component of health information
technology that will transform our healthcare system. EMR technology will eventually
feed data to Regional Health Information Networks (RHIOs). RHIOs will, in turn,
connect into a National Health Information Network to provide seamless access to critical
medical information no matter where it is needed. Information technology is not the endall-be-all to fix our healthcare system, but it will be a major stepping stone toward
streamlining and improving continuity of care. Information technology (IT) has
revolutionized most major industries. Yet the most vital industry of all --- healthcare,
including behavioral healthcare --- is one of the last to embrace the full benefits of IT.
Healthcare consultants estimate that while the financial services industry spends over 7%
of its budget on IT, the healthcare industry spends only 3%. Instituting a standardized,
nationwide EMR network will not be easy. Each provider will need to assign resources to
implement an EMR, forcing change and adaptation. Change is hard and every
stakeholder must be convinced of the benefits. This includes patients who fear their
privacy being breached, doctors who believe EMRs threaten their practices and hospitals
and clinics that wonder how they are going to pay for such a huge undertaking.
Improving client outcomes is the priority at DMH. We must do what we can with
available resources to enhance existing systems with clinical features, moving toward a
fully realized EMR. Staff access to computers, though limited in the past, will naturally
improve as a consequence of useful clinical modules being developed. An incremental
approach based on adding clinical functionality to existing systems, standardizing online
forms, imaging medical records where appropriate and providing access to clinical
reports will combine to create a reasonably low risk course of action to improve clinical
workflow and client care outcomes.
The Office of Network and Information Technology (ONIT) partnered with SanteeWateree CMHC staff to develop an EMR based on one developed for Santee-Wateree.
This new system, with many additional features, has been successfully piloted at Santee
Wateree and is now being implemented at other centers. The purpose of this User
Manual is to provide detailed feature documentation and to prepare staff to use the
system to streamline and enhance the delivery of services to our clients. Please give us
your feedback on this manual. We want it to be a valuable reference guide. Help us make
it better. Send your feedback to EMR support staff by choosing Email Help Desk from
the EMR Home Screen.
Lastly, it is important to note that adopting an EMR does not change clinical protocols,
pathways or standards of care and is not intended to replace a physician’s judgment in
treating clients.
2
Getting Started: How to Log on to the EMR
Start Internet Explorer and either enter the URL (https://emrnet/emr) or click on the EMR
link from the DMH Intranet home page and you will be presented with a log on screen.
You must identify yourself with your unique CIS/EMR user identification (user id) and
password. (Hint: This password is not generally the same as your Novell password
which you use to log your PC onto the network.) After successfully entering your
CIS/EMR userid and password and clicking log on you will be taken to either a select
facility screen or the EMR Home screen.
If your logon is unsuccessful, please check the message above the login prompt. Verify
that the caps lock is off and re-enter your userid and password. If you are still having
problems please contact your local systems administrator. (Hint: If the local SA can’t
solve the problem or is unavailable, then please contact the ONIT Response Line at 803935-5550 or email helpdesk with the details of your problem.)
EMR sessions are associated with specific facilities (Centers or Hospitals). You can only
work with one facility at a time. If you are registered at multiple facilities then you will
be prompted to select the facility with which you would like to work during this session.
Simply click the down arrow and a list of facilities for which you are registered will
appear in the drop down. Click a facility and click go. (Hint: You can change the facility
later inside the application if you wish.) If you are not registered at multiple facilities
you will not see the select facility screen because this will default (be automatically
selected by the application) and you will see the EMR Home screen.
The EMR Home Screen: How to Navigate the System
This is home base or the Home screen for the EMR and is mainly used to navigate to the
various component modules of the system. The Home screen also displays a count of
items that need attention and a daily appointment list. It is important to familiarize
yourself with the features of this screen because many details are repeated on other
screens within the EMR. The horizontal burgundy bar located just under the DMH logo
contains navigation links to the major EMR components. It is consistent throughout the
EMR. (Hint: clicking on the Home link at the far left side of the navigation bar always
takes you back to this screen from anywhere within the EMR.) The blue bar down the
left side of the screen contains some additional links as noted below.
Home Screen: Top (Burgundy) Navigation Bar Links
• Home: this page
• Client: Look up a specific client’s information
• Staff: Manage EMR users (available to selected administrative staff)
• Plan of Care: View and manage client case load Plans of Care and Progress
Summaries
• Scheduler: Schedule and manage client appointments
• Clinical Notes: Document services rendered to clients
3
Home Screen: Side (Blue) Navigation Bar Links
• Email Help Desk: send a note to the EMR support staff
• Client Signature: select a client and a form for the client to sign electronically
• Change Password: change your EMR/CIS password (Hint: this will not affect
your electronic signature password which is the same as your Novell password).
Home Screen: The overview sections represent
• Review items - POC items that require the user's review/signature
• Rejected items - POC items that were rejected by the reviewer
• Clinical Notes Due - Clinical Notes items that are due/past due
• POC or PS Due - POC items that are due/past due
Home Screen: Switch Facility to
This feature at the top right of the Home screen allows you to switch the facility
whose records/information you want to work with. This feature allows switching
facilities without having to logout and log back in and is exclusively for users who work
at multiple facilities.
Home Screen: Switch User to
This feature at the top right of the Home screen allows supervisors to view and,
within limits, act on the work of their subordinates. The dropdown contains all the users
under the current user in the subordinate hierarchy (i.e. includes all of the user’s
subordinates, as well as all of their subordinates, etc.). An example would be a
supervisor could switch to and view a subordinate’s Plan of Care caseload.
Home Screen: Logout
For security reasons please remember to log out at the end of your session using this
logout link in the upper right corner of the screen.
Home Screen: Quick Search
This feature on the right side just under the navigation bar is a short cut which
allows looking up a specific client’s information without having to first go to the Client
link. Once a search criteria is entered and the enter key is pressed, the Client screen will
display with any matches found.
Search criteria are handled as follows:
• A numeric entry will search on the client id (CID)
• Entries matching nnn-nn-nnnn (where n is a number between 0-9 and yes, you
do enter the dashes) are searched based on social security number
• Alphabetic entries are searched based on the client’s last name
• Alphabetic entries separated by a comma are searched based on the client’s
last name, first name (e.g. “Doe, Jane” searches for clients named “Jane
Doe”).
4
(Hint: when searching by name you can use a wildcard search to locate all names that
begin with what you enter – e.g. typing “Jo” will match Jones, Johns, Johnson, etc.)
Home Screen: Email Help Desk Screen
This screen allows you to send a message directly to the EMR support staff. Please do
not include any confidential information in your message.
• Select a subject from the drop down choices
• Write your message
• Press the “Send Message” button
EMR support staff will respond to your message as soon as possible. We appreciate
feedback and take it seriously. No system is perfect and we fully expect to continuously
improve the EMR with your help.
(Hint: This is not the same thing as using GroupWise to email the “helpdesk.”
“Helpdesk” is a special user id set up in GroupWise to allow communication directly
with the ONIT Response line about such things as network problems or Novell log on
problems when the local Systems Administrator is unavailable.)
Home Screen: Diagnosis Discrepancies table
When the system detects a difference between CIS, POC and PMA diagnosis codes for a
client on the user’s caseload, a table labeled "Diagnosis Discrepancies" will appear on
the EMR home page. It will list the number of clients with discrepancies.
To view the clients that have discrepancies click on the "Show/Hide List" link following
the number of discrepancies. To view the specific discrepancy, click on the "Show/Hide
Details" link next to the client. A table will appear listing the diagnosis for CIS, POC,
and PMA with differences highlighted in blue.
Electronically Signing Forms: Signature Authorization screen
The first time the user attempts to sign a form during an EMR session he/she will be
presented with the Signature Authorization screen. This is a simple screen that asks for
a Signature ID and a Signature Password. Enter your Novell User id and Novell
password. This is the same user id and password that you use to log your PC onto the
network after you first turn it on. Make sure your Caps Lock key is not on when typing
your password.
Your Novell user id and password used for signature authorization may be different from
your EMR/CIS user id and password used to sign onto the EMR or CIS. We know this is
confusing. This unfortunate situation will be remedied with technology called “single
sign-on.” Although this will require additional funding we are hopeful that eventually
we’ll be able to implement this to makes things a bit easier for you.
5
Important Note: This screen will only appear once per login. It comes up the first time
you attempt to sign a form. Subsequent signatures will use the same credentials as those
entered on the first signing and will not require re-entry of signature id and signature
password. Please make sure your computer is secured during any absence. If you will be
gone for an extended period either log out of the EMR application (preferred) or lock
your workstation (press ctrl-alt-delete and then press the “Lock Workstation” button).
Client Signature – POC:
To obtain a client’s signature on a POC go through the Client Signature link on the
home page. (Hint: To obtain a client’s signature on a Consent Form go through the
Client tab to find the client. Then click on the Consent tab, select the consent form and
fill it out. When you reach the client signature area it is similar to the following.)
You must locate the client who will be signing a form. Entering a CID or SSN will
return only one record when there is a match. Entering a first or last name may return a
list of clients from which to choose.
(Hint: when searching by name you can use a wildcard search to locate all names that
begin with what you enter – e.g. typing “Jo” will match Jones, Johns, Johnson, etc.
If you do know the entire name it’s best to type it in completely because this will lessen
search time.)
Select (by clicking on) the desired client in the list resulting from the search. The next
screen will present a list of forms that are available for the client to sign with an icon in
the last column to indicate if this form has been previously signed by the client.
Select/click on the desired form.
On the next screen there will be several fields to fill out as well as a read-only version of
the selected form for the client and/or clinician to review. Once the form has been
reviewed please select one of the radio buttons at the top of the screen:
• Accept Plan
• Decline Plan
• Patient Refused to Sign
Unless Patient Refused to Sign was selected you must now click the Capture
Signature button. A window will pop-up to display the captured signature. Use the
signature pad to let the client sign and press Ok on the pop-up window. The captured
signature should now appear in the space beneath the Capture Signature button.
Once the signature is captured or the Patient Refused to Sign button is selected you
must enter your signature user id and password – this is your Novell user id and
password; the same as when signing any other form (see signature section for details).
Press the submit button. The signed form will then be presented for your review.
Change Password Screen:
To change your EMR/CIS password:
6
•
•
•
•
Click Change Password on the blue side navigation bar.
Enter your current password
Enter your new password twice (this is to minimize the chance of mistyping it)
Click the submit button
Client: Selecting a client
The Client link takes you to a client search screen that allows you to look up a summary
of the client’s information, such as medications, allergies, POC, medical notes, schedule,
etc.
To locate a client make sure you are on the Search link of the Client screen. If necessary
click the search link to display the search form. Enter information in the search form to
identify the client (CID or SSN is easiest as they are discrete identifiers).
• If you are entering the CID or SSN you do not need to fill other fields.
• When searching by name you can use a wildcard search to locate all names that
begin with what you enter – e.g. typing “Jo” will match Jones, Johns, Johnson,
etc. If you do know the entire name it’s best to type it in completely because this
will lessen search time.
• You can select to search only the center you are logged in to (see upper right of
screen), all centers, or a list of centers by clicking the appropriate radio button.
When selecting a list of centers you can select multiple centers by holding down
the control key (often labeled “Ctrl”) and clicking the centers you want. Each
highlighted center will be searched for matches to your entered criteria.
• You may choose to show discharged patients by selecting the appropriate radio
button.
If the search criteria were specific enough to return only one match then that client is
automatically selected. If the search criteria return multiple possible matches they are
presented in a list. Select the client whose information you would like to view by
clicking on that entry. To revise your search click on the Search link to re-display the
search entry form.
Client: Overview link
Once a client is selected their information will load and a new set of links will appear
allowing the user to browse the client’s information. By default the Overview link will
be selected. This link provides general information about the client, such as demographic
information, diagnosis, allergies, and medications.
If there are any alerts associated with the client then a notification will appear on the
Overview link screen. Select the Alerts link for details on any alerts.
7
If the client has multiple admissions each link will have a list of admissions to select
from, with the selection defaulting to the currently active admission. (Hint: Selecting a
different admission will change only the “admission related” information.)
Client: Goals link
The Goals link will display the client’s goal(s) which were entered on the Individual Plan
of Care (POC). To view the plan associated with a goal click the View Plan.
If the client is in the user’s case load and the plan associated with the goal has not been
submitted as complete, there will be an Edit link in place of the View Plan link allowing
the user to directly edit the plan containing the selected goal. Goals that are associated
with an expired Plan of Care will be listed as Inactive. To add a new goal to the current
Plan of Care click on the Add/Update goals link above the goals list. If the current Plan
of Care has already been submitted as complete (electronically signed) this will open an
addendum to add new goals to the plan.
Client: POC link
The POC link will display an overview of the client’s Individual Plan of Care (POC). If
the client has any closed series POCs they will display in the POC History section. If the
client is in the user’s case load, then this screen will act very similar to an entry on the
Plan of Care case load screen. If the client is not in the user’s case load, clicking on the
icons will present read-only versions of the forms. Please refer to the Plan of Care
section for more details on a POC series and rules as well as the meaning and actions of
the various icons and sections.
Client: Med. Notes link
The Med. Notes link will display a list of the client’s medical notes. The owner of the
form will have the ability to modify them. (Hint: The owner of a form is the user who
originally created the form.) Medical Notes will be presented with all the forms that need
to be completed as well as those that have been completed. Click the radio button on the
left to interact with a form. Users who are not owners (creators) of a form will be
presented with view-only versions of the completed forms.
Client: CSN link
The CSN link will display a list of the client’s clinical service notes. Forms that need to
be completed as well as those that are complete will be presented. The owner of a form
will have the ability to modify the form. Click the radio button on the left to interact with
a form. Users who are not owners of a note will be presented with a view-only version.
Client: Appointments link
The Appointments link will display a list of all appointments for the selected admission.
A graph will also be presented to give an overview of appointment(s) status. Add an
appointment by clicking the Add Appointments link above the graph. View/update
appointment details by clicking on that appointment’s entry in the list. Updating is
available only if the appointment is both in the future and has a status of pending.
Client: Meds link
8
The Meds link presents more detailed information about the client’s medications and
allergies than the overview link.
Client: History link
The History link displays (for the selected admission) a graph of the client’s GAF scores,
diagnosis information, and active medications and allergies, and CAFAS information if
available. To view the exact date and score on the GAF chart the user can move the
cursor over a data point on the graph and this information will pop up.
Client: Alerts link
The Alerts link will default to displaying all the alerts associated with the client. Add a
new alert by clicking on the Add Alert link above or below the alerts list. Update an
alert by clicking on the Edit link in the Action Column of that alert. Delete an alert by
clicking on the Delete link in the Action Column of that alert.
Selecting Edit or Add will display a new window. Selecting Edit to update an existing
alert will pre-fill existing information. Selecting Add will bring up a blank alert form.
Fill or update the fields as needed and click the Submit button.
Deleting an alert will present a confirmation prompt. Verify that you are deleting the
correct alert before proceeding. Click the Delete button to confirm the deletion.
Client: Consent Forms (see Appendix B for sample forms)
Consent forms are available from the consent forms tab on the client screen:
1. Medicare Auth.
2. Medicaid Auth.
3. Private Ins. Auth.
4. Disclosure Auth.
5. Request to Amend Protected Health Info (PHI)
6. Income Verification
7. Exam/Treatment consent
8. Follow-up contact
9. Request to inspect PHI
10. Neuroleptic consent (English/Spanish)
To start a new copy of a consent form click the circle with the ‘+’. If there is a current
consent form the description next to the ‘+’ turns into a link and can be clicked to view
the form. Each time a new consent form is signed that link will show the latest. There is
an ‘Archive’ link at the bottom that shows all forms in chronological order. Use this if
access to a previous copy of a form is needed.
Note: The forms do not allow saving for later completion. They need to be completed in
one session.
9
The basic procedure is to fill out the form, and then the client and the witness sign
electronically to complete the form.
The following forms deviate from the standard procedure in some way.
• Request to Amend PHI and Request to Inspect PHI
Once the form is signed and completed, clicking on the link next to the ‘+’ brings up
an option to grant/deny the request in addition to a PDF copy of the request. Select
the grant/deny link and fill out the form to grant or deny the request.
• Income verification
This form can have up to 3 times where ‘No Proof’ is selected.
• Exam/Treatment consent
Once this form is completed for an admission, clicking on the ‘+’ will ask the user if
they want to create a new form or add signatures to the existing form. Clicking on the
link next to the ‘+’ (once a signed form exists) shows the original consent and
provides links to allow viewing ‘additional signature’ forms that were added after the
original consent.
Client: Import Link
The Import link will allow any documents to be incorporated into the Electronic Medical
Record as long as they have been converted to the Portable Document Format (PDF).
(Note: These documents must be PDF files and no other file type will be accepted. If you
need help in converting other file types to PDF please get in touch with your SA.) These
documents are associated with a specific client and are also identified by a date and a
document type. This identification process will be useful when searching for this
information at some future time.
In order to have access to the Import link the user must have the Import Records role or
the Clinical role (see Staff Module: Role Link).
The screen is divided into two sections, import and view.
Client: Import Link – Import New File
This section will only appear if the user has the Import Records role. All three fields on
this section are required to import a document. The Type of Record field is a drop down
to choose the document type. The Record Date is the date on the document (not the date
it is being imported). The Record Date cannot be in the future. The File to Upload can
be typed in or chosen using the Browse button. If the file name is typed, it must include
the full path name of the file (i.e. C:\PDFS\myfile.pdf). The Browse button opens a
standard windows file selection window. Once all three fields are completed click the
Save PDF button.
10
A verification screen will appear. At the top are two buttons Import and Cancel.
Underneath the buttons are the Type of Record and Date of Record that were entered on
the previous screen. Below is the PDF. The purpose of this screen is to manually verify
that the PDF is the correct one and that the type and date are correct. If any of these are
not correct, click on the Cancel button and it will return you to the previous screen with a
message, Importing PDF Canceled. If correct click the Import button and the PDF will
be imported and you will be returned to the previous screen with a message, PDF import
successful.
Client: Import Link – View Existing Imported Records
This section will appear if the user has either the Import Records role or the Clinical role.
The only field required on this screen is the Type of Record. Again this field is a drop
down, but there is an ALL choice in the drop down. The ALL choice will not limit the
search by type. The other fields are not required, but will limit the search for efficiency.
These are the Beginning Record Date, Ending Record Date, and Only Search Current
Admission. The date fields can be used separately. If only the beginning date is entered,
the search will be from that day forward. If only the ending date is entered, the search
will be from that day backward. By default, this search will include information from all
admissions. If you only want to search the current admission, click the check box Only
Search Current Admission. Once you have entered all of your search criteria, click the
Search button. If your search does not find any imported records, you will be returned to
this screen with a message No Imported PDFS Found. If your search does find
records, you will be presented with a list of records that matched your search. Above the
list are four buttons Select All, Unselect All, View Selected, and Cancel. These
buttons are repeated below the list. The list has three columns. The Select column is a
check box to select the record as one you would like to view. The Type of Record
column lists the type. This column is blank unless the type of record is different than the
record above it. The final column is the Date of Record. The headers for both the Type
of Record and Date of Record columns are links that will sort the results.
The Select All button checks the select box by all records. The Unselect All button unchecks the box by all records. View Selected displays a new screen. The bottom of the
screen shows one PDF at a time with three buttons and a counter above the record. The
buttons are Next, Prev, and Return. The Next and Prev buttons will be grayed out if
you are at the end of the list. For example, if you are on the first record the Prev will be
grayed out. If you are on the last record, the Next button will be grayed out. If only one
record was selected then both buttons will be grayed out. The Return button will return
you to the first Import records screen. On the right is a counter to let you know where
you are in the list of records. Below the buttons are the labels Type of Record, Date of
Record and Date/Time of Import.
If the user has the Import Records role, there will be an Update Record section with two
fields above the record. This section is to change the Type of Record and Record Date
of a previously imported record. If the record is to be changed, both fields are required.
Once you click Update PDF, the record will be updated and you will be returned to the
main Import records screen with a message PDF update successful.
11
Plan of Care: Working with the POC
Selecting the Plan of Care top navigation link will display the user’s case load. If the
user does not have a case load then a list of forms that have been submitted for review
will display. If the user has a case load as well as records to review, then the case load
will display by default with a link above the Urgency Sections box to display the review
items.
Plan of Care: Urgency Sections
The case load is divided into three sections indicating the urgency of attention needed for
each Plan of Care: urgent (attention needed now), warning (attention needed soon) and ok
(in compliance). By default only the urgent and warning sections are displayed. To view
the Plans of Care that are in compliance please check the In Compliance checkbox in the
15
Section Selection box at the top of the screen and press the Go button. The user can use
the Section Selection box to determine which sections to display. The sections will
always be listed from most urgent to least urgent. Urgency is determined for a given
series as follows.
•
•
•
Urgent – No plan or one of the mandatory progress summaries is past due
Warning – One of the mandatory progress summaries is due soon
OK – Plan completed and no mandatory progress summaries due soon
Plan of Care: Action Items
This link will list rejected and completed forms. Rejected forms will automatically
disappear from the list once they have been modified. Clicking on a rejected item will
take you to the same screen as if you clicked on it in the caseload screen. Clicking on an
item in the completed list will open the completed form (PDF). Completed forms will
remain until they are removed by either checking the box next to them in the list and
clicking the remove button or by clicking the remove button at the top of the page that
comes up when you click on an entry in the completed list. The purpose of Action Items
is to make it easier for users to track rejected items and to print completed items.
Plan of Care: Sorting
The case load can be sorted by date, client id, admission number, client name, and
admission date. Sort the case load by clicking the appropriate sort header. Clicking the
same header again will reverse the direction of the sort. The sort selection and direction
are indicated by the arrow next to the header. (Hint: Each section will be sorted
separately – e.g. Attention Needed Now will be sorted separately from Attention
Needed Soon, etc.)
Plan of Care: Selecting Client(s)
The case load can be filtered to display only records matching one of the following
criteria (or filters).
• By CID - To show only the records for a given client enter the client id (CID) in
the List by Client ID field and press the Submit button adjacent to the field.
•
By Last Name - enter a client’s last name and press the submit button next to the
field to display all clients with the provided last name. (Hint: when searching by
name you can use a wildcard search to locate all names that begin with what you
enter – e.g. typing “Jo” will match Jones, Johns, Johnson, etc. If you do know the
entire name it’s best to type it in completely because this will lessen search time.)
If a filter returns multiple entries, then those entries will be listed in their respective
urgency sections beginning with the most urgent. (Hint: To reverse the filter and view
the entire caseload again please click on the Show All button below the filter boxes.)
Plan of Care: Multiple Pages
Case loads with many entries are divided over multiple pages (screens). To select how
many entries are visible per page select an entry from the Records per page drop down
16
list. If multiple pages are necessary to display all the case load entries, then the user can
select which page to display by clicking the appropriate entry range link displayed below
the Records per page drop down list. If all case load entries are displayed on a single
page then there will be no entry range link displayed.
Plan of Care: Row/Series
Each entry or row on the Plan of Care screen represents a series. Each series represents a
Plan of Care and any associated forms, such as addendums or progress summaries. Each
item in a series has a status icon. Refer to the icon legend for their meaning. Clicking on
the icon will cause the appropriate action. (Hint: “Plan Not Started” and “Disabled/Not
Available” icons do not have an action associated with them.)
Plan of Care: Progress Summaries
Progress summaries 1-4 are listed as separate items (labeled PS1, PS2, PS3, and PS4) and
one is due every 90 days. If a progress summary is needed between those 90 day periods,
then an Other PS should be created. Other PS (Other Progress Summaries) and
addendums can be added any time there is a completed plan. PS1 requires that a
completed plan be present and that the current date be (at most) 30 days prior to the
progress summary’s due date. PS2-PS4 Progress Summaries require that the previous
Progress Summary be completed and that the current date be (at most) 30 days prior to
the progress summary’s due date. Progress Summaries will change to a state of "warning"
(attention needed soon) 30 days prior to their due date.
Other PS should be used to add a progress summary that is not part of the standard four
progress summaries series.
Plan of Care: Addendums and Rollover
Addendums are used to add goals or services to a completed plan. Rollover is used when
either the current Plan of Care has expired or when the current Plan of Care requires
reformulation. A Rollover will create a new series with a new Plan of Care. (Hint:
Progress Summary due dates are not related to the Plan of Care, they are based on the
admission date; therefore doing a Rollover will not change the due date of the next
Progress Summary.)
Plan of Care: Start New or Update
To start or update a Plan of Care click on the icon in the Plan column of the case load
screen. The EMR attempts to pre-fill the diagnosis from existing data. If there is no
diagnosis or if it needs to be altered, please enter a valid diagnosis code and press either
the Enter or Tab keys or click into another field. If the diagnosis code is valid the
description will fill in automatically.
Plan of Care: Goals/Objectives/Interventions
The plan must have at least one Goal which has one Objective which in turn has one
Intervention.
Adding Goals: Each goal will have at least one objective associated with it. To
add a goal click the “+” (add item) icon following the last goal on the plan.
17
Adding Objectives: Each objective will have at least one intervention associated
with it. To add an objective click the “+” (add item) icon following the last objective for
the goal to which you want to add an objective.
Adding Interventions: To add an intervention click the “+” (add item) icon
following the last intervention for the objective to which you want to add an intervention.
Target Date: Each objective will have a target date. This must either be an actual
date in the mm/dd/yyyy format or the word “ongoing” if it is an ongoing objective.
Ongoing objectives will carry over their value on roll-over (i.e. when new plan is due or
the plan needs to be reformulated). Objectives with dates will have their date fields reset
to be blank on roll-over.
Deleting a Goal/Objective/Intervention: To delete a goal/objective/intervention
click the “X” (remove item) icon next to the desired item. NOTE: all the sub-items
associated with the deleted item will also be deleted. This means any interventions
associated with a deleted objective and any objectives associated with a deleted goal will
also be deleted.
NOTE: you can not delete the last item in a set. There must be at least one Goal, each
goal must have at least one objective, and each objective must have at least one
intervention.
Plan of Care: Services
A plan must have at least one service. Select the service, frequency, and type of staff
from the drop down list.
•
•
Add a service: Click the “+” (add item) icon below the last service
Delete a service: Click the “X” (remove item) icon next to the service you want
to delete. (Hint: There must be at least one service remaining. You cannot delete
all services.)
The POC and Addendum allow selecting multiple entries for "Type of Staff" for each
service. A maximum of 4 items are displayed at a time. If more than 4 are available there
will be a scroll bar next to the box that can be used to see the remaining items. There are
two ways to select more than one item in the list
•
To select consecutive items, hold down the shift key, click on the first entry (type
of staff) you want to add, then while still holding down the shift key, click on the
last item (type of staff) you want included. All the items in between the first and
last will now be highlighted. You can now release the shift key. To undo the
multiple selections simply click on an item without holding the shift key; this will
make that the only highlighted item.
•
To select multiple items (not necessarily consecutive in the list), hold down the
control key (usually labeled "ctrl” and found under the shift key). While holding
18
down the ctrl key select the specific items you want highlighted. Only the items
you click will highlight (as opposed to the items in between also being
highlighted). Once all the desired items are selected release the ctrl key. To undo
the selection click on an item without holding down any keys; this will make it
the only selected item.
Plan of Care: Diagnosis Codes (DSM-IV-TR)
The POC accepts up to 6 regular DSM-IV-TR diagnosis codes and up to 6 rule-out
diagnosis codes. The program will alert the user if there are more diagnoses in CIS than
on the POC and present a button to add them to the POC. Type in the diagnosis and
press enter, tab, or click outside the diagnosis field for it to retrieve the diagnosis
description.
•
If you enter a diagnosis that only has one description and press enter or move the
cursor out of the diagnosis code field it will automatically populate the description
field.
•
If you enter a diagnosis that has multiple descriptions a window will pop up when
you either press enter or move the cursor out of the diagnosis code field. It will
have a list of links - one for each description. Select the one you want by clicking
on it, which will close the pop up window and set the description to the selected
one.
•
If you want to change the description after selecting one you will have to click in
the diagnosis code field and press enter. This will allow the list of descriptions to
once again appear for your selection.
•
To add more than the standard two diagnosis codes click on the [+] next to the
"Additional Diagnosis" header. The program will try to pre-populate the
"Additional Diagnosis" fields from CIS. If there is a discrepancy between what's
in CIS and what's on the POC the user will be alerted (i.e. it will list the "active
diagnosis" from CIS under the applicable diagnosis field).
•
To add rule-out diagnoses click on the [+] next to the "Rule-out diagnosis"
header.
•
To delete a diagnosis click on the [x] next to the field you wish to delete.
•
Rule-out diagnoses are free text fields limited to 30 characters.
Plan of Care: Save (finish later), Sign and Save, or Cancel
You may either save a plan for later completion or electronically sign (completing your
part of the process) and save it. Saving for later completion does not enforce any rules
such as filling in required fields and will not prompt you to sign it or choose a reviewer.
19
It’s merely a convenient way to pause your work on the plan and save it so you can come
back to it later. You will be able to pick back up right where you left off. Electronically
signing a form completes your part of processing the form and saves it with your
electronic signature which includes a date and time stamp.
Save (finish later): To save a plan for later completion click the Save (finish
later) button. You will not be prompted to fill out any missing required fields. You will
be returned to the case load screen. You can continue working on the plan at any time.
Sign and Save: Click the Sign and Save button. This will check that all required
fields have been filled out and then send you to a screen to select a reviewer if
appropriate. After the reviewer is selected (or if no review is required) and if it’s the first
time then the signature screen is displayed. After signing the plan it cannot be updated
unless submission is revoked before the plan is completed. Once the plan is completed
(meaning all necessary signatures are present) the plan can no longer be revoked. To add
goals or services to the plan use the Addendum on the main Case Load screen. To
reformulate the plan use the Rollover function on the main Case Load screen.
Cancel: This cancels any changes made to the plan and returns the user to Case
Load screen.
Once a form has been signed and submitted for review the status icon on the Case Load
screen for that form will change to indicate it is in a submitted status. It will remain in
this status and with this icon until the form has the highest required signature (currently
MD for Plan of Care/Addendums, MHP for Progress Summaries). Once all signatures
are present then the form’s status will change to complete.
Until the form is completed the submitting user has the ability to revoke the submission
to either make corrections or submit the form to a different staff member.
Plan of Care: Unlocking a POC
Once a POC is completed, it is locked but you have the ability to unlock the form. Only
forms in the active series can be unlocked. Unlocking a form will require re-signing that
form and all subsequent forms. For example, if a plan is unlocked after 2 progress
summaries associated with that plan have already been signed then those summaries will
be unlocked in the order they were signed once the plan is completed. This is to ensure
that changes to the plan (such as adding goals or objectives) are reflected in the
summaries and addendums. an unlocked series can be identified by the check mark + "x"
icon for all items except one - which has a check mark and pencil icon. The user needs to
keep following the checkmark and pencil icon as it moves across the series (i.e. it
indicates the current item that needs to be re-signed).
To unlock a POC form:
•
Click on the icon associated with the signed form you wish to unlock.
20
•
•
•
•
Click on the "Unlock" button. You will be reminded that you will have to sign all
subsequent forms. Click "Ok" or "Cancel" as appropriate.
Fill out the unlocked form - a reason for unlocking will have to be added.
Once the unlocked form is completed the next form in line will automatically be
unlocked. Continue signing forms until the last one is reached.
Once the last previously signed form in the series is signed the series will return
to its normal state (while re-signing forms all other items are blocked).
Progress Summary: Working with the Progress Summary
Enter a progress summary by clicking on the currently active progress summary’s icon
for PS1 – PS4 or clicking on the “+” icon in the Other PS column of the main case load
screen. Fill out the form as appropriate. The following fields are required: GAF, outcome
rating, and progress description.
Progress Summary: Save (finish later), Sign and Save, Cancel
Save (finish later): Saves the form without checking required fields and returns
the user to the case load screen. This feature allows you to suspend work on a form but
save it “as is” so you can finish it later.
Sign and Save: Sign and Save checks required fields, saves the form once all
required fields are filled in with appropriate values and either prompts for selection of
reviewer or for signature credentials as appropriate. After signing the progress summary
it cannot be updated unless the submission is revoked before the progress summary is
completed. Once the progress summary is completed (all necessary signatures are
present) it can no longer be revoked. Either use Other PS to add additional progress
summaries, wait for the next summary to be due, or Rollover the series and reformulate
the plan (if you filled out PS4).
Cancel: cancels any changes made to form and returns the user to the case load
screen.
Progress Summary: Read Only
A read-only view of a Progress Summary is presented when a submitted or completed
item is clicked. Pressing the Done button on a read-only view of a progress summary will
return the user to the previous screen.
Reviewer Selection: Providing for Reviewer Signatures
If a form is submitted for signature and the requirements state that an additional signature
is required (e.g. when an MHP signs a Plan of Care, an MD signature is required to
finalize the form), the Reviewer Selection screen will be presented, allowing the user to
21
select the reviewing staff member. To choose a staff member to review a form select the
name from the drop down list. The list contains all staff members with the correct level
of credentials for the next required signature.
If the reviewer is MD level, a checkbox will also be presented to allow selecting that staff
member to be the default selection for the current client for all future forms that require
an MD level signature. This checkbox will not be visible for reviewer selections that are
not MD level.
The user can add a note to the reviewer by typing in the provided text box.
Once the desired reviewer is selected and optionally a note added, press the Accept
button to submit the form to the reviewer.
Revoking a POC or Progress Summary submission
To revoke a submission the user clicks on the icon of the submitted form they would like
to revoke. The screen for a submitted item will display a read-only version of the
submitted form as well as details about who it was submitted to, when it was submitted
and the status of the submission.
The user can use this screen to see whose approval the form is waiting on and to review
the form.
To revoke the form, press the Revoke Submission button. This will revoke the form and
display it again in an editable mode, allowing modifications to be made and the form to
be saved for later or re-signed and re-submitted.
Caseload Management
The POC has two links related to caseload management: Temporary Caseload and
Caseload Management. The Caseload Management link allows users to re-assign all
or part of their caseloads. Caseloads can be permanent or temporary. The difference is
that a temporary assignment is added to a separate caseload screen and can be revoked by
the assigner. A permanent assignment is added to the assignee’s regular caseload.
Temporary assignments are viewed using the Temporary Caseload link.
On the caseload management screen there is a drop-down list that allows you to select the
user for whom you want to assign caseloads. By default this list contains the current user
and, if they are a supervisor, all of their subordinates (same as switch user list). There is
a "Caseload Manager" role that will allow the user to select any other user at the facility
and assign their caseloads.
22
Under the user selection box you will find the caseload assignment boxes - one each for
regular caseload and temporary caseload (only the ones that apply will appear). The user
selects the members of selected user's caseload on the left and the case load manager(s)
they want to assign the selections to on the right (shift-click and ctrl-click are available).
The system will then try to distribute the selected caseload as evenly among the caseload
managers as possible. For example: user selects 20 entries from their caseload and 4
managers, the system will then assign 5 cases to each selected manager.
If the user is assigning their own caseload they are only able to assign temporarily; if they
are assigning for another user they can assign permanently - use the radio buttons beneath
the caseload selection box to choose an option.
Under the caseload selection boxes there is a list of cases that have been temporarily
assigned to someone else. To undo the temporary assignment, select the appropriate case
and click the undo button at the bottom (select all convenience button is available).
Reviewing POC Records: Records to Review queue
If the user does not have a case load assigned then the Plan of Care link will
automatically display the Records to Review queue for the user. If the user has a case
load assigned and has items to review, the Records to Review queue will be accessible
via a link at the top of the Plan of Care screen.
The Records to Review screen list a reviewer’s queue. It will list the items that the user
needs to review and e-sign.
Each line represents one item. Once the reviewer has reviewed the item they can either
reject it back to the submitter or approve it by e-sign.
Rejecting an item requires the reviewer to provide a reason for the rejection. Approval
requires the reviewer to electronically sign the form and possibly select the next reviewer
in line (see Reviewer Selection for details).
Select an item to review by clicking on the link in the queue that corresponds to the item
to be reviewed. The user may now review the read-only copy of the item. If changes are
needed to the form, it should be rejected to the submitter with a note detailing the
changes necessary for approval. Any comments sent with the form by previous
submitters will be visible by clicking the Show Comments link above the form.
The user has three options: Accept, Reject, Cancel
Accept: Press the Accept button to accept the form and sign it. If the form
requires additional signatures/approvals, then the approver will be presented with the
reviewer selection screen. If the reviewer has not signed any forms under the current
session they will be presented with the signature screen as well.
23
Once the form is approved and if it does not require any further approval it will be
removed from the reviewer’s queue and put in a completed status. If the form requires
additional approval it will remain in the reviewer queue until it is either revoked by the
original submitter or completed. Hint: A reviewer can also revoke their submission. For
example, if a BA level clinician submitted the plan to an MHP and then the MHP submits
to an MD, the MHP can also revoke their submission until the MD signs or rejects – this
feature is used in the case of the MHP deciding to reject or needs to re-route.
Reject: Add a rejection reason to text box and press the Deny button. A rejection
reason is required. This will remove the item from the reviewer’s queue and change its
status to “rejected”. The owner/original submitter will see the form as rejected
A rejected form will have its icon changed to reflect its status. To view the rejection
reason and modify the form please click on the icon of the rejected item.
Cancel: Pressing the Cancel button will leave the item unchanged in the
reviewer’s queue for later review/completion.
Rollover
The rollover icon at the end of each case load item/series will close the series and start a
new one. This functionality should be used to start a new Plan of Care after the current
one expires or to re-formulate a Plan of Care as necessary.
By selecting the “Rollover” icon the user will display a screen allowing them to select
which goals to retain for the new Plan of Care. Retained goals will be pre-filled in the
new Plan of Care and ready for editing as necessary. It is not required to retain any goals.
If no goals are selected an empty goal will be presented in the new Plan of Care
A goal is retained by selecting the checkbox above the goal to be retained. Alternatively
the “Select All” button will check all of the goals.
Retained goals and their objectives/interventions can be edited once the rollover is
completed.
Once the desired goals are selected for retention then click the Rollover button. A new
editable Plan of Care form will be presented with the selected goals pre-filled. Any
objective whose target date was "ongoing" will have "ongoing" pre-filled on the Rollover
plan of Care. All other target dates will be reset to blank and require an entry before
signing the plan or addendum.
Staff Module: Administering EMR Users
From the EMR Home page click the Staff link on the top (burgundy) navigation Bar.
This will bring up the Staff Search screen.
24
Staff Module: Staff Search screen
Type in the first few letters of the staff’s name and click find to search for a specific staff
or leave blank to retrieve a list of all staff. You can search by first name or last name
depending on which bullet is marked. The Add New Staff button will appear if the user
has administrative access rights (administrative tasks role).
Staff Module: Query Results screen
The Query Results screen lists one or more staff members depending on the search
criteria entered on the previous screen. The three small icons beginning at the left of
each staff name are links to set up the access level, profile, and role respectively. The
columns represent different functional areas where access rights are tracked. The “X”
(incomplete) and “√“(complete) within each folder icon indicated whether that particular
section of the staff record has been completed. You can hover the mouse pointer over a
folder to see a detailed description of each entry.
Staff Module: Access (IT) link
The Access (IT) link is the blue icon at the extreme left of each staff row. Follow this
link to update staff access levels (Administrative, QA, Group Edit Access levels). You
will be able to update who will be supported by this staff member and also limit locations
and offices for scheduling appointments.
Staff Module: Profile link
The Profile link is the second (green) icon from the left of each staff row. Follow this
link to update supervisor selection for auditing and case load monitoring purposes. It is
also used to update office and location (which comprises the cost center for billing
purposes). This link also allows you to change the role abbreviation that appears before
the name on the query results screen. These abbreviations relate to job roles.
Staff Module: Role link
The Role link is the third icon from the left of each staff row. Follow this link to update
role based security. You can set or restrict access to different parts of the EMR.
Staff Module: Quality Assurance screen
The Quality Assurance screen is reached from the Query Results screen by clicking on
the QA folder for a particular staff member. The QA Complete is checked to indicate
that all QA items have been completed. A check here will result in a check mark
displayed within the folder under the QA column on the Query Results screen. The
Credentialed Services link will appear if staff has Administrative and QA privileges.
Staff Module: Credential Services screen
The Credential Services link on the Quality Assurance screen takes you to a screen that
lists all the available services for the staff based on their credentials. You can add and
remove services by selecting one or more services and clicking the add or remove
buttons. Services that are added will appear in the scheduler when assigning services to
appointments. To select multiple services please press and hold the Ctrl key while you
25
select the services. The services are not added or removed until you click the submit
button at the bottom of the screen.
Staff Module: Staff Profile screen
The Profile link is the second (green) icon from the left of each staff row of the Query
Results screen. It takes you to the Staff Profile screen where you can update, delete or
terminate a staff profile. The staff profile contains first and last name, staff code, login
id, supervisor, location, office, cost center, and position. A check box is provided to
indicate, when checked, that this staff member has been terminated from DMH.
Choosing a supervisor from the drop down menu on this screen will allow the supervisor
to view this staff member’s caseload including schedule, clinical notes and Plan of Cares.
The Details box can be used to add additional information as necessary. The buttons at
the bottom determine the action taken on any changes entered via this screen. Changes
are applied when the Update button is selected. This staff record is removed from this
CMHC if the Delete button is selected. (Hint: If the staff member is authorized to
provide services at other centers, those profiles will be unaffected by this delete. It is used
primarily to remove someone who was added in error.) The Back button returns the user
to the previous screen and discards all changes entered.
Staff Module: Staff Access Level
The Staff Access Level screen is reached from the Query Results screen by selecting the
blue icon at the extreme left of each staff row. This screen authorizes access to different
sections of the EMR.
Administrative Access: checking this box allows the staff member to add new
staff, add and modify staff profiles including this screen. When this box is checked the
Add New Staff Button will appear on the Staff Search screen for this staff member.
Quality Assurance Access: checking this box allows the staff member to add
and modify credentials and to modify QA information.
Group Edit Access: checking this box allows the staff member to modify client
groups for scheduling.
Select Staff Supported, Selected Locations, or Selected Offices to add entries in those
categories. Each link brings up a unique screen to allow entries to be added.
The Update button at the bottom applies any changes. The Back button takes you back
to the previous screen.
Staff Module: Staff Supported
The Staff Supported screen allows you to add and modify the list of support staff for this
profile. Each staff member can potentially support other staff members. This feature
allows a staff member to schedule appointments and view caseloads for the supported
staff in this list. Select the staff that will be supported by the staff member being profiled
and click Add. Conversely you can select staff supported and click Remove. The
26
Submit button will apply the changes. The Back button will return to the previous
screen.
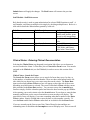
Staff Module: Staff Roles screen
Role based security is used to grant authorization for selected EMR functions to staff. A
staff member can belong to multiple roles simply by checking multiple boxes. Below is a
table which details the authorizations granted by each role.
Role Name
Admin
Role Description
Administrative tasks
Role Manager
User roles
Medical Notes
Clinical
Special medical notes
Clinical tasks
Authorizations
Add new staff, create and
modify staff profiles, grant
access to role management.
Establish and modify staff
roles
access C-39
Goals, Med Notes, POC,
CSN, Meds, and History
links in the Client Section
Clinical Notes: Entering Clinical Documentation
Selecting the Clinical Notes top (burgundy) navigation link allows you to document
services rendered to clients. It first takes you to a Search for Form screen. You must be
assigned to the Clinical role (see Staff Module) in order to access this section of the
EMR.
Clinical Notes: Search for Forms
The Search for Forms screen allows you to search for forms three ways: by date, or
ticket number, or both date and ticket number. There are three radio buttons on the left
side which let you choose how you want to enter the search criteria. The Enter Date
input text box and/or Enter Ticket text box will appear on the right side of the screen
depending on which button is selected. The screen will default to Date with the current
date preloaded in the Enter Date textbox. You can enter a new date in mm/dd/yyyy
format or simply click the calendar symbol and chose the date from the pop up calendar.
After entering your search criteria select the Search button. If you chose to enter the date
manually and did not use the correct format then an error message will display. The
same kind of error will display if you enter something other than a number in the Enter
Ticket window. Simply click ok and re-enter the date or ticket number correctly. To
reset the Date textbox and/or Ticket textbox back to its default click the Reset button.
If you are currently on the first screen of the Clinical Notes Section and there are
outstanding notes to finish then the Incomplete screen will display next. This screen will
27
show all outstanding notes (see more on Incomplete screen below). Clicking on the
Skip Incomplete Section button at the bottom of the screen will take you to the List
screen which will display clinical forms according to your search criteria.
Clinical Notes: The List screen
The List screen displays clinical notes according to search criteria entered on the Search
for Forms screen. A Go to Incomplete Section at the bottom of the screen will take you
to the Incomplete screen if there are incomplete notes. You can also get here as a result
of entering search criteria in the Client search and selecting the CSNs or Med Notes link
for a client. If you got here from Client search then the Go to Incomplete Section button
will not appear. To be able to view Category VIII Start a C-39 with No Sched. Appt or
Generic Note Assoc. W/ Medication the Medical Notes role is required. This is only
accessible from the Client Screen.
A variety of displays can occur in this section depending on search criteria. If no
appointments are scheduled for that day then a “No Records Found” message will display
at the top of the screen.
Forms will fall under one of the following categories:
•
•
•
•
•
•
•
•
•
•
•
•
Process of Being Reviewed - displays all forms that you have signed and are
awaiting a signature from another staff
Waiting for your Review - displays forms that have been signed by another staff
and are awaiting your signature (not limited by search criteria)
Appointment Info for Search Selection - displays appointments that fit search
criteria
Note Information for Search Selection - displays pending notes that fit search
criteria
Unsigned Forms for Search Selection - displays unsigned forms that fit search
criteria
Walk In Forms for Search Selection - displays saved forms for clients that
where scheduled as walk-in appointments. This form will go to the unsigned
section once a transfer occurs.
Signed Forms for Search Selection - displays signed forms according to search
criteria
Reviewed by you for Search Selection - displays forms that have your signature
on the second signature block
Start a C-39 with No Sched. Appt / Generic Note Assoc. W/ Medication –
there is no appointment scheduled. Allows you to enter a C-39 with medication
information.
Start a C-39 with No Sched. Appt / Generic Note - there is no appointment
scheduled. Allows you to enter a C39 for client selected.
Records - displays all signed forms by client search criteria
Unsigned Records - displays all unsigned forms by client search criteria.
Clinical Notes: The Incomplete screen
28
The Incomplete screen shows unfinished clinical documentation (incomplete forms and
notes). You get to this screen from the Search for Forms screen if there are items that
need attention. This screen will also appear when the Go to Incomplete Section button is
selected from the List screen. The Incomplete screen will only appear if there are notes
over 24 hours old that need to be completed or forms waiting or being reviewed or if
there are unsigned forms.
A variety of displays can occur in this section. The categories are explained below:
•
•
•
•
•
•
•
Process of Being Reviewed - displays all forms that you have signed and are
awaiting a signature from another staff
Waiting for your Review - displays forms that have been signed by another staff
and are awaiting your signature
Appointment Info over 72 Hours - displays scheduled appointments between 72
hours and 90 days old
Appointment Info over 24 hours - displays scheduled appointments between 24
hours and 72 hours old
Note Information over 72 hours - displays pending notes at least 72 hours old
Note Information over 24 hours - displays pending notes between 24 hours and
72 hours old
Unsigned Form - displays all unsigned forms
Clinical Notes: Columns on List / Incomplete / Client Screens
Type of Appointment - Individual or Group appointment
Client ID, First Name, Last Name - (pertaining to client)
Service Code and Description - you may pick the service code for appointments on the
List and Incomplete screens that haven’t been started. The default is the service code
chosen in Scheduler. You may only start a C-39 from the Client screen. The service
code will be shown for appointments that have been started. Otherwise, the program
displays the service code, description and name of the form.
Date – (date of appointment) You may select a date on the Client screen for forms that
have not been started.
Time - Pick an appointment time for appointments that have not been started.
Clinical Notes: Group Forms
Group Forms differ from individual forms in that the client information appears after the
appointment information. A dropdown box beside the client information allows you to
choose whether the client was present or a cancel/no-show. After a group form has been
started it is possible to pull up all the clients associated with the form by clicking Entire
Group.
Alerts - client alerts in red on appointments that have not been started
29
Ticket number - ticket number of the service on forms that have been started
Bill Date - date the ticket was billed on forms that have been started
Payment - the payment type for this service ticket
.
Clinical Notes: Processing a Form
The modal dialog menu gives you various options depending on the processing state of
the form.
•
•
•
•
•
•
Start Form - start a new form
Exit Menu - exit the modal dialog menu
Update Form – update the form
View Form - view the form in “read only” mode (no update allowed)
Review Form - review form for a second signature
Delete Form – delete form (form has been started but not signed)
Clinical Notes: Clinical Service Note (CSN) Form
Section 1 - This section is read only if the group has already been started or a
cancellation no-show.
Staff Selection List - allows you to select the staff you want to add to the appointment.
Simply click the staff you would like to add and then click the Add button.
Staff List - the list of staff that is assigned to your appointment. You can remove staff by
selecting the staff from the list and clicking Remove.
Staff Time - allows you to enter the staff time
Primary - allows you to select the primary staff
DMHFACIL - pre-filled
Cost Center - dropdown selected based on location and office you have chosen
Location - dropdown list allows you to choose location
Office - dropdown list allows you to choose office
Place of Service - dropdown list allows you to choose place of service
Svc Code, Batchno, Group number – pre-filled
Doctor on Premise - dropdown list allows you to choose doctor on premise. Only
appears when the client has Medicare.
Date, Time Service Provided - pre-filled
Section II
Name, CID, Cancel/NS, Bill Time, Ticket, Audit, Pmttp (Payment type) – pre-filled
GAF – may be pre-filled but dropdown allows you to select a GAF score
Incarc - dropdown list
Problem - dropdown list allows you to choose problem
Emerg - dropdown list allows you to choose emergency type
Treatment Goal/Focus - dropdown list allows you to select one of the POC Goals or
input your own
Note – pre-filled with prompts
30
Clinical Notes: Clinical Service Note (CSN) process
Fill out the information for the CSN and click the appropriate processing button.
• Cancel - Take you back to originating page
• Submit - will give you two or three choices depending on circumstances:
o Exit Menu - takes you back to CSN
o Save Form - allows you to save form without signing
o Sign/Save Form - allows you to sign and save the form
Clinical Notes: CSN walk-in client process
To schedule a walk-in appointment first go through the general process of filling out a
Clinical Service Note. After finishing the CSN and pressing submit you will only be
given the option to save the CSN. The CSN will be placed in a walk-in appointment slot
after it has been saved. When you do obtain the necessary patient information you can
transfer the client out of walk in status. You can transfer them out of walk in status by
clicking on the Transfer button. Search for the new client, select the client and then
click Transfer.
Clinical Notes: Multiple signatures
Fill out the Clinical Service Note and sign the form. The form will automatically be
placed in the queue of the staff member who needs to sign next. Hint: secondary signing
staff must be on the staff list. Once the second staffer has signed the CSN then it will be
transferred from the Waiting to be Signed section to Signed section.
The CSN will show up in the Waiting for your Signature section. Click the radio
button selecting the CSN then the Review button. The Review button will take you to
the signed form. At the top of the page you will see the following three buttons.
•
•
•
Cancel – returns you to the list page
Accept – adds your signature to the form. The form will then be placed in
your “reviewed” bin.
Deny - If you choose to deny the form you will be prompted for a denial
reason. The form will be returned to the originating staff with your name
and the reason for the denial.
Clinical Notes: Initial Clinical Assessment (ICA)
Start a new ICA from the EMR home screen by first clicking on the ‘Clinical Notes’
link on the top navigation bar. You will see a list of scheduled appointments. Click a
radio button associated with one of the following individual appointments: H001, H002,
H003 or H004. Select the ‘Start form’ button on the dialog window to start a Clinical
Service Note (CSN). There will be a command button ‘Start ICA’ on the left side of the
31
screen located under CSN title. Information about the current ICA status will be
available right above the ‘Start ICA’ button.
Note: The command button title and information label content will depend on the ICA
status.
Click the ‘Start ICA’ button to open the ICA form. The ICA form contains about 20
fields. You do not have to insert information into all fields. The mandatory fields have a
yellow background and are marked with a red asterisk (*). As with all forms you can
use the tab key or the mouse pointer to navigate the fields.
There are a few special features and short cuts that will help you to insert information in
some sections of the ICA:
•
‘Go directly to MSE Section’ button
Click this button to start with the MSE section first.
•
Mental Health Medication (Current) section
o Auto complete text box for mediation name:
When you type the first letter of a medication a drop down list with
available medications will appear below. Navigate that list and
select the medication you want and double click or click the
‘Enter’ button to place that medication in the medication field.
After a medication is entered, the frequency and dosage fields then
become mandatory.
o Add new medications:
Click ‘Add new medication’ or insert a number into the textbox
on the right side of the link and new medication rows will appear.
o Delete a medication:
Delete a medication name from the textbox and all other fields
associated with that medication will be cleared.
o Titrate medication:
If it is necessary to use the same medication with a different
dosage/frequency you have to insert medication information for the
first dosage/frequency, then you can go to the next row and skip
the medication name field and simply insert information into
dosage/frequency field. The medication name will appear
automatically.
32
•
Allergy section
To add fields for a new allergy click the link ‘Add new allergy’ or insert a
number into the textbox on the right side of the link and new rows with three
fields for allergy names will appear.
•
Child and Adolescent section
The section is required for all patients 18 or under. The section is optional
if patient’s age is between 19 and 21. The user has the choice to add/delete it
by clicking the check box on the left side of the section title. The section is
not available to patients older then 21.
You must choose either the ‘Yes’ or ‘No’ option for ‘Complete ICA now’ located at the
bottom of the page. If you decide to continue an ICA during the next appointment then
click ‘No’, otherwise click ‘Yes’ to complete the ICA now. After that you have to click
the ‘Save and Sign’ button. The dialog window with two buttons ‘OK’ and ‘Cancel’
will be available.
•
•
If you select the ‘Cancel’ button, the form remains open on the screen.
If you select the ‘OK’ button the form will be saved and then signed.
Before signing the form the program checks all the mandatory fields. If some of the
mandatory fields are blank (no inserted information) then the alert window will prompt
you to insert the information in to that field.
You will then be redirected back to the CSN page. The signed ICA will be located
underneath the CSN form. You have to scroll down to see the signed ICA form. You
have to use the PDF document scroll bar to navigate to the signed ICA form. If you scroll
down to the end of the ICA form you will be able to see your signature.
Note: To finish with this service you have to complete and sign the CSN (ticket) form.
Update an ICA
There are two ways to update the ICA: either from the ‘ICA’ or the ‘Client’ link on the
top navigation bar. The search form is available in either case.
•
If you use the ‘ICA’ tab you will see your caseload list. You can use a scrollbar or
search form to find the patient. If the ICA already exists for the patient then the
patient’s CID, first and last name will be underlined. You have to click on the row
to see the current ICA history. The most recent ICA will be available for update.
•
If you use the ‘Client’ tab you must use a search form to find the patient. After
you select the patient, the list with a number of tabs will appear underneath the
client name. You have to click the ‘ICA’ tab (the very last on the right side) to
33
view the current ICA history. The most recent ICA will then be available for
update.
Delete an incomplete ICA
Note: You cannot delete a completed ICA.
If the ICA is not completed and there is more than one CSN (appointment) associated
with this ICA then you have to start to delete it from the most recent record.
•
Use the ‘ICA’ or ‘Client’ tabs on the top navigation bar to reach
the current ICA history.
•
If there is more then one record in the ICA history list, the most recent
record will be located at the top of the list.
•
Click the ‘Update’ link and then click the ‘Delete’ button at the top of the
ICA form. The dialog window will ask you to confirm or cancel the
action. If you select the ‘OK’ button then the ICA will be deleted.
•
If there are more records to delete you have to repeat the previous step.
Clinical Notes: Initial PMA (H012 Initial)
Click on the Clinical Notes link on the Top Navigation Bar and a search form will be
presented. There are three search options:
• by date
• by ticket number (for signed forms)
• by date and ticket number (for signed forms)
Click the Search button to bring up a list with previously scheduled appointments.
Appointments will be listed based on the search criteria. Each appointment will be
shown with information specific to that appointment including: client ID, first and last
name, service code, description, and date/time. Clicking the radio button next to the
desired appointment will bring up a dialog box with two options:
• Start
• Exit Menu
Click the Start button to start a new form. There are three buttons at the top and bottom
of clinical forms:
• Save Form
• Save and Sign Form
• Cancel
34
There are also a few links in the middle of the form that will redirect you back to the top.
This saves you from having to scroll to reach the command buttons. You can Save Form
at any time. All the information you have entered into the form will be saved. You can
Cancel the form at any time and all unsaved information will be lost. Save and Sign
Form applies your electronic signature and completes the form.
The form name, client name, client ID and ticket number are located on the top of the
form. Hint: The ticket number will be blank until you sign the form.
The Initial PMA contains 20 sections, each containing fields where you may input
information. The mandatory fields have a yellow background and are marked with a red
asterisk (*). You cannot Save and Sign Form until all mandatory fields are filled in. All
other fields are optional. Use the tab key or the mouse to navigate the sections/fields.
Clinical Notes: Initial PMA (H012 Initial) - Section Descriptions
1. Chief Compliant/Perception of Problem (use client's own words): This field is
required. A label with the number of the remaining characters will appear underneath the
text area as soon as you start typing into the text area. This feature is common to most
free text fields and helps you to manage the number of the characters you insert.
2. History of Present Illness: This field is required.
3. Are You Pregnant? This field is optional. Choose the appropriate response by
clicking one of the radio buttons.
4. Target Symptoms for Treatment: These fields are optional. This section contains a
list with the symptom’s name and the associated check box. The choice “Other” has an
associated text box for the appropriate description. You may select as many of the
symptoms as necessary or you may skip this section.
5. Substance/Alcohol Use: These fields are required. There are six choices you can
select. If None is selected then all other choices become disabled. Otherwise, it is
possible to select more than one checkbox. Any selections other than None will require a
description in the text area underneath.
6. Psychiatric History/Hospitalizations: This field is required.
7. Social History: This field is optional.
8. Family History (medical, psychiatric, substance use): This field is optional.
35
9. Medical History: This field is optional. This section contains a list with the diseases
and the associated check boxes. The choice Other has an associated text box for the
appropriate description. Elaborate is a text area for additional comments.
10. Allergies: This field is required. Please select the NKDA checkbox if there is no
allergy. There are three text boxes for text input. If it is necessary to enter more allergies,
please click the Add More Allergies link (below the first row of the input boxes). The
number in the text box on the right side of the link is the number of allergy rows that will
be added.
11. Current Medication: This section is optional and has three types of medication:
• Mental Health Medication
• Physical Healthcare Medication
• Other: OTC, Herbals, Vitamins, etc.
There is a one row of input text boxes shown for each type of medication. If it is
necessary to add more medications, please click the link below the last row of each
medication type. The number in the text box on the right side of the link is the number of
rows that will be added.
Hint: A spell checking routine is available for the psychiatric medications. When you
start entering a medication name (generic or trade) then the EMR will suggest the closest
match from a standard list published in 2007 by NIMH. If you find that a standard
medication is not in the list then please let us know so we can add it to the list.
Mental Health Medication: contains the following fields:
• Mental Health Medication - generic or trademarked
medication
• Dosage
• Frequency
• Amount
• Refills
• Date D/C – date when this medication was discontinued
• Samples
• Smp Dsg – Sample Dosage
• Smp Amt – Sample Amount
If a medication name is typed into the Mental Health Medication text box (first
box in the row), then Dosage and Frequency must also be entered. This feature is
unique to the Mental Health Medication section.
Physical Healthcare Medication contains the following optional fields:
• Physical Healthcare Medication (generic or trademarked
medication)
• Dosage
• Frequency
36
•
•
Purpose
Date D/C (date when this medication was discontinued)
Other: OTC, Herbals, Vitamins, etc. contains the following optional fields:
• OTC, Herbals, Vitamins (generic or trademarked medication)
• Frequency
• Purpose
• Date D/C (date when this medication was discontinued)
The Current medication cannot be deleted or changed. It can be only
discontinued. To discontinue a medication it is necessary to indicate the date
when it was discontinued (Date D/C) or indicate the reason for which it has to be
discontinued. The Reason for Discontinuing Medication text box becomes
visible after the Date D/C text box is activated/clicked.
The Date D/C field should be entered in mm/dd/yy format. Otherwise, the alert
window will prompt you to enter a valid date. The Reason for Discontinuing
Medication field has no format requirements and can contain up to 110 characters
12. Mental Status Examination: This section contains a list with the mental status
definitions and the associated check boxes. There are only two fields that are required:
• Suicidal Ideation
• Homicidal Ideation
If Yes is selected for these fields you have to insert a brief description into the associated
text box.
13. Diagnosis and Impression of Progress: All fields are required in this section
except Additional Rating and Explanation of Diagnosis. The GAF score must be an
integer that is no less than 0 and no greater than 100; otherwise the alert window will
prompt you to enter a valid score.
Managing Axis I diagnosis on PMA and Follow-Up PMA, the POC and in CIS
Doctors have the ability on the PMA forms to add or change a client’s diagnosis in the
Diagnosis and Impression of Progress section.
If you change the Axis I diagnosis on the PMA then the CIS diagnosis can optionally be
updated (synchronized with the PMA) when this PMA is signed and saved. However, the
POC diagnosis will not be updated but a notification about any diagnosis discrepancies
will be available on the EMR Home Screen for the applicable caseload manager. (This
logic is intentional and was set by the EMR Modifications Subcommittee.)
How to add/change diagnosis on existing PMA forms
To change diagnosis code and description click on the text box for the diagnosis code.
37
Type one, two or three numbers in the code text box and a drop down list with the
available codes will appear below the text box. Select the diagnosis code from the drop
down.
A drop down list with the available descriptions will then appear. Select the applicable
description. If the current diagnosis has only one description then the description text
box will be pre-filled without displaying a drop down list.
As you enter the Axis I diagnosis, the system checks it against the existing Active CIS
diagnosis. If it is different then a link appears “Replace PMO Diagnosis with CIS
Diagnosis”. If you click this link, the Active CIS diagnosis becomes the Axis I PMA
diagnosis.
To add another diagnosis click “Add other Diagnosis” and a new line with text boxes
will appear.
Below the “Add other Diagnosis” link is a text box labeled “Explanation of
Diagnosis”. This text box should contain any additional Axis I explanation necessary.
For example, for 293.0 ("Delirium due to...") you would use this text box to indicate the
associated General Medical Condition.
If the CIS diagnosis code is not the same as the PMA diagnosis then a warning message
will appear when you click “sign and save”. A window will pop up "Current diagnosis
is not the same as Active CIS diagnosis. Do you want to overwrite it?” Clicking YES
will change the Active CIS diagnosis to match the new PMA Axis I diagnosis.
When the system detects a difference between CIS, POC and PMA diagnosis codes for a
client on the user’s caseload, a table labeled "Diagnosis Discrepancies" will appear on
the EMR home page. It will list the number of clients with discrepancies.
14. Recommendation for Treatment: These fields are optional. This section contains
a list of recommendation choices and associated text box for descriptions.
15. MHC SVC/Interventions: At least one check box has to be selected in this section.
This section contains a list with the services/interventions. Further education has an
associated text box for entering a description. There is an Other text box for additional
information.
16. Medication Ordered: The Medication Ordered Section will be pre-filled
automatically with information from the Current Medication Section (Psychiatric
Subsection) when the form is started. It allows users to save time and to avoid the
situation where users forget to insert the information in the Medication Ordered
Section.
A medication in the Medication Ordered Section can be discontinued only through the
Current Medication Section (Mental Health Medication). When a particular psychiatric
38
medication is discontinued in the Current Medication Section, this medication will be
removed from the Medication Ordered Section automatically.
Ordered Mental Health Medication contains the following fields:
o
o
o
o
o
o
o
o
Mental Health Medication (generic or trademarked medication)
Dosage
Frequency
Amount
Refills
Samples
Smp Dsg (sample dosage)
Smp Amt (sample amount)
If the medication name is inserted into the Mental Health Medication text box
(first text box in the row), then Dosage and Frequency are also required.
17. Medication Education Provided: These fields are optional. This section contains a
list with the medication education choices and the associated check box. The choice
Other has an associated text box for a description.
18. Justification for Continued Treatment: This field is required (at least one check
box has to be selected in this section). This section contains a list with the justification
choices.
19. Follow-up: This field is required (at least one text box has to be filled). This section
contains four choices for the follow up visit.
20. Extra Notes: This field is optional.
Clinical Notes: Initial PMA (H012 Initial) – Completing the form
If you press the SAVE FORM button you will be redirected to the main clinical records
page with listed appointments and forms. The form is now located in the Unsigned
Forms section. Click the radio button to open this form again. The dialog box will
appear with these options:
• Update Form
• Exit Menu
• Delete Form
The Exit Menu button will close the dialog window.
If you press Delete Form then a new dialog window will ask you to confirm or cancel
the action. If you select OK then the form will be deleted and the record for this client
then appears under the Appointments section.
39
Select Update Form to continue entering information into the form now. The Initial
PMA form is opened and you can update any sections/fields.
Select Save and Sign Form to apply your electronic signature and complete the form.
You will see a dialog window with two buttons: OK and Cancel. If you select Cancel,
the form remains opened on the screen. If you select OK the form will be saved and then
signed. Before signing the form the program checks all the mandatory fields. If some of
the mandatory fields are blank then the alert window will prompt you to fill out the field.
You have to press OK in the alert window and the program will direct your cursor to the
field that requires completion. Once all mandatory fields are satisfied then the signing
screen appears. You have to use your Novell user id and password for signature
authorization and then press the Submit button (see the Electronically Signing Forms
section for additional details).
A screen with the Clinical Service Note followed by the signed Initial PMA will appear.
You can scroll down to see the signed Initial PMA form. If you scroll down to the end of
the form you will be able to see your signature. (Hint: Use the PDF document scroll bar
on the right side of the form to navigate the signed PMA form.) If you would like to print
the form then select the printer icon on the PDF tool bar at the top.
The next step in the process is to fill out the Clinical Service Note associated with this
Initial PMA. Please return to the top of the screen and fill out the CSN form (see Clinical
Service Notes section).
Clinical Notes: Follow up PMA (H012)
Click on the Clinical Notes link on the Top Navigation Bar and a search form will be
presented. There are three search options:
• by date
• by ticket number (for signed forms)
• by date and ticket number (for signed forms)
Click the Search button to bring up a list with previously scheduled appointments.
Appointments will be listed based on the search criteria. Each appointment will be
shown with information specific to that appointment including: client ID, first and last
name, service code, description, and date/time. Clicking the radio button next to the
desired appointment will bring up a dialog box with two options:
• Start
• Exit Menu
Click the Start button to start a new form. There are three buttons at the top and bottom
of clinical forms:
• Save Form
• Save and Sign Form
• Cancel
40
There are also a few links in the middle of the form that will redirect you back to the top.
This saves you from having to scroll to reach the command buttons. You can Save Form
at any time. All the information you have entered into the form will be saved. You can
Cancel the form at any time and all unsaved information will be lost. Save and Sign
Form applies your electronic signature and completes the form.
The form name, client name, client ID and ticket number are located on the top of the
form. Hint: The ticket number will be blank until you sign the form.
The Follow Up PMA contains 19 sections, each containing fields where you may input
information. The mandatory fields have a yellow background and are marked with a red
asterisk (*). You cannot Save and Sign Form until all mandatory fields are filled in. All
other fields are optional. Use the tab key or the mouse to navigate the sections/fields.
Some information is brought forward (rolls over) from the most recent PMA. This will
save considerable typing if the data has not changed. This “rolled over” information can,
of course, be updated as necessary.
Clinical Notes: Follow up PMA form – Sections and Fields
1. Current Medication: (same as Initial PMA, please see Initial PMA section)
2. Interval History:
The medical management program check box is discussed in the next section of
the EMR titled “Clinical Notes: Medical Management Program (MMP).
Labs: This field is required.
There are two fields for Labs. Either select None if there are no labs or enter a
brief description in the text box.
Pregnant: This field is optional. This information rolls over from the most resent
PMA and can be updated as necessary.
3. Reason for Visit: This field is required. This section contains five reason types and
their associated check boxes.
4. Target Symptoms for Treatment: These fields are optional. This section contains a
list with the symptom names and associated check boxes. The choice Other has an
associated text box for entering a description. This information rolls over from the most
recent PMA.
5. Symptoms Description: This field is optional. The label with the number of
remaining characters will appear underneath the text area as soon as you start typing.
This feature helps you to manage the number of characters you insert and is common to
most free text fields.
41
6. Medication Use: These fields are optional. If you select No for Taking regularly
then you have to select one of five options: Refusing, Skipping dose, Overtaking, Run
out, or Other.
7. SE reported to Medications: This field is required. If you select Yes then you have
to enter a description in the text box below.
8. MD or ER visit since last MHC visit: This field is required. If you select Yes then
you have to insert a description in the text box below.
9. Substance/Alcohol Use: This field is required. This information rolls over from the
most resent PMA. There are six possible choices including None. If None is selected
then all other choices become disabled. Otherwise, you must include a description in the
text box below.
10. Allergies: This field is required. This information rolls over from the most resent
PMA. If you have to enter more allergies, please click on the Add More Allergies link
(below the first row of input boxes). The number in the text box on the right side of the
link is the number of allergy rows that will be added when you click.
11. Mental Status Examination: This section contains a list with the mental status
definitions and associated check boxes. There are only two fields that are required:
• Suicidal Ideation
• Homicidal Ideation
If Yes is selected for these fields you have to insert a brief description in the associated
text box.
12. Diagnosis and Impression of Progress: All fields are required in this section with
the exception of Additional Rating and Explanation of Diagnosis. The axis information
rolls over from the most resent PMA. The GAF score must be an integer between 0 and
100. Otherwise the alert window will prompt you to enter a valid score.
Note: please see text related to managing diagnosis under Initial PMA item 13.
13. Recommendation for Treatment: These fields are optional. This section contains
a list with recommended choices. Five options have an associated text box for a
description.
14. MHC SVC/Interventions: This field is required. At least one check box has to be
selected in this section. The section contains a list with the services/interventions
choices. Further Education has an associated text box for a description. The Other text
box is for additional information.
15. Medication Ordered: (same as Initial PMA, see Initial PMA section)
42
16. Medication Education Provided: These fields are optional. This section contains a
list with the education choices. The choice Other has an associated text box for a
description.
17. Justification for Continued Treatment: This field is required. At least one check
box has to be selected.
18. Follow-up: This field is required. This section contains four choices for the follow
up visit and at least one text box has to be filled.
19. Extra Notes: This field is optional.
Clinical Notes: Follow up PMA (H012) – Completing the form
If you press the SAVE FORM button you will be redirected to the main clinical records
page with listed appointments and forms. The form is now located in the Unsigned
Forms section. Click the radio button to open this form again. The dialog box will
appear with these options:
• Update Form
• Exit Menu
• Delete Form
The Exit Menu button will close the dialog window.
If you press Delete Form then a new dialog window will ask you to confirm or cancel
the action. If you select OK then the form will be deleted and the record for this client
then appears under the Appointments section.
Select Update Form to continue entering information into the form now. The Follow Up
PMA form is opened and you can update any sections/fields.
Select Save and Sign Form to apply your electronic signature and complete the form.
You will see a dialog window with two buttons: OK and Cancel. If you select Cancel,
the form remains opened on the screen. If you select OK the form will be saved and then
signed. Before signing the form the program checks all the mandatory fields. If some of
the mandatory fields are blank then the alert window will prompt you to fill out the field.
You have to press OK in the alert window and the program will direct your cursor to the
field that requires completion. Once all mandatory fields are satisfied then the signing
screen appears. You have to use your Novell user id and password for signature
authorization and then press the Submit button (see the Electronically Signing Forms
section for additional details).
A screen with the Clinical Service Note followed by the signed Follow UP PMA will
appear. You can scroll down to see the signed Follow Up PMA form. If you scroll down
to the end of the form you will be able to see your signature. (Hint: Use the PDF
43
document scroll bar on the right side of the form to navigate within the form.) If you
would like to print the form then select the printer icon on the PDF tool bar at the top.
The next step in the process is to fill out the Clinical Service Note associated with this
PMA. Please return to the top of the screen now and fill out the CSN form. When the
form is ready to be signed, please press the SUBMIT button on top of the form.
Clinical Notes: Medical Management Program (MMP)
The Medical Management Program is a special way of documenting clients who require
medical management only. Establishing a client in MMP means that the POC will be
discontinued (their current POC series is closed). Users should make sure they have
finished what they need to do in the POC before placing a client in MMP. This feature of
the EMR saves time by reducing the amount of clinical documentation required for these
special cases.
To start MMP for the current client, first begin a Follow up PMA (H012) then:
Click the “Medical Management Program” check box located right under the
“Interval History” title on the Follow up PMA.
Click the “OK” button on the dialog window to continue with MMP.
The following fields will appear on the form:
•
•
•
•
•
•
•
Client Goal (text box, read only). This goal rolls over from the most recent
POC (first client goal).
Intervening Service since last PMA (check boxes, six options)
Vital Signs section (height, weight, waist, blood pressure and BMI which
calculates automatically after height and weight are entered). This data
rolls over from the most recent Nursing form (H021 - Medication
Monitoring Form).
Remain/Discontinue MMP (radio button)
Patient verbally agrees to continue this level of care (check box)
Patient agrees to continue current goal/Patient requests new goal (radio
button)
New Goal (text box). This field is mandatory.
To continue MMP for the current client:
Start the follow up PMA for the patient. The most recent MMP information (client
goal and vital signs) will be available. Insert all necessary information into the MMP
fields and save it.
To Save MMP for the current client:
44
Click either the “Save” or “Save and Sign Form” button to add the client to
MMP. Reminder: If you choose MMP for the client then the POC will be
discontinued.
To Discontinue MMP for the current client:
It is possible to discontinue the MMP at any time by selecting the “Discontinue
MMP” radio button near the bottom of the form. A discontinuation reason is
required.
If you choose to discontinue the MMP for the client then the next Progress
Summary due date will still be based on the admission anniversary, but consider
the MMP discontinue date to calculate which PS due date to use.
Example:
Admission Date: 02/23/2001
MMP discontinue date: 06/11/08
Therefore the admission anniversary is 02/23/08, resulting in the following PS
due dates (admission anniversary +90, +180, +270 and +360):
05/23/08, 08/21/08, 11/19/08, and 02/17/09
The next PS will be due 08/21/08 since it is the first PS due date after the MMP
discontinue date.
Note: When the MMP for the client is discontinued a new series is opened in the
POC and a Plan will be due. The due date of the next progress summary will then
be calculated based on the admission anniversary and MMP discontinue dates
(see above).
If MMP is abandoned (i.e. the user deletes the form on which they put the client
into MMP) then the POC will be rolled back and the previously active series will
be open again.
Clinical Notes: Medication Monitoring Form (H021)
Click on the Clinical Notes link on the Top Navigation Bar and a search form will be
presented. There are three search options:
• by date
• by ticket number (for signed forms)
45
• by date and ticket number (for signed forms)
Click the Search button to bring up a list with previously scheduled appointments.
Appointments will be listed based on the search criteria. Each appointment will be
shown with information specific to that appointment including: client ID, first and last
name, service code, description, and date/time. Clicking the radio button next to the
desired appointment with service code H021-M Nursing Services will bring up a dialog
box with two options:
• Start
• Exit Menu
Click the Start button to start a new form. There are three buttons at the top and bottom
of clinical forms:
• Save Form
• Save and Sign Form
• Cancel
There are also a few links in the middle of the form that will redirect you back to the top.
This saves you from having to scroll to reach the command buttons. You can Save Form
at any time. All the information you have entered into the form will be saved. You can
Cancel the form at any time and all unsaved information will be lost. Save and Sign
Form applies your electronic signature and completes the form.
The form name, client name, client ID and ticket number are located on the top of the
form. Hint: The ticket number will be blank until you sign the form.
The Medical Monitoring form contains 14 sections, each containing one or more fields
where you may input information. The mandatory fields have a yellow background and
are marked with a red asterisk (*). You cannot Save and Sign Form until all mandatory
fields are filled in. All other fields are optional. Use the tab key or the mouse to navigate
the sections/fields. Some information is brought forward (rolls over) from the most
recent appointment. This will save considerable typing if the data has not changed. This
“rolled over” information can, of course, be updated as necessary.
Clinical Notes: Medication Monitoring form (H021) - sections and field descriptions
1. Additional patient information and Medication Compliant: These fields are
required. The first row includes following fields:
• Child/Adults
• Age (read only)
• School/Job Employment
These fields present the information that was previously saved for this client.
The second row includes the following fields:
• Medication Compliant (with options: Yes, No, N/A)
• Reason (with options: Refusing; Skipping doses, Overtaking,
Run out)
If the N/A option is selected, then all Reason options are disabled and the N/A check box
under the Medication Education section (below Current medication) is selected.
46
The third row includes the following fields:
• Medication Effectiveness (with options: Working, Improving,
Not Working, Partially Working)
•
Neuroleptic Consent (with options: Yes, No, N/A)
2. Current Medication: (same as Initial PMA, please see Initial PMA section)
If the Current Mental Health Medication is changed during the Medication Monitoring
appointment, the C39_2 form has to be submitted to the doctor. Otherwise the changes
will not be effective.
3. Medication Education: This field is required. This section contains a list with the
medication education choices and associated check box.
4. Allergies: This field is required and this information rolls over from the most resent
appointment. If you have to enter more allergies, please click on Add More Allergies
below the first row of input boxes. The number in the text box on the right side of the link
is the number of additional allergy rows that will be added when you click.
5. Physicians, Pharmacy, Hospitalization and Labs: These fields are required.
6. Measurements: This section contains the following fields:
• Ht (height) (not required if “N/A” entered into BMI field)
• Wt (weight) (not required if “N/A” entered into BMI field)
• Waist
• Pulse
• BP standing
• BP sitting
• Temp
• BMI (entering “N/A” here will allow for blank Ht and Wt
when those are unknown)
• AIMS Date
• N/A (related to AIMS date)
• FSBS Date
• Results (FSBS)
• UDS Date
• Results (UDS)
• EKG Date
• Results (EKG)
There are five required fields in this section: Ht, Wt, Pulse, BP sitting, AIMS Date (or
N/A). The BMI (Body mass index) calculates automatically as soon as the information is
entered into the Ht and Wt fields.
47
7. Other Medical Conditions: This field is optional.
8. Pregnant, Normal Menses, Date of Last Menses: These fields are required. The
Date of Last Menses field must be entered in mm/dd/yy format. Otherwise the alert
window will prompt you to enter a valid date.
9. Current Symptoms: This field is required. This section contains a list with the
symptom names and check boxes. If Sleep Disturbance is selected, then a Sleep
Disturbance Description has to be selected as well (select one using the radio buttons).
10. Substance/Alcohol Use: This field is required. There are six choices from which to
choose. If None is selected then all other choices become disabled. Otherwise it is
possible to select more then one checkbox. Illicit drugs and Other have associated text
boxes for descriptions. There is text area Other Health Eroding Behavior/Comments
for optional additional comments.
11. Side Effect Profile: This field is required (at least one must be selected) and
contains a list of side effect profile choices and associated check boxes. The
Other/Comments text area is for adding comments.
12. Outcome Measures: This field is required. The GAF score must be an integer
between 0 and 100. Otherwise the alert window will prompt you to enter a valid score.
13. Return Appointment Date and Time, Next PMA Date and Time, CSN#:
Date fields must be entered in the mm/dd/yy format. Otherwise an alert window will
prompt you to enter a valid date.
14. Additional Comments / Notes: This field is optional.
Clinical Notes: Medication Monitoring form (H021) – completing the form
Click SAVE and SIGN FORM to complete the form. You will see a dialog window
with two buttons: OK and Cancel. If you select Cancel, the form remains opened on the
screen. If you select OK, the form will be saved and then signed but before signing the
program checks all mandatory fields. If some mandatory fields are blank (no inserted
information) then the alert window will prompt you to insert information into to that
field. You have to press OK in the alert window and the program will place the cursor in
the field that you need to enter. Click OK to continue.
The screen with the Clinical Service Note and the signed Med Monitoring form will
appear. The signed Med Monitoring form is presented in PDF form and is located below
the CSN form. Please scroll down to see the signed form. You use the PDF document
scroll bar to navigate the signed Med Monitoring form (this is located at the right edge of
the form). If you scroll down to the end of the form you will be able to see your
signature. If you need to print the form then click the printer icon on the PDF tool bar.
48
Return to the top of the screen and fill out the CSN form (see Clinical Service Note
section for details). When the form is ready to be signed, please click the SUBMIT
button at the top of the form, then click SIGN/SAVE FORM button in the dialog
window. The signed form will then be presented for your inspection.
Clinical Notes: Telepsychiatry ED Module
The Telepsychiatry Emergency Department (ED) Module is designed to automate the
clinical documentation of psychiatric consultations conducted via teleconferencing
equipment between SCDMH psychiatrists and walk-in ED clients in hospitals around the
state. This project was funded in large part by a Duke Endowment grant. The process
involves the use of an automated fax server located in Columbia which receives requests
from hospitals across the state and relays consultation results back to local fax machines
in the EDs. This module is available only to SCDMH staff psychiatrists who are
assigned to the ED Telepsychiatry project.
ED Module: To review received faxes for consultation requests
Login to the EMR and select ‘30-Duke Endowment Grant’ facility from the drop
down list. You will be taken to the home page for ED Telepsychiatry. Here the
Work Queue with received faxes will be shown. Each incoming fax will be shown
with the date and originating hospital name. Faxes typically have a cover sheet with
general information about the request and additional pages with any reference
information relevant to the client. Three actions are available for each fax:
•
•
•
Show/Hide - to view or hide this fax
Start - to start a Telepsychiatry consult
Delete - to delete this fax from the work queue
ED Module: To Start an Ed Telepsychiatry Consultation
Click the ‘Start” link associated with the consult you would like to start. The
‘Search for Client’ form will be available on the next screen. Enter information in
the search form to identify the client (CID or SSN is easiest as they are discrete
identifiers).
• If you are entering the CID or SSN you do not need to fill other fields.
• When searching by name you can use a wildcard search to locate all
names that begin with what you enter (similar to any other search form
in the EMR). If you do know the entire name it’s best to type it in
completely because this will lessen search time.
• A match or a list of multiple possible matches will be presented.
Select the client by clicking that entry.
49
•
If no matching client was found, click the “Add as new client” button
that will appear below the ‘Search for Client” form. The fields Last
Name, First Name and Sex are required to add a new client.
The Notify ED form comes up on the next screen to allow you to notify the hospital
that the consult is to be started for this client. This will alert the hospital ED staff to
prepare for the consult. Please verify that the hospital name and fax number are
correct. You have the option at this point to change the fax number before sending
the notification.
Click the ‘Submit” button to send the notification.
After the notification is sent then click the ‘CONTINUE TO CONSULTS PAGE” link
(located above the notification form) to go to the Consult page.
You can start the consult as an Initial (from ‘Start an Initial Consult’ section) or as a
Follow-up (from ‘Start a Follow Up Consult’ section). All previously completed
consult forms for the current client will be listed in the ‘Start a Follow Up Consult’
section.
Each type of consult will be shown with information specific to that consult
including: client ID, first and last name, consult date and time. Clicking the radio
button next to the desired consult will bring up a dialog box with two options:
•
•
Start Form
Exit Menu
ED Module: Initial and Follow Up ED Consult forms
The form name, consult date, client ID, hospital name and other client identifying
information are located on the top of the form. The mandatory fields have a yellow
background and are marked with a red asterisk (*). All other fields are optional.
After the ED consult form is completed, saved and signed, then the Clinical Service
Notes will be presented for you to complete. (The signed ED form will be located at
the end of CSN form.) Fill out the information for the CSN and click the appropriate
processing button. In order to sign the CSN it is necessary to specify the service code
by clicking on the ‘Svc Code’ drop down list. Please refer to “Clinical Notes:
Clinical Service Note (CSN) Form” section for information about filling out the CSN.
ED Module: To Fax Completed Consult to Hospital
After the CSN is signed the “Send Fax of Consult to Hospital’ button will be
available on the screen above the signed CSN form. Click this button to go to the
notification screen. Please make sure that the hospital name and fax number are
correct. If the CSN form cannot be completed right away:
•
Click the ‘Save form’ button and you will be taken back to the ‘Consult’ page.
50
•
•
•
•
•
Find the signed consult form (Initial or Follow-up) you just completed and click
the radio button associated with this form and click ‘View PDF’ button on the
dialog window.
The “Send Fax of Consult to Hospital’ button will be available on the screen
above the signed consult form.
Click this button to go to the notification screen.
Click the ‘Submit’ button to fax consult form and notification to the Hospital.
Click ‘CONTINUE TO CONSULTS PAGE’ link to return to the Consult page.
51
Appendix A – Sample Clinical Forms
•
Addendum to Plan of Care (pdf. final form)
•
Addendum to Plan of Care (web form - screen shot)
•
Clinical Service Note
•
Clinical Service Note (H010)
•
Follow Up PMA Form (H012)
•
Initial PMA Form (H012)
•
Medication Monitoring Form (H021)
•
Plan of Care (pdf final form)
•
Plan of Care (web form - screen shot)
•
Progress Summary (pdf final form)
•
Progress Summary (web form - screen shot)
ADDENDUM TO PLAN OF CARE
CLIENT NAME:
PAT
PATIENT2
Dated:
ADMISSION DATE:
MEDICAID #: (If applicable)
CLIENT ID #:
09/04/2007
01/01/2007
PAGE 1
9449577
PRIMARY DIAGNOSIS ADDRESSED IN THE TX.: CODE AND DESCRIPTION
(changes need to be dated and initialed)
OTHER DIAGNOSIS ADDRESSED IN TX.: CODE AND DESCRIPTION
(changes need to be dated and initialed)
347-NARCOLEPSY
290.40-VASCULAR DEMENTIA, UNCOMPLICATED
PROMPTS:
Number Goals and Objectives (1., 1.1, 1.2, 2., 2.1, 2.2 as appropriate)
Goals should be in the words of the client, family, and/or stakeholder - list things they would like to achieve, change, or need help with.
Objectives should be reflective of the client's expectiatons, development, culture/ethnicity, tx. team's expectations, understandable to the client & their family
as appropriate to the DX; and behavioral, measurable, achievable.
Interventions at least one for each objective that tells how and what is done to achieve the objective.
(MD MUST INITIAL AND DATE ANY ADDED SERVICES OR CHANGES IN FREQUENCY AFTER MD SIGNATURE/AUTHORIZATION BELOW)
TARGET
SERVICES
FREQUENCY
DATE
Goal # 2
MISC
addendum goal
Objective # 2.1
addendum objective
TYPE
OF STAFF
27xYear
NON-MHP
01/01/08
Intervention # 2.1.1 addendum intervention
COPY
CLIENT SIGNATURE AND DATE
(indicates input and copy offered)
Accepted
Declined
SCDMH
NOV. 2004 (REV. APR. 2006)
C-181
CLINICIAN SIGNATURE, TITLE AND DATE:
PHYSICIAN SIGNATURE, TITLE, AND DATE:
(confirms medical necessity and appropriateness)
CLINICAL SERVICE NOTE
STAFF LIST
TIME: 15 For Staff: 6123 DOCTOR USER5
TIME: 10 For Staff: 6001 DEMO CLINICIAN
TIME: 10 For Staff: 3 STAFF TESTING1
3H ANDERSON-OCONEE-PICKENS
MHC
060 ANDERSON MENTAL HEALTH
Cost Center
3HS25 ANDERSON MHC-OUTPATIENT ADULTS
Office
11 OFFICE
Svc Code:
115 PHYSICIANS-ADULT
H012
PSYCHIATRIC/MEDICAL
ASSESSMENT
Modifier:
Batchno: 240072220
Doc Prem:
Staff ID:
6123
Group number:
Date:
Time Service Provided:
Facility
Location
Place Of
Service:
Name:
PATIENT
PMA
Cancel/NS:
GAF:
75
Cid:
10138984
Ticket: 216
Incarc: N
Problem:
Emerg:
Treatment Goal / Focus:
08/28/2007
08:00
Bill Time:
25
Audit:
207
Pmttp: 07
1 SUBSTANCE
0 NORMAL HOURS, NO EMERGENCY
Note
See Corresponding PMA FORM
Svc Code: H012
Ticket: 216
PSYCHIATRIC/MEDICAL ASSESSMENT
Audit: 207
Cancel/NS:
Cid:
10138984
Bill Time: 25
Name: PATIENT
PMA
CLINICAL SERVICE NOTE
STAFF LIST
TIME: 15 For Staff: 1076 NATALIA AGAFONOVA
TIME: 15 For Staff: 155 SHERRY GRAINGER
TIME: 15 For Staff: 2401 ALAN JOHNS
Facility
Location
Place Of
Service:
3F SANTEE-WATEREE COMMUNITY
MHC
C SUMTER CLINIC
Cost Center
11 OFFICE
Svc Code:
3FC25 SANTEE-WATEREE MHC-SUMTER CLINIC
STI
25 ADULT-SHORT TERM INTERVENTION
H010
INJECTABLE MEDICATION
ADMINISTRATION
H016
INJECTION ADMINISTRATION
Office
Svc Code2:
Modifier:
Batchno: 191079364
Group number:
Date:
Time Service
Provided:
Doc Prem:
Staff ID:
1076
Name:
PAT
PATIENT1
Cancel/NS:
GAF:
Cid:
2032640
Ticket:
30501643
Ticket2: 30501644
Incarc: N
90
Medication
HALDOL DEC (51-100MG)
Problem:
Emerg:
Treatment Goal / Focus:
07/10/2007
08:15
Bill Time:
15
Audit:
Audit2:
1337740
1337741
Pmttp:
02
Pmttp2: 02
NDC
00703 - 7023 - 01
0 PSYCHIATRIC
0 NORMAL HOURS, NO EMERGENCY
Note
Side Effects / Adverse Reaction
Route
Injection Site
Svc Code:
Ticket:
Svc Code2:
Ticket:
H010
INJECTABLE MEDICATION ADMINISTRATION
30501643
Audit: 1337740
H016
INJECTION ADMINISTRATION
30501644
Audit2: 1337741
Cancel/NS:
Cid:
Cancel/NS:
Cid:
2032640
2032640
Bill Time:
Name:
Bill Time2:
Name:
15
PAT
30
PAT
PATIENT1
PATIENT1
FOLLOW-UP PSYCHIATRIC MEDICAL ASSESSMENT ORDERS AND SERVICE NOTES (PMA)
NAME: PATIENT PMA
ID: 10138984
Ticket No: 217
Current Medication
Mental Health Medication
Dosage
10MG
20MG
30MG
250MG
Frequency
1 QAM
2 QNS
1 or 2 QD
2 QHS
Physical Healthcare Medication
Dosage
Frequency
Purpose
Date D/C
Dosage
Frequency
Purpose
Date D/C
ABILIFY
BUPROPION
CELEXA
DEPAKOTE
Amount Refills Date D/C
Samples
Smp Dsg
Smp Amt
Premarin
Lotril
Other: OTC, Herbals, Vitamins, etc.
Vitamin C
Interval History
Labs:
None
Pregnant:
N/A
Reason for Visit:
Medication check
Change in Symptoms
F/U after DC from Hospital
F/U after change in Medications
Other
Target Symptoms for Treatment
AV hallucinations
Agoraphobia
Anxiety
Court ordered
Delusions/paranoia
Depression
Flashbacks
Hyperactive/inattentive
Hyperverbal
Irritability
Legal problems
Mania/hypomania
Oppositional
Obsessive/compulsive
SI/HI/Ideation/attempts
Sleep/appetite disturbance
Thought disorganization
Trauma
Other
other symptoms
Symptoms Description:
Finally has a job. Some depression.
Medications Use
Taking regularly:
Yes
SE Reported to Medications
SE Reported to Medications ..............................................................................
MD or ER visit since last MHC visit
MD or ER visit since last MHC visit ....................................................................
Substance/Alcohol Use
None
Pack a day
Tobacco
Caffeine
Alcohol
Street Drugs
Other
(if checked, describe)
Allergies
honey
| orange
| aspirin
Mental Status Examination
Sensorium
Appearance
Behavior
Psychomotor Abnormalities
Speech
Cognition
Judgment
Insight
Emotion
Thought Content
Thought Process
Suicidal Ideation
Homicidal Ideation
Abnormal Movement
Alert:
Oriented:
Normal For Patient:
Cooperative:
None:
Normal For Patient:
Attention:
Intact:
Concentration: Intact:
Memory:
Intact:
Good:
Good:
Mood:
Euthymic:
Affect: Appropriate:
Hallucinations: No:
Delusions: No:
Logical/Goal directed:
No:
No:
None:
Other:
(describe)
(if not,describe)
(describe)
Other:
(describe)
(if not,describe)
(if not,describe)
(if not,describe)
(if not,describe)
Fair:
Fair:
Poor:
(describe)
Poor:
(describe)
(if not,describe)
(if not,describe)
Yes:
(describe)
Yes:
(describe)
Distractible:
LOA:
Yes:
(describe)
Yes:
(describe)
Face:
Lips/Tongue:
FOI:
Trunk:
Diagnosis and Impression of Progress
Axis I: 296.34 Major depression, recurrent, severe with psychotic features.
Axis II: No diagnosis
Axis III: Hypertension
Follow-up PMA (page 1)
ID: 10138984
Date: 08/31/2007 12:40:09
Axis IV: Disabled
GAF:80 | Additional Rating:
(desribe)
Recommendation for Treatment
Labs:
Therapeutic drug level:(describe)
BUN/Creatinine
UDS for drugs of abuse
Thyroid function
CBC / Diff
Other labs ordered:(describe)
HGA1C
FBS
Other diagnostic:(describe)
Other diagnostic:(describe)
Other diagnostic:(describe)
Lipid panel
other diagnostic
MHC svc/Interventions:
Blood sugar
Individual therapy
Other:
Drug screen
Group therapy
AIMS
Medication monitoring
Further education (describe)
Case management
PMA
Medication Ordered
Medications: Same as above:
Mental Health Medication
ABILIFY
BUPROPION
CELEXA
DEPAKOTE
ELAVIL
Medication Education Provided:
Medication, dose, time to take
Purpose/Expected benefits/Risk
Common side effects
Client
Dosage
10MG
20MG
30MG
250MG
15MG
Frequency
1 QAM
2 QNS
1 or 2 QD
2 QHS
1 BID
Family
Lab monitoring required/reason
Expected length of tx.
Effects on pregnancy/nursing
Amount Refills
Samples
Smp Dsg
Smp Amt
Financial availability
Alternative to medication/Risk of no treatment
Other (describe)
Justification for Continued Treatment
Requires monitoring of response to medication
Requires monitoring for medication side effects
Follow-up:
Days:
Symptoms unstable
Prevent decompensation
Weeks: 8
Months:
Improve level of functioning
Prevent hospitalization
Other:
Extra Notes
None
Follow-up PMA (page 2)
ID: 10138984
Date: 08/31/2007 12:40:09
INITIAL/EXTENDED PHYSICIAN'S MEDICATION ASSESSMENT ORDERS AND SERVICE NOTES (PMA)
NAME: PATIENT PMA
ID: 10138984
Ticket No: 216
Chief Compliant/Perception of Problem (use client's own words)
Chief Compliant/Perception of Problem .... ..... ...... ......... ......... ........ ....... .... .......
History of Present Illness
History of Present Illness ..............................................................................
Pregnant:
N/A
Target Symptoms for Treatment
AV hallucinations
Agoraphobia
Anxiety
Court ordered
Delusions/paranoia
Depression
Flashbacks
Hyperactive/inattentive
Hyperverbal
Irritability
Legal problems
Mania/hypomania
Oppositional
Obsessive/compulsive
SI/HI/Ideation/attempts
Sleep/appetite disturbance
Thought disorganization
Trauma
Other
other symptoms
Substance/Alcohol Use
None
Pack a day
Tobacco
Caffeine
Alcohol
Street Drugs
Other
(if checked, describe)
Psychiatric History/Hospitalizations
Psychiatric History/Hospitalizations ....................................................................
Social History
Social History...... ...... ....... ......... ....... ...... ...... ........ .......... ....... ..... ..
Family History (medical, psychiatric, substance use)
Family History ...... ...... ....... ......... ....... ...... ...... ........ .......... ....... ..... ..
Medical History
N/R
Cancer
Diabetes
Epilepsy
Heart disease
High blood pressure
HIV/AIDS
Hyperlipidemia
Kidney disease
Migraine headaches
Strokes
Thyroid disease
Other
Allergies
honey
| orange
| aspirin
Current Medication
Mental Health Medication
Dosage
100MG
200MG
300MG
Frequency
QAM
QNS
1 or 2 QD
Physical Healthcare Medication
Dosage
Frequency
Purpose
Date D/C
Dosage
Frequency
Purpose
Date D/C
ABILIFY
BUPROPION
CELEXA
Amount Refills Date D/C
Samples
Smp Dsg
Smp Amt
Premarin
Lotril
Other: OTC, Herbals, Vitamins, etc.
Vitamin C
Mental Status Examination
Sensorium
Appearance
Behavior
Psychomotor Abnormalities
Speech
Cognition
Judgment
Insight
Emotion
Thought Content
Thought Process
Suicidal Ideation
Homicidal Ideation
Abnormal Movement
Alert:
Oriented:
Normal For Patient:
Cooperative:
None:
Normal For Patient:
Attention:
Intact:
Concentration: Intact:
Memory:
Intact:
Good:
Good:
Mood:
Euthymic:
Affect: Appropriate:
Hallucinations: No:
Delusions: No:
Logical/Goal directed:
No:
No:
None:
Other:
(describe)
(if not,describe)
(describe)
Other:
(describe)
(if not,describe)
(if not,describe)
(if not,describe)
(if not,describe)
Fair:
Fair:
Poor:
(describe)
Poor:
(describe)
(if not,describe)
(if not,describe)
Yes:
(describe)
Yes:
(describe)
Distractible:
LOA:
Yes:
(describe)
Yes:
(describe)
Face:
Lips/Tongue:
FOI:
Trunk:
Diagnosis and Impression of Progress
Axis I: 296.34 Major depression, recurrent, severe with psychotic features.
Axis II: No diagnosis
Initial PMA (page 1)
ID: 10138984
Date: 08/31/2007 12:35:00
Axis III: Hypertension
Axis IV: Disabled
GAF:75 | Additional Rating:
(desribe)
Recommendation for Treatment
Labs:
Therapeutic drug level:(describe)
BUN/Creatinine
UDS for drugs of abuse
Thyroid function
CBC / Diff
Other labs ordered:(describe)
HGA1C
FBS
Other diagnostic:(describe)
Other diagnostic:(describe)
Other diagnostic:(describe)
Lipid panel
MHC svc/Interventions:
Blood sugar
Individual therapy
Other:
Drug screen
Group therapy
AIMS
Medication monitoring
Further education (describe)
Case management
PMA
Medication Ordered
Medications: Same as above:
Mental Health Medication
ABILIFY
BUPROPION
CELEXA
DEPAKOTE
Medication Education Provided:
Medication, dose, time to take
Purpose/Expected benefits/Risk
Common side effects
Client
Dosage
10MG
20MG
30MG
250MG
Frequency
1 QAM
2 QNS
1 or 2 QD
2 QHS
Family
Lab monitoring required/reason
Expected length of tx.
Effects on pregnancy/nursing
Amount Refills
Samples
Smp Dsg
Smp Amt
Financial availability
Alternative to medication/Risk of no treatment
Other (describe)
Justification for Continued Treatment
Requires monitoring of response to medication
Requires monitoring for medication side effects
Follow-up:
Days:
Symptoms unstable
Prevent decompensation
Weeks: 8
Months:
Improve level of functioning
Prevent hospitalization
Other:
Extra Notes
Extra Notes ...... ...... ....... ......... ....... ...... ...... ........ .......... ....... ..... ..
Initial PMA (page 2)
ID: 10138984
Date: 08/31/2007 12:35:00
MEDICATION MONITORING FORM
ID: 10138984
NAME: PATIENT PMA
Adult:
Medication Compliant:
Medication Effectiveness:
Age: 34
No
Working
Ticket No: 219
School/Job Employment: SCDMH
Reason:
Run out
Neuroleptic Consent:
No
Current Medication
Mental Health Medication
Dosage
10MG
20MG
30MG
250MG
ABILIFY
BUPROPION
CELEXA
DEPAKOTE
Physical Healthcare Medication
Frequency
1 QAM
2 QNS
1 or 2 QD
2 QHS
Purpose
Dosage
Frequency
Purpose
Dosage
Frequency
Purpose
Premarin
Other: OTC, Herbals, Vitamins, etc.
Vitamin C
(*) Med. Education:
N/A
Name
Time to Take
Dosage
Purpose
Benefits
Side Effects
Pillminder
Barriers to Care
Allergies
honey
| orange
Primary Physician:
Dr.Demo
Last Medical Hospitalization:
Labs:
| aspirin
| Pharmacy:
CVS
| Last Psychiatric Hospitalization:
last year
2005
Measurements
Ht: 5FT2
Wt: 150Lbs
AIMS Date:
N/A
EKG Date:
Waist:
FSBS Date:
Result:
Pulse: 60
Result:
BP standing:
UDS Date:
BP sitting:
Result:
100/60
Temp:
BMI: 27
Other Medical Conditions
None
Pregnant:
N/A
| Normal Menses:
N/A | Date of Last Menses:
N/A
Current Symptoms
Denies all symptoms
AV hallucinations
Agoraphobia
Anxiety
Appetite over
Appetite under
Delusions/paranoia
Depression
Flashbacks
Flight of ideas
Hyperactive/inattentive
Hyperverbal
Irritability
Legal problems
Mania/hypomania symptoms
Oppositional
Obsessive/compulsive
SI/HI/attempts
Thought disorganization
Trauma
Sleep Disturbance
| #Hours:
Substance/Alcohol Use
None
Tobacco
Caffeine
Other Health Eroding Behavior/Comments:
Alcohol
Illicit drugs
(decribe)
Other
(decribe)
Side Effect Profile
Neurological (EPS)
Akathesia
Parkinsonism
Dystonia
Tremors
Abnormal Movements
Drooling
Metabolic
Weight Gain
Weight Loss
Elevated Cholesterol
Elevated Triglycerides
Endocrine
Fatigue
Increased Thirst
Constant Hunger
Frequent Urination
Visual Problems
Gynecomastia
Sexual Dysfunction
Other/Comments:
Comments.........................
Gastrointestinal
Nausea
Stomach Cramps
Diarrhea
Constipation
Dry Mouth
Outcome Measures
GAF: 80
Return Appt.Date: 10/01/07
Time: 10:00 am
| Next PMA Date: 11/01/07
Time: 10:00 am
| CSN#:
Additional Comments / Notes
Additional Comments / Notes .............................................................................
MedMonitoring (page 1)
ID: 10138984
Date: 08/31/2007 12:56:18
PLAN OF CARE
CLIENT NAME:
PAT
PATIENT2
CLIENT ID #:
Dated:
ADMISSION DATE:
MEDICAID #: (If applicable)
09/04/2007
01/01/2007
PAGE 1
9449577
PRIMARY DIAGNOSIS ADDRESSED IN THE TX.: CODE AND DESCRIPTION
(changes need to be dated and initialed)
OTHER DIAGNOSIS ADDRESSED IN TX.: CODE AND DESCRIPTION
(changes need to be dated and initialed)
347-NARCOLEPSY
290.40-VASCULAR DEMENTIA, UNCOMPLICATED
PROMPTS:
Number Goals and Objectives (1., 1.1, 1.2, 2., 2.1, 2.2 as appropriate)
Goals should be in the words of the client, family, and/or stakeholder - list things they would like to achieve, change, or need help with.
Objectives should be reflective of the client's expectiatons, development, culture/ethnicity, tx. team's expectations, understandable to the client & their family
as appropriate to the DX; and behavioral, measurable, achievable.
Interventions at least one for each objective that tells how and what is done to achieve the objective.
(MD MUST INITIAL AND DATE ANY ADDED SERVICES OR CHANGES IN FREQUENCY AFTER MD SIGNATURE/AUTHORIZATION BELOW)
TARGET
SERVICES
FREQUENCY
DATE
Goal # 1
WRAPS-CSS
goal 2
Objective # 1.1
objective 2.1
TYPE
OF STAFF
25xWeek
BA
01/01/08
Intervention # 1.1.1 intervetion 2.1.1
COPY
CLIENT SIGNATURE AND DATE
(indicates input and copy offered)
Accepted
Declined
SCDMH
NOV. 2004 (REV. APR. 2006)
C-181
CLINICIAN SIGNATURE, TITLE AND DATE:
PHYSICIAN SIGNATURE, TITLE, AND DATE:
(confirms medical necessity and appropriateness)
PLAN OF CARE
PAGE 2
CLIENT NAME:
PAT
PATIENT2
CLIENT ID
9449577
Strengths: (programs, institutions, people in client's life that offer support/
motivation)
Needs: (treatment or global needs, include legal involvements/requirements,
e.g., court ordered to tx.)
strengths
needs
Abilities (assets/skills of the client that can be used in treatment)
Preferences: (appt. times, therapist, types of treatment, language of
preference)
abilities
preferences
Other Service Providers/Referrals: (include co-occuring disabilities/needs
beyond the scope of the MHC)
X VR
X DDSN X DSS
X A&D
X DHEC X MD X OTHER (list)
Referral Source
Contact Name: contact name
Other:
list of other
referral info
Program:
program
Discharge/Transition Criteria
discharge
Center Use:
center use
Other:
other
SCDMH
NOV. 2004 (REV. APR. 2006)
C-181
(initiated with the client on intake)
Telephone: 1-800-555-5555
04/01/07
PROGRESS SUMMARY
to
06/30/07
(Due at transfer, discharge, and no less often than every 90 days)
Name:
PAT
ID #:
9449577
PATIENT2
Current GAF: 100
Current CAFAS
(optional):
Check All Services Received:
X
Other Rating:
PMA
Med Adm
PMA-APRN
X
Fm. Tx.
MHS-NOS
Gp. Tx.
BHP-ES
Outcome Rating Scale:
1- None 2- Limited 3- Some 4- Significant 5- Accomplished
TCM
X
NS
X
WRAPS-BI
X
CI
CI-MHS
X
CCS
PRS
WRAPS-CG
WRAPS-CCS
STAD
WRAPS-TDC
ASSMT
PSS
X BH-DT
X
SPD
ACT-1
X
IND. Tx.
ACT-2
Summary: 1.Progress on each goal & tx. Objective (outcome rating). 2. Clinical justification of the need for continuing treatment by learly statnig how the continuation of services is
necessary to treat the disorder or prevent decompensation (the benefit or impact fo the services) and/or criteria for discharge to another program or from Center. 3.
Plan/recommendation for future treatment, include client and family feedback; integration of client into the communtiy and changes in treatment planning. For transfer or discharge, list
medications/efficacy.
Objective
Number
Outcome
Rating
1.1
1
Progress
Progress
Progress
Progress
Progress
Progress
Progress
Progress
Progress
Progress
Progress
Progress
Progress
Progress
Progress
Progress
Progress
Progress
Progress
Progress
Clinician's Signature and Title:
SCDMH FORM
NOV. 2004 C-182
text
text
text
text
text
text
text
text
text
text
text
text
text
text
text
text
text
text
text
text
Progress
Progress
Progress
Progress
Progress
Progress
Progress
Progress
Progress
Progress
Progress
Progress
Progress
Progress
Progress
Progress
Progress
Progress
Progress
Progress
text
text
text
text
text
text
text
text
text
text
text
text
text
text
text
text
text
text
text
text
Progress
Progress
Progress
Progress
Progress
Progress
Progress
Progress
Progress
Progress
Progress
Progress
Progress
Progress
Progress
Progress
Progress
Progress
Progress
Progress
text
text
text
text
text
text
text
text
text
text
text
text
text
text
text
text
text
text
text
text
Progress
Progress
Progress
Progress
Progress
Progress
Progress
Progress
Progress
Progress
Progress
Progress
Progress
Progress
Progress
Progress
Progress
Progress
Progress
Date:
text
text
text
text
text
text
text
text
text
text
text
text
text
text
text
text
text
text
text
Progress
Progress
Progress
Progress
Progress
Progress
Progress
Progress
Progress
Progress
Progress
Progress
Progress
Progress
Progress
Progress
Progress
Progress
Progress
text
text
text
text
text
text
text
text
text
text
text
text
text
text
text
text
text
text
text
Progress
Progress
Progress
Progress
Progress
Progress
Progress
Progress
Progress
Progress
Progress
Progress
Progress
Progress
Progress
Progress
Progress
Progress
Progress
text
text
text
text
text
text
text
text
text
text
text
text
text
text
text
text
text
text
text
Progress
Progress
Progress
Progress
Progress
Progress
Progress
Progress
Progress
Progress
Progress
Progress
Progress
Progress
Progress
Progress
Progress
Progress
Progress
text
text
text
text
text
text
text
text
text
text
text
text
text
text
text
text
text
text
text
Appendix B - Sample Consent Forms
•
Authorization to disclose protected health information
•
Consent to examinations and treatment
•
Consent for follow-up contact
•
Income verification / Determination of ability to pay reduction
•
Medicaid release form
•
Medicare release form
•
Neuroleptic (Antipsychotic) Medication Consent Form
•
Private Insurance release form
•
Request to amend SCDMH protected health information
•
Request to inspect and/or copy SCDMH protected health information
I PAT PATIENT3 at Happy Lane , Happy , SC 29222 DOB 05/10/1976, SSN
333-33-3333, Medical record (admission number) 1010351 authorize the release
of my SCDMH health information, as specified below, for the following purpose:
testing
I authorize the release of the following information for the time period from
0 1 / 0 1 / 0 1 to 0 1 / 0 1 / 1 0
Infor mation fro m all SCDMH inpatient and outpatient facilities, centers, clinics,
programs and offices.
AND The information authorized to be released includes:
All information from above
This information should be released to:
Name: Fake Name
Street: 200 Nowhere Lane
City: Imagineville
State: SC
ZIP: 29999
Phone: 555-555-5555
Relationship: N/A
I understand that the above information is protected by applicable law and if this
form is not complete, SCDMH may not be able to release the information.
I understand that the information may include alcohol/drug abuse and/or
HIV/AIDS/ARC and other infectious disease information about me.
I do not want the following information disclosed:
This Authorization is valid for one year from my signing unless an earlier date,
condition or event is specified here:
I understand the information disclosed may be subject to re-disclosure by the
entity name above. I may cancel this Authorization by writing the local Privacy
Officer where I received or am receiving treatment. I understand that if I cancel
this Authorization, SCDMH cannot take back any use or release made with my
Authorization, and SCDMH must keep records of my treatment. I understand that
applicable law may permit or require the use, disclosure or re-disclosure of
information about me without my Authorization. I have been given a copy of this
Authorization.
Authority if signed by Personal Representative:
Method of Release:
Consent to Examinations and Treatment
Consent and authority is hereby given to this mental health facility and its
professional s ta ff to p e rfo rm o r h a v e p e r f o r m e d e x a m i n a t i o n s a n d / o r
psychotherapy and/or related mental health treatments and to administer
medications when deemed necessary or advisable by appropriate members of the
professional staff in consultation with me. This statement has been fully
explained to me and I understand it.
I have been provided a copy of the SCDMH Notice of Privacy Practices and an
opportunity to review it and ask questions.
Yes
No
Client Signature:
PAT PATIENT3
Parent or Legal Guardian:
Fake Name
Date: 0 5 / 1 8 / 2 0 0 9
Date:0 5 / 1 8 / 2 0 0 9
SIGNIFICANT OTHER PARTICIPANTS INVOLVED IN THE IDENTIFIED PATIENT'S
SERVICES
I agree to participate in therapy focused on the patient signing above. I
understand that any information that I give may be included in the patient's record
and disclosed as allowed by law. I also understand that if I want to receive therapy
or other treatment services, a separate consent to examination and treatment is
required.
Name: Participant One
Relationship: none
Name: Participant Two
Relationship: none
Date:05/18/2009
Date:05/18/2009
Name: Participant Three
Relationship: none
Name:
Relationship:
Date:05/18/2009
Date:05/18/2009
Name:
Relationship:
Name:
Relationship:
Date:05/18/2009
Date:05/18/2009
Consent for Follow-up Contact
Purpose
We want to measure the benefits to consumers who have received
treatment/service offered by this MHC. This information will help improve
serivces to others in the future.
We hope you will consent to be contacted after discharge, but you do not have to
do so. Your consent will not affect how you are treated at this agency. If you
refuse, it will not keep you from receiving routine services.
Procedures
You will be contacted one or two months after discharge and asked some
questions about how you are doing. Your spouse or other contact person (names
by you below) may be contacted for information about how you are doing. Your
aftercare referral may also be contacted to provide follow up information. We will
send you a questionnaire in the mail and ask that you return it and we may
contact you by telephone.
Confidentiality
Your privacy will be safeguarded. Your participation and all information obtained
in this study are protected by state and federal law. Your name will not appear on
any data that is published. All information will be used to improve services.
Risk/Discomfort
There is virtually no risk of physical or emotional harm from this survey. No
experimental procedures are involved.
Questions or Comments
If you have any questions about this survey, please contact your case manager.
Permission
This study has been explained to me. I understand the purpose of this survey. My
signature below shows that I give voluntary consent to participate and have been
given a copy of this form.
I give my permission for you to contact the following person for follow up
information.
Name: Fake Name
Relationship: None
Address: 200 Nowhere Lane, Fakeville, SC,
29999
Phone: 555-555-5555
Consumer Signature:
COMMUNITY MENTAL HEALTH CENTER
DETERMINATION OF ABLITITY TO PAY REDUCTION
Guarantor of payment if
Client PAT PATIENT3 " UCID
9524889"
other than client
Date of
SS:
333-33-3333
05/10/1976
Prepared By:
Birth:
INCOME
CURRENT
Self
Spouse/Household
Alimony/Child Support
Public Assistance (list
each type)*
type on
type two
100
100
100
EXTRAORDINARY
EXPENSES
Medical
Alimony/Child Support
other
(non-discretionary)***
other out one
other out two
100
100
"
ALAN JOHNS
CURRENT
50
50
50
50
GROSS EXPENSES
other (list each)**
other type one
other type two
100
100
GROSS INCOME
700
GROSS INCOME
LESS GROSS EXPENSE
700
EQUAL ADJUSTED
GROSS INCOME
500
NUMBER OF
DEPENDENTS
4
* List each type of public assistance, such as food stamps, AFDC, etc.
** For other recent income, other liquid assets of funds available for payment of medical bills
including bank assets accumulated from public benefit payments , trust, etc.
*** For recent non-recurring expenses, medial-expenses, etc
SECTION 1:
PROOF PROVIDED
I ACKNOWLEDGE THAT THE INFORMATION GIVEN IS ACCURATE AND COMPLETE AND THAT I WILL
UPDATE THE INFORMATION AS IT AFFECTS MY ABILITY TO PAY. YOU MAY BE SUBJECT TO CIVIL
OR CRIMINAL PENALTIES IF YOU GIVE FALSE OR INCOMPLETE INFORMATION.
I AUTHORIZE ANY ENTITY HOLDING FINANCIAL RECORDS OR OTHER INFORMATION IN ANY FORM
PERTAINING TO THE FINANCIAL INFORMATION GIVEN BY ME ABOVE TO DISCLOSE TO THE CENTER
ANY FINANCIAL INFORMATION NECESSARY FOR THE CENTER TO DETERMINE MY ELIGIBILITY, IF
ANY, FOR A REDUCTION ON MY BILL.
Self Pay
Medicaid
Medicare
Champus
Private Ins
Medicaid HMO
I have been given a completed copy of this form and understand that I may request a review of my ablity to pay at any
time. This information may be updated at any time but must be reviewed at least anually.
I UNDERSTAND THAT I AM RESPONSIBLE FOR PAYMENT, AFTER ANY BALANCE REDUCTION FOR WHICH I MAY QUALIFY, FOR
SERVICES PROVIDED TO ME BY THE CENTER AND THAT PAYMENT IS EXPECTED WHEN SERVICES ARE RENDERED.
NO PROOF
I understand that in order to qualify for a reduction on my bill that I must provide proof of income, which
I did not
provide on my initial visit. I will be allowed THREE(3) visits from this date to bring this proof and have my
financial information
assessed to see if I qualify to receive a reduction of balances for services rendered from this initial visit to
present.
Failure to provide this information within 3 visits will result in possibly qualifying for a reduction on any
future balance I may incur.
I UNDERSTAND THAT I AM RESPONSIBLE FOR PAYMENT, AFTER ANY BALANCE REDUCTION FOR WHICH I
MAY QUALIFY, FOR
SERVICES PROVIDED TO ME BY THIS CENTER AND THAT PAYMENT IS EXPECTED WHEN SERVICES ARE
RENDERED.
UNEMPLOYED/NO INCOME
I do hereby certify that I am currently unemployed and have no income. Failure to inform the Center of any changes in
my financial or employment status may result in loss of any eligibility for a balance reduction based on income, for
services rendered to me.
Signature:
MEDICAID
I authorize release of any medical information necessary to procress MEDICAID
claims and request payment of benefits to The Department of Mental Health for
services provided by them.
Client Signature
Date: 05/18/2009
Clinician Signature
MEDICARE
I authorize the release of any medical information necessary to process
MEDICARE claims and request payment of benefits to the Department of Mental
Health for any unpaid bills for services provided by them during the period of
05/18/2009 thru 05/18/2010 .
Client Signature
Date: 05/18/2009
Clinician Signature
South Carolina Department of Mental Health
Neuroleptic (Antipsychotic) Medication Consent Form
Client: BERTHA LLOYD
ID#: 7 9 0 0 2 4 8
I understand that neuroleptic medication (antipsychotics) may be very helpful in treating my medical condition.
Clozaril, Risperdal, Zyprexa, Seroquel, Geodon, Abilify and Invega are examples of newer neuroleptics. Haldol, Prolixin,
and Navane are examples of older neuroleptics.
These medicines may help me think more clearly, feel less aggressive and hostile, and may decrease other psychiatric
symptoms. Some of them may help my mood. If I take these medicines regularly, they may keep many of my symptoms
from coming back. The medical staff cannot guarantee how I will respond to any of these medicines.
I have talked with my doctor or nurse practitioner about common side effects seen with these medicines. We have
talked about tardive dyskinesia (TD). I have been told that TD describes movements of the mouth, jaw, tongue, hands,
feet, or body that may be irreversible. I know it happens most often when you take an older medicine for a long time,
and that it can occur spontaneously even when someone has never taken these medicines. The newer neuroleptics can
cause it too, but much more rarely than the older medicines. Sometimes it appears after medicine is stopped or
decreased. I have been advised by my doctor or nurse practitioner to report any symptoms of TD, or other problem
related to taking my medicine, as soon as possible.
My doctor or nurse practitioner and I also talked about the side effects that may be related to the use of these
medications. I have been told that they may cause my blood sugar and/or cholesterol levels to go up. I have been told
this especially true for the newer ones. I have been told that while taking neuroleptic medication I may have to be
monitored for these side effects, including blood testing.
My doctor or nurse practitioner and I have talked about different treatments for my symptoms and we agree that
neuroleptic medicines may help my illness. I have been told that without this medication my condition may improve
very slowly but is more likely to get worse.
The doctor or nurse practitioner will try to answer questions I have about these medicines. We will work together if we
need to change the dose of my medicine, switch from one medicine to another, or stop my treatment. I agree to take
these medicines as prescribed by my doctor for the treatment of my medical condition.
02/24/2010
Client Signature
Date/Time
Prescribing Health Care Provider
Date/Time
Other Signature, if indicated
Date/Time
02/24/2010
Substitute Decision Maker
Date/Time
VERBAL CONSENT IN LIEU OF WRITTEN CONSENT
Verbal consent was given by:
John
02/24/2010
Substitute Decision Maker (relationship)
Physician/Nurse Practitioner obtaining consent:
Date
02/24/2010
Signature
Witness:
Date
02/24/2010
Signature
Date
PRIVATE INSURANCE
I authorize release of any medical information necessary to process claims for
PAT PATIENT3 and request payments of benefits to The Department of Mental
Health for services provided by them
Client Signature
Date: 05/18/2009
Clinician Signature
REQUEST TO AMEND SCDMH PROTECTED HEALTH INFORMATION
Name: PAT PATIENT3
Date of Birth: 0 5 / 1 0 / 1 9 7 6
SS#: 3 3 3 - 3 3 - 3 3 3 3
Address: Happy Lane , Happy , SC 29222
Phone: 5 5 5 - 5 5 5 - 5 5 5 5
Description of the information to be amended, including dates of
documentation if applicable:
words words words words words words words words words words words words
words words words words words words words words words words words words
words words words words words words
SCDMH facility, center, clinic, program or office documenting this information:
N/A
Name(s) of SCDMH staff documenting this information:
N/A
The reason(s) why I believe that
incomplete:
words words words words words
words words words words words
words words words words words
the above information is incorrect or
words words words words words words words
words words words words words words words
words
I am requesting that the described information be amended to read as follows:
words words words words words words words words words words words words
words words words
REQUEST TO INSPECT AND/OR COPY SCDMH PROTECTED HEALTH
INFORMATION
Name: PAT PATIENT3
Date of Birth: 05/10/1976
SS#: 333-33-3333
Address: Happy Lane Happy SC 29222
Phone: 555-555-5555
I am requesting access to my protected health information as contained in the
South Carolina Department of Mental Health (SCDMH) Designated Record Set, for
inspecting and/or copying as indicated below:
Entire Medical Record for the time period from: 01/01/01 through 01/01/10
Entire Financial Record for the time period from: 01/01/01 through 01/01/10
Other:
I understand that my access to this informaton does not include psychotherapy
notes; information needed for some legal proceedings involving SCDMH; research
information; information provided under the promise of confidentiality where
access is likely to reveal the source or when a SCDMH licensed health care
professional determines that my access is reasonably likely to endanger my or
other person's life or physical safety.
I understand that SCDMH will usually provide access within 30 days of receipt of
my request. If the information is not located on site, SCDMH will notify me in
writing and may take up to 60 days to provide access. Within that time period, if
there will be additional delays, SCDMH may take a one time 30 day extension by
letting me know in writing the reasons for the delay and the date that action will
be taken. SCDMH will notify me in writing if it denies me access. I may have the
right to have that decision reviewed and SCDMH will comply with the reviewer's
decision. Instead of providing access/copies, if I agree, SCDMH may provide me
with a written summary of the information requested. I understand that SCDMH
may charge for its cost of providing copies or a written summary, an will let me
know what those charges are before I am billed for them.