1
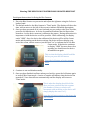
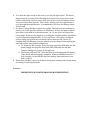
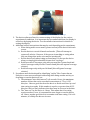
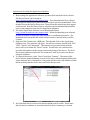
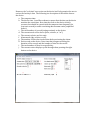
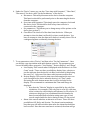
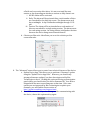
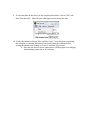
Bite Counter
User Manual
For Technical Support Please Contact:
Bite Technologies Support
[email protected]
864-643-9424
About This Manual
The Bite Counter is intended to be used by professionals and this manual is
written to help those professionals. This manual is broken into three parts. The
first part explains instructions for the research “participant” or the end user of the
Bite Counter who is being overseen by the professional. The second part describes
instructions for the “experimenter” or professional who is overseeing the use of the
Bite Counter. The final section of the manual describes the Bite Counter application
software and how to configure the Bite Counter for various research paradigms or
feedback programs and download data from the device using the software.
Warning: THE DEVICE IS NOT WATER PROOF OR WATER RESISTANT
Participant Instructions for Using the Bite Counter:
1. Place the Bite Counter on your wrist and adjust the tightness using the Velcro or
leather band.
2. The default mode for the Bite Counter is “Time” mode. The display will show the
time, with an arrow to the left of the screen to indicate PM when appropriate.
3. Once you have prepared all of your food and you are ready to take your first bite,
press the left button once. A series of sounds will indicate that the device has
turned on. As the device turns on it calibrates the sensor. During calibration it is
important to hold the device as still as possible. While calibrating, the display
reads “1888”. Once the device has calibrated, the device will be in Bite Count
mode and depending on the device settings, the device will now display your
active bite count, calorie count or just the word “on” to indicate that it is in Bite
Count mode. If the device continues
to display “1888” for more than a few
seconds, you should turn the device
off and back on again.
This is what the display should look like
before you press the left button.
Press the left button to begin counting
bites.
4. Continue to eat and drink normally.
5. Once you have finished and have taken your last bite, press the left button again
to turn off Bite Count mode. A series of sounds will indicate that the device has
turned off. Your data will save automatically and the display will return to
‘Time’ mode.
This is what the display should look like
after you have activated the bite counter
(the number of bites or calories will
increment with each bite or the device will
simply display the word “on”).
Press the left button again to deactivate the
bite counter.
6. To review the days stored on the device, you use the right button. The device
may present all or some of the following: most recent bite count, most recent
calorie count, daily total bite count, daily total calorie count and battery status.
You access these data from the ‘Time” mode. Simply press the right button to
cycle through the available data. At a minimum you will see the battery status
and the time.
7. It is best to charge the Bite Counter every night. The battery status indicator is
based on 0-4 scale (in bars, similar to a cell phone). At zero, the device will not
enter Bite Count mode in a reliable manner. At 1-4, the device will enter Bite
Count mode. However, the length of recording time available will be dependent
on you individual eating behavior. In our experience, if the device is charged
every evening, the typical user can make it more than one day. Hence, by
charging daily if a charging session is missed, you can charge it that evening the
next day and still have a functioning device.
a. To charge the Bite Counter, insert the large end of the USB cable into the
power supply and plug the small end of the USB cable into the Bite
Counter making sure it goes in the right way.
b. The display will read “chr” when the battery is charging and will display
‘Time’ mode when charging is complete. When you think the device is
fully charged, you should still check the battery status indicator to see
that it reads 4.
8. Please wear the Bite Counter at all times during your waking hours except when
exercising or entering the water.
Reminder:
THIS DEVICE IS NOT WATER PROOF OR WATER RESISTANT.
Experimenter Instructions for Using the Bite Counter
1. Before deploying the device with a subject, you should do the following:
a. Be sure you have downloaded and saved all previous data.
b. Run the device “Diagnostics”. You do this by holding the device steady,
pressing and holding the right button down and pressing the left button
and then releasing both buttons. The first diagnostic is a “Display Test”.
During this test you should see the entire display activated. Following
this test the device goes into “Sensor Test” mode. During the sensor test,
you should slowly roll the device away from you and then back towards
you as if it were being rolled on the wrist. The numbers on the display
should go positive and then negative and a corresponding auditory cue
will go high and low in pitch. You should do this rolling motion once or
twice and at some point stop the rolling motion in any position. When the
motion is stopped and the device held steady, the number should stay
within +/-10 and the sound cease.
c. Verify that the display settings are as desired for the experimental
conditions.
d. Connect the device to a computer with the Bite Counter software. Sync
the time with the computer time. After saving any data on the device,
clear the data from the device.
e. Fully charge the device.
The display after entering test mode.
2. The battery status indicator currently uses a “four-bar” scale. The device
operation requires a battery status between 1-4 bars. Please ensure that you
have instructed participants in charging the device. You should provide the
participant with reminders to charge the device during the study. When the
battery status falls to zero bars, the device will not enter Bite Count mode, but
will continue to save any data that were previously collected. It is good practice
to charge the device every evening to ensure that the device will record an entire
day’s activity as battery life is highly dependent on the duration of time the
device is in Bite Count mode.
The battery status display with maximum charge
3. The device software allows for custom setting of the display for the various
experimental conditions. It is important that you understand how the display is
set before deploying the device. See the software instructions for details on
setting the display.
4. Additional subject instructions that may be used depending on the experiment:
a. When eating multi-course meals, please turn on/off the device with each
course.
b. Use the device to record all meals and snacks. (This will attempt to
capture all calories. However, if the person is snacking or eating when
they are doing other tasks, error may be introduced).
c. Use the device only when eating an actual meal. Do not use the device
when you simply grab a handful of some food “on the go”.
d. Drink non-caloric beverages only with your non Bite Counter hand and
caloric beverages with your Bite Counter hand (this will capture beverage
calories).
e. Drink beverages only with your left hand (this will ignore beverage
calories).
5. Procedures must be developed for identifying “outlier” Bite Counts that are
likely do to some error associated with eating while doing another activity or
forgetting to turn the device off, etc.
a. The minimum “inter-bite-interval” is 8 seconds. Hence, the maximum
number of bites that can be recorded in one minute is 7.5 or 0.125
bites/sec. Hence a good check on the data is to divide total bites by total
time eating in seconds. If this number is equal to or greater than 0.125
bites/sec this is a likely indicator that there may be an error in the data.
b. The “time out” for the device is 1 hour. This means that if an eating
session reaches 1 hour, it is assumed the user forgot to turn the device
off. Hence, another good check is to examine total time eating. If it is 60
minutes, it is likely the data are in error.
Instructions for Using the Application Software
1. Before using the Application Software you must first install the Device Driver.
The Device Driver can be found at:
http://www.icountbites.com/support.html . First download the Device Driver.
Then open the directory in which the Device Driver has been downloaded. Now
double click on the Device Driver icon. Then follow the instructions that appear
on the screen. Note the Device Driver only has to be downloaded and installed
once on any computer that runs the Application Software.
2. The latest Application Software can be downloaded from:
http://www.icountbites.com/support.html . When downloading new software,
be sure to archive or delete the older software to avoid mixing versions. The
download is an executable file and it is all you need to interact with your Bite
Counter.
3. Plug your Bite Counter into a USB port. Then double click on the Application
Software icon. The software will open. You will see a menus system with: “File”;
“USB”; “Device” and “Advanced”. The majority of your interaction with the
device will occur under the “Device” menu. You will also see a window that
provides information on the current status and setting of the device. The all of
these status indicators will read “Not connected” until you connect the device
using the software.
4. To connect the device, select “Device” and then “Connect”. The status of the
device will be updated and any records on the device will be displayed below the
status indicator area. In addition, a bar graph will show the total number of bites
taken each day that the device was used since the last reset.
5. All of the data that is stored on the device should now be visible. Please note
that the device continues to store data until the device’s memory is cleared.
However, the “real-time” user review on the device itself only permits the user to
review the last day’s data. The following is a description of the visible data on
the device:
a. The computer time.
b. The device time. A and B are shown to ensure that the time on the device
matches the actual time. Note that the clock on the device is fairly
accurate, but should be synced with the computer time frequently (at
least once a week) to make correlating data streams easier (explained
below).
c. The total number of records (eating sessions) on the device.
d. The current mode of the device (bites, calories, or “on”).
e. The current calories per bite ratio
f. Alarm mode (day, session, or off).
g. The number of bites that can be taken before activating the alarm.
h. Each record on the device: Date, time that it began recording, the
duration of the record, and the number of bites for the record.
i. The total number of bites for a specific day.
j. The current review displays cycled through when pressing the right
button on the device.
6. Under the “Device” menu, you can also “Sync time with Computer”, “Clear Data”,
“Disconnect” the device and “Set the Parameters” of the device.
a. Disconnect: This safely disconnects the device from the computer.
This function should be performed prior to disconnecting the device
from the computer.
b. Sync time with Computer: This simply syncs the computer clock and
the device clock. This should be done every time to device is
connected to the computer.
c. Set parameters: This allows you to change many of the options on the
device (see section 7).
d. Clear Data: This clears all of the data from the device. When you
attempt to clear the data it will ask if you have saved the data. You
have to attempt to clear the data twice before it actually clears. This is
a safeguard against accidentally clearing the data.
7. To set parameters, select “Device” and then select “Set the Parameters”. Once
you do this a pop up window with radio button controls. The parameters you
can set fall under three categories: “Live Display”, “Review Display” and “Alarm”
a. Live Display: This controls what is displayed with the device is in “Bite
Count” mode. There are three possibilities: display bites, calories or
just the indicator that the device is in Bite Count mode by displaying
the word “on”. Only one of the three radio buttons can be active.
b. Review Display: This controls what stored information the user can
cycle through on the device when the device is in “Time” mode.
Activating the radio button means that it will be included in the
display. We recommend at a minimum that Time and Charge be
displayed.
i. Note that the “Calories” display is controlled by the cals/bite
calculation. For example, if the cals/bite is set at 20, each time
a bite is taken the calorie display will advance by 20 calories. If
calories are displayed, we recommend that this number be
based on an individual calculation using some type of food
record coupled with the device during at least a 3 day period.
c. Alarm: this controls whether an alarm is set or not. There are three
possibilities: Off; Daily; and Session. The alarm is an intermittent
beep that goes off with each bite taken after the alarm threshold has
been crossed. Note that once an alarm is activated, the alarm will go
off with each successive bite taken. It is not reset until the next
session or day depending on whether a session or daily alarm is set.
i. Off: No alarm will be activated
ii. Daily: The alarm will be activated after a total number of bites
are exceeded for the daily bite count. The alarm resets each
day at midnight. A day is defined as midnight through 11:59
pm.
iii. Session: The alarm will be activated after a total number of
bites are exceeded for a single eating session. The alarm resets
for each eating session. An eating session is defined as the time
between the device being turned on and then off.
d. Calories per Bite ratio: this allows you to set the calories per bite
conversion ratio.
8. The “Advanced” menu allows you to control two technical features of the device:
a. Update Device App: This allows you to perform a “firmware” update
using the “Update Device App Code”. However, you should only
attempt a firmware update if you have been instructed by Bite
Technologies to do so. Clicking this option will bring up a navigation
panel where you should select the device firmware file. Your device
shipped with the most recent firmware at that time. If for some
reason you are instructed by Bite Technologies to update your
firmware, you will find the latest version at:
http://www.icountbites.com/support.html .
b. Slow USB connection: If you are having trouble communicating with
the device, choose this option and try again.
9. To save the data on the device to the computer hard drive, click on “File” and
then “Save Data As”. This will open a dialogue box for saving the data.
10. To exit the software click on “File” and then “Quit”. Note that prior to quitting
the software you should “Disconnect” the device from the software before
exiting the software by clicking on “Device” and then “Disconnect”.
a. Note that the device can be connected to a USB purposes for charging
without being connected to the software.