1
PIMEX MailExpress
User Manual
Includes Installation, setup and usage instructions.
PIMEX MailExpress
User Manual
Includes Installation, setup and usage instructions
1
PIMEX Group, LLC
The software described in this book is furnished under a license agreement and may
be used only in accordance with the terms of the agreement.
Copyright Notice
Copyright © 2002 - 2008 PIMEX Group, LLC. All rights reserved. Under the copyright laws, this manual may not be copied, in whole or in part, without the written
consent of PIMEX.
Every effort has been made to ensure that the information in this manual is accurate.
PIMEX is not responsible for printing or clerical errors.
PIMEX Group, LLC
P.O. Box 1732
Livingston, NJ 07039
USA
http://www.pimexonline.com
Portions of Internet Direct Component Suite (Indy) are Copyright © 1993 - 2005 Chad Z.
Hower (Kudzu) and the Indy Pit Crew - http://www.indyproject.org
2
Contents
Contents......................................................................................
3
Chapter 1: Introduction .............................................................
5
About PIMEX MailExpess .........................................................................
What’s New.................................................................................................
How it Works ..............................................................................................
Skills Needed ..............................................................................................
Installation...................................................................................................
System Requirements..................................................................................
The PIMEX MailExpress User Interface....................................................
Upgrading To Advanced Edition ................................................................
5
5
6
6
7
8
8
9
Chapter 2: System Setup and Configuration .......................... 11
The Connection Pane .................................................................................. 11
Settings............................................................................................................. 11
Test Connection ............................................................................................... 14
Chapter 3: Message Setup ....................................................... 15
The Message Pane....................................................................................... 15
Settings.............................................................................................................
HTML Restrictions...................................................................................
Headers .....................................................................................................
Text ..................................................................................................................
Method .............................................................................................................
15
16
17
18
19
Chapter 4: Mailing List Setup ................................................... 21
The Mailing List Pane................................................................................. 21
Parameters................................................................................................... 21
Importing a Mailing List............................................................................. 22
Example ...........................................................................................................
Commands Available in the Mailing List Pane ...............................................
Import .......................................................................................................
Export .......................................................................................................
22
26
26
27
3
Clear..........................................................................................................
Add ...........................................................................................................
Edit............................................................................................................
Delete........................................................................................................
Message Status Icons .......................................................................................
27
27
28
29
30
Chapter 5: Message Review ..................................................... 31
The E-Mail Pane ......................................................................................... 31
Example: Previewing the “Raw” email text .................................................... 31
Example: Previewing the Email After Substitution......................................... 32
HTML Preview ................................................................................................ 35
Chapter 6: Sending Your Message .......................................... 39
The Command Menu .................................................................................. 39
Send All Remaining / Send Next Batch...........................................................
Send Selected ...................................................................................................
Resend Failed...................................................................................................
Stop Sending ....................................................................................................
39
40
40
40
Successful Send .......................................................................................... 41
Chapter 7: .................................................................................. 43
Chapter 7: Advanced Edition ................................................... 43
Screen Differences in Advanced Edition .................................................... 43
Attachments ..................................................................................................... 45
Backup Workspage .......................................................................................... 47
Restore Workspace .......................................................................................... 48
Chapter 8: Troubleshooting Tips ............................................. 51
Index ............................................................................................ 55
4
CHAPTER
1
Introduction
About PIMEX MailExpess
PIMEX MailExpress is a bulk mail program that gives you a powerful and efficient
way to reach your customers and contacts via e-mail. It's perfect for individuals or
businesses intending to send out newsletters, announcements, business notices and
other essential information. All that’s needed is a text (flat ASCII) file containing a
list of email addresses.
This utility is Freeware. It was designed for Windows 95/98/ME/NT/2000/XP/
Vista, and requires a SMTP Server (hosted by most Internet Service Providers, or
ISPs). Each message can be personalized, so all addressees will receive letters
intended for them only. And best of all, the contact list can be created by PIMEX
from any address book or distribution list simply with a couple of mouse clicks!
Note: PIMEX MailExpress will not work with AOL or web-based (Yahoo, Hotmail,
etc.) e-mail accounts. However, it will work with Google Mail (Gmail) if you enable
POP3 option in your Gmail account.
What’s New
As of 6/02/2008 PIMEX MailExpress has been enhanced to provide you with the
following features:
Windows Vista support
SSL Connection support
BCC Method for sending emails
“Send Selected” option to send to selected recipients
Send up to 20,000 messages at a time (Advanced Edition only)
Backup and Restore program workspace (connection settings, e-mail list, message) (Advanced Edition only)
Send an unlimited number of file attachments (Advanced Edition only)
Introduction
5
How it Works
MailExpress streamlines the process of merging text content with lists of email recipients and allows you to control when and how you send them. The content can be a
simple TXT file from NotePad, for example, or an HTML file created using a variety
of sources. See“HTML Restrictions” on page 16.
The program imports lists of e-mail addresses with optional parameters in text or
CSV (comma-separated values) format, generated by PIMEX or other contact manager software as well as lists created by programs such as Excel.
The use of MailExpress Paramete in your email gives you the flexibility to personalize
and format your messages as you desire.
Skills Needed
PIMEX MailExpress is simple to use, requiring only a basic knowledge of:
email programs and addressbooks
simple import/export functions in applications such as Microsoft Excel
the Windows Operating System environment
Important DO NOT SEND UNSOLICITED E-MAIL. Be aware that you are
solely responsible for the messages you send. In many cases sending unsolicited
email (spam) is in violation of the law, and you will be solely accountable and liable
for damages and violations. We reserve the right to refuse technical support and/or
other services if you:
send unsolicited email
hijack a mail server relay
distribute illegal information or materials
forge header information
put false or misleading information in the subject
fail to provide a means for recipients to unsubscribe from your e-mail lists
6
Chapter 1
Installation
PIMEX MailExpress is available for immediate download, and it’s completely free.
Click on the download button at http://www.pimexonline.com/
mailproduct.html to download and install it. At the conclusion of the install process
a shortcut to the application will be placed on your desktop.
Introduction
7
System Requirements
Disk Space
2.4 MB
Operating System
Windows ® 95, 98, Me, NT, 2000, XP or Vista
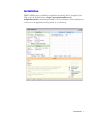
The PIMEX MailExpress User Interface
The MailExpress interface is made up of four window “panes” and a Command
Menu, which are always visible unless they are overlaid by a pop-up window. The
four panes are the Connection, Message, Mailing List and Email.
.
Connection - The Connection pane displays and accepts settings that control the link
between MailExpress and your email server as well as its behavior while you are connected.
Message - The Message pane displays and accepts settings that pertain to the email
that you are about to send.
Mailing List - The Mailing List pane displays and accepts data describing the recipients of your email. It also offers functions that allow you to import, export and edit
recipient lists.
Email - The Email pane displays the content of the email to be sent.
Command Menu - The Command Menu occupies the right-hand side of the Email
pane and provides additional commands that you use to direct the transmission of
emails, as well as links to additional information about PIMEX MailExpress including:
Help - provides access to the electronic version of this manual
Advanced Edition - offers the option to purchase a full-featured version of
MailExpress
PIMEX Online - provides a link to http://www.pimexonline.com
About - displays MailExpress program and PIMEX company information
Status Bar - The Status Bar is located at the bottom of the MailExpress window. It is
divided into three sections, from left to right:
8
Chapter 1
message status icon area - shows the number of sent, unsent and failed messages
from the most recent transmission
record position indicator area - shows the position in the mailing list of the recipient that is selected in the Mailing List pane. For example, 2:2 in the record position indicator of the sample status bar below indicates record two of two.
command message area - shows the description of any command’s purpose if
you pause over the command with your cursor
Upgrading To Advanced Edition
If you like the functionality of PIMEX MailExpress, but want to expand its possibilities, you can buy the Advanced Edition. The Advanced Edition of PIMEX MailExpress can:
send up to 20,000 e-mail messages at a time
send file attachments (unlimited number)
Blind CC (BCC )every e-mail to up to 100 destinations (using BCC Method)
backup and restore program workspace (connection settings, e-mail list, message)
Once your payment is processed, we will email you your personal code, which will
automatically convert the program to the Advanced Edition. Owners of previous
versions (2.x, 3.x) are offered a 50% upgrade discount. To purchase the Advanced
Edition go to http://www.pimexonline.com.
Introduction
9
10
Chapter 1
CHAPTER
2
System Setup and Configuration
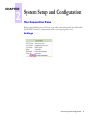
The Connection Pane
Before using MailExpress you’ll need to provide some information that will enable
the PIMEX software to communicate with your outgoing mail server.
Settings
System Setup and Configuration 11
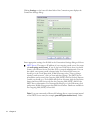
Clicking Settings on the lower left hand side of the Connection pane displays the
Connection Settings dialog:
Enter appropriate settings for all fields in the Connections Settings dialog as follows:
SMTP Server: The name or IP address of your outgoing e-mail server (for example mail.spring-mail-1.com). If you do not know what this is then you should
contact your Internet Service Provider (ISP) or network administrator. You can
also check your current e-mail software setup. For Outlook 2003 users you
should go to the Tools Menu click E-Mail Accounts, select “View or change
existing e-mail accounts”, click on Next and then Change. The SMTP Server
information can be seen in the Outgoing Mail (SMTP) field. In Outlook Express
5 and 6 you should go to Tools Menu and click on Accounts, click the Properties
button and then click Servers tab. See the Outgoing Mail (SMTP) field for the
SMTP Server information. For Netscape Messenger go to the Edit menu, click
preferences, Mail & Newsgroups then Mail Servers menu. Details are available in
the Outgoing Mail (SMTP) Server field.
Note: If you are connected to Microsoft Exchange Server, enter its name instead
of the SMTP Server name(for example, pamail02.pimexonline.local). Under
12
Chapter 2
“authentication” enter your Microsoft Exchange Server login parameters – user
name and password. If you are not sure what they are, contact your network
administrator.
Port Number: The value is typically 25 or 465. This can be verified in the
“advanced settings” section of your current e-mail program.
Timeout (s): Connection or server reply timeout in seconds. If you click on Test
Connection (see below), and connection settings are invalid, MailExpress will
timeout and display a connection error after this amount of time. A typical value
is 30 seconds.
SMTP server requires authentication: If your email provider requires you to
authenticate your connection before sending messages, you should enable this
option and provide values for the SMTP User and Password fields. You can
check this setting in your current e-mail program.
Your E-Mail: The sender’s e-mail address
Your Name: The sender’s full name or a company name (Examples: John Smith,
B&C Enterprises)
SMTP server requires SSL connection: Check this box if you know that your
SMTP server requires an encrypted connection (SSL). You can check this setting
in the “advanced options” section of your current e-mail program.
Delay (s): Time Delay, in seconds, between messages. You can try sending e-mails
with no delay (0), and if you encounter errors after a few e-mails, you should
change it to 1 or 2 seconds. This setting depends on how quickly your SMTP
Server can process e-mails.
Reconnect (msg): Determines how many messages the program should send
before creating a new, fresh connection. Some mail servers have a limit on the
number of messages they will receive in a session. Others may simply slow down
in order to reduce input. For typical dialup users the setting should be kept at 25
or under. For cable or DSL connections you should be able to push this much
higher. This setting may need a bit of tweaking to obtain the best results.
Pause (s): Pause in seconds before each reconnection is made. A value from 1 to
5 seconds should be appropriate.
One batch of e-mails per session: If your Internet Service Provider has a limit on
the number of e-mails you can send in a certain period of time, this option may
become handy. For example, if the limit is 100 e-mails per hour, you should
check this box and set the number in the Batch (msg) dropdown list to 100. After
you close this dialog box, the Send All Remaining option in the E-Mail window
System Setup and Configuration 13
will change to Send Next Batch, and the program will automatically stop each
time after 100 e-mails have been sent. Every subsequent batch will have to be
manually restarted at any time.
Batch (msg): Determines how many e-mails will be sent after you click on Send
Next Batch option.
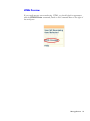
Test Connection
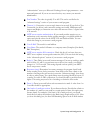
To make sure that the settings you have entered are valid, click on Test Connection.
This will allow you to connect to your SMTP server using the settings you have just
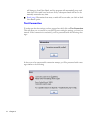
entered. If the connection is successful, you’ll be presented with the following message:
In the event of an unsuccessful connection attempt, you’ll be presented with a message similar to the following:
14
Chapter 2
CHAPTER
3
Message Setup
The Message Pane
After configuring your Connection parameters, it’s time to focus on the actual email
to be sent.
Settings
By clicking on the Settings command within the Message pane, you can set values
that will affect not only the content, but also the behavior of the message.
Message Setup 15
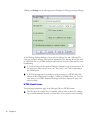
Clicking on Settings on the Message pane will display the Message Settings dialogue:
In the Message Settings dialogue you provide the Subject line and a Message File
(both are required), and set other optional parameters.The message file can be either
an ASCII text file or a HTML document and contains the body of the email you are
broadcasting.
A text file message can be typed in Windows Notepad or any word processor. In
the latter case, make sure you save it as "Text Only (*.txt)" before importing it
into MailExpress.
A HTML message can be created in a word processor or a HTML editor like
Microsoft Word, Microsoft FrontPage, CoffeeCup HTML Editor, etc. You can
even create your HTML-formatted message in Outlook Express if there is no
need for tables.
HTML Restrictions
The following restrictions apply if the Message File is in HTML format:
The File must be a single .htm or .html file with no links to other files (images,
logos, html documents) located on a local drive. If you need to insert an image
16
Chapter 3
file, the file must be located on a web server/web site, and have a valid URL, for
example: http://www.pimexonline.com/images/P5.jpg.
The file cannot contain frames.
The file cannot reference external CSS (cascading style sheet) files located on a
local drive.
Note: We strongly recommend that you test the HTML message appearance
after it is imported by clicking on HTML Preview in the E-Mail window (See
Chapter 5: “Example: Previewing the Email After Substitution” on page 32 ). If
it is not formatted correctly, you will need to make the necessary changes and
then re-import it again.
The message (as well as a subject) can contain up to nine optional parameters (%1,
%2, %3, ... %9) if you want to personalize your e-mail for each addressee (see Chapter 4: “Parameters” on page 21).
Attachments (Advanced Edition only): Click on the Add button to add file attachments.
"BCC" Every e-mail to: Check this box and enter an e-mail address below if you want
a copy of each e-mail to be sent to that address. This address will be invisible to other
recipients.
"Reply to" is different from sender: Check this box and enter an e-mail addressin the
box below it if you want a reply address to be different from the value of "Your EMail" entered in Settings in the Connection box. Later, if any recipient clicks on
"Reply", this address will appear in the "To:" box.
The following parameter is a person's name: If your Mailing List contains multiple
columns/parameters, all columns starting with the second one are treated as parameters. If one of the parameters is a person's name, you can check this box and enter the
parameter number next to it. MailExpress will then add the person's name to the
email header ("To:" section), and your messages will look more personal; for example, To: Clay Tinsley <[email protected]>
Headers
To adjust message headers, click on the “Headers...” button in the lower-right corner.
This option is recommended for advanced users only.
Message Setup 17
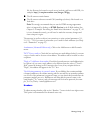
Text
In the event you wish to edit the body of the Message File prior to sending, use the
Text command on the Message pane:
Clicking on the Text command here displays the Message Text editing box, where
you can make your changes and save the file.
18
Chapter 3
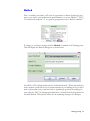
Method
Prior to sending your email, you’ll have an opportunity to dictate whether the message is to be sent to each recipient with personalization, or as one “Blind CC” (BCC)
to “undisclosed recipients” or to a generic group name such as “Rules Committee.”
To change or view these settings, click the Method command on the Message pane.
This will display the Method dialogue box, shown below:
Send Method: The default send method is “Individual E-mails.” When this method is
used a separate e-mail will be sent to each destination in your mailing list. If you don’t
need to personalize every e-mail and wish to significantly speed up the mailing process, select the “BCC (no message personalization)” method from the drop-down list
for Send Method. Then provide values for the remaining settings in the dialogue.
Message Setup 19
Send To: The default value for this is “undisclosed-recipients”. This could the name
of your mailing list (“Board of Directors, for example.) Every recipient will see this
text in the message header. Do not leave it blank.
E-mail Address: Destination e-mail address (To:) for every e-mail message sent. In
most cases you can leave it blank, but some Internet Service Providers may require
that a valid e-mail address be specified in the “To:” section. Again, every recipient
will see this address in the e-mail header.
BCC (per email): Number of blind carbon copy recipients from the Mailing List (see
below) per every message sent. The maximum number is 5 in the Free Edition of
MailExpress (100 in the Advanced Edition). Please note that your ISP can have a
limit on the amount of BCC copies (usually between 50 and 100).
20
Chapter 3
CHAPTER
4
Mailing List Setup
The Mailing List Pane
The Mailing List pane is where you’ll assign, view and manipulate the list of recipients
for your email message. Initially, you need to import a comma-separated values
(CSV) file of email addresses, which can be created in one of several ways:
by typing the list manually, using Notepad, or another text editor
by exporting data in CSV (comma-separated value) format from a spreadsheet
program such as Excel or another similar program
by exporting data in CSV (comma-separated) format from another contact manager application such as PIMEX.
Note: We recommend PIMEX, because it is designed to work with PIMEX MailExpress, has a special tool for generating e-mail address lists with optional parameters,
and can create multiple list files with a predefined number of lines (200 in each file,
for example). PIMEX is available for a free download at http://www.pimexonline.com.
This input file must be an ASCII text file containing up to 200 lines (Free Edition) or
20,000 lines (Advanced Edition).
Important: Each line must start with a mandatory e-mail address.
Parameters
PIMEX MailExpress allows you flexibility in personalizing your messages by accepting extra parameters from the message file in addition to the email addresses. Use the
following guidelines when using parameters:
The email addresses imported into MailExpress can be followed by as many as 9
optional parameters.
If used, these parameters must immediately follow the email address and be separated by commas, tabs or semicolons.
Mailing List Setup 21
If any of the parameters contain commas or double quotes (James Sterner, Jr..
for example) they must be surrounded by double quotes. ( “James Sterner, Jr.”,
for example.)
The recipient information then, should be in the following format:
address,param1,param2,param3,......,param8,param9
Importing a Mailing List
Once you have exported your mailing list data from whatever application you’re
using, the process of importing it into PIMEX MailExpress is a simple one.
Example
As an example, assume the following is the contents of a CSV file called
Business.csv, which you will use as your mailing list:
[email protected],Raymond Force,Vogue,$14.86
[email protected],"John McClarey, Jr.",Allure,$16.04
[email protected],Mary Gatesworth,Vogue,$14.86
[email protected],Michelle Holm,Home and Garden,$10.20
In this case there are three additional parameters associated with this email address:
The name of the contact
The magazine that the contact has subscribed to
The price of the subscription
22
Chapter 4
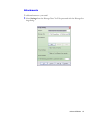
To import this data into EpressMail, execute the following steps:
1 Click the Import command on the lower left-hand side of the Mailing List Pane:
Mailing List Setup
23
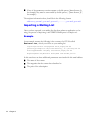
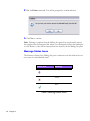
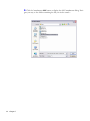
2. Navigate to the directory where your file is located, highlight the file, and click
the Open button:
24
Chapter 4
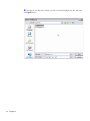
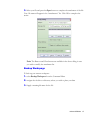
3. View the list of recipients in the Mailing List pane:
The Send All Remaining command in the Command Menu is now shown in bold.
This indicates that the command is now available for use since the message file has
been designated and your recipient list is loaded:
Mailing List Setup
25
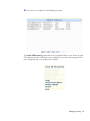
Also notice that at the bottom of the Mailing List pane, the Import, Export, Clear
and Add commands are now shown in bold, indicating that they also are available.
The Edit and Delete commands are not available until you highlight recipients in the
Mailing List pane:
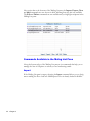
Commands Available in the Mailing List Pane
Along the bottom edge of the Mailing List pane are six commands that help you to
manage the lists of recipients to whom you are broadcasting emails.
Import
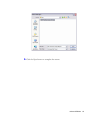
If the Mailing List pane is empty, selecting the Import command allows you to designate a mailing list file to load into MailExpress. If a list is already loaded in MailEx-
26
Chapter 4
press, then selecting Import will display a dialogue box asking you if you wish to
deactivate the current list:
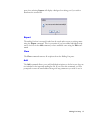
Export
The mailing list that is currently loaded can be saved under a new or existing name
using the Export command. This is convenient if you have added individual recipients to the list via the Add command, or have modified some using the Edit command.
Clear
The Clear command removes all recipients from the Mailing List pane.
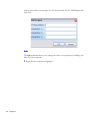
Add
The Add command allows you to add individual recipients to the list in case they are
not included in the imported mailing list file. If you select this command, you’ll be
prompted to enter the email address along with any parameters you wish to use in
Mailing List Setup
27
order to personalize your message. You will be presented with the Add Recipient dialogue box:
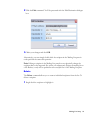
Edit
The Edit command allows you to change the values of a recipient in the Mailing List
Pane. To Edit a recipient:
1 Single-click the recipient to highlight it.
28
Chapter 4
2 Click the Edit command. You’ll be presented with the Edit Destination dialogue
box:
3. Make your changes and click OK.
Alternatively, you can simply double-click the recipient in the Mailing List pane in
order perform the same edit operation.
Note: Editing a recipient in the Mailing List pane does not physically change the
recipient data on the imported file, unless you subsequently Export the mailing list to
a file. Rather, it only will be updated in active reci[ient list of the Mailing List pane.
Delete
The Delete command allows you to remove individual recipients from the list. To
delete a recipient
1 Single-click the recipient to highlight it.
Mailing List Setup
29
2 Click the Delete command. You will be prompted to confirm deletion.
3. Click Yes to confirm
Note: Deleting a recipient from the Mailing List pane does not physically remove
the recipient from the imported file, unless you subsequently Export the mailing list
to a file. Rather, it only will be removed from the active list in the Mailing List pane.
Message Status Icons
The leftmost column of the Mailing List pane contains an icon that reflects the current status of each individual email
Status Icon
Meaning
Ready to send
Failed
Sent
Table 1: Message Status Icons
30
Chapter 4
CHAPTER
5
Message Review
The E-Mail Pane
The E-mail pane serves two purposes:
To provide a view of the raw email message before substitution is performed on
the input parameters (%0, %1, %2, for example). This view is available if a source
file is not yet designated in the Message pane, or if a source file is designated, but
no recipients are selected.highlighted in the Mailing List pane.
To provide a preview of the email after substitution of the parameter values. This
view shows you what the recipient will actually see and is possible when the
Source File is designated and recipients are selected or highlighted.
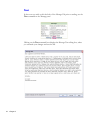
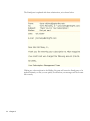
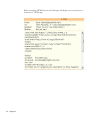
Example: Previewing the “Raw” email text
Using the sample recipient list from “Importing a Mailing List” on page 22, assume
that we want to send the following email to all recipients in the list. (“%0” should be
replaced with the email address, %1 should be replaced with the full name of the
recipient, “%2” should be replaced with the name of the magazine the recipient has
purchased and “%3” should be replaced with the price of the subscription to that
magazine. The email is saved in a file called ThankYou.txt which is designated as
the Source File in the Message pane.)
Date:
9/17/2007
E-mail:
%0
Dear %1,
Thank you for renewing your subscription to %2 magazine.
Your credit card was charged the following amount: %3.
Sincerely,
Your Subscription Management Team
Message Review 31
Make sure no recipients are selected in the Mailing List pane. If any are selected/
highlighted use CTRL-click to deselect the recipient(s).
The “raw” email text is now viewable in the E-mail pane:
Example: Previewing the Email After Substitution
If your email Source File is designated and your Mailing List is imported, then clicking once on any recipient in the Mailing List pane will cause the E-Mail pane to perform parameter substitutions and allow you to view the personalized email as the
recipient will see it.
32
Chapter 5
In the following example one recipient is selected in the Mailing List pane:
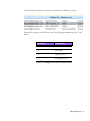
Selecting the recipient shown above causes the following substitutions in the “raw”
email:
Parameter
Substitution
%0
Email Address
%1
Full Name
%2
Magazine Title
%3
Subscription Price
Table 1: Example Parameter Substitutions
Message Review 33
The Email pane is updated with these substitutions, as is shown below:
Clicking any other recipient in the Mailing List pane will cause the Email pane to be
updated instantly so that you can quickly confirm that your messages will be formatted correctly.
34
Chapter 5
HTML Preview
If your email message was created using HTML, you should check its appearance
with the HTML Preview command, found on the Command Menu to the right of
the email pane:
Message Review 35
Before requesting HTML Preview, the Email pane will display your content prior to
resolution of HTML tags:
36
Chapter 5
After selecting the HTML Preview command all tags, hyperlinks and graphics will
be resolved and displayed in the HTML Message Preview dial:
Use the Next and Prior buttons to cycle forward and backward through the recipients in preview mode. Click the Close button to exit preview mode and return to
PIMEX MailExpress.
Note: If you need to insert a parameter inside an HTML tag, it must be surrounded
by square brackets. For example, the following fragment:
<a href="http://www.website.com/feedback.asp?e=[%0]&n=[%1]">
would be converted to:
Message Review 37
<a href="http://www.website.com/
[email protected]&n=John McClarey, Jr.">
38
Chapter 5
CHAPTER
6
Sending Your Message
The Command Menu
When you’re ready to start transmitting your email messages your focus should be
directed to a series of commands that are listed on the upper portion of the Command Menu. Those commands are:
Send All Remaining / Send Next Batch
Send Selected
Resend Failed
Stop Sending
Send All Remaining / Send Next Batch
After all required parameters have been set and a list of e-mail addresses has been
imported, the Send All Remaining (or Send Next Batch if “One batch of emails
per session” is checked off in the Connection Settings dialogue) command in the
Command Menu will become enabled.
If you click on Send All Remaining, the status bar on the bottom of the screen will
display the progress of the transmission.
If there are failures after the job is completed, you can click on Resend Failed to automatically resend them. You can also manually select one or more lines in the Mailing
List pane and select the Send Selected command after fixing the cause of the error.
Sending Your Message 39
To reset the status of selected items to “Not Sent”, right-click on a highlighted item
and choose “Reset status to “Not Sent” from the popup menu. To highlight all items in the Mailing List,
right-click on the list view and choose “Select All”
from the menu.
When the entire transmission is completed, you can
export the log file in comma-separated values (CSV)
format, which can be opened and printed by any
spreadsheet application (Microsoft Excel, for example), or any text editor. To export
the log, select on Export Log in the Command
Menu, and enter the file name.
Send Selected
At any point after all required parameters have been
set and a list of e-mail addresses has been imported,
you can select one or more recipients for immediate sending. Use combinations of
CTRL, SHIFT and left-click to pick adjacent and non-adjacent individual recipients
and/or groups as you would in any Windows application.
Resend Failed
If any individual emails fail to send, the Resend
Failed command will become enabled. You can then
resolve the emails containing the errors and select
Resend Failed. Doing so will cause all the failed
messages to retransmit.
Stop Sending
At any point during a transmission, you can interrupt the process by selecting Stop
Sending from the Command Menu. Unsent messages will be picked up and sent in
the next transmission.
40
Chapter 6
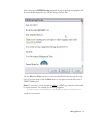
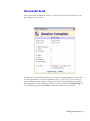
Successful Send
After a successful transmission session, you’ll be presented with the Session Complete dialogue, shown below:
The Session Complete dialogue shows you statistics for the transmission and offers
you the opportunity to save the transmission log to a TXT file. To save the log in
comma-separated values format, which can be opened and printed by any spreadsheet application (such as Microsoft Excel) or any text editor, click Export Log. To
close this dialogue box, select Close, or click the window’s Close button.
Sending Your Message
41
42
Chapter 6
CHAPTER
7
Advanced Edition
Upgrading to Advanced Edition gives you the following enhanced features:
ability to send up to 20,000 e-mail messages at a time
ability to send an unlimited number of file attachments
ability to Blind CC (BCC) every email to up to 100 destinations
ability to backup and restore your workspace (connection settings, e-mail list and
message)
Screen Differences in Advanced Edition
Once you upgrade to Advanced Edition, you’ll immediately notice two changes in the
user interface:
1. The addition of an “Attachments” option on the Message Pane, shown below:
43
Attachments can be designated by selecting the Settings command from the Message
Pane. See See “Settings” on page 15 of Chapter 3.
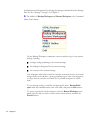
2. The addition of Backup Workspace and Restore Workspace to the Command
Menu, shown below:
Use the Backup Workspace command to create an archive copy of your current
settings, including
message settings pertaining to the current message
the mailing list designated for the current message
the contents of the current message
Your workspace archive file is useful as a security measure if saved to an external
storage device or second drive , giving you backup copy in case of an emergency,
or a copy that you can take to a remote PC or portable computer for offsite
work.
To save message settings, e-mail list, and message file select Backup Workspace from the command menu, enter a file name, and press the Save button.
To restore a previously saved workspace, select the Restore Workspace command, select the file you want to restore, select restore options, and click the
Proceed button.
44
Chapter 7
Attachments
To add attachments to your email
1 Select Settings from the Message Pane. You’ll be presented with the Message Settings dialog :
Advanced Edition 45
2. Click the Attachments Add button to display the Add Attachments dialog. Navigate your way to the folder containing the file you wish to attach :
46
Chapter 7
3. Select your file and press the Open button to complete the attachment of the file.
Your file name will appear in the :Attachments:” list. Click OK to complete the
action:
Note: The Remove and Clear buttons are available in the above dialog in case
you wish to modify the attachment list.
Backup Workspage
To back up your current workspace :
1. select Backup Workspace from the Command Menu
2. navigate the the drive or directory where you wish to place your data
3. Supply a meaningful name for the file
Advanced Edition 47
4. click the Open button to complete the backup
Restore Workspace
To restore, or open a previously-saved workspace:
1. Select Restore Workspace from the Command Menu.
2. Navigate the the drive or directory containing the workspace file.
3. Select the file.
48
Chapter 7
5. Click the Open button to complete the restore.
Advanced Edition 49
50
Chapter 7
CHAPTER
8
Troubleshooting Tips
1. Problem:
I receive an error with a specific number, for example “Socket
error #10060”.
Solution
This error is NOT generated by MailExpress. It is reported by your SMTP server.
Please search the Internet for the error message text to learn about possible
causes. If you don’t find a solution that works for you, contact your ISP or network administrator.
2. Problem:
I entered my SMTP Server and User information, but when I
click on Test Connection I get an error.
Possible Causes and Solutions
Double-check your account settings in your primary e-mail program. Often
incoming POP3 e-mail server requires authentication (password) while
SMTP server does not. If "SMTP Server requires authentication" box is clear
in your e-mail program, uncheck it in MailExpress as well.
Contact your ISP or network administrator and verify your outgoing e-mail
settings
Check if SMTP server requires SSL connection
3. Problem:
Test Connection works fine, but when I try to send e-mails, I
get an error on a first message.
Possible Causes and Solutions
Your SMTP Server may require authentication in order to send e-mails. See
topic above for possible solutions
Your email server may require a login to the incoming POP3 e-mail server in
order to send e-mails (this is quite typical for educational networks, and can
be verified with your network administrator). MailExpress currently does not
support this option. Try to use your home or business ISP for bulk e-mails.
Troubleshooting Tips
51
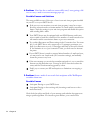
4. Problem:
After first few e-mails are successfully sent, I start getting a failure on every e-mail or an error message pops up.
Possible Causes and Solutions
The most probable source of this type of error is an anti-virus program installed
on your PC or on your SMTP Server.
If the error you see mentions your anti-virus program, it may be set up to
block the connection after a certain number of e-mails within a certain time
frame. Check the settings in your anti-virus program and disable this option
while sending bulk e-mails.
Your SMTP Server may be equipped with anti-SPAM features, and it may
reject e-mails or break the connection if the number of e-mails exceeds a certain number within a certain time frame or per one connection.
Try to adjust Reconnect and Pause settings in the Connection box. For example, if your SMTP Server only accepts up to 15 messages per minute, you
need to set Reconnect to every 15 messages, and Pause to about 40 seconds.
If the limitation is on a “per-connection" basis, you don't need to increase
the pause.
If your SMTP Server is tuned to accept a limited number of e-mails per hour,
you may need to use batch mode (in Connection settings), and manually
restart the process every hour.
If the error message you receive has a number assigned to it, try to search the
Internet on this particular error. You may be able to learn more about the
cause, and find a workaround suggested by others
Finally, try to contact your ISP and inquire as to limitations on outgoing emails.
5. Problem:
Some e-mails do not reach their recipients while MailExpress
considers them sent.
Possible Causes
Anti-spam filtering on your SMTP Server
Anti-spam filtering on the receiving side (incoming e-mail server or the email client itself)
Check both the subject and body of your message, and calculate the spam score
using a specific algorithm. If it exceeds a given number, your e-mail will be
52
Chapter 8
blocked, but you most likely will not be notified about it. You can learn more
about spam scores on the Internet, for example at http://spamcheck.sitesell.com .
Troubleshooting Tips
53
54
Chapter 8
Index
Symbols
"Reply to" is different from sender, 17
A
About MailExpress, 8
accounts, Outlook, 12
Add button, for attachments, 17
Add command for adding recipients, 26
Advanced Edition, 8
anti, 52
Anti-SPAM, 52
anti-virus program, 52
ASCII, 16
ASCII, address file input, 5
attachments, 5
adding, 17
authentication, 51
B
batch emails, 52
batch mode, 52
Batch, Send Next command, 39
BCC (per email), 20
BCC Every e-mail to, 17
Blind CC, 19
bulk e-mails, 52
button, Add, 17
C
cascading style sheet, 17
CC, Blind, 19
Clear, Mailing List command, 26
Command Menu, 8, 25
command message area, 9
Commands, Mailing List pane
Add, 27
Clear, 27
Delete, 29
Edit, 28
Export, 27
import, 26
commas, in parameters, 22
comma-separated values, 40
Configuration, Connection pane, 11
Connection, 11
Test, 14
connection pane, 8
connection, SSL, 51
CSS, 17
CSV, 6, 21, 40
D
Delete, recipient, 26
download, PIMEX software, 7
E
Edit, Mailing List command, 26
Email, 8
E-mail Address, 20
E-Mail Pane, 31
Example, previewing, 32
Excel, 6
Export Log, 40, 41
Export, from Excel, 6
Export, Mailing List, 26
F
failures, sending, 39
faulures
resending, 40
55
filtering, Anti-SPAM, 52
frames, 17
freeware, 5
G
graphics, previewing in emails, 37
H
Headers button, 17
Help, 8
HTML, 16
HTML editor, 16
CoffeeCup HTML Editor, 16
Microsoft FrontPage, 16
Microsoft Word, 16
Outlook Express, 16
HTML Preview, 35
hyperlinks, 37
I
image
url, 17
Import, 26
import, from Excel, 6
Importing, 22
Installation, 7
Interface, user, 8
interrupt, transmission, 40
Introduction, 5
IP address setting, SMTP Server, 12
ISP, 12, 51, 52
L
Log, Export, 40
M
Mailing, 21
Mailing List
importing to, 23
Mailing List pane, 21
Mailing list pane, 8
Message File, 16
Message Pane, 15
BCC (per email), 20
E-mail Address, 20
Method, 15
Message pane, 8
message pane
text, 18
Message Status, 9
Icons, 30
Message, sending, 39
messages
resending failed, 40
Microsoft Exchange Server, 12
N
Netscape, 12
Netscape Messenger, 12
Newsgroups, 12
Notepad, 6, 16, 21
O
One batch of e-mails per session, 13
outgoing email server, 12
Outlook, 12
Outlook Express, 12
P
pam, 6
Pane, 31
pane, 31
message, 15
panes
connection, 8
email, 8
56
mailing list, 8
message, 8
panes, window, 8
parameters, 6, 17, 21
Pause setting, Connections, 52
PIMEX Online, 8
POP3 server, 51
Preview, HTML, 35
Previewing, 31
Previewing HTML, 35
previewing, HTML, 17
Q
quotes, double, in parameters, 22
R
recipients, 25
recipients, editing, 29
Reconnect setting, Connections, 52
record position indicator area, 9
Requirements, system, 8
Resend Failed command, 40
S
Send All Remaining command, 25, 39
Send Method, 19
Send Method, Message pane setting, 19
Send Selected command, 40
Send To, 20
Send To Method, Message pane setting, 20
Sending Your Message, 39, 43
Settings
authentication, SMTP server requires,
13
Batch, 14
Delay, 13
Headers, Message Pane, 15
Message Pane, 15
One batch of e-mails per session, 13
Pause, 13
Port Number, 13
Reconnect, 13
Send Method, Message Pane, 19
SMTP server requires SSL connection,
13
Text command, Message Pane, 18
Timeout, 13
Your E-Mail, 13
Your Name, 13
Settings, connection, 11
Setup, 11
SMTP, 12, 51, 52
SMTP Server, 12, 52
SMTP server requires SSL connection, 13
Socket error, 51
SPAM, 52
SSL, 51
SSL connection support, 5
Status Bar, 8
Status, message, 30
Stop Sending, 40
style sheet
cascading, 17
Successful Send, 41
T
tags, HTML, 37
Test Connection, 14, 51
Text Only, 16
Troubleshooting, 51
txt files, 16
U
URL, for inserted images, 17
57
Y
Your E-Mail setting, Connection pane, 13
Your Name setting, Connection pane, 13
58
www.pimexonline.com
000-0000-?
Printed in U.S.A
59
60