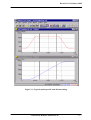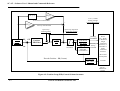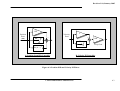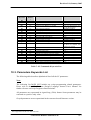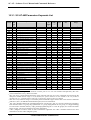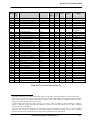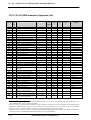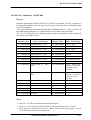
1
SC-AT Family Advanced Multi-Axes Servo Controllers Software User’s Manual and Commands Reference Document Revision: 3.10 Date: January 2005 SC-AT – Software User’s Manual and Commands Reference DOCUMENT INFORMATION Document Revision: 3.10, January 2005 Document Name: SC-AT Users Manual Ver 310.doc COPYRIGHT Copyright © 1994 – 2005 Control and Robotics Solutions Ltd. The information in this User’s Manual may be updated from time to time by Control and Robotics Solutions Ltd. to reflect additional features of the product, or documentation updates. Updates may be temporarily published in version release notes (usually attached to any new release), or available for download through our WEB site. Control and Robotics Solutions Ltd. 5 Mazal Eliezer St. New Industrial Zone, Rishon Le-Zion ISRAEL Tel: Fax: 972-3-9510022 972-3-9510033 Web site: Support: www.consol.co.il [email protected] b Control and Robotics Solutions Ltd. Revision 3.10, January 2005 Revision History Rev. Description Date 0.0 Creation, F/W Version 1.43 1.7.2002 1.0 SC-4M-SA Version 203 Update Release Notes 1/4/2003 1.02 SC-4M-SA Version 204 Update Release Notes 1/5/2003 1.03 SC-4M-SA Versions 205/B, 205/C, 2.05/D Update Release Notes 5/8/2003 3.10 Correct Mistake in: CA[14] should be CA[4] in section 6.9 “Filter Gain Scheduling”. 9/1/2005 Updated for SC-AT Family Controllers (SC-AT-4M and SC-AT-2M). Table 1: This User’s Manual Revision History Control and Robotics Solutions Ltd. c SC-AT – Software User’s Manual and Commands Reference CONTENTS Table of Contents CONTENTS .............................................................................................................................................................. D TABLE OF CONTENTS .................................................................................................................................. D LIST OF TABLES ............................................................................................................................................. H LIST OF FIGURES ............................................................................................................................................ H 1. INTRODUCTION......................................................................................................................................... 1-1 2. REVISIONS HISTORY ............................................................................................................................... 2-1 2.1. F/W VERSION 1.43, JULY 2002 .............................................................................................................. 2-1 2.2. F/W VERSION 203 : SC-4M-SA BOARDS, APRIL 2003........................................................................... 2-1 2.2.1. SC-4M-SA Release Version 2.03 Modifications Description............................................................ 2-2 2.3. F/W VERSION 204 : SC-4M-SA BOARDS, MAY 2003 ............................................................................ 2-6 2.4. F/W VERSION 205/B : SC-4M-SA BOARDS, AUG 2003 ......................................................................... 2-7 2.5. F/W VERSION 205/C : SC-4M-SA BOARDS, OCT. 2003......................................................................... 2-9 2.6. F/W VERSION 205/D : SC-4M-SA BOARDS, DEC. 2003....................................................................... 2-10 2.7. SC-AT FAMILY CONTROLLERS – DOCUMENT VERSION 3.10, JANUARY 2005 ..................................... 2-11 2.7.1. SC-AT-4M Differences From Previous SC-4M-SA Version 2.05.................................................... 2-11 2.7.2. SC-AT-2M Differences From Previous SC-4M-SA Version 2.05.................................................... 2-12 3. GLOSSARY................................................................................................................................................. 3-14 4. COMMANDS SYNTAX AND PROTOCOLS ......................................................................................... 4-20 4.1. GENERAL.............................................................................................................................................. 4-20 4.2. SUPPORTED COMMUNICATION PROTOCOLS .......................................................................................... 4-20 4.2.1. Simultaneous Communication Channels Operation Support.......................................................... 4-21 4.3. CONTROLLER COMMUNICATION LANGUAGE DEFINITIONS .................................................................. 4-21 4.3.1. General ........................................................................................................................................... 4-21 4.3.2. Language Notations........................................................................................................................ 4-21 4.3.3. Controller Language Syntax ........................................................................................................... 4-24 5. MOTION MODES ........................................................................................................................................ 5-1 5.1. POINT TO POINT – PTP (MM=0, SM=0) ................................................................................................ 5-1 5.1.1. PTP Motion Description ................................................................................................................... 5-1 5.1.2. Starting a PTP Motion ...................................................................................................................... 5-2 5.1.3. Monitoring Motions .......................................................................................................................... 5-2 5.1.4. Stopping a Motion............................................................................................................................. 5-4 5.1.5. On The Fly Parameters Change ....................................................................................................... 5-4 5.2. REPETITIVE POINT TO POINT – REP PTP (MM=0, SM=1)...................................................................... 5-4 5.3. JOGGING – JOG (MM=1, SM=0)............................................................................................................ 5-6 d Control and Robotics Solutions Ltd. Revision 3.10, January 2005 5.3.1. Description........................................................................................................................................5-6 5.3.2. Starting a Jog Motion........................................................................................................................5-6 5.3.3. Monitoring a Motion .........................................................................................................................5-6 5.3.4. Stopping a Motion .............................................................................................................................5-6 5.3.5. On The Fly Parameters Change........................................................................................................5-7 5.4. GEARING MOTION MODES......................................................................................................................5-7 5.4.1. Position Based Gearing (MM=2) .....................................................................................................5-7 5.4.2. Velocity Based Gearing (MM=3)....................................................................................................5-10 5.5. ECAM MOTIONS ..................................................................................................................................5-10 5.5.1. Position Based ECAM (MM=5, SM=0)..........................................................................................5-10 5.6. SEARCH INDEX .....................................................................................................................................5-14 5.7. JOYSTICK MOTION MODES ...................................................................................................................5-14 5.7.1. Velocity Based Joystick Motion Mode.............................................................................................5-14 5.7.2. Position Based Joystick Motion Mode ............................................................................................5-14 5.8. POSITION STEP MOTION (MM=8 , SM=0 OR SM=1) ............................................................................5-15 5.8.1. Description......................................................................................................................................5-15 5.8.2. Starting a Step Motion ....................................................................................................................5-15 5.8.3. Monitoring and Stopping a Step Motion .........................................................................................5-15 5.9. PROFILE SMOOTHING IN THE SC-AT CONTROLLERS FAMILY ...............................................................5-16 6. THE CONTROL FILTER............................................................................................................................6-1 6.1. GENERAL ................................................................................................................................................6-1 6.2. LINEAR PID AND PIV FILTER EQUATIONS ..............................................................................................6-1 6.2.1. Standard PID Filter Mode ................................................................................................................6-1 6.2.2. PIV Filter Mode ................................................................................................................................6-1 6.2.3. Position Error Calculation ...............................................................................................................6-3 6.3. HIGH (2ND) ORDER FILTERS.....................................................................................................................6-3 6.4. OUTPUT COMMAND AND D2A GAIN ......................................................................................................6-4 6.5. PWM COMMAND FORMAT .....................................................................................................................6-5 6.6. ENCODER GAIN ......................................................................................................................................6-5 6.7. DUAL LOOP OPERATION (IN SC-AT-2M)...............................................................................................6-6 6.8. NON-LINEAR ELEMENTS ........................................................................................................................6-6 6.9. FILTER GAIN SCHEDULING .....................................................................................................................6-7 6.10. ACCELERATION AND VELOCITY FEED FORWARD ...................................................................................6-8 6.11. OPEN LOOP OPERATION .........................................................................................................................6-8 6.11.1. SC-AT-4M Open Loop Operation - SIN commutation motors .....................................................6-9 6.12. REAL TIME SERVO LOOP PROTECTIONS .................................................................................................6-9 6.13. SUMMARY OF ALL CONTROL FILTER RELATED PARAMETERS ................................................................6-9 7. FAULTS PROTECTIONS AND LIMITS ..................................................................................................7-1 7.1. DRIVER FAULTS AND ABORT INPUT .......................................................................................................7-2 7.2. SOFTWARE GENERATED FAULTS ............................................................................................................7-3 7.2.1. High Position Error ..........................................................................................................................7-3 7.2.2. Encoder Signal Error Protections.....................................................................................................7-3 7.2.3. Motor Stuck Protection .....................................................................................................................7-4 7.3. SOFTWARE PROTECTIONS – (NON FAULT CONDITIONS) .........................................................................7-4 7.4. SPECIAL HANDLING OF SOFTWARE LIMITS .............................................................................................7-5 8. ADVANCED FEATURES............................................................................................................................8-1 8.1. DATA RECORDING ..................................................................................................................................8-1 8.1.1. Operating Data Recording in the SC-AT Controller’s Family .........................................................8-2 8.1.2. Data Recording Keywords ................................................................................................................8-2 8.1.3. Data Recording Support on the SC-AT-4M/2M Shell .......................................................................8-6 8.2. POSITION COMPARE EVENTS ..................................................................................................................8-7 8.2.1. Mode 0: Fixed GAP (Incremental), Distance < 16 Bit .....................................................................8-8 8.2.2. Mode 1: Fixed GAP (incremental) , Distance > 16 Bit ....................................................................8-9 8.2.3. Mode 2: 32 Bit Arbitrary Tables .....................................................................................................8-10 8.2.4. Mode 3: 32 Bit Arbitrary Tables with FPAG RAM Support ...........................................................8-11 8.2.5. Compare Function Parameters, Activation and Error Codes.........................................................8-11 8.2.6. Configuring Digital Outputs for the Compare Function.................................................................8-16 8.2.7. Position Compare Events Examples ...............................................................................................8-19 Control and Robotics Solutions Ltd. e SC-AT – Software User’s Manual and Commands Reference 8.3. POSITION CAPTURE EVENTS ................................................................................................................. 8-23 8.3.1. Capture Modes................................................................................................................................ 8-23 8.3.2. Operating the Position Capture and Relevant Keywords ............................................................... 8-24 8.3.3. Configuring Fast Digital Inputs for the Capture Function............................................................. 8-27 8.3.4. Position Capture Events Examples ................................................................................................. 8-28 8.4. AUXILIARY ANALOG INPUT INTERFACES ............................................................................................. 8-33 8.5. SUPPORT FOR DC BRUSHLESS MOTORS - SIN COMMUTATION (SC-AT-4M ONLY) ............................. 8-35 8.5.1. General Background....................................................................................................................... 8-35 8.5.2. Sin Commutation in BLDC Motors................................................................................................. 8-36 8.6. DYNAMIC ERROR MAPPING CORRECTION ............................................................................................ 8-46 9. SC-AT-4M/2M SHELL SOFTWARE......................................................................................................... 9-1 10. KEYWORDS REFERENCE................................................................................................................. 10-1 10.1. KEYWORDS ATTRIBUTE REFERENCE .................................................................................................... 10-1 10.2. COMMAND KEYWORDS LIST ................................................................................................................ 10-2 10.3. PARAMETERS KEYWORDS LIST ............................................................................................................ 10-3 10.3.1. SC-AT-4M Parameters Keywords List....................................................................................... 10-4 10.3.2. SC-AT-2M Parameters Keywords List....................................................................................... 10-6 10.4. KEYWORDS LIST – FUNCTIONAL GROUPS ............................................................................................ 10-8 10.4.1. Keywords Group Description .................................................................................................... 10-8 10.4.2. Keywords Groups....................................................................................................................... 10-8 10.5. KEYWORDS LIST – ALPHABETICAL LIST ............................................................................................ 10-13 10.5.1. AB – Abort Motion Command.................................................................................................. 10-14 10.5.2. AC – Acceleration .................................................................................................................... 10-15 10.5.3. AD – Analog Input Dead Band ................................................................................................ 10-16 10.5.4. AF – Analog Input Gain Factor ............................................................................................... 10-17 10.5.5. AG – Analog Input Gain .......................................................................................................... 10-18 10.5.6. AI – Analog Input..................................................................................................................... 10-19 10.5.7. AO – Analog Output (Auxiliary) .............................................................................................. 10-20 10.5.8. AP – Absolute Position............................................................................................................. 10-21 10.5.9. AR – General Purpose Array ................................................................................................... 10-22 10.5.10. AS – Analog Input Offset.......................................................................................................... 10-24 10.5.11. BG – Begins a new Motion Command ..................................................................................... 10-25 10.5.12. BR – Begin Recording Command............................................................................................. 10-27 10.5.13. CA – Special Control Parameters Array.................................................................................. 10-28 10.5.14. CB – CAN Baud Rate ............................................................................................................... 10-30 10.5.15. CG – Axis Configuration.......................................................................................................... 10-31 10.5.16. DA – Data Recording Array .................................................................................................... 10-36 10.5.17. DB – Down Load Buffer........................................................................................................... 10-38 10.5.18. DC – Deceleration ................................................................................................................... 10-39 10.5.19. DF – Down Load Firmware..................................................................................................... 10-40 10.5.20. DL – Limit Deceleration .......................................................................................................... 10-41 10.5.21. DO – Analog DAC Offset......................................................................................................... 10-42 10.5.22. DP – Desired Position ............................................................................................................. 10-46 10.5.23. EA – ECAM Parameters Array ................................................................................................ 10-47 10.5.24. EC – Communication Error Code............................................................................................ 10-48 10.5.25. EM – End of Motion Reason .................................................................................................... 10-49 10.5.26. ER – Max Position Error Limit ................................................................................................ 10-50 10.5.27. FF – Feed Forward Gains ....................................................................................................... 10-51 10.5.28. FR – Following Ratio............................................................................................................... 10-53 10.5.29. GP – Axis Group Identifiers Definitions (SC-AT-4M Only)..................................................... 10-56 10.5.30. HL – High Software Limit ........................................................................................................ 10-58 10.5.31. IA – Indirect Array................................................................................................................... 10-59 10.5.32. IL – Input Logic........................................................................................................................ 10-60 10.5.33. IP – Input Port ......................................................................................................................... 10-61 10.5.34. IS – Integral Saturation Limit .................................................................................................. 10-65 10.5.35. KD – Control Filter Diff Term Gain ........................................................................................ 10-66 10.5.36. KI – Control Filter Integral Term Gain ................................................................................... 10-67 10.5.37. KP – Control Filter Proportional Term Gain .......................................................................... 10-68 10.5.38. KR – Kill Repetitive Motions Command .................................................................................. 10-69 f Control and Robotics Solutions Ltd. Revision 3.10, January 2005 10.5.39. 10.5.40. 10.5.41. 10.5.42. 10.5.43. 10.5.44. 10.5.45. 10.5.46. 10.5.47. 10.5.48. 10.5.49. 10.5.50. 10.5.51. 10.5.52. 10.5.53. 10.5.54. 10.5.55. 10.5.56. 10.5.57. 10.5.58. 10.5.59. 10.5.60. 10.5.61. 10.5.62. 10.5.63. 10.5.64. 10.5.65. 10.5.66. 10.5.67. 10.5.68. 10.5.69. 10.5.70. 10.5.71. 10.5.72. 10.5.73. 10.5.74. 10.5.75. 10.5.76. 10.5.77. 10.5.78. 10.5.79. 10.5.80. 10.5.81. 10.5.82. 10.5.83. 10.5.84. 10.5.85. 10.5.86. 11. LD / SV – Load and Save Commands.......................................................................................10-70 LL – Low Software Limit ..........................................................................................................10-71 ME – Master Encoder ..............................................................................................................10-72 MF – Motor Fault Reason........................................................................................................10-74 ML – Magnetic Location (SC-AT-4M ONLY) ..........................................................................10-78 MM – Motion Mode..................................................................................................................10-79 MO – Motor ON (Enable / Disable the Servo Loop)................................................................10-81 MP – Magnetic Pitch (SC-AT-4M ONLY)................................................................................10-82 MS – Motion Status ..................................................................................................................10-83 NC – No Control (Set Open Loop Mode) .................................................................................10-85 OC – Output Clear Bit Command ............................................................................................10-87 OL – Output Logic....................................................................................................................10-88 OM – I/O Modes Hardware Configuration..............................................................................10-89 OP – Output Port .....................................................................................................................10-98 OS – Output Set Bit Command ...............................................................................................10-100 PA – Parameters Array ..........................................................................................................10-101 PE – Position Error................................................................................................................10-103 PG – Position Compare Parameters Array............................................................................10-104 PQ – Compare Function Activate / Disable Command..........................................................10-106 PO – PID Output....................................................................................................................10-108 PS – Position (Encoder Position)...........................................................................................10-109 RA – CAN Receiving Address.................................................................................................10-110 RG – Data Recording GAP ....................................................................................................10-111 RL – Data Recording Length..................................................................................................10-114 RP – Relative Position............................................................................................................10-116 RR – Data Recording Status...................................................................................................10-117 RS – Reset Controller Command............................................................................................10-118 RV – Data Recording, Recorded Variables............................................................................10-119 SM – Special Motion Mode Attribute Parameter ...................................................................10-123 SP – Speed..............................................................................................................................10-125 ST – Stop Motion Command...................................................................................................10-126 SR – Status Register ...............................................................................................................10-128 SV – Save Command...............................................................................................................10-130 TA – CAN Transmitting Address ............................................................................................10-131 TC – Torque Command ..........................................................................................................10-132 TD – Timer Down...................................................................................................................10-134 TL – Torque Limit (Analog Command Saturation) ................................................................10-138 TR – Target Radius.................................................................................................................10-139 TT – Target Time....................................................................................................................10-140 VA / VD / VS – Vector Motion Parameters ............................................................................10-141 VR – Get Version Command...................................................................................................10-143 WT – Wait Period ...................................................................................................................10-147 WW – Profiler Smooth Factor................................................................................................10-149 XC – Last Capture Position Latch..........................................................................................10-150 XN – Capture Events Counter ................................................................................................10-151 XP – Auxiliary Encoder Position – (SC-AT-2M Only) ...........................................................10-152 XV – Auxiliary Encoder Velocity............................................................................................10-153 ZI – CAN Array ......................................................................................................................10-154 COMMUNICATION AND PROGRAM ERROR CODES................................................................11-1 Control and Robotics Solutions Ltd. g SC-AT – Software User’s Manual and Commands Reference List of Tables Table 1: This User’s Manual Revision History ............................................................................. c Table 2: Control Filter Parameters............................................................................................ 6-10 Table 3: “PG” Array in SC-AT-4M - Compare Function Parameters Description .................. 8-12 Table 4: “PG” Array in SC-AT-2M - Compare Function Parameters Description .................. 8-13 Table 5: Error Codes Generated by the "PQ" Compare Function ............................................ 8-15 Table 6: SC-AT Keywords Attributes and Restrictions............................................................ 10-2 Table 7: SC Commands Keywords List.................................................................................... 10-3 Table 8: SC Parameters Keywords List .................................................................................... 10-5 Table 9: SC Parameters Keywords List .................................................................................... 10-7 Table 10: Motion and Profiler Related Keywords .................................................................... 10-9 Table 11: Control Filter and Real time Servo Loop Related Keywords................................... 10-9 Table 12: Data Recording Related Keywords........................................................................... 10-9 Table 13: Special Encoder Interface Related Keywords ........................................................ 10-10 Table 14: I/O Functions Related Keywords............................................................................ 10-10 Table 15: Communication and Configuration Keywords ....................................................... 10-11 Table 16: Protection Keywords............................................................................................... 10-11 Table 17: General Purpose Related Keywords ....................................................................... 10-11 Table 18: End Of Motion Reason (EM) Codes....................................................................... 10-49 Table 19: Motor Fault Cause Reasons - (MF) Codes. ............................................................ 10-74 Table 20: Motor Fault Cause Reasons - (MF) Codes in SC-AT-2M...................................... 10-76 Table 21: Extended Motor Fault Cause Reasons - (MF) Codes in SC-AT-2M...................... 10-77 Table 22: “MS” Motion Status Parameter Bits Description ................................................... 10-83 Table 23: "OM" - I/O Mode Configuration Functionality Definitions ................................... 10-89 Table 24: SC-AT-4M - "XOM" - IO_MODE_0 Bits Configuration Description ................. 10-90 Table 25: SC-AT-4M "YOM" - IO_MODE_1 Bits Configuration Description ................... 10-91 Table 26: "OM" - I/O Mode Configuration Functionality Definitions ................................... 10-94 Table 27: SC-AT-2M "XOM" - IO_MODE_0 Bits Configuration Description ................... 10-94 Table 28: SC-AT-2M "YOM" - IO_MODE_1 Bits Configuration Description .................... 10-95 Table 29: SC-AT-4M to Host - CAN VR Version Report Message Format........................ 10-143 Table 30: SC-AT-2M to Host - CAN VR Version Report Message Format........................ 10-145 Table 31: Communication and Program Error Codes............................................................... 11-6 List of Figures Figure 4-1: Communication Channels Handling within the Firmware Main Idle Loop .......... 4-20 Figure 5-1: Typical motion profile with full smoothing. .......................................................... 5-17 Figure 5-2: Typical motion with no profile smoothing............................................................. 5-18 Figure 6-1: Position Over Velocity Loop (PIV) Control Scheme Structure .............................. 6-1 Figure 6-2: Position Loop (PID) Control Scheme Structure....................................................... 6-2 Figure 6-3: Position PID and Velocity PI Filters........................................................................ 6-3 Figure 8-1: Analog Input Scaling Block Diagram .................................................................... 8-33 h Control and Robotics Solutions Ltd. Revision 3.10, January 2005 1. INTRODUCTION The SC-4M is a new advanced, state of the art, multi axes servo controller, enhancing the Control and Robotics Solutions Ltd. SC products family line. This document covers the product general Software User’s Manual and describes the Command Reference of the new SC-AT servo controllers. The SC-AT servo controllers consist of the following controllers: 1. SC-AT-4M 4 Axis Servo Controller. 2. SC-AT-2M Dual Axis Servo Controller. This manual is based on previous versions that supported the SC-4M-SA controller. The following additional documents are available for further reference: Document Type Document Name Document Title Programmer User’s Manual SC-AT Users Manual Ver 310.pdf SC-AT Family – Advanced Multi-Axes Servo Controllers, Software User’s Manual and Commands Reference Script Language User’s Manual SC-AT Macro Language Ver 310.pdf SC-AT Family - Advanced Multi-Axes Servo Controller - Script Programming Language and the Integrated Development Environment. PC Shell HMI Software Description SC-AT Shell HMI Ver 310.pdf SC-AT Family - PC MMI Software SC4M Shell and Source Code Editor User’s Manual Communication Protocols ICD’s SC-AT Communication Protocols Ver 310.pdf SC-AT Family - Advanced Multi-Axes Servo Controllers Communication Protocols User’s Manual DCOM Library Communication AIP SCServer COM Interface Ver 310.pdf SCServer - COM / DCOM - Interface Library Reference User’s Guide SC-AT-4M Hardware User’s Manual SC-AT-4M Hardware User’s Manual Ver 100.pdf SC-AT-4M - Advanced Technology Multi-Axes Servo Controller Hardware Interfaces User’s Manual SC-AT-2M Hardware User’s Manual (This document) SC-AT-2M Hardware Users Manual Ver 100.pdf SC-AT-2M - Advanced Technology Dual-Axes Servo Controller Hardware Interfaces User’s Manual Control and Robotics Solutions Ltd. 1-1 SC-AT – Software User’s Manual and Commands Reference The main purpose of this User’s Manual is to provide full information over the supported software features of the product, as well as to give a user technical reference for each keyword supported by the communication protocol. 1-2 Control and Robotics Solutions Ltd. Revision 3.10, January 2005 2. REVISIONS HISTORY This chapter describes the updates made by each firmware revision modification (low level controller software). 2.1. F/W Version 1.43, July 2002 • Version 0.0: Creation of this User’s Manual. First release of the SC-4M Product and its reference manual. 2.2. F/W Version 203 : SC-4M-SA Boards, April 2003 • Version 1.0 of this user’s manual describes the changes related to the SC-4M-SA, Firmware Version 2.03 release. • The SC-4M-SA is a new hardware board version of the basic SC-4M board. It includes a smeller and more efficient hardware design, and also some performance enhancement features. • The SC-4M-SA, F/W Version 2.03 release includes: ¾ New Boot that support force down load firmware using the on-board dip switches (Dip-SW #2). ¾ New FPGA code version (designated as Version 200). ¾ New Firmware code version (designated as Version 203). • Users should be aware that since this version includes a new Boot sector, upgrade of old SC-4M-SA versions requires modifying both the Boot and FPGA sectors to be done in C&RS. • The user can verify the correct Firmware and FPGA versions using the BVR (Report Version) command. The controller respond to this command with the following string: ”SC-4MSA,203,4,200,250” : The following interpretation is applicable: ¾ ¾ ¾ ¾ ¾ SC-4MSA: Indicates the new SC-4M-SA product code. 203: Indicates that Firmware Version 2.03 is installed. 4: Indicates that this is a 4 axis version. 200: Indicates the FPGA version (2.00). 250: Indicates the Macro Buffer size in kBytes (250 kBytes). • Please note: Firmware version 2.03 MUST be used with FPGA version 2.00 or higher. Downloading F/W version 203 to boards with older FPGA versions will result in a malfunctioning (un-expected results) board. • In the following section, the major F/W Version 2.03 and FPGA Version 2.00 are described. Control and Robotics Solutions Ltd. 2-1 SC-AT – Software User’s Manual and Commands Reference 2.2.1. SC-4M-SA Release Version 2.03 Modifications Description This section describes the modifications in version 2.03 of the SC-4M-SA firmware and hardware. 2.2.1.1. Important Note about H/W Interfaces Compatibility - The SC-4M-SA board has identical electrical interfaces as the SC-4M. Similar main connectors and pin-out are used (44 and 64 pins flats, and Communication interface). - The main Power input connector is a smaller type (3.81 mm pitch) Mini-Combicon Phonix, replacing the SC-4M Power Input (5mm pitch) Combicon Phonix connector. 5 pins are still used, but in opposite pin-out order then the SC-4M !! The new pin order matches the Phonix connector pin-out order definition. Please see the SC-4M-SA Hardware User’s Manual and electrical drawings before connecting the new board to the main power supply ! 2.2.1.2. New SC-4M-SA Features and Firmware Modifications • Mechanical Size: The new SC-4M-SA board size is: 136 x 76 mm (was 146 x 112). • Power Input Connector: Smaller pitch (3.81 mm) Phonix Mini-Combicon, 5 pins (GNDx2, VCC, +Vm, -Vm). The board connector P/N is: “Phonix MC 1.5/5-G-3.81”. The mating power input connector is: “Phonix MC 1.5/5-ST-3.81”. • Communication Interface Connector: The SC-4M-SA has a Dual Port RJ-45 option only (no option for Quad). Both CAN bus channels and the RS-232 can be interfaced from a single RJ45 port. Note that ALL 8 pins of the RJ-45 are in use. Please consult C&RS for additional pins assignment. • Configuration Dip-Switches: New 8 Dip SW for general purpose configurations are now available on board. Currently the first two switches are used for: (i) Servo sample source selection (must be “on”), and (ii) Firmware down-load options (see below). Other options may be supported by new firmware versions. • High Resolution DAC: The SC-4M-SA board uses an 8 channels 16 bit DAC for the main servo analog command outputs. This replaces the 14 bits filtered PWM interface of the previous SC-4M board. As a result of that, the analog second-orderfilter (@ 300 Hz, ξ=0.7) does no longer exist in the new analog output circuit. Only a simple low pass (first-order) filter is implemented (@~2,000 Hz) to filter high frequency power supply noises. This, other then having full true 16 bit servo command resolution, also significantly improves the controller transfer function phase response (much smaller phase lag up to very high frequencies). The user can of course always use the digital 2nd order control filter and locate it wherever needed for a specific application. The user should be aware that DAC output values are +10 volts in the short time between power up and firmware boot process. It is obligatory to use 2-2 Control and Robotics Solutions Ltd. Revision 3.10, January 2005 the Inhibit signals (which are h/w protected for “disable” on power up) to avoid undesired system motion. • 44 Auxiliary I/O’s: The new SC-4M-SA board design has a special Auxiliary I/O’s connector exporting 44 additional I/O’s from its Main FPGA. Although these I/O’s and currently not supported by the standard firmware, they can be used for customization purposes. Please contact C&RS for more information on this option. • Force Down Load Firmware: The SC-4M-SA now support a force down load firmware option. In case a download firmware process fails (for example, if power supply is disabled during download process), occasionally the controller might enter an un-defined state. Although rare, this can sometimes happen. In order to recover from such conditions, the user can force the controller to enter a down-load firmware process immediately after power up by setting dip switch #2 to “on”. Please see the “DF” command for more information on down load firmware process. • Reset Controller: A new “RS” Reset Controller function was added. Upon receiving an “RS” command, the controller resets itself. • Save Parameters and Macro: The “QS” and “SV” commands are now unified to “SV” that saves both parameters and the script. The “SV” command can receive a parameter (“1” or “2”) to indicate whether the parameters only or script only are to be saved. “SV” without any parameter saves both. • Axes Group Definition Array: A new array parameter (“GP”) is used to assign axes groups. This replaces the previous functionality of the “GA” parameter. Please see “GP” command reference for more information. The “A” pre-fix (e.g. “APS”) is now initialized by default after power up to access only axes “X”, “Y”, “Z” and “W”. • Axes Related Parameters Size Attribute: Many parameters are now updated to reflect their true size. Most of the parameters now refer to axes “X”, “Y”, “Z”, “W” only. There are still some parameters with full 10 axes relation (e.g. “RV” etc.). Please see the parameters list in this User’s Manual (sections 10.2 belowand 10.3 below) for more information. • Remote CAN Access: The controller now fully support all remote CAN messages command formats. Please see the command references for: “ZA”, “ZR”, “ZC”, “ZS” and “ZM” commands. • Download Array Buffer by CAN: A new protocol was added to support fast Buffer (array) assignment. In this mode the controller receives a start index parameter, and then automatically increments the index with each coming data. Very high download data rates can be achieved in that way. Please see “DB” command reference for more information. • Data Recording: The controller now support up to 100,000 data points in a single data vector, or up to 10 vectors 10,000 data points each (any other combination that does not exceeds 100,000 points is valid). A new parameter (“RG[2]”) that controls the Data Recording Upload buffer rate is now available to overcome PC CAN bus interface cards rate limitations. For more information please see section 8.1 below. Control and Robotics Solutions Ltd. 2-3 SC-AT – Software User’s Manual and Commands Reference • Fast I/O Support: The SC-4M-SA support 4 Fast digital outputs and 4 Fast digital Inputs (only 3 Fast inputs were supported in the SC-4M). The necessary H/W configuration (replacing “0” Ohm resistors) was slightly modified (different resistors names). Please see sections 8.2.6.2 below and 8.3.3.2 below and the H/W user’s manual for more information. Software configuration bits to support the additional fast input support were also added (see the “YOM” command update description below in this section). • New definition for MD Drivers Fault Source: The SC-4M-SA now enables the user to define the source of the Driver Fault signals. By default, the main DRV_FLT signals (on the main 64 pins connector) are used as Driver Faults. The user can now define the MD-Driver fault to be the DRV_FLT signal source. Please see the “XOM” command update description below in this section for more details on the new configuration bits. • New definition for the DRV_FLT Logic Signals: Due to an enhancement made in the FPGA encoders fault logic protection, the DRV_FLT logic configuration bit was removed from its previous definition (Bits #24, #25, #26, #27, zero based in “IL”), to new bits in “CG”. Please see new “CG” bits command update description below in this section, and the “CG” and “IL” command references in this User’s Manual. • Updated Hardware I/O’s Configuration “OM” Command: The FPGA now support some new I/O modes configuration bits. These are now reflected in new bits in the “XOM” (IO_MODE_0) configuration word. It is now a full 32 bit filed word. The new SC4M Shell supports an easy to use configuration dialog for all I/O configuration bits (for more information please see the “OM” command reference). The new bits are: ¾ ¾ ¾ ¾ ¾ YOM Bit # 27 (0 Based): S/W Configure Digital Input #4 as a fast input. YOM Bit # 28 (0 Based): Select X-Axis Driver Fault Source for MD-X. YOM Bit # 29 (0 Based): Select Y-Axis Driver Fault Source for MD-Y. YOM Bit # 30 (0 Based): Select Z-Axis Driver Fault Source for MD-Z. YOM Bit # 31 (0 Based): Select W-Axis Driver Fault Source for MD-W. • New bits in “CG” Axis Configuration Parameter: The “CG” (Axis Configuration) command was updated with some new bits. Please see the “CG” command reference in this User’s Manual for full description of all bits. The “CG” bits are: ¾ ¾ ¾ ¾ ¾ ¾ ¾ CG Bit # 0 (0 Based): Inverse Motor Command (Main DAC and PWM). CG Bit # 1 (0 Based): Inverse Encoder Direction. CG Bit # 2 (0 Based): Configure Axis as SIN commutated (for SIN motors). CG Bit # 3 (0 Based): Use PID control (when set). PIV control when not set. CG Bit # 4 (0 Based): Inverse Auxiliary Motor Command (Aux. DAC only). CG Bit # 5 (0 Based): Enable Encoder Protection as Driver Fault. CG Bit # 6 (0 Based): Invert DRV_FLT Signal Logic. • New Encoder Protection Features: The SC-4M-SA firmware now fully supports two encoder protection schemes. These are: (i) Encoder Quadrature error, and (ii) Encoder dis-connected error. Encoder Quadrature error is detected when both “A” 2-4 Control and Robotics Solutions Ltd. Revision 3.10, January 2005 and “B” are changed in the same clock. Encoder disconnected error is detected when: (A = !A) or (B= !B) for 4 consecutive servo samples. The user can select to enable (or disable) the Encoder protection logic by setting (or clearing) bit CG[5]. When enabled, both protection schemes are operational. Note that both errors are reported as Driver Faults, with new special Motor Fault condition values. Please see chapter 7 below in this user’s manual for more information. See also “CG” and “MF” command references. • Motor Stuck Protection: The controller now checks for a Motor Stuck condition as part of its real time servo loop (in close loop mode only !). Motor Stuck condition is defined as a saturated servo command, with “0” velocity measurement. If this condition is permanent for 4 seconds (consecutive 65536 servo sample), the axis is disabled. A new “MF” value is defined for that purpose. Please see the “MF” command references. • DAC Offset Command: A new DAC Offset command is now available. The ”DO” command can be used to calibrate the analog output offset value. “DO” is applied in LSB units. The range of the new “DO” command is ±32767. The value of “DO” is saved to the flash memory, and is restored on each power up. Note that “DO” has an effect whenever the system is powered on, regardless to the Motor On (MO) and NO Control (NC) states. Please see the “DO” command reference for more information. • Repetitive Point To Point: A change was made in the Repetitive Point To Point motion mode behavior (MM=0, SM=1). In case that the initial requested motion distance is “0”, the controller will not start any motion sequence. If during Repetitive motion sequence a non-normal end of motion reason is observed (EM != 1), the Repetitive motion sequence is aborted. For example, if Limits are detected, etc. • Status Indication LEDs: The SC-4M-SA has only 2 Status Indication LEDs. D1: FPGA Led, and D2: CPU Led. The FPGA Led now holds the internal hardware ABORT inhibit condition. Whenever the H/W detects an ABORT condition (all drivers are disabled), the FPGA LED is Off. The FPGA Led is On only when there is NO Abort condition. The CPU Led behavior reflects various internal S/W condition states. Please see the SC-4M-SA relevant documentation for more information. • Control Filter Parameters Naming Conventions Change: There are few naming conventions change implemented in the SC-4M-SA firmware 2.03 and above. Please see chapter 6 in this User’s Manual for more information about the control filter structure and parameters. In general, the “A1” array was replaced by “CA” – Control Parameters Array. The new relevant parameters names are: ¾ ¾ ¾ ¾ ¾ ¾ ¾ ¾ ¾ KP[2] KI[2] KD[2] CA[4] FF[2] CA[7] CA[8] CA[9] CA[13] – 2nd PID filter Prop. Gain (Replacing A1[1]). – 2nd PID filter Integ. Gain (Replacing A1[2]). – 2nd PID filter Deriv. Gain (Replacing A1[3]). – 2nd PID filter Duration (Replacing A1[4]). – Acc. Feed Forward Gain (Replacing A1[14]). – 2nd Order Filter ‘a0’ (Replacing A1[7]). – 2nd Order Filter ‘b1’ (Replacing A1[8]). – 2nd Order Filter ‘b2’ (Replacing A1[9]). – 2nd Order Filter ‘Enable’/’Disable’ flag (Replacing A1[13]). Control and Robotics Solutions Ltd. 2-5 SC-AT – Software User’s Manual and Commands Reference ¾ CG[Bit #3] - Set PID Control Mode, (Replacing A1[6]). • MD PWM Command Resolution: The SC-4M-SA has a new 32 kHz PWM command interface for the MD drivers. The command value is automatically derived from the upper 11 bits of the DAC command value. • New SC-4M Shell Application: The SC-4M Shell application was updated to support the new features of the SC-4M-SA. Please consult C&RS for updated Setup utility for the new Shell application. 2.3. F/W Version 204 : SC-4M-SA Boards, May 2003 Version 1.02 of this user’s manual describes the changes related to the SC-4M-SA, firmware revision 2.04. The following changes were made in Release Version 2.04 of the SC-4M-SA Servo Controller: • Motor Stuck Protection – Change Protection Timing Delay: In F/W Revision 2.03 the Motor Stuck Protection was initially implemented, with delay time of 4 seconds (consecutive 65536 servo sample). In F/W revision 2.04 (and later revisions), the Motor Stuck Protection delay was reduced to 0.5 seconds. • New Special Open Loop Mode (NC=3) for X and Y Axes: When working with SIN commutated motors, it is required to operate the motor in open loop, during motor PHASES initialization, in a stepper operation mode. In this mode the motor SIN phase angle command can be initialized by a user defined parameter, and is not effected by the actual Magnetic Location. Please see the “NC” command reference and section 8.4 below in this User’s Manual for more information. 2-6 Control and Robotics Solutions Ltd. Revision 3.10, January 2005 2.4. F/W Version 205/B : SC-4M-SA Boards, Aug 2003 Version 1.03 of this user’s manual describes the changes related to the SC-4M-SA, firmware revision 2.05/B, Dated 5/8/2003. Release 2.05/B of the SC-4M-SA was initiated by C&RS in order to enhance the software features of the controller and fix some known bugs. This release version does not include or involve any hardware modifications, and is applicable for the SC-4M-SA Boards, Hardware Revision 1.0. New revision Firmware Name Code: Revision Release Date: FW 2.05/B. 5 August 2003. In general, Firmware Revision 2.05/B only enhances the features of the SC-4M-SA firmware options. Other then fixing a bug in the QW command, and slightly altering the behavior of the RA/TA commands (see description below), the new release is fully backward compatible with older revisions. The following changes were made in Release Version 2.05/B of the SC-4M-SA Servo Controller: • Fix Bug in Macro QW Command: Due to a bug in the axes attributes interpretation logic, the QW (Conditional Wait) Command was working only on X axes related conditions. This bug was fixed in revision 2.05. • Support Read/Write Hardware Access: Two new commands (XW/XR) where implemented to allow Read/Write Access to selected controller H/W registers. Please refer to the XW/XR Command Reference Manual for more information. Users should avoid using these functions without prior consulting with C&RS technical support. • Modify CAN RA/TA Parameters Behavior: The RA/TA parameters (CAN bus address settings) now takes effect immediately. In previous F/W revisions (2.04 and earlier) the RA/TA (CAN Receive and Transmit addressed) commands took effect only after saving parameters to the controller FLASH memory, and after BOOT. In Revision 2.05 and later, changing RA/TA will immediately re-init the CAN hardware to take the requested effect. Care should be taken, as changing RA/TA while working in CAN bus, will stop the communication with the PC. The parameters must still be saved to the FLASH (as in previous revisions) in order to be valid after boot. Some new error codes where added. Please refer to the RA/TA Commands Reference Manual for more information. • New Parameters Added to the VR (Version Report) command: The VR (Version Report) command now support receiving a parameter as part of the command syntax. Calling VR without any parameter is fully compatible to previous revisions version report format. However, the controller now also support the following additional version reports: Control and Robotics Solutions Ltd. 2-7 SC-AT – Software User’s Manual and Commands Reference ¾ ¾ ¾ “AVR,1” : Reports Boot and Angel Versions. “AVR,2” : Reports Firmware (Major and Minor) Versions, with its release Date and Time. “AVR,3” : Reports the FPGA Version. The new version report format is supported only in RS-232 communication. In CAN bus the controller will report back the standard version format string, similar to the previous revisions version format, regardless of the command parameter. • New Enhanced Down Load Buffer Mode (EDB): A new Enhanced Down Load Buffer Mode (EDB) is now supported as an option. This is an enhancement to the SC4M and SC-2M old DownLoadBuffer (DB) command, to allow fast and large data blocks transfer from a host PC to the controller. In this mode, the controller is continuously listening to a new dedicated CAN address, and monitors all messages received in it. According to a new set of parameters, the controller then stores the incoming data in the relevant buffers, and auto-increment the store location for one or two buffers separately. The new EDB mode is supported in CAN communication only! In order to avoid initialization problems, and fully backward support any existing application, the EDB mode is always DISABLED after power up. In order to activate the new EDB mode, a host system must initialize the mode. Please refer to the EDB Command Reference description for full information on how to initialize and use the EDB mode function. • Change in ZI parameters Range: To support the new EDB mode parameters range, ZI commands range was extended to +/-100,000 (was 0 to 2048). Care should be taken when using with ZM,ZA,ZR,ZC Commands, as they DO NOT check the range of the used ZI (used as CAN Send/Get Addresses). The user must initialize valid and correct (in range) CAN address. • Modify Gearing Motion Mode: Gearing Motion Mode (MM=2) is now fully supported for X and Y axes using a master DP follow method. The FR (Following Ratio) parameter is using a 32 bit, 8.24 format scaling resolution, to allow ratios of up to : x 256, and 1/16,777,216. Please refer to the Gearing Motion Mode Command Reference Manual for more information. 2-8 Control and Robotics Solutions Ltd. Revision 3.10, January 2005 2.5. F/W Version 205/C : SC-4M-SA Boards, Oct. 2003 Version 1.03 of this user’s manual describes the changes related to the SC-4M-SA, firmware revision 2.05/C, Dated 30/10/2003. Release 2.05/C of the SC-4M-SA was initiated by C&RS in order to enhance the controller’s general purpose Analog Inputs to support 12 bit A2D’s. The new version fully support both the standard (10 bit) and enhanced resolution (12 bits) A2D devices. As both A2D devices are hardware compatible, this firmware version fully support both H/W configurations without any special definitions (for the SC-4MSA Boards, Hardware Revision 1.0). Some analog input parameters ranges were changed to support the higher resolution. Please see the relevant section in this User’s Manual for more information about Analog Inputs Support on the SC-4M-SA. There are no other changes associated with this firmware revision. New revision Firmware Name Code: Revision Release Date: FW 2.05/C. 30 October 2003. The following changes were made in Release Version 2.05/C of the SC-4M-SA Servo Controller: • Enhanced A2D’s Resolution Support: The standard Analog Inputs interface now support as default the 12 bit A2D’s. Using the “AG” and “AF” parameters (Analog Input Gain and Gain Factor) users can scale the analog input reading “AI” to any desired scale. The final A2D Input gain can be any number in the range of 19.0 to 19.16 format. The A2D’s are sampled at a rate of ~ 2 kHz (i.e. each analog input is sampled once per 8 servo cycles). When working with 10 Bit A2D’s, a higher noise level is expected (at least +/-2 LSB). Using AF>=2, this noise can be eliminated. The following related parameter ranges were updated: ¾ ¾ ¾ AS – Analog Input Offset is now: [0 ÷ 4095]. AG – Analog Input Gain is now: [-524,288 ÷ 524,288] or [-2^19 ÷ +2^19]. AF – Analog Input Gain Factor is now: [0 ÷ 16]. Please see the relevant section in this User’s Manual for more information about Analog Inputs Support on the SC-4M-SA. Control and Robotics Solutions Ltd. 2-9 SC-AT – Software User’s Manual and Commands Reference 2.6. F/W Version 205/D : SC-4M-SA Boards, Dec. 2003 Version 1.03 of this user’s manual describes the changes related to the SC-4M-SA, firmware revision 2.05/D, Dated 12/2003. Release 2.05/D of the SC-4M-SA was initiated by C&RS, mainly in order to enhance the controller’s motion modes, and support Position Based ECAM motions. In addition, revision 2.05/D also induces: Support for programming the CAN Baud rate using the CB command, and default initialization of some control filter parameters. New revision Firmware Name Code: Revision Release Date: FW 2.05/D. 8 December 2003. The following changes were made in Release Version 2.05/D of the SC-4M-SA Servo Controller: • Position Based ECAM Motion Mode: ECAM is a unique motion mode that allows one axis to follow a motion of another axis, with a user defined table based position ratio. The SC-4M-SA firmware version 2.05/D support master based Position ECAM following, on X and Y axes only. All 4 axes can be used as masters. ¾ ¾ A new ECAM parameters array “EA” is now supported. For the user defined position table, the general purpose “AR” array is used. Please see the relevant section in this User’s Manual for more information about ECAM motion mode support. • CAN Baud Rate Settings: The CAN Baud rate can now be set by using the “CB” command. All hardware CAN bus baud rates that are supported by the CAN controller hardware are now supported. Please see the “CB” command reference for more information. • RS-232 Baud Rate Settings: The RS-232 Baud rate can now be set by using the DIP Switch #3 on the SC-4M-SA Board. When set to “OFF” the default baud rate setting of 38,400 bps is selected. When DIP-SW#3 is set to “ON”, the RS-232 baud rate is selected as 115,200 bps. Note that this version supports only the main communication link as 115,200 bps. The download firmware is still executed in 38,400, regardless of the DIP-SW settings. Newer BOOT versions will support download firmware at 115,200 also. 2-10 Control and Robotics Solutions Ltd. Revision 3.10, January 2005 2.7. SC-AT Family Controllers – Document Version 3.10, January 2005 This version (3.10) of the User’s Manual now supports the SC-AT controller family, currently the following products: • Supporting SC-AT-2M F/W Version 101/A. • Supporting SC-AT-4M F/W Version 300/A. The following corrections and additions are included in that version of this User’s Manual: • Correct Mistake in: CA[14] was printed in section 6.9 “Filter Gain Scheduling” by mistake. The PID[2] filter duration is set by CA[4]. The User’s Manual was updated to correct this mistake. • Correct mistake in PA – Parameters Array. The ‘PA’ parameters array is and always was an axis related array parameter, and not as previously stated. • The “ZI” array is specifically documented in this version. Please refer to the “ZI” parameter in section 10. This document version does not omit any features that are supported in the SC-AT-4M, but specifies if the feature is not supported by the SC-AT-2M. Also, differences in bit configurations may exist between both the SC-AT-4M and the SC-AT-2M platforms. These differences are specifically specified. 2.7.1. SC-AT-4M Differences From Previous SC-4M-SA Version 2.05 The SC-AT-4M product is a new hardware version of the SC-4M-SA controller. The new version includes a more powerful CPU core, and some hardware and software improvements. The SC-AT-4M is 100% hardware and software compatible to the SC4M-SA multi axes servo controller. The main S/W enhancements in the SC-AT-4M are: • Download FPGA: The SC-AT-4M (and SC-AT-2M) products now support the downloading of FPGA code to the controllers flash memory. Please refer to the SCAT Shell manual for further information. • Fast IO Resistors Configuration: The SC-AT-4M Fast I/O resistors configuration was changed. Please see section 8.3.3.2 and 8.2.6.2 below for more information. • Master/Slave Support: Support for New BASE FPGA version was added. This includes the new Master/Slave Initialization support, as Master Default. Please consult C&RS sales for more information about this option. Control and Robotics Solutions Ltd. 2-11 SC-AT – Software User’s Manual and Commands Reference 2.7.2. SC-AT-2M Differences From Previous SC-4M-SA Version 2.05 Main Modifications / Differences between the SC-AT-4M and the SC-AT-2M: • Groups: The SC-AT-2M no longer supports the A,C,D groups, and the option to assign different axes per group. The only group that is supported in the SC-AT-2M is the “B” group – which includes both of the axes – X and Y. • Data Recording Variables: The “RV” keyword in the SC-AT-2M is no longer an axis related normal keyword. The “RV” keyword in the SC-AT-2M is a onedimensional array, with the size of 8, each array element reflecting a different vector to be recorded. • SIN Commutation: In current firmware version, the SC-AT-2M does not support SIN Commutation. The dedicated “CG” bit, and the “ML” and the “MP” parameters are not supported in this release of the SC-AT-2M. • Position Servo Loop Sampling Time: The SC-AT-2M is based on a different micro-processor, where the sampling time is slower than the SC-AT-4M. The servosampling rate in the SC-AT-2M is of 8,192 Hz (every 122 [µs]). Every mention of the servo sampling rate of the SC-AT-4M , includes a note regarding the servo sampling rate of the SC-AT-2M. • Download Buffer: As the Download Buffer (“DB”) feature is a subset of the EDB mode, this feature is no longer supported by the SC-AT-2M. • Data Array Lengths: The data array lengths of the SC-AT-2M are different than the buffer array lengths in the SC-AT-4M. Please refer specifically to each array keyword, in section 10. • Number Of Scripts Supported: The SC-AT-2M supports 2 macro scripts only – X and Y scripts. • Axis Configuration Keyword: “CG” – The SC-AT-2M supports additional CG bits. The same bits were kept for functions that are identical to the SC-AT-4M. Please refer to the “CG” keyword in section 10. • New Keywords: - The following new keywords were added to the SC-AT-2M: o XP – Auxiliary Axis Position. o XV– Auxiliary Axis Velocity. Please refer specifically to each keyword, in section 10. • New Error Codes: New Error codes were added. Please refer to Error Codes 53, 54, 55, 56 in the Error Codes description under section 11 below. • Script “QW” Keyword: The “QW” keyword was modified slightly in order to support the SC-AT-2M script. Please refer to the SC-AT Script manual. 2-12 Control and Robotics Solutions Ltd. Revision 3.10, January 2005 • Begin Motion: “BG” Command Into a Software Limit - If a “BG” command, in Motion Mode Point-To-Point, is initiated into a software limit (The resulted “AP” is in to the low or high limits), then an error is returned, and an Error Code is set. Please refer to “HL” and “LL” in this user manual, section 10. This option will be supported in the SC-AT-4M in the future. • Get Version “VR” Parameter: – The “VR” supports different parameters and options. Please refer to the “VR” parameter in section 10. This option is also supported by the new SC-AT-4M firmware. • Download FPGA: The firmware and the SC-AT-4M/2M shell now supports the downloading of FPGA to the SC-AT boards (both 2M and 4M support this option). Please refer to the SC-AT Shell manual for further information. This option is also supported by the new SC-AT-4M firmware. • CAN Addresses: Additional CAN Transmit and Receive Addresses – The SC-AT2M, in addition and independent to the standard RA and TA CAN addresses, listens and transmits on additional addresses. Please refer to the “ZI” parameter in section 10. This option will be supported in the SC-AT-4M in the future. • Compare Function Implementation: In the SC-AT-2M, the “PG[i][6]” parameter (Pulse Width Mode) is not used. In turn, the pulse width parameter “PG[i][5]” is used to set the required pulse width, in multiplications of 1.92 µSec intervals. This is non-compatible to the SC-AT-4M implementation that specified only 4 width options. Please see section 8.2.5.2 below for more information. Control and Robotics Solutions Ltd. 2-13 SC-AT – Software User’s Manual and Commands Reference 3. GLOSSARY The following definitions are used within this manual. Please note that these definitions are provided only for the scope of the SC-AT products and this manual. 3-14 Abort Input A dedicated digital input typically connected to the machine’s emergency button. When the SC detects an active state at this input it immediately disables both motors. In the SC-AT family controllers, in addition to the standard firmware support for the Abort signal as noted above, the Abort signal is also monitored by the Hardware to disable all drivers in case Abort is sensed. Analog Command, ACmd A dedicated analog output of the SC (one or two for each axis), which is used to transfer the digital control filter result to the motor’s driver (where it typically considered as a current or velocity command). Its standard typical range is ±10 [v]. In most normal cases, only one analog ±10 [v] command is used for each controlled axis. In this case an auxiliary analog output is available for each axis. However, if electronic Sinusoidal Commutation (see definition below) is used, each axis operating in this mode uses 2 x ±10 [v] analog commands. In this case, no Auxiliary Analog Output is available for that axis. Analog Commands Scaling The SC-AT-4M support as a standard 2 x Analog Output Interfaces for each axis. Total of 8 x ±10 [v] @ 16 [bits] resolution. The SC-AT-4M also support 4 x PWM outputs for special drivers interfaces. Each PWM interface is 12[bits] resolution. The SC-AT-2M support 2 x Analog Output Interfaces for the X/Y axes, ±10 [v] @ 12 or 13 [bits] resolution. The SC-AT-2M also support PWM commands at 12 bits resolution. To avoid loop and command gain differences, the standard S/W interface for ALL command (both Analog and PWM) outputs is fixed at 16 [bits], i.e.: +32767[bits] for +10[v] command, and –32767[bits] for -10[v] command. Control and Robotics Solutions Ltd. Revision 3.10, January 2005 On the SC-AT-4M, when not using sinusoidal commutation drivers, the auxiliary analog output (±10 [v], 16 [bits]) can be used as a general-purpose analog output. Analog Outputs Auxiliary On the SC-AT-2M, when not using analog commands as driver commands, the auxiliary analog output (±10 [v], 12 or 13 [bits]) can be used as a general-purpose analog output. Clause A single, complete, independent, communication statement that can be interpreted and evaluated. Each clause consists of keywords and operators and is terminated by a terminator (to identify end of clause). Clause - Assignment A communication statement sent by a host and instructs the SC to assign a value to a specified parameter. A typical assignment clause consists of: Keyword Clause - Command “=” value terminator A communication statement sent by a host and instructs the SC to perform a specified command (process). A command clause consists of: Keyword terminator A communication statement sent by a host and instructs the SC-AT to report the value of a specified parameter. A typical report clause consists of: Clause - Report Keyword terminator Clause - Terminator A character that identifies end of communication clause. It can be <CR> or “;” in the communication from a host to an SC or “>” in the opposite direction (all for the RS232 line). Command Interpreter The Commands Interpreter is an internal software module of the SC-AT firmware, responsible for interpreting Clauses sent to the controller. The Command Interpreter handles all commands passed to the SC-AT. Communication Protocol The low-level hardware and software definition of a communication channel. In RS232, for example, it includes the baud-rate, handshake options, parity, etc. Communication Syntax, Language Syntax The rules that define the correct sequence of characters that may create a valid communication clause. Control and Robotics Solutions Ltd. 3-15 SC-AT – Software User’s Manual and Commands Reference Digital Control Filter An algorithm that is periodically executed (16,483 times per second in the SC-AT-4M, 8192 times per second in the SC-AT-2M). The algorithm compares the desired motor position and its actual position to calculate a command to the motor to minimize the difference between these values. The new SC Digital Control Filter algorithm supports both standard position based PID, as well as Position Over Velocity loop structure. The new SC-AT products support additional advanced features. Please see the relevant chapter in this User’s manual under “Control Filter Algorithms”. Echo In RS-232 mode, the SC-AT controller’s automatically echoes (send a copy back) each character that it receives during normal communication. The returned character can be used by the host to verify proper communication. In the binary CAN bus communication protocol, ECHO is not supported. Only OK/ERR prompt is used. 3-16 Error Codes In case that the SC-AT encounters an error when interpreting a received clause it ignores this clause and responds with “?” before the returned terminator (“>”). The SC-AT also stores a code for the interpretation error at a parameter named “EC” – which can be later reported to analyze the error source. A separate parameter “QC” holds the error codes of any program running in the controller (Scripts or Macro). Fault Input A dedicated digital input whose source is typically the motor’s driver. It is used to inform the SC-AT about a driver’s malfunction – for which the SC-AT needs to inhibit the driver and to abort all motion activities. Firmware Version Downloading The SC-AT executes an internal firmware (BIOS) to perform all its tasks. From time to time new firmware versions are released (corrections of problems, new features, etc.). New firmware version will be supplied by C&RS (or be available from our web site). The SC-AT, together with the SCShell, enables the downloading of a new version via the RS232 (ONLY !) line. The advantages of this process (over older EPROM replacement method) are clear. FLASH Memory The SC-AT-4M includes a 16M[bits] FLASH memory for its firmware, parameters and user program. The SC-AT2M includes a 2M[bits] FLASH memory for its firmware, parameters and user program. The FLASH memory is, in principal, similar to an EEPROM memory. Control and Robotics Solutions Ltd. Revision 3.10, January 2005 The FLASH memory enables the downloading of a new firmware version. Host A computer, terminal, PLC or any other device which may send communication clauses to the SC-AT, via one of its communication links. Identifiers – Axes The SC-AT Commands Syntax always requires an axis identifier before the keyword itself. If a Keyword attribute is non-axis related, any axis identifier is legal, and will have the same result. The Command Interpreter ignores the axis identifiers of non-axis-related keywords. Identifiers – Group Axes The SC-AT Commands Syntax support the concept of Axes Group identifier definition. An Axes Group allows the user to define an arbitrary sub-set of controller axes to be acted upon1. Like in normal axes identifiers, the Command Interpreter ignores the Group Identifier of non-axisrelated keywords. The SC-AT-4M supports up to 4 axes Groups identifiers: A, B, C, D. The A and B Groups always have the default of “All” and “Both” (X and Y) assignments after power up. The SC-AT-2M supports the ‘B’ – Both group identifier only 1 Inhibit Output A dedicated digital output of the SC-AT (one for each axis) which is used to enable/disable an external motor’s driver. The inhibit output reflects the state of the MO parameter. Incremental Encoder A standard position sensor used as a position feedback in conjunction with motors and servo systems. A special SCAT hardware circuit uses the encoder’s signals to continuously sense the motor/load position (and speed) and to accordingly control the motor motion. Keyword A token, consisting of 2 characters, which identifies a unique SC-AT’s command or parameter. Keyword Attributes Each Keyword of the SC-AT has one or more attributes. The Keyword attribute tells the command Interpreter how to be treated. For example, a Keyword can be an axis related Keyword (related to an axis) or Global Keyword. Limit – Hardware RLS, FLS Most (although not all) motion systems have mechanical end-of-travel stops (especially with linear load motion). In order to prevent the load from hitting these stops, an The SC-AT-2M does not support configurable Axis groups. Control and Robotics Solutions Ltd. 3-17 SC-AT – Software User’s Manual and Commands Reference electronic device/switch is located before each stop (Reversed and Forward) to detect this situation. These switches are connected to the SC-AT’s RLS and FLS digital inputs (Reverse Limit Switch and Forward Limit Switch). When the SC-AT detects an active state at one of these inputs it stops any motion toward the related direction. 3-18 Limits – Software HL, LL Similarly to the hardware limits (RLS and FLS above), the SC supports software limitation for motion range. HL (High Limit) and LL (Low Limit) defines a position range in which the SC-AT operates normally. Whenever the motor’s position exceeds this range, the SC-AT stops any motion to the related direction. Motion - Modes Motion Mode defines the method in which the SC-AT calculates the desired position command as a function of time. The SC-AT supports various motion modes. The basic modes are listed below: - Point To Point (PTP). - Jogging. - ECAM. - Gearing. - Step. - Repetitive Step and PTP. Motion - Profiling Motion Profiling is the actual algorithm that calculates new reference points to the servo loop according to the selected Motion Mode. Motion - On-The-Fly Changing A characteristic of the SC-AT family that enables the modification of most of its parameters even when they are active. For example, the PID parameters can be modified while the motor is in servo loop (motor is on). A unique characteristic of the SC-AT is that all (except profile smoothing) of its motion parameters (such as: speed, acceleration, deceleration, distance, etc.) can be modified on-the-fly under almost any conditions. Position Capture Events The Capture Position feature supported by the new SC-AT family products is the ability of the encoder interface hardware to capture (latch) the exact encoder location when a pre-defined Input or encoder Index is detected. The Capture hardware can latch encoder position when counting at ANY encoder speed. The Capture mechanism can be programmed to latch encoder positions based on a user defined digital input, or encoder index pulse. Position Compare The Compare Position feature supported by the new SCControl and Robotics Solutions Ltd. Revision 3.10, January 2005 Events AT product is the ability of the encoder interface hardware to compare the actual encoder hardware counter value to a pre-defined user register value, and to generate a H/W pulse when there is a condition match. The basic compare mechanism can work at ANY encoder speed. Compare mechanism can be operated as a fixed GAP auto increment condition, or variable GAP tables. See specific chapter later on in this User’s Manual for further information. Scripts or Macro Programming The SC-AT-4M controller supports up to 10 simultaneous internal programs. The SC-AT-2M supports up to 2 simultaneous internal programs. (Also referred to as “Scripts” or “Macro” programs). Internal programs are used for tasks like Homing an axis, or other user defined low level servo tasks. The new SC-AT family controllers are provided with an advanced SDI (“Software Development Environment”), including very powerful debugger and editor utilities, making Scripts programming and debugging an easy task. Sinusoidal Electronic Commutation (Currently Supported in SC-AT-4M Only) Electronic Sinusoidal Commutation is refereed to the ability of the controller to electronically and continuously control DC brushless motors phases commutation. In brushless type motors, there are 2 main techniques for phase commutation. The traditional “Trapezoidal” commutation, usually done within the analog motor driver, and “Sinusoidal” commutation. In Sinusoidal commutation the motor phase currents are changed continuously as a function of the motor magnetic angle. In Electronic Sinusoidal Commutation the controller generates the 2 phase current commands (to be used by a special motor driver) as a function of the encoder feedback reading. 2 Virtual Axes2 The SC-AT-4M support 2 Virtual axes, U and V. The virtual axes are used for special features like multiple axes synchronized motions, Master Slave, etc. Windows Shell Program, SCShell C&RS provides an enhanced Windows 9x (or NT/2000/XP) application program (named AT-Shell) for easy and fast interface with the SC-AT family controllers. Using the AT-Shell, starting-up or verifying a new idea/concept is just few mouse clicks away. Currently not supported in the SC-AT-2M controller. Control and Robotics Solutions Ltd. 3-19 SC-AT – Software User’s Manual and Commands Reference 4. COMMANDS SYNTAX AND PROTOCOLS 4.1. General This chapter mainly focuses on the SC-AT communication syntax, including response to commands clauses and errors. The various communication protocols are briefly presented for reference only (see section 4.2 below), as they are fully covered in the “SC-AT Communication Protocol User’s Manual”. The command syntax shall define the syntax for the SC-AT-4M controller. In case there is a difference between the AT-4M and the AT-2M controllers, a separate explanation or section shall be included, for the SC-AT-2M controller case. 4.2. Supported Communication Protocols The SC-AT currently supports two basic communication protocols and channels: • ASCII based RS-232 • Binary CAN bus. Using separate hardware interface layers, the RS-232 and CAN bus communication links (and their protocols) are completely independent from one another, and can be used simultaneously (excluding few special cases as described in section 4.2.1 below). Process ASCII RS232 Messages Process Binary CAN Messages Firmware Main Idle Loop Process Internal Scripts Programs Figure 4-1: Communication Channels Handling within the Firmware Main Idle Loop 4-20 Control and Robotics Solutions Ltd. Revision 3.10, January 2005 As shown in Figure 4-1, the servo controllers firmware main loop is continuously monitoring both communication channels, handling incoming messages separate from one another. This is possible in the SC-AT firmware and syntax architecture as almost all keywords and commands are executed immediately without blocking any other process. The complete “bits and bytes” comprehensive description of each one of the protocols is fully given in the “SC-AT Communication Protocol User’s Manual”. 4.2.1. Simultaneous Communication Channels Operation Support As discussed above, both communications protocols can operate simultaneously without any interference. This is possible in the SC-AT architecture as almost all keywords and commands are executed immediately without blocking any other process. However, there are some special cases where a special operation in one channel can block the other. These cases are: • When downloading new firmware in RS-232 (Supported ONLY in RS-232), all other channels are of course immediately disabled. • When downloading a new user program in one of the channels, the other channel is blocked for the same operation. Other communication with the second channel is fully functional. • When uploading large arrays in one channel, other channels will be blocked until the upload operation is completed. 4.3. Controller Communication Language Definitions 4.3.1. General In the following sub-sections, the controller basic communication language is defined. It should be noted that the same “Language Syntax Rules” applies, regardless of the command source, which can be one of: RS-232 Communication, CAN bus Communication, Possible other future supported communication links, and the Internal script program engine. When a new command is received from either one of the channels described above, its source is recorded for later reference, and the command itself is passed to an internal software module “The Command Interpreter”, which checks its syntax, and if a valid command is detected, executes the command. 4.3.2. Language Notations The communication keywords are divided into two groups of Keywords: • Parameters Keywords. • Command Keywords. Control and Robotics Solutions Ltd. 4-21 SC-AT – Software User’s Manual and Commands Reference The execution time of a parameter keyword is minimal and usually negligible (few micro-seconds at most). The execution time of a command may be longer (for example: save parameters, or upload list data). Below please find the definitions of each Keyword type group. 4.3.2.1. Parameters Keywords Parameters can always report their value (generally reflecting the value of an internal software or hardware register) and in most cases can be assigned with a value. There are some read only parameters that can not be assigned with a new value. For example, the “AI” (Analog Input value) is a read only parameter. There are some parameters that when assigned with a new value, can also modify the values of other parameters. For example, when modifying the “PS” (Current Encoder Position Value) of an axis, the “DP” (The current position command reference or Desired Position) is also modified to the same value to avoid positioning errors. 4.3.2.2. Command Keywords Command Keywords always initiates a process (start a motion, save parameters, begin internal script program execution, etc.). Commands does not report a specific register values, and in general, does not assign any specific register values, though they can internally modify values of more then one register. For example, the “BR” (Begin Recording) command, will of course modify the value of the “RR” (Recording Status) register. The “LD” (Load from Flash) command will of course modify values of almost ALL registers! Commands can receive a parameter (actually an argument) which effects the command process. For example, the command to execute a program (“QE”) can receive a label string argument, indicating the name of the subroutine to execute (e.g. “XQE,#HOME”). Command’s parameter can be a string (see above), or a number. The command’s parameter is separated from the command itself using a comma “,” character. 4.3.2.3. Keywords Attributes and Restrictions Each Keyword has attributes defining it, and restrictions that must be satisfied in order to accept the command clause. The Command Interpreter module checks the restrictions before actually executing the command or making a parameter assignment. For parameters, the restrictions relate only for assignment, since reporting is always valid. (For a complete list of ALL attributes and restrictions please refer to section 10.1 Keywords Attribute Reference). Restrictions, for both parameters and commands, may be one or more of the following list (the restriction attribute value is given for reference, see section 10.1 Keywords Attribute Reference for more information): • None: No restriction is applicable. • Motor Should be ON (0x00000001): The requested command or parameter assignment needs an enabled motor. For example, the “BG” (begin motion) command must have its related motor enabled in order to be executed successfully. 4-22 Control and Robotics Solutions Ltd. Revision 3.10, January 2005 • Motor Should be OFF (0x00000002): The requested command or parameter assignment needs a disabled motor. For example, the “CG” (axis configuration) parameter can be assigned with a new value ONLY if its related motor is disabled. The assignment can not be executed if the motor is enabled. • Motion Should be ON (0x00000004): The requested command or parameter assignment can be executed only if a motion is currently being executed. • Motion Should be OFF (0x00000008): The requested command or parameter assignment can be executed only if there is no current motion. For example, the Motion Mode (“MM”) parameter can not be changed during motion. • Parameter is Read Only (0x00000010): A Read-Only parameter can only be inquired for its value. The user can not assign values for Read-Only parameters. For example, “DP” (the current reference Desired Position value) is a read only parameter, and can not be directly assigned a new value by the user. • Keyword Source MUST be an internal program (0x00100000): The keyword can only be used from an internal script program. For example, the “RT” (return from subroutine) command can only be called from with in a program subroutine. • Keyword Source MUST be external Communication (0x00200000): The keyword can only be used from an external communication link. For example, the “QD” (download a new program) command can only be called from an external communication link. • Keyword Source MUST be RS-232 Communication (0x00400000): The keyword can only be called from an RS-232 link. For example downloading new Firmware is supported ONLY in RS-232 mode. • Keyword Source MUST have all internal programs halted (0x10000000): The keyword can only be executed when all internal user programs are halted. For example, the “LD” command (Load from flash), can be called only in that case. Parameter values always have a minimum and maximum value for assignment clauses. Most parameters are saved to FLASH. Few are initialized to default non-active values on power-on, reset, or load-from-FLASH events. 4.3.2.4. Axes Identifiers and Groups The SC-AT family controllers support Group Definitions for Axes Identifiers. The SCAT controller language syntax requires an axis identifier before any Keyword. When a specific axis identifier is given, the command interpreter will interpret the clause and will act upon the specific axis only. In order to let the user perform an action on more then one axis simultaneously, for example, reporting position of all axes at once, the notation of Group Axes Identifiers is supported by the SC-AT command interpreter. SC-AT-4M There are 4 Axes Groups supported by the SC-AT-4M. These are: A, B, C and D. By default, the “A” group stands for ALL axes and the “B” group defines X and Y axes sub- Control and Robotics Solutions Ltd. 4-23 SC-AT – Software User’s Manual and Commands Reference group. For example, issuing the following assignment “APS=0” set the position of all axes to “0”, while “BPS=0” set only the “X” and “Y” axes position to “0”. When the controller is powered-up, the “A” and “B” groups definitions are automatically set to their default. The user can not change the default definition of the “A” and “B” groups, nor save them to the FLASH memory. After power up, the user can however define other values to the “A” and “B” groups, although this is not recommended. As a design rule we recommend to use “A” and “B” always as their default initial definitions. If other sub-groups are needed it is recommended to use the “C” and “D” groups. The “C” and “D” groups can be assigned to any value. The definition is saved to the flash memory with all other controller parameters, and can be used after power up. Groups definition is simply made using a new bit array filed parameter for each group. Each BIT in the parameter defines an axis to be related to the group. For example, “1023” (all 10 bits are “1”) defines “ALL”. “1” defines the “X” axis only. “3” defines “X” and “Y” axes (the ”B” default) and so on. For further information regarding Groups Definitions please see the “GP” keyword reference in section 10.5.29 in this User’s Manual. The SC-AT-4M/2M Shell program provides an easy GUI for groups definitions. Please see chapter 9 for more information. Note: In the current firmware version, when working in CAN bus communication, a multiple axes report command for a group with more then 2 axes will report ONLY the first two axes values. This limitation is currently implied due to the 8 bytes basic CAN message format. This limitation may be removed in future firmware versions. SC-AT-2M There is 1 Axes Group supported by the SC-AT-2M: “B”. This group defines X and Yaxes sub-group. For example, issuing the following assignment “BPS=0” set the position of both axes to “0”. The ‘B’ group is un-configurable, and obviously does not the “GP” keyword for group configuration. 4.3.3. Controller Language Syntax In the following section the general Language Syntax of the SC-AT family servo controller’s software is presented. Please note that while the discussion below mostly refers to the RS-232 ASCII protocol, the CAN bus protocol is logically similar. For further references regarding the full RS-232 and CAN bus binary protocols, please refer to the: “SC-AT Communication Protocol User’s Manual”. 4.3.3.1. Host to SC Each keyword consists of two upper case letters. Some of the parameters are defined as arrays. These parameters are always referred to with their two letters keyword and with an index number within a square brackets, e.g. AR[2]. 4-24 Control and Robotics Solutions Ltd. Revision 3.10, January 2005 Each command clause is terminated with a terminator character, which may be one of <CR> or “;”. Each command clause is preceded with an axis identification letter, to identify the axis to which the command clause is addressed to. It might be one of the following characters: SC-AT-4M Axis Prefixes SC-AT-2M Axis Prefixes X’, ‘Y’, ‘Z’, ‘W’, ‘E’, ‘F’, ‘G’, ‘H’ and ‘X’, ‘Y’ (total of 2 axes interface). ‘U’, ‘V’ – for axes 1 through 8, and for the 2 additional Virtual axes (total of 10 axes interface). ‘B’ for Both – After power up, ‘B’ always ‘B’ for Both ‘X’ and ‘Y’ axes. refers to the ‘X’ and ‘Y’ axes. This is done for backward compatibility. A’ for All – After power up, ‘A’ always refers to all axes !. ‘C’ and ‘D’: two additional user defined groups. All groups (‘A’, ‘B’, ‘C’, ‘D’) can be configured to define any subset of axes using a special new Group assign parameter. Some of the command clauses are not axis related (e.g.: SV for saving parameters to the FLASH or the AR for the global general-purpose array). In these cases the axis identification letter is ignored, although it still must be included. The Command Interpreter handles a command clause only after the termination character h as been received. Next command clause characters are received (buffered) but are not handled until the current command handling is completed. Each command clause includes only a single keyword. The keyword may be a command or a parameter. In case of a command keyword, the command clause will include the command keyword (preceded with the axis identification letter), with optional parameters (string or numbers), separated with a comma (‘,’). In case of a parameter keyword, the command clause may be a report or a set parameter clause. A report parameter value command clause includes only the parameter keyword (with index in square brackets for arrays). A set parameter value command clause includes the parameter keyword (with index in square brackets for arrays), “=” and the value. The parameter value is a decimal, long integer and in text format (printable characters). Control and Robotics Solutions Ltd. 4-25 SC-AT – Software User’s Manual and Commands Reference Notes: • Blanks, tabs and new-line characters are received, echoed but ignored. • Back-spaces are handled. Examples: XSP <CR> YSP ; XAR[5]<CR> Report parameter clauses YSP= 10000; BAC = 1000000 <CR> BAR[3]=345 ; XBG <CR> AST ; YQE,#HOME_X Set parameter clauses Commands Command to execute a subroutine “HOME_X” using the ‘Y’ script engine. named 4.3.3.2. SC To Host Each character (including blanks, tabs, new-line and terminators) are echoed as is, unless otherwise is selected by the user (EO command: Echo On/Off). In case of a report parameter clause, the reported value is sent back to the host (decimal, long integer, text format in RS-232, and binary format in CAN bus). After handling each command clause, a prompt is sent back to the host computer. The prompt is “>” in case of a successful command clause execution or “?>” in case of any error in the execution of the command clause (command was not executed). In the later case, a dedicated parameter (EC: Error Code) will hold the code of the last communication error. In cases where the last error was generated in a user script program, another dedicated parameter holding the last program error code is updated. (QC: Program Error Code). For a complete description of all currently supported error codes, please refer to chapter 11 later on in this User’s Manual. Notes: • An empty command clause is a legal “do nothing” or “Ping” command. • The prompt is sent only after the clause execution have been completed. Examples: The italics strings are the SC responses to the Host computer. The blanks are only for the clarity of the example and the send/get timing. 4-26 Control and Robotics Solutions Ltd. Revision 3.10, January 2005 Setting “SP” (Speed of X axis) to 10,000: X S P = 1 0 0 0 0 ; X S P = 1 0 0 0 0 ; Echo (only if EO=1) > Response (always sent) Setting “AC” (Acceleration of X and Y by default) to 10,000: B A C = 1 0 0 0 0 0 0 CR B A C = 1 0 0 0 0 0 0 CR Echo (only if EO=1) > Response (always sent) Reporting the value of the Z axis SP (Axis ‘Z’ is supported in the SC-AT-4M only): Z S P CR Z S P CR 10000 Echo (only if EO=1) > Response (always sent) Control and Robotics Solutions Ltd. 4-27 SC-AT – Software User’s Manual and Commands Reference Reporting the value of the SP (for X and Y by default): B S P ; B S P ; 10000 , 20000 > Echo (only if EO=1) Response (always sent) Reporting the value of the SP (Grouping axes, is supported in the SC-AT-4M only - for all axes, assuming A is configured to All axes): A S P CR A S P CR 100, 200, 300, 400, 500, 600, 700, 800, 900, 1000 > Echo (only if EO=1) Response (always sent) Executing a Begin Motion Command for X and Y by default: B B G CR B B G CR Echo (only if EO=1) > Response (always sent) Trying to assign out of range value to YAC (error prompt is sent, and EC is updated accordingly): Y A C = - 1 0 0 0 CR Y A C = - 1 0 0 0 CR Echo (only if EO=1) ? > Response (always sent) Executing a Script function named “HOME_X” in Program #1 (X): X Q E , # HOME_X CR X Q E , # HOME_X CR > Echo (only if EO=1) 4-28 Response (always sent) Control and Robotics Solutions Ltd. Revision 3.10, January 2005 5. MOTION MODES This chapter describes the various Motion Modes that are supported by the SC-AT controller’s family. Motion Mode defines a type of motion. The exact motion, for each Motion Mode, is defined by a set of related parameters, such as speed (SP), acceleration (AC) and many other parameters. While most of these parameters can be modified on-the-fly during an active motion (practically affecting the motion profile), the Motion Mode itself can not be modified during an active motion. The Motion Mode for the SC-AT is defined by a combination of two parameters: MM (Motion Mode) and SM (Special Motion Mode). Most standard motion modes are defined by the value of MM, with SM=0. Some special motion modes uses both MM (to define the basic motion mode) and SM (to define a special variation of it). The following sections describe the details of each motion mode. Please refer to the following notes: ¾ The communication clauses given in the following sections for how to start/stop and monitor each motion mode are just examples. A specific application can use any desired value for the related parameters (such as acceleration and speed). ¾ The values of most parameters does not need to be sent again before each motion. The SC will use the current value of each parameter when a new motion is commanded. ¾ Sometimes we use a semicolon ‘;’ mark between to commands. This is simply to save space. The user can use the ‘;’ in all commands, or use none. 5.1. Point To Point – PTP (MM=0, SM=0) 5.1.1. PTP Motion Description In this mode the controller calculates a standard smoothed trapezoidal profile from the current position to a user specified target position, using a user specified acceleration and speed. The profile is called trapezoidal since the velocity command has a trapezoidal (or triangular for short distances) shape. The user can select to smooth the profile in order “round” the sharp trapezoidal (or triangular) corners. If smoothing is used, then the Control and Robotics Solutions Ltd. 5-1 SC-AT – Software User’s Manual and Commands Reference actual jerks are limited (no zero time acceleration change). Without smoothing, the jerks are infinite (acceleration is changed at “0” time). The target position can be specified relatively to the current desired position, using the RP (Relative Position) parameter. It can be also specified as an absolute position, using the AP (Absolute Position) parameter. It is important to note that a PTP motion are always executed toward the value of the AP parameter. However, sending an RP=<value> clause is internally interpreted as: AP=DP+<value>, where DP is the current desired position (normally equal to the current actual position). As a result, the AP is indeed modified when a new value is assigned to RP, and any following PTP motion toward AP will actually move to the desired relative position. The only disadvantage of this method is that, for repeated relative motions, RP should be sent again before each motion. The SC-AT controllers support separate AC (Acceleration) and DC (Deceleration) values in all profile based motion types. Furthermore, a new DL (Deceleration on Limit) parameter is supported in order to define a special Deceleration values when Limits are hit (works both for software and hardware limits). 5.1.2. Starting a PTP Motion Communication Clauses MO=1 MM=0;SM=0 AC=500000 DC=500000 DL=1000000 WW=0 SP=50000 AP=100000 RP=30000 BG Description Enabling the servo loop, motor on Setting PTP motion mode Assigning a value for the acceleration, [counts/sec2] Assigning a value for the deceleration, [counts/sec2] Assigning a value for the Limit DC, [counts/sec2] Defines no smoothing. Assigning a value for the speed, [counts/sec] Assigning an absolute target position, [counts] or, assigning a relative value for the target position Begin the motion 5.1.3. Monitoring Motions During and after an active motion, the motion status can be continuously monitored using the following parameters. Please note that these parameters reflect the internal controller status regardless of the motion mode, and are relevant in all motion modes described below in this chapter. The user can of course choose to record any of these variable (and many others) using the internal Data Recording capability. Please refer to the chapter dealing in Data Recording features of the SC-AT controllers in this User’s Manual (see section 8.1). 5-2 Control and Robotics Solutions Ltd. Revision 3.10, January 2005 Communication Clauses PS VL DP PE MO MF MS SR EM Description Reports the current actual motor position, [counts]. Reports the current actual motor speed, [counts/sec]. Reports the current desired position, [counts]. Reports the current position error (DP-PS), [counts] Reports the current motor status. Should be normally 1 for motor on. Will be 0 (off) only in case of fault during the motion. A code describing why the motor was lastly disabled: MF=0: Motor was not disabled. MF=1: Driver’s fault (Fault input). MF=2: Abort input (emergency stop). MF=3: High position error (|PE| > ER). MF=4: Motor Stuck Condition. MF=65: Encoder Quad Error. MF=129: Encoder Dis-Connected Error. A bitwise code describing the current motion status: Bit 0: In motion. Bit 1: In stop. Bit 2: In acceleration. Bit 3: In deceleration. Bit 4: Waiting for input to start motion. Bit 5: In PTP stop (decelerating to target). Bit 6: Waiting for end of WT period. A bitwise code describing some controller statuses. Currently only Bit #5 (zero based) is reported. Other bits may be used in the future and should not be assumed to have any pre-defined value. Bit 5: In target3. A code describing the cause for last end-of-motion: EM=0: EM=1: EM=2: EM=3: EM=4: EM=5: EM=6: EM=7: EM=8: Motion is still active. Normal end-of-motion. Forward limit switch (FLS). Reverse limit switch (RLS). High software limit (PS > HL). Low software limit (PS < LL). Motor was disabled (check MF). User command (ST or AB). Motor off by user (MO=0). 3 This bit indicates that the motion profile has been finished and that the absolute position error (|PE|) is smaller than the target radius (TR) for at least target time (TT) consecutive samples (each 61 [µs]). Control and Robotics Solutions Ltd. 5-3 SC-AT – Software User’s Manual and Commands Reference 5.1.4. Stopping a Motion A PTP motion is automatically finished when the desired position (the motion profile, not the actual motor position) reaches the desired target position. At this time the Motion Status (MS) is read as 0 and the controller is ready for a new motion or a new motion mode. The EM (End Motion) parameter is set to 1, indicating normal end-of-motion. A PTP motion can be also stopped by the following communication clauses: Communication Clauses AB ST MO=0 Description Aborts the motion immediately (DP remains as its last value). Stops the motion with deceleration to zero speed. Disables the motor, effectively stopping any motion. Of course, any software or hardware fault, limitation, or protection will also immediately abort or stop the motion (depending on the fault or limitation type). The Last motion end reason can be monitored with the EM parameter. 5.1.5. On The Fly Parameters Change The following parameters can be modified on-the-fly during an active PTP motion: Communication Clauses SP AC,DC,DL RP AP Description Starts an acceleration or deceleration toward the new SP value. Defined new Accelerations and Decelerations for the current motion. Changes motion (including direction) to move toward the new AP (AP=DP+RP) value. RP can be modified even during deceleration to the previous target position and can be modified to any value, independent of the current position. Changes motion (including direction) to move toward the new AP. AP can be modified even during deceleration to the previous target position and can be modified to any value, independent of the current position. Note that AP (or RP) change during motion may cause the motor to change its motion direction. This will happen if a new AP value is given to a point that was already passed by the system. 5.2. Repetitive Point To Point – Rep PTP (MM=0, SM=1) This mode is very similar to the standard PTP motion mode, as described above. 5-4 Control and Robotics Solutions Ltd. Revision 3.10, January 2005 However, repetitive motion mode supports motions back and forth between two positions. Each motion is a standard PTP motion (uses SP, AC, DC etc. as described above) but the controller automatically generates the sequence of motions without the need to re-sending the BG command. This mode is excellent for tuning the PID filter. The motor is commanded to perform infinite motions back and forth, while the PID parameters are modified on-the-fly to examine their effect on the motion performance (optionally using the Data Recording feature). Two additional keywords are used for the Repetitive PTP mode: ¾ WT: Wait Time parameter, in samples • • SC-AT-4M each sample is 61 SC-AT-2M each sample is 122 [µs]. [µs]. WT Defines the wait time between consecutive motions. Upon BG, the controller will generate a motion toward AP, waits WT samples and than will generate a motion toward the original position, where it will wait again WT samples, and so on for ever. ¾ KR: Kill Repetitive command. Unlike a standard PTP motion, a Repetitive PTP motion does not finished unless stopped by the user or any fault or limitation. While AB and ST will act just as for a standard PTP motion, KR will stop the repetitive sequence, completing the current PTP motion and only then stopping. A Repetitive PTP motion is started just as a standard PTP motion but with SM=1, instead of SM=0. This means that the basic motion mode is still a PTP motion (MM=0) but it has a special modification, identified by SM=1. Notes: ¾ Each motion segment within a repetitive motion is treated as a standard PTP motion. The only difference is reflected in the SR parameter, bit 4 (In Repetitive PTP motion). In addition, when a motion segment is finished and the motion is “paused” for WT samples, a dedicated bit in MS will identify this status (bit 6). ¾ Modifying AP on-the-fly will modify the target position of the current segment but will not affect the 2nd target position (the “back” motion). ¾ In the SC-AT controller’s the repetitive motion is also supported under STEP mode (MM=8). Control and Robotics Solutions Ltd. 5-5 SC-AT – Software User’s Manual and Commands Reference 5.3. Jogging – JOG (MM=1, SM=0) 5.3.1. Description In this mode the controller calculates a standard acceleration profile, using the user specified acceleration (AC), toward the user specified speed (SP). This speed is kept constant until the motion is stopped by a user command. In case of an ST (Stop) command, the controller calculates a deceleration profile, using the user specified deceleration (DC). The motion’s direction is set according to the sign of the SP (Speed) parameter. 5.3.2. Starting a Jog Motion Communication Clauses MO=1 MM=1;SM=0 AC=500000 DC=200000 DL=1000000 WW=0 SP=50000 BG Description Enabling the servo loop, motor on Setting Jogging motion mode Assigning a value for the acceleration, [counts/sec2] Assigning a value for the deceleration, [counts/sec2] Used when stopped or when changing SP on the fly. Assigning a value for the Limit DC, [counts/sec2] Defines no smoothing. Assigning a value for the speed, [counts/sec] Begin the motion 5.3.3. Monitoring a Motion Please refer to section 5.1.3 above. 5.3.4. Stopping a Motion A Jogging motion is, theoretically, an infinite motion. It stops only as a result of a user command or due to some fault, limitation or protection. A Jogging motion can be stopped by the following communication clauses: Communication Clauses AB ST MO=0 Description Aborts the motion immediately (DP remains as its last value). Stops the motion with deceleration (using DC) to zero speed. Disables the motor, effectively stopping any motion. Of course, any software or hardware fault, limitation, or protection will also immediately abort or stop the motion (depending on the fault or limitation type). 5-6 Control and Robotics Solutions Ltd. Revision 3.10, January 2005 5.3.5. On The Fly Parameters Change The following parameters can be modified on-the-fly during an active Jogging motion: Communication Clauses SP AC, DC Description Starts an acceleration or deceleration toward the new SP value. The New SP value can have a different sign from the previous SP value. Will affect any following motion toward a new SP value. 5.4. Gearing Motion Modes 5.4.1. Position Based Gearing (MM=2) 5.4.1.1. Description Gearing (or electronic gearing) motion is refer to a motion mode where an axis follows another axis position with a pre-defined (fixed) ratio. The SC-AT-4M and SC-AT-2M supports position gearing motion mode for X and Y axes only. The position gearing is implemented based on a master DP follow method. In this method, the follower axis is slaved to a (user selected) Master Axis Desired Position (i.e. The Master’s DP, not its actual encoder position PS). This method allows to perform very accurate multiple axes vector motions, with one axis being used as a master, while other axes can be slaved to it’s reference position (i.e. to the master’s theoretical profiler output). Note: The master axis can be in Motor On or Off (i.e. MO=0) states. In the later case, the Master’s DP=PS, so using a disabled axis as a master axis, will provide true encoder position tracking. The “FR” (Following Ratio) parameter is using a 32 bit, 8.24 format scaling resolution, to allow ratios of up to: × ±128, and : × ± 1/16,777,216. The following dedicated parameters are used for Position Based Gearing Motion: - “ME” in SC-AT-4M Controllers: Master Encoder or Axis. This parameter defines which axis is the Master axis for a given slave gear motion. On the SC-AT-4M Controllers, the “ME” parameter can be any valid physical axis (ME=0 for X, ME=1 for Y, ME=2 for Z or ME=3 for W). - “ME” in SC-AT-2M Controllers: Master Encoder or Axis. This parameter defines which axis is the Master axis for a given slave gear motion. On the SC-AT-2M Controllers, the “ME” parameter can select between the following encoder inputs: ME=0 for X Axis Encoder, ME=1 for Y Axis Encoder, ME=2 for X Auxiliary Encoder Input, ME=3 for Y Auxiliary Encoder Input. Control and Robotics Solutions Ltd. 5-7 SC-AT – Software User’s Manual and Commands Reference - “FR”: Following Ratio. This parameter defines the slave’s following ratio in relation to the Master’s axis (“ME”) reference position (“DP”). “FR” can be any number in the range of: [-2,147,000,000 ÷ 2,147,000,000]. As noted above, “FR” is an integer number scaled to 8.24 format. I.e., “FR=16,777,216” means a following ratio =1.0. The slave axis reference position is relative to the master’s and slave’s initial position when the slave axis was initially commanded to actually begin the Gearing Motion. Gearing motion is initialized like any other motion. This means that first the motion parameters and mode should be set, and then a valid “BG” (Begin Command) should be given. Upon issuing a “BG” command to an axis in MM=2, first the master and slave initial positions are locked, and then the axis enters a motion state where its reference is calculated according to the following equation: SlaveDP = (MasterDP − MasterInitDP ) ⋅ FR + SlaveInitDP 16,777,216 Remarks: ¾ For an axis in gearing motion mode (the slave), all other motion profiler parameters (i.e. “SP”, “AC”, etc.) are ignored. ¾ Users should avoid alter a master axis “DP” (by a issuing a “PS=” command to the master axis) while it is connected to a slave axis that is in motion, to avoid position Step Commands to the slave and possible a high error faults. ¾ Although “FR” can be change during motion, doing so will result in a slave step command, which may cause a high error fault. ¾ When an axis is commanded to begin a motion in MM=2, it immediately enters the motion with the reference as defined above. No acceleration profile is generated for cases where the master axis is already in motion. ¾ Currently the SC-AT-4M support position gearing motion mode for X/Y axes only. ¾ Like Jogging, Gearing Motion is also theoretically an infinite motion. It stops only as a result of a user command or due to some fault, limitations or protections. ¾ If a gearing motion is stopped (by a user “ST” command), or by other faults like hardware or software Limits, the slave axis will start to decelerate using the relevant Deceleration parameters: “DC” for normal Stop commands (“ST”) and “DL” for Limit Stop conditions. In this case of course, the axis is “loosing” the master’s tracking. ¾ In Gear Motions “WW” (the smoothing parameter) must be “0”, since the slave is directly following the master DP according to the equation described above. “WW” different from “0” will not effect normal tracking, but will cause a position step command when a Stop command is given. ¾ Like in all other motions, an “AB” (abort motion) command will result in immediate stop of motion without any deceleration profile. ¾ Due to an implementation limitation, currently, only when X is following Y, one (1) sample time delay (61 micro-sec inSC-AT-4M and 122 micro-sec in SC-AT2M) will be present in the generated slave axis (X) reference profile, related to the master profile (Y). 5-8 Control and Robotics Solutions Ltd. Revision 3.10, January 2005 5.4.1.2. Starting a Position Based Gearing Motion Communication Clauses YMO=1 YMM=2;YSM=0 YME=0 YFR=1,048,576 YBG Description Enabling Y Axis servo loop, motor on Set Y axis to Position Based Gear Mode Set Y Master Axis As X (Y will follow X) Set Following Ratio to 1/16. Start Y Motion (Following the X axis) In this example, Y axis is command to follow the X axis reference position, with ratio of 1 /16. Note that usually, when an axis is intended to operate in gear mode, the following axis is first being enabled and enters motion (BG), and only afterwards the master axis is commanded to move. Starting a gearing motion (BG with MM=2), where the master axis is already in motion will result in velocity command step to the following axis. 5.4.1.3. Monitoring a Position Based Gearing Motion Please refer to section 5.1.3 above. 5.4.1.4. Stopping a Position Based Gearing Motion As noted above, Gear motion is, theoretically, an infinite motion. It stops only as a result of a user command or due to some fault, limitation or protection. A Gear motion can be stopped by the following communication clauses: Communication Clauses AB ST MO=0 Description Aborts the motion immediately (DP remains as its last value). Stops the motion with deceleration (using DC) to zero speed. Note that immediately after issuing the “ST” command, the slave axis stops following the master, and starts an autonomous stop profile motion towards zero speed. Disables the motor, effectively stopping any motion. Of course, any software or hardware fault, limitation, or protection will also immediately abort or stop the motion (depending on the fault or limitation type). Note: In gear motion, any fault condition acting on the master axis, will not directly effect the following (slave) axis. This means that the following axis remains linked to the master DP, regardless of the master’s motion status or motor status. For example, if a master axis is disabled due to a high error condition, its motor will be turned off, but the following axis will still be in motion condition, and will keep following the disabled axis encoder, even after it is stopped. 5.4.1.5. On The Fly Parameters Change An axis during gear motion is not effected by any of the normal profiler motion parameters (e.g. SP, AC, etc.). Control and Robotics Solutions Ltd. 5-9 SC-AT – Software User’s Manual and Commands Reference Although the following ration (“FR”) can be modified during motion, it is not recommended to do so, as this will result in a position and possibly also velocity reference steps. 5.4.2. Velocity Based Gearing (MM=3) Note: This mode is currently not fully implemented. 5.5. ECAM Motions 5.5.1. Position Based ECAM (MM=5, SM=0) 5.5.1.1. Description Position based ECAM (Electronic CAM) is a unique motion mode that allows one axis to follow a motion of another axis, based on a user defined position location table. Currently (F/W Revision 2.05/D) the SC-4M-SA support position based ECAM motion mode for X and Y axes only. The SC-AT support master reference position (“DP”) based ECAM motion. In this mode, the position profile is taken from a set of values from the “AR[]” array, actually performing a user defined contour. The time scale is, instead of Time (as for Time based ECAM, see MM=4), the master “DP” (Desired Position) value. The active master Axis can be selected from any of the 4 available encoder inputs (axes X,Y,Z,W in SC-AT-4M and X/Y Main and Auxiliary in SC-AT-2M) using the “ME” (Master Encoder) command. A new Array Parameter "EA" - ECAM Parameters Array (Size [4][8] in SC-AT-4M and [2][8] in SC-AT-2M) was added to support the new ECAM motion mode: - “EA[1]”: (ES) ECAM Start Index. Points to the first point in AR[] to be used for the ECAM. - “EA[2]”: (EW) ECAM Wrap Index. Points to the first point in AR[], to be used for ECAM cycles following the first cycle. - “EA[3]”: (EE) ECAM End Index. Points to the last point in AR[] to be used for the ECAM. - “EA[4]”: (EG) ECAN Gap. Defines the master distance (in [counts], related to the master encoder) between two consecutive AR[] points. - “EA[5]”: (EN) ECAM Number Of Cycles. Defines the actual number of ECAM cycles to be executed. If 0, ECAM is performed infinite number of cycles, until stopped. If “EN > 0” the axis will perform “EN” complete ECAM cycles. - “EA[6]”: (EI): ECAM Interpolation Mode. Defines the method used to interpolate the position profile commands with an “EG” period (between each two consecutive AR[] points). Currently only linear interpolation is supported. “EI” should be always set to “0”. 5-10 Control and Robotics Solutions Ltd. Revision 3.10, January 2005 - “EA[7]”: (MI): Master Init Position. Defines the starting position of the master. MI defines the starting position of the master. If MI is zero (normal case) then the starting master position is set to the position of the master at the time of the BG command. The ECAM table is than entered according to relative master motions from this point. If MI is a non-zero value, it is used to set the starting master position, instead of the above method. This method is useful if the starting point of the ECAM was captured using the position capturing option and the value captured should be used to accurately define the starting position of the master. MI is not saved to the FLASH and is initialized to zero after power-on or reset. The user may set it to any value before starting an ECAM motion. - “EA[8]”: Is not used, and should not be initialized for future compatibility. During the “BG” (Begin Motion) command, when MM=5, the ECAM parameters (ES, EW, EE, etc.) are checked for their validity and a "?" is returned in case of an error. In that case “EC” is set to 14 (EC_WRONG_MOTION_PARAM). The following conditions must be satisfied for a proper initialization of ECAM motion: - The ECAM Start Index (ES, EA[1]) must be >= 1. - The ECAM Wrap Index (EW, EA[2]) must be >= ECAM Start Index (EA[1]). - The ECAM End Index (EE, EA[3]) must be < AR_ARRAY_LENGTH (10,000 for SC-AT-4M or 16,000 for SC-AT-2M. In the SC-AT-2M the array used is acyually the DA array. Please refer to the “DA” keyword 10.5.16.2 below). - The ECAM Gap (EG, EA[4]) must be >= 1. Note that practically, this number must be much larger then 1 (usually larger then 100). - The ECAM Gap (EG, EA[4]) must be <= 32,767. - The ECAM Number Of Cycles (EN, EA[5]) must be >= 0. A New End Of Motion Reason was added. “EM” EM_BAD_PROFILE_PARAM = 9” is now used to indicate bad ECAM parameters that are encountered during ECAM motion. A new Array code for “EA” is implemented for the CAN bus interface. The “EA” CAN Array Code is: 22. The difference between each two consecutive AR[] points must be within the range of +/-32767. No check is done and in case of values out of range, unexpected motions may happen ! It is important to understand that ECAM mode uses the AR[] table data as a relative trajectory reference, based on the initial position of the axis before starting the ECAM motion. This means that usually, the first value in the ECAM table is “0”, otherwise “jump” in the motion profile will be resulted. After the number of requested ECAM cycles (EN) has been completed, the motion is aborted and “DP” is set to the end-point value of this cycle (Initial DP + AR[EE]). Note that an ABORT command is used, not STOP. This is to ensure that the final “DP” value will match the ECAM table value. It is the user’s responsibility to ensure that the Control and Robotics Solutions Ltd. 5-11 SC-AT – Software User’s Manual and Commands Reference ECAM profile includes the deceleration part to avoid sudden abort of motion when the number of cycles is completed. As noted above, ECAM uses the general purpose AR[] array for Table Input data. In general, the Master Based ECAM works only for positive and monotonous motion of the master axis. If the master moves in a negative direction, use the relevant “CG” configuration bits to inverse its direction. Unexpected motions can happen if the master does not perform positive motion. However, within an ECAM cycle, the master can stop and even invert its motion direction without any problems, as long as the master does not move below the Start (ES) and above the End (EE) locations. Another limitation is that the master axis should not perform more than a complete ECAM cycle during the time between two consecutive samples (61 [us]). However, this limitation can be normally ignored since it practically means bad ECAM parameters setup. In ECAM Motions, “WW” (the smoothing parameter) must be “0”, since the axis is using the table locations as a reference. 5.5.1.2. Starting a Position Based ECAM Motion The following code sequence will initiate an ECAM motion of Y axis, with X being the master. The ECAM motion is a triangular profile from 0 to 5000 and back to 0. Communication Clauses YWW=0;YMO=1 YMM=5;YSM=0 YEA[1]=1;YEA[2]=1 YEA[3]=13 YEA[4]=10000 YEA[5]=1 YEA[7]=0 XAR[1]=0;XAR[2]=0 XAR[3]=1000 XAR[4]=2000 XAR[5]=3000 XAR[6]=4000 XAR[7]=5000 XAR[8]=5000 XAR[9]=4000 XAR[10]=3000 XAR[11]=2000 XAR[12]=1000 XAR[13]=0 YME=0 YBG 5-12 Description Enable Y Axis servo loop, motor on, No Smoothing Set Y axis to Position Based ECAM Mode Set ECAM Start and Wrap Indexes to 1 (i.e. AR[1]) Set ECAM End Index to 13 (i.e. AR[13]) Set ECAM Gap to 10,000 counts. Set ECAM Number of Cycles to “1”. Set Normal Master Init Position. The Master position at BG will be used as the Master Init Position. Initialize the ECAM Table (AR[1] to AR[13]). Set Y Master Axis As X (Y will follow X) Begin the motion for Y axis Control and Robotics Solutions Ltd. Revision 3.10, January 2005 In this example, the ECAM Gap is 10,000 counts (referring to the master’s, X axis, position), while the distance between each two table points is 0 or 1,000 counts (referring to the slave’s, Y axis, position). As a result, when the X and Y axes will move, the speed of the Y axis will be exactly 1/10 that of the X axis. The users can of course set any table data such as SIN tables to create circular motions, or any other arbitrary profile. 5.5.1.3. Monitoring a Position Based ECAM Motion Please refer to section 5.1.3 above. 5.5.1.4. Stopping a Position Based ECAM Motion As noted above, ECAM motion stops when the actual ECAM number of cycles equals EN (when EN > 0). ECAM is an infinite motion if EN=0. When EN > 0 and the actual number of cycles equals EN, the axis stop immediately (using ABORT Command) setting “DP” to the last table value (relatively). When EN=0, in order to stop the ECAM motion, users should use the STOP or ABORT commands. In general, like any other motion, an ECAM motion can be stopped by the following communication clauses: Communication Clauses AB ST MO=0 Description Aborts the motion immediately (DP remains as its last value). Stops the motion with deceleration (using DC) to zero speed. Note that immediately after issuing the “ST” command, the slave axis stops following the master, and starts an autonomous stop profile motion towards zero speed. Disables the motor, effectively stopping any motion. Of course, any software or hardware fault, limitation, or protection will also immediately abort or stop the motion (depending on the fault or limitation type). Note: Like in Gearing motions, in ECAM motion also, any fault condition acting on the master axis, will not directly effect the following (slave) axis. This means that the following axis remains linked to the master DP, regardless of the master’s motion status or motor status. For example, if a master axis is disabled due to a high error condition, its motor will be turned off, but the following axis will still be in motion condition, and will keep following the disabled axis encoder, even after it is stopped. 5.5.1.5. On The Fly Parameters Change An axis during ECAM motion is not effected by any of the normal profiler motion parameters (e.g. SP, AC, etc.). Changing any of the ECAM motion parameters has no effect once motion has been started. Control and Robotics Solutions Ltd. 5-13 SC-AT – Software User’s Manual and Commands Reference 5.6. Search Index The SC-AT controllers do not have a special dedicated motion mode for search index. The user can however use the advanced fast capture support of the SC-AT hardware to latch index location at exact (1 count) accuracy, at any motion type and speed. Please refer to section 8.2.7.2 below for full information and examples on how to use the Capture option to latch index location. 5.7. Joystick Motion Modes 5.7.1. Velocity Based Joystick Motion Mode 5.7.1.1. Description This mode is very similar to the Jogging mode. However, instead of jogging in the user specified SP value, the jogging speed is taken from the analog input (assuming it is connected to a Joystick or any other source of analog voltage). The analog input parameter AI is used instead of SP. All other parameters (AC, DC etc.) are used exactly as for Jogging mode. Note: This mode is currently not fully implemented. 5.7.2. Position Based Joystick Motion Mode 5.7.2.1. Description This mode is very similar to the standard PTP mode. However, instead of using the user specified Absolute Position (AP) parameter as the target position, this modes uses the Analog Input (AI) parameter as its target position. Since a standard PTP mode supports on-the-fly modification of the AP parameter, this mode automatically supports the changes of the AI during the motion, practically tracking them with the user specified acceleration (AC) and speed (SP) parameters, These parameters needs to be high enough to enable good tracking on the joystick motions (variations of the AI parameter) but low enough to avoid “nervous” motions. An important note is that when this mode is activated using the required MM and SM values, the AP parameter is continuously and internally assigned with the AI value. Note: This mode is currently not fully implemented. 5-14 Control and Robotics Solutions Ltd. Revision 3.10, January 2005 5.8. Position Step Motion (MM=8 , SM=0 or SM=1) 5.8.1. Description In this mode the Desired Position (DP) is assigned with the Absolute Position (AP) immediately after the Begin (BG) command. The profiler does not generate any motion profile and the AC, DC and SP values are ignored. The theoretical Motion time in this mode is “0” by definition (True Step command). This mode is useful for the measurement of the closed loop step response and bandwidth. It is generally not used in practical applications since it generates infinite acceleration and jerk. MM=8 can be combined with SM=1 to generate repetitive step motions. Note that you can also use the Relative Position (RP) parameter. Assigning a value to RP will anyhow modify the value of AP properly. Note that the value of the step should be smaller than ER to avoid High Error fault. In addition, high step values can cause oscillations due to the non-linearity’s (especially saturation) which are an inherent part of the control loop. 5.8.2. Starting a Step Motion Communication Clauses MO=1 MM=8;SM=1 AP=100 RP=30 BG Description Enabling the servo loop, motor on Setting Position Step motion mode (Repetitive Mode) Assigning an absolute target position, [counts] or, assigning a relative value for the target position Begin the motion Note that the SC-AT controllers also support repetitive Step Motions. Similarly, this can be done by setting SM=1 instead of SM=0 in the above sequence. WT is used as the delay time between each two consecutive motions. 5.8.3. Monitoring and Stopping a Step Motion Please refer to section 5.1.3 above. Note that the Step motion mode is very short (one sample time). As a result, it is practically impossible to monitor the state of this motion. In addition, a Step motion does not affect the EM parameter, which remains with the same value it has before the BG command. Since the Step motion is very short, it is not practical to stop it after a BG command. If a repetitive Step Motion is commanded, the user should use the KR (Kill repetitive) command, much like a normal PTP Rep motion. Control and Robotics Solutions Ltd. 5-15 SC-AT – Software User’s Manual and Commands Reference 5.9. Profile Smoothing in the SC-AT Controllers Family The SC-AT controllers Family support an advanced, symmetric S-curve like profile smoothing algorithm. The smoothing is controlled by the WW parameter. WW can be set to 0 to avoid any profile smoothing. In that case the generated position velocity profile is pure trapezoidal (or triangular). If WW is set to 12, the smoothing is set to its maximal value. In that case the generated profile has full smoothing, and the velocity trajectory is not pure trapezoidal. The WW parameter is used by the controller as a power of 2 coefficients for the smoothing time value. For example, WW=6 means that smoothing is done over a period of time of 2^6 sample time - In the SC-AT-4M this will take approx. 4 msec. In the SCAT-2M this will take approx. 8 msec. The resulted profile will generate its full acceleration value in this time. Setting WW=12 to its Maximal smoothing value of 2^12, will result in a 0.25 sec. (SCAT-4M) or 0.5 sec (SC-AT-2M) acceleration smooth period. The following figures shows two simple profiles generated in similar motion parameters, with different smoothing values. For both motions, the following general parameters are used: AC=DC=1,000,000 SP=100,000 AP=100,000 In one case no smoothing is used (WW=0), and in the other full smoothing is defined (WW=12). Figure 5-1 below shows the motion profile with full smoothing implemented in the profile. Note the smooth velocity profile (the upper window in red). There are no “sharp” corners in the generated velocity profile. The resulted acceleration profile (not shown in the graph) is of course continuous and dose not have any sudden “step” changes. 5-16 Control and Robotics Solutions Ltd. Revision 3.10, January 2005 Figure 5-1: Typical motion profile with full smoothing. Control and Robotics Solutions Ltd. 5-17 SC-AT – Software User’s Manual and Commands Reference Figure 5-2 below shows the same motion profile with no smoothing at all implemented in the profile. Note the sharp “trapezoidal” velocity profile (the upper window in red). The resulted acceleration profile (not shown in the graph) is clearly not continuous, and includes 0 time acceleration changes (jerks). Note also the resulted actual motor velocity seen slightly overshooting in this case in both constant speed and zero speed settlings (the blue actual motor speed graph overshooting the red desired speed graph in the upper window). Figure 5-2: Typical motion with no profile smoothing. 5-18 Control and Robotics Solutions Ltd. Revision 3.10, January 2005 Note that profile-smoothing implementation does not imply any numerical limitations, and does not include any “minimal motion time” limit, which might be implied by the use of the smoothing itself. The user should be aware that theoretically, a smoothed profile takes longer time to complete then a similar trapezoidal profile with no smoothing. The actual time difference between the non-smoothed theoretical trapezoidal profile to the smoothed one depends on all motion profile parameters (SP, AC, DC and the motion distance of course). In any case, the maximal time difference does not exceed the overall smoothed period (2^WW sample times). Control and Robotics Solutions Ltd. 5-19 Revision 3.10, January 2005 6. THE CONTROL FILTER 6.1. General The SC-AT controller’s family, supports, as a standard, two control filter structures to allow users maximum flexibility in servo control loops tuning. These are: • Full Position feedback based control loop - Designated below as PID. • Dual, Position over Velocity, loop control filter structure - Designated below as PIV. Although in the presence of a single feedback device (usually a single encoder based position feedback) it is easy to show that the two control schemes are identical (there exist a transformation converting from one filter constants to the other), there are few benefits (mainly for the tuning process) for the PIV configuration that will be discussed below. • Figure 6-1: Position Over Velocity Loop (PIV) Control Scheme Structure below shows the SC-AT control loop structure in PID scheme. • Figure 6-2 below shows the SC-AT control loop structure in PIV scheme. • Figure 6-3 below shows both the position loop PID filter and Velocity loop (in PIV Mode) PI filter implementations. The User can select between the two control schemes, using a special bit in the axis configuration word (CG[3] zero based). The SC-AT controller’s family includes, in addition to the standard (PID or PIV) filter structures some additional features as described below: ¾ ¾ ¾ ¾ ¾ ¾ ¾ High position error limit. Digital 2nd order low-pass filter (can be operational in all modes). Automatic Gain Scheduling for improved point to point settling performances. Special Open Loop modes (for both normal and SIN mode4 commutation). Acceleration and Velocity Feed Forwards. Separate saturation levels for the Integral term and command output signal. SIN Tables for SIN commutation motors4. In the following sections the Linear Filters equations and non-linear algorithms are described in details. 4 SIN commutation Currently supported in SC-AT-4M only. Control and Robotics Solutions Ltd. 6-1 Revision 3.10, January 2005 (1 − z −1 ) FF[2] ± 10 V, (4M-16bit) Analog Voltage Command Interfaces Acceleration Feed Forward + FF[1] + Velocity Feed Forward Open Loop Command (TC) Motion Profile Generator DP + PE KP PS + + - Velocity PI Filter Open Loop Operation Mode Switch (NC) 2nd Ord. Filter + + ±TL PO Analog Command 16 Bit DACS (Dac_Gain) Command Saturation Position Loop Gain FR[2] (1 − z −1 ) Dual Loop Option (SC-AT-2M) Encoder Velocity (Counts / Second) SC-AT-2M Auxiliary Encoder Auxiliary Analog Command Sinusoidal Commutation (1 − z −1 ) Driver DC - Brush or Brushless Single Command Interface, or Brushless 2 Phase Command Interface Motor and Load System Encoder Gain (Enc_Gain) Encoder Encoder Position – PS (Counts) ElectroMechanical System Figure 6-1: Position Over Velocity Loop (PIV) Control Scheme Structure Control and Robotics Solutions Ltd. 6-1 SC-AT – Software User’s Manual and Commands Reference (1 − z −1 ) FF[2] ± 10 V, 16 Bits Analog Voltage Command Interfaces Acceleration Feed Forward + FF[1] + Velocity Feed Forward Open Loop Command (TC) Motion Profile Generator DP + PS PE Position PID Filter Open Loop Operation Mode Switch (NC) 2nd Ord. Filter + + ±TL PO Analog Command 16 Bit DACS (Dac_Gain) Command Saturation Auxiliary Analog Command Sinusoidal Commutation Driver DC - Brush or Brushless Single Command Interface, or Brushless 2 Phase Command Interface Motor and Load System Encoder Position – PS (Counts) Encoder Gain (Enc_Gain) Encoder ElectroMechanical System Figure 6-2: Position Loop (PID) Control Scheme Structure 6-2 Control and Robotics Solutions Ltd. Revision 3.10, January 2005 KP Position Error (PE) KI 1 − z −1 + + Velocity Error + 1 + KD KI 1 − z −1 + Loop Gain KD ⋅ (1 − z −1 ) A: Position Loop PID Controller B: Velocity PI Controller Figure 6-3: Position PID and Velocity PI Filters. Control and Robotics Solutions Ltd. 6-3 Revision 3.10, January 2005 6.2. Linear PID and PIV Filter Equations 6.2.1. Standard PID Filter Mode In standard Close Loop operation in PID mode, the linear PID control filter output is fed into the 2nd order filter (if it is enabled), and then passes the final output saturation for the DAC. The PID loop linear filter is shown in Figure 6-3 A above. The PID linear filter equations are: PE k = DPK − PS K k KP KD KI × PE K + × ( PE K − PE k −1 ) + × ∑ PE i 256 256 65536 i =0 PO k = Sat (TL, U k × SecondOrderFilter ) Uk = where: ¾ DP is the current desired position (or position command) in encoder counts. This value is usually the output of the profiler routine, according to the current motion mode and the motion parameters (such as: AC, DC, SP, etc.). ¾ PS is the actual encoder position reading (in counts). ¾ PE is the current position error value (in encoder counts). ¾ KP, KI and KD are PID Proportional, Integral and Derivative gains. ¾ U is the PID filter output. ¾ TL is the output command saturation value. ¾ The 2nd order filter block is filter high order low-pass filter. ¾ PO is the final control loop output. This value is converted to the analog output command for the external driver using the 16 bit DAC in the system. U can also be written in a Z transform transfer function equation as follows: ⎛ KP KD ⎞ KI 1 ⎟ U = PE × ⎜⎜ + × (1 − z −1 ) + × −1 ⎟ 65536 (1 − z ) ⎠ ⎝ 256 256 6.2.2. PIV Filter Mode In Close Loop operation in PIV mode, the control loop structure can be considered as divided into two separated loops. An external position loop, cascaded over an internal velocity loop. Similar to the PID mode, the linear Velocity loop (PI) control filter output is fed into the 2nd order filter (if it is enabled), and then passes the final output saturation for the DAC. Control and Robotics Solutions Ltd. 6-1 SC-AT – Software User’s Manual and Commands Reference The Velocity loop linear PI filter in PIV mode is shown in Figure 6-3 B above. The linear filter equations in that mode are: PE k = DPK − PS K VC k = PE k × KP + ( DPK − DPK −1 ) × 65536 VE k = VC k − ( PS K − PS K −1 ) × 65536 VE ' k = VE k × KD k VE ' k + KI × ∑VE ' k 65536 i =0 POk = Sat (TL, U k × SecondOrderFilter ) Uk = where: ¾ DP, PS and PE are the desired position, actual position and position error (similar to PID mode). ¾ KP is the position loop gain. ¾ KI is the velocity loop Integral term gain. ¾ KD is the velocity loop overall gain multiplier. ¾ VC is the velocity loop reference command. Note that VC includes an inherent (not controlled by the user) velocity command feed forward element, represented in the second equation above by: DPk-DPk-1. ¾ VE is the internal velocity loop error. The velocity loop feedback is currently used as a simple numeric derivative of the position reading, represented in the third equation above by: PSk-PSk-1. Both VC and VE are internal software variables and can not be accessed from the communication. ¾ U is the Velocity PI filter output. ¾ TL is the output command saturation value. ¾ The 2nd order filter block is filter high order low-pass filter. ¾ PO is the final control loop output. This value is converted to the analog output command for the external driver using the 16 bit DAC in the system. The filter equations in this case can also be written in a Z transform transfer function equation as follows: ⎛ 1 KI ⎞ ⎟ + U = PE × KP + (1 − z −1 ) × 65536 × KD × ⎜⎜ −1 ⎟ 65536 ( 1 ) − z ⎝ ⎠ ( ) Please note that here, the final close loop transfer function has the same structure as in the PID case (2 zeros and an integral), but with different parameters scaling, and with an isolated parameters form. This can be considered as a more convenient filter form, as one can note that the filter has 2 zeros, separately effected by KP and KI, an integral, and total loop gain KD (actually the velocity loop gain). Another benefit in that form is that one can operate the close loop system with KP=0 (no position feedback) to tune the velocity loop performances only, and then use the KP gain to control the position loop gain (and resulted bandwidth). 6-2 Control and Robotics Solutions Ltd. Revision 3.10, January 2005 6.2.3. Position Error Calculation In both PID and PIV modes, the basic position error is computed and reported using the PE variable. This is a read only parameter, updated by the real time control loop, and computed by: PE k = DPK − PS K where as noted above: DP, PS and PE are the desired position, actual position and position error, all in encoder count units. The position error is always “0” by definition whenever the servo is off (MO=0), since the servo controller automatically updates the current desired position “DP” to be equal to the actual position “PS”. During all Servo ON modes (MO=1), in both open and close loop cases, the real time control loop checks the current position error value (“PE”) and compares it to the maximum allowed position error (ER). Whenever PE > ER the real-time loop automatically disables the motor and indicates the error reason as High Error fault. In the SC-AT family controllers, the maximum ER value can be as high as 8,000,000 counts. 6.3. High (2nd) Order Filters The SC-AT controller’s family include a digital second order filter. Note: The 2nd order filter is present in all control scheme structures, i.e.: PID, PIV and Open Loop (see figures Figure 6-1: Position Over Velocity Loop (PIV) Control Scheme Structure and Figure 6-2). The user can test the operation of the filter in open loop, and actually record the step response of the filter. This can be done (when the 2nd order filter is enabled) by switching to Open Loop mode (NC=1), issue a torque command (TC=XX), and record the Driver Command signal. The filter can be enabled or disabled using a special dedicated new parameter: CA[13]. ¾ When CA[13]=0 the 2nd order filter is disabled in all modes. ¾ When CA[13]=1 the 2nd order filter is enabled in all modes. The 2nd order filter equations are: Yk = U K × a0 1 − b1 × Y K −1 − b2 × Y K −2 or Yk = a 0 × U K + b1 × Y K −1 + b2 × Y K −2 where: ¾ U and Y are the filter input and output signals, and Control and Robotics Solutions Ltd. 6-3 SC-AT – Software User’s Manual and Commands Reference ¾ a0, b1, b2 are the filter constants. The filter parameters are user defined, and are set in by a special set of dedicated new parameters: CA[7], CA[8], and CA[9] with the following scaling: ¾ CA[7] = a0 x 65536 x 16384. ¾ CA[8] = b1 x 65536. ¾ CA[9] = b2 x 65536. With the new SC-AT-4M/2M Shell, the user can easily and automatically set filter variables. The Shell provides a utility that converts standard Frequency and Damping values to the controller filter form parameters scaling. The Shell is using a standard Z transform for the conversion. 6.4. Output Command and D2A Gain According to the specific controller type and operation mode, the control filter output is converted to an analog driver command, or PWM signals. The SC-AT controllers family support the following command types and resolutions: ¾ SC-AT-4M: Main Analog Commands D2A’s are 16 bits resolution. ¾ SC-AT-4M: PWM command outputs (for Mini Drivers) in 12 bits resolution. ¾ SC-AT-2M: Analog Commands are 12/13 bits resolution (s/w configurable). ¾ SC-AT-2M: PWM command outputs in 12 bits resolution. To avoid loop and command gain differences, the standard S/W for both the SC-AT-4M and SC-AT-2M (in all drive types and operation modes), support interface for ALL command types (both Analog and PWM) outputs in fixed 16 [bits] resolution, i.e.: +32,767 [bits] for +10[v] (or +100% PWM) command, and –32,767 [bits] for -10[v] (or –100% PWM) command. An additional (fixed) gain is implied by this conversion. This gain is: Command DAC_Gain = 10 [v] / 32767 [LSB] Since a command output of ±32767 (the maximum command value for the SC-AT) generates the full-scale analog command of ±10 [v]. In addition to that, on the SC-AT-4M the analog command electrical output circuit, includes a first order low pass filter with a cross over frequency of ~ 2000 Hz. The purpose of that filter is to reduce high frequency power supply noises, and its effect on the close loop system performances should be negligible. In any case, this filter can be removed in case this is specifically required for custom applications. On the SC-AT-2M controllers, the analog command signals is filtered with a 2nd order low pass filter at @ 310 Hz. Please refer to the specific product hardware user’s manual for further information regarding analog output electrical interface characteristics. 6-4 Control and Robotics Solutions Ltd. Revision 3.10, January 2005 6.5. PWM Command Format As noted in the previous section, the SC-AT controllers provides, in addition to the analog servo command interfaces, also PWM commands for the Mini-Drivers interfaces (both SC-AT-2M and SC-AT-4M), and for the integrated driver interface (SC-AT-2M Only). This is relevant for the following configurations: ¾ SC-AT-4M: PWM command outputs (for PMD-1M Mini Drivers). ¾ SC-AT-2M: PWM command outputs (for PMD-1M Mini Drivers). ¾ SC-AT-2M: PWM command outputs for the PD-AT-2M Integrated drivers. When using the SC-AT PWM outputs, the electrical command interface bypasses the Analog DAC circuits. The SC-AT servo controller’s command the driver with direct digital PWM and Direction lines. In this case, the SC-AT hardware automatically generates the PWM and Direction command from the upper 12 bits (11 + sign) of the DAC command. The resulted PWM frequency is approximately 32 kHz. The command gain in that case is still the same as in the DAC case (the gain is normalized internally by the hardware). ¾ A full +32767 [LSB] command generates a 100% PWM signal with (+) Dir. ¾ A ½ scale +16384 [LSB] command generates a 50% PWM signal with (+) Dir. ¾ A “0” command generates a 0% PWM signal with (+) Dir. ¾ A ½ scale -16384 [LSB] command generates a 50% PWM signal with (-) Dir. ¾ A full -32767 [LSB] command generates a 100 % PWM signal with (-) DIR. For a complete description of the relevant product, command electrical interfaces characteristics please refer to the specific product’s hardware user’s manual. 6.6. Encoder Gain The SC-AT counts quadrature encoder pulses. This implies a feedback gain. For example, a typical rotary system with an encoder of 1000 [ppr], mounted on the motor’s axis, the encoder’s gain is as follows: Enc_Gain = (4 * 1000) / 2π [counts/rad]. Control and Robotics Solutions Ltd. 6-5 SC-AT – Software User’s Manual and Commands Reference 6.7. Dual Loop Operation (In SC-AT-2M) The SC-AT-2M controllers support an option to use a secondary encoder as a velocity loop feedback in PIV mode operation (please see Figure 6-1). In this mode, the SC-AT-2M auxiliary encoder inputs (supported when using the SCAT-2M-CB) are used to measure the inner loop position and velocity, and the velocity feedback is used for the PIV internal velocity loop (Please see the SC-AT-2M hardware user’s manual for more information regarding the SC-AT-2M auxiliary encoders support). This option allows better close loop performances when systems with motor and resonant load structures are present. In that case usually an additional motor encoder is used to close a motor velocity loop, and the main load encoder is used to close the outer position loop. When operating this mode, the user must scale the inner loop encoder velocity (usually motor encoder) to the outer position loop encoder velocity. This is achieved by the FR[2] parameter. The scaling of FR[2] is 1/65,536. This means that for a 1:1 ratio, FR[2] should be set as follows: FR[2]=65536. Scaling can be done by using the data-recording interface to record main and auxiliary encoder positions, and calculating the ratio between them. The Dual loop operation mode is operated by setting Bit #7 (zero based) of CG. Please see the “CG” and “FR” keywords (Sections 10.5.15.2 and 10.5.28.2 below) for more information. Note that for each axis, the dual loop structure always use the auxiliary encoder input of the specific axis (i.e. X auxiliary for X, and Y auxiliary for Y). 6.8. Non-Linear Elements The actual control filter structure includes the following non-linearity’s: ¾ The filter command output is saturated to the value the “TL” (Torque Limit) parameter. The output command saturation is active at all times in all modes. The software range limit for “TL” is 0 ÷ 32,767 in DAC [LSB] units. ¾ When working in close loop operation only (in both PID and PIV modes), the filter Integral term output is also saturated to the value the IS (Integral Saturation) parameter. The software range limit for “IS” is 1 ÷ 32767 in DAC [LSB] units. By setting “IS=1”, the user can actually disable the Integral term in the system. “IS” should be generally used when it is required that the integral will compensate small dynamic errors or friction forces, but to avoid large values to be charged to the integral history. ¾ To the value of “PO” (the final filter signal output, after the PID/PIV and 2nd order filter calculations) an offset value defined by “DO” (DAC Offset) is added in order to compensate analog output voltage offset. Although the software range limit for “DO” is ±32,767 in DAC [LSB] units, it is usually not required to use values more 6-6 Control and Robotics Solutions Ltd. Revision 3.10, January 2005 then few hundreds. Note that by using high values of “DO”, a non-symmetrical analog output range can be resulted. The final DAC command is always protected from roll over beyond 16 bit value. ¾ The DACs in the SC-AT-4M system has a finite resolution of 16 [bits] (±32,767) for ±10 [v]. Although negligible, this still has a non-linear quantization effect. ¾ The SC-AT-2M analog command output has a resolution if 12 or 13 bits (configurable using a dedicated CG bit – see section 10.5.15.2 below). This ¾ When working with the PWM command interface (for MD or other drives using mini-driver interfaces), the final system resolution is 12 [bits] (±2047) for ±100 [%PWM]. ¾ The encoder has of course a finite digital resolution, which also implies non-linear quantization effect. ¾ Non-Linear Gain Scheduling – Please see next section for more information. 6.9. Filter Gain Scheduling The SC-AT software has a built in control filter gain-scheduling logic. The gainscheduling may be used in order to improve the settling performances of a system (mainly to reduce settling times). This is simply done by changing the PID or PIV filter constants (KP, KI, KD) for a short period of time after a motion is completed. The user can define the period (after previous end of motion condition) in which the gain-scheduling is effective. The following parameters can be used by the user in order to operate the gain-scheduling feature: ¾ KP[2] is the parameter replacing KP (= KP[1]) when gain-scheduling is active. ¾ KI[2] is the parameter replacing KI (= KI[1]) when gain-scheduling is active. ¾ KD[2] is the parameter replacing KD (= KD[1]) when gain-scheduling is active. ¾ CA[4] is the gain-scheduling period, in servo sample time (note differences in SCAT-2M and SC-AT-4M sampling times – 16k in 4M , 8k in 2M). The gain-scheduling is active (i.e. KP[2], KI[2], KD[2] are used) after a motion is fully completed (Motion Status bits are Not In Motion), for a period of CA[4] sample times. If before that a new motion has begun, the gain-scheduling is immediately disabled. To disable the gain-scheduling, the user can simply set KP[2]=KP, KI[2]=KI, KD[2]=KD, and/or set the period CA[4]=0. Both will disable the feature. The user should avoid using too high parameter settings to avoid from system going out of stability when the gain scheduling is active. Also, it is not recommended to use this feature when very high position errors are reached during final motion acceleration phase. Control and Robotics Solutions Ltd. 6-7 SC-AT – Software User’s Manual and Commands Reference 6.10. Acceleration and Velocity Feed Forward The SC-AT controller’s family support reference command Feed Forward features. ¾ Command Acceleration Feed Forward (Acc-FF) is supported in both PID and PIV close loop modes. The Acceleration Feed Forward gain is controlled by the FF[2] parameter. FF[2]=0 means no acceleration feed forward is used. The Acceleration Feed Forward Gain (FF[2]) is working on the profile acceleration in counts/sec2 / 219 units. ¾ Command Velocity Feed Forward (Vel-FF) is currently supported in PID close loop control mode only. The Velocity Feed Forward gain is controlled by the FF parameter (FF[1]). FF=0 means no acceleration feed forward is used. The Velocity Feed Forward Gain (FF) is working on the profile velocity in counts/sample time units. In both cases, the resulted Feed Forward value is added to the filter command output, in DAC [LSB] units. Note that the PIV control scheme has an inherent internal velocity feed forward path with unity gain (see Figure 6-1Figure 6-1: Position Over Velocity Loop (PIV) Control Scheme Structure ), directed to the Velocity loop error junction. This is an essential implementation issue, to allow “0” position error during constant speed motion profile. The user cannot change the gain to this feed forward path nor disable it. Future firmware versions may also support velocity feed forward to the DAC command in PIV mode. 6.11. Open Loop Operation The SC-AT controllers support a dedicated Open Loop operation mode. In this mode the user can directly set the value of PO, without the close loop control filter, and regardless of the system position readings or the position or velocity errors. This mode should be used very carefully since the motor is not under close loop control in that case. Note that although under open-loop mode, the high position error protection mechanism of the controller is still active (see section 6.2.3 above). TL always saturates the command, even when operating in open loop mode. The method to activate this mode is to use the NC parameter to disable the close loop operation (set NC=1, in Motor Off, and then set Motor ON) and to use the TC (Torque Command) parameter to set the desired PO value. The actual PO value will be equal to: PO = TC + DO. Since the offset DO is always added to PO. 6-8 Control and Robotics Solutions Ltd. Revision 3.10, January 2005 As the 2nd order filter is applied also under open loop mode, it is possible to record the step response of the filter. Use Open loop operation and record the record the Driver Command signal (see also a remark in section 6.36.3 above). 6.11.1. SC-AT-4M Open Loop Operation - SIN commutation motors For the X and Y axes, the user can also use a special NC=2 mode for open loop SIN commutation motors. When CG[3] is set (SIN commutation is enabled), and NC=2, an open loop TC command will use the internal commutation SIN tables for both phases of the motor (i.e., the scalar TC command will be transformed using the SIN table and encoder Magnetic Location, to a dual phase command, and will change both the MAIN DAC value (for Phase-A) and the AUX DAC value (for Phase-B) accordingly. In F/W revisions 2.04 and later, the controller also support a New Special Open Loop Mode (NC=3) for X and Y Axes. When SIN commutation is enabled and NC=3, the motor SIN phase angle command can be initialized by a user defined parameter, and is not effected by the actual Magnetic Location. This is frequently used during motor PHASES initialization (in SIN mode). For full information about SIN commutated motors support by the SC-AT-4M, please see the “NC” command reference and also section 8.4 below in this User’s Manual. When NC=1, an open loop TC command will only change the value of the main DAC regardless of the stage of CG[3] bit status. 6.12. Real Time Servo Loop Protections The SC-AT family controllers real time loop implements several types or protection mechanisms, such as high position error, motor stuck conditions, encoder faults, etc. Please see chapter 7 below in this User’s Manual for more information. 6.13. Summary of all Control Filter Related Parameters The following table summarizes all servo loop related parameters of the SC-AT controller’s family supported. Keyword MO NC TC TL IS PO DO Description Motor ON – Enables (MO=1) / Disables (MO=0) the servo loop. No Control – Enables (NC=1) / Disables (NC=0) Open Loop Mode. Torque Command in Open Loop mode. Torque Limit – Limits the D2A command – All modes. Integral Term Saturation of PID and PIV control filters The final control filter output command value. The control filter offset calibration parameter. Control and Robotics Solutions Ltd. 6-9 SC-AT – Software User’s Manual and Commands Reference CG[Bit3] Configuration Bit controlling PID (if “1”) or PIV (if “0”) modes. KP,KP[1] KI,KI[1] KD,KD[1] KP[2] KI[2] KD[2] CA[4] Proportional term PID gain, and PIV mode position loop gain. Integral term PID gain, and PIV mode velocity loop Integral term gain. Derivative term PID gain, and PIV mode velocity loop overall gain. KP Gain when gain-scheduling is active. KI Gain when gain-scheduling is active. KD Gain when gain-scheduling is active. Gain-scheduling period. CA[7] CA[8] CA[9] CA[13] FF,FF[1] FF[2] FR[2] 2nd order filter A0 gain. 2nd order filter B1 gain. 2nd order filter B2 gain. 2nd order filter Enable (if “1”) Disable (if “0”) flag. Velocity Feed Forward Gain. Acceleration Feed Forward Gain. Dual Loop Feedback – Velocity Scaling gain (supported in SC-AT-2M only). Table 2: Control Filter Parameters. Please see sections 10.4.2.2 below and 10.5 below in this User’s Manual for full description of the entire filter related parameters. 6-10 Control and Robotics Solutions Ltd. Revision 3.10, January 2005 7. FAULTS PROTECTIONS AND LIMITS The SC-AT controller’s include various protection mechanisms and status report parameters, which ensure safe operation and easy troubleshooting. The protective mechanisms are divided into two groups: Protections and Limitations. Protection refers to a detection of a fault condition and the response to this condition (generally disabling the servo). Limitation refers to an algorithm which continuously monitors and limits (saturates) a value, avoiding it from reaching a fault condition. Faults represent the list of conditions, which are detected and responded to with a proper protection function. Some of the protections are implemented directly by the HW, ensuring safe, fast and immediate response, while some are implemented by software, providing user control of the protection behavior. All the detected faults cause an immediate “servo off” condition. Analog (and PWM) signal commands are reset to “0” voltage (or 0% PWM), and the drivers are immediately disabled. The faults which are detected by the SC-AT controller’s are: • • • • External driver fault (via the Fault input). Abort (emergency switch) input. This fault cause immediate disable of ALL motors. High position error. Encoder signal error – Two types of encoder error detection are supported (see below). • Motor Stuck condition. In addition to the faults described above, the SC-AT controllers also include the following protections: • • • • • Verification of correct firmware and FPGA versions after power on. Forward limit switch – Stop any on going motion in the relevant direction. Reverse limit switch – Stop any on going motion in the relevant direction. High position software limit – Stop any on going motion in the relevant direction. Low position software limit – Stop any on going motion in the relevant direction. The SC-AT controllers include the following limitations: • The peak driver command is limited, usually to limit the max current command to the motor (when a current driver is used). Driver command limitation has two different parameters, TL (which is the ultimate command saturation limit), and IS which can (separately from TL) limit the Integral value. This is needed in some cases to improve dynamic responses. It should be noted that the value of TL Control and Robotics Solutions Ltd. 7-1 SC-AT – Software User’s Manual and Commands Reference overrules the value of IS (please see chapter 6 for further details about the control filter structure). In the following sections a more detailed description of the faults, protections and the controller response in each case is given. 7.1. Driver Faults and Abort Input Driver fault is a condition indicating that something is wrong with the motor power driver connected to the controller. The driver fault is an actual hardware signal line that the driver outputs. This signal is continuously monitored by the controller real time servo loop, at the main control sample rate (16 kHz in the case of the SC-AT-4M or 8 kHz in the case of the SC-AT-2M). If the real time software detects that this line is active, the servo loop axis related to the relevant faulted driver is immediately disabled. There is a separate, independent, driver fault input line for each one of the controller axes. When an axis is disabled by a driver fault, the controller automatically switches to Servo Off (MO=0) condition in that axis. In this condition the controller’s driver inhibit output is activated, and the analog (or PWM) command lines are immediately switched to “0” value. The user can switch the actual logic of the driver fault line separately for each axis. This enables to support any type of driver fault electrical and logic interface (active high or active low). Please see the CG (axis configuration word) for more information. An Abort condition fault is generated when the general purpose ABORT input line is activated. Unlike driver faults, the Abort input is a single common input line that causes disable of all the controller axes. Being a general “Emergency” input, the fault condition generated by an Abort input is handled directly by the SC-AT hardware. Also, the logic of the abort signal can not be inverted. Abort is designed to be fail safe, so in order to normally operate the controller, the user MUST close a circuit through the (isolated) abort input lines at all times. Whenever this circuit is broken, the controller immediately switches to Abort condition. The following parameters reflect the DRIVER FAULTS and ABORT conditions: Controller State MO is set to “0” EM is set to “6” MF is set to “1” for DRV MF is set to “2” for ABORT IP[24] is “1” for XDrv Flt IP[25] is “1” for YDrv Flt IP[26] is “1” for ZDrv Flt5 IP[27] is “1” for WDrv Flt5 IP[28] is “1” for ABORT 5 Description The Motor On parameter is reset to “0”. Last Motion End Reason is “6”- Motor Fault. Motor Fault reason is Driver Fault Input. Motor Fault reason is Abort Input. The relevant bit in IP (the Input Port Word) is set active (high). Bit 24 for X driver fault, Bit 25 for Y, Bit 26 Z, and Bit 27 for W axis. Bit #28 is set high is the Abort input is Active (no current through the Abort lines). SC-AT-4M Only. 7-2 Control and Robotics Solutions Ltd. Revision 3.10, January 2005 7.2. Software Generated Faults The SC-AT real time servo loop software can generate the following faults: • High position loop error. • Encoder signal error. • Motor Stuck condition. Each one of the above axis related fault conditions generates similar result to a Driver Fault condition. The specific axis is immediately disabled, and the relevant software status bits are updated. 7.2.1. High Position Error This error is asserted when the servo loop position error is two high (please see section 6.2.3 above for more information about Position Error calculation). The position error “PE” is continuously compared to the maximal allowed error value “ER”. Whenever “PE > ER” the axis is disabled. The high position error protection is active at all times when a servo axis is enabled (i.e. when MO=1). This means that the position error is also monitored when the axis is in open loop modes. The max allowed positioning error is 8,000,000 encoder counts. High position error fault is reported by “MF=3”. 7.2.2. Encoder Signal Error Protections The SC-AT hardware supports two types of encoder signals error conditions: • Encoder A Quad B Error: This error is asserted when the SC-AT encoder hardware interface detects that both “A” and “B” encoder lines are changed simultaneously. In normal A quad B encoder operation this is a non-valid condition. The encoder signal lines are sampled by the hardware at a very high rate, and If in a single sample event both “A” and “B” changes their state, the error is asserted. • Encoder Disconnected Line Error: This error is asserted when the SC-AT encoder hardware interface detects that one of the following: “A”, “!A”, “B”, “!B” signals are not connected. The condition is detected by sampling all signals, and evaluating the following state: “(A== !A) | (B == !B)”. If the state is true for more then 4 consecutive servo samples, the error is asserted. The second error condition (disconnected line), requires full differential encoder interface to be used. The protection cannot be used in single ended line encoders. Note that only the “A+/A-” and “B+/B-” lines are sampled for errors. There is no implementation for Index disconnected line detection. The user can enable or disable the encoder error detection by a dedicated bit in the axis configuration word “CG (Please see the “CG” keyword reference in section 10.5.15 below for more information). Control and Robotics Solutions Ltd. 7-3 SC-AT – Software User’s Manual and Commands Reference Encoder Error faults (when enabled), are reported by special code in the “MF” keyword (the Motor Fault Cause). Please see the “MF” keyword description in section 10.5.42 below for more information. 7.2.3. Motor Stuck Protection The purpose of the Motor Stuck protection is to protect the motor from sustained high current operation. The protection detects the following condition: • In SC-AT-4M Motor Is Stuck if: The motor current command reaches its peak limit (saturated by TL), without any encoder movement (less then 2 counts/sample time), for a period of 0.5 seconds. • In SC-AT-4M Motor Is Stuck if: The motor current command reaches its peak limit (saturated by TL), without any encoder movement (less then 2 counts/sample time), for a period of 1 second. When the condition is met, the controller automatically disables the faulted axis. This is an axis related fault of course. The motor stuck error condition is operational whenever an axis is enabled in close loop operation mode. The protection is not active in the open loop modes! The protection is operational at all times. There is no way to disable this protection. Motor Stuck fault is reported by “MF=4”. 7.3. Software Protections – (Non Fault Conditions) The following software protections are managed by the SC-AT without generating fault condition. This means that the servo axis stays enabled, even though the protection may be active. • FPGA Version: During the controller boot process, the firmware reads the FPGA version, and verifies that the current version matches the firmware version. An Error is indicated if the version dose not match. The error is reported in 8 blinks of the CPU Led during the boot process. The controller firmware and FPGA versions are reported using the BVR command (please see BVR command reference). It is strongly recommended to avoid this error. Please consult C&RS in any case that an FPGA version error is detected. • CAN Hardware Initialization Failure: During the controller boot process, the firmware initializes the CAN hardware. In case that there is a problem in the CAN hardware initialization process, an error is reported by 16 blinks of the CPU Led during the boot process. The controller then continues the boot process and can still communicate in RS-232. Please consult C&RS in any case that an FPGA version error is detected. 7-4 Control and Robotics Solutions Ltd. Revision 3.10, January 2005 • Hardware and Software Motion Limits: The controller software continuously checks both the hardware and software limits. Whenever a limit is detected, any ongoing motion is stopped. Hardware limits are actual hardware signal lines. Software limits are low (and high) position values, beyond (and above) which the error is asserted. An FLS (Forward Hardware Limit) or High S/W Limit will stop positive motions only (towards increasing position value). An RLS (Reverse Hardware Limit) or Low S/W Limit will stop negative motions only (towards decreasing position value). During Limit stop condition, the controller uses the DL (Deceleration on Limit) value for the deceleration profile. • Torque Limit: The torque limit protection is continuously monitoring the motor command value, and limits the maximal current (or torque, if current driver is used) command). As noted above, the Driver command limitation has two different parameters, TL (which is the ultimate command saturation limit), and IS which can (separately from TL) limit the Integral value. This is needed in some cases to improve dynamic responses. It should be noted that the value of TL overrules the value of IS (please see chapter 6 for further details about the control filter structure). The TL saturation limit is operational is all enabled motor states (both open and close loop modes). 7.4. Special Handling of Software Limits In the SC-AT-2M, when a Begin Motion command (BG) is issued in PTP mode (MM=0), beyond a software limit, the BG command with fail with a new error code type: “EC=53” , “SW_LIMIT_ERROR”. The new error code is generated during the BG command, and only in PTP motion mode. When a “SW_LIMIT_ERROR” is generated, command will not start. This behaviors is different from previous implementations that checked for S/W limits only during motion. This new protection will also be implemented in future firmware versions of the SC-AT4M. Control and Robotics Solutions Ltd. 7-5 Revision 3.10, January 2005 8. ADVANCED FEATURES The SC-AT presents numerous important new and advanced features over the previous SC-2M products family. This chapter describes the following SC-AT advanced controller features: • • • • • • Data Recording. Advanced Encoder Interfaces - Compare Events. Advanced Encoder Interfaces - Capture Events. Auxiliary Analog Interfaces. Support for DC Brushless Motors (Sin Commutation – in SC-AT-4M only). Dynamic Error Mapping Correction. 8.1. Data Recording Data recording is a very powerful feature of the SC-AT controller’s family that allows the user to record internal controller variables, store them in local temporary arrays, and upload them to a host computer using either one of the controller’s communication channels. The user can of course access the recorded buffers from within a script program if required. Data recording significantly improves the control filter adjustment process (control parameters tuning), application debugging and monitoring, and troubleshooting. The SC-AT has new improved outstanding Data Recording capabilities, including the following: SC-AT-4M Simultaneous recording of up to 10 internal controller variables. Up to a total of 100,000 data recording points! The user can select to record 10 vectors 10,000 sample points each, 1 vector 100,000 sample points, or any other combination. Selection of more then 150 internal variables for each recorded vector. More then 100 spare variables to select from, for future firmware usage are already supported in the existing Data Recording interface. Fast sampling rate of up to 61 µSec per SC-AT-2M Simultaneous recording of up to 8 internal controller variables. Up to a total of 15,000 data recording points! The user can select to record 8 vectors 1,875 sample points each, 1 vector 15,000 sample points, or any other combination. Selection of more then 40 internal variables for each recorded vector. More then 50 spare variables to select from, for future firmware usage, are already supported in the existing Data Recording interface. Fast sampling rate of up to 122 µSec per Control and Robotics Solutions Ltd. 8-1 SC-AT – Software User’s Manual and Commands Reference sample point (for all selected vectors). The SC-AT-4M supports Data Recording at the servo-sampling rate of 16,384 Hz. The user can of course choose to collect data samples at a slower rate using the Recording Gap parameter (see below). sample point (for all selected vectors). The SC-AT-2M supports Data Recording at the servo-sampling rate of 8,192 Hz. The user can of course choose to collect data samples at a slower rate using the Recording Gap parameter (see below). Optional advanced triggering options. This option is not supported by the standard firmware version of the controller. Please consult Control and Robotics Solutions Ltd. for more information. In the next sections the operation of Data Recording in the SC-AT controller’s firmware is explained. 8.1.1. Operating Data Recording in the SC-AT Controller’s Family The SC-AT controllers firmware code supports Data Recording using the following Keywords: • Begin / Stop Data Recording command. • Data Recording Configuration Parameters: Select Recorded variables parameter. Select Recording Length parameter. Select Recording GAP parameter. • Report Recording Status parameter. • Data Recording Array. Normally, the user should not use these parameters and command directly, since all the Data Recording features of the SC-AT are fully supported by the SC-AT-4M/2M Shell application GUI. With few mouse clicks, the user can select the recorded variables, initiate recording process, and view the resulted graphs in our advanced Data Viewer application. Please refer to chapter 9 later on in this User’s Manual for more information about the SC-AT-4M/2M Shell application GUI support for Data Recording. However, from time to time the user may choose to directly use Data Recording lowlevel keywords (bypassing the GUI). This may be useful for example to initiate a data recording process from within a script program, in order to synchronize the Data Recording process with a machine sequence. The next sections fully describe the SC-AT firmware Data-Recording interfaces. 8.1.2. Data Recording Keywords This section describes the Data Recording keywords of the SC-AT controller’s family. 8.1.2.1. Begin / Stop Data Recording Command - BR Using this Command, the user can start or stop data recording process. The command only set internal flags that start the real time recording process. The command does not 8-2 Control and Robotics Solutions Ltd. Revision 3.10, January 2005 check validity of recorded vectors whatsoever, except for no current on-going recording process (see error code description below). The command syntax is as follows: XBR,<Optional Parameter> where: • X is an axis identifier. Since “BR” is a global function (not related to any axis), calling it with any axis identifier will start (or stop, according to the parameter) the recording process. • Parameter <Optional>: The “BR” command can receive an optional parameter. When called without any parameter, i.e. “XBR”, the command starts the recording process. • Parameter=1, “XBR,1”: Start a new recording process. This is identical to “XBR”. • Parameter=0, “XBR,0”: Stops the current ongoing recording process. “RR” is reset to “0” immediately. When a new recording starts, “RR” (Recording Status) is automatically set to the value of “RL”, the total required number of sample points. As the recording process goes along, on each sample point the value of “RR” is decremented by “1”. When recording is complete “RR” is “0”. Only then it is possible to upload the recorded data. The “BR” (or “BR,1”) Begin Recording command checks only that “RR” is zero before enabling a new recording process. If “BR” is issued during an active recording (while “RR>0”) the command will be rejected, and a “STILL_RECORDING” error code #16 will be generated. Note that the controller does not check if previous buffers were uploaded or not. Issuing a new Begin Recording command always overrides old data. “BR,0” does not check any conditions, and will always stop data recording process. 8.1.2.2. Select Recording GAP Parameter – RG Please see the “RG” keyword reference (section 10.5.61 below) for more information about upload data recording data delays in CAN bus operation. 8.1.2.2.1. RG Parameter – SC-AT-4M The recording GAP “RG” defines an integer number gap (in 61 µSec servo sample intervals) between each two consecutive recording sample points. “RG” is used to allow data sampling at a slower rate then the servo sample rate. When “RG=1” the data sampling rate equals the servo sample rate of 16,384 points/sec. When “RG=2” recorded data will be sampled every second servo sample, i.e. at a rate of 8,192 points/sec. “RG=16” will result in data sample rate of 1,024 points/sec, and so on. Control and Robotics Solutions Ltd. 8-3 SC-AT – Software User’s Manual and Commands Reference 8.1.2.2.2. RG Parameter – SC-AT-2M The recording GAP “RG” defines an integer number gap (in 122 µSec servo sample intervals) between each two consecutive recording sample points. “RG” is used to allow data sampling at a slower rate then the servo sample rate. When “RG=1” the data sampling rate equals the servo sample rate of 8,192 points/sec. When “RG=2” recorded data will be sampled every second servo sample, i.e. at a rate of 4,096 points/sec. “RG=8” will result in data sample rate of 1,024 points/sec, and so on. 8.1.2.2.3. RG[2] – Recording Upload Delay When uploading large data buffers in CAN bus, the SC-AT controllers can generate high loads on the CAN bus network. Depending on the PC load and type of CAN board, on high buffers upload, some CAN messages can be lost. In order to avoid this problem, the SC-AT controllers can add delays between CAN messages during data recording upload. The Delay is set by RG[2], and is given in servo sample time multipliers. RG[2]=0 means no delay. RG[2]=1 means 1 sample time delay (this is 61 micro-sec on the 4M and 122 micro-sec on the 2M) and so on. Usually, a delay of 3-5 samples is sufficient for most cases. 8.1.2.3. Select Recording Length Parameter – RL “RL” defines the number of data points per sampled vector. This number defines the final size of each recorded vector. 8.1.2.3.1.RL Parameter – SC-AT-4M “RL” can be up to 100,000 if only one vector is selected to be recorded, or up to 10,000 if all vectors (up to 10) are selected for recording. For example, when “RG=16”, and “RL=10,000”, each vector will be ~10 seconds long. Note that the SC-AT-4M/2M Shell software automatically appends a time vector to any recording file. 8.1.2.3.2.RL Parameter – SC-AT-2M “RL” can be up to 15,000 if only one vector is selected to be recorded, or up to 1,875 if all vectors (up to 8) are selected for recording. For example, when “RG=8”, and “RL=1,875”, each vector will be ~2 seconds long. Note that the SC-AT-4M/2M Shell software automatically appends a time vector to any recording file. 8.1.2.4. Report Recording Status Parameter – RR “RR” is a read only parameter, indicating the recording status. When a new recording starts, the value of “RR” is internally set to the value of “RL”. It is being automatically decremented by “1” at each sample point (every “RG” servo sample times). When “RR=0” recording is complete. 8-4 Control and Robotics Solutions Ltd. Revision 3.10, January 2005 8.1.2.5. Select Recorded Variables Parameter – RV The SC-AT supports simultaneous data vectors to be recorded at the same time. The user can of course select to record less then these vectors. SC-AT-4M: The SC-AT-4M supports 10 simultaneous data vectors to be recorded at the same time SC-AT-2M: The SC-AT-2M supports 8 simultaneous data vectors to be recorded at the same time The definition of each recorded vector contents (the link to an internal controller variable) is done using the “RV” parameter. Currently, the following internal controller variables can be selected for data recording for each one of the recorded vectors: Recorded Variable Description NONE (Empty Vector) Encoder Position Encoder Velocity Position Error Desired Position PID Output Status Register Motion Status Analog Input Motor Fault Input Port Output Port Reserved Axis Related --Yes Yes Yes Yes Yes Yes Yes Yes Yes No No --- Variable Keyword --PS VL PE DP PO SR MS AI MF IP OP --- Notes: • By selecting a NULL variable value (RV=0) for a specific vector, this vector will be disabled (not recorded). • It is required that enabled Recorded Vectors will be orderly arranged. This means that after the first NULL RV, all following axes RV’s should be “0”. • Most of the variables are axis-related variables. This means for example, that the user can select to record for each recorded vector the value of XPS, YPS, etc. • Please see the “RV” parameter keyword reference in section 10.5.66 in this User’s Manual for specific details about all possible “RV” values. Control and Robotics Solutions Ltd. 8-5 SC-AT – Software User’s Manual and Commands Reference 8.1.2.6. The Recordings Data Array – DA 8.1.2.6.1. DA Array in SC-AT-4M On the SC-AT-4M “DA” is an internal temporary data array used for the Data Recording logging. Note that this array is a temporary array, and is not saved to the Flash memory. When the controller power is off, all data in the DA will be lost. The data in the “DA” array is arranged in a simple logical order. For each sample point, “DA” contains the recorded variables according to the natural order: XRV, YRV, etc. The size of DA in the SC-AT-4M is 100,000 points. 8.1.2.6.2. DA and AR Arrays in SC-AT-2M On the SC-AT-2M, the data-recording array “DA” size is 16,000 points, but the recording length is limited to 15,000 points only. The general-purpose array “AR” size is 1,000 points, and overlaps the DA array in its first 1,000 points. This means that DA[1÷1000] == AR[1÷1000]. To avoid over-running the AR array when data recording is initiated, the data recording starts from DA[16,000] and ends at DA[1001] (depending on the RL). This implementation allows special applications to define large AR arrays (by accessing “DA” at locations higher then 1,000) for ECAM usage etc. In all normal applications, when using “AR” in its defined limits (i.e. [1÷1000]), no overlap will occur even when the full data recording buffers are used. 8.1.3. Data Recording Support on the SC-AT-4M/2M Shell As noted above, the SC-AT-4M/2M shell GUI application fully supports all the Data Recording features of the SC-AT controllers. The user can select the recorded variables, configure recording length, initiate recording process, and view the resulted graphs in our advanced Data Viewer application. Please refer to chapter 9 later on in this User’s Manual for more information about the SC-AT-4M/2M Shell application GUI support for Data Recording. 8-6 Control and Robotics Solutions Ltd. Revision 3.10, January 2005 8.2. Position Compare Events Position compare events is a hardware-supported feature of the SC-AT controller’s family encoder interface that provides the ability to generate accurate hardware pulses based on comparing the actual encoder position with pre-defined values. When a compare condition is satisfied, a hardware pulse is automatically generated by the controller, and is directed to one of the digital outputs of the SC-AT Controller. As noted, the compare feature is implemented by the SC-AT encoder hardware interface, so the actual delay between the exact compare time to the generated pulse is very short (few cycles of the internal 66 MHZ encoder interface module clock, in the current hardware version). This feature is useful in applications like printing and scanning, where external hardware should be synchronized with actual encoder location. SC-AT-4M The SC-AT-4M supports simultaneous compare events on all of its 4 encoders, independent from one another. The user can configure the hardware to redirect a generated event pulse to any one of the controller digital outputs. This way a user working with a dual axes system (X/Y stage for example), requiring to generate compare event pulses based on the X and Y encoders alternatively, can use only one digital output, and control the source of the pulse to be an X or Y encoder Compare Event, using simple software configuration. The user should be aware that the current hardware version of the SC-AT-4M support 4 of its 8 digital outputs as Fast Outputs. The standard SC-AT-4M digital outputs interface is ALL 8 isolated and buffered. While this is good for normal outputs, when fast synchronization pulses are required, a faster interface is needed. To solve this problem, the SC-AT-4M, supports the first 4 digital outputs as Fast Outputs. Outputs configured as Fast Outputs are non isolated, and are driven by a TTL buffer. The Fast Outputs uses the same pins of normal outputs of the controller (DOut1 through DOut4). SC-AT-2M The SC-AT-2M supports simultaneous compare events on both of its 2 encoders, independent from one another. The user can configure the hardware to redirect a generated event pulse to any one of the controller digital outputs. This way a user working with a dual axes system (X/Y stage for example), requiring to generate compare event pulses based on the X and Y encoders alternatively, can use only one digital output, and control the source of the pulse to be an X or Y encoder Compare Event, using simple software configuration. The user should be aware that the current hardware version of the SC-AT-2M supports 2 of its 8 digital outputs as Fast Outputs. The standard SC-AT-2M digital outputs interface is isolated and buffered. While this is good for normal outputs, when fast synchronization pulses are required, a faster interface is needed. To solve this problem, the SC-AT-2M, supports the first 4 digital outputs as Fast Outputs. Outputs configured as Fast Outputs are non isolated, and are Control and Robotics Solutions Ltd. 8-7 SC-AT – Software User’s Manual and Commands Reference driven by a TTL buffer. The Fast Outputs uses the same pins of normal outputs of the controller (DOut5 and DOut6). As a standard, the controller generates a single hardware pulse for each compare event. The user can control the pulse width in few software configurable options. However, the controller can optionally support any special output pulse sequence. This requires dedicated custom technical support, and should be discussed with Control and Robotics Solutions Ltd. if relevant. Typical applications are printing for example (but not limited to), which may be developed as a custom option. In general, the SC-AT controllers support 4 modes of Compare Events Generation: • • • • Mode 0: Fixed GAP (incremental), Distance < 16 Bit. Mode 1: Fixed GAP (incremental), Distance > 16 Bit. Mode 2: 32 bit Arbitrary GAP location tables. Mode 3: 32 bit Arbitrary GAP location tables using the FPGA RAM. In order to operate the Position Compare feature, there are few dedicated parameters, and a new command that control its operation. In the following sections the operation of each one of the supported Compare Function modes is explained. 8.2.1. Mode 0: Fixed GAP (Incremental), Distance < 16 Bit In this mode, the controller is programmed with the desired start point - PStart, desired end point - PEnd, and desired incremental GAP - Distance. The first pulse will always be generated at the exact Start Position - PStart. The hardware then automatically increments (or decrements, see explanation below) the next compare point by the Distance value, and so on, until the PEnd is reached. The first pulse is thus generated at: Position = PStart, the second is generated at: Position = PStart + Distance, the next one will be at: Position = PStart + Distance * 2, etc. In general, the Nth pulse is generated at position: Position = PStart + Distance * N, where N=0 is the start point – PStart. In this mode the compare pulses are fully generated by the hardware, so there is no limit to the max pulses frequency. Distances as low as 1 encoder count, at any encoder speed are supported. The value of Distance (the incremental GAP) is limited to 16 bit, i.e. +/- 32,767 (excluding 0). The sign of Distance controls direction of operation. Positive Distance value defines increasing encoder counter motion. Negative Distance value defines decreasing encoder counter motion (see remark below). The compare pulse in this mode is automatically disabled by the real time controller firmware when the end point condition is met. This is when: Position > PEnd for Distance > 0, and when: Position < PEnd for Distance < 0. 8-8 Control and Robotics Solutions Ltd. Revision 3.10, January 2005 There are few important issues to note regarding this mode of operation: 1) This depends on the controller being used: SC-AT-4M Although in this mode the hardware is responsible for the exact compare triggering, it is the controller real time software (firmware) that manages the end point monitoring (i.e. disabling the compare pulse output when PEnd is passed). As a result, although the actual pulse frequency is not limited, if the resulting pulse frequency is higher then the servo sampling rate (currently 16,384 Hz), additional pulses might be generated beyond location PEnd. In any case, all pulses will be disabled no later then 61 µSec after PEnd is passed. SC-AT-2M Although in this mode the hardware is responsible for the exact compare triggering, it is the controller real time software (firmware) that manages the end point monitoring (i.e. disabling the compare pulse output when PEnd is passed). As a result, although the actual pulse frequency is not limited, if the resulting pulse frequency is higher then the servo sampling rate (currently 8,192 Hz), additional pulses might be generated beyond location PEnd. In any case, all pulses will be disabled no later then 122 µSec after PEnd is passed. 2) As noted, the value of Distance is limited to +/- 32,767, excluding 0. Although the parameter itself is not range protected, the compare function enable command validates all parameters, and issues a dedicated error code if any of the parameters is out of range. 3) The Compare function works correctly ONLY if the sign of Distance corresponds to the direction of motion, and to PStart and PEnd definitions. This means, that for Distance > 0 the user MUST specify PEnd > PStart, and the motion direction MUST be positive (i.e. from lower encoder count, to higher encoder count). For Distance < 0 the user MUST specify PEnd < PStart, and the motion direction MUST be negative (i.e. from higher encoder count, to lower encoder count). 4) If the above conditions are not met, the compare pulses will be generated in unexpected positions. 8.2.2. Mode 1: Fixed GAP (incremental) , Distance > 16 Bit This operation mode is similar to Mode 0 (i.e. fix, automatically incremented or decremented GAP), except that it allows Distance values to be larger then 16 bit. Actually any Distance number value in the 32 bit range (excluding 0) can be used in this mode. However, since the compare point increment (or decrement) in this mode is managed by the controller real time firmware code, the max possible compare pulse frequency is limited to ½ of the servo sampling rate (i.e. max 8,192 Hz in the SC-AT-4M controller and to 4,096 Hz in the SC-AT-4M controller). The user is recommended to work in this mode in cases where the required incremental GAP is (absolutely) grater then 32,767 encoder counts. If the required distance is (absolutely) smaller then 32,767 counts, Mode 0 should be used. Control and Robotics Solutions Ltd. 8-9 SC-AT – Software User’s Manual and Commands Reference It should be noted that when working in Mode 1, for Distance > 32,767 counts, the Max possible pulses frequency is anyhow limited by the max supported encoder speed. For example, when moving at 30,000,000 counts/sec, if the required distance is 32,768 counts, the resulted frequency is anyhow only: 30,000,000 / 32,768 = 915 Hz. So practically, using either Mode 0 or Mode 1, all possible incremental GAP distances are covered without any frequency limitations. Notes #3 and #4 above regarding the limitations of operation in Mode 0 (directions) are also relevant in this case. This mode is not supported in the current Firmware version. 8.2.3. Mode 2: 32 Bit Arbitrary Tables Mode 2 allows the user to define an array of 32 bit position locations, to specify arbitrary compare locations. In Mode 2 the user fills in the desired compare locations to the general-purpose array “AR”. In the SC-AT-4M Up to 10,000 compare points may be defined (currently limited by the size of the “AR” array). In the SC-AT-2M Up to 1,000 compare points may be defined (currently limited by the size of the “AR” array). The user then defines the IStart and IEnd indexes (index entries on the “AR” array), from which the compare locations will be taken. The Distance parameter needs to be defined as +1 for positive motions, and –1 for negative motions. Operation in Mode 2 has the following limitations: 1) In this mode the controller real time firmware code is responsible for table points location increment. This implies a practical limitation on the position distance (in encoder count units) between each two consecutive table points, depending on the actual motion speed. The limitation requires that the resulting max arbitrary location compare pulse frequency will be smaller then 8,192 Hz (in the current product firmware version). 2) In any case (regardless of the motion direction), IEnd should be greater than IStart. The exact conditions tested before the mode is enabled are: 0 < IStart < IEnd <= 10,000 3) Similarly to Mode 0 and Mode 1, here the positions in the “AR” array MUST be defined in a strict ascending or strict descending order, and comply to the Distance (actually direction) definition, and the actual motion direction. If these conditions are not met, the compare pulses will be generated in unpredicted unexpected positions. 4) The “AR” array (used for location table definitions) is a non-axis related array. The “AR” array size depends on the controller being used: SC-AT-4M – The size of the “AR” Array is [1 x 10,000] SC-AT-2M – The size of the “AR” Array is [1 x 1,000] 8-10 Control and Robotics Solutions Ltd. Revision 3.10, January 2005 Although all axes can operate simultaneously and independent from one another, when working in Mode 2 or Mode 3, all axes share the same “AR” array. The user should use separate “AR” areas for each axis if more then one is needed to be operated in Mode 2 or 3 simultaneously. 8.2.4. Mode 3: 32 Bit Arbitrary Tables with FPAG RAM Support This operation mode is similar to Mode 2 (i.e. supporting 32 bit arbitrary location compare table), but instead of being based only on the real time controller software to manage points increment, it is using the encoder interface RAM as a FIFO to allow unlimited pulse frequency operation. This mode is not supported in the current Firmware version. 8.2.5. Compare Function Parameters, Activation and Error Codes The SC-AT uses a new special array “PG” (abbreviation stands for “Pixel Generation Parameters”) to control the Compare function operation, and a new activation command “PQ”. This section describes the option defined by each parameter, and the command syntax. 8.2.5.1. The “PG” Array – SC-AT-4M The “PG” array elements controls the operation of the compare function. “PG” is an axis related array, sized [10 x 8]. Each axis has 8 parameters controlling the compare operation as described below: Array Element PG[i][1] Function Description Operation Mode PG[i][2] Distance and direction PG[i][3] Start Point This parameter controls the compare function mode of operation: - PG[i][1]=0 : Defines Compare Mode 0. - PG[i][1]=1 : Defines Compare Mode 1 (Optional). - PG[i][1]=2 : Defines Compare Mode 2. - PG[i][1]=3 : Defines Compare Mode 3 (Optional). For Modes 0 and 1 this parameter defines the auto-increment distance: - In Mode 0 this parameter should be limited to +/-32,767, excluding 0. - In Mode 1 this parameter can be any number in the 32 bit range, excluding 0. For Modes 2 and 3 this parameter should be +1 for positive motions (incrementing position motions), and –1 for negative motions (decrementing position motions). For Modes 0 and 1 this parameter defines the Start Position (PStart) in encoder counts for the compare function. The first compare pulse will always be at exactly that point. For Modes 2 and 3 this parameter defines the Start Index (IStart) in the “AR” compare position table, corresponding to the first compare point. The first compare point will be at Control and Robotics Solutions Ltd. 8-11 SC-AT – Software User’s Manual and Commands Reference Array Element PG[i][4] PG[i][5] PG[i][6] PG[i][7] PG[i][8] Function Description the encoder location defined by “AR[Istart]”. End Point For Modes 0 and 1 this parameter defines the End Position (PEnd) in encoder counts for the compare function. Beyond this location the compare function will be automatically disabled. For Modes 2 and 3 this parameter defines the End Index (IEnd) in the “AR” compare position table, corresponding to the last compare point. The last compare point will be at the encoder location defined by “AR[IEnd]”. Pulse This parameter defines the pulse width (when PG[i][6]=1): Width6 - PG[i][5]=0 : Pulse Width = 1.94 µSec. - PG[i][5]=1 : Pulse Width = 7.75 µSec. - PG[i][5]=2 : Pulse Width = 15.5 µSec. - PG[i][5]=3 : Pulse Width = 248.23 µSec (Was 3.9). Pulse Width This parameter defines the compare pulse width mode. Mode - PG[i][6]=0 : Specify that the compare output will be active as long as the compare condition is satisfied. - PG[i][6]=1 : Specify that the compare output will be active as long as the compare condition is satisfied, followed by the width option defined by PG[i][5]. See note regarding compare pulse with in the notes below. Pulse This parameter defines the compare pulse polarity mode. Polarity - PG[i][7]=0 : Defines Normal (Positive) Pulse. - PG[i][7]=1 : Defines Inverted (Negative) Pulse. Not Used Should not be assigned to any value for future compatibility. Table 3: “PG” Array in SC-AT-4M - Compare Function Parameters Description Notes: 1) In the table above, (i) represents the selected axis. 2) In Incremental modes (Modes 0 and 1), since the hardware automatically increments the compare match register, the actual compare condition is valid for only 2 basic H/W clock cycles (66 MHz), so practically, if the pulse mode parameter is set to “0” “PG[i][6]=0”, the resulted compare pulse width will be 33 nano-sec. If “PG[i][6]=1”, the resulted compare pulse width is exactly defined by “PG[i][5]” as specified above. 3) In the arbitrary table supported modes (Modes 2 and 3), the controller real time software is responsible for updating the compare match registers. As a result, the compare pulse width may be longer then requested. The start point of the pulse will however always match the exact compare point without any delay. 6 The “Pulse Width” selection bits were modified in revision 2.03 (in the SC-4M-SA). 8-12 Control and Robotics Solutions Ltd. Revision 3.10, January 2005 8.2.5.2. The “PG” Array – SC-AT-2M The “PG” array elements controls the operation of the compare function. “PG” is an axis related array, sized [2 x 8]. Each axis has 8 parameters controlling the compare operation as described below: Array Element PG[i][1] PG[i][2] PG[i][3] PG[i][4] PG[i][5] PG[i][6] PG[i][7] PG[i][8] Function Description Operation Mode This parameter controls the compare function mode of operation: - PG[i][1]=0 : Defines Compare Mode 0. - PG[i][1]=1 : Defines Compare Mode 1 (Optional). - PG[i][1]=2 : Defines Compare Mode 2. - PG[i][1]=3 : Defines Compare Mode 3 (Optional). Distance For Modes 0 and 1 this parameter defines the auto-increment and distance: direction - In Mode 0 this parameter should be limited to +/-32,767, excluding 0. - In Mode 1 this parameter can be any number in the 32 bit range, excluding 0. For Modes 2 and 3 this parameter should be +1 for positive motions (incrementing position motions), and –1 for negative motions (decrementing position motions). Start Point For Modes 0 and 1 this parameter defines the Start Position (PStart) in encoder counts for the compare function. The first compare pulse will always be at exactly that point. For Modes 2 and 3 this parameter defines the Start Index (IStart) in the “AR” compare position table, corresponding to the first compare point. The first compare point will be at the encoder location defined by “AR[Istart]”. End Point For Modes 0 and 1 this parameter defines the End Position (PEnd) in encoder counts for the compare function. Beyond this location the compare function will be automatically disabled. For Modes 2 and 3 this parameter defines the End Index (IEnd) in the “AR” compare position table, corresponding to the last compare point. The last compare point will be at the encoder location defined by “AR[IEnd]”. Pulse Width This parameter defines the pulse width (ignoring PG[i][6]): - PG[i][5]=0 : Pulse Width = 1 clock of 15 nano/sec. - PG[i][5]=1 : Pulse Width = 1.92 µSec. - PG[i][5]=2 : Pulse Width = 3.84 µSec. - ……. - PG[i][5]= 255: Pulse Width = 489.6 µSec (Max Value) Mode Not used in the SC-AT-2M Pulse This parameter defines the compare pulse polarity mode. Polarity - PG[i][7]=0 : Defines Normal (Positive) Pulse. - PG[i][7]=1 : Defines Inverted (Negative) Pulse. Not Used Should not be assigned to any value for future compatibility. Table 4: “PG” Array in SC-AT-2M - Compare Function Parameters Description Control and Robotics Solutions Ltd. 8-13 SC-AT – Software User’s Manual and Commands Reference Notes: 1. In the table above, (i) represents the selected axis. 2. In Incremental modes (Modes 0 and 1), since the hardware automatically increments the compare match register, the actual compare condition is valid for only 2 basic H/W clock cycles (66 MHz). 3. In the SC-AT-2M, the “PG[i][6]” parameter (Pulse Width Mode) is not used. In turn, the pulse width parameter “PG[i][5]” is used to set the required pulse width, in multiplications of 1.92 µSec intervals. This implementation provides a more flexible user interface for defining the compare pulse width. 4. The max allowed value for “PG[i][5]” is 255. This will result in a Pulse Width of 489.6 µSec. In the arbitrary table supported modes (Modes 2 and 3), the controller real time software is responsible for updating the compare match registers. As a result, the compare pulse width may be longer then requested. The start point of the pulse will however always match the exact compare point without any delay. 8.2.5.3. The “PQ” Command The “PQ” command is an axis-related command, enabling or disabling the Compare function for a specific axis. The command requires a parameter indicating the requested operation. The command syntax is as follows: XPQ,Parameter where: • X is an axis identifier. • SC-AT-4M - For the current SC-AT-4M version the compare function is supported for axes X, Y, Z, W only. Issuing the command with other axes identifies will issue an error (see error codes below). • SC-AT-2M - For the current SC-AT-2M version the compare function is supported for both axes – X and Y. • Parameter=0: Indicates immediate disable of compare for the specified axis. No conditions are checked expect a valid axis identifier. • Parameter=1: Indicates start compare function for the specified axis. The command validates correct parameter (“PG”) for the specific requested mode. In any case that one of the command’s parameters is out of range, the command will return an error prompt: “?>” or will generate a script “Run Time Error” (if called from within a script macro program). The relevant error code flags (“EC” or “QC”) will be updated to reflect the error cause. 8-14 Control and Robotics Solutions Ltd. Revision 3.10, January 2005 Notes: • The user should be aware that not all conditions for a correct operation of the Compare Function could be validated during command initialization. For example, the minimal distance between each two consecutive points in the “AR” table (in Modes 2 and 3) cannot be tested as the limitation depends on the actual motion speed. It is the user’s responsibility to specify correct parameters values for each operation mode. Please refer to the specific mode description section defining operation limitations in each mode. The error codes generated by the “PQ” command are presented below. 8.2.5.4. Dedicated Error Codes related to the Compare Function Operation As explained in the previous section, in case that the “PQ” command fails to validate one of its parameters, the command will return an error prompt: “?>” or will generate a script “Run Time Error” (if called from within a script macro program). The relevant error code flags (“EC” or “QC”) are presented below: Val 34 EC/QC Code Name 38 EC_PARAM_EXPECTED 60 MODE_PARAM_NOT_VALID 61 PULSE_MODE_PARAM_NOT_VALID 62 PULSE_WIDTH_PARAM_NOT_VALID 63 PULSE_POL_PARAM_NOT_VALID 64 PD_PARAM_NOT_VALID 65 PS_PE_PARAM_NOT_VALID 99 NO_HW_SUPPORT_IN_4AXIS_VER EC_PARAM_OUT_OF_RANGE Error Description The “PQ” command’s parameter is allowed to be “0” for disable or “1” for enable. Issuing a “PQ” command with a parameter out of that range will issue this error code. The “PQ” command must receive a parameter. If “PQ” is issued without a parameter this error code is returned. This error is issued by “PQ,1” if the requested Compare Mode defined by PG[i][1] is out of its range. In the current firmware version only Modes 0 and 2 are supported. This error is issued by “PQ,1” if the Pulse Width Mode Parameter defined by PG[i][6] is out of its range. The allowed range for the Pulse Width Mode Parameter is: “0” or “1”. This error is issued by “PQ,1” if the Pulse Width Parameter defined by PG[i][5] is out of its range. The allowed range for the Pulse Width Parameter is: “0” to “3”. This error is issued by “PQ,1” if the Pulse Polarity Parameter defined by PG[i][7] is out of its range. The allowed range for the Pulse Polarity Parameter is: “0” or “1”. This error is issued by “PQ,1” if the Distance Parameter defined by PG[i][2] is out of its range. Out of range values for Distance are: - 0 in all modes. - Out of +/-32,767 range in Mode 0. - Not equal +1 or –1 in Modes 2 and 3. This error is issued by “PQ,1” if the Start Point or End Point Parameters defined by PG[i][3] and PG[i][4] are not valid. These parameters are validated only in Modes 2 and 3 (see specific operation mode description for more details about limitations on PStart and PEnd. The “PQ” command is supported on the SC-AT-4M for axes X, Y, Z, W only. Issuing the command with a different axis identifier will result in this error code. Table 5: Error Codes Generated by the "PQ" Compare Function Control and Robotics Solutions Ltd. 8-15 SC-AT – Software User’s Manual and Commands Reference 8.2.6. Configuring Digital Outputs for the Compare Function The SC-AT controllers have general-purpose digital output pins. There are 8 uncommitted general-purpose digital output in the SC-AT-4M and 6 in the SC-AT-2M. These are DOut1 ÷ DOut8 (in the SC-4M) and DOut1 ÷ Dout4 and Dout5Fast and Dout6Fast (in the SC-AT-2M). When not assigned as position compare event outputs, digital output pins can be controlled by the “OP” (Output Port) parameter. Each hardware digital output pin reflects the state of the corresponding bit in the output word parameter “OP” (please see the “OP” parameter keyword reference for more details). When configured as Position Compare Event output, the actual hardware digital output pins in the are controlled by the compare function. If the compare function is enabled without any output pin being assigned to it, no pulses will be generated (the pin will reflect the relevant bit value of “OP”). When an output pin is assigned to a position compare event function, its state is controlled by the compare logic hardware, and is not affected by the digital output word “OP”. In the SC-AT-4M only the first 4 outputs can be assigned as compare outputs. In the SC-AT-2M, only Dout5Fast and Dout6Fast can be assigned as compare outputs. It should be noted that when an output is assigned to a compare event, only its physical logic level is affected. The value of “OP” is not changed, and does not reflect in this case the actual hardware pin state. The next two sections define how to assign digital outputs to the compare function and how to support fast (TTL) electrical interface. 8.2.6.1. Assignment of a Digital Output to a Position Compare Event The SC-AT Hardware supports assignment for any of its 8 actual (physical) digital output pins as standard outputs, or as a position compare function output. The digital outputs are configured using the IO_MODE_0 select word (currently assigned using the “XOM” parameter (please see the “OM” keyword reference in this user’s manual for further information). This is a 32-bit array word, defined as follows: 8.2.6.1.1. SC-AT-4M - IO_MODE_0 – XOM Keyword IO_MODE_0 : Bits 31 ÷ 24 31 30 29 28 27 26 25 24 Configure DRV FLT SRC Fast Inputs Selection 8-16 23 22 OM-8 21 20 IO_MODE_0 : Bits 23 ÷ 12 19 18 17 16 OM-7 OM-6 11 10 OM-4 9 8 IO_MODE_0 : Bits 11 ÷ 0 7 6 5 4 OM-3 OM-2 Control and Robotics Solutions Ltd. 15 14 13 OM-5 12 3 2 1 OM-1 0 Revision 3.10, January 2005 Each digital output can be assigned as follows, using a 3-bit configuration field OM-i. In the table above, i indicates the relevant digital output number from 1 ÷ 8: • OM-i [1 ÷ 0]: The first two bits of OM select the source axis for the compare output. One of four options is possible as follows: - [0,0] : Select X Compare Source for Output - i. - [0,1] : Select Y Compare Source for Output - i. - [1,0] : Select Z Compare Source for Output - i. - [1,1] : Select W Compare Source for Output - i. • OM-i [2]: Is the output mode selection bit defines whether the output is assigned to a standard output (controlled by “OP”) or an output of a compare function. “0” defines a standard output, “1” defines a compare function output. When the mode select bit is cleared (“0”), then the source selection bits are ignored. OM-1 through OM-8 are using bits 0 ÷23 of the IO_MODE_0 word. Other bits of IO_MODE_0 are used for: • IO_MODE_0 [27 ÷ 24]: These bits control Fast Digital Inputs assignment. Please see section 8.3.3 below and the “OM” keyword reference in this user’s manual for further information. • IO_MODE_0 [31 ÷ 28]: (NEW feature in version 2.03 and later versions only). These bits are used to configure Driver Fault Signals source for MD drivers operation. Please see the “OM” keyword reference in this user’s manual for further information. 8.2.6.1.2. SC-AT-2M - IO_MODE_0 – XOM Keyword IO_MODE_0 : Bits 31 ÷ 0 31 ÷ 4 Not Used 3 2 1 0 OM As noted above, in the SC-AT-2M, only Dout5Fast and Dout6Fast can be assigned as compare outputs. Digital output can be assigned as follows, using a 3-bit configuration field OM, as shown in the table above, and the bit description below. BITS (1:0) – Defines the DOUT5 Fast Output source: 00 – Standard Output, controlled by “OP” 01 – Output from compare channel X 10 – Output from compare channel Y 11 – Currently unused, for future purposes BITS (3:2) – Defines the DOUT6 Fast Output source: 00 – Standard Output, controlled by “OP” 01 – Output from compare channel X 10 – Output from compare channel Y 11 - Currently unused, for future purposes Control and Robotics Solutions Ltd. 8-17 SC-AT – Software User’s Manual and Commands Reference 8.2.6.2. Electrical Configuration for Fast Digital Outputs All standard digital outputs of the SC-AT-4M board are optically isolated and buffered by the hardware design. However, as noted, this standard electrical interface does not allow fast pulses to be transported. For that purpose the SC-AT-4M board design support an optional electrical configuration to bypass the digital outputs isolation and buffering. This is supported only for the first 4 digital outputs: DOut1, DOut2, DOut3 and DOut4. In the SC-AT-4M Controller: Fast Outputs are configured by removing 0Ω resistors: R161, R162, R165, R166 and re-installing them in R268, R265, R266, R267 for outputs 1, 2, 3 and 4 respectively. Standard Outputs are configured by removing 0Ω resistors: R268, R265, R266, R267 and re-installing them in R161, R162, R165, R166 for outputs 1, 2, 3 and 4 respectively. Notes: • If a position compare event will be assigned to a standard non-fast output, the fast compare pulses will not pass the isolated electrical interface, and no pulses will be observed. To work with the Compare Function, Fast Outputs should be used ! • The resistors indicated above (for the fast and standard interface options) MUST not be installed simultaneously. Electrical damage might be caused to the SC-4M board if not done so. • Please see the SC-4M Hardware Reference User’s Manual for more information. • On the SC-AT-2M, Dout5Fast and Dout6Fast are always configured as fast outputs. There is no special hardware configuration required for Fats I/O’s in the SC-AT-2M. 8-18 Control and Robotics Solutions Ltd. Revision 3.10, January 2005 8.2.7. Position Compare Events Examples The following example demonstrates initialization of X axis compare, to generate pulses at a fixed gap (Mode 0), starting from location 10,000 counts to location 100,000 counts, every 40 encoder counts. The pulse is directed to Output #1. Motion from location 0 to location 150,000 counts at Speed=100,000 is then executed. The resulted pulse frequency is 100,000counts/sec/40counts/pulse=2,500 pulse/sec. When motion is completed, the function is programmed to generate pulses in the opposite direction (when moving back to location 0). Only the necessary parameters are re-configured. 8.2.7.1. SC-AT-4M Examples ‘ Disable any active compare for X Axis ‘ ------------------------------------XPQ,0 ‘ ‘ Configure Digital Output #1 to be assigned as an X Axis ‘ Compare Output (All other outputs are standard Outputs) ‘ ------------------------------------------------------XOM=4 ‘ OM-1=4 (DOut1 is X Compare) ‘ ‘ Initialize X axis Motion Parameters and reset position ‘ -----------------------------------------------------XAC=1000000;XDC=1000000;XDL=1000000 XSP=100000;XPS=0;XMO=1;XAP=150000 ‘ ‘ Initialize the X Compare Function ----------------------------------XPG1=0 ‘ Set Mode 0 XPG2=40 ‘ Set Compare Distance XPG3=10000 ‘ Set Compare Start Position XPG4=100000 ‘ Set Compare End Position XPG5=3 ‘ Set Pulse Width (=3.9 µSec) XPG6=1 ‘ Set Pulse Width Mode (Use width Parameter) XPG7=0 ‘ Set Pulse Polarity to Normal (Positive) XPQ,1 ‘ Activate X Compare Function ‘ ‘ Start X motion, and wait for end of motion -------------------------------------------XBG @while (XMS != 0) ‘ Wait for End Of Motion @endwhile ‘ ‘ Initialize the Compare in the opposite direction -------------------------------------------------XPQ,0 ‘ Disable X Compare XPG2=-40 ‘ Set Compare Distance Negative Direction! XPG3=100000 ‘ Set Compare Start Position XPG4=10000 ‘ Set Compare End Position XPQ,1 ‘ Activate X Compare Function ‘ ‘ Start Backward X motion towards 0 position -------------------------------------------XAP=0;XBG Control and Robotics Solutions Ltd. 8-19 SC-AT – Software User’s Manual and Commands Reference The next example demonstrates operation of the Y axis compare in table Mode 2. Initially the controller is programmed to execute a motion from 0 to 4000 counts, with the compare table initialized to generate pulses at locations 1500, 2000, 2250, 2375. When motion is terminated, a backward motion is programmed to generate pulses at the exact same locations, but when moving in the opposite direction. ‘ Disable any active compare for Y Axis ‘ ------------------------------------YPQ,0 ‘ ‘ Configure Digital Outputs #1 and #2 to be assigned to X,Y ‘ Compare outputs (All other outputs are standard Outputs) ‘ --------------------------------------------------------XOM=44 ‘ OM-1=4, OM-2=5 (DOut1 is X, DOut2 is Y) ‘ ‘ Initialize Y axis Motion Parameters and reset position ‘ -----------------------------------------------------YAC=1000000;YDC=1000000;YSP=100000;YPS=0;YMO=1;YAP=4000 ‘ ‘ Initialize the Compare Function, and Table Points ‘ Note that Table points MUST be INVERTED !! --------------------------------------------------YPG1=2 ‘ Set Mode 0 YPG2=1 ‘ Set Compare Direction : POSITIVE! YPG3=1 ‘ Set Compare Start Index: AR[1] YPG4=4 ‘ Set Compare End Index: AR[4] YPG5=3 ‘ Set Pulse Width : =3.9 µSec YPG6=1 ‘ Set Pulse Width Mode (Use width Parameter) YPG7=0 ‘ Set Pulse Polarity to Normal (Positive) ‘ YAR1=1500;YAR2=2000;YAR3=2250;YAR4=2375 YAR1=2375;YAR2=2250;YAR3=2000;YAR4=1500 ‘ YPQ,1 ‘ Activate X Compare Function ‘ ‘ Start motion, and wait for end of motion -----------------------------------------YBG @while (YMS != 0) ‘ Wait for End Of Motion @endwhile ‘ ‘ Initialize the Compare in the opposite direction -------------------------------------------------YPQ,0 ‘ Disable Y Compare YPG2=-1 ‘ Set Compare Direction : NEGATIVE! YPG3=1 ‘ Set Compare Start Index: AR[1] YPG4=4 ‘ Set Compare End Index: AR[4] ‘ YAR1=2375;YAR2=2250;YAR3=2000;YAR4=1500 ‘ YPQ,1 ‘ Activate X Compare Function ‘ ‘ Start Backward X motion towards 0 position -------------------------------------------XAP=0;XBG 8-20 Control and Robotics Solutions Ltd. Revision 3.10, January 2005 8.2.7.2. SC-AT-2M Examples ‘ Disable any active compare for X Axis ‘ ------------------------------------XPQ,0 ‘ ‘ Configure Digital Output #1 to be assigned as an X Axis ‘ Compare Output (All other outputs are standard Outputs) ‘ ------------------------------------------------------XOM=1 ‘ (DOut1 is X Compare) ‘ ‘ Initialize X axis Motion Parameters and reset position ‘ -----------------------------------------------------XAC=1000000;XDC=1000000;XDL=1000000 XSP=100000;XPS=0;XMO=1;XAP=150000 ‘ ‘ Initialize the X Compare Function ----------------------------------XPG1=0 ‘ Set Mode 0 XPG2=40 ‘ Set Compare Distance XPG3=10000 ‘ Set Compare Start Position XPG4=100000 ‘ Set Compare End Position XPG5=2 ‘ Set Pulse Width (=3.9 µSec) XPG7=0 ‘ Set Pulse Polarity to Normal (Positive) XPQ,1 ‘ Activate X Compare Function ‘ ‘ Start X motion, and wait for end of motion -------------------------------------------XBG @while (XMS != 0) ‘ Wait for End Of Motion @endwhile ‘ ‘ Initialize the Compare in the opposite direction -------------------------------------------------XPQ,0 ‘ Disable X Compare XPG2=-40 ‘ Set Compare Distance Negative Direction! XPG3=100000 ‘ Set Compare Start Position XPG4=10000 ‘ Set Compare End Position XPQ,1 ‘ Activate X Compare Function ‘ ‘ Start Backward X motion towards 0 position -------------------------------------------XAP=0;XBG The next example demonstrates operation of the Y axis compare in table Mode 2. Initially the controller is programmed to execute a motion from 0 to 4000 counts, with the compare table initialized to generate pulses at locations 1500, 2000, 2250, 2375. When motion is terminated, a backward motion is programmed to generate pulses at the exact same locations, but when moving in the opposite direction. Control and Robotics Solutions Ltd. 8-21 SC-AT – Software User’s Manual and Commands Reference ‘ Disable any active compare for Y Axis ‘ ------------------------------------YPQ,0 ‘ ‘ Configure Digital Outputs #1 and #2 to be assigned to X,Y ‘ Compare outputs (All other outputs are standard Outputs) ‘ --------------------------------------------------------XOM=9 ‘ (DOut5 is X, DOut6 is Y) ‘ ‘ Initialize Y axis Motion Parameters and reset position ‘ -----------------------------------------------------YAC=1000000;YDC=1000000;YSP=100000;YPS=0;YMO=1;YAP=4000 ‘ ‘ Initialize the Compare Function, and Table Points ‘ Note that Table points MUST be INVERTED !! --------------------------------------------------YPG1=2 ‘ Set Mode 0 YPG2=1 ‘ Set Compare Direction : POSITIVE! YPG3=1 ‘ Set Compare Start Index: AR[1] YPG4=4 ‘ Set Compare End Index: AR[4] YPG5=2 ‘ Set Pulse Width : =3.9 µSec YPG7=0 ‘ Set Pulse Polarity to Normal (Positive) ‘ YAR1=1500;YAR2=2000;YAR3=2250;YAR4=2375 YAR1=2375;YAR2=2250;YAR3=2000;YAR4=1500 ‘ YPQ,1 ‘ Activate X Compare Function ‘ ‘ Start motion, and wait for end of motion -----------------------------------------YBG @while (YMS != 0) ‘ Wait for End Of Motion @endwhile ‘ ‘ Initialize the Compare in the opposite direction -------------------------------------------------YPQ,0 ‘ Disable Y Compare YPG2=-1 ‘ Set Compare Direction : NEGATIVE! YPG3=1 ‘ Set Compare Start Index: AR[1] YPG4=4 ‘ Set Compare End Index: AR[4] ‘ YAR1=2375;YAR2=2250;YAR3=2000;YAR4=1500 ‘ YPQ,1 ‘ Activate X Compare Function ‘ ‘ Start Backward X motion towards 0 position -------------------------------------------XAP=0;XBG 8-22 Control and Robotics Solutions Ltd. Revision 3.10, January 2005 8.3. Position Capture Events Position Capture (Latching) events is a hardware-supported feature of the SC-AT controllers encoder interface that provides the ability to latch the exact encoder position register based on an external or internal hardware pulse. The SC-AT hardware Capture mechanism support two type of trigger pulse sources: • Capture Position Based on an Encoder Index Pulse, and • Capture Position Based on a Digital Input Pulse. Being fully supported by the encoder hardware interface, the SC-AT hardware can capture positions (based on either Index or Inputs), at any encoder speed. There is no limitation on the motion velocity. This feature is useful to find exact (1 count resolution) homing location when operated on the encoder Index, and to synchronously latch multiple axes system locations when operated on digital inputs. The SC-AT-4M supports simultaneous capture on all of its four (4) axes. The SC-AT-2M supports simultaneous capture on both of its two (2) axes. The user can configure the Compare pulse source for each encoder independently from other channels. 8.3.1. Capture Modes 8.3.1.1. SC-AT-4M Capture Modes When operated on the Index pulse, the Capture uses the internal Index signal to latch the position. In this mode each axis can capture the position based only on its own Index pulse. When based on digital inputs, the user can select any one of the 32 digital input lines (general-purpose and dedicated inputs) to be the Capture pulse source for any axis, without any limitation. The same digital input line can be used to synchronously Capture location of all axes at once. Although each one of the controller’s digital inputs can be used as a Capture input, in the current hardware version only the first three (3) digital inputs (DInp1, DInp2, DInp3) are supported as fast TTL inputs. As normal inputs are optically isolated, using standard inputs for Capture introduces a delay of few microseconds. Fast inputs are TTL based, so no delay is present. 8.3.1.2. SC-AT-2M Capture Modes When operated on the Index pulse, the Capture uses the internal Index signal to latch the position. In this mode each axis can capture the position based on its own Index pulse and the latter axis, as well. When based on digital inputs, the user can select any one of Control and Robotics Solutions Ltd. 8-23 SC-AT – Software User’s Manual and Commands Reference the 10 digital input lines to be the Capture pulse source for any axis, without any limitation. The same digital input line can be used to synchronously Capture location of both axes at once. Although each one of the controller’s digital inputs can be used as a Capture input, in the current hardware version only two (2) digital inputs (DInp9, DInp10) are supported as fast TTL inputs. As normal inputs are optically isolated, using standard inputs for Capture introduces a delay of a few microseconds. Fast inputs are TTL based, so no delay is present. 8.3.2. Operating the Position Capture and Relevant Keywords The Capture function is independent to any other operation mode of the controller. The operation of Position Capture is very simple. The user only needs to set the Capture source signal configuration word, and the controller will automatically Capture positions whenever the Capture source pulse is detected. There is no special activation command for the Capture function, nor any special error codes related to it. The following dedicated Keywords are used to configure and work with the Capture function: • XN: Capture Index counter. • XC: Last Capture Position. • YOM: Configure the Capture Signal source for all axes. In the following sections the usage of these keyword is explained. 8.3.2.1. The Capture Events Counter – “XN” Each time the hardware Captures (Latches) a new location, the total number of Capture events (“XN”) is incremented by “1”. The user can reset this variable to “0”, and monitor its value to wait for a Capture event within a script program. This can be used for example to signal events to a host computer whenever a Capture event is sensed. “XN” is an axis related parameter keyword. Each axis holds its own Capture index counter. On the SC-AT-4M, only 4 axes are supported, so accessing “XN” with axes identifiers higher then “W” has no meaning. 8.3.2.2. The Capture Location – “XC” The last Captured location is stored by the controller firmware in the “XC” parameter for each axis independently (i.e.: XXC, YXC etc…). The user should note that when “PS” is updated, the value of “XC” is meaningless. The Capture feature implementation does not support hardware or software buffers. Whenever a Capture is detected, the last value of “XC” is overridden and lost. As indicated above, “XC” is an axis related parameter keyword. Each axis holds its own Captured Position Location value. On the SC-AT-4M, only 4 axes are supported, so accessing “XC” with axes identifiers higher then “W” has no meaning. 8-24 Control and Robotics Solutions Ltd. Revision 3.10, January 2005 8.3.2.3. Selection of Capture Source Pulse – “YOM” The user can configure the Capture pulse source by modifying the IO_MODE_1 register. This is (in the current firmware version) done using the “YOM” parameter (please see the “OM” keyword reference in this user’s manual for further information). This is a 32-bit array word, defined as follows: 8.3.2.3.1. SC-AT-4M - IO_MODE_1 - YOM Keyword IO_MODE_1 : Bits 31 ÷ 16 31 30 29 28 27 26 25 24 23 22 21 20 19 18 17 16 W Axis – Capture Source Select Z Axis – Capture Source Select 15 IO_MODE_1 : Bits 15 ÷ 0 14 13 12 11 10 9 8 7 6 5 4 3 2 1 0 Y Axis – Capture Source Select X Axis – Capture Source Select The IO_MODE_1 register is divided into 4 bytes, each one configuring the Capture Event Source for a separate axis. The LS Byte, controls the X Axis Capture Event configuration, and the MS Byte controls the W Axis Capture Event configuration respectively. The order of Bits in Each Byte is identical for all axes. The Bit order in each Byte is described below: • Bits [3 – 0]: selects the number of digital input to be used as a capture input trigger source for that axis: - Bits[3..0]=0, Select Digital Input #1 (DInp1) – Can be a Fast Input. - Bits[3..0]=1, Select Digital Input #2 (DInp2) – Can be a Fast Input. - Bits[3..0]=2, Select Digital Input #3 (DInp3) – Can be a Fast Input. - Bits[3..0]=3, Select Digital Input #4 (DInp4) – Standard Isolated Input Only. - …. - Bits[3..0]=15, Select Digital Input #15 (DInp15) – Standard Isolated Input Only. • Bit 4: selects weather the general-purpose Digital Inputs are used (i.e. DInp1 to DInp16), or weather the dedicated inputs are used (i.e. XRLS, XFLS, etc.). For a complete list of all dedicated inputs please see the “IP” keyword reference. Dedicated “IP” bits starting from Bit #16 (zero based) as X-RLS, and so on. - Bit 4 = 0 , Select General-Purpose Digital Inputs. - Bit 4 = 1 , Select Dedicated Digital Inputs. • Bit 5: select whether the capture is on one of the inputs defined by Bits[4..0], or on this axis Encoder Index Input: - Bit 5 = 0 , Select I/O’s as Capture Source. - Bit 5 = 1 , Select Indexes as Capture Source. • Bit 6 Select Input polarity: - Bit 6 = 0 , Select Normal (Positive) Pulse Polarity. - Bit 6 = 1 , Select Inverted (Negative) Pulse Polarity. • Bits 7 – 8: Reserved. Should be “0” for future compatibility. Control and Robotics Solutions Ltd. 8-25 SC-AT – Software User’s Manual and Commands Reference 8.3.2.3.2. SC-AT-2M - IO_MODE_1 – YOM Keyword 15 - 14 - 13 - 12 Pol IO_MODE_1 : Bits 15 ÷ 0 11 10 9 8 7 6 5 Y Axis – Capture Source Select 4 Pol 3 2 1 0 X Axis – Capture Source Select The order of Bits in Each Byte is identical for all axes. The Bit order in each Byte is described below: • Bits [3 – 0]: selects the X Axis – Capture Source: “0000” X Event source is DIN1. (0) “0001” X Event source is DIN2. (1) “0010” X Event source is DIN3. (2) “0011” X Event source is DIN4. (3) “0100” X Event source is DIN5. (4) “0101” X Event source is DIN6. (5) “0110” X Event source is DIN7. (6) “0111” X Event source is DIN8. (7) “1000” X Event source is DIN_FAST_9. (8) “1001” X Event source is DIN_FAST_10. (9) “1010” X Event source is INDEX X. (10) “1011” X Event source is INDEX Y. (11) • Bit 4 selects the polarity of the X axis capture event: Bit 4 = 0 Select Normal (Positive) Pulse Polarity. Bit 4 = 1 Select Inverted (Negative) Pulse Polarity. • Bit [7 – 5] – Reserved. Should be “0” for future compatibility. • Bits [11 – 8] selects the X Axis – Capture Source: “0000” Y Event source is DIN1. (0) “0001” Y Event source is DIN2. (1) “0010” Y Event source is DIN3. (2) “0011” Y Event source is DIN4. (3) “0100” Y Event source is DIN5. (4) “0101” Y Event source is DIN6. (5) “0110” Y Event source is DIN7. (6) “0111” Y Event source is DIN8. (7) “1000” Y Event source is DIN_FAST_9. (8) “1001” Y Event source is DIN_FAST_10. (9) “1010” Y Event source is INDEX Y. (10) “1011” Y Event source is INDEX X. (11) • Bit 12 selects the polarity of the Y axis capture event: Bit 12 = 0 , Select Normal (Positive) Pulse Polarity. Bit 12 = 1 , Select Inverted (Negative) Pulse Polarity. • Bits 31 – 13 : Reserved. Should be “0” for future compatibility. 8-26 Control and Robotics Solutions Ltd. Revision 3.10, January 2005 8.3.3. Configuring Fast Digital Inputs for the Capture Function The SC-AT-4M controller board supports the first four (4) of its general-purpose inputs (DInp1, DInp2, DInp3 and DInp4) as Fast Inputs. By default, Fast Inputs are NOT enabled, but rather the standard isolated Input interface is installed. In order to enable Fast Inputs, the electrical interface should be modified, and then the software must be configured to read the Fast Inputs. This section describes the required operations to support Fast Inputs on the SC-AT-4M controller. Please refer to the “SC-AT-4M Hardware User’s Manual” for further information about the SC-AT4M hardware interfaces. Note: Fast and Standard Inputs are using different physical electrical path to the SC-AT-4M controller CPU core. This means that in order to read Fast Inputs, both the actual physical interface, as well as the software configuration MUST be modified accordingly. If the software setup does not match the actual physical configuration, the designated fast Inputs will not be accessible by the controller software. The SC-AT-2M has two dedicated fast inputs (Din9Fasr and Din10Fast). There is no special configuration required for fast digital inputs in the SC-AT-2M. 8.3.3.1. Configuring the Software to Access Fast Inputs – SC-AT-4M Only Once Fast Inputs are enabled by the hardware, the user should configure the software to read the Fast Inputs. This is done by setting Bits #24, #25, #26 and #27 in IO_MODE_0 for Din1, DInp2, DInp3 and DInp4 respectively. • Each bit set to “1” defines an input select as Fast (TTL) Input. • Each bit set to “0” defines an input select as Standard (isolated) Input. The value of IO_MODE_0 is configured using the “XOM” parameter keyword. Please see section 8.2.6.1 above and the “OM” keyword reference in this user’s manual for further information. 8.3.3.2. Electrical Configuration for Fast Digital Inputs – SC-AT-4M Only All standard digital inputs of the SC-AT-4M board are optically isolated by the hardware design. However, as noted, this standard electrical interface does not allow fast input pulses to be transported. For that purpose the SC-AT-4M board design support an optional electrical (physical) configuration to bypass the digital inputs isolation. Control and Robotics Solutions Ltd. 8-27 SC-AT – Software User’s Manual and Commands Reference In the SC-AT-4M Controller: Fast Inputs are configured by removing 0Ω resistors: R114, R117, R128, R131 and reinstalling them in R7, R14, R15, R12 for inputs 1, 2, 3 and 4 respectively. Standard Inputs are configured by removing 0Ω resistors: R7, R14, R15, R12 and reinstalling them in R114, R117, R128, R131 for inputs 1, 2, 3 and 4 respectively. Notes: • If standard input interface is used, Capture might not work properly for short input pulses. It is recommended to work with Fast Inputs configuration. • When Capture is based on a digital input which is connected to one of the controller’s Fast Outputs (when Compare and Capture are operated simultaneously), Fast Inputs and outputs MUST be used, since the Compare Pulse might be to short. • The resistors indicated above (for the fast and standard interface options) MUST not be installed simultaneously. Electrical damage might be caused to the SC-4M board if not done so. • Please refer to the “SC-AT Hardware User’s Manual” for further information about the SC-AT hardware interfaces. 8.3.4. Position Capture Events Examples 8.3.4.1. SC-AT-4M Position Capture Events Examples The following example demonstrates usage of the Capture and Compare functions. The X axis is programmed to generate Compare pulses on fixed GAP. The pulses are directed to Fast Digital Output #1. It is assumed that DOut #1 is physically connected to DInp #1. Axes X and Y are then programmed to Capture their locations on each Compare pulse. The Captured X position should be identical to the desired Compare position. The Captures Y position reflects the Y axis location when X was commanded to generate the Compare pulse. The captured positions are then sent through the CAN bus to a host computer. The Compare GAP is programmed to 200 encoder counts, while motion is at 100,000counts/sec. The resulted Compare frequency is 500 Hz. This application can be used when an X/Y scan is made, and in order to know the exact planar location of the system on each compare pulse. 8-28 Control and Robotics Solutions Ltd. Revision 3.10, January 2005 ‘ Disable any active compare for X Axis ‘ ------------------------------------XPQ,0 ‘ ‘ Configure IO_MODE_0: DOut#1 assigned as X Compare, and DInp#1 ‘ as Fast Output: XOM = 4 + 2^24 = 16777220 ‘ Configure IO_MODE_1: X Y use DInp#1 as their Capture Source. ‘ ------------------------------------------------------------XOM=16777220 ‘ Set IO_MODE_0 YOM=0 ‘ Set IO_MODE_1 (X/Y Use DInp#1 for Capture) ‘ ‘ Initialize X/Y axis Motion Parameters and reset position ‘ -------------------------------------------------------BAC=1000000;BDC=1000000;BDL=1000000 BSP=100000;BPS=0;BMO=1;BAP=150000 ‘ ‘ Initialize the X Compare Function ----------------------------------XPG1=0 ‘ Set Mode 0 XPG2=200 ‘ Set Compare Distance XPG3=10000 ‘ Set Compare Start Position XPG4=100000 ‘ Set Compare End Position XPG5=3 ‘ Set Pulse Width (=3.9 µSec) XPG6=1 ‘ Set Pulse Width Mode (Use width Parameter) XPG7=0 ‘ Set Pulse Polarity to Normal (Positive) XPQ,1 ‘ Activate X Compare Function ‘ ‘ Start X/Y motion, and enter a Loop to wait for the Compare ‘ Pulses. Pulses are counted and after 100 the loop ends. -----------------------------------------------------------BXN=0;XIA1=0 XZI1=3 ‘ Remote MSG sent to CAN Address = 3 BBG #XCAPI1: @while (XXN == XIA1) @endwhile @ XIA1=XXN @ XIA1=XIA1+1 BXC};XZM,2 @if (XIA1 > 100) XJP,#XCAPIEND @endif ‘ Wait for Next Event ‘ Increment counter ‘ Send Last Event ‘ Check End Condition XJP,#XCAPI1 #XCAPIEND: XZM,"END" XQH ‘ Program Done. Note that since X and Y Capture occurs simultaneously, we check only XXN to detect next event. Control and Robotics Solutions Ltd. 8-29 SC-AT – Software User’s Manual and Commands Reference The next example demonstrates simple usage of the Capture mechanism to latch the Index location of the X axis. This can be combined in a simple Homing process to perform exact Index based homing process. This can be done at any motion speed. It is recommended to check that only One Index was found (usually in Rotary Motors), to avoid full motor revolution homing index error. ‘ Initialize X axis Motion Parameters and reset position ‘ -----------------------------------------------------XAC=100000;XDC=100000;XDL=100000 XSP=10000;XPS=0;XMO=1;XAP=10000 ‘ ‘ Configure IO_MODE_1: Use X Axis Compare on Index ‘ -----------------------------------------------YOM=32 ‘ Set IO_MODE_1 – X Compare on Index ‘ ‘ Start X motion, and enter a Loop to wait for the Index ‘ Pulse -------------------------------------------------------XXN=0 XBG @while (!XXN) @endwhile ‘ Wait for Next Index ‘ Index is found. Stop the motion. The Index location ‘ is stored in XXC. Stop the program. ‘ ---------------------------------------------------XST XQH 8.3.4.2. SC-AT-2M Position Capture Events Examples The following example demonstrates usage of the Capture and Compare functions. The X axis is programmed to generate Compare pulses on fixed GAP. The pulses are directed to Fast Digital Output #5. It is assumed that DOut #5 is physically connected to DInp #9. Axes X and Y are then programmed to Capture their locations on each Compare pulse. The Captured X position should be identical to the desired Compare position. The Captures Y position reflects the Y axis location when X was commanded to generate the Compare pulse. The captured positions are then sent through the CAN bus to a host computer. The Compare GAP is programmed to 200 encoder counts, while motion is at 100,000counts/sec. The resulted Compare frequency is 500 Hz. This application can be used when an X/Y scan is made, and in order to know the exact planar location of the system on each compare pulse. 8-30 Control and Robotics Solutions Ltd. Revision 3.10, January 2005 ‘ Disable any active compare for X Axis ‘ ------------------------------------XPQ,0 ‘ ‘ Configure IO_MODE_0: DOut#5 assigned as X Compare ‘ Configure IO_MODE_1: X Y use DInp#1 as their Capture Source. ‘ ------------------------------------------------------------XOM=1 ‘ Set IO_MODE_0 YOM=2056 ‘ Set IO_MODE_1 (X/Y Use DInp#9 for Capture) ‘ ‘ Initialize X/Y axis Motion Parameters and reset position ‘ -------------------------------------------------------BAC=1000000;BDC=1000000;BDL=1000000 BSP=100000;BPS=0;BMO=1;BAP=150000 ‘ ‘ Initialize the X Compare Function ----------------------------------XPG1=0 ‘ Set Mode 0 XPG2=200 ‘ Set Compare Distance XPG3=10000 ‘ Set Compare Start Position XPG4=100000 ‘ Set Compare End Position XPG5=2 ‘ Set Pulse Width (=3.9 µSec) XPG7=0 ‘ Set Pulse Polarity to Normal (Positive) XPQ,1 ‘ Activate X Compare Function ‘ ‘ Start X/Y motion, and enter a Loop to wait for the Compare ‘ Pulses. Pulses are counted and after 100 the loop ends. -----------------------------------------------------------BXN=0;XIA1=0 XZI1=3 ‘ Remote MSG sent to CAN Address = 3 BBG #XCAPI1: @while (XXN == XIA1) @endwhile @ XIA1=XXN @ XIA1=XIA1+1 BXC};XZM,2 @if (XIA1 > 100) XJP,#XCAPIEND @endif ‘ Wait for Next Event ‘ Increment counter ‘ Send Last Event ‘ Check End Condition XJP,#XCAPI1 #XCAPIEND: XZM,"END" XQH ‘ Program Done. Note that since X and Y Capture occurs simultaneously, we check only XXN to detect next event. Control and Robotics Solutions Ltd. 8-31 SC-AT – Software User’s Manual and Commands Reference The next example demonstrates simple usage of the Capture mechanism to latch the Index location of the X axis. This can be combined in a simple Homing process to perform exact Index based homing process. This can be done at any motion speed. It is recommended to check that only One Index was found (usually in Rotary Motors), to avoid full motor revolution homing index error. ‘ Initialize X axis Motion Parameters and reset position ‘ -----------------------------------------------------XAC=100000;XDC=100000;XDL=100000 XSP=10000;XPS=0;XMO=1;XAP=10000 ‘ ‘ Configure IO_MODE_1: Use X Axis Compare on Index ‘ -----------------------------------------------YOM=10 ‘ Set IO_MODE_1 – X Compare on Index ‘ ‘ Start X motion, and enter a Loop to wait for the Index ‘ Pulse -------------------------------------------------------XXN=0 XBG @while (!XXN) @endwhile ‘ Wait for Next Index ‘ Index is found. Stop the motion. The Index location ‘ is stored in XXC. Stop the program. ‘ ---------------------------------------------------XST XQH 8-32 Control and Robotics Solutions Ltd. Revision 3.10, January 2005 8.4. Auxiliary Analog Input Interfaces The SC-AT-4M has four (4) general-purpose analog inputs. The SC-AT-2M has two (2) general-purpose analog inputs. Analog inputs are nominally ±10v and are converted using 12 bits A2D’s in the SC-AT4M, and 10 or 12 bits A2D’s in the SC-AT-2M. When working with 10 bit A2D’s, at least ±2 LSB’s noise (±4 bits, i.e. 8 bits p-t-p noise level) should be expected. This can be reduced by lowering the effective resolution to 10 bits, by using Gain Factor “GF >= 2” (see exact “AI” computation formula below). The analog input values, as can be reported by the “AI” parameter (XAI / YAI in the SCAT-2M and XAI / YAI / ZAI / WAI in the SC-AT-4M) are, of course, a function of the analog input voltage (Ainp in [v] units) but are also a function of a set of scaling and offset parameters as explained below. The following figure shows a schematic block diagram of the Analog Input Software Parameters: Hardware Software AS - Ainp [v] A2D + Σ AI AG × 2 -AF H/W A2D Gain=2047/10 Figure 8-1: Analog Input Scaling Block Diagram Note: On the SC-AT-4M, the analog inputs are sampled at the servo-sampling rate (16 kHz). In the SC-AT-2M, the analog inputs are sampled at ~ 1kHz (each input is sampled every 8 Servo cycles). For a complete description of the Analog Inputs Hardware circuits, please refer to the SC-AT products Hardware User’s Manuals reference. The analog input value is calculated and reported by the software variable “AI” according to the following equation: Control and Robotics Solutions Ltd. 8-33 SC-AT – Software User’s Manual and Commands Reference [ AI = Floor ( Ainp × A2 DHWGain − AS ) × AG × 2 − AF ] Notes: • Floor(x) truncates any non integer value to an integer value towards minus infinity. • Ainp × A2DHWGain is in the range of: -10v analog input result in nominal A2D reading of “0”, 0v analog input result in nominal A2D reading of “2047” and a +10v analog input result in nominal A2D reading of “4095”. • AS, The Analog Offset parameter is in the range of: [0 ÷ 4095]. • Note that “AS” is decremented from the actual (positive) A2D reading value, so for example, in order to nominally achieved a symmetric AI reading, the value of “AS” should be +2047 and not –2047. • The current implementation of “AI” computation formula dose not uses a dead-band function (although the dead-band parameter “AD” is supported, but has no effect). • AG and AF parameters (the Analog Gain and Gain Offset) can be used to achieve any effective gain in the range of : ±219 (±524,288) to ±1/65,536. • AG range is: ±219 (±524,288). • AF range is: [0 ÷ 16], i.e. Gain Factor can be : [1/1 ÷ 1/65,536]. • The AG and AF parameters can be used to achieve very high or very low gains, or can combined together to achieve accurate floating point gains. For example, to achieve an overall gain of 4.125, use AG=33, and AF=3. Using the AG and AF parameters, the user can define any desired range for the AI value. For example, if: XAS=2047;XAG=100;XAF=2 and the analog input varies in the range of ±10 [v], Then: XAI = ±10 * (2047/10) × (100 × 2-2) = ±51,175 This is required for the Joystick motion modes. For example, the AI parameter is used as a speed reference for the Velocity Based Joystick Mode. Using “AG” and “AF”, the AI value can be scaled to any desired velocity range. “AS” can be used to compensate joystick or analog input circuits offsets. Note that nominally, “AS” should be 2047 to achieve “AI=0” for nominal 0v analog input value. “AD” (the analog dead-band) is required for the Velocity Based Joystick Mode. Standard joysticks do not always return to the same zero value when they are released. This may cause a small velocity “drift” motion. “AD” can be used to define a range, at which the analog input will be read as zero, avoiding any undesired motion. In case a simple analog input reading is required, set parameters as follows: AD=0, AS=2047, AG=1 and AF=0. This will provide a standard reading of ±2047 for an input of approximately ±10 [v]. As noted, the dead-band function is not implemented in firmware revision 2.05/C. This will be included in future revisions. 8-34 Control and Robotics Solutions Ltd. Revision 3.10, January 2005 8.5. Support for DC Brushless Motors - Sin Commutation (SC-AT-4M Only) 8.5.1. General Background In an ideal DC servomotor, the motor’s torque (or force in linear motors) is linearly proportional to the motor’s current, and is given by the following simple equation: Tm = Kt × Im where: Tm Kt Im - Is the Motor’s torque (or force), - Is the motor torque (or force) constant, - Is the motor equivalent DC current. For DC type servomotor, it is assumed of course that the motor current vector is ideally perpendicular to the magnetic field at all times. If the current vector is parallel to the magnetic field, the motor will produce no torque at all (like in stepper operation mode). Any deviation in the orthogonality of the current vector in relation to the magnetic field can be considered as a disturbance (or non-linearity) of the motor’s torque constant parameter Kt. This disturbance is in general, a SIN function of the rotor position in reference to the magnetic poles location of the motor. In DC Brush type motors, it is the brush collector (sometimes referred to as the commutator) that mechanically distributes the motor current among the rotor windings in order for the armature current vector to remain perpendicular to the stator magnetic field, regardless of the actual rotor position. In traditional 3-Phase brushless DC motors (BLDC), the current commutation is done electrically by the driver, based on coarse position sensors (Hall Effect Sensors). This commutation method is referred to as Hall Bases Trapezoidal or 6 Step commutation. The Hall effect sensors can locate the relative rotor position in reference to the absolute magnetic poles, within 6 segments (60° each), for a complete 360° of the magnetic cycle (or pitch). In standard Trapezoidal (or 6 Step) commutation, the current flowing through the 3 motor phases is constant during each full 60° segment. Typically, in each segment, the current flows through 2 phases only, while the third phase has “0” current. It is a common standard in this method that the motor’s driver receives a single ±10v current command from the servo controller, and based on the motor Hall Effect Sensor signals generates all 3 phase currents according to the correct sequence. The main shortcoming of this method is that motors operating in Trapezoidal commutation shows a very non linear torque constant, with high ripple (disturbance) torques (forces) at constant input currents. Control and Robotics Solutions Ltd. 8-35 SC-AT – Software User’s Manual and Commands Reference Being directly related to the rotor magnetic position, the disturbance torque frequency depends on the motor velocity, and can have a dramatic effect on overall system performances, as the bandwidth of this disturbance can span over a frequency range from “0” to hundreds of Hz. From the servo-controller aspect, both DC Brush type and DC Brushless (BLDC) motors working in trapezoidal commutation method are similar. 8.5.2. Sin Commutation in BLDC Motors In order to overcome the main shortcoming described above, a continuous Sinusoidal Commutation is used. In this method, instead of fixing the motor phase currents throughout the 60° segments, the currents are continuously (sin based function) changed over the full 360° magnetic cycle. In this case the motor torque constant can be near ideal, with only negligible disturbance torques left (mainly due to lower magnitude - second order - non linearities, which are not under the scope of this discussion). In order to operate a 3 Phase BLDC motor in sinusoidal commutation method, an accurate position of the magnetic rotor location is necessary (i.e. the absolute rotor position in relation to the magnetic cycle). This can be achieved by using an analog position sensor, or more naturally, by using the system digital encoder location. The later method is of course much more reliable, accurate, and does not require a dedicated analog position sensor (cost money) for that purpose. As all modern servo-control systems usually use an incremental encoder feedback sensor, deriving the true rotor position with high accuracy is natural. The main issue to take care of is the initial magnetic angle offset due to the use of an incremental encoder rather then an absolute one (after power up the system does not know its true absolute position). Please refer to the next section for more discussion about magnetic offset phase initialization. In Sinusoidal Commutation it is the servo controller who is responsible for the continuous phase currents distribution. An internal software algorithm takes the servo loop current command, and generates two phase commands according to the following equation: Ia = I × sin(ϕ ) Ib = I × sin(ϕ − 120 ο ) where: I Ia Ib ϕ 8-36 - Is the total armature current command (the servo loop output), - Is the current command for motor phase a, - Is the current command for motor phase b, and - Is the magnetic position of the armature relative to the magnetic poles. Control and Robotics Solutions Ltd. Revision 3.10, January 2005 As shown above, in this mode the controller provide 2 separate current commands (Ia and Ib, each one standard ±10v format) for each channel operating in SIN commutation. The analog commands are issued from the SC-AT-4M servo-controller to a SIN 3 phase driver, through the “Acmd” (Main DAC) and “AcmdAux” (Aux DAC) signals. Please refer to the SC-4M-SA hardware reference manual and to Figure 6-1: Position Over Velocity Loop (PIV) Control Scheme Structure and Figure 6-2 of this User’s Manual for more information. A dedicated SIN power amplifier receives as an input the 2 analog commands (from the controller), and internally derive the third phase command based on the condition that the sum of all 3 phase currents must be zero. The following sections describe the SIN Commutation configuration parameters of the SC-AT-4M. Please see section 10.5 below (in this User’s Manual) for a complete syntax and description of each keyword below. 8.5.2.1. Enable SIN Commutation Mode – New bit in CG By default, the SC-AT-4M servo controller assumes that standard DC brush (or brushless with trapezoidal hall commutation) type motors are used. In this mode the controller uses only the main DAC output of each axis as an analog command output of the servo loop. In order to enable SIN commutation, a dedicated configuration bit in “CG” (the axis configuration word) should be set. Bit #2 (zero based) of “CG” control this mode (each axis has its own configuration bit within the axis CG word): • CG[2 zero-based] = 0 : Disable SIN mode. • CG[2 zero-based] = 1 : Enables SIN mode. In order for the controller to work in SIN commutation mode, the relevant bit in “CG” should be set for the desired axis, and the configuration should be saved in the FLASH or script program. Note that “CG” can be updated only while a motor is disabled (i.e. MO=0). Note: Current firmware versions of the SC-4M support SIN commutation on X and Y axes only. Future revisions will support all 4 servo axes for that mode. 8.5.2.2. The Magnetic Pitch Definition – MP In order to be able to correctly perform the SIN function computation, the controller needs to know the scaling between the main position sensor readings (encoder counts resolution) to the actual (physical) magnetic position. The scaling is defined with a new parameter, “MP” or Magnetic Pitch. The Magnetic Pitch represents the actual full 360° magnetic cycle, scaled to encoder counts. This Control and Robotics Solutions Ltd. 8-37 SC-AT – Software User’s Manual and Commands Reference number should be set once per a given motor and encoder configuration, and should never change. For Example: In a linear brushless motor application, having a magnetic cycle of 60.96 mm (2.4 inch) configured with a linear encoder having final resolution of 0.25 microns per count (4 counts per micron), the magnetic pitch in encoder counts is equal to: MP = 60,960 µm × 4 counts / µm = 243,840 counts Note that some motor manufacturers provide the magnetic pitch distance for 180° magnetic degrees and not 360°. In the SC-4M, “MP” must be equal to full 360° magnetic degrees, i.e. equal to the distance between N-S-N poles (and not N-S only). 8.5.2.3. The Actual Magnetic Location – ML The magnetic pitch (“MP”) defined above, is a constant number (per application) used by the controller to know how many counts are in 360° of the magnetic cycle. As noted above, this parameter should be set once and does should not change during system operation. During operation, in order to compute the instantaneous projection of the current command I to the phase currents Ia and Ib (as noted by the equation in section 8.5.2 above), the true magnetic location angle ϕ should be known at all times. A new real time parameter “ML” (Magnetic Location) holds this position (in encoder count units). “ML” is continuously updated by the real time code, to reflect any change in the encoder position, but unlike the main encoder counter reading “PS”, the “ML” is always held in the range of: 0 ≤ ML ≤ MP. If position is incremented above the value of “MP” (more then 360°), or decrements below 0°, “ML” is automatically modulated to remain in the 0 ≤ ML ≤ MP range. The true magnetic location angle ϕ is computed as follows: ϕο = ML × 360 ο MP As noted, like the true encoder position “PS”, “ML” is continuously updated by the real time code at all times while the controller is operating. “ML” is however not effected when “PS” value is changed. Users can set a value to “ML” in the range of : 0 ≤ ML ≤ MP, to define the offset between the incremental position reading and the true (absolute physical) magnetic 0° location. The initial offset of “ML” should be set ONLY during the “Phase Initialization Process” as explained in the following section. Changing “ML” value after phase initialization, during normal operation in SIN commutation mode, will cause abrupt undesired motion and should be avoided. 8-38 Control and Robotics Solutions Ltd. Revision 3.10, January 2005 8.5.2.4. Phase Initialization Process For correct sinusoidal commutation operation, the exact absolute (up to few electrical degrees) magnetic (or electrical) angle should be known. In a system using incremental position sensor (typically like an encoder), the true absolute physical position after power up is not known. Thus, in the absence of hall effect sensors to provide this information, in order to operate in SIN mode, each time the controller is powered up, a phase initialization process should be performed. The Phase Initialization Process “finds” the true absolute magnetic angle of the system by bringing the motor to a known magnetic equilibrium point, and then stets a correct offset value to “ML” (the real time magnetic location parameter). From that point on, “ML” is updated automatically and holds the true absolute magnetic position. A simple technique for DCBL motors phase initialization process is first to place the rotor into predetermined position, for example, by feeding the two motor phases directly. As constant (DC) current feeds two motor phases, motor torque is a known sinusoidal function of rotor (electrical) angle. The Sinusoidal motor torque curve on one electrical revolution has two zero crossing points: one of them represents a stable equilibrium, and the other – a non-stable one. Note that the equilibrium point is a location, where the motor produces zero force, regardless of the current that flows through its phases. 90° from that point, the motor force is at its maximum peak for a given current. This is where we ideally want to be at all times during normal operation in SIN mode. In the SC-AT-4M servo controller, when the stable equilibrium point is found, the magnetic location offset from that point should be set to -90° (or +270°) electrical degrees: ML@ Stable EQ Point = 3 × MP 4 For the above technique, a worst case “magnetic alignment” movement from a random initial rotor position to a stable state is one half of electrical revolution (±180° electrical degrees, or “MP/2”). This worst case is achieved if initial rotor position almost coincides with a non-stable equilibrium point. We suppose that a motor is not stuck near or at a non-stable equilibrium position (it is theoretically possible for relatively high Coulomb friction). The Phase Initialization Script Example shown below demonstrates how to deal with both coulomb friction and mechanical end of travel limits. There are more efficient methods that implements phase initialization with much smaller rotor movement (few electrical degrees only). These methods involve monitoring the initial phase and closing a loop to minimize the “magnetic alignment” movement. An automatic Phase Initialization Process method that keeps small “magnetic alignment” movement will be presented in future firmware versions of the SC-4M servo-controller. Control and Robotics Solutions Ltd. 8-39 SC-AT – Software User’s Manual and Commands Reference 8.5.2.5. Analog Commands in SIN Mode and Open Loop Operation – NC The SC-4M has 8 analog command outputs (all 16 bit resolution). In normal mode (SIN commutation disabled) the 4 main analog outputs (DAC 1 ÷ 4) are used as the servo drive commands, and the 4 auxiliary analog outputs (DAC 5 ÷ 8) are used for generalpurposes. The “NC” and “TC” parameters allow direct control over the 4 main DAC outputs of the controller in “Open Loop” mode (when control loop is disabled). The “AO” parameter allows direct control over the 4 auxiliary DAC outputs regardless of the “NC” state. Note that After power up, the controller is always initialized to close loop operation mode: NC=0. When SIN mode is disabled, NC=1 enables open loop operation. “TC” can be set in the range of: ±32,767 to set the main analog command outputs in the range of ±10v. Similarly, “AO” can be set in the range of: ±32,767 to set the auxiliary analog commands in the range of ±10v. When SIN mode is enabled, the Main and Auxiliary DAC outputs are used to drive motor Phases A and B respectively. In this case (SIN mode is Enabled), “NC” has few possible modes of operation as described below: • NC=0 – Close Loop: The axis is configured for close loop operation. Phase A and B commands are issued according to the normal SIN commutation equation given in section 8.5.2 above. • NC=1 – Open Loop Desecrate Phase Commands: “TC” directly set the Main DAC command, and “AO” directly set the Auxiliary DAC command. “TC” and “AO” can be set independently. This mode is used during the phase initialization process, to fix the rotor in a known equilibrium point position (see homing example below). Ia Command = TC , IbCommand = AO • NC=2 – Open Loop SIN Commutation BLDC Mode: In this mode, “TC” is set as the equivalent vector current command, and the controller performs the SIN commutation projection according to the Magnetic Location (ϕ=ML/MP x 360°). This mode can be used to provide normal open loop current command only after phase initialization process is completed. Ia Command = TC × sin(ϕ ) IbCommand = TC × sin(ϕ − 120 ο ) In this mode, when “TC” is constant, the motor will produce a constant torque (or force) according to: “T = I x Kt”, and will start to accelerate. 8-40 Control and Robotics Solutions Ltd. Revision 3.10, January 2005 • NC=3 – Open Loop SIN Commutation Stepper Mode: Like in NC=2, in this mode also “TC” is set as the equivalent vector current command, but the controller performs the SIN commutation projection according to a user defined magnetic angle (Global Servo Parameters Array: CA[0]), and not related to the true Magnetic Location (“ML”). The current command equations in this mode are: Ia Command = TC × sin(θ ) IbCommand = TC × sin(θ − 120 ο ) where : θ = CA[0] × 360 ο MP In this operation mode, when “TC” and “CA[0]” are both constant, the motor will be locked in a stable equilibrium point (like a stepper motor holding in its position). “TC” set the motor “Holding Torque”, and “CA[0]” can directly control the rotor phase angle. By increasing or decreasing the value of “CA[0]”, the motor can be moved back and forward (again, much like a stepper motor is controlled). Note that this is still an open loop mode. The actual encoder reading is dis-regarded and no servo loop is performed. This operation mode can be used to allow moving the motor in open loop mode, before phase initialization process is completed. For example, if during the phase initialization mode a mechanical limit is detected, the motor can be commanded for a controlled (open loop) motion to get away from the limit. This mode can also be used to overcome coulomb friction problems during the phase initialization process. The mode can further be used for advanced phase initialization processes. Notes: • Both the Main and Auxiliary DAC commands can be inverted by the hardware using the dedicated configuration bits in “CG” (please refer to the “CG” command reference for more information about “CG” bits). When the Main or Aux DAC commands are inverted, the effect on both “TC” and “AO” should be considered carefully when operating in SIN mode. Switching only one phase command direction in SIN mode can effectively change the commutation sequence and take the motor out of its phase initialization point. If motor direction is to be inverted, both the Main and Aux channels should be inverted. • When the SIN mode commutation enable flag is ON ( CG[2zero-based] = 1 ) and the motor is disabled (MO=0), the real time servo loop automatically reset the value of “AO” (Phase B command) to zero, so any assignment to “AO” has no effect. 8.5.2.6. Analog Offset Calibration In the discussion and SIN mode equation presented above, it is clearly assumed that the command amplitude (at peak Sin level of “1”) is identical for both motor phases. In the presents of an analog offset on either Phase A or B commands, motor performance can dramatically deteriorate due to increased force ripple during rotor movement. The analog offset will directly effect the phases current balance and will increase the overall total motor ripple forces. The following equation simply explains this condition: Control and Robotics Solutions Ltd. 8-41 SC-AT – Software User’s Manual and Commands Reference Ia = I × sin(ϕ ) + Offset Ib = I × sin(ϕ − 120 ο ) It is thus very much recommended to tune the analog offset to as near as possible to zero level when working in SIN mode commutation with BLDC motors. On the SC-4M new hardware revisions, the analog offset value is kept to a minimum level by using accurate analog circuits (0.1%). However, offset can still appear on the analog Main and Aux commands. The “DO” (DAC Offset) command should be used to eliminate the analog offset completely. Please see the “DO” command reference for more information. 8.5.2.7. Phase Initialization Script Routine Examples In this section an example is given to demonstrate a phase initialization process for a linear motor stage application with SIN commutation mode operation. The application uses an X axis high resolution linear motor stage, with a linear 1 micron resolution encoder. The motor’s magnetic pitch is 32 mm, i.e. 32,000 counts (MP=32,000). The initialization point is at –90°, i.e. ML=24,000. The main initialization script routine is “ #COMM_X: ”. The routine initializes global parameters (such as the magnetic pitch, SIN Enable mode bit, etc.), and then gradually increases Phase #2 current command: “AO”. Note that this process is done in open loop mode NC=1, to allow separate desecrate phase command for each one of the phases. Phase #2 current command is increased gradually. In this case in 250 lsb steps (~0.8% of the full current command), each 250msec apart. This is done to avoid abrupt jump in motor location if its initial position is far from the magnetic 0° stable equilibrium point (mainly near the 180° un-stable equilibrium point). During the gradual increase of the Phase #2 current command, we jitter Phase #1 current command (“TC”) in the range of ±500 lsb (~1.5% of the full current command). This is done since if the initial start point is near the 180° un-stable equilibrium point (reference to Phase #2), the current flowing through Phase #1 will not produce any effective force. In this case the motor can be stuck in its un-stable eq. Point, and wrong initialization phase can be assumed. If a small current command to Phase #2 is also applied, the motor will be forced out of its un-stable eq. Point, and will settle at the stable point for correct initialization. Once motor is near its stable eq. Point (referenced to Phase #2), Phase #1 command is reduced to zero (TC=0). The final current commands when the motor is held in its stable equilibrium point is 8,000 lsb (~25% of the full current command) in Phase #2 (AO=8,000), and zero current command in Phase #1 (TC=0). 8-42 Control and Robotics Solutions Ltd. Revision 3.10, January 2005 Note that actual current command values, as well as other initialization process parameters, such as the magnetic pitch, Phase #2 command step resolution, the delay periods, Phase #1 jitter current values etc. are application specific and should be tuned for each electro-mechanical configuration (motor type, stage masses, friction forces, etc.). In general, the higher the friction forces are, greater phase command values will be required. This applies to both the main (Phase #2) command value, and the jitter (Phase #1) command value. Once the motor is settled in its stable equilibrium point, the initialization process is done, and the magnetic offset should then be set to -90° (or +270°). In our case: ML=24,000 counts. Before concluding the initialization process and setting the magnetic offset angle, we check that the motor is not mechanically stuck in one of its mechanical hardtops. The hardware limit switches status is checked for that purpose. If one of the limits is “ON”, we must assume that the motor is stuck in a mechanical hardtop, and recover from that situation, otherwise, again, wrong initialization phase can be assumed. This is done by calling another subroutines (“#XMOV_P:” and “#XMOV_P:”). These subroutines enter the motor to NC=3 (Open Loop SIN Commutation Stepper Mode), and then start to slowly change the phase angle until at least a full magnetic cycle is completed (we actually guarantee that 1.5 full cycles are completed). Note that in this mode the motor is moving in Open Loop Stepper mode operation ! Once this is completed, the main function calls itself again to complete the initialization process once again. It is assumed that the second time the function is executed no hardware limits will be sensed. Error recovery tests can be added to avoid staying locked within an infinite loop in case of un-expected problems. For example, the second call to the main function should not try to re-call itself again. For the sake of code simplicity and clarity, error recovery tests are not implemented in the examples below. Users can of course include them for more robust software application interfaces. Control and Robotics Solutions Ltd. 8-43 SC-AT – Software User’s Manual and Commands Reference ' ' SIN Mode Phase Initialization Process for a Linear Motor ' -------------------------------------------------------#COMM_X: ' XMO=0;XPS=0 ' Disable Motor and Set Zero Position XMP=32000 ' Set Magnetic Pitch @XCG = XCG | 4 ' Enable SIN Commutation Mode in CG XNC=1;XAO=0 ' Switch to Open Loop (Desecrate phases) XER=64000 ' Increase Error for the process XMO=1 ‘ Enable the motor ' ' Excite Phase#2 (XAO), gradually. While doing so jitter Phase#1 ' to avoid stick in 180° dead-lock (non-stable equilibrium point) ' -------------------------------------------------------------@for (temp1 = 250 ; temp1 < 6000 ; temp1=temp1+250) @ XAO=temp1 ' Set Phase #2 command XTC=500 ' Jitter Phase #1 +500 lsb TimerX=4000;WaitTimerX() ' 1/4 Sec delay @ temp1=temp1+250 ' Increase Phase #2 command @ XAO=temp1 XTC=-500 ' Jitter Phase #1 -500 lsb TimerX=4000;WaitTimerX() ' 1/4 Sec delay @endfor ' XAO=8000 ' Hold Phase #2 at 25% of Full Current Command XTC=0 ' Hold Phase #1 at 0% Current Command ' ' Check that we are not mechanically stuck in either RLS or FLS. ' This will cause error in Phase Init. If we are in one of the ' limits, we call a function to Go Out of the relevant Limit in ' STEPPER Mode (NC=3), and then call Ourselves Again to re-Init. ' -------------------------------------------------------------@if (XIP & IP_MASK_XRLS) XCS,#XMOV_P ' Call the Move Away from RLS Func. XCS,#COMM_X ' Call Ourselves Again @endif ' @if (XIP & IP_MASK_XFLS) XCS,#XMOV_N ' Call the Move Away from FLS Func. XCS,#COMM_X ' Call Ourselves Again @endif ' ' All is OK. Initialize the Magnetic Location Offset, ' and set back to normal (Close Loop) mode ' --------------------------------------------------TimerX=16;WaitTimerX() ' 1 Sec delay XML=24000 ' Set the SIN Phase Offset TimerX=16;WaitTimerX() ' 1 Sec delay XTC=0;XAO=0;XMO=0;XNC=0;XER=2500 ' Set Normal Mode Params Back ' ' Done With SIN Initialization Function ' ------------------------------------XQH ' ' 8-44 Control and Robotics Solutions Ltd. Revision 3.10, January 2005 ' ' Function to Move Away From RLS in STEPPER Mode (NC=3) ' ----------------------------------------------------#XMOV_P: ' XMO=0;XAO=0 ' Disable Motor and Analog Out XNC=3 ' Set Special STEPPER Mode (NC=3) XER=150000 ' Increase Error For Process XCA1=0 ' Init Magnetic Phase to ZERO XMO=1;XTC=2000 ' Set Motor ON and TC Current Command ' #MOVXP1: TimerX=16;WaitTimerX() ' 1 mili-sec delay @ XCA1 = XCA1+20 ' Increase Angle @if (XCA1 > 48000) ' Check More then 1.5 Cycle is done XTC=0 ' Done – Return to Calling Function XMO=0;XNC=0 XRT @endif XJP,#MOVXP1 XQH ' ' ' ' Function to Move Away From FLS in STEPPER Mode (NC=3) ' ----------------------------------------------------#XMOV_N: ' XMO=0;XAO=0 ' Disable Motor and Analog Out XNC=3 ' Set Special STEPPER Mode (NC=3) XER=150000 ' Increase Error For Process XCA1=0 ' Init Magnetic Phase to ZERO XMO=1;XTC=2000 ' Set Motor ON and TC Current Command ' #MOVXN1: TimerX=16;WaitTimerX() ' 1 mili-sec delay @ XCA1 = XCA1-20 ' Decrease Angle @if (XCA1 < -48000) ' Check More then 1.5 Cycle is done XTC=0 ' Done – Return to Calling Function XMO=0;XNC=0 XRT @endif XJP,#MOVXN1 XQH ' ' Control and Robotics Solutions Ltd. 8-45 SC-AT – Software User’s Manual and Commands Reference 8.6. Dynamic Error Mapping Correction Dynamic Error Mapping Correction is required for correction of non-linear mechanical position errors, caused for example by lead or ball screw. The correction is done by interpolating desecrate positions user defined correction table, and altering the actual encoder position readings. Each axis can be corrected independently. The correction table itself is defined in equally spaced intervals, between two maximum and minimum values of actual encoder readings. Beyond these values, the correction is fixed at the extreme table value point. As a part of the real-time process, the true encoder position reading is corrected by a value that is taken from the correction table. When current position does not match an exact table point, linear interpolation is performed between two consecutive table points. Outside of table range, the last error correction value will be used. This option is not yet fully supported by standard firmware revisions. Please consult C&RS sales for more information. 8-46 Control and Robotics Solutions Ltd. Revision 3.10, January 2005 9. SC-AT-4M/2M SHELL SOFTWARE The SC-AT-4M/2M Shell Software and Integrated Scripts Development Environment are fully documented in a separate User’s Manual. Please refer to the: “SC-AT-4M/2M shell and IDE User’s Manual” document. Control and Robotics Solutions Ltd. 9-1 Revision 3.10, January 2005 10. KEYWORDS REFERENCE This chapter describes the SC-AT controller keywords supported by the controller Firmware. As discussed, in section 4.3.2 of this user’s manual, the controller Language defines two groups of Keywords: • Parameters Keywords. • Command Keywords. As noted there, each parameter owns a set of internal attribute flags defining the behavior of the Interpreter Module in response to each keyword received, like whether the Keyword is Axis Related or not, is the Keyword is a parameter or command, and much more. 10.1. Keywords Attribute Reference The following table describes the SC-AT Keywords Attributes List. Please note that some of the attributes are internal only, while some other are currently not used. All internal and not used attributes are given for reference purpose only, and are designated in GRAY font. Attribute values are also used internally (by the controller Firmware), and are given for reference purpose only. In the table below the abbreviation “KW” stands for “Keyword”. Where “Need” is used, this means that in order for the clause to be executed correctly, the condition defined there should be met. For example, the command “BG” (Begins a new motion) needs of course its relevant motor to be “ON” (i.e. Enabled). Attribute Definition Attribute Value Attribute Description CPA_MOTOR_ON CPA_MOTOR_OFF CPA_MOTION_ON CPA_MOTION_OFF 0x00000001 0x00000002 0x00000003 0x00000004 Needs Motor ON Needs Motor OFF Needs Motion ON Needs Motion OFF CPA_PARAM_IS_READ_ONLY CPA_PARAM_IS_ARRAY CPA_PARAM_SAVED_TO_FLASH CPA_PARAM_INIT_NEEDED 0x00000010 0x00000020 0x00000030 0x00000040 Parameter is Read Only Parameter is Array Parameter is Saved to Flash Parameter needs initialization (Internal). CPA_PARAM_LEN_BIT_0 CPA_PARAM_LEN_BIT_1 CPA_PARAM_SPECIAL_REPORT 0x00000100 0x00000200 0x00000300 Not Used Not Used Parameter Has Special Report Function Control and Robotics Solutions Ltd. 10-1 SC-AT – Software User’s Manual and Commands Reference Attribute Definition Attribute Value Attribute Description CPA_PARAM_SPECIAL_ASSIGN 0x00000400 Parameter Has Special Assign Function CPA_COMMAND_ALLOWS_PARAM CPA_COMMAND_ALLOWS_STRING_PARAM CPA_COMMAND_SPARE_1 CPA_COMMAND_SPARE_2 0x00001000 0x00002000 0x00003000 0x00004000 Commands Allows a Number Parameter Commands Allows a string Parameter Not Used Not Used CPA_KW_IS_COMMAND CPA_KW_IS_AXIS_RELATED CPA_KW_IS_VIRT_AXIS_RELATED CPA_KW_SPARE_1 0x00010000 0x00020000 0x00030000 0x00040000 Keyword is a Command Keyword Keyword is Axis Related Keyword is Virtual Axis Related Not Used CPA_KW_SOURCE_MUST_BE_MACRO CPA_KW_SOURCE_MUST_BE_COM CPA_KW_SOURCE_MUST_BE_RS232 CPA_KW_SOURCE_MUST_BE_CAN_MAIN 0x00100000 0x00200000 0x00300000 0x00400000 KW Source Must be from MACRO Only KW Source Must be from Comm. only KW Source Must be from RS-232 only KW Source Must be from Main CAN Ch. CPA_KW_SOURCE_MUST_BE_CAN_AUX CPA_KW_SOURCE_MUST_BE_USB CPA_KW_SOURCE_MUST_BE_LAN CPA_KW_SPARE_2 0x01000000 0x02000000 0x03000000 0x04000000 KW Source Must be from Aux CAN Ch. KW Source Must be from USB Channel KW Source Must be from LAN Channel Not Used CPA_KW_ALL_MACRO_HALTED CPA_SPARE_2 CPA_SPARE_3 CPA_SPARE_4 0x10000000 0x20000000 0x30000000 0x40000000 KW Must have all programs halted Not Used Not Used Not Used Table 6: SC-AT Keywords Attributes and Restrictions Each command and parameter can have one or more attributes from the table above. In addition, each parameter has a default value (when not loaded from FLASH or when FLASH value is not valid, as well as Minimum and Maximum limit values. 10.2. Command Keywords List The following table describes alphabetical list of the SC-AT Commands Keywords. Note: The following list DOES NOT include any script programming related commands. Please refer to the “SC-AT Macro (Scripts) Language features User’s Manual” for further reference on Script Program related functions. 10-2 Control and Robotics Solutions Ltd. Revision 3.10, January 2005 Command Keyword AB BG BR DB7 Axis Related ? Yes Yes No No DF KR LD MG OC OS PQ QD QK RS No Yes No No No No Yes No Yes No ST SV UD VR XR XW ZA ZC ZR ZM Yes No No No No No Prg. Related Prg. Related Prg. Related Prg. Related Description Restrictions Immediately Abort any motion Begins a new Motion Start data recording process Download Array Buffers in CAN Bus None Motor ON Not Currently Recording None. Not Supported in the SC-AT-2M Controller. Internal Use Only !! None All Macro Programs Stooped From Macro Program Only None None None Internal Use Only !! Down load new Firmware Kill (stop) repetitive PTP motions Load all parameters from Flash Memory Send RS-232 Message Clear an output Bit (set bit Low) Set an output Bit (set bit High) Activate / Disables Compare Mode Download Macro Program Kill all motions and Programs S/W Reset Controller Stop any motion Save all parameters from Flash Memory Upload Recording Data Get Firmware and FPGA Versions Read data from Hardware Register Address Write data to Hardware Register Address Remote Assign CAN message Remote CAN Command Remote Report Can Message Remote Send CAN Message (String/Number) Communication Only, All Motors are disabled, and programs are stopped None All programs are stopped None None Internal Use Only !! Internal Use Only !! From Program Only From Program Only From Program Only None Table 7: SC Commands Keywords List 10.3. Parameters Keywords List The following table describes alphabetical list of all the SC parameters. Note: The following list DOES NOT include any script programming related parameters. Please refer to the “SC-AT Macro (Scripts) Language features User’s Manual” for further reference on Script Program related functions. All parameters are represented in signed long (32bit) format. Some parameters may be restricted to a positive only value. Grayed parameters are not operational in the current released firmware version. 7 Not Supported in the SC-AT-2M Controller. Control and Robotics Solutions Ltd. 10-3 SC-AT – Software User’s Manual and Commands Reference 10.3.1. SC-AT-4M Parameters Keywords List Key Word A1 AC AD AF AG AI AO AP AR AS CA CB CG DA DC DL DO DP EA EC EM ER FF FR GP HL IA IL IP IS KD KI KP LL ME MF ML 8 9 Axis Rela ted ? Yes Yes Yes Yes Yes Yes Yes No Yes Yes No Yes No Yes Yes Yes Yes Yes No Yes Yes Yes Yes No Yes No No No Yes Yes Yes Yes Yes Yes Yes Yes Description Restrictions Obsolete ! Acceleration Value [counts/s2] Analog Input Dead Band Analog Input Gain Factor Analog Input Gain Analog Input Value Auxiliary Analog Output Value Next Absolute Position Target General Purpose Array Analog Input Offset. Special Control Parameters Array CAN Baud Rate Settings Axis Configuration Data Recording Array Deceleration Value [counts/s2] Limit Deceleration [counts/s2] DAC Analog Offset Desired Position ECAM Motion Parameters Array Last Communication Error Code Last End Of Motion Reason. Max Position Error Limit Acc and Vel Feed Forward Gain Following Ratio for Gearing Group Identifiers Definition High Software Limit for Motions Indirect Access Index Array Set Input Port Bit Logic Get Input Port Integral Saturation Limit PID Differential Gain PID Integral Gain PID Proportional Gain Low Software Limit for Motions Master Encoder Axis Definition Motor Fault Reason Magnetic Location (Position)12 None None None None None None None None None None None Motor Off None None None None --None None None None None None See Remark 11 None None None None None None None None None None None See Footnote Saved To Flash ? Yes Yes Yes Yes Yes No No Yes Yes Yes Yes Yes No Yes Yes Yes No Yes No No Yes Yes Yes --Yes Yes Yes No Yes Yes Yes Yes Yes Yes No No Read Only ? No No No No Yes No No No No No No No No No No No Yes No Yes Yes No No No --No No No Yes No No No No No No Yes No Reset Val --10 0 ----0 0 --2047 --1 --------0 0 0 0 0 --0 --- ------- Array Size --------------1x10,000 --4x16 ----1x100,000 --------4x8 ------4x2 --1x4 --1 x 200 ------4x2 4x2 4x2 --- Assignment Range See Remark 8 512 ÷ 120,000,000 0 ÷ 2,047 0 ÷ 16 -524,288 ÷ 524,288 ± 2,147,000,000 ± 32,767 ± 2,147,000,000 ± 2,147,000,000 0 ÷ 4,095 See Remark 9 1 ÷ 20 0 ÷ 127 ± 2,147,000,000 512 ÷ 120,000,000 512 ÷ 120,000,000 ± 32,767 ± 2,147,000,000 See Remark 10 0 ÷ 100 0÷8 1 ÷ 8,000,000 0 ÷ 65,536 ± 2,147,000,000 1 ÷ 1,023 ± 2,147,000,000 ± 2,147,000,000 0 ÷ 16,777,215 0 ÷ 536,870,911 1 ÷ 32,767 0 ÷ 2,147,000,000 0 ÷ 2,147,000,000 0 ÷ 2,147,000,000 ± 2,147,000,000 0÷3 0 ÷ 255 ± 2,147,000,000 The “A1” array was supported in firmware versions prior to 2.3. It is now obsolete and replaced by the “CA” (Control Parameters Array). Please see below. The “CA” array controls advanced features of the controller real time servo loop. Although not restricted by the interpreter module (allows range is ±2,147,000,000), the specific limitations of each element in the array should be checked in the “A1” command reference and in the “Control Filter” chapter in this User’s Manual. 10 The “EA” array element’s range is restricted by the ECAM mode support. Please refer to the relevant command’s references (“EA”, ECAM Motion Mode Description) for more information. 11 The “GP” parameter defines the Command Interpreter Axes Groups. “GP” is a non-axis related array parameter. Each element relates to a group. GP[1] defines the “A” group, GP[2] defines the “B” group, etc. GP[1] and GP[2] are non-saved to the Flash memory. GP[3] and GP[4] (deafening the “C” and “D” groups) are saved to the Flash. Please see the “GP” keyword reference for more information. 12 “ML” (Magnetic Location) Used for SIN Commutation algorithm. See “ML” command reference for more information. See also “MP” (Magnetic pitch) 10-4 Control and Robotics Solutions Ltd. Revision 3.10, January 2005 Key Word MM MO MP MS NC OL OM Axis Rela ted ? Yes Yes Yes Yes Yes No Yes Description Restrictions Motion mode Motor ON (Enable/Disable) Magnetic Pitch – See “ML” Motion Status No Control (Enable Open Loop) Set Output Port Bit Logic I/O Hardware Configuration 13 Motion Off None See footnote None Motor Off None None OP PA PE PG PO PS RA RG RL RP RR RV SM SP SR TA TC TD TL TR TT VA VD VL VS WT WW XC XN No Yes Yes Yes Yes Yes No No No Yes No Yes Yes Yes Yes No Yes Yes Yes Yes Yes No No Yes Yes Yes Yes Yes Yes Set/Get Output Port General Purpose Parameter Array Position Error Compare Function Parameters Control Drive Command Encoder Position Value Receiving CAN Address Recording Gap 15 Recording Length 16 Next Relative Position Target Recording Status Recorded Variables Special motion mode Speed (For Profiler Motions) Status Register Transmitting CAN Address Torque (Open Loop) Command 32 Bit Timer Down Parameter Torque Limit Target Radius Target Time Vector Acceleration Vector Deceleration Actual Velocity Vector Speed Wait time for Repetitive PTP Smoothing Factor Last Capture (Latch) Pos Value Number of Capture Events None None --None None None None None None None None None No Motion None None None None None None None None None None None None None None None None Saved To Flash ? Yes No Yes No No Yes Yes Read Only ? Reset Val Array Size Assignment Range No No No Yes No No No --0 ----- 0 ----- ----- No Yes No Yes No No Yes Yes Yes No No Yes Yes Yes No Yes No No Yes Yes Yes Yes Yes No Yes Yes Yes No No No No Yes No Yes No No No No No Yes No No No Yes No No No No No No --- 0 ------0 0 ------- --10 x 200 --10 x 8 ------1x2 ------------- --0 ----- --- --- --- --- 0÷8 0÷1 2049 ÷ 100,000,000 0÷8 0÷3 0 ÷ 255 - 2,147,483,648 ÷ +2,147,483,647 0 ÷ 255 ± 2,147,000,000 ± 8,000,000 See Remark 14 ± 32,767 ± 2,147,000,000 0 ÷ 2047 1 ÷ 16,384 1 ÷ 100,000 ± 2,147,000,000 0 ÷ 100,000 0 ÷ 211 0÷8 ± 30,000,000 0 ÷ 8,388,607 0 ÷ 2047 ± 32,767 0 ÷ 100,000,000 0 ÷ 32,767 0 ÷ 32,767 0 ÷ 32,767 0 ÷ 100,000,000 0 ÷ 100,000,000 ± 30,000,000 ± 30,000,000 0 ÷ 800,000,000 0 ÷ 12 ± 2,147,000,000 0 – Only Yes No No No Yes No 0 0 Table 8: SC Parameters Keywords List 13 The “OM” parameters are bit filed commands. Please see the “OM” command reference for more information. The “PG” array element’s range is restricted by the “PQ” command depending on the compare function operation mode. Please refer to the relevant command’s references (“PG”, “PQ”) and the “Advanced Features” section about the compare feature in this user’s manual. 15 The Recording Gap parameter (“RG”) is now a [1 x 2] array. “RG” or “RG[1]” is the recording Gap. “RG[2]” defines a delay for upload Recording data buffers in CAN bus mode only. Please see the “RG” command reference for more information. 16 The “RL” Recording buffer Length defines the number of max recorded data points per vector. It can be 100,000 points for one vector, or 10,000 for 10 vectors (and anything in-between). Please see the “RL” command reference and the section “Data Recording” in this User’s Manual for more information. 14 Control and Robotics Solutions Ltd. 10-5 SC-AT – Software User’s Manual and Commands Reference 10.3.2. SC-AT-2M Parameters Keywords List Key Word Axis Rela ted ? A1 AC AD AF AG AI AO AP AR AS CA CB CG DA DC DL DO DP EA EC EM ER FF FR GP Yes Yes Yes Yes Yes Yes Yes No Yes Yes No Yes No Yes Yes Yes Yes Yes No Yes Yes Yes Yes No HL IA IL IP IS KD KI KP LL ME MF ML Yes No No No Yes Yes Yes Yes Yes Yes Yes Yes MM MO MP Yes Yes Yes Description Restrictions Obsolete ! Acceleration Value [counts/s2] Analog Input Dead Band Analog Input Gain Factor Analog Input Gain Analog Input Value Auxiliary Analog Output Value Next Absolute Position Target General Purpose Array Analog Input Offset. Special Control Parameters Array CAN Baud Rate Settings Axis Configuration Data Recording Array Deceleration Value [counts/s2] Limit Deceleration [counts/s2] DAC Analog Offset Desired Position ECAM Motion Parameters Array Last Communication Error Code Last End Of Motion Reason. Max Position Error Limit Acc and Vel Feed Forward Gain Following Ratio for Gearing Obsolete in the SC-AT-2M Firmware. High Software Limit for Motions Indirect Access Index Array Set Input Port Bit Logic Get Input Port Integral Saturation Limit PID Differential Gain PID Integral Gain PID Proportional Gain Low Software Limit for Motions Master Encoder Axis Definition Motor Fault Reason Currently Not Yet Supported in the SC-AT-2M Firmware. Motion mode Motor ON (Enable/Disable) Currently Not Yet Supported in the SC-AT-2M Firmware. Saved To Flash ? Read Only ? None None None None None None None None None None None Motor Off None None None None --None None None None None None Yes Yes Yes Yes Yes No No Yes Yes Yes Yes Yes No Yes Yes Yes No Yes No No Yes Yes Yes No No No No Yes No No No No No No No No No No No Yes No Yes Yes No No No None None None None None None None None None None None Yes Yes Yes No Yes Yes Yes Yes Yes Yes No No No No Yes No No No No No No Yes Motion Off None See footnote Yes No Yes No No No Reset Val --10 0 ----0 0 --2047 --1 --------0 0 0 0 0 --0 ------- --0 Array Size Assignment Range --------------1x1,000 --2x16 ----1x15,000 --------2x8 ------2x2 --- See Remark 17 512 ÷ 120,000,000 0 ÷ 2,047 0 ÷ 16 -524,288 ÷ 524,288 ± 2,147,000,000 ± 32,767 ± 2,147,000,000 ± 2,147,000,000 0 ÷ 4,095 See Remark 18 1 ÷ 20 0 ÷ 127 ± 2,147,000,000 512 ÷ 120,000,000 512 ÷ 120,000,000 ± 32,767 ± 2,147,000,000 See Remark 19 0 ÷ 100 0÷8 1 ÷ 8,000,000 0 ÷ 65,536 ± 2,147,000,000 --1 x 50 ------2x2 2x2 2x2 --- ----- ± 2,147,000,000 ± 2,147,000,000 0 ÷ 16,777,215 N/A 1 ÷ 32,767 0 ÷ 2,147,000,000 0 ÷ 2,147,000,000 0 ÷ 2,147,000,000 ± 2,147,000,000 0÷3 0 ÷ 255 0÷8 0÷1 2049 ÷ 100,000,000 17 The “A1” array was supported in firmware versions prior to 2.3. It is now obsolete and replaced by the “CA” (Control Parameters Array). Please see below. 18 The “CA” array controls advanced features of the controller real time servo loop. Although not restricted by the interpreter module (allows range is ±2,147,000,000), the specific limitations of each element in the array should be checked in the “A1” command reference and in the “Control Filter” chapter in this User’s Manual. 19 The “EA” array element’s range is restricted by the ECAM mode support. Please refer to the relevant command’s references (“EA”, ECAM Motion Mode Description) for more information. 10-6 Control and Robotics Solutions Ltd. Revision 3.10, January 2005 Key Word MS NC OL OM Axis Rela ted ? Yes Yes No Yes Description Motion Status No Control (Enable Open Loop) Set Output Port Bit Logic I/O Hardware Configuration 20 OP PA PE PG PO PS RA RG RL RP RR RV SM SP SR TA TC TD TL TR TT VA VD VL VS WT WW XC XN No Yes Yes Yes Yes Yes No No No Yes No Yes Yes Yes Yes No Yes Yes Yes Yes Yes No No Yes Yes Yes Yes Yes Yes Set/Get Output Port General Purpose Parameter Array Position Error Compare Function Parameters Control Drive Command Encoder Position Value Receiving CAN Address Recording Gap 22 Recording Length 23 Next Relative Position Target Recording Status Recorded Variables Special motion mode Speed (For Profiler Motions) Status Register Transmitting CAN Address Torque (Open Loop) Command 32 Bit Timer Down Parameter Torque Limit Target Radius Target Time Vector Acceleration Vector Deceleration Actual Velocity Vector Speed Wait time for Repetitive PTP Smoothing Factor Last Capture (Latch) Pos Value Number of Capture Events Restrictions Read Only ? None Motor Off None None Saved To Flash ? No No Yes Yes None None --None None None None None None None None None No Motion None None None None None None None None None None None None None None None None No Yes No Yes No No Yes Yes Yes No No Yes Yes Yes No Yes No No Yes Yes Yes Yes Yes No Yes Yes Yes No No No No Yes No Yes No No No No No Yes No No No Yes No No No No No No Yes No No No Yes No No No Yes No Reset Val Array Size 0 ----- ----- --- 0 ------0 0 ------- --2 x 100 --2x8 ------1x2 ------------- --0 ----- --- --- --- --- 0 0 Assignment Range 0÷8 0÷3 0 ÷ 255 - 2,147,483,648 ÷ +2,147,483,647 0 ÷ 255 ± 2,147,000,000 ± 8,000,000 See Remark 21 ± 32,767 ± 2,147,000,000 0 ÷ 2047 1 ÷ 16,384 1 ÷ 100,000 ± 2,147,000,000 0 ÷ 100,000 0 ÷ 211 0÷8 ± 30,000,000 0 ÷ 8,388,607 0 ÷ 2047 ± 32,767 0 ÷ 100,000,000 0 ÷ 32,767 0 ÷ 32,767 0 ÷ 32,767 0 ÷ 100,000,000 0 ÷ 100,000,000 ± 30,000,000 ± 30,000,000 0 ÷ 800,000,000 0 ÷ 12 ± 2,147,000,000 0 – Only Table 9: SC Parameters Keywords List 20 The “OM” parameters are bit filled commands. Please see the “OM” command reference for more information. The “PG” array element’s range is restricted by the “PQ” command depending on the compare function operation mode. Please refer to the relevant command’s references (“PG”, “PQ”) and the “Advanced Features” section about the compare feature in this user’s manual. 22 The Recording Gap parameter (“RG”) is now a [1 x 2] array. “RG” or “RG[1]” is the recording Gap. “RG[2]” defines a delay for upload Recording data buffers in CAN bus mode only. Please see the “RG” command reference for more information. 23 The “RL” Recording buffer Length defines the number of max recorded data points per vector. It can be 15,000 points for one vector, or 1,750 for 8 vectors (and anything in-between). Please see the “RL” command reference and the section “Data Recording” in this User’s Manual for more information. 21 Control and Robotics Solutions Ltd. 10-7 SC-AT – Software User’s Manual and Commands Reference 10.4. Keywords List – Functional Groups The following section describes the SC Keywords list ordered in functional groups. 10.4.1. Keywords Group Description The following Keyword Groups are distinguished: • • • • • • • • Motion and Profiler Related Keywords. Control Filter and Real time Servo Loop Keywords. Data Recording Related Keywords. Special Features Interface Function Keywords. I/O Function Keywords. Script Programming Keywords. Configuration and Protection Keywords. General Keywords. 10.4.2. Keywords Groups The following list describes all the SC Keywords (excluding Script Programming Keywords) divided to the logical groups indicated above. 10.4.2.1. Motion and Profiler Related Keywords Keyword AB AC AP BG DC DL EA EM FR KR ME MM MS RP SM SP ST WT WW 10-8 Description Abort Command – Immediately stop any motion. Acceleration value in [counts / sec2] for all Profiler based motions. Next Absolute Position for PTP Motions. Begins a new Motion Command. Deceleration value in [counts / sec2] for all Profiler based motions. Limit Deceleration value in [counts / sec2] for all Profiler based motions. ECAM Motion Parameters Array Last End of Motion Reason. Gearing Mode Following Ratio Kill (stop) repetitive PTP motions Master Encoder Definition for ECAM and Gearing Motion Modes. Defined the next Motion Mode, e.g.: PTP, JOG, etc. Motion Status Definition Next Relative Position for PTP Motions. Defines Special motion modes (Repetitive, etc). Defines Cruise Speed in [counts / sec] for all Profiler based motions. Stop Motion Command Defines delay (in units of 1/16384 sec) for repetitive PTP motions. Profile Smooth Factor parameter Control and Robotics Solutions Ltd. Revision 3.10, January 2005 VA VD VL VS Vector Acceleration (for XY Vector Motions) Vector Deceleration (for XY Vector Motions) Vector Limit Deceleration (for XY Vector Motions) Vector Speed (for XY Vector Motions) Table 10: Motion and Profiler Related Keywords 10.4.2.2. Control Filter and Real time Servo Loop Keywords Keyword CA DP ER FF KD KI KP PE PO PS IS SR MO NC TC TL TR TT Description Special Control Parameters Array. Desired Position. Holds the actual Position Reference. Max allowed Position Error. Acceleration and Velocity Feed Forward Gains Control Filter Diff Term Gain Control Filter Integral Term Gain Control Filter Proportional Term Gain Actual servo loop Position Error. The Control Drive Command Position. Holds the actual encoder position value. Integral Term Saturation of PID and PIV control filters Status Register Motor ON – Enables (MO=1) / Disables (MO=0) the servo loop. No Control – Enables (NC=1) / Disables (NC=0) Open Loop Mode. Torque Command in Open Loop mode. Torque Limit – Limits the D2A command – All modes. Target Radius Target Time Table 11: Control Filter and Real time Servo Loop Related Keywords 10.4.2.3. Data Recording Related Keywords Keyword BR DA RG RL RR RV Description Begin Data Recording. Data Recording Array – size 1 x 100,000. Set Recording GAP (in units of 1/16384 sec). Set Recording length (buffer length). Report Recording Status. Set the recorder variables. Table 12: Data Recording Related Keywords Control and Robotics Solutions Ltd. 10-9 SC-AT – Software User’s Manual and Commands Reference 10.4.2.4. Special Features Interface Function Keywords Keyword AR ML MP OM PG PQ XC XN Description General purpose Array – size 1 x 10,000. This array is also used for 32 bit locations table definitions in Mode 2 and Mode 3 of the Position Compare Events Function. Magnetic Pitch for SIN Commutated Brushless Motors24 Magnetic Location for SIN Commutated Brushless Motors25 Set I/O Modes Hardware Configuration. This keyword is used to configure the Compare and Capture functions. See also I/O functions Group. Compare Function Parameters Array – size 10 x 8. This array defines the parameters for the Position Compare Events Function operation. Enable / Disable Position Compare Events Function Command for a specific axis. Capture Location. The “XC” parameter holds the last captured position of an axis. Capture Events Counter. This parameter is automatically incremented by the firmware on each Capture Event. Table 13: Special Encoder Interface Related Keywords 10.4.2.5. Analog and Digital I/O Function Keywords Keyword AD AF AG AI AS AO DO IL IP OC OL OM OP OS Description Analog Dead Band Analog Input Gain Factor Analog Input Gain Analog Input Analog Input Offset Auxiliary Analog Outputs Command Analog Output DAC Offset Input Logic Bit Array. Input Port. Output Clear Bit. Output Logic Bit Array. Set I/O Modes Hardware Configuration. This keyword is used to configure the Compare and Capture functions. See also Special Encoder interface functions. Output Port. Output Set Bit. Table 14: I/O Functions Related Keywords 24 25 Currently Not Yet Supported in the SC-AT-2M Firmware. Currently Not Yet Supported in the SC-AT-2M Firmware. 10-10 Control and Robotics Solutions Ltd. Revision 3.10, January 2005 10.4.2.6. Communication and Configuration Keywords Keyword CB RA TA GP CG EC QC Description CAN Bus – Baud Rate. CAN Bus – Receiving CAN Address. CAN Bus – Transmitting CAN Address. The Commands Interpreter Axes Group Definitions (SC-AT-4M Only). Specific Axis Configuration. Last Communication Error Code. Last Program Error Code. Table 15: Communication and Configuration Keywords 10.4.2.7. Protection Keywords Keyword IS TL LL HL MF Description Integral Term Saturation of PID and PIV control filters (see control filter) Torque Limit – Limits the D2A command – All modes. Low Software Limit High Software Limit Motor Fault Reason Report Table 16: Protection Keywords 10.4.2.8. General Keywords Keyword AR DA IA PA LD/SV RS VR XR/XW Description General purpose Array – size 1 x 10,000. Data recording Array (can also be used for GP) – size 1 x 100,000. Indirect Access – General Purpose Array. General Purpose Parameters Array Load from and Save to Flash Memory (Parameters and Script Program) S/W Reset Controller Command Get Firmware Version Command Read and Write to Hardware Registers – Internal Use Only ! Table 17: General Purpose Related Keywords Control and Robotics Solutions Ltd. 10-11 SC-AT – Software User’s Manual and Commands Reference 10.4.2.9. Programming Keywords The SC-AT servo controllers have a powerful script engine that allows running up to 10 (SC-AT-4M) or 2 (SC-AT-2M) programs simultaneously, at very fast rates. Combined with our Integrated Script Development and Debugging Environment (IDE), the SC-AT’s internal programming engine provides endless capabilities for user application development, starting from simple homing routines, up to full machine sequences management. For complete description, User’s Manual and Commands Reference of the SC-AT’s scripting capabilities, please see the “SC-AT Macro (Scripts) Language features User’s Manual”. 10-12 Control and Robotics Solutions Ltd. Revision 3.10, January 2005 10.5. Keywords List – Alphabetical List The following section presents the SC-AT Keywords list (excluding Script Programming Keywords) in alphabetical order, including detailed definitions of each command and examples. The description of each keyword include: • • • • • Purpose: Attributes: Syntax: Example: See also: The operation or task of the keyword. See below. Valid clause syntax. Simple example of the keyword usage. Related commands. The following list describe all the valid keyword Attributes: Type: Axis related26: Array27: Assignment28: Command Allows Parameter29: Scope: Restrictions: Save to Flash: Default Value: Range: Command / Parameter. Yes / No. Yes (dimension) / No. Yes / No (i.e. Read Only). Yes (Number / String / Both) / No. Communication / Program / Both See below. Yes / No. Yes (value) / No. Min ÷ Max. The following list describe all the valid keyword Restrictions: None. Keyword Needs No Motion. Keyword Needs Motion. Keyword Needs Motor Off. Keyword Needs Motor ON. Important Note for SC-AT-2M Users: The examples that are presented in the following section may include prefixes to axes that are not supported in the SC-AT-2M. Please ignore these prefixes. 26 Axis or related (Keyword’s preceding Character X,Y, … etc. affects the keyword behavior). Applicable for parameters only. 28 Applicable for parameters only. 29 Applicable for commands only. 27 Control and Robotics Solutions Ltd. 10-13 SC-AT – Software User’s Manual and Commands Reference 10.5.1. AB – Abort Motion Command Purpose: The “AB” Abort command aborts any motion immediately, without any profile. The motion will be stopped abruptly in the next servo interrupt following the Abort command. The “AB” command should be used in emergency cases only. Normally, the “ST” or “KR” commands should be used to stop any type of motion. Note that if an Abort command is issued when a motor is moving at high speed, the servo loop may be disabled due to high error. Attributes: Type: Axis related: Array: Assignment: Command Allows Parameter: Scope: Restrictions: Save to Flash: Default Value: Range: Command. Yes. ---. ---. No. All. None. ---. ---. ---. Syntax: XAB; AAB ‘ Aborts X Motion ‘ Abort motion of All axes. Examples: The following code example shows starting a normal motion in X axis from Position “0” to Position “100,000”, and then aborting the motion. XMO=1;XPS=0 XMM=0;XSM=0 XAP=100000 XAC=90000;XDC=90000 XSP=25000 XBG ‘ Enables the Motor and Set Position = “0”. ‘ Set Normal Point To Point Motion Mode. ‘ Set Next PTP absolute location to “100,000” counts. ‘ Set AC=DC=90,000 ‘ Set Speed to “25,000”. ‘ Start a Motion XAB ‘ Will immediately abort the X motion. See Also: BG, ST, KR, ER 10-14 Control and Robotics Solutions Ltd. Revision 3.10, January 2005 10.5.2. AC – Acceleration Purpose: The normal Acceleration value to cruise velocity in all motion modes (that use the internal Profiler). This value is used to set the motion profile acceleration value in PTP, JOG etc. Motion modes. The Acceleration value is defined in units of: [counts/sec2]. All Acceleration/Deceleration parameters in the SC-4M has a 256 counts/sec2 resolution. Attributes: Type: Axis related: Array: Assignment: Command Allows Parameter: Scope: Restrictions: Save to Flash: Default Value: Range: Parameter. Yes. No. Yes. ---. All. None. Yes. 100,000. 512 ÷ 120,000,000. Syntax: XAC=1000000; WAC=1000000; ZAC AAC=240000 ‘ Set X Axis AC=1,000,000. ‘ Set W Axis AC=1,000,000. ‘ Report value of AC for Z axis. ‘ Set AC=250,000 all axes. Examples: The following code example shows starting a normal motion in X axis from Position “0” to Position “100,000”, using Speed and Acceleration values. XMO=1;XPS=0 XMM=0;XSM=0 XAP=100000 XAC=250000 XDC=500000 XSP=25000 XBG ‘ Enables the Motor and Set Position = “0”. ‘ Set Normal Point To Point Motion Mode. ‘ Set Next PTP absolute location to “100,000” counts. ‘ Set Acceleration to “250,000”. ‘ Set Acceleration to “500,000”. ‘ Set Speed to “25,000”. ‘ Start a Motion See Also: DC, DL, SP, BG Control and Robotics Solutions Ltd. 10-15 SC-AT – Software User’s Manual and Commands Reference 10.5.3. AD – Analog Input Dead Band Purpose: Set the Analog Input Dead Band range. Please see the “AI” (Analog Input) command reference for complete information about Analog Input interfaces support. Note: Current firmware revision does not support dead band in the analog input interface. Although the “AD” parameter is fully supported by the communication interface, it has no other effect. Analog Input value always assumes “AD=0”. Attributes: Type: Axis related: Array: Assignment: Command Allows Parameter: Scope: Restrictions: Save to Flash: Default Value: Range: Parameter. Yes. No. Yes. ---. All. None. Yes. 10. 0 ÷ 2,407. Syntax: XAD=10; ZAD AAD=0 ‘ Set X Axis AD=10 (10 LSB of the Analog Input). ‘ Report value of AD for Z axis. ‘ Set AD=0 to all axes (No Dead Band). Examples: See Syntax above. See Also: AF, AG, AI, AS 10-16 Control and Robotics Solutions Ltd. Revision 3.10, January 2005 10.5.4. AF – Analog Input Gain Factor Purpose: Set the Analog Input Gain Factor Multiplier. Please see the “AI” (Analog Input) command reference for complete information about Analog Input interfaces support. Attributes: Type: Axis related: Array: Assignment: Command Allows Parameter: Scope: Restrictions: Save to Flash: Default Value: Range: Parameter. Yes. No. Yes. ---. All. None. Yes. 0. 0 ÷ 16. Syntax: XAF=2; ZAF AAF=0 ‘ Set X Axis AF=2 (Gain factor is ¼). ‘ Report value of AF for Z axis. ‘ Set AF=0 to all axes (Gain Factor 1:1). Examples: See Syntax above. See Also: AD, AG, AI, AS Control and Robotics Solutions Ltd. 10-17 SC-AT – Software User’s Manual and Commands Reference 10.5.5. AG – Analog Input Gain Purpose: Set the Analog Input Gain. Please see the “AI” (Analog Input) command reference for complete information about Analog Input interfaces support. Attributes: Type: Axis related: Array: Assignment: Command Allows Parameter: Scope: Restrictions: Save to Flash: Default Value: Range: Parameter. Yes. No. Yes. ---. All. None. Yes. 0. -524,288 ÷ 524,288. Syntax: XAG=10; ZAG AAF=1 ‘ Set X Axis AG=10. ‘ Report value of AG for Z axis. ‘ Set AG=1 to all axes. Examples: See Syntax above. See Also: AD, AF, AI, AS 10-18 Control and Robotics Solutions Ltd. Revision 3.10, January 2005 10.5.6. AI – Analog Input Purpose: Report the analog input value. The analog input value is calculated and reported by the software variable “AI” according to the following equation: [ AI = Floor ( Ainp × A2 DHWGain − AS ) × AG × 2 − AF ] “AS” The Analog Offset parameter is in the range of: [0 ÷ 4095]. Nominal value of AS=2047 will result in a nominal “AI” reading of “0”. Using the “AG” and “AF” parameters for scaling, the user can define any practical desired range for the AI reading value. Attributes: Type: Axis related: Array: Assignment: Command Allows Parameter: Scope: Restrictions: Save to Flash: Default Value: Range: Parameter. Yes. No. No. ---. All. None. ---. ---. ---. Syntax: AAI ‘ Report value of AI for all inputs (1 through 4). Examples: See Syntax above, and Section 8.4, “Auxiliary Analog Input Interfaces” above, in this User’s Manual for more information. See Also: AD, AF, AG, AS, and Section 8.4, “Auxiliary Analog Input Interfaces” above, in this User’s Manual for more information. Control and Robotics Solutions Ltd. 10-19 SC-AT – Software User’s Manual and Commands Reference 10.5.7. AO – Analog Output (Auxiliary) Purpose: Set Auxiliary Analog Output value. The SC controller has an auxiliary analog output for each axis. The SC-4M has a total of 8 analog outputs – 4 are used as standard servo loop commands, and 4 are used as an Auxiliary Analog Outputs. The SC-AT-2M has 2 auxiliary analog outputs. With the “AO” parameter the user can control the auxiliary analog output value. AO=32767 means –10 Volts output. AO=32767 means +10 Volts output. AO=0 means 0 Volts output (polarity depends on DAC Outputs Polarity bit in “CG”) In the SC-AT-2M, when an axis is configured to work with analog output command, auxiliary analog outputs are assigned as driver commands. On the SC-AT-2M, note that the AO command is applicable only in standard commutation cases. Any axes working in Sinusoidal commutation uses its 2nd auxiliary analog output as the command for Phase #2. See more details in chapter 8.5 of this User’s Manual. The “AO” parameter is NOT saturated by the controller ! Attributes: Type: Axis related: Array: Assignment: Command Allows Parameter: Scope: Restrictions: Save to Flash: Default Value: Range: Parameter. Yes. No. Yes. ---. All. None. No. 0. -32,767 ÷ 32,767. Syntax: XAO=32767; ZAO AAO=0 ‘ Set X Axis AO=32,767 (+10 Volts). ‘ Report value of AO for Z axis. ‘ Set AO=0 to all axes (0 Volts command). Examples: See Syntax above. See Also: NC, TC, CG 10-20 Control and Robotics Solutions Ltd. Revision 3.10, January 2005 10.5.8. AP – Absolute Position Purpose: Defines the Next motion Absolute Position (in counts) target. The absolute position value is used by the controller as the next target position in both the PTP and Repetitive PTP motion modes. Upon a “BG” (begin motion) command, the controller will generate a profile from the current desired (“DP”) position to the current “AP”. Note that in relative motion, the “RP” command simply changes the value of the “AP”. Attributes: Type: Axis related: Array: Assignment: Command Allows parameter: Scope: Restrictions: Save to Flash: Default Value: Range: Parameter. Yes. No. Yes. ---. All. None. No. 0. - 2,147,000,000 ÷ 2,147,000,000. Syntax: XAP=100000; ZAP AAP=0 ‘ Set X Axis Absolute Position to “100,000”. ‘ Report value of Z axis AP. ‘ Set AP=0 in all axes. Examples: The following example shows resetting the X axis position to “0’, and then initiate a normal motion in X axis from Position “0” to Absolute Position “100,000”. XMO=1 XPS=0 XMM=0;XSM=0 XAP=100000 XAC=250000 XDC=500000 XSP=25000 XBG ‘ Enables the X Motor ‘ Set X axis encoder Position = “0”. ‘ Set Normal Point To Point Motion Mode. ‘ Set Next PTP absolute location to “100,000” counts. ‘ Set Acceleration to “250,000”. ‘ Set Acceleration to “500,000”. ‘ Set Speed to “25,000”. ‘ Start a Motion See Also: DP, RP, PS, BG Control and Robotics Solutions Ltd. 10-21 SC-AT – Software User’s Manual and Commands Reference 10.5.9. AR – General Purpose Array 10.5.9.1. AR – General Purpose Array For The SC-AT-4M Purpose: “AR” is a user general-purpose array. The “AR” array is a non-axis related array, with size of 10,000 elements. Each element in the array is a LONG format number, which can be assigned, with any value at any time. Currently, “AR” is also used internally by the Compare mechanism, to define user 32 bit tables for the compare mode. For further information please see section 8.2.3 in this User’s Manual. The index range of the “AR” array is : 1 ÷ 10,000. Since “AR” is non-axis related, accessing XAR, YAR, AAR, etc. actually access the same array element. Attributes: Type: Axis related: Array: Assignment: Command Allows parameter: Scope: Restrictions: Save to Flash: Default Value: Range: Parameter. No. Yes, size = [1][10,000]. Yes. ---. All. None. Yes. 0. - 2,147,000,000 ÷ 2,147,000,000. Syntax: XAR[1]=0; ZAR[1] AAR[300]=1000 ‘ Set AR[1] “0”. ‘ Report value of AR[1]. ‘ Set AR[300]=1,000. Examples: For specific examples regarding usage of the “AR” array for 32 bit tables definition for Compare Events, please see section 8.2 in this User’s Manual for more information. See Also: Compare Functions. 10-22 Control and Robotics Solutions Ltd. Revision 3.10, January 2005 10.5.9.2. AR – General Purpose Array For The SC-AT-2M Purpose: “AR” is a user general-purpose array. The “AR” array is a non-axis related array, with size of 1,000 elements. Each element in the array is a LONG format number, which can be assigned, with any value at any time. Currently, “AR” is also used internally by the Compare mechanism, to define user 32 bit tables for the compare mode. For further information please see section 8.2.3 in this User’s Manual. The index range of the “AR” array is : 1 ÷ 1,000. Since “AR” is non-axis related, accessing XAR, YAR, BAR, etc. actually access the same array element. Please also refer to the “DA” array for further information regarding the “AR” parameter 10.5.16.2 below. Attributes: Type: Parameter. Axis related: No. Array: Yes, size = [1][1,000]. Assignment: Yes. Command Allows parameter: ---. Scope: All. Restrictions: None. Save to Flash: Yes. Default Value: 0. Range: - 2,147,000,000 ÷ 2,147,000,000. Syntax: XAR[1]=0; ZAR[1] AAR[300]=1000 ‘ Set AR[1] “0”. ‘ Report value of AR[1]. ‘ Set AR[300]=1,000. Examples: For specific examples regarding usage of the “AR” array for 32 bit tables definition for Compare Events, please see section 8.2 in this User’s Manual for more information. See Also: Compare Functions. Control and Robotics Solutions Ltd. 10-23 SC-AT – Software User’s Manual and Commands Reference 10.5.10. AS – Analog Input Offset Purpose: Set the Analog Input Offset. Please see the “AI” (Analog Input) command reference for complete information about Analog Input interfaces support. Attributes: Type: Axis related: Array: Assignment: Command Allows Parameter: Scope: Restrictions: Save to Flash: Default Value: Range: Parameter. Yes. No. Yes. ---. All. None. Yes. 2,047. 0 ÷ 4,095. Syntax: XAS=0; ZAS AAS=2047 ‘ Set X Axis AS=0 (no offset). ‘ Report value of AS for Z axis. ‘ Set AG=2047 to all axes. Examples: See Syntax above. See Also: AD, AF, AG, AI 10-24 Control and Robotics Solutions Ltd. Revision 3.10, January 2005 10.5.11. BG – Begins a new Motion Command Purpose: The “BG” command begins a new motion, according to the current motion mode. Please see chapter 5 in this User’s Manual for further information about supported Motions Modes. The “BG” command allows receiving an argument (parameters). The parameter may be omitted to start a normal single axis motion, or (currently in this version), be used (“-1”) to initiate a common “X/Y” vector motion. In the SC-AT-2M, if the motion mode is Point-To-Point (MM=0), and the motion is in to one of the software limits, the “BG” shall return an error, and the “EC” (if command performed via communication) or “QC” (if command performed via macro) shall be set to ErrorCode , EC=53. This feature will be also supported in the SC-AT-4M in the future. Attributes: Type: Axis related: Array: Assignment: Command Allows Parameter: Scope: Restrictions: Save to Flash: Default Value: Range: Command. Yes. ---. ---. Yes, Number (-1). All. Needs Motor ON and No Motion. ---. ---. ---. Syntax: XBG; BBG BBG,-1 ABG ‘ Start X Motion ‘ Start motion in X and Y (non-synchronized). ‘ Start vector X/Y motion.. ‘ Start Motion in all axes. Examples: The following code example shows starting a normal motion in X axis from Position “0” to Position “100,000”, and waiting for end of motion. The example can be written as a script program file. The main routine name is “#MOVX”, and can be executed and tested. Please see the “SC4M Macro (Scripts) Language features User’s Manual” for further information about script programming. ‘ Control and Robotics Solutions Ltd. 10-25 SC-AT – Software User’s Manual and Commands Reference ‘ Routine to Move to Position 100,000 and wait for end of motion. ‘ ----------------------------------------------------------------------------#MOVX XMO=1;XPS=0 XMM=0;XSM=0 XAP=100000 XAC=90000;XDC=90000 XSP=25000 XBG ‘ ‘ Wait for End Of Motion ‘ ----------------------------@while (XMS != 0) @endwhile ‘ XQH ‘ Enables the Motor and Set Position = “0”. ‘ Set Normal Point To Point Motion Mode. ‘ Set Next PTP absolute location to “100,000” counts. ‘ Set AC=DC=90,000 ‘ Set Speed to “25,000”. ‘ Start a Motion ‘ Wait for MS (Motion Status) top be “0”. ‘ Stop program execution. See Also: ST, KR, AB, MM, MS, and VA, VD, VL, VS about Vector Motions. 10-26 Control and Robotics Solutions Ltd. Revision 3.10, January 2005 10.5.12. BR – Begin Recording Command Purpose: The “BR” command begins new data recording sequence. The “BR” command assumes that the recorded variables and parameters are configured. The “BR” command allows receiving an argument (parameter). “XBR” and “XBR,1” will both start a new recording sequence. “XBR,0” will terminate the current data recording process. The “BR” (or “BR,1”) command checks whether the last recording session was terminated, and issues a “STILL_RECORDING” error code #16 if not (i.e. if RR>0). Data Recording can be started only when previous recording session was terminated. Note that the controller does not check if previous buffers were uploaded or not. Issuing a Begin Recording command always overrides old data. Attributes: Type: Axis related: Array: Assignment: Command Allows Parameter: Scope: Restrictions: Save to Flash: Default Value: Range: Command. No. ---. ---. Yes, Number (0, or 1). All. BR or BR,1 - Needs recording off. ---. ---. ---. Syntax: XBR XBR,1 XBR,0 ‘ Start Data recording. ‘ Start Data recording. ‘ Stop Data recording. Examples: See section 8.1 in this User’s Manual for further information. See Also: RG, DA, RL, RR, RV Control and Robotics Solutions Ltd. 10-27 SC-AT – Software User’s Manual and Commands Reference 10.5.13. CA – Special Control Parameters Array Purpose: SC-AT-4M “CA” is a special control parameters array, allowing the user to further configure the servo loop features. “CA” is an axis related array, valid for axes X,Y,Z and W. The size of the “CA” array is [4]x[16]. Each parameter in the CA Array controls a certain feature as explained below (‘i’ indicates an axis identifier, between 1 to 4 for X to W). SC-AT-2M “CA” is a special control parameters array, allowing the user to further configure the servo loop features. “CA” is an axis related array, valid for axes X,Y. The size of the “CA” array is [2]x[16]. Each parameter in the CA Array controls a certain feature as explained below (‘i’ indicates an axis identifier, between 1 and 2 for X and Y). Array Element CA[i][1 ÷3] Function Description Not Used Should be “0” for future compatibility This parameters defines the 2nd PID filter duration. To disable the 2nd PID set: CA[i][4]=0. The duration is defined in servo-samples units. I.e.: - Value of 1 is 1/16384 of a second. - Value of 164 is 10 mili-sec. The recommended value range for the 2nd PID filter duration is: 0 <= CA[i][4] <= 16384. Negative values should be avoided. Please see section 6.9 above for more information. CA[i][4] 10-28 CA[I][5,6] Not Used Should be “0” for future compatibility CA[i][7 ÷9] 2nd Order Filter Parameters CA[i][10 ÷12] Not Used Should be “0” for future compatibility CA[i][13] 2nd Order Filter Enable Bit This parameter Disables (if “0”) or Enables (if !=0) the servo-loop 2nd order filter operation. For future compatibility, the value of CA[i][13] should only be set “0” for Disable, and “1” for Enable. Please see section 6.9 above for more information about the 2nd order filter operation and dynamic filter These 3 parameters control the servo-loop 2nd order filter operation: Filter Gain, Filter Bandwidth and Q factor (or damping ξ). Please see section 6.9 above for more information. Control and Robotics Solutions Ltd. Revision 3.10, January 2005 Array Element Function Description equations. CA[i][14 ÷16] Not Used Should be “0” for future compatibility Note About CA Parameters Range: The “CA” array is not range checked by the communication interface. This means that any valid number in the 32 bit range (± 2,147,000,000) can be set to any of the “CA” parameters. This however should be carefully avoided Users MUST comply to the parameters range setting as defined in the table above for each specific parameter! Attributes: Type: Axis related: Array: SC-AT-4M SC-AT-2M Assignment: Command Allows parameter: Scope: Restrictions: Save to Flash: Default Value: Range: Parameter. Yes. Yes, size = [4][16]. Yes, size = [2][16]. Yes. ---. All. None. Yes. 0. See Note Above ! Syntax: XCA[13]=1; ZCA[7] ACA[4]=0 ‘ Enable 2nd Order filter for X Axis”. ‘ Report value of CA[7] for Z axis. ‘ Set CA[4]=0 for all axes (Disable 2nd PID).. Examples: The following commands will Enable 2nd order filter operation for the X Axis with the following parameters: f=100 Hz, ξ=0.7 XCA[7]=1537305 ; XCA[8]=127552 ; XCA[9]= -62110 XCA[13]=1 ‘ Set Filter Parameters ‘ Enable X 2nd Order filter See Also: KP, KI, KD, and Section 6 above “The Control Filter” in this User’s Manual for more information about the SC-AT servo loop parameters and features. Control and Robotics Solutions Ltd. 10-29 SC-AT – Software User’s Manual and Commands Reference 10.5.14. CB – CAN Baud Rate Purpose: Set CAN baud-rate. The CAN baud rate must be saved to the flash memory, and the controller must be reseated in order to change the CAN baud rate. Please see the remarks about Initialization of CAN bus parameters in the RA and TA command references. Currently the following baud rates are supported: CB = 1 CB = 2 CB = 4 CB = 8 CB = 10 CB = 20 : : : : : : Can Baud CAN Baud CAN Baud CAN Baud CAN Baud CAN Baud = 1 Mbps. = 500 kBps = 250 kBps = 125 kBps = 100 kBps = 50 kBps Attributes: Type: Axis related: Array: Assignment: Command Allows Parameter: Scope: Restrictions: Save to Flash: Default Value: Range: Parameter. No. No. Yes. ---. All. None. Yes. 1. 1 ÷ 20. Syntax: XCB=1 XCB ‘ Set CAN Baud rate to 1 Mbps. ‘ Report value of CB. Examples: ---- See Also: RA, TA 10-30 Control and Robotics Solutions Ltd. Revision 3.10, January 2005 10.5.15. CG – Axis Configuration 10.5.15.1. CG – Axis Configuration for the SC-AT-4M Purpose: “CG” is an axis-related parameter, defining specific axis configuration. “CG” Currently supports 7 configuration bits (Bit #0 to bit #6) as described in the following table (future firmware versions may support more configuration bits): CG Bit (Zero Based) 0 Function Description Invert Main DAC Command This bit controls the MAIN DAC polarity command (main servo driver analog command output: TC). When set to “0” the default polarity is invert, i.e. TC=+32767 will result in an analog command voltage of –10v. When set to “1” the default polarity is non-invert, i.e. TC=+32767 will result in an analog command voltage of +10v. 1 Invert Encoder This bit controls the encoder polarity. Users can set or clear this bit to change the encoder reading direction. When set to “0” the default polarity is non-invert. When set to “1” the default polarity is invert. 2 Configure SIN Mode This bit configures the axis to operate in SIN commutation brushless mode. Please see section 8.5 above for more information. When set to “0”, default normal mode is used. When set to “1”, SIN commutation is enabled based on the encoder position. 3 Use PID/PIV Control Scheme 4 Invert Aux DAC Command This bit configures the servo-loop control scheme to PID or PIV. Please see section When set to “0”, PIV control scheme is used. When set to “1”, PID control scheme is used. This bit controls the Auxiliary DAC polarity command (Aux servo driver analog command output: AO). When set to “0” the default polarity is invert, i.e. AO=+32767 will result in an analog command voltage of –10v. When set to “1” the default polarity is non-invert, i.e. AO=+32767 will result in an analog command voltage of +10v. Control and Robotics Solutions Ltd. 10-31 SC-AT – Software User’s Manual and Commands Reference CG Bit (Zero Based) 5 6 Attributes: Function Description Enable Encoder Error Detection This bit Disables (when set to “0”) or Enables (when set to “1”) the Hardware Encoder Error detection feature. Note that when enabled, the controller will force Driver Fault condition when encoder error is detected. This option must be used with encoders having (electrical ) differential interface only. When single ended encoders are used, this bit must be disabled. Please see section 7.2.2 above for more information about Encoder Error Detection features of in the SCAT-4M. Invert DRV_FLT Logic Signal This bit controls the logical polarity of the Driver Fault digital input. Note that previews firmware versions supported this feature in the high “IL” bits. As of firmware version 2.03 and on, the Driver Fault Logic Polarity is defined by CG bit 6. This bit controls the Driver Fault polarity in both standard and MD driver’s configurations. Type: Axis related: Array: Assignment: Command Allows Parameter: Scope: Restrictions: Save to Flash: Default Value: Range: Parameter. Yes. No. Yes. ---. All. Needs Motor Off. Yes. 0. 0 ÷ 127. Syntax: XCG=0 ZCG ACG=72 ‘ Set X Axis CG=0. ‘ Report value of CG for Z axis. ‘ Set CG=8 in all axes (All in PID Mode). Examples: ---See Also: --- 10-32 Control and Robotics Solutions Ltd. Revision 3.10, January 2005 10.5.15.2. CG – Axis Configuration for the SC-AT-2M Purpose: “CG” is an axis-related parameter, defining specific axis configuration. “CG” Currently supports 16 configuration bits (Bit #0 to bit #15) as described in the following table (future firmware versions may support more configuration bits): CG Bit (Zero Based) 0 Function Description Invert Main Servo Driver Command This bit controls the MAIN Servo Driver command polarity (main servo driver analog or PWM command output: TC). When set to “0” the default polarity is invert, i.e. TC=+32767 will result in an analog command voltage of –10v. When set to “1” the default polarity is non-invert, i.e. TC=+32767 will result in an analog command voltage of +10v. 1 Invert Main Encoder This bit controls the encoder polarity. Users can set or clear this bit to change the encoder reading direction. When set to “0” the default polarity is non-invert. When set to “1” the default polarity is invert. 2 Reserved Should be left 0. 3 Use PID/PIV Control Scheme This bit configures the servo-loop control scheme to PID or PIV. Please see section When set to “0”, PIV control scheme is used. When set to “1”, PID control scheme is used. 4 Reserved Should be left 0. 5 Enable Encoder Error Detection This bit Disables (when set to “0”) or Enables (when set to “1”) the Hardware Encoder Error detection feature. Note that when enabled, the controller will force Driver Fault condition when encoder error is detected. This option must be used with encoders having (electrical) differential interface only. When single ended encoders are used, this bit must be disabled. Please see section 7.2.2 above for more information about Encoder Error Detection features of in the SCAT. 6 7 Reserved Use Auxiliary Encoder Feedback Should be left 0. This bit configures whether an additional auxiliary encoder is used as velocity feedback for dual loop configuration (see also section 6.7 above). Control and Robotics Solutions Ltd. 10-33 SC-AT – Software User’s Manual and Commands Reference CG Bit (Zero Based) 8 9 10 11 12 ÷ 15 Function Invert Auxiliary Encoder Feedback Analog Command Resolution Bit0 Analog Command Resolution Bit1 Reserved Driver Type Description When set to “0”, do not use aux encoder feedback. When set to “1”, use aux encoder feedback. This bit controls the Auxiliary encoder polarity. Users can set or clear this bit to change the Auxiliary encoder reading direction. When set to “0”, do not invert aux encoder. When set to “1”, invert aux encoder. Selects 12 or 13 bit AO (Analog Output) resolution. When set to “0”, 12 bit AO is used. When set to “1”, 13 bit AO is used. Please note, this bit controls the Analog Output resolution, regardless, of the driver command type. Currently Not Used. Should be left 0. Should be left 0. The following driver types are supported: 0 - LSD_0_4 : LSD, 0.4 Amp current limitation. 1 - LSD_1_2 : LSD, 1.2 Amp current limitation. 2 - LSD_3_0 : LSD, 3.0 Amp current limitation. 3 - PMD_1M : PMD-1M Brush/Brushless driver. 4 - PD_AT_2M_BRUSH : PD-AT-2M Brush mode. 5 - PD_AT_2M_BRUSHLESS : PD-AT-2M Brush-less mode. 6 - EXTERNAL : External Driver. 7 - EXTERNAL_INV_DRV_FLT: External Driver, inverted fault logic. 8 ÷ 15 – Reserved – should be left 0. Attributes: 10-34 Type: Axis related: Array: Assignment: Command Allows Parameter: Scope: Restrictions: Save to Flash: Default Value: Range: Parameter. Yes. No. Yes. ---. All. Needs Motor Off. Yes. 0. 0 ÷ 65535. Control and Robotics Solutions Ltd. Revision 3.10, January 2005 Syntax: XCG=0 YCG BCG=72 ‘ Set X Axis CG=0. ‘ Report value of CG for Y axis. ‘ Set CG=8 for both axes (Both in PID Mode). Examples: ---See Also: --- Control and Robotics Solutions Ltd. 10-35 SC-AT – Software User’s Manual and Commands Reference 10.5.16. DA – Data Recording Array 10.5.16.1. DA – Data Recording Array for the SC-AT-4M Purpose: “DA” is used to store data recording buffers. The “DA” array is automatically updated by the recorded data when the controller is in data recording process. When not used for data recording, the “DA” array can be used for any general purpose. It should be noted that the “DA” array is temporary, and IS NOT saved to the flash memory. Resetting the servo controller will erase all data in the “DA” array. Attributes: Type: Axis related: Array: Assignment: Command Allows parameter: Scope: Restrictions: Save to Flash: Default Value: Range: Parameter. No. Yes, size = [1][100,000]. Yes. ---. All. None. No. 0. - 2,147,000,000 ÷ 2,147,000,000. Syntax: XDA[1]=0; XDA[1000] AAR[300]=1000 ‘ Set DA[1] “0”. ‘ Report value of DA[1,000]. ‘ Set DA[300]=1,000. Examples: --- See Also: UD, Data Recording (RG, RL, RV, RR, BR), and section 8.1.2 above. 10-36 Control and Robotics Solutions Ltd. Revision 3.10, January 2005 10.5.16.2. DA – Data Recording Array for the SC-AT-2M Purpose: “DA” is used to store data recording buffers. The “DA” array is automatically updated by the recorded data when the controller is in data recording process. When not used for data recording, the “DA” array can be used for any general purpose. The DA and the AR arrays both share the same memory space. AR is limited to 1,000 from the communication only, but can be further used in order to access parameters with indexes larger than 1,000, via DA. The actual size of DA is 16,000, but recordings are limited to 15,000. The data recordings are performed from the end of the DA vector, while ECAM, PixGen use the standard “AR” parameter, from the beginning. Attributes: Type: Axis related: Array: Assignment: Command Allows parameter: Scope: Restrictions: Save to Flash: Default Value: Range: Parameter. No. Yes, size = [1][16,000] – Recordings limited to 15,000. Yes. ---. All. None. Yes. 0. - 2,147,000,000 ÷ 2,147,000,000. Syntax: XDA[1]=0; XDA[1000] YAR[300]=1000 ‘ Set DA[1] “0”. ‘ Report value of DA[1,000]. ‘ Set DA[300]=1,000. Examples: --See Also: UD, Data Recording (RG, RL, RV, RR, BR), and section 8.1.2 above. See also section 8.1.2.6.2 above for more information about the DA and AR arrays in the SC-AT-2M. Control and Robotics Solutions Ltd. 10-37 SC-AT – Software User’s Manual and Commands Reference 10.5.17. DB – Down Load Buffer The “DB” command provides an efficient fast download of large array buffers in CAN Bus Only. The SC-AT-4M support an additional Extended Down Load Buffer Mode “EDB” that allows downloading data in fast format (also in CAN only) to two arrays simultaneously. Both the “DB” and “EDB” modes support auto-increment of the array index, meaning that the user only provides initial start index and then only sends the data. For a complete description of the “DB” and “EDB” mode operation please see the following reference: “SC-AT Advanced Multi-Axes Servo Controller Communication Protocols - User’s Manual”, Document Revision 1.0, Dated: November 2003, Reference: SC-AT Users Manual Ver 300J.doc. Important Note: The “DB” command is no longer supported in the SC-AT-2M, as it is a subset of the EDB mode. 10-38 Control and Robotics Solutions Ltd. Revision 3.10, January 2005 10.5.18. DC – Deceleration Purpose: The normal Deceleration value from cruise velocity (towards Zero speed) in all motion modes that use the internal Profiler. This value is used to set the motion profile deceleration value in PTP, JOG etc. Motion modes. The Deceleration value is defined in units of: [counts / sec2]. Deceleration in the SC-AT has a 256 counts/sec2 resolution. The SC-AT servo controllers support different deceleration values for normal deceleration and Limits (H/W or S/W) deceleration. See the “DL” parameter. Attributes: Type: Axis related: Array: Assignment: Command Allows Parameter: Scope: Restrictions: Save to Flash: Default Value: Range: Parameter. Yes. No. Yes. ---. All. None. Yes. 100,000. 512 ÷ 120,000,000. Syntax: XDC=1000000; WDC=1000000; ZDC ADC=240000 ‘ Set X Axis DC=1,000,000. ‘ Set W Axis DC=1,000,000. ‘ Report value of DC for Z axis. ‘ Set DC=250,000 in all axes. Examples: The following code example shows starting a motion in Z axis from Position “0” to Position “100,000”, using Speed Acceleration and Deceleration values. ZMO=1;ZPS=0 ZMM=0;ZSM=0 ZAP=100000 ZAC=250000 ZDC=500000 ZSP=25000 ZBG ‘ Enables the Motor and Set Position = “0”. ‘ Set Normal Point To Point Motion Mode. ‘ Set Next PTP absolute location to “100,000” counts. ‘ Set Acceleration to “250,000”. ‘ Set Acceleration to “500,000”. ‘ Set Speed to “25,000”. ‘ Start a Motion See Also: AC, DL, SP, BG Control and Robotics Solutions Ltd. 10-39 SC-AT – Software User’s Manual and Commands Reference 10.5.19. DF – Down Load Firmware Purpose: Down loads new firmware version to the controller. New Firmware should be down loaded to the controller using the Shell utility application ONLY. WARNING: Users, under any circumstances, should NOT use the DF command directly from a terminal interface ! Attributes: Type: Axis related: Array: Assignment: Command Allows Parameter: Scope: Restrictions: Save to Flash: Default Value: Range: Command. No. ---. ---. ---. ---. ---. ---. ---. ---. Syntax: --Examples: --- See Also: --- 10-40 Control and Robotics Solutions Ltd. Revision 3.10, January 2005 10.5.20. DL – Limit Deceleration Purpose: The Limit Deceleration value used by the profiler whenever one of the limits is detected (H/W or S/W) to stop from any speed to “0” speed. This value is used to set the motion profile Limit Deceleration value in PTP, JOG etc. Motion modes. The Limit Deceleration value is defined in units of: [counts / sec2]. Limit Deceleration in the SCAT has a 256 counts/sec2 resolution. Attributes: Type: Axis related: Array: Assignment: Command Allows Parameter: Scope: Restrictions: Save to Flash: Default Value: Range: Parameter. Yes. No. Yes. ---. All. None. Yes. 100,000. 512 ÷ 120,000,000. Syntax: ADL=2000000 XDL ‘ Set DL=2,000,000 in all axes. ‘ Report value of DL for X axis. Examples: The following code example shows starting a motion in Z axis from Position “0” to Position “100,000”. DL is set to 2,000,000 [counts / sec2] (x 10 of AC and DC), so when the HL (High S/W Limit) will be detected (at 50,000 counts), the servo controller will stop the motion with deceleration of 2,000,000 [counts / sec2]. ZMO=1;ZPS=0 ZMM=0;ZSM=0 ZAP=100000 ZAC=200000;ZDC=200000 ZDL=2000000 ZHL=50000 ZSP=25000 ZBG ‘ Enables the Motor and Set Position = “0”. ‘ Set Normal Point To Point Motion Mode. ‘ Set Next PTP absolute location to “100,000” counts. ‘ Set AC=DC= “200,000”. ‘ Set Limit Deceleration to “2,00,000”. ‘ Set Z High S/W Limit to “50,000” counts. ‘ Set Speed to “25,000”. ‘ Start a Motion See Also: AC, DC, SP, HL, LL, BG Control and Robotics Solutions Ltd. 10-41 SC-AT – Software User’s Manual and Commands Reference 10.5.21. DO – Analog DAC Offset 10.5.21.1. DO – Analog DAC Offset For The SC-AT-4M Purpose: “DO” (DAC Offset) set the analog outputs command offset values. The SC-AT-4M has 8 analog command outputs. 4 Main DAC commands (#1, #2, #3, #4), and 4 Auxiliary DAC Commands (#5, #6, #7, #8). Usually (in normal operation mode), the 4 Main DAC commands are used as the X,Y,Z,W analog servo loop commands, and the 4 Auxiliary DAC commands are used as general purpose analog outputs. However, when the controller is operating in SIN commutation mode, each axis configured to operate in SIN mode uses two servo commands, one for Phases A and one and B. ”DO” is usually used to calibrate a zero analog output offset value. “DO” is applied in LSB units. The range of the new “DO” command is ±32,767 (full 16 bit). The nominal resolution of the “DO” command is: 3.2767 lsb/mv. The value of “DO” is saved to the flash memory, and is restored on each power up. Note that “DO” has an effect whenever the system is powered on, regardless to the Motor On (“MO”) and No Control (“NC”) states. As a result, the analog offset calibration can be performed even when the controller is in Servo-Off state (MO=0). Although the software range limit for “DO” is ±32,767 in DAC [LSB] units, it is usually not required to use values more then few hundreds. Note that by using high values of “DO”, a non-symmetrical analog output range can be resulted. The final DAC commands is always protected from roll over beyond 16 bit value. Please see more information about calibrating analog commands offset in SIN commutation mode in section 8.5.2.6 above. “DO” is an axis-related parameter, and controls the offset of the various analog outputs as follows: • • • • • • • • 10-42 “XDO” “YDO” “ZDO” “WDO” “EDO” “FDO” “GDO” “HDO” Set the Analog Offset of the Main X Analog Command Channel. Set the Analog Offset of the Main Y Analog Command Channel. Set the Analog Offset of the Main Z Analog Command Channel. Set the Analog Offset of the Main W Analog Command Channel. Set the Analog Offset of the Auxiliary X Analog Command Channel. Set the Analog Offset of the Auxiliary Y Analog Command Channel. Set the Analog Offset of the Auxiliary Z Analog Command Channel. Set the Analog Offset of the Auxiliary W Analog Command Channel. Control and Robotics Solutions Ltd. Revision 3.10, January 2005 Attributes: Type: Axis related: Array: Assignment: Command Allows Parameter: Scope: Restrictions: Save to Flash: Default Value: Range: Parameter. Yes. No. Yes. ---. All. None. Yes. 0. -32,767 ÷ 32,767. Syntax: XDO=100; EDO=-100; ZDO ADO=0 ‘ Set X MAIN DAC DO=100 (Offset = 30.5 mv). ‘ Set X AUX DAC DO=-100 (Offset = -30.5 mv). ‘ Report value of AS for Z axis. ‘ Set DO=0 to all axes (no analog output offset). Examples: See Syntax above. See Also: TC, AO, and section 8.5.2.6 above, “Analog Offset Calibration” for more information about Analog Command Offset calibration. Control and Robotics Solutions Ltd. 10-43 SC-AT – Software User’s Manual and Commands Reference 10.5.21.2. DO – Analog DAC Offset For The SC-AT-2M Purpose: “DO” (Driver Command Offset) set Driver outputs command offset values. The SC-AT2M has 2 driver command outputs, one for X and one for Y (these can be Analog or PWM). The “DO” parameter set the offset for the Driver command signals. If PWM driver command is used, “DO” set the PWM driver command offset. If Analog driver command is used (according to the driver type selection) There is no special offset parameter for the analog outputs when used as general-purpose outputs (and not ad driver commands). ”DO” should be used to calibrate a zero driver offset value. “DO” is applied in LSB units. The range of the new “DO” command is ±32,767 (full 16 bit, regardless of the actual command resolution). The nominal resolution of the “DO” command is: 3.2767 lsb/mv. The value of “DO” is saved to the flash memory, and is restored on each power up. Note that “DO” has an effect whenever the system is powered on, regardless to the Motor On (“MO”) and No Control (“NC”) states. As a result, the offset calibration can be performed even when the controller is in Servo-Off state (MO=0). Although the software range limit for “DO” is ±32,767 in DAC [LSB] units, it is usually not required to use values more then few hundreds. Note that by using high values of “DO”, a non-symmetrical analog range can be resulted. The final driver command is always protected from roll over beyond 16 bit value. “DO” is an axis-related parameter, and controls the offset of the various analog outputs as follows: • “XDO” • “YDO” Attributes: 10-44 Set the Analog Offset of the Main X Analog Command Channel. Set the Analog Offset of the Main Y Analog Command Channel. Type: Axis related: Array: Assignment: Command Allows Parameter: Scope: Restrictions: Save to Flash: Default Value: Range: Parameter. Yes. No. Yes. ---. All. None. Yes. 0. -32,767 ÷ 32,767. Control and Robotics Solutions Ltd. Revision 3.10, January 2005 Syntax: XDO=100; XDO=-100; XDO BDO=0 ‘ Set X DAC DO=100 (Offset = 30.5 mv). ‘ Set X DAC DO=-100 (Offset = -30.5 mv). ‘ Report value of AS for X axis. ‘ Set DO=0 to both axes (no analog output offset). Examples: See Syntax above. See Also: TC, AO. Control and Robotics Solutions Ltd. 10-45 SC-AT – Software User’s Manual and Commands Reference 10.5.22. DP – Desired Position Purpose: “DP” holds the actual instantaneous Desired Position or Reference Position Command of the servo control loop. When an axis is not in motion “DP” is constant and equals to the local position reference point. When an axis is in motion, “DP” holds the real time servo loop control reference position. In standard Profiler based motions (e.g. Point to point, Jog, etc.), “DP” actually holds the Profiler position output value. Upon completing a standard Point to Point motion, “DP” holds the last value of “AP” used for that motion. In other motion modes, “DP” can be updated by other references (Analog input in Joystick mode, tables in ECAM mode, other axes in master slave modes, etc.). When an axis servo loop is disables (MO=0), “DP” is continuously updated by the servo loop real time process to the value of “PS” (current encoder reading), so the position error (“PE”) is “0” by definition. Attributes: Type: Axis related: Array: Assignment: Command Allows parameter: Scope: Restrictions: Save to Flash: Default Value: Range: Parameter. Yes. No. No. ---. ---. ---. ---. 0. - 2,147,000,000 ÷ 2,147,000,000. Syntax: ZDP ADP ‘ Report value of Z axis DP. ‘ Report value of DP to all axes. Examples: --- See Also: AP, PS, PE. 10-46 Control and Robotics Solutions Ltd. Revision 3.10, January 2005 10.5.23. EA – ECAM Parameters Array Purpose: The “EA” array elements control the operation of the ECAM Motion mode supported by the SC-AT controllers. Please see section 5.5 above “ECAM Motions” in this user’s manual for full description of all “EA” array elements, purpose and limitations. The “EA” array parameter has the following attributes: Attributes: Type: Axis related: Array: SC-AT-4M SC-AT-2M Assignment: Command Allows parameter: Scope: Restrictions: Save to Flash: Default Value: Range: Parameter. Yes. Yes, size = [4][8]. Yes, size = [2][8]. Yes. ---. All. None. Yes. 0. - 2,147,000,000 ÷ 2,147,000,000. See ECAM Mode Description for full limitations description. Syntax: XEA[1]=1 YEA[3]=100 BEA[5] ‘ Set X Axis EA[1] to “1” (ECAM Start Index). ‘ Set Y Axis EA[3] to “100” (ECAM End Index). ‘ Report the ECAM Cycle number for X and Y. Examples: Please refer to section 5.5.1.2 above in this user’s manual for ECAM motion example. See Also: MM, ECAM Motion Mode Description in section 5.5 above. Control and Robotics Solutions Ltd. 10-47 SC-AT – Software User’s Manual and Commands Reference 10.5.24. EC – Communication Error Code Purpose: “EC” holds the last communication error code. The value of “EC” is reset to “0” when the controller boots up. When a communication error occurs (in one of the communication channels), the value of “EC” is updated accordingly by the Commands Interpreter to reflect the specific error cause. The user can clear the value of EC to”0” at any time to clear the last error code register. It should be noted that “EC” only hold errors generated by the Commands Interpreter if the source of the clause is communication. Errors generated by programs are reported by the “QC” parameter, and are “Program Task” specific. Please see the “SC4M Macro (Scripts) Language features User’s Manual” for full information about program execution and their error codes. For a full list of ALL supported communication error codes, please see chapter 11 later on in this User’s Manual. Attributes: Type: Axis related: Array: Assignment: Command Allows parameter: Scope: Restrictions: Save to Flash: Default Value: Range: Parameter. No. No. Yes (0 only). ---. All. None. No. 0. 0 ÷ 100. Syntax: XEC=0 XEC ‘ Reset value of EC. ‘ Report value EC. Examples: --- See Also: QC in “SC4M Macro (Scripts) Language features User’s Manual”. 10-48 Control and Robotics Solutions Ltd. Revision 3.10, January 2005 10.5.25. EM – End of Motion Reason Purpose: “EM” is a read only parameter, reporting the last end of motion reason. “EM” is automatically updated by the real time controller firmware. The following End of Motion reasons are currently reported: EM Value 0 1 2 3 4 5 6 7 8 9 EM Code Description EM_IN_MOTION EM_NORMAL EM_FLS EM_RLS EM_HL EM_LL EM_MF EM_USER_STOP EM_MOTOR_OFF EM_BAD_PROFILE_PARAM In motion, or After Boot up. Last Motion ended Normally. Last Motion ended due to Hardware FLS. Last Motion ended due to Hardware RLS. Last Motion ended due to Software HL Last Motion ended due to Software LL Last Motion ended due to Motor Fault (check MF). Last Motion ended due to User Stop (ST or AB). Last Motion ended due to Motor Off (MO=0). Last Motion ended due to Bad ECAM Parameters. Table 18: End Of Motion Reason (EM) Codes. Attributes: Type: Axis related: Array: Assignment: Command Allows parameter: Scope: Restrictions: Save to Flash: Default Value: Range: Parameter. Yes. No. No. ---. All. None. No. 0. 0 ÷ 9. Syntax: XEM AEM ‘ Report value EM for X-axis. ‘ Report value EM for all axes. Examples: --See Also: MF. Control and Robotics Solutions Ltd. 10-49 SC-AT – Software User’s Manual and Commands Reference 10.5.26. ER – Max Position Error Limit Purpose: The “ER” parameter defines the Max allowed Positioning Error while the servo loop is enabled (MO=1). The Positioning Error (“PE”) is defined as the current desired position minus the actual position: PE=DP-PS. The servo controller real time loop monitors the value of “PE” and compares it to the Max allowed error “ER”. When ABS(PE) > ER, the servo controller automatically disables the servo loop (switch automatically to MO=0 state). The max allowed error “ER” is also monitored when the controller is in Open Loop mode (when NC=1 and MO=1), to avoid the motor from running over the end of travels. When the motor is disabled (MO=0) DP=PS, so the position error is “0” by definition. Attributes: Type: Axis related: Array: Assignment: Command Allows parameter: Scope: Restrictions: Save to Flash: Default Value: Range: Parameter. Yes. No. No. ---. All. None. Yes. 2000. 1 ÷ 8,000,000. Syntax: XER=8000000; ZER AER=2000 ‘ Set X Axis ER to 8,000,000. ‘ Report value of ER for Z axis. ‘ Set ER=2000 for all axes. Examples: --- See Also: PS, DP, PE. 10-50 Control and Robotics Solutions Ltd. Revision 3.10, January 2005 10.5.27. FF – Feed Forward Gains Purpose: “FF” controls the Velocity and Acceleration Feed Forward Gains. The SC-AT control filter structure supports Velocity and Acceleration references feed forward gains. The following is supported under firmware Version 2.03 and later: ¾ Command Acceleration Feed Forward (Acc-FF) is supported in both PID and PIV close loop modes. The Acceleration Feed Forward gain is controlled by the FF[2] parameter. FF[2]=0 means no acceleration feed forward is used. The Acceleration Feed Forward Gain (FF[2]) is working on the profile acceleration in counts/sec2 / 219 units. ¾ Command Velocity Feed Forward (Vel-FF) is currently supported in PID close loop control mode only. The Velocity Feed Forward gain is controlled by the FF parameter (FF[1]). FF=0 means no acceleration feed forward is used. The Velocity Feed Forward Gain (FF) is working on the profile velocity in counts/sample time units. In both cases, the resulted Feed Forward value is added to the filter command output, in DAC [LSB] units. Note that the PIV control scheme has an inherent internal velocity feed forward path with unity gain (see Figure 6-1: Position Over Velocity Loop (PIV) Control Scheme Structure ), directed to the Velocity loop error junction. This is an essential implementation issue, to allow “0” position error during constant speed motion profile. The user can not change the gain to this feed forward path nor disable it. Future firmware versions may also support velocity feed forward to the DAC command in PIV mode. Please see chapter 6 above “The Control Filter” for more information. Attributes: Type: Axis related: Array: SC-AT-4M SC-AT-2M Assignment: Command Allows parameter: Scope: Restrictions: Save to Flash: Default Value: Range: Parameter. Yes. Yes, size = [4][2]. Yes, size = [2][2]. Yes. ---. All. None. Yes. 0. 0 ÷ 65,536. Control and Robotics Solutions Ltd. 10-51 SC-AT – Software User’s Manual and Commands Reference Syntax: XFF[2]=200; ZFF[1] ‘ Set X Axis Acceleration FF to 200. ‘ Report value of Vel FF for Z axis. AFF=0 AFF[1]=0 AFF[2]=0 ‘ Set Velocity FF=0 for all axes. ‘ Same as AFF=0 (Set Velocity FF=0 for all axes). ‘ Set Acceleration FF=0 for all axes. Examples: See Syntax Above. See Also: Please see chapter 6 above “The Control Filter” for more information. 10-52 Control and Robotics Solutions Ltd. Revision 3.10, January 2005 10.5.28. FR – Following Ratio 10.5.28.1. FR – Following Ratio For The SC-AT-4M Purpose: “FR” is the Following Ratio gain for gearing motion modes (MM=2, MM=3). Gearing (or electronic gearing) motion is referred to a motion mode where an axis follows another axis position with a pre-defined (fixed) ratio. Currently the SC-AT-4M supports position gearing motion mode for X and Y axes only. “FR” defines the slave’s axis following ratio in relation to the Master’s axis (“ME”) reference position (“DP”). The “FR” (Following Ratio) parameter is using a 32 bit, 8.24 format scaling resolution, to allow ratios of up to: × ±128, and: × ± 1/16,777,216. “FR” can be any number in the range of: [-2,147,000,000 ÷ 2,147,000,000]. “FR” is an integer number scaled to 8.24 format. I.e., “FR=16,777,216” means following ratio =1.0. Please see section 5.4 above “Gearing Motion Modes” for more information about Gearing Motion Mode operation. Attributes: Type: Axis related: Array: Assignment: Command Allows parameter: Scope: Restrictions: Save to Flash: Default Value: Range: Parameter. Yes. No. Yes. ---. All. None. Yes. 16,777,216. ± 2,147,000,000. Syntax: XFR=16,777,216; YFR AFR=8,388,608 ‘ Set X Axis Gear Ration to 1:1 ‘ Report Gear Ratio of Y axis ‘ Set Gear Ratio = ½ for all axes. Examples: See syntax examples and section 5.4 above. See Also: ME, MM, and section 5.4 above “Gearing Motion Modes” for more information. Control and Robotics Solutions Ltd. 10-53 SC-AT – Software User’s Manual and Commands Reference 10.5.28.2. FR – Following Ratio For The SC-AT-2M Purpose: The “FR” parameter is used as the Following Ratio gain for Gearing motion modes FR[1] - (MM=2, MM=3) - and is also the ratio between the Main Encoder and the Auxiliary encoder in the Auxiliary Encoder FR[2] – Velocity feedback mode (Please refer to the “CG” parameter for information about how to enable dual loop mode). FR[i][1] - Following Ratio gain for Gearing motion modes (MM=2, MM=3). FR[i][2] - Ratio between the Main Encoder and the Auxiliary encoder. i refers to Axes X or Y. Gearing (or electronic gearing) motion is referred to a motion mode where an axis follows another axis position with a pre-defined (fixed) ratio. Currently (F/W Revision 2.05/B) the SC-AT-4M supports position gearing motion mode for X and Y axes only. FR[i][1] defines the slave’s axis following ratio in relation to the Master’s axis (“ME”) reference position (“DP”). The “FR” (Following Ratio) parameter is using a 32 bit, 8.24 format scaling resolution, to allow ratios of up to: × ±128, and: × ± 1/16,777,216. FR[i][1] can be any number in the range of: [-2,147,000,000 ÷ 2,147,000,000]. “FR” is an integer number scaled to 8.24 format. I.e., “FR=16,777,216” means following ratio =1.0. Please see section 5.4 above “Gearing Motion Modes” for more information about Gearing Motion Mode operation. FR[i][2] – Defines the ratio between the Main Encoder and the Auxiliary encoder, whereas FR[i][2] = 65,536 means ratio is 1.0. Please see section 6.7 above for more information about Dual Loop Operation in the SC-AT-2M. Attributes: 10-54 Type: Axis related: Array: Assignment: Command Allows parameter: Scope: Restrictions: Save to Flash: Default Value: Range: Parameter. Yes. Yes. , size = [2][2] Yes. ---. All. None. Yes. 16,777,216. ± 2,147,000,000. Control and Robotics Solutions Ltd. Revision 3.10, January 2005 Syntax: XFR[1]=16,777,216; YFR[1] BFR=8,388,608 XFR[2]=65,536; ‘ Set X Axis Gear Ration to 1:1 ‘ Report Gear Ratio of Y axis ‘ Set Gear Ratio = ½ for all axes ‘ Set X Axis Auxiliary ratio to 1:1 Examples: See syntax examples and section 5.4 above. See Also: ME, MM, and section 5.4 above “Gearing Motion Modes” for more information regarding the gearing mode. Also see the keywords XP, XV, CG and section 6.7 above (Dual Loop Operation (In SC-AT-2M) for more information regarding the Auxiliary Encoder position and Velocity, and dual loop operation. Control and Robotics Solutions Ltd. 10-55 SC-AT – Software User’s Manual and Commands Reference 10.5.29. GP – Axis Group Identifiers Definitions (SC-AT-4M Only) Purpose: The “GP” parameter defines the SC-AT-4M Commands Interpreter Group Axes Identifiers. “GP” is a non-axis related, array parameter. • • • • GP[1] – Defines the “A” group. GP[2] – Defines the “B” group. GP[3] – Defines the “C” group. GP[4] – Defines the “D” group. Each group can be linked with one or more axes (up to 10 axes), covering all the supported controller axes, including the “U” and “V” virtual axes. Each bit in “GP[]” element is associated with a specific axis respectively. Bit #0 (zero based) links the “X” axis to the group. Bit #1 (zero based) links the “Y” axis to the group, and so on. The “A” and “B” groups (“GP[1]” and “GP[2]”) always have default values of “15” (axes X,Y,Z,W) and “3” (X and Y axes) respectively after power up. The default values of “GP[1]” and “GP[2]” can not be changed for the power up state. After power up, the user can however define other values to the “A” and “B” groups, although this is not recommended. As a design rule we recommend to use “A” and “B” always as their default initial definitions. If other sub-groups are needed it is recommended to use the “C” and “D” groups. The value of “GP[3]” and “GP[4]” (“C” and “D”) groups can be assigned with any value and can be saved to the flash memory. Attributes: Type: Axis related: Array: Assignment: Command Allows parameter: Scope: Restrictions: Save to Flash: Default Value: Range: Parameter. No. Yes, size = [1][4]. Yes. ---. All. See Above !. See Above !. 15. 1 ÷ 1,023. Syntax: XGI[1]=1023 XGI[2]=3 XGI[3] XGI[4]=15 10-56 ‘ Defines the “A” group as All Axes. ‘ Defines the “B” group as “X” and “Y” sub-set. ‘ Report the value of “C” group definition. ‘ Defines the “D” group as “X,Y,Z,W” sub-set. Control and Robotics Solutions Ltd. Revision 3.10, January 2005 Examples: See the Command Syntax Above. See Also: Section 4.3.2.4 above for more information about Axes Group identifiers and the SCAT-4M Commands Interpreter support for Groups. Control and Robotics Solutions Ltd. 10-57 SC-AT – Software User’s Manual and Commands Reference 10.5.30. HL – High Software Limit Purpose: “HL” is the Software High Position Limit. This value is monitored during all motions by the controller. Whenever the actual encoder position “PS” is higher then the “HL” value and the velocity “VL” is positive (moving towards higher positions), motion is stopped immediately using the stop deceleration parameter “DL”. “DL” should be normally set to a higher value then “DC”, as during normal operation conditions “HL” is for emergency cases stop only. In the SC-AT-2M (Only) the value of “HL” is validated by the controller during motion start “BG” commands only. i.e. a motion beyond the software limits (to an AP > HL) cannot be initiated, in motion mode Point-To-Point (MM=0). A special communication error code (EC=53) is generated by the BG command in that case (BG command will return ?>). Attributes: Type: Axis related: Array: Assignment: Command Allows parameter: Scope: Restrictions: Save to Flash: Default Value: Range: Parameter. Yes. No. Yes. ---. All. None. Yes. 2,147,000,000. ± 2,147,000,000. Syntax: XHL=100000000 ZHL AHL=2147000000 ‘ Set X Software HL to 100,000,000 ‘ Report value of Z Software High Limit ‘ Set Software HL to 2,147,000,000 for all axes. Examples: --See Also: DL, HL, PS, EC=53 (See Communication Error Codes in chapter 11 below). 10-58 Control and Robotics Solutions Ltd. Revision 3.10, January 2005 10.5.31. IA – Indirect Array Purpose: “IA” is a user general-purpose Index Array. Although “IA” can be used for any general purpose during program development, it was intentionally defined to allow Indirect Index Addressing from within a script program. The “IA” array is a non-axis related array, with size of 200 elements in the SC-AT-4M and with a size of 100 in the SC-AT-2M. Each element in the array is a LONG format number, which can be assigned, with any value at any time. The index range of the “IA” array is: 1 ÷ 200 (SC-AT-4M) and 1 ÷ 100 (SC-AT-2M). Since “IA” is non-axis related, accessing XAR, YAR, AAR, etc. actually access the same array element. As noted “IA” is a user general-purpose array, and is not used anywhere by the controller’s firmware code, unless the user has included a reference to it within a script program. Attributes: Type: Axis related: Array: SC-AT-4M SC-AT-2M Assignment: Command Allows parameter: Scope: Restrictions: Save to Flash: Default Value: Range: Parameter. No. Yes, size = [1][200]. Yes, size = [1][100]. Yes. ---. All. None. Yes. 0. - 2,147,000,000 ÷ 2,147,000,000. Syntax: XIA[1]=0; BIA[10] AIA[100]=1000 ‘ Set IA[1] “0”. ‘ Report value of IA[10] ‘ Set IA[100]=1,000. Examples: See Below. See Also: Please see “SC-AT - Advanced Multi-Axes Servo Controller - Script Programming Language and the Integrated Development Environment User’s Manual”, Section 3.5, “Variables And Indirect Addressing”. Control and Robotics Solutions Ltd. 10-59 SC-AT – Software User’s Manual and Commands Reference 10.5.32. IL – Input Logic Purpose: The “IL” Input Logic parameter controls the logic of all digital inputs of the SC-AT servo controller. Bits [0 : 23] of “IL” corresponds (and inverts) the relevant bits in “IP”. Please see the “IP” parameter reference for exact definitions of all “IP” and “IL” bits. By default IL=0. Each bit in “IL” that is assigned to “1” inverts the logic of the corresponding “IP” bit (bits [0 : 23] Only). Notes: • The ABORT input logic CANNOT be inverted. Being a SAFETY input, the ABORT logic must be configured such that when disconnected by the hardware, the ABORT is active, i.e. all axes are disabled. • The Driver Fault Bits (IP[24 : 27] for the SC-AT-4M or IP[24:25] for the SC-AT2M) can be inverted using CG[bit #6]. These are the “IL” parameter attributes: Attributes: Type: Axis related: Array: Assignment: Command Allows parameter: Scope: Restrictions: Save to Flash: Default Value: Range: Parameter. No. No. Yes. ---. All. None. Yes. 0. 0 ÷ 16,777,215 (0x00ff,ffff). Syntax: XIL AIL XIL=15 ‘ Report IL value (non-axis related). ‘ Report IL value (non-axis related). ‘ Inverts the logic of DIN1, DIN2, DIN3, DIN4. Examples: --See Also: CG, IP. 10-60 Control and Robotics Solutions Ltd. Revision 3.10, January 2005 10.5.33. IP – Input Port 10.5.33.1. IP – Input Port – SC-AT-4M Purpose: Read the digital Input Port bits of the SC-AT-4M servo controller. The “IP” parameter is continuously updated by the real time servo loop to reflect the value of all digital input bits of the controller. “IP” reports both the uncommitted digital inputs (Digital Inputs #1 ÷ #16), as well as all the committed digital inputs, i.e. limit switches, driver faults, and Abort input. The SC-AT-4M support the following digital inputs (uncommitted and committed), according to the order as listed: IP Bit# (0 Based) and Hex Value H/W Signal Name / Functionality IP Bit# (0 Based) and Hex Value H/W Signal Name / Functionality 0 , 0x0000,0001 Digital Input #1 – Din1 16 , 0x0001,0000 X Axis – RLS 1 , 0x0000,0002 Digital Input #2 – Din2 17 , 0x0002,0000 X Axis – FLS 2 , 0x0000,0004 Digital Input #3 – Din3 18 , 0x0004,0000 Y Axis – RLS 3 , 0x0000,0008 Digital Input #4 – Din4 19 , 0x0008,0000 Y Axis – FLS 4 , 0x0000,0010 Digital Input #5 – Din5 20 , 0x0010,0000 Z Axis – RLS 5 , 0x0000,0020 Digital Input #6 – Din6 21 , 0x0020,0000 Z Axis – FLS 6 , 0x0000,0040 Digital Input #7 – Din7 22 , 0x0040,0000 W Axis – RLS 7 , 0x0000,0080 Digital Input #8 – Din8 23 , 0x0080,0000 W Axis – FLS 8 , 0x0000,0100 Digital Input #9 – Din9 24 , 0x0100,0000 X Axis – Driver Fault 9 , 0x0000,0200 Digital Input #10 – Din10 25 , 0x0200,0000 Y Axis – Driver Fault 10 , 0x0000,0400 Digital Input #11 – Din11 26 , 0x0400,0000 Z Axis – Driver Fault 11 , 0x0000,0800 Digital Input #12 – Din12 27 , 0x0800,0000 W Axis – Driver Fault 12 , 0x0000,1000 Digital Input #13 – Din13 28 , 0x1000,0000 ABORT Input 13 , 0x0000,2000 Digital Input #14 – Din14 29 , 0x2000,0000 Not Used. 14 , 0x0000,4000 Digital Input #15 – Din15 30 , 0x4000,0000 Not Used. 15 , 0x0000,8000 Digital Input #16 – Din16 31 , 0x8000,0000 Not Used. Notes: • Bits #0 ÷ #15 of IP are the uncommitted Digital Inputs. • Bits #16 ÷ #23 of IP are the RLS and FLS Limit Switch flags of axes X, Y, Z, W. • RLS and FLS stand for the Reverse (Back) Limit Switch flag inputs, and the Forward (Front) Limit Switch flag inputs. • Bits #24 ÷ #27 of IP are the Driver Fault Inputs of axes X, Y, Z, W. The polarity of these bits can be inverted using CG[6]. Control and Robotics Solutions Ltd. 10-61 SC-AT – Software User’s Manual and Commands Reference • Bit #28 is the General Abort Input. When Abort is ON, all axes are disabled! • Note: The polarity of the ABORT bit Can Not be inverted. • Bits #29 ÷ #31 are currently not used. These are the “IP” parameter attributes: Attributes: Type: Axis related: Array: Assignment: Command Allows parameter: Scope: Restrictions: Save to Flash: Default Value: Range: Parameter. No. No. No. ---. All. None. No. 0. 0 ÷ 536,870,911 (0x1fff,fff). Syntax: XIP YIP AIP ‘ Report IP value (non-axis related). ‘ Report IP value (non-axis related). ‘ Report IP value (non-axis related). Examples: This example waits for Digital Input #4 to become High, implemented in Low level controller syntax (please refer to the SC-AT Macro User Manual for further references): #WDI4ON: XIP};16};&;XJF, #WDI4ON: ‘ Check value of (XIP & 16) The following example does the same, but in high level Script Syntax: #WDI4ON: @ XPA[1] = XIP & 16 @if (XPA[1] != 16) XJF, #WDI4ON: @endif ‘ Use XPA[1] as a temporary Value ‘ Check value of XPA[1] ‘ If XPA[1] is not 16, stay in loop. See Also: IL, OP, SC-AT Macro User’s Manual. 10-62 Control and Robotics Solutions Ltd. Revision 3.10, January 2005 10.5.33.2. IP – Input Port – SC-AT-2M Purpose: Read the digital Input Port bits of the SC-AT-2M servo controller. The “IP” parameter is continuously updated by the real time servo loop to reflect the value of all digital input bits of the controller. “IP” reports both the uncommitted digital inputs (Digital Inputs #1 ÷ #10), as well as all the committed digital inputs, i.e. limit switches, driver faults, and Abort input. The SC-AT-2M supports the following digital inputs (uncommitted and committed), according to the order as listed: IP Bit# (0 Based) and Hex Value H/W Signal Name / Functionality IP Bit# (0 Based) and Hex Value H/W Signal Name / Functionality 0 , 0x0000,0001 Digital Input #1 – Din1 16 , 0x0001,0000 X Axis – RLS 1 , 0x0000,0002 Digital Input #2 – Din2 17 , 0x0002,0000 X Axis – FLS 2 , 0x0000,0004 Digital Input #3 – Din3 18 , 0x0004,0000 Y Axis – RLS 3 , 0x0000,0008 Digital Input #4 – Din4 19 , 0x0008,0000 Y Axis – FLS 4 , 0x0000,0010 Digital Input #5 – Din5 20 , 0x0010,0000 X Index 5 , 0x0000,0020 Digital Input #6 – Din6 21 , 0x0020,0000 Y Index 6 , 0x0000,0040 Digital Input #7 – Din7 22 , 0x0040,0000 X Aux Encoder Index 7 , 0x0000,0080 Digital Input #8 – Din8 23 , 0x0080,0000 Y Aux Encoder Index 8 , 0x0000,0100 Digital Input #9 – Din9 – fast 24 , 0x0100,0000 X Axis – Driver Fault – Result – After Driver Fault Source logic (CG Mux) 9 , 0x0000,0200 Digital Input #10 – Din10 – fast 25 , 0x0200,0000 Y Axis – Driver Fault – Result – After Driver Fault Source logic 11 , 0x0000,0800 Y Axis External Fault Input (CG Mux) 26 , 0x0400,0000 0 27 , 0x0800,0000 0 12 , 0x0000,1000 X Axis Internal Fault Input 28 , 0x1000,0000 ABORT Input 13 , 0x0000,2000 Y Axis Internal Fault Input 29 , 0x1000,0000 Not Used. 14 , 0x0000,4000 X Index 30 , 0x2000,0000 Not Used. 15 , 0x0000,8000 Y Index 31 , 0x4000,0000 Not Used. 10 , 0x0000,0400 X Axis External Fault Input Notes: • Bits #0 ÷ #9 of IP are the uncommitted Digital Inputs. • Bits #16 ÷ #19 of IP are the RLS and FLS Limit Switch flags of axes X and Y • RLS and FLS stand for the Reverse (Back) Limit Switch flag inputs, and the Forward (Front) Limit Switch flag inputs. Control and Robotics Solutions Ltd. 10-63 SC-AT – Software User’s Manual and Commands Reference • The driver fault may be from 2 different sources: • Internal Driver Fault Source – Used in Control and Robotics Solutions Dedicated Drivers • External Driver Fault Source – Used in 3rd party driver manufacturers. • The driver fault source is set using CG[13]. • Bits #24 ÷ #25 of IP are the Driver Fault Inputs of axes X and Y. The polarity of these bits can be inverted using CG[6]. These bits are the result of the driver fault – Internal or external. • The actual status of the internal or external driver fault may be found in Bits #12 ÷ #15. • Bit #28 is the General Abort Input. When Abort is ON, all axes are disabled! • Note: The polarity of the ABORT bit Can Not be inverted. • Bits #29 ÷ #31 are currently not used. These are the “IP” parameter attributes: Attributes: Type: Axis related: Array: Assignment: Command Allows parameter: Scope: Restrictions: Save to Flash: Default Value: Range: Parameter. No. No. No. ---. All. None. No. 0. 0 ÷ 536,870,911 (0x1fff,fff). Syntax: XIP YIP AIP ‘ Report IP value (non-axis related). ‘ Report IP value (non-axis related). ‘ Report IP value (non-axis related). Examples: See examples for the SC-AT-4M, above. See Also: IL, OP, SC-AT Macro User’s Manual. 10-64 Control and Robotics Solutions Ltd. Revision 3.10, January 2005 10.5.34. IS – Integral Saturation Limit Purpose: The “IS” parameter limits the output value of the Integral Term only when working in Close Loop mode in PID or PIV control schemes. “IS” limits ONLY the integral term saturation, and not the actual final control output, which is limited by the “TL” parameter. The purpose of “IS” is to allow different saturation limits to the Integral and control output. This is needed in some cases to avoid overshoots. Please look in this User’s Manual under “The Control Filter” chapter 6 for further information. The range of “IS” is: 1 ÷ 32,767. IS=1 practically disables Integral term in the control filter. IS=32,767 is full range (100 % integral saturation). Attributes: Type: Axis related: Array: Assignment: Command Allows parameter: Scope: Restrictions: Save to Flash: Default Value: Range: Parameter. Yes. No. Yes. ---. All. None. Yes. 32,763. 1 ÷ 32,767. Syntax: XIS=16384; ZIS AIS=32767 ‘ Set X Axis IS=16,384 (50% of Max Range). ‘ Report value of IS for Z axis. ‘ Set IS=32,767 in all axes (100 % limit). Examples: The following code example shows starting a normal motion in X axis from Position “0” to Position “10,000”, but with the PID Integral term saturated to 25 %. XMO=1;XPS=0 XMM=0;XSM=0 XAP=10000 XAC=90000;XDC=90000 XSP=25000 XIS=8192 XBG ‘ Enables the Motor and Set Position = “0”. ‘ Set Normal Point To Point Motion Mode. ‘ Set Next PTP absolute location to “100,000” counts. ‘ Set AC=DC=90,000. ‘ Set Speed to “25,000”. ‘ Limit IS to 25 % (± 2.5 Volts) ‘ Start a Motion See Also: TL, Control Filter Implementation Control and Robotics Solutions Ltd. 10-65 SC-AT – Software User’s Manual and Commands Reference 10.5.35. KD – Control Filter Diff Term Gain Purpose: The “KD” parameter is used to set the control filter algorithm position loop Differential term gain in PID control mode, and Velocity loop overall gain in PIV control mode. The “KD” parameter is an array parameter, with the size of [4]x[2], i.e. for each axis (X, Y, Z, W), KD[1] and KD[2] are available. The first element “KD[1]” or “KD” (see note below) set the normal filter gains, while the second element “KD[2]” set the gain for the “Gain-Scheduling” algorithm. Please see section 6.9 above for more information about Filter Gain Scheduling. Note: The SC-AT command interpreter supports (for backward compatibility) access to any array parameter first element, as a non-array element. This means that for example, “XKD” is identical to “XKD[1]”. Attributes: Type: Axis related: Array: Assignment: Command Allows parameter: Scope: Restrictions: Save to Flash: Default Value: Range: Parameter. Yes. Yes, size = [4][2]. Yes. ---. All. None. Yes. 32,767. 0 ÷ 2,147,000,000. Syntax: XKD=16384 XKD[1]=16384 XKD[2]=30000 ZKD AKD=100000 ‘ Set X Axis KD=16,384 ‘ Same as XKD=16384, Set X Axis KD=16,384 ‘ Set X Axis KD[2]=30000 (for Gain Scheduling) ‘ Report value of KD for Z axis. ‘ Set KD=100,000 for all axes Example: --- See Also: CG, KP, KI and Chapter 6 above, “The Control Filter”. 10-66 Control and Robotics Solutions Ltd. Revision 3.10, January 2005 10.5.36. KI – Control Filter Integral Term Gain Purpose: The “KI” parameter is used to set the control filter algorithm position loop integral term gain in PID control mode, and Velocity PI loop integral term gain in PIV control mode. The “KI” parameter is an array parameter, with the size of [4]x[2], i.e. for each axis (X, Y, Z, W), KI[1] and KI[2] are available. The first element “KI[1]” or “KI” (see note below) set the normal filter gains, while the second element “KI[2]” set the gain for the “Gain-Scheduling” algorithm. Please see section 6.9 above for more information about Filter Gain Scheduling. Note: The SC-AT command interpreter supports (for backward compatibility) access to any array parameter first element, as a non-array element. This means that for example, “XKI” is identical to “XKI[1]”. Attributes: Type: Axis related: Array: Assignment: Command Allows parameter: Scope: Restrictions: Save to Flash: Default Value: Range: Parameter. Yes. Yes, size = [4][2]. Yes. ---. All. None. Yes. 32,767. 0 ÷ 2,147,000,000. Syntax: XKI=16384 XKI[1]=16384 XKI[2]=30000 ZKI AKI=100000 ‘ Set X Axis KI=16,384 ‘ Same as XKI=16384, Set X Axis KI=16,384 ‘ Set X Axis KI[2]=30000 (for Gain Scheduling) ‘ Report value of KI for Z axis. ‘ Set KI=100,000 for all axes Example: --- See Also: CG, KP, KD and Chapter 6 above, “The Control Filter”. Control and Robotics Solutions Ltd. 10-67 SC-AT – Software User’s Manual and Commands Reference 10.5.37. KP – Control Filter Proportional Term Gain Purpose: The “KP” parameter is used to set the control filter algorithm position loop proportional term gain in PID control mode, and position loop overall gain in PIV control mode. The “KP” parameter is an array parameter, with the size of [4]x[2], i.e. for each axis (X, Y, Z, W), KP[1] and KP[2] are available. The first element “KP[1]” or “KP” (see note below) set the normal filter gains, while the second element “KP[2]” set the gain for the “Gain-Scheduling” algorithm. Please see section 6.9 above for more information about Filter Gain Scheduling. Note: The SC-AT command interpreter supports (for backward compatibility) access to any array parameter first element, as a non-array element. This means that for example, “XKP” is identical to “XKP[1]”. Attributes: Type: Axis related: Array: Assignment: Command Allows parameter: Scope: Restrictions: Save to Flash: Default Value: Range: Parameter. Yes. Yes, size = [4][2]. Yes. ---. All. None. Yes. 32,767. 0 ÷ 2,147,000,000. Syntax: XKP=16384 XKP[1]=16384 XKP[2]=30000 ZKP AKP=100000 ‘ Set X Axis KP=16,384 ‘ Same as XKP=16384, Set X Axis KP=16,384 ‘ Set X Axis KP[2]=30000 (for Gain Scheduling) ‘ Report value of KP for Z axis. ‘ Set KP=100,000 for all axes Example: --- See Also: CG, KI, KD and Chapter 6 above, “The Control Filter”. 10-68 Control and Robotics Solutions Ltd. Revision 3.10, January 2005 10.5.38. KR – Kill Repetitive Motions Command Purpose: The “KR” Kill Repetitive command terminates repetitive Point To Point motion cycles. Unlike the “ST” command, the motion will not be stopped immediately, but after the current motion is ended. Attributes: Type: Axis related: Array: Assignment: Command Allows Parameter: Scope: Restrictions: Save to Flash: Default Value: Range: Command. Yes. ---. ---. No. All. None. ---. ---. ---. Syntax: XKR; AKR ‘ Stop X Repetitive Motion ‘ Stop Repetitive Motion of All axes. Examples: The Next example shows starting a Repetitive motion in X axis from Position “0” to Position “100,000” using “WT” Wait delay between the motions. KR is then issued to kill the repetitive motion. XMO=1;XPS=0 XMM=0;XSM=1 XAP=100000 XAC=250000 XDC=500000 XSP=25000 XWT=16384 XBG ‘ Enables the Motor and Set Position = “0”. ‘ Set Repetitive Point To Point Motion Mode. ‘ Set Next PTP absolute location to “100,000” counts. ‘ Set Acceleration to “250,000”. ‘ Set Acceleration to “500,000”. ‘ Set Speed to “25,000”. ‘ Set 1 second delay between motions. ‘ Start a Motion XKR ‘ Will terminate the repetitive motion. See Also: BG, AB, ST, SM, MM, WT Control and Robotics Solutions Ltd. 10-69 SC-AT – Software User’s Manual and Commands Reference 10.5.39. LD / SV – Load and Save Commands Purpose: “LD” and “SV” are the Load from FLASH memory and SAVE to Flash Memory commands. The “LD” and “SV” commands are used to load and save the controller parameters and script program from and to the board Flash memory. The “LD” and “SV” commands can only be issued while all motors are in disable mode (in MO=0). SV should be issued only when the system is not in motion. The “SV” command can receive the following parameters: ASV ASV,1 ASV,2 ‘ Save All Parameters and Script Program to Flash Memory ‘ Save Only the Controller Parameters to the Flash Memory ‘ Save Only the Script Program to the Flash Memory The “LD” and “SV” commands has the following attributes: Attributes: Type: Axis related: Array: Assignment: Command Allows Parameter: Scope: Restrictions: Save to Flash: Default Value: Range: Command. No. ---. ---. Yes (See SV Command Above). All. All Motors Must be Off. ---. ---. ---. Syntax: XSV XSV,1 XSV,2 BLD ‘ Save all Parameters and Script Program to Flash Memory ‘ Save Only Parameters to Flash Memory ‘ Save Only the Script Program to Flash Memory ‘ Load Parameters and Script Program from Flash Memory Examples: See Syntax Above. See Also: ----- 10-70 Control and Robotics Solutions Ltd. Revision 3.10, January 2005 10.5.40. LL – Low Software Limit Purpose: “LL” is the Software Low Position Limit. This value is monitored during all motions by the controller. Whenever the actual encoder position “PS” is smaller then the “LL” value and the velocity “VL” is negative (moving towards lower positions), motion is stopped immediately using the stop deceleration parameter “DL”. “DL” should be normally set to a higher value then “DC”, as during normal operation conditions “LL” is for emergency cases stop only. In the SC-AT-2M (Only) the value of “LL” is validated by the controller during motion start “BG” commands only. i.e. a motion beyond the software limits (to an AP < LL) cannot be initiated, in motion mode Point-To-Point (MM=0). A special communication error code (EC=53) is generated by the BG command in that case (BG command will return ?>). Attributes: Type: Axis related: Array: Assignment: Command Allows parameter: Scope: Restrictions: Save to Flash: Default Value: Range: Parameter. Yes. No. Yes. ---. All. None. Yes. 2,147,000,000. ± 2,147,000,000. Syntax: XLL=100000000 ZLL ALL=2147000000 ‘ Set X Software LL to 100,000,000 ‘ Report value of Z Software Low Limit ‘ Set Software LL to 2,147,000,000 for all axes. Examples: --See Also: DL, HL, PS, EC=53 (See Communication Error Codes in chapter 11 below). Control and Robotics Solutions Ltd. 10-71 SC-AT – Software User’s Manual and Commands Reference 10.5.41. ME – Master Encoder Purpose: “ME” is the Master Encoder Definition for Gearing and ECAM motion modes. Gearing and ECAM are motion modes where an axis follows another axis position with a pre-defined (fixed) ratio (in Gearing) or using user defined position tables (in ECAM). The “ME” parameter defined the master axis for that purpose. Note: The master axis can be in Motor On or Off (i.e. MO=1, or MO=0) states. In the later case, the Master’s DP=PS, so using a disabled axis as a master axis, will provide true encoder position tracking. “ME” defines which axis is the Master axis for a given slave motion. The “ME” parameter can be any valid physical axis, as described below: • SC-AT-4M Controllers: On the SC-AT-4M Controllers, the “ME” parameter can be any valid physical axis: ME=0 for X. ME=1 for Y. ME=2 for Z. ME=3 for W. • SC-AT-2M Controllers: On the SC-AT-2M Controllers, the “ME” parameter can select between the following encoder inputs: ME=0 for X Axis Encoder. ME=1 for Y Axis Encoder. ME=2 for X Auxiliary Encoder Input. ME=3 for Y Auxiliary Encoder Input. Please see sections 5.4 above and 5.5 above for more information about Gearing and ECAM Motion Modes operation. Attributes: 10-72 Type: Axis related: Array: Assignment: Command Allows parameter: Scope: Restrictions: Save to Flash: Default Value: Range: Parameter. Yes. No. Yes. ---. All. None. Yes. 0. 0 ÷3. Control and Robotics Solutions Ltd. Revision 3.10, January 2005 Syntax: XMM=1; YMM AMM=0 ‘ Set X Master Encoder as Y ‘ Report Master Encoder of Y Axis ‘ Set All MM=0 Examples: See syntax examples and sections 5.4 above and 5.5 above. See Also: FR, MM, and sections 5.4 above and 5.5 above for more information. Control and Robotics Solutions Ltd. 10-73 SC-AT – Software User’s Manual and Commands Reference 10.5.42. MF – Motor Fault Reason 10.5.42.1. MF – Motor Fault Reason in SC-AT-4M Controllers Purpose: “MF” is a read only parameter reporting the last motor fault reason. “MF” is automatically updated by the real time controller firmware. As actual Motor Faults always causes an MO=0 condition (Motor Disable), the purpose of the “MF” parameter is to latch the cause of the last fault, since when the motor is disabled, usually the immediate fault cause will disappear. The following Motor Fault reasons are currently reported: MF Value 0 1 MF Code Description MF_NO_FAULT MF_DRV_FLT None – Normal Operation. Fault caused buy a Driver Error for a specific axis (DRV_FLT H/W line was asserted). Fault caused buy the general Abort Input (ABORT H/W line was asserted). Fault caused for a specific axis, when its position error “PE” is exceeding the allowed maximum position error for that axis (when : Abs(PE) > ER). Fault caused for a specific axis when a Motor Stuck Condition is detected. Motor Stuck is a condition that the servo command is saturated (reaching “TL”) for more then 0.5 seconds, and no motion is detected. Fault cause by an encoder QUAD Error – If Encoder Error Detection is enabled. Fault cause by an encoder Disconnected Error – If Encoder Error Detection is enabled. 2 MF_ABORT_INPUT 3 MF_HIGH_ERR 4 MF_MOTOR_STUCK 0x40 MF_ENC_ERR_1 0x80 MF_ENC_ERR_2 Table 19: Motor Fault Cause Reasons - (MF) Codes. Note: The “MF_ENC” codes can be OR’ed with the “MF_DRV_FLT” when asserted. These are the “MF” parameter attributes: Attributes: 10-74 Type: Axis related: Array: Assignment: Command Allows parameter: Scope: Restrictions: Save to Flash: Default Value: Range: Parameter. Yes. No. No. ---. All. None. No. 0. See Above. Control and Robotics Solutions Ltd. Revision 3.10, January 2005 Syntax: XMF AMF ‘ Report Motor Fault for X axis. ‘ Report value of MF for all axes. Examples: --- See Also: EM, and Section 7.2 above for more information about software generated faults. Control and Robotics Solutions Ltd. 10-75 SC-AT – Software User’s Manual and Commands Reference 10.5.42.2. MF – Motor Fault Reason in SC-AT-2M Controllers Purpose: “MF” is a read only parameter reporting the last motor fault reason. “MF” is automatically updated by the real time controller firmware. As actual Motor Faults always causes an MO=0 condition (Motor Disable), the purpose of the “MF” parameter is to latch the cause of the last fault, since when the motor is disabled, usually the immediate fault cause will disappear. On the SC-AT-2M, the Motor Fault reason parameter holds encoded information about the actual fault cause as follows: • Lower 16 bits of “MF” hold Motor Fault reason as generated and set by the real time firmware. • Upper 16 bits of “MF” holds the extended Motor Fault reason, as latched by the hardware. The lower 16 bits of “MF” represent a general fault cause number as defined in the following table: Lower 16 Bits of MF: MF Value MF Code Description 0 MF_NO_FAULT None – Normal Operation. 1 MF_DRV_FLT Fault caused buy a Driver Error for a specific axis (DRV_FLT H/W line was asserted). 2 MF_ABORT_INPUT Fault caused buy the general Abort Input (ABORT H/W line was asserted). 3 MF_HIGH_ERR Fault caused for a specific axis, when its position error “PE” is exceeding the allowed maximum position error for that axis (when : Abs(PE) > ER). 4 MF_MOTOR_STUCK Fault caused for a specific axis when a Motor Stuck Condition is detected. Motor Stuck is a condition that the servo command is saturated (reaching “TL”) for more then 0.5 seconds, and no motion is detected. Table 20: Motor Fault Cause Reasons - (MF) Codes in SC-AT-2M. The Upper 16 bits of “MF” represent extended fault source options, and they are set ONLY when the lower 16 bits of MF equals to “1” (i.e. the motor fault type is Driver Fault). The additional fault source information is defined in the following table: 10-76 Control and Robotics Solutions Ltd. Revision 3.10, January 2005 Upper 16 Bits of MF (Valid Only When Low16Bits(MF)==1): MF Bit# Fault Source MF Bit# (0 Based) Fault Source (0 Based) (16+) 0 Internal Type Driver Fault (16+) 8 Not Used (set to 0) (16+) 1 External Type Driver Fault (16+) 9 Not Used (set to 0) (16+) 2 Under Voltage Fault (PD-AT-2M) (16+) 10 Not Used (set to 0) (16+) 3 Over Voltage Fault (PD-AT-2M) (16+) 11 Not Used (set to 0) (16+) 4 Encoder A quad B Error (16+) 12 Not Used (set to 0) (16+) 5 Not Used (set to 0) (16+) 13 Not Used (set to 0) (16+) 6 Not Used (set to 0) (16+) 14 Not Used (set to 0) (16+) 7 Encoder Disconnect Line Error (16+) 15 Not Used (set to 0) Table 21: Extended Motor Fault Cause Reasons - (MF) Codes in SC-AT-2M. Note: The extended (upper 16 bits) of “MF” codes are OR’ed with the “MF_DRV_FLT” when asserted. These are the “MF” parameter attributes: Attributes: Type: Axis related: Array: Assignment: Command Allows parameter: Scope: Restrictions: Save to Flash: Default Value: Range: Parameter. Yes. No. No. ---. All. None. No. 0. See Above. Syntax: XMF AMF ‘ Report Motor Fault for X axis. ‘ Report value of MF for all axes. Examples: --See Also: EM, and Section 7.2 above for more information about software generated faults. Control and Robotics Solutions Ltd. 10-77 SC-AT – Software User’s Manual and Commands Reference 10.5.43. ML – Magnetic Location (SC-AT-4M ONLY) Purpose: “ML”, the Magnetic Location (or Magnetic Position), is a special parameter related to Brushless SIN commutation mode supported by the SC-AT-4M special features. “ML” holds the magnetic angle of the motor from 0° (when ML=0) to 360° (when ML=MP), and is used to derive the 2 SIN commands for sinusoidal commutated brushless drivers. “ML”, the magnetic location is similar to “PS” the encoder position, except that its value is modulated by the “MP” (Magnetic Pitch) value. “ML” can be set to any value in the range of: 0 <= ML <= MP. When the position “PS” is changed by the encoder movement, “ML” is updated also (1:1 relation to PS). However, unlike “PS”, when the position increases beyond the value of “MP” or decreases below “0”, “ML” is modulated (wrapped) to keep the 0° to 360° range. “ML” is usually set by the user or a script program during the phase initialization process of a brushless sin commutated motor. Altering “ML” value during motion or after the phase initialization process, in a sin commutated motor is a serious error, and can cause unexpected abrupt motions Attributes: Type: Axis related: Array: Assignment: Command Allows parameter: Scope: Restrictions: Save to Flash: Default Value: Range: Parameter. Yes. No. Yes. ---. All. Needs Motion Off. No. 0. - 2,147,000,000 ÷ 2,147,000,000. Syntax: XML=150000 YML ‘ Set X Axis Magnetic Position to 150,000 encoder counts ‘ Report value of Y axis Magnetic Location Examples: --See Also: PS, MP, and section 8.5 above for more information about SIN commutation. 10-78 Control and Robotics Solutions Ltd. Revision 3.10, January 2005 10.5.44. MM – Motion Mode Purpose: Set the controller Motion mode for the next Motion. Currently, the following motion modes are supported: MM=0 – Pint to Point. MM=1 – Jogging. MM=2 – Position Based Gearing. MM=5 – Position Based ECAM. MM=8 – Step Command (no profiler). Other Motion modes will be supported by later firmware versions of the controller. Please refer to the chapter 5 above in this User’s Manual for further information about the supported motion modes. The MM command is restricted to No Motion condition. Trying to change MM value while motion is in progress will generate an “EC_NEEDS_MOTION_OFF” error # 50. Attributes: Type: Axis related: Array: Assignment: Command Allows Parameter: Scope: Restrictions: Save to Flash: Default Value: Range: Parameter. Yes. No. Yes. ---. All. Needs Motion Off. Yes. 0. 0 ÷ 8. Syntax: XMM=1; ZMM AMM=0 ‘ Set X Axis MM=1. ‘ Report value of MM for Z axis. ‘ Set MM= 0 in all axes. Examples: The example shows starting a Normal (Non-Repetitive) motion in X axis from Position “0” to Position “100,000”. XMO=1;XPS=0 XMM=0;XSM=0 XAP=100000 XAC=250000 XDC=500000 ‘ Enables the Motor and Set Position = “0”. ‘ Set Normal Point To Point Motion Mode. ‘ Set Next PTP absolute location to “100,000” counts. ‘ Set Acceleration to “250,000”. ‘ Set Acceleration to “500,000”. Control and Robotics Solutions Ltd. 10-79 SC-AT – Software User’s Manual and Commands Reference XSP=25000 XBG ‘ Set Speed to “25,000”. ‘ Start a Motion The following code example shows starting a Jog motion in the Y axis using SP=-50,000 counts/sec (Negative Motion). YMO=1;YPS=0 YMM=1;YSM=0 YAC=250000 YDC=500000 YSP=-50000 YBG ‘ Enables the Motor and Set Position = “0”. ‘ Set Normal JOG Motion Mode. ‘ Set Acceleration to “250,000”. ‘ Set Acceleration to “500,000”. ‘ Set Speed to “-50,000”. ‘ Start a Motion The next example shows a STEP motion in X axis from Position “0” to Position “100”. Note that in STEP motions there is no profile, so AC/SP/DC may not be set. When the BG command is issued, the reference position of the relevant axis is set immediately to the value of AP. Note that MM=8 can be combined with SM=1 to generate repetitive STEP motions! XMO=1;XPS=0 XMM=8;XSM=0 XBG ‘ Enables the Motor and Set Position = “0”. ‘ Set Normal STEP Motion Mode. ‘ Start a Motion See Also: SM, BG, WT, MO, and chapter 5 above in this User’s Manual for further information about the supported motion modes. 10-80 Control and Robotics Solutions Ltd. Revision 3.10, January 2005 10.5.45. MO – Motor ON (Enable / Disable the Servo Loop) Purpose: Set Motor On or Off. MO=0 will turn the relevant motor off (disabling the motor driver), and MO=1 will set the motor ON (enabling the driver). Note that when MO=1 command is issued, the DP (desired Position) is set to PS (actual position). The SC-AT-2M controllers, support special hardware configurations for 1 or 2 axes mode. When, in a single axis configuration, an MO=1 assignment is given to the nonsupported axis, a special error code will be issued (EC=54, AXIS_NOT_SUPPORTED). Attributes: Type: Axis related: Array: Assignment: Command Allows parameter: Scope: Restrictions: Save to Flash: Default Value: Range: Parameter. Yes. No. Yes. ---. All. None. No. 0. 0 ÷ 1. Syntax: XMO=1; ZMO AMO=0 ‘ Enable X Motor (set XMO to 1). ‘ Report value of MO for Z axis. ‘ Set MO=0 in all axes (Disable All Axes) Examples: The following code example shows starting a Jog motion in the Y axis using SP=-50,000 counts/sec (Negative Motion). MO must be set to “1” to start the motion. YMO=1 YPS=0 YMM=1;YSM=0 YAC=250000 YDC=500000 YSP=-50000 YBG ‘ Enables the Motor and Set Position = “0”. ‘ Set Position = “0”. ‘ Set Normal JOG Motion Mode. ‘ Set Acceleration to “250,000”. ‘ Set Acceleration to “500,000”. ‘ Set Speed to “-50,000”. ‘ Start a Motion See Also: NC, BG, MM, SM, PS Control and Robotics Solutions Ltd. 10-81 SC-AT – Software User’s Manual and Commands Reference 10.5.46. MP – Magnetic Pitch (SC-AT-4M ONLY) Purpose: “MP”, the Magnetic Pitch, is a special parameter related to Brushless SIN commutation mode supported by the SC-AT-4M special features. “MP” holds the position value in encoder units of a full 360° (magnetic degrees) of the motor. The actual number should match the Motor manufacturer data and the specific encoder resolution used in the application. “MP” is used in conjunction with the Magnetic Location angle “ML” of the motor, to derive the 2 SIN commands for sinusoidal commutated brushless drivers. For example, in a high resolution linear motor stage with magnetic pitch of 32 mm and a linear 1 micron resolution encoder, the magnetic pitch is 32,000 counts (MP=32,000). Attributes: Type: Axis related: Array: Assignment: Command Allows parameter: Scope: Restrictions: Save to Flash: Default Value: Range: Parameter. Yes. No. Yes. ---. All. Needs Motor Off. Yes. 0. 0 ÷ 2,147,000,000. Syntax: XMP=275000 YMP ‘ Set X Axis Magnetic Position to 275,000 encoder counts ‘ Report value of Y axis Magnetic Pitch Examples: --See Also: PS, ML, and section 8.5 above for more information about SIN commutation. 10-82 Control and Robotics Solutions Ltd. Revision 3.10, January 2005 10.5.47. MS – Motion Status Purpose: The “MS” Motion Status parameter holds information on the current motion status of specific axes. This is a read only, axis related parameter. When an axis is not in motion, its “MS” parameter is “0” by definition, i.e. all bits are cleared (whether a motion did not start at all, or ended due to any reason). The “MS” parameter is a bit field array. Each bit represents a certain motion status. More then one bit can be high i.e. logically “1” during a motion sequence. “MS” is most commonly used to monitor end of motion condition. Another way to monitor end of motion is to use the extended WAIT commands (“QW”). Please see the “SC-AT Macro (Scripts) Language features User’s Manual” for more information. The following table describes the current supported “MS” bits: MS BIT 0 1 2 3 4 5 6 31-7 MS Code MS_IN_MOTION MS_IN_STOP MS Hex Value 0x00000001 0x00000002 MS_IN_ACC MS_IN_DEC Reserved Reserved MS_IN_WAIT_REP 0x00000004 0x00000008 0x00000010 0x00000020 0x00000040 Reserved 0x00000080 Description Whenever this bit in “1”, the axis is in Motion. This bit “1”, when the axis is stopping due to user command or any other non-normal stop condition, such as Limit, etc. This bit indicates that the axis is accelerating. This bit indicates that the axis is decelerating. Not Used In This Version. Not Used In This Version. This bit indicates that the axis is waiting for the Wait Time to elapse in Repetitive PTP motions. Not Used In This Version. Table 22: “MS” Motion Status Parameter Bits Description The “MS” parameter has the following attributes: Attributes: Type: Axis related: Array: Assignment: Command Allows parameter: Scope: Restrictions: Save to Flash: Default Value: Range: Parameter. Yes. No. No. ---. All. None. No. 0. 0 ÷ N.A. Control and Robotics Solutions Ltd. 10-83 SC-AT – Software User’s Manual and Commands Reference Syntax: XMS AMS ‘ Report value MS for X axis. ‘ Report value MS for all axes. Examples: The following simple example demonstrates a repetitive motion in the X axis, not using the internal Repetitive PTP mode, but rather by a simple script that polls the “MS” to check end of motion and to initiate a backward motion and so on. XMO=1;XPS=0 XMM=0;XSM=0 XAC=250000 XDC=500000 XSP=25000 ‘ Enables the Motor and Set Position = “0”. ‘ Set Normal Point To Point Motion Mode. ‘ Set Acceleration to “250,000”. ‘ Set Acceleration to “500,000”. ‘ Set Speed to “25,000”. #X_START ‘ Label for REP PTP Motion XAP=100000 ‘ Set Next PTP absolute location to “100,000” XBG ‘ Start a Motion @while (XMS != 0) ‘ Wait for End Of Motion in X (XMS=0) @endwhile XAP=0 XBG @while (XMS != 0) @endwhile ‘ Set Next PTP absolute location to “0” ‘ Start a Motion ‘ Wait for End Of Motion in X (XMS=0) XJP, #X_START See Also: BG, EM, MM, SM, TR, TT. 10-84 Control and Robotics Solutions Ltd. Revision 3.10, January 2005 10.5.48. NC – No Control (Set Open Loop Mode) Purpose: The “NC” parameter keyword set the controller to open-loop mode. In this mode the user can command a direct analog output command to the controller Analog Command (Acmd) output, bypassing the PID/PIV controller filter. Please refer to the “TC” command for further information. The value of “NC” is not saved to the Flash memory, and each time the controller boots up, the value of “NC” is set to “0” by default (normal close loop operation). In order to switch to Open Loop mode, the user should switch the motor off (set MO=0 for the relevant axis), then set the value of “NC” to “1” (NC=1), and then switch the motor ON back again. After MO=1 with NC=1, by default the analog output value commend is “0” to avoid motor motion (TC is set automatically to zero when MO=1). In this state, the user can control the actual analog output value using the “TC” (Torque Command parameter keyword). It should be noted that in Open Loop mode the actual analog command is still limited by the “TL” (Torque Limit) parameter. Also, the control 2nd order filter may be used to monitor its operation and actual effect on the analog output value. The operation of the filter can of course be disabled by an appropriate flag (see 2nd order filter definitions in this User’s Manual). The user can choose to record the actual Driver Command (“PO”) value. In case the 2nd order filter is enabled, the actual value recorded is the step response of the filter. If no 2nd order filter is used, the actual value recorded will be equal to the value commanded by “TC”. In any case the value is saturated by “TL”. “NC” can also be used for the special SIN commutation operation mode, to allow phase initialization process of brushless DC motors. For a complete description of the “NC” parameter options for SIN commutation support please see section 8.5.2.5 above “Analog Commands in SIN Mode and Open Loop Operation – NC” Please note, the special SIN commutation operation mode is Currently Not Yet Supported in the SC-AT-2M Firmware. In order to switch back again to close loop operation the motor should be disabled (MO=0), and only then “NC” may be set back to “0”. The “NC” command is restricted to Motor OFF condition. Trying to modify “NC” while motor is enabled (MO=1) will generate an “EC_NEEDS_MOTOR_OFF” error # 48. The “NC” parameter has the following attributes: Attributes: Type: Axis related: Array: Assignment: Command Allows parameter: Parameter. Yes. No. Yes. ---. Control and Robotics Solutions Ltd. 10-85 SC-AT – Software User’s Manual and Commands Reference Scope: Restrictions: Save to Flash: Default Value: Range: All. NEEDS_MOTOR_OFF. No. 0. 0 ÷ 3. Syntax: XNC=0; ZNC ANC=1 ‘ Disable Open Loop (default) ‘ Report Open loop Mode for Z axis. ‘ Set NC=1 (Open Loop) for all axes. Examples: The following code example enables Open Loop mode on Y axis, and set the Y axis analog command output to +5 volts and –10 volts: YMO=0 YNC=1 YMO=1 YTL=32763 YTC=16384 ‘ Must Disables the Motor before changing the NC. ‘ Set NC=1 to indicate Open Loop for that axis. ‘ Set MO=1 for Y Again. ‘ Set Command saturation to ± 10 Volts. ‘ Set command value to +50% (+5 Volts). YTC=-32763 ‘ Set command value to -100% (-10 Volts). YMO=0 YNC=0 ‘ Disables the Motor before changing the NC. ‘ Restore Close loop mode. See Also: TC, TL, 2nd order filter definitions, Data Recording, and section 8.5.2.5 above. 10-86 Control and Robotics Solutions Ltd. Revision 3.10, January 2005 10.5.49. OC – Output Clear Bit Command Purpose: The “OC” command Clears (Set to “0”) a specific Bit in the digital Output Port word. Unlike the “OP” parameter that only allows simultaneous access to all the output bits, the “OC” command allows bit wise clear operations on the digital output word. This is required for example when only a certain bit is need to be cleared, without the other bits changed. Using the “OC” Output Clear Bit command saves the user from first reading the value of “OP”, clearing one of its bits using a logical “&” operator, and then re-assign “OP” (read-modify-write). When accessing the output port bits from two separate script tasks, this is necessary, otherwise the value of “OP” can be wrong. The “OC” Output Clear Bit command must receive a parameter, indicating the specific bit to mask (currently: 1 ÷ 8). Calling the command without a parameter will generate an “EC_PARAM_EXPECTED” (EC=38) error. Calling the command with an out of range parameter, will generate an “EC_PARAM_OUT_OF_RANGE” (EC=34) error. Attributes: Type: Axis related: Array: Assignment: Command Allows parameter: Scope: Restrictions: Save to Flash: Default Value: Command Parameter Range: Command. No. No. ---. Must have, Bit # (1 ÷ 8). All. None. ---. ---. 1 ÷ 8. Syntax: XOC,1 XOC,8 ‘ Clears the first bit (LSB, Bit 0) in OP to “0”. ‘ Clears the last bit (MSB, Bit 7) in OP to “0”. Examples: XOP=255 XOC,1 ‘ Set ALL digital outputs to High (“1”) logic. ‘ Clears the first bit (LSB, Bit 0) in OP to “0” (OP=254) XOP=255 XOC,8 ‘ Set ALL digital outputs to High (“1”) logic. ‘ Clears the last bit (MSB, Bit 7) in OP to “0” (OP=127) See Also: OL, OP, OS. Control and Robotics Solutions Ltd. 10-87 SC-AT – Software User’s Manual and Commands Reference 10.5.50. OL – Output Logic Purpose: Sets (and get) the SC-AT Output Port Logic control word. Using the “OL” Output Logic parameter, the user can control the actual H/W logic level of each bit in the controller Output Port Word. Each bit in “OL” corresponds to the same bit in “OP”, and to a specific H/W digital output. The bit order of “OL” is the same as “OP”, i.e.: • • • • Bit 0 of OL – Controls the logic of digital output port #1. Bit 1 of OL – Controls the logic of digital output port #2. … Bit 7 of OP – Controls the logic of digital output port #8. “OL” is non-axis related, so axis-preceding character has no effect. “OL” is usually set to a pre-defined value after the initial application setup, and then “OP”, “OS” or “OC” should be used to control the outputs. Attributes: Type: Axis related: Array: Assignment: Command Allows parameter: Scope: Restrictions: Save to Flash: Default Value: Range: Parameter. No. No. Yes. ---. All. None. Yes. 0. 0 ÷ 255. Syntax: XOL=0; AOL XOL=128 XOL=255 ‘ Set non-inverted logic to all digital Outputs. ‘ Report value of OL, the output port word. ‘ Invert the logic of output port #8. ‘ Invert the logic of all output ports. Examples: --See Also: OC, OP, OS 10-88 Control and Robotics Solutions Ltd. Revision 3.10, January 2005 10.5.51. OM – I/O Modes Hardware Configuration Purpose: The “OM” parameter is used to configure the programmable Hardware I/O interfaces of the SC-AT-4M controller. Notes: • In the SC-AT this parameter is currently used to configure the programmable Hardware I/O interfaces. This functionality may be implemented in future firmware versions in a different way. • In the old SC-2M controller, the “OM” parameter was used to configure S/W Programmable Outputs logic. This option is not supported on the current SC-AT controllers firmware versions ! It may however be implemented in future firmware versions. Please consult Control and Robotics Solutions for further information regarding this option. This parameter was used in the SC-2M to reflect the following internal controller states: - OM = 0 – to disable the alternate function. - OM = 1 – for alternate function on "In Motion". - OM = 2 – for alternate function on "In Constant Speed" (no Acceleration or Dec.). - OM = 3 – for alternate function on "In Acceleration or Deceleration". - OM = 4 – for alternate function on "In Stop". - OM = 5 – for alternate function on "In Target". - OM = 6 – for alternate function on "Motor On". 10.5.51.1. OM – I/O Modes Hardware Configuration For The SC-AT-4M Although “OM” is an axes related parameter (and it is implemented as such), in the SCAT-4M firmware there is no actual relation between the XOM, YOM, etc. to actual axes. The distinct axes identifiers are used in this case only to access more then one optional hardware registers of the SC-AT-4M. Writing to “OM” immediately changes the corresponding internal hardware register values. In the current firmware version, there are only 2 functional registers related to the “OM” parameter. These are: “OM” Axis # XOM Hardware Register IO_MODE_0 YOM IO_MODE_1 ZOM ÷VOM ---- Functionality Controls Digital Outputs Assignment (as normal or Compare Output functions), and Fast Digital Inputs. Controls Encoder Capture I/O signal Source and logic. Currently Not in use ! Should be left not assigned for future compatibility. Table 23: "OM" - I/O Mode Configuration Functionality Definitions Control and Robotics Solutions Ltd. 10-89 SC-AT – Software User’s Manual and Commands Reference IO_MODE_0 – “XOM”: The following table describes the IO_MODE_0 bits order and specific description: IO_MODE_0 : Bit # 31 ÷ 0 3 3 2 2 2 2 2 2 2 2 2 2 1 1 1 1 1 1 1 1 1 1 9 8 7 6 5 4 3 2 1 0 1 0 9 8 7 6 5 4 3 2 1 0 9 8 7 6 5 4 3 2 1 0 Spare Fast DIn OM-8 OM-7 OM-6 OM-5 OM-4 OM-3 OM-2 OM-1 Bits 23 .. 0 Name IO_MODE_0 Bits Description OM-1 ÷ OM-8 Each digital output can be assigned as a normal output, or as a special Compare Function output, using a 3-bit configuration field OM-i (i indicates the relevant digital output pin number relating from DOut1 to DOut8). Each one of the outputs can be assigned to any of the axes Compare Modules. The first two bits of OM-i [1 ÷ 0] select the source axis for the compare output. One of four options is possible as follows: - [0,0] : Select X Compare Source for Output - i. - [0,1] : Select Y Compare Source for Output - i. - [1,0] : Select Z Compare Source for Output - i. - [1,1] : Select W Compare Source for Output – i. OM-i [2]: Is the output mode selection bit defining whether the output is assigned to a standard output (controlled by “OP”) or an output of a compare function. “0” defines a standard output, “1” defines a compare function output. When the mode select bit is cleared (“0”), then the source selection bits are ignored. 27 .. 24 Fast Digital Inputs These bits control the configuration of digital inputs 1 through 3 respectively as standard or FAST INPUTS. Bit #27 is not in use and should be left “0”. Each bit set to”1” defines usage of a Fast Digital Input. When set to “0” the standard input is used. Please note that in order to set FAST INPUTS, special Hardware configuration is also required. Please refer to the SC-AT-4M Hardware User’s Manual, and to the section describing Advanced Features, Capture Options in this User’s Manual (see section 8.2.7.2). 31 .. 28 Reserved These bits are currently not used, and should be left “0” for future compatibility. Table 24: SC-AT-4M - "XOM" - IO_MODE_0 Bits Configuration Description 10-90 Control and Robotics Solutions Ltd. Revision 3.10, January 2005 IO_MODE_1 – “YOM”: The following table describes the IO_MODE_1 bits order and specific description: IO_MODE_1 : Bit # 31 ÷ 0 3 3 2 2 2 2 2 2 2 2 2 2 1 1 1 1 1 1 1 1 1 1 9 8 7 6 5 4 3 2 1 0 1 0 9 8 7 6 5 4 3 2 1 0 9 8 7 6 5 4 3 2 1 0 W Axis – Capture Z Axis – Capture Y Axis - Capture X Axis - Capture Event Source Event Source Event Source Event Source Definition Definition Definition Definition Bits 7 .. 0 Name X Axis Evt IO_MODE_0 Bits Description Bits [7–0] of IO_MODE_1 controls the Capture Event Source for the X Axis. The following bit order definitions applies: - Bits [3 – 0] selects the number of digital input to be used as a capture input trigger source for that axis: - Bits[3..0]=0, Select Digital Input #1 (DInp1). - …. - Bits[3..0]=15, Select Digital Input #15 (DInp15). - Bit 4 selects weather Normal Digital Inputs are used i.e. DInp1 to DInp16 (if set to “0”), or weather the dedicated inputs are used, i.e. XRLS, XFLS, etc., (if set to “1”). For a complete list of all dedicated inputs please see the “IP” keyword reference. Dedicated “IP” bits starting from Bit #16 (zero based) as X-RLS, and so on. - Bit 5 select whether the capture is on one of the inputs defined by Bits[4..0] (if set to “0), or on this axis Encoder Index Input (if set to “1). - Bit 6 Select Input polarity. “0” set Normal pulse polarity, “1” set Inverted pulse polarity. - Bits 7 – 8 : Reserved. Should be “0” for future compatibility. 15 .. 8 Y Axis Evt Bits 15–8 of IO_MODE_1 control the Capture Event Source for the Y axis. Bit order within this field is similar in all axes. 23 .. 16 Z Axis Evt Bits 23–16 of IO_MODE_1 control the Capture Event Source for the Z axis. Bit order within this field is similar in all axes. 31 .. 24 W Axis Evt Bits 31–24 of IO_MODE_1 control the Capture Event Source for the W axis. Bit order within this field is similar in all axes. Table 25: SC-AT-4M "YOM" - IO_MODE_1 Bits Configuration Description Control and Robotics Solutions Ltd. 10-91 SC-AT – Software User’s Manual and Commands Reference The “OM” parameter has the following attributes: Attributes: Type: Axis related: Array: Assignment: Command Allows parameter: Scope: Restrictions: Save to Flash: Default Value: Range: Parameter. Yes. No. Yes. ---. All. None. Yes. 0. -2,124,000,000 ÷ +2,124,000,000. Syntax: XOM=0 XOM ‘ Reset IO_MODE_0 register. ‘ Report Value of IO_MODE_0. XOM=0 XOM ‘ Reset IO_MODE_1 register. ‘ Report Value of IO_MODE_1. Accessing OM with other axes identifiers has no effect, and should be avoided for future compatibility. Examples: The following assignment set All digital outputs as standard normal outputs, controlled by the “OP” parameter. XOM=0 The following assignment set Digital Output #1 (DOut1) to be assigned to X Axis Compare, Digital Output #2 (DOut2) to be assigned to Y Axis Compare, and All other digital outputs as standard normal outputs, controlled by the “OP” parameter. In this MODE accessing the two low bits of “OP” (by modifying “OP” value or with the “OC” and “OS” Output Clear and Set Bit commands) will only modify the value of “OP”, but will not affect the actual hardware output pins. XOM=44 The following assignment set only Digital Output #1 (DOut1) to be assigned to X Axis Compare. All other digital outputs as standard normal outputs, controlled by the “OP” parameter. XOM=4 10-92 Control and Robotics Solutions Ltd. Revision 3.10, January 2005 The following assignment set only Digital Output #1 (DOut1) to be assigned to Y Axis Compare. All other digital outputs as standard normal outputs, controlled by the “OP” parameter. XOM=32 The following assignment defines the X Axis Capture Source to be the X Encoder Index Input. YOM=32 The following example demonstrates simultaneous independent usage of X and Y axes, axes Compare and Capture functions. • The X axis is configured to generate Compare DOut1 is connected by external wiring to programmed to latch the Compare locations. • The Y axis is configured to generate Compare DOut2 is connected by external wiring to programmed to latch the Compare locations. pulses on DOut1, and assuming that Din1, the X Capture function is pulses on DOut2, and assuming that Din2, the Y Capture function is ‘ Set Din1 and Din2 as Fast Inputs, and program X Compare to DOut1 ‘ and Y Compare to DOut2. ‘ The resulted value is: 2^25+2^24+32+8+4 is set to IO_MODE_0. ‘ ---------------------------------------------------------------------------------‘ XOM=50331692 ‘ Set IO_MODE_0 YOM=256 ‘ Set X Capture on Din1, Y Capture on Din2. See Also: OP, IP, Compare Function (See section 8.2), Capture Function (see section 8.2.7.2), The SC-AT-4M Hardware User’s Manual for references about Fast Digital Outputs and Inputs. Control and Robotics Solutions Ltd. 10-93 SC-AT – Software User’s Manual and Commands Reference 10.5.51.2. OM – I/O Modes Hardware Configuration For The SC-AT-2M Although “OM” is an axes related parameter (and it is implemented as such), in the SCAT-2M firmware there is no actual relation between the XOM, YOM, etc. to actual axes. The distinct axes identifiers are used in this case only to access more then one optional hardware registers of the SC-AT-2M. Writing to “OM” immediately changes the corresponding internal hardware register values. In the current firmware version, there are only 2 functional registers related to the “OM” parameter. These are: “OM” Axis # XOM Hardware Register IO_MODE_0 YOM IO_MODE_1 Functionality Controls Digital Outputs Assignment (as normal or Compare Output functions). Controls Encoder Capture I/O signal Source and logic. Table 26: "OM" - I/O Mode Configuration Functionality Definitions IO_MODE_0 – “XOM”: The following table describes the IO_MODE_0 bits order and specific description: IO_MODE_0 : Bit # 31 ÷ 0 3 3 2 2 2 2 2 2 2 2 2 2 1 1 1 1 1 1 1 1 1 1 9 8 7 6 5 4 3 2 1 0 1 0 9 8 7 6 5 4 3 2 1 0 9 8 7 6 5 4 3 2 1 0 Out Out Reserved 6 Src Bits 1 .. 0 3 .. 2 31 .. 4 Name DOut5 Src IO_MODE_0 Bits Description Defines the DOut5 (Fast output) source: DOut6 Src 00 – As normal Output. (0) 01 – From compare X (1) 10 – From compare Y (2) Defines the DOut6 (Fast output) source: Reserved Src 00 – As normal Output. (0) 01 – From compare X (1) 10 – From compare Y (2) These bits are currently not used, and should be left “0” for future compatibility. Table 27: SC-AT-2M "XOM" - IO_MODE_0 Bits Configuration Description 10-94 5 Control and Robotics Solutions Ltd. Revision 3.10, January 2005 IO_MODE_1 – “YOM”: The following table describes the IO_MODE_1 bits order and specific description: IO_MODE_1 : Bit # 31 ÷ 0 3 3 2 2 2 2 2 2 2 2 2 2 1 1 1 1 1 1 1 1 1 1 9 8 7 6 5 4 3 2 1 0 1 0 9 8 7 6 5 4 3 2 1 0 9 8 7 6 5 4 3 2 1 0 Y YAxis Reserv X X Axis Reserved P O L Bits 7 .. 0 Name X Axis Evt X Pol 7 .. 5 Reserved 11 .. 8 X Axis Evt 12 Y Pol 31..13 Reserved Capture Event Source Def ed P O L Capture Event Source Def IO_MODE_0 Bits Description Bits [3–0] of IO_MODE_1 controls the Capture Event Source for the X Axis. The following bit order definitions applies: “0000” X Event source is DIN1. (0) “0001” X Event source is DIN2. (1) “0010” X Event source is DIN3. (2) “0011” X Event source is DIN4. (3) “0100” X Event source is DIN5. (4) “0101” X Event source is DIN6. (5) “0110” X Event source is DIN7. (6) “0111” X Event source is DIN8. (7) “1000” X Event source is DIN_FAST_9. (8) “1001” X Event source is DIN_FAST_10. (9) “1010” X Event source is INDEX X. (10) “1011” X Event source is INDEX Y. (11) Select Input polarity for Axis X. “0” set Normal pulse polarity, “1” set Inverted pulse polarity. These bits are currently not used, and should be left “0” for future compatibility Bits [11–8] of IO_MODE_1 controls the Capture Event Source for the Y Axis. The following bit order definitions applies: “0000” X Event source is DIN1. (0) “0001” X Event source is DIN2. (1) “0010” X Event source is DIN3. (2) “0011” X Event source is DIN4. (3) “0100” X Event source is DIN5. (4) “0101” X Event source is DIN6. (5) “0110” X Event source is DIN7. (6) “0111” X Event source is DIN8. (7) “1000” X Event source is DIN_FAST_9. (8) “1001” X Event source is DIN_FAST_10. (9) “1010” X Event source is INDEX Y. (10) “1011” X Event source is INDEX X. (11) Select Input polarity for Axis Y. “0” set Normal pulse polarity, “1” set Inverted pulse polarity. These bits are currently not used, and should be left “0” for future compatibility Table 28: SC-AT-2M "YOM" - IO_MODE_1 Bits Configuration Description Control and Robotics Solutions Ltd. 10-95 SC-AT – Software User’s Manual and Commands Reference The “OM” parameter has the following attributes: Attributes: Type: Axis related: Array: Assignment: Command Allows parameter: Scope: Restrictions: Save to Flash: Default Value: Range: Parameter. Yes. No. Yes. ---. All. None. Yes. 0. -2,124,000,000 ÷ +2,124,000,000. Syntax: XOM=0 XOM ‘ Reset IO_MODE_0 register. ‘ Report Value of IO_MODE_0. XOM=0 XOM ‘ Reset IO_MODE_1 register. ‘ Report Value of IO_MODE_1. Accessing OM with other axes identifiers has no effect, and should be avoided for future compatibility. Examples: The following assignment set All digital outputs as standard normal outputs, controlled by the “OP” parameter. XOM=0 The following assignment set Digital Output #5 (DOut5) to be assigned to X Axis Compare, Digital Output #6 (DOut6) to be assigned to Y Axis Compare. In this MODE accessing the bits 5 and 6 of “OP” (by modifying “OP” value or with the “OC” and “OS” Output Clear and Set Bit commands) will only modify the value of “OP”, but will not affect the actual hardware output pins. XOM=9 The following assignment set only Digital Output #5 (DOut5) to be assigned to X Axis Compare. All other digital outputs as standard normal outputs, controlled by the “OP” parameter. XOM=1 10-96 Control and Robotics Solutions Ltd. Revision 3.10, January 2005 The following assignment set only Digital Output #5 (DOut1) to be assigned to Y Axis Compare. All other digital outputs as standard normal outputs, controlled by the “OP” parameter. XOM=2 The following assignment defines the X Axis Capture Source to be the X Encoder Index Input. YOM=10 The following example demonstrates simultaneous independent usage of X and Y axes, axes Compare and Capture functions. • The X axis is configured to generate Compare pulses on DOut5, and assuming that DOut5 is connected by external wiring to Din9, the X Capture function is programmed to latch the Compare locations. • The Y axis is configured to generate Compare pulses on DOut6, and assuming that DOut6 is connected by external wiring to Din10, the Y Capture function is programmed to latch the Compare locations. ‘ Set X Compare to DOut5 and Y Compare to DOut6. ‘ The resulted value is: 5. ‘ ---------------------------------------------------------------------------------‘ XOM=9 ‘ Set IO_MODE_0 YOM=2312 ‘ Set IO_MODE_1:X Capture on Din9, Y Capture on Din10. See Also: OP, IP, Compare Function (See section 8.2), Capture Function (see section 8.2.7.2), The SC-AT-2M Hardware User’s Manual for references about Fast Digital Outputs and Inputs. Control and Robotics Solutions Ltd. 10-97 SC-AT – Software User’s Manual and Commands Reference 10.5.52. OP – Output Port Purpose: Sets (and gets) the SC-AT controller uncommitted digital Output Port bits. The SC-AT-4M servo controller supports 8 general-purpose digital outputs (please refer to the “SC-AT-4M Hardware User’s Manual” for more information about H/W interfaces of digital I/O). The SC-AT-2M servo controller supports 6 general-purpose digital outputs (please refer to the “SC-AT-2M Hardware User’s Manual” for more information about H/W interfaces of digital I/O). The “OP” parameter holds the Output Port word (bit array). Each bit in “OP” controls a single digital output bit port (as shown below). The user can of course read the value of “OP” in order to get the current Output Port word status. • • • • Bit 0 of OP – Controls digital output port #1. Bit 1 of OP – Controls digital output port #2. … Bit 7 of OP – Controls digital output port #8. “OP” controls simultaneous access to all the Output Port word bits at one assignment. In order to access one bit at a time (Set or Clear a specific bit), the new SC firmware includes 2 new commands: “OS” – That Set (to “1” logic) a specific output bit, and “OC” – That clears (to “0” logic) a specific output bit. Please see “OS” and “OC” references. The user can also control the actual H/W logic level of each output bit using the “OL” – Output Logic parameter. “OP” is non-axis related, so axis-preceding character has no effect. Attributes: Type: Axis related: Array: Assignment: Command Allows parameter: Scope: Restrictions: Save to Flash: Default Value: Range: Parameter. No. No. Yes. ---. All. None. No. 0. 0 ÷ 255. Syntax: XOP=0; AOP XOP=255 10-98 ‘ Set the Output Port to “0” (all bits cleared). ‘ Report value of OP, the output port word. ‘ Set ALL digital outputs to High (“1”) logic. Control and Robotics Solutions Ltd. Revision 3.10, January 2005 Examples: --See Also: OC, OL, OS, XOM. Control and Robotics Solutions Ltd. 10-99 SC-AT – Software User’s Manual and Commands Reference 10.5.53. OS – Output Set Bit Command Purpose: The “OS” command Sets (Set to “1”) a specific Bit in the digital Output Port word. Unlike the “OP” parameter that only allows simultaneous access to all the output bits, the “OS” command allows bit wise set operations on the digital output word. This is required for example when only a certain bit is need to be set, without the other bits changed. Using the “OS” Output Set Bit command saves the user from first reading the value of “OP”, setting one of its bits using a logical “|” operator, and then re-assign “OP” (read-modify-write). When accessing the output port bits from two separate script tasks, this is necessary, otherwise the value of “OP” can be wrong. The “OS” Output Set Bit command must receive a parameter, indicating the specific bit to set (currently: 1 ÷ 8). Calling the command without a parameter will generate an “EC_PARAM_EXPECTED” (EC=38) error. Calling the command with an out of range parameter, will generate an “EC_PARAM_OUT_OF_RANGE” (EC=34) error. Attributes: Type: Axis related: Array: Assignment: Command Allows parameter: Scope: Restrictions: Save to Flash: Default Value: Command Parameter Range: Command. No. No. ---. Must have, Bit # (1 ÷ 8). All. None. ---. ---. 1 ÷ 8. Syntax: XOS,1 XOS,8 ‘ Sets the first bit (LSB, Bit 0) in OP to “1”. ‘ Sets the last bit (MSB, Bit 7) in OP to “1”. Examples: XOP=0 XOS,1 ‘ Clears ALL digital outputs to Low (“0”). ‘ Set the first bit (LSB, Bit 0) in OP to “1” (OP=1) XOP=0 XOS,8 ‘ Clears ALL digital outputs to Low (“0”). ‘ Sets the last bit (MSB, Bit 7) in OP to “1” (OP=128) See Also: OC, OL, OP. 10-100 Control and Robotics Solutions Ltd. Revision 3.10, January 2005 10.5.54. PA – Parameters Array 10.5.54.1. PA – Parameters Array – SC-AT-4M Purpose: “PA” is a user general-purpose parameters Array. “PA” can be used during script program development for any purpose. The “PA” array is an axis related array, with size of 10x200 elements. Each element in the array is a LONG format number, which can be assigned, with any value at any time. The index range of the “PA” array is: 1 ÷ 200. As noted “PA” is a user general-purpose array, and is not used anywhere by the controller’s firmware code, unless the user has included a reference to it within a script program. Attributes: Type: Axis related: Array: Assignment: Command Allows parameter: Scope: Restrictions: Save to Flash: Default Value: Range: Parameter. Yes. Yes, size = [10][200]. Yes. ---. All. None. Yes. 0. - 2,147,000,000 ÷ 2,147,000,000. Syntax: XPA[1]=0; ZPA[10] APA[100]=1000 ‘ Set XPA[1] “0”. ‘ Report value of ZPA[10] ‘ Set for all axes : PA[100]=1,000. Examples: See Below. See Also: Please see “SC-AT - Advanced Multi-Axes Servo Controller - Script Programming Language and the Integrated Development Environment User’s Manual”, Section 3.5, “Variables And Indirect Addressing”. Control and Robotics Solutions Ltd. 10-101 SC-AT – Software User’s Manual and Commands Reference 10.5.54.2. PA – Parameters Array – SC-AT-2M Purpose: “PA” is a user general-purpose parameters Array. “PA” can be used during script program development for any purpose. The “PA” array is an axis related array, with size of 2x100 elements. Each element in the array is a LONG format number, which can be assigned, with any value at any time. The index range of the “PA” array is: 1 ÷ 100. As noted “PA” is a user general-purpose array, and is not used anywhere by the controller’s firmware code, unless the user has included a reference to it within a script program. Attributes: Type: Axis related: Array: Assignment: Command Allows parameter: Scope: Restrictions: Save to Flash: Default Value: Range: Parameter. Yes. Yes, size = [2][200]. Yes. ---. All. None. Yes. 0. - 2,147,000,000 ÷ 2,147,000,000. Syntax: XPA[1]=0; YPA[10] BPA[100]=1000 ‘ Set XPA[1] “0”. ‘ Report value of YPA[10] ‘ Set both axes : PA[100]=1,000. Examples: See Below. See Also: Please see “SC-AT - Advanced Multi-Axes Servo Controller - Script Programming Language and the Integrated Development Environment User’s Manual”, Section 3.5, “Variables And Indirect Addressing”. 10-102 Control and Robotics Solutions Ltd. Revision 3.10, January 2005 10.5.55. PE – Position Error Purpose: “PE” is a read only parameter, holding the actual servo loop positioning error. The Positioning Error (“PE”) is defined as the current desired position minus the actual position: PE=DP-PS. Whenever the servo loop is enabled (MO=1) in both open and close loop modes, the real time software computes and updates the value “PE”. When the motor is disabled (MO=0) DP=PS, so the position error is “0” by definition. Attributes: Type: Axis related: Array: Assignment: Command Allows parameter: Scope: Restrictions: Save to Flash: Default Value: Range: Parameter. Yes. No. No. ---. All. None. No. 0. - 8,000,000 ÷ 8,000,000. Syntax: XPE APE ‘ Report X axis Positioning Error PE. ‘ Report Positioning Error PE for all axes. Examples: --- See Also: ER, PS, DP. Control and Robotics Solutions Ltd. 10-103 SC-AT – Software User’s Manual and Commands Reference 10.5.56. PG – Position Compare Parameters Array 10.5.56.1. PG – Position Compare Parameters Array For The SC-AT-4M Purpose: The “PG” array elements controls the operation of the Position Compare Function. “PG” is an axis related array, sized [10 x 8]. Each axis has 8 parameters controlling the compare function operation as described below. The SC-AT-4M product support the Compare Function on axes X, Y, Z, W, so accessing the “PG” array with other axes identifiers has no effect. Please see section 8.2.5.1, Table 3: “PG” Array in SC-AT-4M - Compare Function Parameters Description in this user’s manual for full description of all “PG” array elements, purpose and limitations. The “PG” array parameter has the following attributes: Attributes: Type: Axis related: Array: Assignment: Command Allows parameter: Scope: Restrictions: Save to Flash: Default Value: Range: Parameter. Yes. Yes, size = [10][8]. Yes. ---. All. None. Yes. 0. - 2,147,000,000 ÷ 2,147,000,000. See Compare Function description for full limitations description. Syntax: XPG[1]=0 YPG[2]=100 WPG[7]=0 ZPG[6] ‘ Set X Axis PG[1] to “0” (set X axis Mode 0). ‘ Set Y Axis PG[2] to “100” (set Y axis Compare Distance=100). ‘ Set W Axis PG[7] to “0” (set W axis Compare Pulse Polarity). ‘ Report Z Axis Compare Pulse Mode flag. Examples: Please refer to section 8.2.7 in this user’s manual for Compare Function operation examples. See Also: PQ, Compare Function Description, section 8.2. 10-104 Control and Robotics Solutions Ltd. Revision 3.10, January 2005 10.5.56.2. PG – Position Compare Parameters Array For The SC-AT-2M Purpose: The “PG” array elements control the operation of the Position Compare Function. “PG” is an axis related array, sized [2 x 8]. Each axis has 8 parameters controlling the compare function operation as described below. The SC-AT-2M product supports the Compare Function on both axes X and Y. Please see section 8.2.5 above, in this user’s manual for full description of all “PG” array elements, purpose and limitations. The “PG” array parameter has the following attributes: Attributes: Type: Axis related: Array: Assignment: Command Allows parameter: Scope: Restrictions: Save to Flash: Default Value: Range: Parameter. Yes. Yes, size = [2][8]. Yes. ---. All. None. Yes. 0. - 2,147,000,000 ÷ 2,147,000,000. See Compare Function description for full limitations description. Syntax: XPG[1]=0 YPG[2]=100 XPG[7]=0 ‘ Set X Axis PG[1] to “0” (set X axis Mode 0). ‘ Set Y Axis PG[2] to “100” (set Y axis Compare Distance=100). ‘ Set X Axis PG[7] to “0” (set W axis Compare Pulse Polarity). Examples: Please refer to section 8.2.7 in this user’s manual for Compare Function operation examples. See Also: PQ, Compare Function Description, section 8.2. Control and Robotics Solutions Ltd. 10-105 SC-AT – Software User’s Manual and Commands Reference 10.5.57. PQ – Compare Function Activate / Disable Command Purpose: The “PQ” command is an axis-related command, enabling or disabling the Compare Function for a specific axis. The command requires a parameter indicating the requested operation. The command syntax is as follows: XPQ,Parameter where: • X is an axis identifier. For the current SC-AT-4M version the compare function is supported for axes X, Y, Z, W only. Issuing the command with other axes identifies will issue an error (see error codes below). For the current SC-AT-2M version the compare function is supported both axes X and Y. • Parameter=0: Indicates immediate disable of compare for the specified axis. No conditions are checked expect a valid axis identifier. • Parameter=1: Indicates start compare function for the specified axis. The command validates correct parameter (“PG”) for the specific requested mode. In any case that one of the command’s parameters is out of range, the command will return an error prompt: “?>” or will generate a script “Run Time Error” (if called from within a script macro program). The relevant error code flags (“EC” or “QC”) will be updated to reflect the error cause. Notes: • The user should be aware that not all conditions for a correct operation of the Compare Function could be validated during command initialization. For example, the minimal distance between each two consecutive points in the “AR” table (in Modes 2 and 3) cannot be tested as the limitation depends on the actual motion speed. • It is the user’s responsibility to specify correct parameters values for each of the supported Compare Modes. Please refer to specific Compare Modes description in section 8.2 defining operation limitations in each mode. • For full description of the Compare Mode Function Operation (“PQ”) please refer to section 8.2.5.3 in this user’s manual. • For full description of the Compare Mode Function Error codes please refer to section 8.2.5.4 and Table 5: Error Codes Generated by the "PQ" Compare Function in this user’s manual. 10-106 Control and Robotics Solutions Ltd. Revision 3.10, January 2005 The “PQ” command has the following attributes: Attributes: Type: Axis related: Array: Assignment: Command Allows Parameter: Scope: Restrictions: Save to Flash: Default Value: Range: Command. Yes. ---. ---. Must Have, Number (0, or 1). All. See Above. ---. ---. ---. Syntax: The command syntax is as follows (see also syntax definitions above): XPQ,1 YPQ,1 WPQ,0 ZPQ,0 ‘ Enable Compare Function for X Axis. ‘ Enable Compare Function for Y Axis. ‘ Disable Compare Function for W Axis. ‘ Disable Compare Function for Z Axis. Examples: Please refer to section 8.2.7 in this user’s manual for Compare Function operation examples. See Also: PG, Compare Function Description, section 8.2. Control and Robotics Solutions Ltd. 10-107 SC-AT – Software User’s Manual and Commands Reference 10.5.58. PO – PID Output Purpose: “PO” is a read only parameter reflecting the actual servo driver command value. In close loop operation, “PO” is the actual servo control output. In open loop operation, “PO” equals the “TC” command. Attributes: Type: Axis related: Array: Assignment: Command Allows parameter: Scope: Restrictions: Save to Flash: Default Value: Range: Parameter. Yes. No. No. ---. All. ---. ---. ---. - 32,767÷ 32,767. Syntax: XPS APS ‘ Report PO value for X Axis ‘ Report PO value for all Axes Examples: --- See Also: TC, and Control Loop Description in section 6 above. 10-108 Control and Robotics Solutions Ltd. Revision 3.10, January 2005 10.5.59. PS – Position (Encoder Position) Purpose: This command reports the actual controller position (Encoder Value). The user can also set as desired value to the current position (define the current position as ##). Note that setting the position value is valid only when not in motion. Setting the “PS” will immediately set the “DP” (desired position) to the same value. The “PS” command is restricted to No Motion condition. Trying to change “PS” value while motion is in progress will generate an “EC_NEEDS_MOTION_OFF” error # 50. Attributes: Type: Axis related: Array: Assignment: Command Allows parameter: Scope: Restrictions: Save to Flash: Default Value: Range: Parameter. Yes. No. Yes. ---. All. Needs Motion Off. No. 0. - 2,147,000,000 ÷ 2,147,000,000. Syntax: XPS=0; ZPS APS=0 ‘ Set X Axis Position (encoder) to “0” ‘ Report value of Z axis position (encoder) ‘ Set PS=0 in all axes (Reset All Axes) Examples: The following example shows resetting the X axis position to “0’, and then initiate a normal motion in X axis from Position “0” to Position “100,000”. XMO=1 XPS=0 XMM=0;XSM=0 XAP=100000 XAC=250000 XDC=500000 XSP=25000 XBG ‘ Enables the X Motor ‘ Set X axis encoder Position = “0”. ‘ Set Normal Point To Point Motion Mode. ‘ Set Next PTP absolute location to “100,000” counts. ‘ Set Acceleration to “250,000”. ‘ Set Acceleration to “500,000”. ‘ Set Speed to “25,000”. ‘ Start a Motion See Also: DP, MM, ER Control and Robotics Solutions Ltd. 10-109 SC-AT – Software User’s Manual and Commands Reference 10.5.60. RA – CAN Receiving Address Purpose: Set CAN Receiving Address. The CAN Receiving address is the CAN address which the controller monitor for incoming CAN messages. Response will be sent to the CAN address defined by the “TA” parameter. The CAN Receiving Address must be saved to the flash memory, and the controller must be reseated in order to change the CAN settings. Changing RA/TA will immediately re-init the CAN hardware to take the requested effect. Care should be taken, as changing RA/TA while working in CAN bus, will stop the communication with the PC. The parameters must still be saved to the FLASH (as in previous revisions) in order to be valid after boot. A new error code “EC_HW_INIT_ERROR=97” was added to indicate a CAN hardware initialization error. The SC-AT-2M, in addition and independent to the standard RA and TA CAN addresses, listens and transmits on additional addresses. Please see the “ZI” keyword for more information Attributes: Type: Axis related: Array: Assignment: Command Allows Parameter: Scope: Restrictions: Save to Flash: Default Value: Range: Parameter. No. No. Yes. ---. All. None. Yes. 1. 0 ÷ 2047. Syntax: XRA=1 XRA ‘ Set CAN RA=1. ‘ Report value of RA. Examples: ---See Also: CB, TA, ZI. 10-110 Control and Robotics Solutions Ltd. Revision 3.10, January 2005 10.5.61. RG – Data Recording GAP 10.5.61.1. RG – Data Recording GAP For The SC-AT-4M Purpose: The “RG” Recording Gap parameter controls the number of servo cycles interval (Gap) between each two consecutive recorded data points. The SC-AT-4M data recording capabilities allows collecting data at the servo loop rate, i.e. 16,384 per second. However, since currently the recording buffers are limited to 10,000 data points to each vector (up to 10 vectors simultaneously), at 16,384 points per second this would have limited the recording time to less then 1 second. In order to allow longer recordings “RG” is defined. For example, if RG=16, i.e. a data point is collected to the recording buffer each 16 servo cycles (i.e. at a rate of ~ 1msec per point), recording of up to 10 seconds is possible, and so on. Attributes: Type: Axis related: Array: Assignment: Command Allows Parameter: Scope: Restrictions: Save to Flash: Default Value: Range: Parameter. No. Yes, Size [2]. Yes. ---. All. None. Yes. 1. 1 ÷ 16,384. Syntax: XRG=1 XRG ‘ Set Recording Gap to “1”. ‘ Report value of RG. Examples: See section 8.1 in this User’s Manual for further information. See Also: BR, DA, RL, RR, RV Control and Robotics Solutions Ltd. 10-111 SC-AT – Software User’s Manual and Commands Reference 10.5.61.2. RG – Data Recording GAP For The SC-AT-2M Purpose: The “RG” Recording Gap parameter controls the number of servo cycles interval (Gap) between each two consecutive recorded data points. The SC-AT-2M data recording capabilities allows collecting data at the servo loop rate, i.e. 8,192 per second. However, since currently the recording buffers are limited to 1,875 data points to each vector (up to 8 vectors simultaneously), at 8,192 points per second this would have limited the recording time to less then 1 second. In order to allow longer recordings “RG” is defined. For example, if RG=8, i.e. a data point is collected to the recording buffer each 8 servo cycles (i.e. at a rate of ~ 1msec per point), recording of up to 10 seconds is possible, and so on. Attributes: Type: Axis related: Array: Assignment: Command Allows Parameter: Scope: Restrictions: Save to Flash: Default Value: Range: Parameter. No. Yes, Size [2]. Yes. ---. All. None. Yes. 1. 1 ÷ 16,384. Syntax: XRG=1 XRG ‘ Set Recording Gap to “1”. ‘ Report value of RG. Examples: See section 8.1 in this User’s Manual for further information. See Also: BR, DA, RL, RR, RV 10-112 Control and Robotics Solutions Ltd. Revision 3.10, January 2005 10.5.61.3. RG[2] – Data Recording Upload Delays Purpose: The “RG[2]” Recording Upload Delay parameter controls the number of servo cycles delay between each two consecutive CAN messages during Upload Recording Data in CAN bus operation mode. When uploading large data buffers in CAN bus, the SC-AT controllers can generate high loads on the CAN bus network. Depending on the PC load and type of CAN board, on high buffers upload, some CAN messages can be lost. In order to avoid this problem, the SC-AT controllers can add delays between CAN messages during data recording upload. The Delay is set by RG[2], and is given in servo sample time multipliers. RG[2]=0 means no delay. RG[2]=1 means 1 sample time delay (this is 61 micro-sec on the 4M and 122 micro-sec on the 2M) and so on. Usually, a delay of 3-5 samples is sufficient for most cases. For complete description of the RG keyword attributes and examples please see the RG keyword command reference above. Attributes: See “RG” keyword Above. Syntax: See “RG” keyword Above. Examples: See “RG” keyword Above. See Also: See section 8.1.2.2.3 above in this User’s Manual for further information. Control and Robotics Solutions Ltd. 10-113 SC-AT – Software User’s Manual and Commands Reference 10.5.62. RL – Data Recording Length 10.5.62.1. RL – Data Recording Length For The SC-AT-4M Purpose: The “RL” Recording Length parameter controls the number of data points to be collected to the recording buffers during data recording process, and as a result the overall recording time. The “RL” parameter defines the number of points per vector. If RL=1000, this means that for each selected vector to be recorded, 1,000 data points will be collected. The total number of points collected in the recording process is: RL x Number of Recorded Variables. Currently, the SC-AT-4M support up to 10 recorded vectors of up to 10,000 points each, to a total of 100,000 data points overall. Future firmware versions may support longer vectors length (when fewer vectors are selected). The overall data recording time is: (RL x RG) / 16,384 in [sec] units. Attributes: Type: Axis related: Array: Assignment: Command Allows Parameter: Scope: Restrictions: Save to Flash: Default Value: Range: Parameter. No. No. Yes. ---. All. None. Yes. 1. 1 ÷ 100,000. Syntax: XRL=1000 XRL ‘ Set Recording Length to “1,000”. ‘ Report value of RL. Examples: See section 8.1 in this User’s Manual for further information. See Also: BR, DA, RG, RR, RV 10-114 Control and Robotics Solutions Ltd. Revision 3.10, January 2005 10.5.62.2. RL – Data Recording Length For The SC-AT-2M Purpose: The “RL” Recording Length parameter controls the number of data points to be collected to the recording buffers during data recording process, and as a result the overall recording time. The “RL” parameter defines the number of points per vector. If RL=1000, this means that for each selected vector to be recorded, 1,000 data points will be collected. The total number of points collected in the recording process is: RL x Number of Recorded Variables. Currently, the SC-AT-2M support up to 8 recorded vectors of up to 1,875 points each, to a total of 15,000 data points overall. Future firmware versions may support longer vectors length (when fewer vectors are selected). The overall data recording time is: (RL x RG) / 8,192 in [sec] units. Attributes: Type: Axis related: Array: Assignment: Command Allows Parameter: Scope: Restrictions: Save to Flash: Default Value: Range: Parameter. No. No. Yes. ---. All. None. Yes. 1. 1 ÷ 15,000. Syntax: XRL=1000 XRL ‘ Set Recording Length to “1,000”. ‘ Report value of RL. Examples: See section 8.1 in this User’s Manual for further information. See Also: BR, DA, RG, RR, RV Control and Robotics Solutions Ltd. 10-115 SC-AT – Software User’s Manual and Commands Reference 10.5.63. RP – Relative Position Purpose: Defines the Next motion Relative Position (in counts) target. The relative position is used for Relative Point to point motions. When issuing an RP=## command the value of the next absolute position is computed as follows: AP=DP+RP. Upon a BG (begin motion) command, the controller will generate a profile from the current desired (“DP”) position to the current “AP”. Please refer to the “AP” command for more information. Attributes: Type: Axis related: Array: Assignment: Command Allows parameter: Scope: Restrictions: Save to Flash: Default Value: Range: Parameter. Yes. No. Yes. ---. All. None. No. 0. - 2,147,000,000 ÷ 2,147,000,000. Syntax: XRP=100000; ZRP ARP=100 ‘ Set X Axis Relative Position to “100,000”. ‘ Report value of Z axis RP. ‘ Set RP=100 in all axes. Examples: The following example shows performing a +100 counts step, followed by a –100 counts step: XMO=1 XPS=0 XMM=0;XSM=0 XAC=90000;XDC=90000 XSP=25000 XRP=100 XBG ‘ Enables the X Motor ‘ Set X axis encoder Position = “0”. ‘ Set Normal Point To Point Motion Mode. ‘ Set AC=DC=90,000. ‘ Set Speed to “25,000”. ‘ Define a +100 counts step. ‘ Start a Motion XRP=-100 XBG ‘ Define a -100 counts step. ‘ Start a Motion See Also: DP, AP, PS, BG 10-116 Control and Robotics Solutions Ltd. Revision 3.10, January 2005 10.5.64. RR – Data Recording Status Purpose: “RR” is a read only parameter, indicating the recording process status. When new recording begins (after “BR” command is issued) “RR” is internally set to the value of “RL”. During the data recording process, “RR” is automatically decremented by “1” for each data point collected (to all buffers). This practically happens every “RG” servo cycles. When “RR” equals “0”, data recording has terminated, and the recorded data can be uploaded. When RR > 0, data recording upload is denied. Attributes: Type: Axis related: Array: Assignment: Command Allows Parameter: Scope: Restrictions: Save to Flash: Default Value: Range: Parameter. No. No. No. ---. All. None. No. ---. 1 ÷ 10,000. Syntax: XRR ‘ Report value of RR. Examples: See section 8.1 in this User’s Manual for further information. See Also: BR, DA, RG, RL, RV Control and Robotics Solutions Ltd. 10-117 SC-AT – Software User’s Manual and Commands Reference 10.5.65. RS – Reset Controller Command Purpose: The “RS” command can be used to reset the controller software. “RS” causes the SC-AT micro-processor to enter a software reset state, and completely re-init the controller software. After Reset, the entire controller parameters and script program will resume their boot up values. The AUTOEXEC will start running like in power up condition. The “RS” command has the following attributes: Attributes: Type: Axis related: Array: Assignment: Command Allows Parameter: Scope: Restrictions: Save to Flash: Default Value: Range: Command. No. ---. ---. No. All. All Motors Must be Off, No Program running. ---. ---. ---. Syntax: XRS ‘ Will Reset the SC-AT controller. Examples: ---- See Also: ----- 10-118 Control and Robotics Solutions Ltd. Revision 3.10, January 2005 10.5.66. RV – Data Recording, Recorded Variables 10.5.66.1. RV – Data Recording, Recorded Variables For The SC-AT-4M Purpose: “RV” – Recorded variables, is an axis-related parameter, selecting the data member to be recorded for each one of the 10 data recording vectors. XRV control Vector #1, YRV control Vector #2, and so on (VRV control Vector #10). The user can select one of 211 internal data members for each vector. In general the user can select one of 20 axis specific (currently 9 available and 11 reserved) data elements for each axis, and 10 global registers. In the following list all options for “RV” are defined. In the table below (i) indicates the requested axis in zero based form. X axis is defined by i=0, Y axis is defined by i=1, … V axis is defined by i=9. RV Value 0 i x 20 + 1 i x 20 + 2 i x 20 + 3 i x 20 + 4 i x 20 + 5 i x 20 + 6 i x 20 + 7 i x 20 + 8 i x 20 + 9 i x 20 + (10 ÷ 20) 201 202 203 ÷210 Attributes: Data Member to be recorded for Axis (i) None (Empty) Position Velocity Position Error Desired Position PID Output Status Register Motion Status Analog Input Motor Fault Reserved Input Port Outpot Port Reserved Type: Axis related: Array: Assignment: Command Allows Parameter: Scope: Restrictions: Save to Flash: Default Value: Range: Keyword --(i) PS (i) VL (i) PE (i) DP (i) PO (i) SR (i) MS (i) AI (i) MF --IP OP --- Parameter. Yes. No. Yes. ---. All. None. Yes. 0. 0 ÷ 211. Control and Robotics Solutions Ltd. 10-119 SC-AT – Software User’s Manual and Commands Reference Syntax: XRV=0 ZRV ARV=0 ‘ Set X axis RV to 0 (no recording). ‘ Report value of Z axis RV. - Set RV=0 in all axes. Examples: See section 8.1 in this User’s Manual for further information. See Also: BR, DA, RG, RL, RR 10-120 Control and Robotics Solutions Ltd. Revision 3.10, January 2005 10.5.66.2. RV – Data Recording, Recorded Variables For The SC-AT-2M Purpose: The “PA” array is an axis related array, with size of 2x100 elements. Each element in the array is a LONG format number, which can be assigned, with any value at any time. The index range of the “PA” array is: 1 ÷ 100. The “RV” keyword – Recorded variables, in the SC-AT-2M is a non axis related array, with the size of 1x8 elements. Using the “RV” array, the user may select the data member to be recorded for each one of the 8 data recording vectors. XRV[1] controls Vector #1, XRV[2] controls Vector #2, and so on. The user can select one of 51 internal data members for each vector. In general the user can select one of 20 axis specific (currently 11 available and 9 reserved) data elements for each axis, and 10 global registers. In the following list all options for “RV” are defined. In the table below (i) indicates the requested axis in zero based form. X axis is defined by i=0, Y axis is defined by i=1. RV Value 0 I x 20 + 1 I x 20 + 2 I x 20 + 3 I x 20 + 4 I x 20 + 5 I x 20 + 6 I x 20 + 7 I x 20 + 8 I x 20 + 9 I x 20 + 10 I x 20 + 11 I x 20 + (12 ÷ 20) 41 42 43 ÷51 Attributes: Data Member to be recorded for Axis (i) None (Empty) Position Velocity Position Error Desired Position PID Output Status Register Motion Status Analog Input Motor Fault Auxiliary Position Auxiliary Velocity Axis Related Reserved Input Port Output Port Reserved Type: Axis related: Array: Assignment: Command Allows Parameter: Scope: Restrictions: Save to Flash: Default Value: Range: Keyword --(i) PS (i) VL (i) PE (i) DP (i) PO (i) SR (i) MS (i) AI (i) MF (i) XP (i) XV --IP OP --- Parameter. No. Yes, size = [1][8]. Yes. ---. All. None. Yes. 0. 0 ÷ 211. Control and Robotics Solutions Ltd. 10-121 SC-AT – Software User’s Manual and Commands Reference Syntax: XRV[1]=0 XRV[1] ‘ Set X axis RV to 0 (no recording). ‘ Report value of RV[1]. Examples: See section 8.1 in this User’s Manual for further information. See Also: BR, DA, RG, RL, RR 10-122 Control and Robotics Solutions Ltd. Revision 3.10, January 2005 10.5.67. SM – Special Motion Mode Attribute Parameter Purpose: Defines an enhancement to the standard Point To Point Motion Mode (MM=0). Currently the following Special Modes are supported: • SM=0: No Special Mode. • SM=1, Repetitive Motion: Repetitive Point to Point. When the controller is in MM=0 (PTP) and SM=1, the motion will be Repetitive. This means that the axis will be commanded to perform a PTP motion to the specified absolute position and then, after the motion is completed and a user specified delay (WT) is expired, a new motion is automatically initiated to the starting position (AP is updated to this value). When the later motion is completed, and the WT delay is finished, the cycle starts again. This back-and-forth motion is repeated until stopped by one of the following clauses: AB (abort), ST (stop), KR (Kill repetitive), and MO=0. • Future Firmware Versions may extend the functionality of the controller special motion modes using additional SM values. Although the command interpreter allows values of SM up to 8, currently values above 1 should not be assigned. The SM command is restricted to No Motion condition. Trying to change SM value while motion is in progress will generate an “EC_NEEDS_MOTION_OFF” error # 50. Attributes: Type: Axis related: Array: Assignment: Command Allows Parameter: Scope: Restrictions: Save to Flash: Default Value: Range: Parameter. Yes. No. Yes. ---. All. Needs Motion Off. Yes. 0. 0 ÷ 8. Syntax: XSM=1; ZSM ASM=0 ‘ Set X Axis SM=1. ‘ Report value of SM for Z axis. ‘ Set SM=0 in all axes. Control and Robotics Solutions Ltd. 10-123 SC-AT – Software User’s Manual and Commands Reference Examples: The following code example shows starting a Normal (Non-Repetitive) motion in X axis from Position “0” to Position “100,000”. XMO=1;XPS=0 XMM=0;XSM=0 XAP=100000 XAC=250000 XDC=500000 XSP=25000 XBG ‘ Enables the Motor and Set Position = “0”. ‘ Set Normal Point To Point Motion Mode. ‘ Set Next PTP absolute location to “100,000” counts. ‘ Set Acceleration to “250,000”. ‘ Set Acceleration to “500,000”. ‘ Set Speed to “25,000”. ‘ Start a Motion The Next example shows starting a Repetitive motion in X axis from Position “0” to Position “100,000” (same motion parameters as above), using “WT” Wait delay between the motions. XMO=1;XPS=0 XMM=0;XSM=1 XAP=100000 XAC=250000 XDC=500000 XSP=25000 XWT=16384 XBG ‘ Enables the Motor and Set Position = “0”. ‘ Set Repetitive Point To Point Motion Mode. ‘ Set Next PTP absolute location to “100,000” counts. ‘ Set Acceleration to “250,000”. ‘ Set Acceleration to “500,000”. ‘ Set Speed to “25,000”. ‘ Set 1 second delay between motions. ‘ Start a Motion See Also: MM, WT, AB, ST, KR, MO 10-124 Control and Robotics Solutions Ltd. Revision 3.10, January 2005 10.5.68. SP – Speed Purpose: The Speed of the profile in PTP motions, and the Jogging speed in Jogging motions. The Speed value is defined in units of: [counts / sec]. The value of SP can be negative, to define a negative JOG motion. However, in PTP motion mode, the SP sign is ignored, and actual speed direction is set by position profile requirements. Attributes: Type: Axis related: Array: Assignment: Command Allows parameter: Scope: Restrictions: Save to Flash: Default Value: Range: Parameter. Yes. No. Yes. ---. All. None. Yes. 100,000. -30,000,000 ÷ 30,000,000. Syntax: XSP=100000; WSP=-50000; ZSP ASP=20000 ‘ Set X Axis SP=100,000. ‘ Set W Axis SP=-50,000. ‘ Report value of SP for Z axis. ‘ Set SP=200,000 in all axes. Examples: The following code example shows starting a Jog motion in the Y axis using SP=-50,000 counts/sec (Negative Motion). YMO=1;YPS=0 YMM=1;YSM=0 YAC=250000 YDC=500000 YSP=-50000 YBG ‘ Enables the Motor and Set Position = “0”. ‘ Set Normal JOG Motion Mode. ‘ Set Acceleration to “250,000”. ‘ Set Acceleration to “500,000”. ‘ Set Speed to “-50,000”. ‘ Start a Motion See Also: AC, DL, SP, MM, BG Control and Robotics Solutions Ltd. 10-125 SC-AT – Software User’s Manual and Commands Reference 10.5.69. ST – Stop Motion Command Purpose: The “ST” Stop command stops any motion using the “DC” (deceleration value). Unlike the Abort (“AB”) command, the stop command stops the motion by generating a deceleration profile to “0” speed until a complete motion stop. “ST” may be used whenever a motion needs to be stopped in controlled manner. For example, when a motion to search some input flag is performed, when the input is detected, the “ST” command may be used to stop the motion (see example below). Attributes: Type: Axis related: Array: Assignment: Command Allows Parameter: Scope: Restrictions: Save to Flash: Default Value: Range: Command. Yes. ---. ---. No. All. None. ---. ---. ---. Syntax: XST; AST ‘ Stop X Motion ‘ Stop motion of All axes. Examples: The following example starts a motion, and then enters a loop to check for Input #1 to become low (“0”). When condition is met, the motion is stooped. The following example can be written as a script program file. The main routine name is “#FINDI1”, and can be executed and tested. Please see the “SC-AT Macro (Scripts) Language features User’s Manual” for further information about script programming. ‘ ‘ Routine to find Input #1 ‘ ---------------------------#FINDI1 ‘ XMO=1;XPS=0 XMM=0;XSM=0 XAP=100000 10-126 ‘ Enables the Motor and Set Position = “0”. ‘ Set Normal Point To Point Motion Mode. ‘ Set Relative motion of “100,000” counts. Control and Robotics Solutions Ltd. Revision 3.10, January 2005 XAC=90000;XDC=90000 ‘ Set AC=DC=90,000 XSP=25000 ‘ Set Speed to “25,000”. XBG ‘ Start a Motion ‘ ‘ Now enter a loop to check for input #1 to become low. ‘ ----------------------------------------------------------------@while (AIP & 1) ‘ Wait for Input “1” to be Low. @endwhile ‘ ‘ Input is found, so stop the motion. ‘ ---------------------------------------XST ‘ ‘ Wait for End Of Motion ‘ ----------------------------@while (XMS != 0) ‘ Wait for MS (Motion Status) top be “0”. @endwhile ‘ XQH ‘ Stop the program See Also: BG, AB, KR, MS, IP Control and Robotics Solutions Ltd. 10-127 SC-AT – Software User’s Manual and Commands Reference 10.5.70. SR – Status Register Purpose: The “SR” Status Register is a read only parameter holding information on the current axis status. Currently, “SR” should only be used to inquire the “In Target” bit condition of the axis. Other status bits might be supported in the future. The “In Target” status is indicated in bit #6 (“1” based, i.e. 0x20 Hex) of “SR”. For a complete description of In Target Status bit operation please see the “TR” and “TT” parameters. The “SR” parameter has the following attributes: Attributes: Type: Axis related: Array: Assignment: Command Allows parameter: Scope: Restrictions: Save to Flash: Default Value: Range: Parameter. Yes. No. No. ---. All. None. No. 0. 0 ÷ N.A. Syntax: XSR ASR ‘ Report value SR for X axis. ‘ Report value SR for all axes. Examples: The following simple example demonstrates how initialize a PTP motion in X axis, then to wait for end of motion (monitoring “MS”) and “In Target” condition (monitoring “SR”). XMO=1;XPS=0 XMM=0;XSM=0 XAC=250000 XDC=500000 XSP=25000 XAP=100000 TR=10;TT=160 XBG 10-128 ‘ Enables the Motor and Set Position = “0”. ‘ Set Normal Point To Point Motion Mode. ‘ Set Acceleration to “250,000”. ‘ Set Acceleration to “500,000”. ‘ Set Speed to “25,000”. ‘ Set Next PTP absolute location to “100,000” ‘ Set Target Radius and Target Time ‘ Start a Motion Control and Robotics Solutions Ltd. Revision 3.10, January 2005 @while (XMS != 0) @endwhile ‘ Wait for End Of Motion in X (XMS=0) @while (XSR != 32) @endwhile ‘ Wait for In Target in X (XSR=32) Another way to wait for “In Target” condition is to use the special “QW” command like in the following example: $defineWaitForEndOfMotionX() $defineWaitForXInTR() "XQW,100000" "XQW,101060" XMO=1;XPS=0 XMM=0;XSM=0 XAC=250000 XDC=500000 XSP=25000 XAP=100000 TR=10;TT=160 XBG ‘ Enables the Motor and Set Position = “0”. ‘ Set Normal Point To Point Motion Mode. ‘ Set Acceleration to “250,000”. ‘ Set Acceleration to “500,000”. ‘ Set Speed to “25,000”. ‘ Set Next PTP absolute location to “100,000” ‘ Set Target Radius and Target Time ‘ Start a Motion WaitForEndOfMotionX() WaitForXInTR() ‘ Will wait for End of Motion in X Axis ‘ Will wait for In Target in X Axis See Also: MS, BG, TR, TT, QW in the “SC-AT Script User’s Manual. Control and Robotics Solutions Ltd. 10-129 SC-AT – Software User’s Manual and Commands Reference 10.5.71. SV – Save Command Purpose: Please see “LD” Load Command. 10-130 Control and Robotics Solutions Ltd. Revision 3.10, January 2005 10.5.72. TA – CAN Transmitting Address Purpose: Set CAN Transmitting Address. The CAN transmitting address is CAN address which the controller responds to in any case a CAN message is received (the receiving address is defined in the “RA” parameter). The CAN Transmitting Address must be saved to the flash memory, and the controller must be reset in order to change the CAN settings. Changing RA/TA will immediately re-init the CAN hardware to take the requested effect. Care should be taken, as changing RA/TA while working in CAN bus, will stop the communication with the PC. The parameters must still be saved to the FLASH (as in previous revisions) in order to be valid after boot. A new error codes “EC_HW_INIT_ERROR=97” was added to indicate a CAN hardware initialization error. In the SC-AT-2M, in addition and independent to the standard RA and TA CAN addresses, listens and transmits on additional addresses. Please see the “ZI” keyword for more information. Attributes: Type: Axis related: Array: Assignment: Command Allows Parameter: Scope: Restrictions: Save to Flash: Default Value: Range: Parameter. No. No. Yes. ---. All. None. Yes. 2. 0 ÷ 2047. Syntax: XTA=2 XTA ‘ Set CAN TA=2. ‘ Report value of TA. Examples: ---See Also: CB, RA, ZI. Control and Robotics Solutions Ltd. 10-131 SC-AT – Software User’s Manual and Commands Reference 10.5.73. TC – Torque Command Purpose: The “TC” parameter keyword is used to set the Servo Analog Command value to a user specified value, when operating in Open Loop mode (when NC=1, and MO=1). In Open loop mode, the value of “TC” is directly forwarded to the controller Analog Command (Acmd) output, bypassing the PID/PIV controller filter. Please refer to the “NC” command for further information on how to enter Open Loop mode. The value of “TC” is not saved to the Flash memory. After MO=1 with NC=1, by default the analog output value commend is “0” to avoid motor motion (“TC” is set automatically to zero when MO=1). It should be noted that in Open Loop mode the actual analog command is still limited by the “TL” (Torque Limit) parameter. Also, the control 2nd order filter may be used to monitor its operation and actual effect on the analog output value. The operation of the filter can of course be disabled by an appropriate flag (see 2nd order filter definitions in this User’s Manual). The user can choose to record the actual Driver Command (“PO”) value. In case the 2nd order filter is enabled, the actual value recorded is the step response of the filter. If no 2nd order filter is used, the actual value recorded will be equal to the value commanded by “TC”. In any case the value is saturated by “TL”. The value range of the “TC” parameter is 16 bit, reflecting the controller extended analog command resolution. This means that setting TC=32767, will command an analog command of +10 volts, while setting TC=-32767, will command an analog command of -10 volts. TC=0 will of course set analog command to 0 volts. Note that the sign of the analog output can be inverted using the dedicated “CG” bits. The Analog offset can be set using the “DO” command. For brushless SIN commutation motors, “TC” should be used in conjunction with the Auxiliary Analog Output command “AO”. Please see section 8.5.2.5 above for more information about SIN commutated brushless motors operation with the SC-AT-4M. Please note, the SIN commutated brushless motors operation is not yet supported in the SC-AT-2M Attributes: 10-132 Type: Axis related: Array: Assignment: Command Allows parameter: Scope: Restrictions: Save to Flash: Default Value: Range: Parameter. Yes. No. Yes. ---. All. None. No. 0. -32,767 ÷ 32,767. Control and Robotics Solutions Ltd. Revision 3.10, January 2005 Syntax: XTC=16384; ZTC ATC=0 ‘ Reset value of X axis TC to “16384”. ‘ Report the TC value of Z axis. ‘ Set TC=0 for all axes (set analog Cmd =0). Examples: The following code example enables Open Loop mode on Y axis, and set the Y axis analog command output to +5 volts, and –10 volts: YMO=0 YNC=1 YMO=1 YTL=32763 YTC=16384 ‘ Must Disables the Motor before changing the NC. ‘ Set NC=1 to indicate Open Loop for that axis. ‘ Set MO=1 for Y Again. ‘ Set Command saturation to ± 10 Volts. ‘ Set command value to +50% (+5 Volts). YTC=-32763 ‘ Set command value to -100% (-10 Volts). YMO=0 YNC=0 ‘ Disables the Motor before changing the NC. ‘ Restore Close loop mode. See Also: CG, NC, TL, 2nd order filter definitions, Data Recording, and section 8.5.2.5 above for more information about SIN commutated brushless motors operation and open loop commands in the SC-AT-4M. Control and Robotics Solutions Ltd. 10-133 SC-AT – Software User’s Manual and Commands Reference 10.5.74. TD – Timer Down 10.5.74.1. TD – Timer Down For The SC-AT-4M Purpose: The “TD” parameter is an internal timer counting down towards “0”. The timer can be set to any value from 0 to 100,000,000. When reaching a count of 0 the timer stops. “TD” should be used by user programs to generate delays or count time. The “TD” parameter is always reset to “0” after boot. “TD” is an axis related parameter. There are 10 different internal timers that can be accessed by the user: XTD, YTD, ZTD, WTD, ETD, FTD, GTD, HTD, UTD, VTD. There is no actual relation between XTD to the X axis. Each timer can be used by any program. The “TD” timers count in the servo sample rate, i.e. 16,384 counts per second. The “TD” parameter has the following attributes: Attributes: Type: Axis related: Array: Assignment: Command Allows parameter: Scope: Restrictions: Save to Flash: Default Value: Range: Parameter. Yes. No. Yes. ---. All. None. No. 0. 0 ÷ 100,000,000. Syntax: XTD=16384; ZTD ATD=16384 ‘ Set 1 Second Delay for X Timer. ‘ Report the value of ZTD. ‘ Set 1 Second Delay in all timers. Examples: The following code example set the X Timer to 1 Second delay and then wait for the timer to reach zero count. This is a simple way to implement a 1 second delay function. 10-134 Control and Robotics Solutions Ltd. Revision 3.10, January 2005 XTD=16384 ‘ @while (XTD > 0) @endwhile ‘ Set X Timer to 1 Second ‘ Waits for XTD to become zero Another way to generate a 1 second delay is to use “TD” as above but then wait for “TD” to reach a zero value using the “QW” command: $define TimerX $define WaitTimerX() "XTD" "XQW,107000" TimerX=16384 WaitTimerX() ‘ Set XTD=16384 ‘ Waits for XTD to become zero See Also: The SC-AT Script Programming User’s Manual. Control and Robotics Solutions Ltd. 10-135 SC-AT – Software User’s Manual and Commands Reference 10.5.74.2. TD – Timer Down For The SC-AT-2M Purpose: The “TD” parameter is an internal timer counting down towards “0”. The timer can be set to any value from 0 to 100,000,000. When reaching a count of 0 the timer stops. “TD” should be used by user programs to generate delays or count time. The “TD” parameter is always reset to “0” after boot. “TD” is an axis related parameter. There are 2 different internal timers that can be accessed by the user: XTD and YTD. There is no actual relation between XTD to the X axis. Each timer can be used by any program. The “TD” timers count in the servo sample rate, i.e. 8,192 counts per second. The “TD” parameter has the following attributes: Attributes: Type: Axis related: Array: Assignment: Command Allows parameter: Scope: Restrictions: Save to Flash: Default Value: Range: Parameter. Yes. No. Yes. ---. All. None. No. 0. 0 ÷ 100,000,000. Syntax: XTD=8192; XTD BTD=8192 ‘ Set 1 Second Delay for X Timer. ‘ Report the value of XTD. ‘ Set 1 Second Delay for both timers. Examples: The following code example set the X Timer to 1 Second delay and then wait for the timer to reach zero count. This is a simple way to implement a 1 second delay function. XTD=8192 ‘ @while (XTD > 0) @endwhile 10-136 ‘ Set X Timer to 1 Second ‘ Waits for XTD to become zero Control and Robotics Solutions Ltd. Revision 3.10, January 2005 Another way to generate a 1 second delay is to use “TD” as above but then wait for “TD” to reach a zero value using the “QW” command: $define TimerX $define WaitTimerX() "XTD" "XQW,107000" TimerX=16384 WaitTimerX() ‘ Set XTD=8192 ‘ Waits for XTD to become zero See Also: The SC-AT Script Programming User’s Manual. Control and Robotics Solutions Ltd. 10-137 SC-AT – Software User’s Manual and Commands Reference 10.5.75. TL – Torque Limit (Analog Command Saturation) Purpose: The “TL” parameter limits the value of the analog output command to the servo amplifier. In applications where a current loop driver is used (most cases), the “TL” limit actually limits the motor current. “TL” saturates the analog output command in both Close Loop (NC=0) and Open Loop (NC=1,2,3) operation modes. Please look in this User’s Manual under “The Control Filter” chapter 6 for further information. The range of “TL” is: 0 ÷ 32,767. TL=0 disables the analog command output to “0” volts. TL=32,767 is full range (100 % command), i.e.: ± 10 Volts. Attributes: Type: Axis related: Array: Assignment: Command Allows parameter: Scope: Restrictions: Save to Flash: Default Value: Range: Parameter. Yes. No. Yes. ---. All. None. Yes. 32,763. 0 ÷ 32,767. Syntax: XTL=16384; ZTL ATL=32767 ‘ Set X Axis TL=16,384 (50% of Max Range). ‘ Report value of TL for Z axis. ‘ Set TL=32,767 in all axes (100 % limit). Examples: The following code example enables Open Loop mode on Y axis, but limits the Max analog command to ± 5 Volts. YMO=0 YNC=1 YMO=1 YTL=16384 YTC=16384 YTC=-32767 ‘ Must Disables the Motor before changing the NC. ‘ Set NC=1 to indicate Open Loop for that axis. ‘ Set MO=1 for Y Again. ‘ Set Command saturation to ± 5 Volts. ‘ Set command value to +50% (+5 Volts). ‘ Set command value to -100% (-10 Volts), but TL will actually limit the actual outout value to –5 Volts. See Also: NC, TC, IS 10-138 Control and Robotics Solutions Ltd. Revision 3.10, January 2005 10.5.76. TR – Target Radius Purpose: The “TR” parameter defines the Target Radius in Encoder counts for the In Target detection logic. “TR” is used in conjunction with “TT” the Target Time and the Status register “SR” parameters. During operation, while an axis is enabled (MO=1) and not in motion (MS=0), the real time control loop continuously checks the position error “PE”, and when ABS(PE) <= TR, for at least “TT” (Target Time) sample times, a dedicated bit in “SR” is set to high (logic “1’). The In Target logic is usually used to let a host application (or a script program) to monitor end of motion condition and waiting for the axis to reach the desired target position within a specific defined error. The “TR” parameter has the following attributes. Attributes: Type: Axis related: Array: Assignment: Command Allows Parameter: Scope: Restrictions: Save to Flash: Default Value: Range: Parameter. Yes. No. Yes. ---. All. None. Yes. 2. 0 ÷ 32,767. Syntax: XTR=10 ZTR ATR=20 ‘ Set X Target Radius to 10 counts. ‘ Report value of Z Target Radius. ‘ Set All Axes Target Radius to 20 counts. Examples: See the “SR – Status Register” Command reference. See Also: SR, TT. Control and Robotics Solutions Ltd. 10-139 SC-AT – Software User’s Manual and Commands Reference 10.5.77. TT – Target Time Purpose: The “TT” parameter defines the Target Time in servo sample units for the In Target detection logic. “TT” is used in conjunction with “TR” the Target Radius and the Status register “SR” parameters. During operation, while an axis is enabled (MO=1) and not in motion (MS=0), the real time control loop continuously checks the position error “PE”, and when ABS(PE) <= TR, for at least “TT” (Target Time) sample times, a dedicated bit in “SR” is set to high (logic “1’). The In Target logic is usually used to let a host application (or a script program) to monitor end of motion condition and waiting for the axis to reach the desired target position within a specific defined error. The “TT” parameter has the following attributes. Attributes: Type: Axis related: Array: Assignment: Command Allows Parameter: Scope: Restrictions: Save to Flash: Default Value: Range: Parameter. Yes. No. Yes. ---. All. None. Yes. 2. 0 ÷ 32,767. Syntax: XTT=160 ZTT ATT=656 ‘ Set X Target Time to 160 samples (10 msec in the SCAT-4M and 20 msec in the SC-AT-2M). ‘ Report value of Z Target Time. ‘ Set All Axes Target Time to 60 samples. Examples: See the “SR – Status Register” Command reference. See Also: SR, TR. 10-140 Control and Robotics Solutions Ltd. Revision 3.10, January 2005 10.5.78. VA / VD / VS – Vector Motion Parameters Purpose: The “VA” - Vector Acceleration, “VD” - Vector Deceleration, and “VS” - Vector Speed, are used for the special X/Y Vector motions. Vector motions are supported by the SC-AT for execution of synchronized X and Y motions. The Vector motion syntax is fully compatible with the SC-2M servo controller syntax. Vector motion is initialized in the SC-AT by issuing a BBG,-1 command (BBG command with a parameter equals to –1). When a BBG,-1 command is executed, the controller first computes the Vector Distance and Vector Angle, base on the X and Y motion distance components. The vector distance is not directly defined along the vector but instead it is defined as its X, Y components. The desired motion distances for the X and the Y axes are defined normally using AP (or RP). The desired distance along the X axis is (XAP-XDP) and (YAP-YDP) for the Y axis. The DP value represents the desired current position (before the motion) while AP is the desired target position. The Vector Distance and Angle are computed as follows: Vector Distance = SQRT { (XAP-XDP)2+ (YAP-YDP) 2 } Vector Angle = ATAN { (YAP-YDP) / (XAP-XDP) } Once the Vector Angle is determined, it is used to compute the accelerations, decelerations and speeds projection on both X and Y axes, as follows: XAC XDC XDL XSP = = = = AVA AVD AVL ASP * * * * SIN SIN SIN SIN (Vector (Vector (Vector (Vector Angle) Angle) Angle) Angle) YAC YDC YDL YSP = = = = AVA AVD AVL ASP * * * * COS COS COS COS (Vector (Vector (Vector (Vector Angle) Angle) Angle) Angle) In the next phase (of the BBG,-1) command, both the X and Y axes are commanded for synchronized motion, based on the AC/DC/DL/SP parameters computed above. The actual axis specific AC/DC/DL/SP are being overwritten by the BBG,-1. Note that in this case, the BBG,-1 command must be use BBG. XBG,-1 or YBG,-1 will start a motion in X or Y only, with unexpected motion parameters, and should be avoided. Control and Robotics Solutions Ltd. 10-141 SC-AT – Software User’s Manual and Commands Reference The BBG,-1 function calculates new values to the above parameters independently of the Motion Mode and the Special Mode parameters. As a result, a vector motion will be created for all motion modes which use the above parameters, including: Jogging, PointTo-Point, Repetitive Point-To-Point etc. Motion modes which do not use the above parameters (such as ECAM) will not be affected by the -1 parameter (BG,-1). However, the above parameters will be anyhow recalculated and overwritten. The user can still modify all parameters which supports on-the-fly modification (such as SP). However, it will affect each axis independently and will cause a motion not along the originally desired vector. VA, VD, VL and VS can still be modified on the fly, but will have no effect since these parameters are used only for the pre-calculation within the BBG,-1 command function. Note that in the current implementation, the controller does not "remember" that it is in vector (common) motion. The BBG,-1 performs a pre-calculation which prepare the SP, AC DC and DL parameters of both axes for a synchronized motion along the vector and initiate a motion for both axes. From this point the two axes performs normal independent motion according to their MM and SM parameters. While this is a very simple and predictable behavior, it has a disadvantage that the axes are not truly linked together. For example, a fault in one axis will not have any effect on the other. Future firmware versions will include advanced fully synchronized multiple axes vector motion. Attributes and Syntax: Except from being non-axis related parameters, the “VA” - Vector Acceleration, “VD” Vector Deceleration and “VS” - Vector Speed, are analogues to the axis specific parameters “AC” / “DC” and “SP”, and has similar attributes. Examples: The following example will start a common XY vector motion: BMO=1;BMM=0;BSM=0 BVS=100000;BVA=1000000;BVD=1000000 XAP=50000;YAP=600000 BBG,-1 Se Also: AC, DC, DL, SP, MM, and chapter 5 above. 10-142 Control and Robotics Solutions Ltd. Revision 3.10, January 2005 10.5.79. VR – Get Version Command 10.5.79.1. VR – Get Version Command For The SC-AT-4M Purpose: The “VR” command retrieves the controller Firmware and FPGA versions. The standard Version Command response report (in RS-232 communication protocol) has the following syntax: ”SC-4M_P,300,4,300,250” : The following interpretation is applicable: ¾ ¾ ¾ ¾ ¾ SC-4M_P: Indicates the new SC-AT-4M product code. 300: Indicates that Firmware Version 3.00 is installed. 4: Indicates that this is a 4 axis version. 300: Indicates the FPGA version (3.00). 250: Indicates the Macro Buffer size in kBytes (250 kBytes). Please Note: Firmware version must comply to FPGA versions. Downloading firmware versions without prior authorization from C&RS is not allowed, and might result in a malfunctioning (un-expected results) board. In CAN bus communication, the standard VR report has the following syntax: Byte 1 Type Number =24 Byte 2 FW Ver Hi =0 Byte 3 FW Ver Low =205 Byte 4 Num Axes =4 Byte 5 FPGA Version =200 Byte 6 Reserve d 0 Byte 7 Macro Size Hi =0 Byte 8 Macro Size Low =250 ‘ Table 29: SC-AT-4M to Host - CAN VR Version Report Message Format The VR (Version Report) command also supports receiving a parameter as part of the command syntax. Calling “VR” without any parameter is fully compatible to previous revisions version report format (indicated above). However, the controller now also support the following additional version reports: ¾ ¾ ¾ “AVR,1” : Reports Boot and Single or Dual Flash Devices. “AVR,2” : Reports Firmware (Major and Minor) Versions, with its release Date and Time. “AVR,3” : Reports the FPGA Version. “AVR,1” CAN Format: Byte 0: Single Or Dual Flash. (0/1 Respectively). Byte 1: Product Version High Byte. Byte 2: Product Version Low Byte. Control and Robotics Solutions Ltd. 10-143 SC-AT – Software User’s Manual and Commands Reference Byte 3: Boot Version High Byte. Byte 4: Boot Version Low Byte. Byte 5: 0 Byte 6: 0 Byte 7: 0 “AVR,2” CAN Format: Byte 0: 0. Byte 1: Product Version High Byte. Byte 2: Product Version Low Byte. Byte 3: Product Minor Version. Byte 4: 0. Byte 5: 0 Byte 6: 0 Byte 7: 0 “AVR,3” CAN Format: Byte 0: 0. Byte 1: Product Version High Byte. Byte 2: Product Version Low Byte. Byte 3: Altera Version High Byte. Byte 4: Altera Version Low Byte.. Byte 5: 0 Byte 6: 0 Byte 7: 0 The “VR” command has the following attributes: Attributes: Type: Axis related: Array: Assignment: Command Allows Parameter: Scope: Restrictions: Save to Flash: Default Value: Range: Command. No. ---. ---. Yes (See Above). All. None. ---. ---. ---. Syntax: XVR XVR,2 ‘ Standard Version Report ‘ Reports Firmware (Major and Minor) Versions, with its release Date and Time (RS-232 only) Examples: See Syntax Above. See Also: ---- 10-144 Control and Robotics Solutions Ltd. Revision 3.10, January 2005 10.5.79.2. VR – Get Version Command For The SC-AT-2M Purpose: The “VR” command retrieves the controller Firmware and FPGA versions. The standard Version Command response report (in RS-232 communication protocol) has the following syntax: ”SC-AT-2M,101,2,5,16” : The following interpretation is applicable: ¾ ¾ ¾ ¾ ¾ SC-AT-2M: Indicates the new SC-AT-2M product code. 101: Indicates that Firmware Version 1.01 is installed. 2: Indicates that this is a 2 axis version. 5: Indicates the FPGA version (5). 16: Indicates the Macro Buffer size in kBytes (16 kBytes). Please Note: Firmware version must comply to FPGA versions. Downloading firmware versions without prior authorization from C&RS is not allowed, and might result in a malfunctioning (un-expected results) board. In CAN bus communication, the standard VR report has the following syntax: Byte 1 Type Number =52 Byte 2 FW Ver Hi =0 Byte 3 FW Ver Low =101 Byte 4 Num Axes =2 Byte 5 FPGA Version =5 Byte 6 Reserve d 0 Byte 7 Macro Size Hi =0 Byte 8 Macro Size Low =16 Table 30: SC-AT-2M to Host - CAN VR Version Report Message Format The VR (Version Report) command also supports receiving a parameter as part of the command syntax. Calling “VR” without any parameter is fully compatible to previous revisions version report format (indicated above). However, the controller now also support the following additional version reports: ¾ ¾ ¾ “BVR,1” : Reports Boot and Single or Dual Axes Controller Version. “BVR,2” : Reports Firmware (Major and Minor) Versions, with its release Date and Time. “BVR,3” : Reports the FPGA Version. In current firmware version, special VR requests are supported on the SC-AT-2M in RS232 only. Control and Robotics Solutions Ltd. 10-145 SC-AT – Software User’s Manual and Commands Reference The “VR” command has the following attributes: Attributes: Type: Axis related: Array: Assignment: Command Allows Parameter: Scope: Restrictions: Save to Flash: Default Value: Range: Command. No. ---. ---. Yes (See Above). All. None. ---. ---. ---. Syntax: XVR XVR,2 ‘ Standard Version Report ‘ Reports Firmware (Major and Minor) Versions, with its release Date and Time (RS-232 only) Examples: See Syntax Above. See Also: ---- 10-146 Control and Robotics Solutions Ltd. Revision 3.10, January 2005 10.5.80. WT – Wait Period Purpose: Wait time for Repetitive Point to Point. When the controller is in MM=0 (PTP) and SM=1, the motion will be Repetitive. This means that the axis will be commanded to perform a PTP motion to the specified absolute position and then, after the motion is completed and a user specified delay (WT) is finished, a new motion is automatically initiated to the starting position (AP is updated to this value). This back-and-forth motion is repeated until stopped by one of the following clauses: AB (abort), ST (stop), KR (Kill repetitive), and MO=0. SC-AT-4M The WT parameter defines the delay time in number of servo samples (each is approximately 61 [us] or 1/16,384 of a sec) between the back-and-forth motions. SC-AT-2M The WT parameter defines the delay time in number of servo samples (each is approximately 122 [us] or 1/8,192 of a sec) between the back-and-forth motions. Attributes: Type: Axis related: Array: Assignment: Command Allows Parameter: Scope: Restrictions: Save to Flash: Default Value: Range: Parameter. Yes. No. Yes. ---. All. None. Yes. 0. 0 ÷ 800,000,000. Syntax: XWT=0; ZWT AWT=16384 ‘ Set X Axis WT=0. ‘ Report value of WT for Z axis. ‘ Set WT= 16384 in all axes. Examples: The example shows starting a Repetitive motion in X axis from Position “0” to Position “100,000” using 1 sec “WT” Wait between the motions. XMO=1;XPS=0 XMM=0;XSM=1 XAP=100000 XAC=100000;XDC=100000 XSP=25000 ‘ Enables the Motor and Set Position = “0”. ‘ Set Repetitive Point To Point Motion Mode. ‘ Set Next PTP absolute location to “100,000” counts. ‘ Set Acceleration to “250,000”. ‘ Set Speed to “25,000”. Control and Robotics Solutions Ltd. 10-147 SC-AT – Software User’s Manual and Commands Reference XWT=16384 XBG ‘ Set 1 second delay(SC-AT-4M) or 2 second delay (SC-AT-2M) ‘between motions. ‘ Start a Motion See Also: AC, DL, SP, MM, BG 10-148 Control and Robotics Solutions Ltd. Revision 3.10, January 2005 10.5.81. WW – Profiler Smooth Factor Purpose: The SC-AT supports an advanced, symmetric S-curve like profile smoothing algorithm. The smoothing is controlled by the “WW” parameter. “WW” can be set to 0 to avoid any profile smoothing. In that case the generated position velocity profile is pure trapezoidal (or triangular). If “WW” is set to 12, the smoothing is set to its maximal value. In that case the generated profile has full smoothing, and the velocity trajectory is not pure trapezoidal. The “WW” parameter is used by the controller as a power of 2 coefficient for the smoothing time value. For example, WW=6 means that smoothing is done over a period of time of 2^6 sample time, i.e. 4 msec (in the SC-AT-4M) or 8 msec (in the SC-AT4M). The resulted profile will generate its full acceleration value in the 2^6 sample time. Setting WW=12 to its Maximal smoothing value of 2^12, will result in a 0.25 sec (SCAT-4M) or 0.5 sec (SC-AT-2M) acceleration smooth period. Attributes: Type: Axis related: Array: Assignment: Command Allows Parameter: Scope: Restrictions: Save to Flash: Default Value: Range: Parameter. Yes. No. Yes. ---. All. Not In Motion. Yes. 0. 0 ÷ 12. Syntax: XWW=0; ZWW AWW=8 ‘ Set XWW=0 (No Smoothing for X Axis) ‘ Report value of WW for Z axis. ‘ Set WW= 8 for all axes. Examples: ---See Also: MM, and Section 5.9 above, “Profile Smoothing in the SC-” in this User’s Manual for more information about profile smoothing support in the SC-AT family controllers. Control and Robotics Solutions Ltd. 10-149 SC-AT – Software User’s Manual and Commands Reference 10.5.82. XC – Last Capture Position Latch Purpose: The “XC” parameter is used in conjunction with the Capture function to report the last captured position of an axis. The last Captured location is stored by the controller firmware in the “XC” parameter for each axis independently (i.e.: XXC, YXC, ZXC and WXC for X, Y, Z and W axes respectively). The user should note that when “PS” is updated, the value of “XC” is meaningless. The Capture feature implementation does not support hardware or software buffers. Whenever a Capture is detected, the last value of “XC” is overwritten and lost. As indicated above, “XC” is an axis related parameter keyword. Each axis holds its own Captured Position Location value. On the SC-AT-4M, only 4 axes are supported, so accessing “XC” with axes identifiers higher then “W” is meaningless. On the SC-AT-2M, Both axes are supported. “XC” has the following attributes: Attributes: Type: Axis related: Array: Assignment: Command Allows Parameter: Scope: Restrictions: Save to Flash: Default Value: Range: Parameter. Yes. No. No. ---. All. None. No. 0. - 2,147,000,000 ÷ 2,147,000,000. Syntax: XXC YXC WXC BXC} ‘ Reports the Last Captured position of X axis. ‘ Reports the Last Captured position of Y axis. ‘ Reports the Last Captured position of W axis. ‘Pushes the last X and Y Captured positions to the Stack top. Examples: Please refer to section 8.3.4 in this user’s manual for Capture Function operation examples. See Also: XN, Capture Function Description, section 8.2.7.2. 10-150 Control and Robotics Solutions Ltd. Revision 3.10, January 2005 10.5.83. XN – Capture Events Counter Purpose: The “XN” parameter is used in conjunction with the Capture function to report the number of Capture Events. Each time the hardware Captures (Latches) a new position, the total number of Capture events (“XN”) is incremented accordingly. The user can reset this variable to “0”, and monitor its value to wait for a Capture event within a script program. This can be used for example to signal events to a host computer whenever a Capture event is sensed. “XN” is an axis related parameter keyword. Each axis holds its own Capture index counter. On the SC-AT-4M, only 4 axes are supported, so accessing “XN” with axes identifiers higher then “W” has no meaning. On the SC-AT-2M, both axes are supported. “XN” has the following attributes: Attributes: Type: Axis related: Array: Assignment: Command Allows Parameter: Scope: Restrictions: Save to Flash: Default Value: Range: Parameter. Yes. No. Yes. ---. All. None. No. 0. 0. Syntax: XXN YXN=0 ‘ Reports the X axis Capture Events Number. ‘ Reset Y axis Capture Event counter. Examples: Please refer to section 8.3.4 in this user’s manual for Capture Function operation examples. See Also: XC, Capture Function Description, section 8.2.7.2. Control and Robotics Solutions Ltd. 10-151 SC-AT – Software User’s Manual and Commands Reference 10.5.84. XP – Auxiliary Encoder Position – (SC-AT-2M Only) Purpose: This command reports the position of the Auxiliary Encoder. The user can also set as desired value to the current position (define the current position as ##). This position is read every Servo Interrupt, and updates the parameter accordingly. This parameter is updated, irrelevant to the fact if the Velocity Dual Loop Mode is enabled. (Please refer to the “CG” parameter). The Velocity dual loop uses XP for the dual-loop feedback. Please refer to FR[2] regarding the ratio between the main and Aux. Encoders. Note: This option is currently supported in the SC-AT-M only. Attributes: Type: Axis related: Array: Assignment: Command Allows parameter: Scope: Restrictions: Save to Flash: Default Value: Range: Parameter. Yes. No. Yes. ---. All. ---. No. 0. - 2,147,000,000 ÷ 2,147,000,000. Syntax: XXP=0; YXP BXP=0 ‘ Set X Axis Aux. Position (encoder) to “0” ‘ Report value of Y axis Aux. position ‘ Set PS=0 for both axes Examples: --See Also: PS, XV. 10-152 Control and Robotics Solutions Ltd. Revision 3.10, January 2005 10.5.85. XV – Auxiliary Encoder Velocity Supported in the SC-AT-2M ONLY. Purpose: This parameter consists of the Auxiliary Encoder Velocity. Please note, the velocity is the delta of the Auxiliary encoder position from the previous servo-loop Interrupt. In the SC-AT-2M, the sampling time is 8,192 Hz. Therefore, if for instance, the delta from the previous Servo-Loop Interrupt is 4, then the velocity is 4 * 8192 = 32768 counts/sec. The XV keyword has the following attributes: Attributes: Type: Axis related: Array: Assignment: Command Allows parameter: Scope: Restrictions: Save to Flash: Default Value: Range: Parameter. Yes. No. No. ---. All. ---. No. 0. - 2,147,000,000 ÷ 2,147,000,000. Syntax: YXV BXP=0 ‘ Report value of Y axis Aux. Velocity ‘ Set PS=0 for both axes Examples: --See Also: XV, FR Control and Robotics Solutions Ltd. 10-153 SC-AT – Software User’s Manual and Commands Reference 10.5.86. ZI – CAN Array 10.5.86.1. ZI – CAN Array – SC-AT-4M Purpose: The “ZI” array holds various CAN related parameters. These parameters are used in numerous cases: 1. CAN remote unit addresses. 2. EDB modes. 3. Future modes. For CAN remote unit addresses, “ZI” is usually used in script programs in order to define the remote unit’s addresses. The “ZI” array is an axis related array, with size of 10x4 elements. Each element in the array is a LONG format number, which can be assigned, with any value at any time. The index range of the “ZI” array is: 1 ÷ 4. X Y Z W 1 Remote Transmit Address (The remote message is sent from the SC-AT-4M on this address) for macro ‘X’. Remote Transmit Address (The remote message is sent from the SC-AT-4M on this address) for macro ‘Y’. Remote Transmit Address (The remote message is sent from the SC-AT-4M on this address) for macro ‘Z’. Remote Transmit Address (The remote message is sent from the SC-AT-4M on this address) for macro ‘W’. 2 Remote Receive Address (The remote message is received in the SC-AT-4M on this address) for macro ‘X’. Remote Receive Address (The remote message is received in the SC-AT-4M on this address) for macro ‘Y’. Remote Receive Address (The remote message is received in the SC-AT-4M on this address) for macro ‘Z’. Remote Receive Address (The remote message is received in the SC-AT-4M on this address) for macro ‘W’. 3 4 EDB Buffer1 Configuration Array Code EDB Error Status Buffer1 Axis Code EDB Receiving CAN Address Buffer1 Current Index E Buffer2 Array Code Buffer2 Axis Code Buffer2 Current F G 10-154 Buffer1 Increment Value Control and Robotics Solutions Ltd. Revision 3.10, January 2005 1 2 3 4 Index Buffer2 Increment Value H U V The ZI keyword has the following attributes: Attributes: Type: Axis related: Array: Assignment: Command Allows parameter: Scope: Restrictions: Save to Flash: Default Value: Range: Parameter. Yes. Yes, size = [10][4]. Yes. ---. All. None. Yes. 0. - 100,000 ÷100,000. Syntax: Examples: See Below. See Also: Please see “SC-AT - Advanced Multi-Axes Servo Controller - Script Programming Language and the Integrated Development Environment User’s Manual”, “Remote CAN”. Control and Robotics Solutions Ltd. 10-155 SC-AT – Software User’s Manual and Commands Reference 10.5.86.2. ZI – CAN Array – SC-AT-2M Purpose: “ZI” holds various CAN related parameters. These parameters are used in numerous cases: 1. CAN remote unit addresses. 2. EDB modes. 3. Additional Transmit and receive addresses. For CAN remote unit addresses, “ZI” is usually used in script programs in order to define the remote unit’s addresses. The “ZI” array is an axis related array, with size of 2x12 elements. Each element in the array is a LONG format number, which can be assigned, with any value at any time. The index range of the “ZI” array is: 1 ÷ 12. 1 2 3 4 5 6 7 8 9 10 11 12 X Remote Transmit Address (The remote message is sent from the SC-AT-2M on this address) for macro ‘X’. Remote Receive Address (The remote message is received in the SC-AT-2M on this address) for macro ‘X’. Additional CAN TA Address Additional CAN RA Address EDB Error Status Buffer1 Array Code Buffer1 Axis Code Buffer1 Current Index Buffer1 Increment Value Y Remote Transmit Address (The remote message is sent from the SC-AT-2M on this address) for macro ‘Y’. Remote Receive Address (The remote message is received in the SC-AT-2M on this address) for macro ‘Y’. EDB Configuration EDB Receiving CAN Address Buffer2 Array Code Buffer2 Axis Code Buffer2 Current Index Buffer2 Increment Value The ZI keyword has the following attributes: Attributes: 10-156 Type: Axis related: Array: Assignment: Command Allows parameter: Scope: Restrictions: Save to Flash: Default Value: Range: Parameter. Yes. Yes, size = [2][12]. Yes. ---. All. None. Yes. 0. - 100,000 ÷100,000. Control and Robotics Solutions Ltd. Revision 3.10, January 2005 Syntax: Examples: Please refer to Please see “SC-AT - Advanced Multi-Axes Servo Controller - Script Programming Language and the Integrated Development Environment User’s Manual”, “Remote CAN”. See Also: Please see “SC-AT - Advanced Multi-Axes Servo Controller - Script Programming Language and the Integrated Development Environment User’s Manual”, “Remote CAN”. Control and Robotics Solutions Ltd. 10-157 Revision 3.10, January 2005 11. COMMUNICATION AND PROGRAM ERROR CODES The following table lists ALL possible communication and program Error Codes supported by the SC-AT Firmware. The error codes listed below are applicable to both communication errors as well as program execution error codes. The errors below are applicable in both the SC-AT-4M and the SC-AT-2M, unless specified otherwise. For Program related error codes please see the “SC-AT Macro (Scripts) Language features User’s Manual” for more information. EC Val 0 1 EC Code Name Error Description COM_OK No Error in history. This value is received also by resetting the EC variable. BAD_KEYWORD_AXIS This error is issued in the following cases: 1. 2. 2 SYNTAX_ERROR Bad axis prefix was used for the command / parameter. Keyword does not support one of the axes in the group prefix used. e.g.Group 1 is set to 1023, and the AAC clause is sent. This error is issued once a wrong syntax for current clause was sent to the controller. It may be one of the following: 1. 2. 3. 4. Unrecognized operator. Unrecognized Keyword. Macro label not according to syntax defined. General clause not according to the defined syntax. 3 BAD_ARRAY_INDEX This error is issued if a clause includes an array variable, and the index of the array variable is not in the correct range for the specific array. Please note, ALL start array indexes are 1 AND NOT 0. 4 NOT_IN_SCOPE Not Used. 5 BAD_NUMBER_RANGE This error code is issued if an assignment clause is not in the range for the specific variable. 6 READ_ONLY This error code is issued if an assignment clause was issued on a Read Only keyword. 7 NOT_AN_ARRAY This error code is issued if a clause consists of array referral on a keyword that is NOT an array. This is detected in the Control and Robotics Solutions Ltd. 11-1 SC-AT – Software User’s Manual and Commands Reference EC Val EC Code Name Error Description following matter: 1. 2. An Open Parenthesis appears in the clause, after the Keyword. (Or at all…). Digits appear immediately after the keyword in a clause. 8 AN_ARRAY Not used 9 RECEIVE_BUF_FULL This error code is issued if the string sent by RS-232 exceeds the maximum of 128 characters. 10 TOO_LONG_MESSAGE Not Used. 11 FAIL_ERASE_FLASH Not Used. 12 FAIL_WRITE_FLASH Not Used. 13 TOO_LARGE_NUMBER This error code is issued if the clause being interpreted includes an assign command with more than 12 digits. 14 WRONG_MOTION_PARAM This error code is issued if during a motion the controller detects wrong motion parameters. This can happen for example if during ECAM motion, bad ECAM data or wrong motion of the master axis is detected. Please see ECAM motion mode description for more information. 15 WRONG_RECORD_PARAM This error code is issued if the number of recording points exceeds the size of the DA array. 16 STILL_RECORDING This error code is issued when the user sends a Begin Recording Command (“BG”, or “BG,1”) while Data Recording is still in process, i.e. RR > 0. Data Recording can be started only when previous recording session was terminated. Note that the controller does not check if previous buffers were uploaded or not. Issuing a Begin Recording command always overrides old data. 17 NO_RECORDING_DATA Not Used. 18 CAN_BAD_ARRAY_CODE Not Used. 19 CAN_BAD_LENGTH Not Used. 20 STACK_FULL This error code is issued once a macro source clause included a push command once the stack was full. The push command can be to one of the following stacks: 1. 2. 21 STACK_EMPTY This error code is issued once a macro source clause included a pop command once the stack was empty. The pop command can be to one of the following stacks: 1. 11-2 Number Stack – As a result of a number push command. The number stack size is 15. Program Stack – As a result of a ‘Call’ command. The Program’s Stack size is 15. Number Stack – As a result of a number pop Control and Robotics Solutions Ltd. Revision 3.10, January 2005 EC Val EC Code Name Error Description 2. command. Program Stack – As a result of a ‘Return’ command. 22 NOT_ENOUGH_ARG Not Used. 23 DIVIDE_BY_ZERO This error code is issued once a macro source clause included a division operator to a denominator with the value of zero. 24 BAD_CONSTANT Not Used. 25 NO_VALID_MACRO This error code is issued once the ‘QI’ keyword is issued without any macro in the system. 26 CAN_NOT_FIND_LABEL This error code is issued once the QE,#LABEL clause is sent with an un-existing label. This means the user issued an execute command to a specific macro routine, but the specific routine does not exist. 27 BAD_NUMERIC_FIELD Not Used. 28 CLAUSE_TOO_LONG This error code is issued once a clause exceeds the length of 255. 29 MACRO_END This error code is issued once a macro One Step or an macro Execute command were issued and the macro reached the end. 30 MACRO_POINTER This error code is issued once the macro pointer is not in the limits of the macro code or one of the following functions lack a pointer as a parameter: 1. 2. Jump. Call. 31 TARGET_ADDRESS Not Used. 32 TOO_LONG_LABEL This error code is issued if a label parameter exceeds the limit of 12. It can happen in one of the following functions: 1. 2. 3. Jump. Call. Execute. 33 PARAM_NOT_ALLOWED This error code is issued if a parameter in a dedicated clause, exceeds the limits for this parameter. 34 PARAM_OUT_OF_RANGE This error code is issued when a command is given a parameter out of range, or when trying to assign a parameter with a value out of its range. Please check the relevant command or parameter keyword reference for more information about the allowed range for the specific parameter. 35 STATE_NUMBER_RANGE Not Used. Control and Robotics Solutions Ltd. 11-3 SC-AT – Software User’s Manual and Commands Reference EC Val 36 EC Code Name Error Description CAN_BAD_SPECIAL This error code is issued when a CAN message size, in the special download array feature, differs from 1, 4 or 8. 37 CAN_REMOTE_TIMEOUT The SC-AT family controllers has the ability to send, via macro, CAN strings to remote units. If the remote unit does not reply within a given timeout (1 second), this error is issued. 38 PARAM_EXPECTED This error is issued when a command requiring a parameter is issued with out one. Please check the relevant command keyword reference for more information about the command’s parameter. 39 BAD_PARAM_TYPE Not Used. 40 BAD_PARAM_LENGTH Not Used. 41 CAN_NOT_ACTIVE Not Used. 42 BAD_ARGUMENT Not Used. 43 CAPTURE_DISABLED Not Used. 44 BAD_PARAM_SYNTAX This error is issued when the wrong parameter is attached to a clause. 45 ARRAY_PARAM Not Used. 46 DOWNLOAD_OVERFLOW This error is issued in the following cases: 1. 2. The macro buffer, during the download macro, exceeds the maximum macro size. An index overflow occurred in the special CAN download buffer sequence. 47 NEEDS_MOTOR_ON This error is issued if the condition for the specific clause is having the motor On, while the clause was issued when motor is OFF. 48 NEEDS_MOTOR_OFF This error is issued if the condition for the specific clause is having the motor Off, while motor is ON. 49 NEEDS_MOTION_ON This error is issued if the condition for the specific clause is having the motion On, while motion is Off. 50 NEEDS_MOTION_OFF This error is issued if the condition for the specific clause is having the motion Off, while motion is On. 51 MACRO_NOT_INITIALIZED This error is issued if a macro related clause is initiated, before the macro was initialized. 52 NEEDS_COMMUNICATION This error is issued if a clause was not sent via communication whilst the clause was defined to be of KW_SOURCE_MUST_BE_COM. 53 SW_LIMIT_ERROR A Point-To-Point motion was initiated into one of the software limits. 11-4 Control and Robotics Solutions Ltd. Revision 3.10, January 2005 EC Val 54 EC Code Name Error Description AXIS_NOT_SUPPORTED 55 UNSUPPORTED_MODE 56 EC_UNSUPPORTED_DRIVER The Assignment to MO=1 failed, as the current hardware does not support the axis set. The method called is no longer supported in the current firmware version. Set when a CG for Un-Supported Driver type is configured in CG in SC-AT-2M product. 60 PG_ERR_MODE_PARAM_NOT_VALID This error is issued by “PQ,1” (Enable Compare Function) if the requested Compare Mode defined by PG[i][1] is out of its range. In the current firmware version only Modes 0 and 2 are supported for Compare Function). 61 PG_ERR_PULSE_MODE_PARAM_NOT_VALID This error is issued by “PQ,1” (Enable Compare Function) if the Pulse Width Mode Parameter defined by PG[i][6] is out of its range. The allowed range for the Pulse Width Mode Parameter is: “0” or “1”. 62 PG_ERR_PULSE_WIDTH_PARAM_NOT_VALID This error is issued by “PQ,1” (Enable Compare Function) if the Pulse Width Parameter defined by PG[i][5] is out of its range. The allowed range for the Pulse Width Parameter is: “0” to “3”. 63 PG_ERR_PULSE_POL_PARAM_NOT_VALID This error is issued by “PQ,1” (Enable Compare Function) if the Pulse Polarity Parameter defined by PG[i][7] is out of its range. The allowed range for the Pulse Polarity Parameter is: “0” or “1”. 64 PG_ERR_PD_PARAM_NOT_VALID This error is issued by “PQ,1” (Enable Compare Function) if the Distance Parameter defined by PG[i][2] is out of its range. Out of range values for Distance are: - 0 in all modes. - Out of +/-32,767 range in Mode 0. - Not equal +1 or –1 in Modes 2 and 3. 65 PG_ERR_PS_PE_PARAM_NOT_VALID This error is issued by “PQ,1” (Enable Compare Function) if the Start Point or End Point Parameters defined by PG[i][3] and PG[i][4] are not valid. These parameters are validated only in Modes 2 and 3 (see specific operation mode description for more details about limitations on PStart and PEnd). 70 QW_AXIS_OUT_OF_RANGE This error is issued if the Axis, which is derived from the parameter to the QW command, is out of range. 71 QW_CODE_OUT_OF_RANGE This error is issued if the Code, which is derived from the parameter to the QW command, is out of range. 72 QW_BIT_OUT_OF_RANGE This error is issued if the Bit, which is derived from the parameter to the QW command, is out of range. 73 QW_LOGIC_OUT_OF_RANGE This error is issued if the Logic, which is derived from the parameter to the QW command, is out of range. 74 QW_INTERNAL This error is issued if an internal error, due to the QW command occurred. 97 HW_INIT_ERROR An error occurred trying to re-initialize the CAN bus via re- Control and Robotics Solutions Ltd. 11-5 SC-AT – Software User’s Manual and Commands Reference EC Val EC Code Name Error Description 98 NO_SW_SUPPORT_IN_4AXIS_VER 99 NO_HW_SUPPORT_IN_4AXIS_VER This error code is issued when a command not supported by the specific SC-AT-4M hardware revision is issued. Please check the relevant command for more information about the possible error source. 100 FLASH_ERASE This error code is issued if an error occurred during the Saving to Flash Procedure. The error is related to erasing the flash. 101 FLASH_VOLTAGE This error code is issued if an error occurred during the Saving to Flash Procedure. The error is related to the flash voltage. 102 FLASH_ACK_TIMEOUT This error code is issued if an error occurred during the Saving to Flash Procedure. The error is related to acknowledge time out from the flash hardware. 103 FLASH_SUSPEND This error code is issued if an error occurred during the Saving to Flash Procedure. The error is related to flash suspend. 104 FLASH_WRITE This error code is issued if an error occurred during the Saving to Flash Procedure. The error is related to flash write. setting the RA or TA variables This error code is issued when a command not supported by the specific SC-AT-4M software firmware revision is issued. Please check the relevant command for more information about the possible error source. Table 31: Communication and Program Error Codes ZY 11-6 Control and Robotics Solutions Ltd.