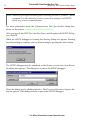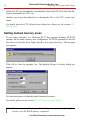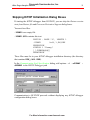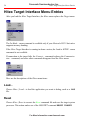
1
Freescale Semiconductor, Inc.
Hitex Emulator
Target Interface
Product Manual
Manual Date
HITEX Emulator Target Interface
Nov 2002
For More Information: www.freescale.com
Freescale Semiconductor, Inc.
For More Information: www.freescale.com
Contents
Freescale Semiconductor, Inc.
Contents
Hitex Target Interface . . . . . . . . . . . . . . . . . . . . . . . . . . . 5
Overview . . . . . . . . . . . . . . . . . . . . . . . . . . . . . . . . . . . . . . . . . . . . . . . . . . . . . . . . . 5
Highlights . . . . . . . . . . . . . . . . . . . . . . . . . . . . . . . . . . . . . . . . . . . . . . . . . . . . . . . . 6
Requirements . . . . . . . . . . . . . . . . . . . . . . . . . . . . . . . . . . . . . . . . . . . . . . . . . . . . . 6
Hitex Target Interface Demo . . . . . . . . . . . . . . . . . . . . . 7
Debugging with the Hitex Target Interface . . . . . . . . . . . . . . . . . . . . . . . . 7
Preparing the HiTOP Debugger to Communicate with HI-WAVE . 7
Starting with the Hitex Target Interface . . . . . . . . . . . . . . . . . . . . . . . . . . . 8
Debugging an Application in RAM. . . . . . . . . . . . . . . . . . . . . . . . . . . . . . . 12
Using the Startup Command File to Map Emulation Memory . . . . . 13
Loading a Hitex File Format Application in HiTOP from HI-WAVE14
Converting an Absolute File to Hitex File Format . . . . . . . . . . . . . . . . . . . . . . . . 14
Loading the Hitex File Format File. . . . . . . . . . . . . . . . . . . . . . . . . . . . . . . . . . . . 15
Hitex Target Interface Manual. . . . . . . . . . . . . . . . . . . 17
Introduction . . . . . . . . . . . . . . . . . . . . . . . . . . . . . . . . . . . . . . . . . . . . . . . . . . . . . . 17
Working in Parallel in HI-WAVE and HiTOP . . . . . . . . . . . . . . . . . . . . 18
Interfacing Your System and the Target . . . . . . . . . . . . . . . . . . . . . . . . . . 19
Preparing the HiTOP debugger. . . . . . . . . . . . . . . . . . . . . . . . . . . . . . . . . . . . . . . 19
Hardware Connection . . . . . . . . . . . . . . . . . . . . . . . . . . . . . . . . . . . . . . . . . . . . . . 20
Loading the Hitex Target Interface . . . . . . . . . . . . . . . . . . . . . . . . . . . . . . . . . . . . 20
Selecting the CPU . . . . . . . . . . . . . . . . . . . . . . . . . . . . . . . . . . . . . . . . . . . . . . . . . 23
Setting banked memory areas . . . . . . . . . . . . . . . . . . . . . . . . . . . . . . . . . . . . . . . . 24
Skipping HiTOP Initialization Dialog Boxes . . . . . . . . . . . . . . . . . . . . . . . . . . . . 25
Hitex Target Interface Menu Entries . . . . . . . . . . . . . . . . . . . . . . . . . . . . . . 26
Load... . . . . . . . . . . . . . . . . . . . . . . . . . . . . . . . . . . . . . . . . . . . . . . . . . . . . . . . . . . 26
Reset . . . . . . . . . . . . . . . . . . . . . . . . . . . . . . . . . . . . . . . . . . . . . . . . . . . . . . . . . . . 26
Load in HiTOP.... . . . . . . . . . . . . . . . . . . . . . . . . . . . . . . . . . . . . . . . . . . . . . . . . . 27
Communication or Connect . . . . . . . . . . . . . . . . . . . . . . . . . . . . . . . . . . . . . . . . . 27
Set Bank... . . . . . . . . . . . . . . . . . . . . . . . . . . . . . . . . . . . . . . . . . . . . . . . . . . . . . . . 27
Set CPU... . . . . . . . . . . . . . . . . . . . . . . . . . . . . . . . . . . . . . . . . . . . . . . . . . . . . . . . 27
Command Files . . . . . . . . . . . . . . . . . . . . . . . . . . . . . . . . . . . . . . . . . . . . . . . . . . . 27
Help . . . . . . . . . . . . . . . . . . . . . . . . . . . . . . . . . . . . . . . . . . . . . . . . . . . . . . . . . . . . 27
Hitex Target Interface Dialog Boxes . . . . . . . . . . . . . . . . . . . . . . . . . . . . . 28
Load Hitex Executable File Dialog Box . . . . . . . . . . . . . . . . . . . . . . . . . . . . . . . . 28
Communication Link Specification Dialog Box. . . . . . . . . . . . . . . . . . . . . . . . . . 30
Banked Memory Location Dialog Box . . . . . . . . . . . . . . . . . . . . . . . . . . . . . . . . . 31
CPU Identification Dialog Box. . . . . . . . . . . . . . . . . . . . . . . . . . . . . . . . . . . . . . . 33
Hitex Target Interface
Files Dialogwww.freescale.com
Box . . . . . . . . . . . . . . . . . . . . . . . 34
For Command
More Information:
3
4
Freescale Semiconductor, Inc.
Status Bar Information for the Hitex Target Interface . . . . . . . . . . . . .36
Status Messages . . . . . . . . . . . . . . . . . . . . . . . . . . . . . . . . . . . . . . . . . . . . . . . . . . .36
Stepping and Breakpoint Messages . . . . . . . . . . . . . . . . . . . . . . . . . . . . . . . . . . . .37
Notification Messages . . . . . . . . . . . . . . . . . . . . . . . . . . . . . . . . . . . . . . . . . . . . . .37
Hitex Target Interface Environment . . . . . . . . . . . . . . . . . . . . . . . . . . . . . .39
Default Target Setup . . . . . . . . . . . . . . . . . . . . . . . . . . . . . . . . . . . . . . . . . . . . . . .39
Hitex Target Interface Environment Variables . . . . . . . . . . . . . . . . . . . . . . . . . . .39
Hitex Target Interface Command Files . . . . . . . . . . . . . . . . . . . . . . . . . . . .66
Startup Command File . . . . . . . . . . . . . . . . . . . . . . . . . . . . . . . . . . . . . . . . . . . . . .66
Reset Command File . . . . . . . . . . . . . . . . . . . . . . . . . . . . . . . . . . . . . . . . . . . . . . .67
Preload Command File . . . . . . . . . . . . . . . . . . . . . . . . . . . . . . . . . . . . . . . . . . . . .67
Postload Command File . . . . . . . . . . . . . . . . . . . . . . . . . . . . . . . . . . . . . . . . . . . . .67
Hitex Target Interface Commands . . . . . . . . . . . . . . . . . . . . . . . . . . . . . . . .68
Index . . . . . . . . . . . . . . . . . . . . . . . . . . . . . . . . . . . . . . . 75
For More Information: www.freescale.com
Contents
Hitex Target Interface
Freescale Semiconductor, Inc.
5
Hitex Target Interface
Overview
This document helps you become familiar with and use the Hitex Target Interface.
This document consists of these sections:
• The Hitex Target Interface Demo section answers common questions and describes
how to use advanced features of the Hitex Target Interface.
• The Introduction section introduces the Hitex Target Interface concept.
• The Working in parallel in HI-WAVE and HiTOP section describes how you can
use HI-WAVE and HiTOP together.
• The Interfacing Your System and the Debugger section describes the connection
between the in-circuit emulator and the debugger.
• The Hitex Target Interface Menu Entries section describes the Hitex Target Interface specific menu entries.
• The Hitex Target Interface Dialogs section describes the Hitex Target Interface
specific dialog boxes.
• The Status Bar Information for the Hitex Target Interface section describes the status bar messages of the Hitex Target Interface.
• The Hitex Target Interface Environment section lists all the variables this target
interface uses to store the configuration.
• The Hitex Target Interface Command Files section describes all the Hitex Target
Interface command files.
• The Hitex Target Interface Commands section lists all the HI-WAVE commands
specific to this target interface.
• The Index contains all keywords of the Hitex Target Interface.
For More Information: www.freescale.com
Freescale Semiconductor, Inc.
6
Highlights
Highlights
• The Hitex Target Interface currently supports these in-circuit emulators from hitex
DEVELOPMENT TOOLS:
• Motorola HC12 hitex DEVELOPMENT TOOLS in-circuit emulator:
DProbeHC12-A, DPRobeHC12-B, and DProbeHC12-DG. Watchpoints are
possible for the DBox16 or DBoxHC12 base unit.
• Motorola HC08 hitex DEVELOPMENT TOOLS in-circuit emulator.
• STMicroelectronics ST7 hitex DEVELOPMENT TOOLS in-circuit emulator.
• The Hitex Target Interface supports parallel debugging with the HI-WAVE and the
HiTOP debugger. You can load an application in Hitex File Format from the HIWAVE debugger, with or without HiTOP debugger symbols.
• The Hitex Target Interface supports memory banking for the M68HC12A4 and
M68HC12DG128.
Requirements
• A debug system from hitex DEVELOPMENT TOOLS normally consists of an incircuit emulator and HiTOP, the user interface for all in-circuit emulators available
from hitex. To use the Hitex Target Interface, you must install the HiTOP debugger
from hitex DEVELOPMENT TOOLS. For more information about communication
between HI-WAVE and HiTOP, please see the section Interfacing Your System and
the Debugger.
• The HiTOP debugger from hitex DEVELOPMENT TOOLS must support the
Remote Control Interface in order to communicate with HI-WAVE.
For More Information: www.freescale.com
Freescale Semiconductor, Inc.
Hitex Target Interface Demo
7
Hitex Target Interface Demo
Debugging with the Hitex Target Interface
This section is an overview of debugging with the Hitex Target Interface.
This interface lets you download an executable program from the HI-WAVE environment to the emulation memory. It provides feedback of the real target system
behaviour to HI-WAVE.
HI-WAVE fully supervises and monitors the target system. That is, HI-WAVE control the CPU execution. You can read and write to memory; you can single-step,
run, or stop the CPU; you can set breakpoints in the code.
Note: Uninvolved Components As an external MCU executes the code, the
Hitex Target Interface cannot provide memory statistics. This means that
you cannot use the Hitex Target Interface for profiling, coverage analysing,
or I/O simulation.
Preparing the HiTOP Debugger to
Communicate with HI-WAVE
To make communication possible between the in-circuit emulator and HI-WAVE,
you must load the HiTOP debugger program of the hitex DEVELOPMENT TOOLS.
You must set up the HiTOP debugger for use with a remote control, such as HIWAVE which uses the Remote Control Interface (RCI).
The HiTOP debugger .INI file must be in the directory where you installed
HiTOP:
• HFW_6812.INI for Motorola HC12
• HFW_6811.INI for Motorola HC08
• HFW_6811.INI for STMicroelectronics ST7
To establish remote control, add these lines to the HiTOP debugger .INI file that
For More Information: www.freescale.com
8
Freescale Semiconductor, Inc.
Starting with the Hitex Target Interface
corresponds to your in-circuit emulator:
[HiSCRIPT Remote]
Activate=1
Port=4215
DebugLevel=0
The port number must correspond with the HI-WAVE UDP port configuration.
For hardware connections, please refer to the hitex DEVELOPMENT TOOLS
User’s Manual.
Starting with the Hitex Target Interface
1. If HI-WAVE is running, close it. Then, from within the Hiware Technology Tools
shell, open the project directory that corresponds to your target derivative. For
example:
• C:\METROWERKS\DEMO\HC12\HITEX\DG128 if you are using a
Motorola HC12 DprobeHC12-DG hitex emulator.
• C:\METROWERKS\DEMO\HC12\HITEX\A4 if you are using a Motorola
HC12 DprobeHC12-A hitex emulator.
• C:\METROWERKS\DEMO\HC12\HITEX\B32 if you are using a Motorola
HC12 DprobeHC12-B hitex emulator.
• C:\METROWERKS\DEMO\HC08\HITEX if you are using a Motorola HC08
hitex emulator.
• C:\METROWERKS\DEMO\ST7\HITEX if you are using a STMicroelectronics ST7 hitex emulator.
2. Run HI-WAVE. If the HiTOP debugger is not already started, the system opens
the Communication Link Specification dialog box.
For More Information: www.freescale.com
Freescale Semiconductor, Inc.
Hitex Target Interface Demo
9
.
3. Make sure that the path and executable name in the HiTOP Debugger edit box
match your installation. The value in the UDP Port edit box must match the one
in the .INI file, which is in the HiTOP debugger directory (see the Preparing
the HiTOP Debugger to Communicate with HI-WAVE section). If the emulator is
connected to the computer in which you started HI-WAVE, specify localhost in
the Host Name edit box, Otherwise, enter the remote computer name TCP/IP
address or DNS name in this edit box.
4. When you are done changing the settings, click Ok. The debugger tries connecting to the target, and the Booting ... dialog box appears.
5. It may take up to one minute to boot. To abort the boot process, click the Abort
button.
6. The Restore session state from Restore file dialog box appears. (This dialog box
is part of the HiTOP debugger.)
7. Click Initialize to initialize and to close the dialog box. The Processor Derivative
Support dialog box appears. (This dialog box also is part of the HiTOP debugFor More Information: www.freescale.com
Freescale Semiconductor, Inc.
10
Starting with the Hitex Target Interface
ger.)
8. Click Cancel to close this dialog box.
9. If the system cannot establish a connection, click the Abort button, then verify
your parameter values. To retry the connection, select the Hitex | Connect menu
command.
10.When the system successfully connects to the target emulator, the CPU Identification dialog box appears:
11.Use the drop-down list to select the CPU core that corresponds to the target
derivative connected to your hitex in-circuit emulator.
For More Information: www.freescale.com
Freescale Semiconductor, Inc.
Hitex Target Interface Demo
11
12.Click OK to close the dialog and install the selected CPU core.
13.If the target derivative is a Motorola HC12 that supports banking (such as an
M68HC12A4 or M68HC12DG128), a dialog box prompts you for the configuration of the bank memory area:
14.Click OK to close this dialog box, and to open the Banked Memory Location dialog box:
15.The default PPAGE settings are the M68HC12DG128. The default EPAGE and
DPAGE settings are for the M68HC12A4.
Note: If you use the M68HC12DG128 DProbeHC12-DG, you must define at least
one page from 0x8000 to 0xBFFF. Otherwise, there could be display problems in the Hi-WAVE Memory component.
16.Click OK to close the Banked Memory Location dialog box and connect to the
target.
For More Information: www.freescale.com
12
Freescale Semiconductor, Inc.
Debugging an Application in RAM
The HI-WAVE status bar shows the CPU name and the target status.
The HI-WAVE main menu includes a Hitex entry. The Hitex menu lets you reset the
application (select Reset), set the serial communication parameters (select Communication...), or load a .ABS application to debug (select Load...).
The Load in HiTOP... menu entry is greyed if the Hitex Target Interface is in demo
mode.
The Set Bank... menu entry is present only if your target derivative is a Motorola
HC12 that supports banking.
The Set CPU... menu entry opens the CPU Identification dialog box which allows
you to select the CPU core matching your hardware.
The Command Files menu entry opens the Hitex Target Interface Command Files
dialog box, so that you can set up the command files for the target interface.
The Help menu entry opens the Hitex Target Interface help file.
Debugging an Application in RAM
1. Choose the Hitex | Load menu command. This opens the Load Object File dialog
box.
2. Select file FIBO.ABS and click Open.
3. The system closes the dialog box and loads the program.
4. Choose Run | Start/Continue or click
.
For More Information: www.freescale.com
Freescale Semiconductor, Inc.
Hitex Target Interface Demo
13
5. The system starts the application.
6. Choose Run | Halt or click
.This stops program execution.
Using the Startup Command File to Map
Emulation Memory
You must define the emulation memory before loading an application. After you
define the emulation memory, you may load the application after the Hitex Target
Interface connection appears.
To map the emulation memory during the HI-WAVE startup routine, you can use the
Startup command file, along with the PT command:
- PT (Pass Through HiSCRIPT command) is a HI-WAVE command that lets you use
any HiSCRIPT command within HI-WAVE.
- Startup command file is executed each time you initiate the connection to the
Hitex Target Interface.
As an example (for DProbeHC12-B), to map the on-chip Flash and EEPROM, your
Startup command file might contain:
PT MAP B32_EEPROM AT 0xD00 LEN 0x300
PT MAP B32_FLASH AT 0x8000 LEN 0x8000
The following steps show how to load the FIBOBANK.ABS sample from the C:/
METROWERKS/DEMO/HC12/Hitex/DG128 on a DProbeHC12-DG, in standalone mode.
1. If HI-WAVE is running, close it. From within the HIWARE Technology Tools
shell, open the project directory that corresponds to the M68HC12DG128 derivative.: C:\METROWERKS\DEMO\HC12\Hitex\DG128.
2. Using an editor, create a text command file (use the STARTUP.CMD default
name) to map all the different memory pages of the M68HC12DG128. The file
might contain:
PT MAP PAGE0 AT P0:0x8000 LEN 0x4000
PT MAP PAGE1 AT P1:0x8000 LEN 0x4000
PT MAP PAGE2 AT P2:0x8000 LEN 0x4000
PT MAP PAGE3 AT P3:0x8000 LEN 0x4000
PT MAP PAGE4 AT P4:0x8000 LEN 0x4000
For More Information: www.freescale.com
Freescale Semiconductor, Inc.
14
Loading a Hitex File Format Application in
PT MAP PAGE5 AT P5:0x8000 LEN 0x4000
PT MAP PAGE6 AT P6:0x8000 LEN 0x4000
PT MAP PAGE7 AT P7:0x8000 LEN 0x4000
3. Run HI-WAVE. If the HiTOP debugger is not already started, the system opens
the Communication Link Specification dialog box. Follow the steps of the Starting with the Hitex Target Interface section of this demo to connect to the target.
4. The system executes the Startup command file.
.
Note: If the system does not execute the Startup command file at this point, use the
Hitex Target Interface Command Files Manager dialog box to verify that the
correct Startup command file is set up for the Hitex Target Interface. Once
you have set up the Startup command file correctly, close and restart HIWAVE.
5. Choose Hitex | Load. This opens the Load Object File dialog box.
6. Select file FIBOBANK.ABS and click Open.
7. This closes the dialog box and loads the program.
8. Choose Run | Start/Continue or click
9. The system starts the application.
10.Choose Run | Halt or click
.
.This stops program execution.
Loading a Hitex File Format Application in
HiTOP from HI-WAVE
The Hitex | Load in HiTOP menu command lets you load a file (in Hitex File Format) in the HiTOP debugger, as you load the symbols from the corresponding absolute file in HI-WAVE.
This feature is not available if the Hitex Target Interface is in demo mode.
Converting an Absolute File to Hitex File Format
You must use the absolute file (generated by the HIWARE Technology Tools) to generate a Hitex File Format file before you can load this file in the HiTOP debugger,
You must use a hitex DEVELOPMENT TOOLS symbol preprocessor to perform this
operation.
For More Information: www.freescale.com
Freescale Semiconductor, Inc.
Hitex Target Interface Demo
15
You can automate the .HTX file generation process by using a make file.
Example:
To generate the FIBOD128.ABS sample, you can use a make file, such as
FIBOD128.MAK:
makeall:
$(COMP) $(FLAGS) fibo.c
$(LINK) fibod128.prm
This make file lets you create the .HTX file that corresponds to the
FIBOD128.ABS application.
If the name of the hitex symbol preprocessor is SP6812ED.EXE (for ELF/Dwarf
2.0), and if a copy of this symbol preprocessor is in directory
C:\METROWERKS\DEMO\HC12\HITEX\DG128, (which contains the generated
absolute file, add this line to the make file:
C:\METROWERKS\DEMO\HC12\HITEX\DG128\SP6812ED.EXE FIBOD128.ABS
Execute the makefile using the Maker to create the .ABS and the corresponding
.HTX files.
For more information about the HI-WAVE Maker, please see the related documentation.
Loading the Hitex File Format File
Once you have created the FIBOD128.HTX file out of the FIBOD128.ABS file,
you can load it in the HI-WAVE debugger:
1. Choose the Hitex | Load in HiTOP... menu command. This opens the Load Hitex
Executable File dialog box.
For More Information: www.freescale.com
Freescale Semiconductor, Inc.
16
Loading a Hitex File Format Application in
2. Select the .HTX file you want to load. Select the appropriate load option button:
Load Code + Symbols, Load Symbols only, or Load Code only. Then click Open
to load your selection in the HiTOP debugger.
3. The Waiting dialog box appears while the HiTOP loads the .HTX file. If any
problem occurs, you can end the download by clicking the Abort button. This
stops communication.
4. The system loads the .HTX file in HiTOP, and loads the symbols from the corresponding .ABS file in HI-WAVE. If you specified Load Code + Symbols or Load
Code only, the system sets the PC to the application entry point.
5. The Load Hitex Executable File dialog box closes, and you can debug in HIWAVE.
.
Note: HI-WAVE’s Load in Hitop feature downloads large applications faster than
the standard loading function. This feature also lets you load symbols in HIWAVE and open a single file in HiTOP.
For More Information: www.freescale.com
Freescale Semiconductor, Inc.
Hitex Target Interface Manual
17
Hitex Target Interface
Manual
Introduction
This document describes the features of the Hitex Target Interface, an advanced feature of HI-WAVE that lets you load different target interfaces. This document also
introduces the HiTOP Development System. The HiTOP debugger is a product from
hitex DEVELOPMENT TOOLS.
With the target interface, you can transfer a program from the HI-WAVE environment to an external target system that executes the program. HI-WAVE receives
feedback of the real target-system behaviour.
HI-WAVE controls the CPU execution. You can read and write in internal or external memory; you can single-step, run, or stop processes in the CPU; and you can set
breakpoints in the code.
.
Note:
Uninvolved Components The Hitex Target Interface cannot
provide memory statistics for external processors. This means that you cannot use the Hitex Target Interface for profiling, coverage analysing, or I/O
simulation.
For More Information: www.freescale.com
Freescale Semiconductor, Inc.
18
Working in Parallel in HI-WAVE and HiTOP
Working in Parallel in HI-WAVE and HiTOP
The Hitex Target Interface lets you debug in parallel in HI-WAVE and HiTOP.
HiTOP notifies HI-WAVE about each action, so that the HI-WAVE status always
matches the HiTOP status.
For example, you can load your application in HI-WAVE, run the application from
HiTOP, then perform a single step in HI-WAVE. The HI-WAVE and HiTOP debuggers stay synchronized.
You can load the application in either HI-WAVE or HiTOP. If you load the application in HiTOP, you must load the symbols in HI-WAVE so that the Source and Data
component can display the correct information.
To load an application (with symbols) in the HiTOP debugger, select the Hitex |
Load in HiTOP menu command. An open file dialog box appears. This dialog box
lets you load a .HTX file (with or without symbols) in the HiTOP debugger, and at
the same time load the symbols from a corresponding .ABS file in HI-WAVE.
This parallelism also means that while you debug with HI-WAVE, you can use
advanced features of the HiTOP debugger to set triggers, map emulation memory,
and use the trace component.
If an event occurs in HiTOP, the system refreshes HI-WAVE, displaying one of these
explanations in the status bar:
• Step performed in HiTOP
• Modified memory in HiTOP
• Unhandled command performed in HiTOP
• Trigger event occurred in HiTOP
• ILLEGAL_BP (if a breakpoint has been set in HiTOP)
• RUNNING
• HALTED
Note: Loading an application in HiTOP before you start HI-WAVE can affect the
displays in the Memory component, in the Assembly component, and in the
Data component.
For More Information: www.freescale.com
Freescale Semiconductor, Inc.
Hitex Target Interface Manual
19
Interfacing Your System and the Target
A debug system from hitex DEVELOPMENT TOOLS normally consists of an incircuit emulator and HiTOP. HiTOP is the interface you use to operate all in-circuit
emulators available from hitex.
You must load the HiTOP debugger program (from hitex DEVELOPMENT
TOOLS) before you can establish communication between the emulator and HIWAVE.
For communication with the hitex system, HI-WAVE uses the Remote Control
Interface (RCI), from hitex DEVELOPMENT TOOLS. The RCI communicates
with the HiTOP debugger via a socket interface.
Communication through the RCI follows the HiSCRIPT command language protocol. Commands sent from HI-WAVE to HiTOP are HiSCRIPT commands. Answers
and responses also follow the HiSCRIPT protocol.
Commands and answers are ASCII strings that terminate with the characters '\0'.
These strings may contain '\n' and/or '\r' characters.
For more information about HiSCRIPT, see the section "The HiSCRIPT Command
Language", of the HiTOP's User's manual.
Preparing the HiTOP debugger
Configuring a remote control lets the HiTOP debugger communicate with the HIWAVE Remote Control Interface (RCI).
The HiTOP debugger .INI files are in the directory that contains HiTOP:
• HFW_6812.INI for Motorola HC12
• HFW_6811.INI for Motorola HC08
• HFW_6811.INI for STMicroelectronics ST7
To enable and set up a remote control, add the following lines to the appropriate
HiTOP debugger .INI file:
[HiSCRIPT Remote]
Activate=1
Port=4215
DebugLevel=0
The [HiSCRIPT Remote] entries are:
Activate:
This For
line More
enables
or disableswww.freescale.com
the remote control. The value 1 enables
Information:
20
Freescale Semiconductor, Inc.
Interfacing Your System and the Target
the remote control. The value 0 disables the remote control.
Port: This line specifies the port through which HiTOP receives HiSCRIPT commands and sends protocol answers. The port number must correspond to the configuration of the UDP Port in HI-WAVE (see the Loading The Target Interface
section). The UDP Port value must be an open port on the host system. HiTOP
sends out notifications through the next port (that is, Port + 1).
DebugLevel: This line enables or disables HiSCRIPT activity logging. The
value 1 logs all send and receive HiSCRIPT commands and notifications to a file.
(The log file, "d.log", is in the directory that contains the HiTOP debugger). The
value 0 disables logging.
Hardware Connection
For hardware connection information, please see the hitex DEVELOPMENT
TOOLS User’s Manual.
Loading the Hitex Target Interface
Usually, the PROJECT.INI file specifies the target. To make Hitex the target,
change the file’s Target= line, in the [HI-WAVE] section, to Target=hitex.
The Hitex Target Interface automatically detects the target connection to your system. If the interface cannot detect the target connection, the Communication Link
Specification dialog box appears, notifying you that the target is not connected or is
connected to a different port.
If the PROJECT.INI file specifies a different target (or no target), you can load
the Hitex Target Interface.
Choose the Component | Set Target...menu command.
The Set Target dialog box appears. Choose Hitex from the list of possible targets
and click OK.
For More Information: www.freescale.com
Freescale Semiconductor, Inc.
Hitex Target Interface Manual
21
The debugger tries to connect to the target. The following conditions prompt the
system to open the Communication Link Specification dialog box:
• You are using the Hitex Target Interface for the first time,
• The HiTOP debugger is not yet started, or
• The connection between HI-WAVE and the HiTOP debugger is not already set in
the current project directory.
.
This dialog box lets you modify the UDP Port, the Host Name, and the path and
name of the HiTOP Debugger.
Make sure that parameter values of your host computer are correct. Check that the
UDP Port you use matches the one the .INI file specifies. (Please see the section
Interfacing Your System and the Target, Preparing the HiTOP debugger for more
information.) Otherwise, it is not possible to communicate between HI-WAVE and
the target. Ensure that the Host Name and the HiTOP debugger path and name are
also correct.
For More Information: www.freescale.com
22
Freescale Semiconductor, Inc.
Interfacing Your System and the Target
Note: Another way to open this dialog box is choosing the Hitex | Connect... menu
command. Use this method if previous connection attempts with HiTOP
failed, or if you lost communication.
For more information about the Communication Link Specification dialog box,
please see the section Communication Link Specification.
After you specify the UDP Port, the Host Name, and the path to the HiTOP Debugger, click OK.
While the HiTOP debugger is booting, the Booting dialog box appears. Booting
may take as long as a minute; you can abort booting by pressing the Abort button.
The HiTOP debugger must be initialized, so the Restore session state from Restore
file dialog box appears. (This dialog box is part of the HiTOP debugger.)
Close this dialog box by clicking Initialize. The Processor Derivative Support dialog box appears. (This dialog box also is part of the HiTOP debugger.)
For More Information: www.freescale.com
Freescale Semiconductor, Inc.
Hitex Target Interface Manual
23
Close this dialog box by clicking Cancel.
Note: You can switch off display of these two HiTOP dialog boxes. For instructions, see section Skipping HiTOP initialization dialogs of this manual.
If a connection could not be established, click the Abort button, check that the
parameter values are correct, then try again by choosing Hitex | Connect. (You must
close the HiTOP debugger before this second communication attempt.)
If you want to exit the Communication Link Specification dialog box and environment, click Cancel.
Selecting the CPU
If you did not loaded the target interface, HI-WAVE prompts for information about
the CPU you are using.
The CPU Identification dialog box appears:
For More Information: www.freescale.com
24
Freescale Semiconductor, Inc.
Interfacing Your System and the Target
Select the CPU core that matches your hardware, then click OK. This closes the dialog box and installs the CPU core.
Another way to open this dialog box is choosing the Hitex | Set CPU... menu command.
For details about the CPU Identification dialog box, please see the section CPU
Identification.
Setting banked memory areas
If your target derivative is a Motorola HC12 that supports banking, HI-WAVE
prompts for the bank memory area configuration. HI-WAVE prompts for this the
first time you load the Hitex Target Interface in a project directory. This message
box appears:
Click OK to close the message box. The Banked Memory Location dialog box
appears:
Use this dialog box to define the banked memory locations.
For details, please see the section Banked Memory Location dialog.
Note: You must complete the settings of this dialog box, or you risk affecting the
display in the HI-WAVE Memory component.
For More Information: www.freescale.com
Freescale Semiconductor, Inc.
Hitex Target Interface Manual
25
Skipping HiTOP Initialization Dialog Boxes
If starting the HiTOP debugger from HI-WAVE, you can skip the Restore session
state from Restore file and Processor Derivative Support dialog boxes.
You need two files:
- DUMMY is an empty file.
- DUMMY.SFR contains this text:
REGION : BASE "0", LENGTH 1
-DUMMY
0x00,1,RW,HEX
ENDREGION
WINDOW 1 "Dummy"
|[-DUMMY####]|
ENDWINDOW
These files must be in your HiTOP debugger installation directory (the directory
that contains HFW_6812.EXE).
In the Communication Link Specification dialog, add options: -i -uDUMMY dDUMMY to the HiTOP Debugger path
Communication to HI-WAVE proceeds without displaying any HiTOP debugger
configuration dialog boxes.
For More Information: www.freescale.com
Freescale Semiconductor, Inc.
26
Hitex Target Interface Menu Entries
Hitex Target Interface Menu Entries
After you load the Hitex Target Interface, the Hitex menu replaces the Target menu:
The Set Bank... menu command is available only if your Motorola HC12 derivative
supports memory banking.
If the Hitex Target Interface is running in demo version, the Load in HiTOP... menu
command is not available.
If connection to the target fails, the Connect... command replaces the Communication... command, and some other commands disappear from the Hitex menu:
Here are the descriptions of the Hitex menu items:
Load...
Choose Hitex | Load... to load the application you want to debug, such as a .ABS
file.
Reset
Choose Hitex | Reset to execute the Reset command file and reset the target system
processor. This action makes use of the HiSCRIPT command RESET TARGET.
For More Information: www.freescale.com
Freescale Semiconductor, Inc.
Hitex Target Interface Manual
27
Load in HiTOP...
Choose Hitex | Load in HiTOP... to display the Load Hitex Executable File dialog
box. This dialog box lets you to load an application for debugging (such as a .HTX
file) directly in the HiTOP debugger. At the same time, the system loads symbols of
the corresponding .ABS file in HI-WAVE.
If connection to the target fails, this menu command is not available. If the target
interface is in demo mode, this command is greyed out.
Communication or Connect
Choose Hitex | Communication... or Hitex | Connect to open the Communication
Link Specification dialog box. If connection to the target fails, the Connect command replaces the Communication... command.
Set Bank...
Choose Hitex | Set Bank... to open the Banked Memory Location dialog box. This
dialog box is available only if your derivative is a Motorola HC12 that supports
memory banking.
Set CPU...
Choose Hitex | Set CPU... to open the CPU Identification dialog box.
Command Files
Choose Hitex | Command Files to open the Hitex Target Interface Command Files
dialog box.
Help
Choose Hitex | Help to open the Hitex Target Interface Help File.
For More Information: www.freescale.com
Freescale Semiconductor, Inc.
28
Hitex Target Interface Dialog Boxes
Hitex Target Interface Dialog Boxes
This section describes the dialog boxes specific to the Hitex Target Interface:
• Load Hitex Executable File (not available in demo mode).
• Communication Link Specification.
• Banked Memory Location (available only for a Motorola HC12 derivative that
supports banking).
• CPU Identification.
• Hitex Target Interface Command Files.
Load Hitex Executable File Dialog Box
The Load Hitex Executable File dialog box appears when you choose the Hitex |
Load in HiTOP... menu command.
This open file dialog box lets you load an application in Hitex File Format (.HTX)
directly to the HiTOP debugger, simultaneously loading the application’s symbols
in HI-WAVE. (The application must have corresponding .ABS file.)
This feature is particularly useful if you must download a large application to emulator memory, as this feature is faster than the default download speed of the regular
Load command. This feature also is useful if you need the load symbols to debug in
the HiTOP debugger.
This dialog box lets you limit what parts of the application get loaded into the
For More Information: www.freescale.com
Freescale Semiconductor, Inc.
Hitex Target Interface Manual
29
HiTOP debugger: the code and symbols, only the code, or only the symbols (the
default). HI-WAVE always loads the symbols, but if you select code, or code and
symbols, HiTOP assigns the program entry point value to the PC.
Converting an Absolute File to Hitex File Format
To generate a Hitex File Format (.HTX) file from an absolute file (.ABS, in ELF/
Dwarf 2.0 or in HI-Cross File Format), you must use a symbol preprocessor from
hitex DEVELOPMENT TOOLS.
A make file can automate this conversion. For example, for Motorola HC12 emulators, hitex provides the SP6812ED.EXE symbol preprocessor to convert an ELF/
Dwarf 2.0 .ABS file (generated by the HIWARE Technology Tools) to Hitex File
Format (.HTX).
The Maker can automatically generate the HTX file, if you append a command like:
H:\METROWERKS\DEMO\HC12\HITEX\DG128\SP6812ED.EXE FIBOD128.ABS
This command produces the file FIBOD128.HTX, which you can load in the
HiTOP debugger.
Load in HiTOP Feature Limitations
Before you can use the Load in HiTOP feature, the HiTOP debugger must be able to
find and access the application. This can be a problem if the path to the program is
specified as a relative path, or if the program is on a different host or network.
The .HTX application file must have the same name as the .ABS file. Otherwise
the system will not load the symbols in HI-WAVE.
The time taken to load the application to the emulator depends on the size of the
application. The Waiting dialog box appears during this time.
Clicking the Abort button breaks communication between the HiTOP debugger and
the HI-WAVE Target Interface.
For More Information: www.freescale.com
Freescale Semiconductor, Inc.
30
Hitex Target Interface Dialog Boxes
Communication Link Specification Dialog Box
The Communication Link Specification dialog box appears automatically if:
• You use the Hitex Target Interface for the first time,
• The HiTOP debugger is not yet started, or
• The connection between HI-WAVE and the HiTOP debugger is not already set in
the current project directory.
An alternate way to open this dialog box is to select the menu command Hitex |
Communication... or Hitex | Connect.
If you have an open connection to the target, you change only the options Show
Protocol and Close HiTOP debugger on Quit. The other elements of this dialog box
are greyed out.
If this dialog box opened as the result of a failed connection attempt, or if you
selected Hitex | Connect, you can modify the UDP Port, the Host Name, and the
path to the HiTOP Debugger, as well as the check boxes.
.
Enter the path and name of the HiTOP debugger in the HiTOP Debugger edit box.
Alternatively, click the Browse button to find the program. The default path is
C:\HITEX\HFW_6812.EXE.
For More Information: www.freescale.com
Freescale Semiconductor, Inc.
Hitex Target Interface Manual
31
In the UDP Port edit box, enter the same value specified in the HiTOP debugger
.INI file (the default UDP Port is 4215):
• HFW_6812.INI for Motorola HC12
• HFW_6811.INI for Motorola HC08
• HFW_6811.INI for STMicroelectronics ST7
In the Host Name edit box, enter the TCP/IP address or the network name of the
computer on which the emulator is installed. The default Host Name is localhost. If
the emulator is connected to the computer you use to start HI-WAVE, this default
value is correct.
The check box Close HiTOP debugger on Quit automatically quits the HiTOP
debugger when you close HI-WAVE. This feature’s default setting is ON (checked).
The checkbox Show Protocol controls display of messages sent between the HiTOP
debugger and the HI-WAVE debugger. Check this box to have commands and
responses reported in the Command Line window. Clear this box to have the system
not echo commands or responses.
Note: Show Protocol is a useful debugging feature in case of a communication
problem.
Note: The system stores your settings for this dialog box in the [Hitex] section
of the PROJECT.INI file. These settings will be the defaults for your next
debugging session.
Banked Memory Location Dialog Box
This dialog box is available only if your derivative is a Motorola HC12 that supports memory banking.
The Banked Memory Location dialog box appears automatically the first time you
use the Hitex Target Interface with an HC12 derivative that supports banking. If the
current PROJECT.INI file already defines the banked memory area locations,
another way to open this dialog box is by selecting the Hitex | Set Bank.... menu
command.
This dialog box lets you specify the banked memories you want to use, and their
locations. The system supports the PPAGE, DPAGE and EPAGE, if they are available on the HC12 derivative.
For More Information: www.freescale.com
32
Freescale Semiconductor, Inc.
Hitex Target Interface Dialog Boxes
PPAGE Property Page: Use the PPAGE property page to set up the PPAGE
banked memory area. Enter the start address and end address (hexadecimal values)
in the appropriate edit box. Enter the number of pages (decimal value) in the appropriate edit box. Check the Enable Banked Memory Area checkbox to enable the
PPAGE banked memory area.
This property page does not appear in the dialog box if the PPAGE register is not
available in the HC12 derivative.
DPAGE Property Page: Use the DPAGE property page to set up the DPAGE
banked memory area. Enter the start address and end address (hexadecimal values)
in the appropriate edit box. Enter the number of pages (decimal value) in the appropriate edit box. Check the Enable Banked Memory Area checkbox to enable the
DPAGE banked memory area.
This property page does not appear in the dialog box if the DPAGE register is not
available in the HC12 derivative.
EPAGE Property Page: Use the EPAGE property page to set up the EPAGE
banked memory area. Enter the start address and end address (hexadecimal values)
in the appropriate edit box. Enter the number of pages (decimal value) in the appropriate edit box. Check the Enable Banked Memory Area checkbox to enable the
EPAGE banked memory area.
This property page does not appear in the dialog box if the EPAGE register is not
available in the HC12 derivative.
Various Property Page: Use this page to disable banking, or to use just one
one bank of the three. To suppress automatic display of the Banked Memory Location dialog box, clear the Display dialog at connection if banked memory locations
not defined check box.
For More Information: www.freescale.com
Freescale Semiconductor, Inc.
Hitex Target Interface Manual
33
Note: The system stores your settings for this dialog box in the [Hitex] section
of the PROJECT.INI file. These settings become the new default settings
for subsequent debugging sessions.
Note: If you use the M68HC12DG128 DProbeHC12-DG, you must define at least
one page from 0x8000 to 0xBFFF. Otherwise, you could encounter display
problems in the HI-WAVE Memory component.
CPU Identification Dialog Box
The CPU Identification dialog box automatically appears if this is the first time you
have used the Hitex Target Interface. This dialog box also appears if you have yet to
set in the current project directory the connection between HI-WAVE and the
HiTOP debugger. To open this dialog box yourself, select the Hitex | Set CPU...
menu command.
Use the drop-down list to select the CPU core that corresponds to the derivative
connected to your hitex in-circuit emulator.
For More Information: www.freescale.com
34
Freescale Semiconductor, Inc.
Hitex Target Interface Dialog Boxes
Currently, the HI-WAVE Hitex Target Interface supports Motorola HC12, Motorola
HC08, and STMicroelectronics ST7 CPU cores.
After you select the appropriate CPU core, click the OK button. This closes the dialog box and installs the core.
Note: The system stores your setting for this dialog box in the [Hitex] section of
the PROJECT.INI file. These settings become the new default settings for
subsequent debugging sessions.
Hitex Target Interface Command Files Dialog Box
To open the Hitex Target Interface Command Files dialog box, select the Hitex |
Command Files menu command.
Each page of this property-sheet dialog box corresponds to an event upon which HIWAVE automatically can run a command file. The possible files are the Startup
command file, the Reset command file, the Preload command file, or the Postload
command file.
The text box lets you specify the command file to be run after each of the tabbed
events.
Use the Browse button to specify the path and name of the command file. The
default command files are:
• Startup page: STARTUP.CMD,
• Reset page: RESET.CMD,
• Preload page: PRELOAD.CMD,
For More Information: www.freescale.com
Freescale Semiconductor, Inc.
Hitex Target Interface Manual
35
• Postload page: POSTLOAD.CMD.
Check the Enable Command File check box enable the command file for the given
event. Clear the check box to disable the command file for the given event. The
default setting for all checkboxes is enabled (checked).
Note: The system stores your settings for this dialog box in the [Hitex] section
of the PROJECT.INI file, using variables CMDFILE0, CMDFILE1,
... CMDFILEn. These settings become the new default settings for subsequent debugging sessions.
For More Information: www.freescale.com
Freescale Semiconductor, Inc.
36
Status Bar Information for the Hitex Target
Status Bar Information for the Hitex Target
Interface
When you have loaded the Hitex Target Interface, the HI-WAVE status bar displays
the name of the cpu and the HI-WAVE status (target status).
Status Messages
HiTOP Ready
HI-WAVE is ready, waiting for you to load a new target or application. The system
generates this message once you start HI-WAVE and the connection to the HiTOP
debugger is established.
No Link To Target
Connection to the target system failed.
RUNNING
The application is executing in HI-WAVE.
HALTED
The application has been stopped, according to your request. (You chose the Run |
Halt menu election, or clicked the Halt toolbar button.)
RESET
The system is processing a reset request. (You chose the Hitex | Reset menu command, clicked the Reset toolbar button, or entered a Reset command.
For More Information: www.freescale.com
Freescale Semiconductor, Inc.
Hitex Target Interface Manual
37
Stepping and Breakpoint Messages
STEPPED
The application has been stopped, due to a source-level single step. (You chose the
Run | Single Step menu command, or clicked the Single Step toolbar button.)
STEPPED OVER
The application has been stopped, due to a step over a function call. (You chose the
Run | Step Over menu command, or clicked the Step Over toolbar button.)
STOPPED
The application has been stopped, due to a step out from function call. (You chose
the Run | Step Out menu command, or clicked the Step Out toolbar button.)
TRACED
The application has been stopped, due to an assembler-level single step. (You chose
the Run | Assembly Step menu command, or clicked the Assembly Step toolbar button.)
BREAKPOINT
The application has been stopped upon reaching a breakpoint.
WATCHPOINT
The application has been stopped upon reaching a watchpoint.
Notification Messages
Step performed in HiTOP
This message indicates that a step has been performed in the HiTOP debugger. The
system automatically checks the status of the emulator and refreshes HI-WAVE.
For More Information: www.freescale.com
38
Freescale Semiconductor, Inc.
Status Bar Information for the Hitex Target
Modified memory in HiTOP
This message indicates that memory has been read from (or written to) in the
HiTOP debugger. The system automatically checks the status of the emulator and
refreshes HI-WAVE.
Unhandled command performed in HiTOP
This message indicates that an unhandled command has been performed in the
HiTOP debugger. The system automatically checks the status of the emulator and
refreshes HI-WAVE.
Trigger event occurred in HiTOP
This message indicates that the emulator is halted on a trigger event set in the
HiTOP debugger. The system automatically checks the status of the emulator and
refreshes HI-WAVE.
For More Information: www.freescale.com
Freescale Semiconductor, Inc.
Hitex Target Interface Manual
39
Hitex Target Interface Environment
Default Target Setup
You can use the Target menu to load a Hitex Target Interface directly, or you can set
the default Hitex Target Interface in the PROJECT.INI file. The file should be in
the working directory.
Example [HI-WAVE] section of a PROJECT.INI file:
[HI-WAVE]
Window0=Source
Window1=Assembly
Window2=Procedur
Window3=Register
Window4=Memory
Window5=Data
Window6=Data
Target=hitex
0
60
0
60
60
0
0
0
0
30
30
60
55
78
60
40
60
40
40
60
60
30
30
25
30
40
23
22
Typically, you set the target in the [HI-WAVE] section of the PROJECT.INI file,
as shown above. However, if the target is not defined in this way, you can load the
Hitex Target Interface interactively. Please refer to the Loading the Hitex Target
Interface section of this manual.
Note: Please see the HI-WAVE User’s Manual for additional information about
the PROJECT.INI file.
Hitex Target Interface Environment Variables
This section describes the environment variables specific to the Hitex Target Interface:
BANK_D_ACTIVATED
BANK_D_END
BANK_D_NUMBER
BANK_D_START
BANK_DLG_AT_CONNECT
For More Information: www.freescale.com
Freescale Semiconductor, Inc.
40
Hitex Target Interface Environment
BANK_E_ACTIVATED
BANK_E_END
BANK_E_NUMBER
BANK_E_START
BANK_P_ACTIVATED
BANK_P_END
BANK_P_NUMBER
BANK_P_START
CLOSEHITOP
CMDFILEn
CPUSTRING
HOST
PATHTOHITOP
PORT
SHOWPROT
The system stores these variables in the [Hitex] section of the PROJECT.INI
file.
Example [Hitex] section of a PROJECT.INI file:
[Hitex]
SHOWPROT=0
HOST=localhost
PATHTOHITOP=C:\HITEX\HFW_6812.EXE
PORT=4215
CLOSEHITOP=1
CPUSTRING=M68HC12
CMDFILE0=CMDFILE STARTUP ON "startup.cmd"
CMDFILE1=CMDFILE RESET ON "reset.cmd"
CMDFILE2=CMDFILE PRELOAD ON "preload.cmd"
CMDFILE3=CMDFILE POSTLOAD ON "postload.cmd"
The remainder of this section consists of environment variable descriptions, in
alphabetic order, and in this standard topic order:
Topic
Description
Short Description
Short description of the variable.
Syntax
EBNF syntax of the variable.
Default
Default setting or value for the variable.
For More Information: www.freescale.com
Freescale Semiconductor, Inc.
Hitex Target Interface Manual
Topic
Description
File
Name of the file that will hold the variable.
Section
Name of the section in the file.
Components
Component on which the variable depends.
Description
Full description and instructions.
Example
Small example of using the variable.
For More Information: www.freescale.com
41
Freescale Semiconductor, Inc.
42
Hitex Target Interface Environment
BANK_D_ACTIVATED
–––––––––––––––––––––––––
Short Description
Enables/disables support of the DPAGE banked memory area
Syntax
BANK_D_ACTIVATED= 0 | 1
Default
0.
File
PROJECT.INI
Section
[Hitex]
Components
Hitex Target Interface.
Description
The BANK_D_ACTIVATED variable specifies whether to use the DPAGE banked
mechanism, if the Motorola HC12 derivative supports DPAGE.
Giving this variable the value 1 corresponds to checking the Enable DPAGE
Banked Memory Area check box of the Banked Memory Location dialog box.
Example
BANK_D_ACTIVATED=1
For More Information: www.freescale.com
Freescale Semiconductor, Inc.
Hitex Target Interface Manual
43
BANK_D_END
–––––––––––––––––––––––––
Short Description
Specifies the end address of the DPAGE banked memory area
Syntax
BANK_D_END= <hexadecimal DPAGE end address>
Default
0x7FFF.
File
PROJECT.INI
Section
[Hitex]
Components
Hitex Target Interface.
Description
The BANK_D_END variable specifies the hexadecimal end address of the DPAGE
banked memory area. This variable corresponds to the End Address edit box of the
DPAGE Banked Memory Area group, of the Banked Memory Location dialog box.
This variable has effect if the Motorola HC12 derivative supports DPAGE, and the
DPAGE banked memory area has been set up. The system ignores this variable if
the HC12 derivative does not support DPAGE.
Example
BANK_D_END=0x7FFF
For More Information: www.freescale.com
Freescale Semiconductor, Inc.
44
Hitex Target Interface Environment
BANK_D_NUMBER
–––––––––––––––––––––––––
Short Description
Specifies the number of pages in the DPAGE banked memory area
Syntax
BANK_D_NUMBER= <decimal number of DPAGE pages>
Default
256.
File
PROJECT.INI
Section
[Hitex]
Components
Hitex Target Interface.
Description
The BANK_D_NUMBER variable specifies the decimal number of pages in the
DPAGE banked memory area. This variable corresponds to the Number of pages
edit box of the DPAGE Banked Memory Area group, of the Banked Memory Location dialog box. This variable has effect if the Motorola HC12 derivative supports
DPAGE, and the DPAGE banked memory area has been set up. The system ignores
this variable if the HC12 derivative does not support DPAGE.
Example
BANK_D_NUMBER=256
For More Information: www.freescale.com
Freescale Semiconductor, Inc.
Hitex Target Interface Manual
45
BANK_D_START
–––––––––––––––––––––––––
Short Description
Specifies the start address of the DPAGE banked memory area
Syntax
BANK_D_START= <hexadecimal DPAGE start address>
Default
0x7000.
File
PROJECT.INI
Section
[Hitex]
Components
Hitex Target Interface.
Description
The BANK_D_START variable specifies the hexadecimal start address of the
DPAGE banked memory area. This variable corresponds to the Start Address edit
box of the DPAGE Banked Memory Area group, of the Banked Memory Location
dialog box. This variable has effect if the Motorola HC12 derivative supports
DPAGE, and the DPAGE banked memory area has been set up. The system ignores
this variable if the HC12 derivative does not support DPAGE.
Example
BANK_D_START=0x7000
For More Information: www.freescale.com
Freescale Semiconductor, Inc.
46
Hitex Target Interface Environment
BANK_DLG_AT_CONNECT
–––––––––––––––––––––––––
Short Description
Controls automatic display of the Banked Memory Location dialog box
Syntax
BANK_DLG_AT_CONNECT= 0 | 1
Default
1.
File
PROJECT.INI
Section
[Hitex]
Components
Hitex Target Interface.
Description
The BANK_DLG_AT_CONNECT variable specifies whether to display the Banked
Memory Location dialog box upon connection to a target. This functionality applies
only if banked memory areas are not defined, and if the connected Motorola HC12
derivative supports banking.
Giving this variable the value 1 corresponds to checking the Display this dialog at
connection if banked memory locations are not defined checkbox of the Various
property page, of the Banked Memory Location dialog box.
For More Information: www.freescale.com
Freescale Semiconductor, Inc.
Hitex Target Interface Manual
Example
BANK_DLG_AT_CONNECT=1
For More Information: www.freescale.com
47
Freescale Semiconductor, Inc.
48
Hitex Target Interface Environment
BANK_E_ACTIVATED
–––––––––––––––––––––––––
Short Description
Enables/disables support of the EPAGE banked memory area
Syntax
BANK_E_ACTIVATED= 0 | 1
Default
0.
File
PROJECT.INI
Section
[Hitex]
Components
Hitex Target Interface.
Description
The BANK_E_ACTIVATED variable specifies whether to use the EPAGE banked
mechanism, if the Motorola HC12 derivative supports EPAGE.
Giving this variable the value 1 corresponds to checking the Enable EPAGE Banked
Memory Area checkbox of the Banked Memory Location dialog box.
Example
BANK_E_ACTIVATED=1
For More Information: www.freescale.com
Freescale Semiconductor, Inc.
Hitex Target Interface Manual
49
BANK_E_END
–––––––––––––––––––––––––
Short Description
Specifies the end address of the EPAGE banked memory area
Syntax
BANK_E_END= <hexadecimal EPAGE end address>
Default
0x7FF.
File
PROJECT.INI
Section
[Hitex]
Components
Hitex Target Interface.
Description
The BANK_E_END variable specifies the hexadecimal end address of the EPAGE
banked memory area. This variable corresponds to the End Address edit box of the
EPAGE Banked Memory Area group, of the Banked Memory Location dialog box.
This variable has effect if the Motorola HC12 derivative supports EPAGE, and the
EPAGE banked memory area has been set up. The system ignores this variable if
the HC12 derivative does not support EPAGE.
Example
BANK_E_END=0x7FF
For More Information: www.freescale.com
Freescale Semiconductor, Inc.
50
Hitex Target Interface Environment
BANK_E_NUMBER
–––––––––––––––––––––––––
Short Description
Specifies the number of pages in the EPAGE banked memory area
Syntax
BANK_E_NUMBER= <decimal number of EPAGE pages>
Default
256.
File
PROJECT.INI
Section
[Hitex]
Components
Hitex Target Interface.
Description
The BANK_E_NUMBER variable specifies the decimal number of pages in the
EPAGE banked memory area. This variable corresponds to the Number of pages
edit box of the EPAGE Banked Memory Area group, of the Banked Memory Location dialog box. This variable has effect if the Motorola HC12 derivative supports
EPAGE, and the EPAGE banked memory area has been set up. The system ignores
this variable if the HC12 derivative does not support EPAGE.
Example
BANK_E_NUMBER=256
For More Information: www.freescale.com
Freescale Semiconductor, Inc.
Hitex Target Interface Manual
51
BANK_E_START
–––––––––––––––––––––––––
Short Description
Specifies the start address of the EPAGE banked memory area
Syntax
BANK_E_START= <hexadecimal EPAGE start address>
Default
0x400.
File
PROJECT.INI
Section
[Hitex]
Components
Hitex Target Interface.
Description
The BANK_E_START variable specifies the hexadecimal start address of the
EPAGE banked memory area. This variable corresponds to the Start Address edit
box of the EPAGE Banked Memory Area group, of the Banked Memory Location
dialog box. This variable has effect if the Motorola HC12 derivative supports
EPAGE, and the EPAGE banked memory area has been set up. The system ignores
this variable if the HC12 derivative does not support EPAGE.
Example
BANK_E_START=0x400
For More Information: www.freescale.com
Freescale Semiconductor, Inc.
52
Hitex Target Interface Environment
BANK_P_ACTIVATED
–––––––––––––––––––––––––
Short Description
Enables/disables support of the PPAGE banked memory area
Syntax
BANK_P_ACTIVATED= 0 | 1
Default
0.
File
PROJECT.INI
Section
[Hitex]
Components
Hitex Target Interface.
Description
The BANK_P_ACTIVATED variable specifies whether to use the PPAGE banked
mechanism, if the Motorola HC12 derivative supports PPAGE.
Giving this variable the value 1 corresponds to checking the Enable PPAGE Banked
Memory Area checkbox of the Banked Memory Location dialog box.
Example
BANK_P_ACTIVATED=1
Note: If you use the M68HC12DG128 DProbeHC12-DG, you must define at least
one page from 0x8000 to 0xBFFF. Otherwise, you could encounter display
problems in the HI-WAVE
Memory
component.
For More
Information:
www.freescale.com
Freescale Semiconductor, Inc.
Hitex Target Interface Manual
53
BANK_P_END
–––––––––––––––––––––––––
Short Description
Specifies the end address of the PPAGE banked memory area
Syntax
BANK_P_END= <hexadecimal DPAGE end address>
Default
0xBFFF.
File
PROJECT.INI
Section
[Hitex]
Components
Hitex Target Interface.
Description
The BANK_P_END variable specifies the hexadecimal end address of the PPAGE
banked memory area. This variable corresponds to the End Address edit box of the
PPAGE Banked Memory Area group, of the Banked Memory Location dialog box.
This variable has effect if the Motorola HC12 derivative supports PPAGE, and the
PPAGE banked memory area has been set up. The system ignores this variable if
the Motorola HC12 derivative does not support PPAGE.
Example
BANK_P_END=0xBFFF
For More Information: www.freescale.com
Freescale Semiconductor, Inc.
54
Hitex Target Interface Environment
BANK_P_NUMBER
–––––––––––––––––––––––––
Short Description
Specifies the number of pages in the PPAGE banked memory area
Syntax
BANK_P_NUMBER= <decimal number of PPAGE pages>
Default
8.
File
PROJECT.INI
Section
[Hitex]
Components
Hitex Target Interface.
Description
The BANK_P_NUMBER variable specifies the decimal number of pages in the
PPAGE banked memory area. This variable corresponds to the Number of pages
edit box of the PPAGE Banked Memory Area group, of the Banked Memory Location dialog box. This variable has effect if the Motorola HC12 derivative supports
PPAGE, and the PPAGE banked memory area has been set up. The system ignores
this variable if the HC12 derivative does not support PPAGE.
Example
BANK_P_NUMBER=8
For More Information: www.freescale.com
Freescale Semiconductor, Inc.
Hitex Target Interface Manual
55
BANK_P_START
–––––––––––––––––––––––––
Short Description
Specifies the start address of the PPAGE banked memory area
Syntax
BANK_P_START= <hexadecimal PPAGE start address>
Default
0x8000.
File
PROJECT.INI
Section
[Hitex]
Components
Hitex Target Interface.
Description
The BANK_P_START variable specifies the hexadecimal start address of the
PPAGE banked memory area. This variable corresponds to the Start Address edit
box of the PPAGE Banked Memory Area group, of the Banked Memory Location
dialog box. This variable has effect if the Motorola HC12 derivative supports
PPAGE, and the PPAGE banked memory area has been set up. The system ignores
this variable if the HC12 derivative does not support PPAGE.
Example
BANK_P_START=0x8000
For More Information: www.freescale.com
Freescale Semiconductor, Inc.
56
Hitex Target Interface Environment
CLOSEHITOP
–––––––––––––––––––––––––
Short Description
Controls automatic HiTOP debugger closing, upon closing of HI-WAVE
Syntax
CLOSEHITOP= 0 | 1
Default
1.
File
PROJECT.INI
Section
[Hitex]
Components
Hitex Target Interface.
Description
The CLOSEHITOP variable specifies whether to close the HiTOP debugger automatically, upon closing HI-WAVE. (You must start the HiTOP debugger for HIWAVE to be able to communicate with a hitex emulator.)
Giving this variable the value 1 corresponds to checking the Close HiTOP debugger
on Quit checkbox of the Communication Link Specification dialog box.
Example
CLOSEHITOP=1
For More Information: www.freescale.com
Freescale Semiconductor, Inc.
Hitex Target Interface Manual
57
CMDFILEn
–––––––––––––––––––––––––
Short Description
Contains a CMDFILE Command Line command to be used to define a command
file on a event.
Syntax
CMDFILEn=CMDFILE <event> ON <filename>
Where:
n is 0, 1, 2, or 3
<event> is STARTUP, RESET, PRELOAD, or POSTLOAD
<filename> specifies a command file
Defaults
These command files are enabled:
Startup: STARTUP.CMD,
Reset: RESET.CMD,
Preload: PRELOAD.CMD,
Postload: POSTLOAD.CMD.
File
PROJECT file
Section
[Hitex]
Components
Hitex Target Interface.
For More Information: www.freescale.com
Freescale Semiconductor, Inc.
58
Hitex Target Interface Environment
Description
The CMDFILEn variable specifies one of four command files, to be executed upon
the corresponding event. There are four events, each with a seperate HI-WAVE command files for the Hitex Target Interface. You should define four CMDFILEn variable entries.
These variables correspond to specifying command-file status and names via the
Hitex Target Interface Command Files dialog box.
Example
CMDFILE0=CMDFILE STARTUP ON "startup.cmd"
CMDFILE1=CMDFILE RESET ON "reset.cmd"
CMDFILE2=CMDFILE PRELOAD ON "preload.cmd"
CMDFILE3=CMDFILE POSTLOAD ON "postload.cmd"
For More Information: www.freescale.com
Freescale Semiconductor, Inc.
Hitex Target Interface Manual
59
CPUSTRING
–––––––––––––––––––––––––
Short Description
Specifies the cpu core of the derivative
Syntax
CPUSTRING = Unknown | M68HC08 | M68HC12 | ST7
Default
Unknown.
File
PROJECT.INI
Section
[Hitex]
Components
Hitex Target Interface.
Description
The CPUSTRING variable specifies (to HI-WAVE) the cpu core of the derivative
connected to the HiTOP debugger. This variable corresponds to the CPU Core drop
down list box of the CPU Identification dialog box.
Example
CPUSTRING=M68HC12
For More Information: www.freescale.com
Freescale Semiconductor, Inc.
60
Hitex Target Interface Environment
HOST
–––––––––––––––––––––––––
Short Description
Specifies the host computer
Syntax
HOST=<host name>
Default
localhost.
File
PROJECT.INI
Section
[Hitex]
Components
Hitex Target Interface.
Description
The HOST variable specifies the host computer: the computer on the network to
which the debugger connects. The <host name> can be the computer TCP/IP
address, the computer name (if a DNS server is available, or localhost (the
computer on which HI-WAVE is running)
This variable corresponds to the Host Name edit box of the Communication Link
Specification dialog box.
Example
HOST=localhost
HOST=mycomputer.metrowerks.com
For More Information: www.freescale.com
Freescale Semiconductor, Inc.
Hitex Target Interface Manual
HOST=172.12.0.37
For More Information: www.freescale.com
61
Freescale Semiconductor, Inc.
62
Hitex Target Interface Environment
PATHTOHITOP
–––––––––––––––––––––––––
Short Description
Specifies the HiTOP debugger for communication
Syntax
PATHTOHITOP=<path and executable name>
Default
C:\HITEX\HFW_6812.EXE
File
PROJECT.INI
Section
[Hitex]
Components
Hitex Target Interface.
Description
The PATHTOHITOP variable specifies the path and name of the HiTOP debugger
that handles communication between HI-WAVE and the remote system.
This variable corresponds to the HiTOP Debugger edit box of the Communication
Link Specification dialog box.
Example
PATHTOHITOP=C:\HITEX\HFW_6812.EXE
For More Information: www.freescale.com
Freescale Semiconductor, Inc.
Hitex Target Interface Manual
63
PORT
–––––––––––––––––––––––––
Short Description
Specifies the communication UDP Port
Syntax
PORT=<UDP Port number>
Default
4215.
File
PROJECT.INI
Section
[Hitex]
Components
Hitex Target Interface.
Description
The PORT variable specifies the UDP Port used for communication between HIWAVE and HiTOP.
This variable corresponds to the UDP Port edit box of the Communication Link
Specification dialog box.
Example
PORT=4215
For More Information: www.freescale.com
Freescale Semiconductor, Inc.
64
Hitex Target Interface Environment
SHOWPROT
–––––––––––––––––––––––––
Short Description
Enables/disables Show Protocol functionality
Syntax
SHOWPROT=1|0
Default
0 (OFF).
File
PROJECT.INI
Section
[Hitex]
Components
Hitex Target Interface.
Description
The SHOWPROT variable specifies whether the system reports commands and
responses in the HI-WAVE Command Line component.
Assigning this variable a value of 1 corresponds to checking the Show Protocol
checkbox of the Communication Device Specification dialog box.
Example
SHOWPROT=1
For More Information: www.freescale.com
Freescale Semiconductor, Inc.
Hitex Target Interface Manual
65
Note: The Show Protocol functionality can be used to troubleshoot communication
problems.
For More Information: www.freescale.com
Freescale Semiconductor, Inc.
66
Hitex Target Interface Command Files
Hitex Target Interface Command Files
The Hitex Target Interface lets instruct HI-WAVE to execute command files at certain trigger events:
• at connection: Startup command file,
• at reset: Reset command file,
• right before a file is loaded: Preload command file,
• right after a file has been loaded: Postload command file.
To specify a command file’s full name and status (enabled/disabled), use the CMDFILE command-line command, or use the Hitex Target Interface Command Files
dialog box.
You can use any HI-WAVE command in a command file. You can take advantage
of the large set of commands the HI-WAVE manual introduces to set up the target
hardware for an event.
Example command file content:
WB 0x0035 0x00
WB 0x0012 0x11
PROTOCOL OFF
• The WB 0x0035 0x00 command sets memory location 0x35 to 0.
• The WB 0x0012 0x11 command sets memory location 0x12 to 0x11.
• The command PROTOCOL OFF specifies no command and response reporting in the command line.
Startup Command File
HI-WAVE executes the Startup command file as soon as you load the Hitex Target
Interface.
To change the parameters of this feature, either use the CMDFILE STARTUP command-line command or use the Startup property page of the Hitex Target Interface
Command Files dialog box.
The default Startup command file is the STARTUP.CMD file in the current project
directory.
For More Information: www.freescale.com
Freescale Semiconductor, Inc.
Hitex Target Interface Manual
67
Reset Command File
HI-WAVE executes the Reset command file as soon as you specify a reset. (You can
click the reset toolbar button, choose a reset menu command, or enter a reset command-line command.)
To change the parameters of this feature, use the CMDFILE RESET command-line
command or use the Reset property page of the Hitex Target Interface Command
Files dialog box.
The default Reset command file is the RESET.CMD file in the current project directory.
Preload Command File
HI-WAVE executes the Preload command file just before the system loads an application to the target system through the Hitex Target Interface.
To change the parameters of this feature, either use the CMDFILE PRELOAD command-line command or use the Preload property page of the Hitex Target Interface
Command Files dialog box.
The default Preload command file is the PRELOAD.CMD file in the current project
directory.
Postload Command File
HI-WAVE executes the Postload command file just after the system loads an application to the target system through the Hitex Target Interface.
To change the parameters of this feature, either use the CMDFILE POSTLOAD
command-line command or use the Postload property page of the Hitex Target
Interface Command Files dialog box.
The default Postload command file is the POSTLOAD.CMD file in the current
project directory.
For More Information: www.freescale.com
Freescale Semiconductor, Inc.
68
Hitex Target Interface Commands
Hitex Target Interface Commands
After setting the Hitex target interface, you can use only a subset of the HiTex Target Interface commands:
CMDFILE
PROTOCOL
PT
RESET
You can enter these commands in the command files or you can enter these commands in the in the HI-WAVE Command Line component.
The rest of this section describes these commands, in alphabetic order, and in this
standard topic order:
Topic
Description
Short Description
Short description of the command.
Syntax
EBNF syntax of the command.
Alias
Synonym, if any.
Components
Component on which the command depends.
Description
Full description and instructions.
Example
Small example of using the command.
For More Information: www.freescale.com
Freescale Semiconductor, Inc.
Hitex Target Interface Manual
69
CMDFILE
–––––––––––––––––––––––––
Short Description
Sets the file path, name, and status of a command file.
Syntax
CMDFILE <file kind> ON|OFF ["<file name and path>"]
Alias
None
Components
Hitex Target Interface.
Description
The CMDFILE command sets up a command file full name and status (disabled/
enabled). Using this command corresponds to making the same settings by using
the Hitex Target Interface Command Files.
The system stores command-file settings in the [Hitex] section of the PROJECT
file (variable CMDFILEn).
Example
For the list of available command files, enter CMDFILE without any parameters.
in>CMDFILE
Hitex Target Interface Command Files:
STARTUP ON startup.cmd
RESET ON reset.cmd
PRELOAD ON preload.cmd
POSTLOAD
ON
postload.cmd
You can change the status of the Startup command file:
in>CMDFILE STARTUP OFF "my own startup.cmd"
in>CMDFILE
For More Information: www.freescale.com
Freescale Semiconductor, Inc.
70
Hitex Target Interface Commands
Hitex Target Interface Command Files:
STARTUP
RESET
OFF my own startup.cmd
ON reset.cmd
PRELOAD
ON preload.cmd
POSTLOAD
ON postload.cmd
For More Information: www.freescale.com
Freescale Semiconductor, Inc.
Hitex Target Interface Manual
71
PROTOCOL
–––––––––––––––––––––––––
Short Description
Enables/disables the Show Protocol functionality
Syntax
PROTOCOL ON|OFF
Alias
None
Components
Hitex Target Interface.
Description
The PROTOCOL command specifies whether to display commands to (and
responses from) the HiTOP debugger in the HI-WAVE Command Line window.
Giving this command the value OFF corresponds to checking the Show Protocol
checkbox of the Communication Link Specification dialog box.
The system stores the Show Protocol functionality state in the [Hitex] section of
the PROJECT.INI file (variable SHOWPROT).
Example
PROTOCOL ON
Note: The Show Protocol functionality is a useful debugging feature, in case of a
communication problem.
For More Information: www.freescale.com
Freescale Semiconductor, Inc.
72
Hitex Target Interface Commands
PT
–––––––––––––––––––––––––
Short Description
Pass through HiSCRIPT commands
Syntax
PT <HiSCRIPT command>
Alias
None
Components
Hitex Target Interface.
Description
The PT command executes a HiSCRIPT command within HI-WAVE. The HiSCRIPT command follows the PT command; it can be an entry in the Command Line
component or in a command file.
As soon as the system sends the HiSCRIPT command to the HiTOP debugger, the
system refreshes the HI-WAVE status.
Example
PT RESET TARGET
For More Information: www.freescale.com
Freescale Semiconductor, Inc.
Hitex Target Interface Manual
73
RESET
–––––––––––––––––––––––––
Short Description
Resets the target board
Syntax
RESET
Alias
None
Components
Hitex Target Interface.
Description
The RESET command resets the target.
The system resets the target board (using the RESET TARGET HiSCRIPT command), then executes the Reset command file.
Example
RESET
For More Information: www.freescale.com
74
Freescale Semiconductor, Inc.
Hitex Target Interface Commands
For More Information: www.freescale.com
Index
Freescale Semiconductor, Inc.
Index
Symbols
.ABS . . . . . . . . . . . . . . . . . . . . . . . . . . . . . . 26
.HTX . . . . . . . . . . . . . . . . . . . . .27, 28, 29, 29
B
BANK_D_ACTIVATED . . . . . . . . . . . . . . 42
BANK_D_END . . . . . . . . . . . . . . . . . . . . . . 43
BANK_D_NUMBER . . . . . . . . . . . . . . . . . 44
BANK_D_START . . . . . . . . . . . . . . . . . . . 45
BANK_DLG_AT_CONNECT . . . . . . . . . . 46
BANK_E_ACTIVATED . . . . . . . . . . . . . . 48
BANK_E_END . . . . . . . . . . . . . . . . . . . . . . 49
BANK_E_NUMBER . . . . . . . . . . . . . . . . . 50
BANK_E_START . . . . . . . . . . . . . . . . . . . . 51
BANK_P_ACTIVATED . . . . . . . . . . . . . . . 52
BANK_P_END . . . . . . . . . . . . . . . . . . . . . . 53
BANK_P_NUMBER . . . . . . . . . . . . . . . . . 54
BANK_P_START . . . . . . . . . . . . . . . . . . . . 55
Banked Memory Location dialog . . . . . . . . 31
banked memory locations . . . . . . . . . . . . . . 31
BREAKPOINT . . . . . . . . . . . . . . . . . . . . . . 37
Breakpoint
BREAKPOINT . . . . . . . . . . . . . . . . . . . 37
75
D
Default target . . . . . . . . . . . . . . . . . . . . . . . .39
Dialog
Processor Derivative Support . . . . . . . . .25
Restore session state from Restore file .25
Display Bank Memory Location dialog at connection . . . . . . . . . . . . . . . . . . . . . . .32
DPAGE . . . . . . . . . . . . . . . . . . . . . . . . . . . .32
DPAGE Banked Memory Area . . . . . . . . . .32
DUMMY . . . . . . . . . . . . . . . . . . . . . . . . . . .25
DUMMY.SFR . . . . . . . . . . . . . . . . . . . . . . .25
E
Environment variables . . . . . . . . . . . . . . . . .39
EPAGE . . . . . . . . . . . . . . . . . . . . . . . . . . . . .32
EPAGE Banked Memory Area . . . . . . . . . .32
H
HALTED . . . . . . . . . . . . . . . . . . . . . . . . . . .36
Hardware Connection . . . . . . . . . . . . . . .8, 20
Help . . . . . . . . . . . . . . . . . . . . . . . . . . . . . . .27
HFW_6211.INI . . . . . . . . . . . . . . . . . . . . . .19
HFW_6212.INI . . . . . . . . . . . . . . . . . . . . . .19
Highlights . . . . . . . . . . . . . . . . . . . . . . . . . . . .6
HiSCRIPT . . . . . . . . . . . . . . . . . . . . . . . . . .19
Hitex
Communication Configuration . . . . . . .19
Hitex Target Interface Dialogs . 28, 28, 30,
31, . . . . . . . . . . . . . . . . . . . . . . . .33
Menu Entries . . . . . . . . . . . . . . . . . .26, 26
C
Postload command file . . . . . . . . . . . . . .67
Preload command file . . . . . . . . . . . . . .67
Close HiTOP debugger on Quit . . . . . . . . . 31
Reset command file . . . . . . . . . . . . . . . .67
CLOSEHITOP . . . . . . . . . . . . . . . . . . . . . . . 56
Startup command file . . . . . . . . . . . . . . .66
CMDFILE . . . . . . . . . . . . . . . . . . . . . . . . . . 69
Hitex
| Command Files . . . . . . . . . . . . . .27, 34
CMDFILEn . . . . . . . . . . . . . . . . . . . . . . . . . 57
Hitex | Communication... . . . . . . . . . . . .27, 30
Command Files . . . . . . . . . . . . . . . . . . . 27, 66
Hitex | Connect . . . . . . . . . . . . . . . . . . . .27, 30
Commands . . . . . . . . . . . . . . . . . . . . . . . . . . 68
Hitex | Connect.. . . . . . . . . . . . . . . . . . . . . . .22
Communication . . . . . . . . . . . . . . . . . . . . . . 27
Hitex | Help . . . . . . . . . . . . . . . . . . . . . . . . .27
Communication Link Specification dialog . 30
Hitex | Load in HiTOP... . . . . . . . . . . . . . . .27
Connect . . . . . . . . . . . . . . . . . . . . . . . . . . . . 27
Hitex
| Load... . . . . . . . . . . . . . . . . . . . . . . . .26
Converting an absolute file to Hitex File Format
Hitex | Reset . . . . . . . . . . . . . . . . . . . . . . . . .26
. . . . . . . . . . . . . . . . . . . . . . . . . . . . . 29
Hitex | Set Bank... . . . . . . . . . . . . . . . . .27, 31
Coverage . . . . . . . . . . . . . . . . . . . . . . . . . 7, 17
Hitex | Set CPU... . . . . . . . . . . . . . . . . . . . . .27
CPU Identification dialog . . . . . . . . . . . . . . 33
Hitex Target Interface Command Files dialog .
CPUSTRING . . . . . . . . . . . . . . . . . . . . . . . . 59
34
Hitex
Target
Interface Dialogs . 28, 28, 30, 31,
For More Information: www.freescale.com
76
Freescale Semiconductor, Inc.
33
Hitex Target Interface Command Files dialog . . . . . . . . . . . . . . . . . . . . . . . .34
HiTOP . . . . . . . . . . . . . . . . . . . . . . . . . . 6, 19
HiTOP Debugger . . . . . . . . . . . . . . . . . . . . .21
HiTOP Debugger edit box . . . . . . . . . . . . . .30
HiTOP Ready . . . . . . . . . . . . . . . . . . . . . . . .36
HOST . . . . . . . . . . . . . . . . . . . . . . . . . . . . . .60
Host Name . . . . . . . . . . . . . . . . . . . . . . 21, 31
How To
Debugging an Application in RAM . . . .12
Loading an Hitex File Format application in
HiTOP from HI-WAVE . . . . . . .14
Starting with the Hitex Target Interface 7, 8
Using the STARTUP.CMD to Map Emulation Memory . . . . . . . . . . . . . . . .13
I
I/O . . . . . . . . . . . . . . . . . . . . . . . . . . . . . . 7, 17
P
PATHTOHITOP . . . . . . . . . . . . . . . . . . . . . 62
PORT . . . . . . . . . . . . . . . . . . . . . . . . . . . . . 63
PPAGE . . . . . . . . . . . . . . . . . . . . . . . . . . . . 32
PPAGE Banked Memory Area . . . . . . . . . . 32
Preparing the HiTOP debugger . . . . . . . . . . 19
Profiling . . . . . . . . . . . . . . . . . . . . . . . . . 7, 17
PROJECT.INI . . . . . . . . . . . . . . . . . . . . 20, 39
PROTOCOL . . . . . . . . . . . . . . . . . . . . . . . . 71
PT . . . . . . . . . . . . . . . . . . . . . . . . . . . . . 72, 72
R
Requirements . . . . . . . . . . . . . . . . . . . . . . . . 6
RESET . . . . . . . . . . . . . . . . . . . . . . . . . 36, 73
Reset . . . . . . . . . . . . . . . . . . . . . . . . . . . . . . 26
RUNNING . . . . . . . . . . . . . . . . . . . . . . . . . 36
S
No Link To Target . . . . . . . . . . . . . . . . . . . .36
Notification Message
Modified memory in HiTOP . . . . . . . . .38
Step performed in HiTOP . . . . . . . . . . .37
Trigger event occured in HiTOP . . . . . .38
Unhandled command performed in HiTOP
38
Notification Messages . . . . . . . . . . . . . . . . .37
Set Bank... . . . . . . . . . . . . . . . . . . . . . . . . . . 27
Set CPU... . . . . . . . . . . . . . . . . . . . . . . . . . . 27
Show Protocol . . . . . . . . . . . . . . . . . . . . . . . 31
SHOWPROT . . . . . . . . . . . . . . . . . . . . . . . . 64
Simulation . . . . . . . . . . . . . . . . . . . . . . . . 7, 17
Skipping HiTOP Initialization dialogs . . . . 25
Status Bar Information for the Hitex Target Interface . . . . . . . . . . . . . . . . . . . . . . . 36
Status Message . . . . . . . . . . . . . . . . . . . . . . 36
HALTED . . . . . . . . . . . . . . . . . . . . . . . . 36
HiTOP Ready . . . . . . . . . . . . . . . . . . . . 36
No Link To Target . . . . . . . . . . . . . . . . 36
Reset . . . . . . . . . . . . . . . . . . . . . . . . . . . 36
RUNNING . . . . . . . . . . . . . . . . . . . . . . 36
Step performed in HiTOP . . . . . . . . . . . 37, 38
STEPPED . . . . . . . . . . . . . . . . . . . . . . . . . . 37
STEPPED OVER . . . . . . . . . . . . . . . . . . . . 37
Stepping and Breakpoints Messages . . . . . . 37
Stepping Message
STEPPED . . . . . . . . . . . . . . . . . . . . . . . 37
STEPPED OVER . . . . . . . . . . . . . . . . . 37
STOPPED . . . . . . . . . . . . . . . . . . . . . . . 37
TRACED . . . . . . . . . . . . . . . . . . . . . . . . 37
STOPPED . . . . . . . . . . . . . . . . . . . . . . . . . . 37
O
T
L
Load Hitex Executable File . . . . . . . . . . . . .27
Load Hitex Executable File dialog . . . . . . . .28
Load in HiTOP . . . . . . . . . . . . . . . . . . . . . . .27
Load... . . . . . . . . . . . . . . . . . . . . . . . . . . . . . .26
Loading an application . . . . . . . . . . . . . . . . .26
Loading the Hitex Target Interface . . . . . . .20
M
Memory banking . . . . . . . . . . . . . . . . . . . . . .6
N
Overview . . . . . . . . . . . . . . . . . . . . . . . . . . . .5
Target Command Files . . . . . . . . . . . . . . . . 66
For More Information: www.freescale.com
Index
Freescale Semiconductor, Inc.
Target commands . . . . . . . . . . . . . . . . . . . . 68
TRACED . . . . . . . . . . . . . . . . . . . . . . . . . . . 37
Trigger event occured in HiTOP . . . . . . . . . 38
U
UDP Port . . . . . . . . . . . . . . . . . . .8, 20, 21, 31
Unhandled command performed in HiTOP 38
V
Variable . . . . . . . . . . . . . . . . . . . . . . . . . . . . 39
W
WATCHPOINT . . . . . . . . . . . . . . . . . . . . . . 37
Watchpoint
WATCHPOINT . . . . . . . . . . . . . . . . . . . 37
Watchpoints . . . . . . . . . . . . . . . . . . . . . . . . . . 6
For More Information: www.freescale.com
77