1
Using the LOCK Function to measure resistance
The Lock function can be used to make several resistance measurements in succession without the
need to push and hold the TEST key for each measurement.
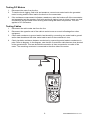
1. Press the LOCK key to enter the LOCK mode, and then press the TEST key.
2. Zero out the test lead resistance.
3. Connect the probes to the test locations in succession.
4. Press the LOCK key to disable the lock function.
Note: The meter cannot indicate if the circuit is live in this mode. Ensure that the circuit is de-energized
before connecting the test leads or the fuse may blow.
Auto Power Off
To conserve battery life, the meter will automatically turn off after 15 minutes of non-use. To turn the
meter back on, turn the rotary switch to OFF, then to the desired function.
Analog Bar Graph
The analog bar graph displays resistance on a logarithmic scale and voltage on a linear scale. The
value always tracks the main display.
Maintenance
Battery Replacement
When the low battery symbol appears (BT) on the LCD the six 1.5V ‘AA’ batteries must be replaced.
1. Turn the meter off and remove the test leads
2.
Remove the four (4) Phillips head screws on the rear of the meter
3.
Remove the meter’s rear cover
4.
Replace the batteries observing polarity
5.
Affix the rear cover and secure the rear screws
You, as the end user, are legally bound (Battery ordinance) to return all used batteries
and accumulators; disposal in the household garbage is prohibited!
You can hand over your used batteries / accumulators at collection points in your
community or wherever batteries / accumulators are sold!
Disposal: Follow the valid legal stipulations in respect of the disposal of the device at the
end of its lifecycle
Fuse Replacement
If the meter turns ON but does not measure correctly, check the internal fuse.
1. Turn the meter off and remove the test leads
2.
Remove the four (4) Phillips head screws on the rear of the meter
3.
Remove the meter’s rear cover
4.
Check and replace the fuse if necessary (0.5A / 600V fast blow)
5.
Affix the rear cover and secure the rear screws
Cleaning
Periodically wipe the case with a dry cloth. Do not use solvents or abrasives to clean this instrument.
6
Model 380363-EU-EN-V-3.1-1/12