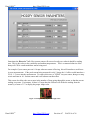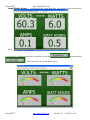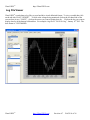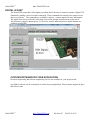
1
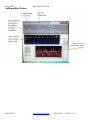
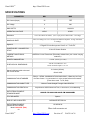
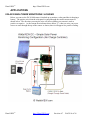
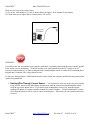
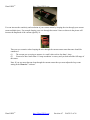
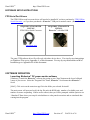
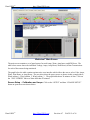
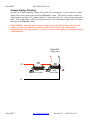
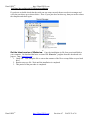
WattsVIEWTM
http://WattsVIEW.com
WattsVIEW
tm
Power Monitor Model: DC-10000
DC Power Monitoring Made Easy
Models: DC-10000 Serial
DC-1000 USB
DC-25000
OWNERS MANUAL
WattsVIEWTM
http://WattsVIEW.com
Revision 4.7
PAGE 1 of 26
WattsVIEWTM
http://WattsVIEW.com
Table of Contents
WattsVIEW tm Power Monitor Model: DC-10000...............................................................................................1
Safety.......................................................................................................................................................................2
Introduction..............................................................................................................................................................3
HARD DRIVE SIZE REQUIREMENTS...........................................................................................................3
CPU / MEMORY REQUIREMENTS.................................................................................................................3
Applications.........................................................................................................................................................3
GPRS / SMS Modem usage (Solar Panel / Wind turbine monitoring)...................................................................3
Wattsviewtm DC Power Monitor Overview...........................................................................................................4
Changing the Voltage monitoring range of your WattsVIEW sensor.................................................................5
Wattsviewtm Serial DB 9 Pin Connector............................................................................................................6
Wattsviewtm USB (Mini USB connector)..........................................................................................................6
Software Main Screen..........................................................................................................................................7
SPECIFICATIONS..................................................................................................................................................8
APPLICATIONS.....................................................................................................................................................9
SOLAR PANEL POWER MONITORING / LOGGING...................................................................................9
HARDWARE SETUP INSTRUCTIONS.............................................................................................................10
SOFTWARE SETUP INSTRUCTIONS...............................................................................................................13
FTDI Serial Port Drivers .................................................................................................................................13
The FTDI USB to serial converter driver will need to be installed if you have purchased a FTDI USB to
Serial Converter , or if you have purchased a Wattsviewtm USB power monitor sensor. (Shown below)....13
SOFTWARE OPERATION..............................................................................................................................13
Log File Viewer....................................................................................................................................................17
DIGITAL IO PORT...........................................................................................................................................18
CUSTOM SOFTWARE FOR YOUR APPLICATION ...................................................................................18
Voltage Scaling / Dividing................................................................................................................................19
APPENDIX A: Windows Installation .................................................................................................................20
APPENDIX B: MAC OS X Installation...............................................................................................................23
APPENDIX C: User Manual Revision History....................................................................................................25
Hardware Accessories...........................................................................................................................................25
RCOMMENDED SERIAL CABLE.................................................................................................................25
RECOMMENDED POWER SUPPLY.............................................................................................................25
TECHNICAL SALES & SUPPORT.....................................................................................................................25
Safety
When installing and operating this power monitor
1. You are responsible for following all electrical code & safety guidelines that are established in your
country.
2. Make sure all lines have adequate over current protection such as fuses and breakers. Understand that if
you do not use over current protection high current cables and wires can short out and cause liquid metal
to form and burn a person very badly or cause death.
3. By using this product, you agree that before operating your power monitor, you will have a licensed
electrician look over your work just to make sure it is safe to operate and meets regulations and code.
WattsVIEWTM
http://WattsVIEW.com
Revision 4.7
PAGE 2 of 26
WattsVIEWTM
http://WattsVIEW.com
Introduction
The WattsVIEW power monitoring software and module allows a person to convert a regular computer into a
data logger which will monitor
• DC Voltage
• Current (Amps)
• Watts
• Watt Hours
• Amp Hours
tm
Up to 10 Wattsview power monitoring sensors can be used at one time if they share a common ground with
each other and the computer they are plugged into. If they do not share a common ground then you will need to
use a USB isolation module like the ones sold here. The data is stored in a Log directory on the computer in
tm
tab delimited text file. One log file per sensor per day is created. For example, two Wattsview power
monitoring sensors would generate about 60 log files each month. The software offers an adjustable sampling
interval with a default of one data point every 30 seconds. The smallest logging interval is 1 seconds at which
tm
approximately 86,400 entries a day would be made for each Wattsview sensor you have connected to your
computer.
HARD DRIVE SIZE REQUIREMENTS
One WattsVIEW sensor can generate about 5 Gig of data a year at a 1 second logging interval. So if you have a
50 Gig hard drive or bigger, then you will be fine.
CPU / MEMORY REQUIREMENTS
Your computer should have at least 2 Gig of RAM to be able to look at the log history efficiently. An old
windows XP laptop can easily do the job when it comes to logging the data, but if you were to select a one year
period to look at in the log viewer, then it might choke.
Applications
The Wattsview DC Power Monitor is Well Suited for the Following Applications
tm
- Solar Panel Power Monitoring
- Wind Turbine Power Monitoring
- Bicycle Generator Power Monitoring
- Battery Charging Amp Hours / KWH
- Battery Discharge Power Monitoring
- Hydrogen Production Electrolysis Power Monitoring
- Hydro Generator Power Monitoring
- Salt / Chlorine Swimming Pool Generator Monitoring
- Constant Power Control Systems
- Solid state relay control closed loop power monitoring
GPRS / SMS Modem usage (Solar Panel / Wind turbine monitoring)
tm
When using the Wattsview sensor at remote locations where a cell phone wireless grid is method of
communication via a GPRS modem, a much lower data rate is typically desired so as to now overwhelm the
GPRS / SMS system. A transmission rate of one time each second will often exceed the monthly allowed data
for a sim card / data plan. If a slower data rate is required, then download the video tutorial on the
http://wattsview.com/downloads using the “WattsVIEW Configuration Utility”.
WattsVIEWTM
http://WattsVIEW.com
Revision 4.7
PAGE 3 of 26
WattsVIEWTM
http://WattsVIEW.com
tm
Wattsview DC Power Monitor Overview
tm
Wattsview with DB 9 Pin Serial COM Port
connector
tm
Wattsview with Mini USB
tm
The Wattsview DC Power monitor utilizes an open source PIC microprocessor which measures up to 105
Amps of current from a hall effect transducer sensor and measure up to 200 Volts to calculate Watts and Watt
Hours. The formula for power is then applied and allows for the calculation of “Watts”.
VOLTS x AMPS = WATTS
tm
This data is calculated and transmitted about once every second . The Wattsview power monitor
tm
communicates with any serial compatible software such as Hyper terminal or Wattsview free data logging /
power monitoring software. (See software details in software installation section).
tm
tm
The Wattsview software connects to the Wattsview sensor through either of two methods:
1) RS232 serial port
2) USB Cable
WattsVIEWTM
http://WattsVIEW.com
Revision 4.7
PAGE 4 of 26
WattsVIEWTM
http://WattsVIEW.com
Changing the Voltage monitoring range of your WattsVIEW sensor.
The WattsVIEW sensor can monitor from zero to 200 Volts which may not be your desired range. Below you
will see R1 and R2 which form a ~41 to 1 Voltage divider so that when 200 Volts is present at the input of the
Voltage monitoring (Green connector below) the PIC microcontroller only sees 4.6 Volts. Since this is such a
wide range, the resolution of the Voltage measurement is only good out to one digit of precision.
Example: With an 8 bit Analog to digital conversion capability of the PIC, 2^8 gives us 256 counts to
measure 200 Volts. Dividing the range by the counts we get : 200 / 256 = 0.78 Volts resolution.
If you want to improve that resolution for lower Voltage measurements the best resolution you can get is 0.1
Volt by changing R1 from 150kΩ to ~18kΩ which performs as a 5 to 1 Voltage divider with a resoultion of
256 Counts / 30 Volts = 0.1 Volts. Digikey part number CF14JT18K0CT-ND costs about $0.10 and is easy to
install if you have a soldering iron. Please contact us if you would like us to make the custom modification.
After you change the resolution you will need to recalibrate the WattsVIEW sensor as shown in this YouTube
video: https://www.youtube.com/watch?v=nWXPmwbHCa4 (You can also find this video link by going to
http://wattsview.com and click on downloads. Look in the “Configuration Utility” section.
You also have the option of modifying the WattsVIEW senwsor so that you can measure a Voltage higher than
200 Volts. This will introduce some risk as this sensor is not rated for high Voltage which could arc and short
out the divider – making a puff of smoke. Some customers have been successful in monitoring up to 400 Volts
but the customer must know that if this is done, that the customer assume all liability, responsibility regarding
damage to the sensor or to the computer monitoring the sensor.
WattsVIEWTM
http://WattsVIEW.com
Revision 4.7
PAGE 5 of 26
WattsVIEWTM
http://WattsVIEW.com
tm
Wattsview Serial DB 9 Pin Connector
Most computers today do not come with an RS 232 serial port so in order to use
tm
the Wattsview Serial with the DB 9 pin connector a USB to serial converter will
be needed (Shown to the right). For example the FTDI adapter will work with the
tm
Wattsview serial power monitor. (A free software driver for the FTDI must be
installed for FTDI converter to work.
This FTDI USB to Serial Converter is sold online here (Google “FTDI USB to
Serial”)
tm
This style of Wattsview with the DB 9 pin connector is especially convenient for a person who has access to
tm
many older computers and wants to use one just as a data logger that runs 365 days a year. The Wattsview
USB module needs a simple off the shelf USB to Mini cable.
tm
Wattsview USB (Mini USB connector)
tm
The Wattsview USB saves the hassle of having to order a separate USB to
tm tm
Serial Converter. The FTDI converter is integrated with the Wattsview
sensor so that the sensor can plug directly into the computer using a simple /
off the shelf USB A to Mini B Cable (Right). This is a common cable that
comes with many digital cameras.
This cable is sold online here.
WattsVIEWTM
http://WattsVIEW.com
Revision 4.7
PAGE 6 of 26
WattsVIEWTM
http://WattsVIEW.com
Software Main Screen
WattsVIEWTM
http://WattsVIEW.com
Revision 4.7
PAGE 7 of 26
WattsVIEWTM
http://WattsVIEW.com
SPECIFICATIONS
PARAMETER
MIN
MAX
-75
105
DC Voltage
0
200
MAX WATTS
0
10,000 W
12VDC
30VDC
DC Current (Amps)
OPERATING VOLTAGE
Resolution
SAMPLING RATE
Digital IO
POWER SUPPLY CONNECTOR
STYLE
0.75 Volts with R1 at 150kΩ, (0.1V if you put in a 18kΩ for R1 - 30V range)
Takes 16 readings over a 0.7 second period and then output the average from those
16 readings.
8 Digital IO bits that operate from 0 to 5 Volts DC
2.5mm ID Center Positive
CURRENT MONITORING
METHOD
Hall Effect Current Transducer (Electrically isolated from your current carrying
conductor.)
POWER CONSUMPTION
< 1 Watt (30 ma @ 12 volts)
PCB PHYSICAL DIMENSIONS
Just the Circuit Board 3" X 2"
Circuit mounted on plate 4" X 2.5"
0.4 Inches (9.2mm)
Max wire diameter able to be used
with current sensor
COMMUNICATION STANDARD
~Size 6 AWG
RS232 – SERIAL COMMUNICATIONS 9600 BAUD, 8 Data bits, No Parity,
No Flow Control. You must send a /r to the sensor before it will transmit.
(Three wires used: Tx, Rx, Gnd)
COMMUNICATION CABLE TYPE
Male to Female Straight Through Cable DB 9 PIN
COMMUNICATION PROTOCOL
Asynchronous ASCII Numerical Text, no check sum, no handshaking
DATA STRING EXAMPLE
STANDARD MODE
000012.1V 00001.0A 00012.1W 00000.0WH
TEXT DELIMITER
END OF LINE CHARACTER
DATA STRING EXAMPLE
(PANEL METER MODE)
Model L61001-BL (Red)
Or
WattsVIEWTM
Spaces
CARRIAGE RETURN \r\n
*0H 00000.0A
More info on meters at:
http://WattsVIEW.com
Revision 4.7
PAGE 8 of 26
WattsVIEWTM
Model L51001-BL (Green)
WattsVIEWTM
http://WattsVIEW.com
HTTP://www.laurels.com/magna_serial.htm
http://WattsVIEW.com
Revision 4.7
PAGE 9 of 26
WattsVIEWTM
http://WattsVIEW.com
APPLICATIONS
SOLAR PANEL POWER MONITORING / LOGGING
Below you can see the DC-10,000 sensor is hooked up to monitor a solar panel that is charging a
battery. The positive wire from the solar panel is routed through the round current sensor as
shown below. The direction you route the wire will affect whether your current is read as
positive or negative. As the current flow indicator shows below "I", when you wire you power
source to come through the top of the sensor as shown, then it will appear as a positive reading.
WattsVIEWTM
http://WattsVIEW.com
Revision 4.7
PAGE 10 of 26
WattsVIEWTM
http://WattsVIEW.com
HARDWARE SETUP INSTRUCTIONS
1. Mounting The Hall Effect Current Sensor
Secure the DC-10,000W to a panel or plate
where the circuit board traces can not short out against any kind of metal items. This will destroy the
power monitor. You can use stand offs, or plastic spacers for example with some 6-32 screws through
the corner mounting holes.
2. Serial Cable Installation
Connect a male DB9 Straight through serial cable from your
computer to the DC-10,000W Sensor. If your computer does not have a serial (com) port, then you will
need to use a USB to serial adapter cable like one of the ones sold here. This will require you to install
some software drivers first before you plug it in. Such as the FTDI adapter shown in the previous
section.
3. Connecting Voltage Monitoring Use light gauge wire (Size 18 to 28 AWG stranded) to
connect to the green voltage monitoring terminals as shown below. You will need a small flat end
screw driver to tighten down the screw terminals. For best results use stranded wire instead of sold
wire.
4. Connecting Operating Power
10,000W Current sensor are:
The operating Voltage requirements power for the DC-
DC Volts
Current
Power Consumption
Center post ID
12 - 30
30mA
< 1 Watt
2.5mm
The center of the power connector is positive and has an inner diameter of 2.5mm. The positive input to this
connector is diode protected so that if you happen to reverse the polarity to the sensor it will not damage the
components on the board.
WattsVIEWTM
http://WattsVIEW.com
Revision 4.7
PAGE 11 of 26
WattsVIEWTM
http://WattsVIEW.com
_
There are two ways to power this sensor.
(1) Use an AC wall adapter to 12 volts as shown below in Figure 1 Wall Adapter Power Supply.
(2) Connect the power input cable to a battery that is 12V or 25V .
_
Figure 1 Wall Adapter Power Supply
WARNING!
You need to take into account that your computer must share a common ground with the sensor and the ground
of the system you are monitoring. Problems usually occur with grounds when the DC voltage to an AC
inverter is being monitored, or when a computer that is monitoring the sensor is connected to something that is
plugged into a computer, like a large plasma screen.
To take care of this problem a USB isolator must be used to isolate the computer ground from the ground of the
system being monitored.
5. Routing Wire Through Current Sensor You will need to route one of the two wires coming
from your DC power source through the current sensor with the current traveling through the sensor
from the top end as shown below. If you do not route it through the correct way, then the current
reading will appear as a negative number instead of a positive number. Keep in mind that DC current
flows from the positive side of a power source to the negative. That's how you can remember direction
of travel.
WattsVIEWTM
http://WattsVIEW.com
Revision 4.7
PAGE 12 of 26
WattsVIEWTM
http://WattsVIEW.com
You can increase the sensitivity and resolution of your current sensor by looping the wire through your current
sensor multiple times. For example looping your wire through the sensor 5 times as shown in the picture will
increase the amplitude of the current signal by 5x.
There are two scenarios where looping the wire through the current sensor more than once should be
considered
(1)
The current you are trying to measure is a small value such as less than 1 Amp
(2)
You need to have better then 0.1 Amps resolution / accuracy and you don't need the full range of
the sensor.
Note: If you use more than one loop through the current sensor then you must adjust the loop count
tm
setting in the Wattsview software.
WattsVIEWTM
http://WattsVIEW.com
Revision 4.7
PAGE 13 of 26
WattsVIEWTM
http://WattsVIEW.com
SOFTWARE SETUP INSTRUCTIONS
FTDI Serial Port Drivers
The FTDI USB to serial converter driver will need to be installed if you have purchased a FTDI USB to
tm
Serial Converter , or if you have purchased a Wattsview USB power monitor sensor. (Shown below)
REQUIRES FTDI DRIVER
INSTALL
FTDI USB to Serial Converter
REQUIRES FTDI DRIVER
INSTALL
tm
Wattsview with Mini USB
sold online here
The same FTDI software driver file will work with either device above. For step by step instructions
on Windows Flow go to Appendix A: of this document. For step by step instructions on MAC
Installtion go to Appendix B: of this document
SOFTWARE OPERATION
tm
Launching Wattsview DC power monitor software
tm
[Windows] Launch the Wattsview software buy going to your "Start" button on the lower left hand
tm
tm
corner of your screen. Select the "Program Files" menu, Wattsview Serial menu then Wattsview Serial.
[MAC] Click twice on the wattsview.app file in the folder you selected for install.
The main screen will open and verify the log file path, the KWH path, number of available ports, and
number of sensors responding. If there are no sensors, then you will be prompted with the option to use
“Simulated” Data where you can pick wind turbines or solar panels to monitor and see simulated data
coming into the program.
WattsVIEWTM
http://WattsVIEW.com
Revision 4.7
PAGE 14 of 26
WattsVIEWTM
http://WattsVIEW.com
_
tm
Wattsview Main Screen
The main screen contains a set of panel meters for total Amps, Watts, Amp hours, and KW Hours. The
table below meters shows the individual Voltage, Amps, Amp Hours, Watt Hours, & Data Transmissions
for each of the sensors being monitored.
The graph below the table contains an interactive user interface which allows the user to select Volts, Amps,
Watts, Watt Hours, or Amp Hours. The user also selects the power source as shown in this example above,
Wind_turbine_1, Wind_turbine_2, Wind_turbine_3. The graph holds about 30 minutes of data. Click on
the “LOG VIEWER” tab to see data older than 30 minutes.
Sensor Setup - Calibration and Loops Click on the “SETUP” and then “CHANGE SETUP”
button to open the screen shown below:
WattsVIEWTM
http://WattsVIEW.com
Revision 4.7
PAGE 15 of 26
WattsVIEWTM
http://WattsVIEW.com
_
tm
Sometimes the Wattsview hall effect current sensor will not read exactly zero when it should be reading
zero. This is due to day to day variability and ambient temperatures. This is a common behavior of the
honeywell CSLA current transducer sensor being used.
For example if your sensor puts out 0.1 Amps when no current is flowing, this will introduce a small error
in your measurements. If the peak current being measured is only 5 Amps, the 0.1 offset would introduce a
2% (0.1 / 5) error into the measurement. To remove this error, or “ZERO” out your sensor, then go to setup
screen and enter in -0.1 for that sensor and it will subtract out that offset.
This screen also allows the user to enter in the number of loops going through the sensor so that the current
reading is accurate. For instance, if there is 5 loops then the software will divide the reading from the
sensor by a factor of “5” to display the proper Amps value.
_
Figure 2 Example of looping wire through sensor
WattsVIEWTM
http://WattsVIEW.com
Revision 4.7
PAGE 16 of 26
WattsVIEWTM
Large Display Screen
http://WattsVIEW.com
If you click on the “Large Read-outs” tab, you will see the screen shown
below.
If you prefer to see analog meters then you need to click on the
button and select
. Then you will see the screen shown below.
WattsVIEWTM
http://WattsVIEW.com
Revision 4.7
PAGE 17 of 26
WattsVIEWTM
http://WattsVIEW.com
Log File Viewer
WattsVIEWtm records data to log files on your hard drive in tab delimited format. To view recorded data click
on the tab titled “LOG VIEWER” . To look at the voltage being monitored click on the left hand side of the
screen where it says “VOLTS”, click on the sensor you want to display data for. Click on the day you want to
display data for in the bottom left hand box. For example a log file of “20130116.log” January 16th 2013. The
date format is YYYYMMDD.
_
WattsVIEWTM
http://WattsVIEW.com
Revision 4.7
PAGE 18 of 26
WattsVIEWTM
http://WattsVIEW.com
DIGITAL IO PORT
The WattsVIEW sensor has a 8 bit digital port which allows the user to control or monitor 8 digital TTL
channels by sending a series of remote commands. These commands for someone who wants to write
their own software. The commands are available by request – contact support for more information.
The digital lines can be used with a solid state relay to turn on high current sources such as an AC
driven heater to control constant power. N Drivers to control and monitor these digital channels are
available in LabVIEW
_
CUSTOM SOFTWARE FOR YOUR APPLICATION
Electrical engineering and software engineering services are available for your project needs.
Any kind of software can be customized or written for your application. Please contact support for price
and delivery time.
WattsVIEWTM
http://WattsVIEW.com
Revision 4.7
PAGE 19 of 26
WattsVIEWTM
http://WattsVIEW.com
Voltage Scaling / Dividing
In some cases a max monitoring voltage of 200 Volts DC is not adequate. For this situation a voltage
tm
divider circuit can be used on the input of the Wattsview sensor. The resistors below are made by
Ohmite and are rated for 1.6kV voltage isolation, 5 inches long. $14 each. They can be mounted on a
panel . This would divide a 1,000 Volt potential down to a 166 Volt potential which falls well within
tm
the range of the Wattsview sensor.
DISCLAIMER: Some alternative energy systems can exceed 1,000 Volts DC. Be aware this
voltage can cause fire, damage to property, instant death or injury. By following these
suggestions and connecting to power, you agree to have a licensed engineer or electrician inspect
your installation.
WattsVIEW
Voltag Input
v+
R1
100kΩ
P/N L50J100K
R2
20kΩ
P/N L50J20K
v-
WattsVIEWTM
http://WattsVIEW.com
Revision 4.7
PAGE 20 of 26
WattsVIEWTM
http://WattsVIEW.com
APPENDIX A: Windows Installation
If you have the install disk then you can run the setup.exe driver install program shown below.
_
If you do not have the install disk then the driver installer can be found at this URL :
HTTP://www.ftdichip.com/Drivers/VCP.htm
Click this website (shown below). The windows download is a Setup.exe file which automatically
installs when you double click on it.
_
The process flow for the FTDI Windows Setup.exe installer is shown below
WattsVIEWTM
http://WattsVIEW.com
Revision 4.7
PAGE 21 of 26
WattsVIEWTM
http://WattsVIEW.com
This is the first screen that pops up. Click on the “Extract”
button.
Next allow the program to finish extracting.
Click on the “Next” button
Allow installation to finish.
This screen should appear when finished. Click on the
“Finish” button.
WattsVIEWTM
http://WattsVIEW.com
Revision 4.7
PAGE 22 of 26
WattsVIEWTM
http://WattsVIEW.com
Verifying Successful serial COM port Installation
If you desire to double check that the serial port was setup correctly then access device manager and
verify the port shows up as shown below. Note: If your port does not show up, then you need to reboot
the computer and check again.
Get the latest version of Wattsview
tm
Copy the installation zip file from your install disk to
tm
your computer. Or download the latest version of the Wattsview program from the downloads web
page at: http://wattsview.com
1. Unzip File Now unzip the file or extract the contents of the file to a temp folder on your hard
drive.
2. Run the setup.exe file. Wait until the installation is completed
3. This portion of the procedure is completed.
WattsVIEWTM
http://WattsVIEW.com
Revision 4.7
PAGE 23 of 26
WattsVIEWTM
http://WattsVIEW.com
APPENDIX B: MAC OS X Installation
If you do not have the installation disk then download the software from downloads page at
http://wattsview.com
Place the contents of the zip file into the folder you want this application to reside from here on out.
For example, you can leave it in the download area, or put it in the application folder. It should look
look something like this when you open the zip file:
MAC OS X Install files
Note: There are 3 .dmg files to install.
1. Click on and run the LabVIEW 2012 runtime engine .dmg file
2. When installer launches click on the LabVIEW runtime engine .pkg file and follow the
promptsClick on and run the NI-VISA file, it may require you to reboot. These are low level serial
port drivers written by National Instruments.
3. Click on and run the FTDI dmg file which are drivers written by FTDI which will configure USB to
serial adapter.
4. Follow the instructions in the user manual to setup the WattsVIEW sensor.
5. Connect your WattsVIEW sensor to the computer, verify that you have connected the 12 Volt
power connector into the wattsVIEW sensor as shown in owner’ manual.
6. Open the WattsVIEWtm folder
7. Launch the WattsViewtm APP file which will scan for devices and ports and display data.
8. Connect the sensor to your MAC computer by plugging one end of the USB cable to your MAC and
the other end to the WattsVIEW sensor.
9. Wait 5 seconds, then Launch the System Profiler utility, or Apple System Profiler for earlier
versions of OS X. This can be accessed by going to the Finder and selecting Applications from the
Go menu, then open the
10. Utilities folder. Select USB under Hardware in the panel to the left and then select the appropriate
device from the USB Device Tree. In the screen shot below (from OS 10.4), the device has a
deviceID given by: Vendor ID: 0x0403 , Product ID: 0x6001 (See example below)
11. This ends this part of the installation, Refer now to the Launching WattsVIEW section of this
manual.
WattsVIEWTM
http://WattsVIEW.com
Revision 4.7
PAGE 24 of 26
WattsVIEWTM
http://WattsVIEW.com
WattsVIEWTM
http://WattsVIEW.com
Revision 4.7
PAGE 25 of 26
WattsVIEWTM
http://WattsVIEW.com
APPENDIX C: User Manual Revision History
Revision 4.5 11/11/13 Updated MAC installation to include NI-VISA driver install
Revision 4.6 12/3/14 Updated phots, minor changes to content.
Hardware Accessories
RCOMMENDED SERIAL CABLE
This cable can be used with the
WattsVIEW serial DB 9pin model
DB 9 Pin Male To Female Straight
Through
RECOMMENDED POWER SUPPLY
This cable can be used with the
WattsVIEW serial DB 9pin model.
120V to 220 V AC 50/60 Hz
Sold here online
TECHNICAL SALES & SUPPORT
PHONE: 480-489-4111
EMAIL: [email protected]
WattsVIEWTM
http://WattsVIEW.com
Revision 4.7
PAGE 26 of 26