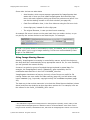
1
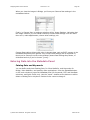
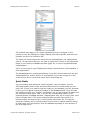
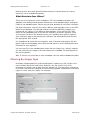
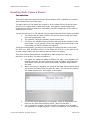
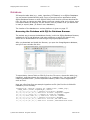
ImageIngester User’s Manual For ImageIngester 2 and ImageIngesterPro 2. Manual Version 2.1.03 February 24, 2007 ImageIngester.com Marc Rochkind Basepath Associates [email protected] WARRANTY THIS SOFTWARE IS PROVIDED BY THE COPYRIGHT HOLDER "AS IS" AND ANY EXPRESS OR IMPLIED WARRANTIES, INCLUDING, BUT NOT LIMITED TO, THE IMPLIED WARRANTIES OF MERCHANTABILITY AND FITNESS FOR A PARTICULAR PURPOSE ARE DISCLAIMED. IN NO EVENT SHALL THE COPYRIGHT OWNER OR CONTRIBUTORS BE LIABLE FOR ANY DIRECT, INDIRECT, INCIDENTAL, SPECIAL, EXEMPLARY, OR CONSEQUENTIAL DAMAGES (INCLUDING, BUT NOT LIMITED TO, PROCUREMENT OF SUBSTITUTE GOODS OR SERVICES; LOSS OF USE, DATA, OR PROFITS; OR BUSINESS INTERRUPTION) HOWEVER CAUSED AND ON ANY THEORY OF LIABILITY, WHETHER IN CONTRACT, STRICT LIABILITY, OR TORT (INCLUDING NEGLIGENCE OR OTHERWISE) ARISING IN ANY WAY OUT OF THE USE OF THIS SOFTWARE, EVEN IF ADVISED OF THE POSSIBILITY OF SUCH DAMAGE. © 2007 Marc Rochkind. All rights reserved. ImageIngester User’s Manual Version 2.1.03 Page 2 If you want to start ingesting now and read the manual later... 1. Download ImageIngester or ImageIngesterPro for Mac OS X or Windows XP/Vista from ImageIngester.com and install it. 2. Connect your camera or card and make sure it’s visible in the Finder or Windows Explorer. (If you’re prompted to do something with it by the operating system or another photo ingestion program, say no.) 3. Choosing Preferences from the ImageIngester or ImageIngesterPro menu (Mac) or Tools menu (Windows). If you’re using ImageIngesterPro, click on the Folders tab. 4. Change the Primary Root Folder (may be called Primary Image Folder) to where you want ingested images to go. Leave the Card Folder set to [user choice]. 5. Change the Pre-Conversion Backup Root (may be called Backup Image Folder) to where you want backed-up images to go. 6. Click on the Apps tab and uncheck Run DNG Converter if it’s checked. 7. Close the Preferences panel. 8. Press the Start button at the top of the main window. 9. You’ll be prompted to choose the camera or card. Navigate to the card’s DCIM folder and choose it. 10. That’s it… your images will be ingested to the Primary folder! If you don’t like the way your files have been named, or how they’ve been arranged into folders, or that your raw files didn’t get converted to DNGs, or that you didn’t get a chance to enter keywords, then… that’s what the rest of this manual is for! © 2007 Marc Rochkind. All rights reserved. 2007-02-24 ImageIngester User’s Manual Version 2.1.03 Page 3 Table of Contents The Digital Photography Workflow ....................................................................................... 4 ImageIngester Versions ....................................................................................................... 4 What ImageIngester Can Do ................................................................................................ 5 Getting Started ..................................................................................................................... 7 Hardware and Software Requirements......................................................................................7 Support ................................................................................................................................7 Downloading and Installing IIP ................................................................................................8 Mounting the Camera or Card .................................................................................................8 A Quick Tour of the User Interface ....................................................................................... 9 The Main Window ..................................................................................................................9 Preferences and Preference Sets............................................................................................10 The Tools Menu ...................................................................................................................11 Basic Features (II and IIP) ................................................................................................ 11 Copying Images ..................................................................................................................11 Automatic Ingestion.............................................................................................................14 Backing Up Images ..............................................................................................................14 Renaming Images................................................................................................................16 Arranging Images Into Folders ..............................................................................................19 Converting Images to DNG ...................................................................................................25 Verifying Images .................................................................................................................28 Launching a Viewer..............................................................................................................28 Using a Static Metadata Template..........................................................................................28 Checking For Updates ..........................................................................................................31 Advanced Features (IIP only)............................................................................................. 31 Tracking Clients, Projects, Cards, and Ingestions .....................................................................31 IPTC and UserData Database Tables ......................................................................................32 Using a Dynamic Metadata Template......................................................................................32 Establishing Adobe Camera Raw Settings................................................................................34 Entering Data into the Metadata Panel....................................................................................35 Filtering By Image Type .......................................................................................................37 Handling Multi-Camera Shoots ..............................................................................................38 More About Workflow ......................................................................................................... 45 ImageIngester and DAM Workflow .........................................................................................45 A Simplified Workflow ..........................................................................................................47 ImageIngester and Lightroom ...............................................................................................48 Reference Material.............................................................................................................. 49 Macros ...............................................................................................................................49 Macro Lab...........................................................................................................................53 Database ............................................................................................................................55 Locating Preferences, Databases, and Templates .....................................................................57 Acknowledgements............................................................................................................. 59 Change History ................................................................................................................... 59 © 2007 Marc Rochkind. All rights reserved. 2007-02-24 ImageIngester User’s Manual Version 2.1.03 Page 4 The Digital Photography Workflow In pre-digital times, after shooting a roll of film, photographers either took it into their darkroom to develop and print the images, or, much more commonly, dropped off the film at a lab for processing. The negatives got filed away (or sometimes thrown away or misplaced) and the prints were saved in a drawer or put into an album. A few images were reprinted, maybe even enlarged, from negatives or slides. But now photography has changed dramatically for many photographers who now have their own digital darkrooms: Photoshop, Camera Raw, Aperture, Lightroom, Capture One, Nikon Capture, and many others. The control and flexibility of your own darkroom is terrific, but doing all those processing steps yourself takes time and energy, especially because most photographers are shooting more with digital than they did with film, and because clients want their pictures right away. Consider everything serious photographers have to do just to get their images ready for viewing and processing: Copying the images into the computer. Making a backup (you don’t want to erase the card with only a single copy on your computer). Renaming the files, perhaps with the date and time the image was taken. Placing the images from each shoot in a folder so you can find them later, perhaps organized by date, or by client, or by image sequence number. Converting raw images to Adobe DNG. Applying bulk metadata, such as your name, a copyright notice, and the location and subject matter of the shoot. Those getting-ready steps (called ingestion) are tedious, time-consuming, and boring, but very important. Since they’re also repetitive—what you do is nearly identical for every card—they’re a perfect candidate for automation, and that’s exactly what ImageIngester is for. Once you’ve set up your preferences (backup location, naming scheme, folder locations, and so on), all you do to ingest is insert the card in your card reader (or plug in your camera) and press the ImageIngester Start button. If auto-ingestion is switched on, you don’t even have to press the Start button! ImageIngester Versions There are two versions of ImageIngester: A free version, called just ImageIngester, and a commercial ($40) version called ImageIngesterPro. I’ll often call them II and IIP for short. If I use the full name ImageIngester, I’m talking about both. In fact, II and IIP are the same application, called ImageIngesterPro, and you pick which version you want to run by choosing Switch Mode on the ImageIngesterPro (Mac) or Help (Windows) menu. In this manual, however, II and IIP will usually be discussed as though they were different applications. © 2007 Marc Rochkind. All rights reserved. 2007-02-24 ImageIngester User’s Manual Version 2.1.03 Page 5 II (the free version) is missing the Advanced Features discussed starting on page 31.1 Menu items and buttons for Advanced Features are still there, but they’re ineffective, although you can still try out the Metadata and Multi-Camera Shoot panels. You can view the Database, but you can’t update it. What ImageIngester Can Do What sets ImageIngester apart from other ingestion utilities is the amount of processing it can do automatically. ImageIngester’s design was dictated by three guiding principles: 1. The contents of the image file must not be altered in any way. Even conversion to DNG, if requested, is performed not by ImageIngester, but by Adobe DNG Converter running as a separate task. (It’s a free download from Adobe.) 2. Images can’t be viewed in ImageIngester, because there are too many types of image files to deal with, and because viewing delays ingestion, which prolongs the time until the card is backed up. No editing, printing, or cataloging, either. 3. Given the constraints of #1 and #2, ImageIngester should handle as much of the workflow as possible. Here’s the whole list of everything IIP can do with one press of the Start button (or no press, if auto ingestion is enabled): • Copying images (page 11) from the camera or card to the hard drive. • Automatic ingestion (page 14) and ejection of cards. • Backing up images (page 14) so there’s a second, or even third copy, ideally on a separate device such as a FireWire drive. • Renaming images (page 16) to something more descriptive than, say, DSC_0123.NEF. Perhaps something like MJR_20061204_173802_0123.NEF (my initials, date, time, and original file sequence number). • Arranging images into folders (page 19), set up however you like. Perhaps something like 2006/12/04 or 2006/2006-12-04 or Commercial/Muriel’s Wedding/01234-01399. • Converting images to DNG (page 25), which is Adobe’s universal raw format. You can choose most of the DNG options, such as full-size JPEG preview and embedding the original raw. (I like to convert during ingestion, others like to wait until they’ve done some adjusting in Adobe Camera Raw, and others don’t want DNGs at all.) 1 That statement is true of ImageIngesterPro 2.1 and later running in ImageIngester mode. ImageIngester 1.x has a feature set that doesn’t include all the Basic Features and implements a few of them (such as Destination Folder) differently. © 2007 Marc Rochkind. All rights reserved. 2007-02-24 ImageIngester User’s Manual Version 2.1.03 Page 6 • Verifying images (page 28), to help ensure they got copied OK from the card. You can run DNG Converter without actually converting to check raws; the checker for JPEGs is built-in. • Launching a viewer (page 28), so iView Media Pro, Bridge, or whatever you choose gets started as soon as ingestion is complete. • Adding bulk metadata (pages 28 and 32), so you can insert data that applies to the entire ingestion, such as your copyright notice, keywords, subject and location information, and even iView Media Pro catalog sets. • Establishing Adobe Camera Raw settings (page 34; IIP only), so that the images come up in ACR with your chosen settings already applied. • Filtering by image type (page 35; IIP only), which allows you to ignore unwanted files, such as JPEGs from a camera that insists on including a JPEG along side of each raw. Or, you can choose to include only designated files, which is handy when you’re using IIP to re-ingest an entire folder tree on your hard drive. • Tracking clients, projects, cards, and ingestions (page 31; IIP only) in a built-in SQLite3 database, which allows you to review the details of every ingestion you’ve made, including any notes you’ve entered at ingestion time. • Handling multi-camera shoots (page 38; IIP only) so that files from different cameras can be renamed in time-sequence order. Each of these bulleted features is discussed in its own section under Basic Features (starting on page 11) or Advanced Features (starting on page 31). The following diagram shows how IIP automates ingestion. Some features, such as the post-ingestion backup, aren’t shown. Adobe DNG Converter Copy Size verified after copy Backup Folder Verifies raw format Primary Folder Copy Backup and Primary best on separate drives Size verified after copy Verify JPEGs Launch viewer Each JPEG read and decompressed (Bridge, Photoshop, etc.) © 2007 Marc Rochkind. All rights reserved. 2007-02-24 ImageIngester User’s Manual Version 2.1.03 Page 7 Getting Started Hardware and Software Requirements ImageIngester has no special hardware requirements, assuming your computer is powerful enough to do whatever photo editing you’re using it for and that is has a way to mount your camera or card as a mass-storage device, which usually means a USB connection (see the section Mounting the Camera or Card on page 8). There are versions of ImageIngester (II and IIP) for the Mac running OS X 10.4 (Tiger) and for Windows running Windows XP or Vista. ImageIngester won’t run on OX X 10.3 or earlier, and, although it might run on earlier versions of Windows, the installation program won’t work on earlier versions and there’s no support available. Apple’s next version of OS X, 10.5 (Leopard) will be supported when it’s released by Apple. If you want to convert or verify raw files (pages 25 and 28), you have to install Adobe DNG Converter. It’s available free from Adobe (adobe.com/products/dng). If you have a newer camera and it won’t convert your raw files, make sure you have the latest version; Adobe updates DNG Converter (and Camera Raw) several times a year. Support If you need help or have a question, first check ImageIngester.com, which contains lots of material that’s updated frequently. The Technical Notes and FAQ pages contains answers to commonly-asked questions. There’s a lot of other material on the site also. The most efficient way to get direct support is on the ImageIngester forum at thedambook.com/smf (scroll down to the ImageIngester section under Software Discussions). I check this forum regularly and often respond to posts that request support or ask general questions in a few hours. If you’d rather not post your question publicly or if it’s too specific for a public forum, send email to [email protected]. If you’re running a paid-for copy of ImageIngesterPro, please put “IIP Support” in the subject line so I can give your email priority. Limited support is available from me if you’re running II or IIP on an unsupported OS, which includes Mac OS X earlier than 10.4, Windows earlier than XP (such as 2000), or any non-Windows system running the Windows version, including Linux under a Windows emulator or Mac OS X running Virtual PC or Parallels. I’ll still try to answer your questions as time permits, but, as I don’t have those environments available to me, I won’t be able to diagnose any system problems you might have. No support is available for any software other than ImageIngester itself, such as your OS, SQLite, SQLite Database Browser, ODBC drivers, iView Media Pro, Photoshop, Lightroom, and Aperture. However, sometimes you can get help if you post a message to a web forum, such as the ImageIngester forum at thedambook.com/smf. © 2007 Marc Rochkind. All rights reserved. 2007-02-24 ImageIngester User’s Manual Version 2.1.03 Page 8 Downloading and Installing IIP You can download II and IIP from the web site ImageIngester.com. That gets you a DMG file on the Mac and an MSI file on Windows. If the files don’t run automatically, double-click on them. The DMG file should mount as a folder, from which you can just drag the ImageIngester application to your Applications folder (or wherever you want it to be). On Windows, the MSI file starts an installation program that takes you through the necessary steps. Note that downloading II is really downloading IIP and running it in ImageIngester mode. If ImageIngester won’t run after you install it, do the following, in order: 1. Make sure you’re running a supported OS. 2. Uninstall it and then reinstall it. 3. Download it again and then uninstall it and reinstall it. 4. Send email to [email protected] and ask for help. You can run IIP for a while—up to 25 ingestions—to try it out without registering it, but then you’ll have to pay for and enter a registration code that you can get by choosing Buy a License from the ImageIngesterPro (Mac) or Tools (Windows) menu. That takes you to the purchasing web site, which you can also access directly at ImageIngester.com/ImageIngester/buylicense.php. Follow the instructions on the web site to complete the registration process. When run in ImageIngester mode, ingestions don’t count towards your 25-ingestion trial. If you don’t want to pay for a license after the trial is over, you can still switch to ImageIngester mode at that time. There’s an Update Check option on the Preferences-Apps panel that you can check if you want an automatic check for an available update to be run once a week or so. Mounting the Camera or Card There are two ways to get images from your digital camera into your computer: 1. Attach the camera to the computer with a USB cable or, rarely, with FireWire. 2. Take the card out of the camera and connect it to the computer with a card reader. In both cases, ImageIngester can access the images only if the folders and files follow the DCF standard (see www.exif.org/dcf.pdf), which nearly all cameras do. This is the folder arrangement you may have seen on the card that has a folder named "DCIM" at the top level. Method #1 works with ImageIngester if the camera is can mount as a mass-storage (or removable) device, which many cameras can. On some, such as the Nikon D70, it's an option you set. If the camera connects as a PTP (Picture Transfer Protocol) device, ImageIngester can't access it. If that's an option, then your choices © 2007 Marc Rochkind. All rights reserved. 2007-02-24 ImageIngester User’s Manual Version 2.1.03 Page 9 are to set the option to Mass Storage (or whatever your camera calls it) or to use Method #2. Method #2 is almost always a better choice, even if Method #1 works, because the transfer is usually much faster, you don't have to plug anything into the camera, you don't run down the camera's battery or risk it running down while you're ingesting, you don't forget to turn the camera off, and you don't tie up the camera. More importantly, Method #2 is the only practical method if you have several cards from a shoot. You don't want to load them back into the camera to ingest them. The main reason for preferring Method #1 even when Method #2 will work is that the camera comes with a dock, perhaps one that also charges the battery. In this case Method #1 is actually the more convenient of the two. A potential reason for not using Method #2 is that you don't have a card reader. They're cheaper than you might think: I use a SanDisk ImageMate 12 in 1, which takes just about every card made, and it costs only about $30. Readers that take fewer than 12 kinds of cards sell for even less, like $10. Feedback from ImageIngester users indicates that some Canon SLRs support only PTP, so for these the only way to use them with ImageIngester is to remove the card (Method #2). Sometimes you’re not actually ingesting from a card, but from a portable hard drive. In that case just connect it directly to your computer. A Quick Tour of the User Interface Nearly every control you need to configure and use ImageIngester is on the main window, the Preferences panel, or the Tools menu. They’ll be briefly introduced here, saving the details for later on, when specific features are discussed in detail. The Main Window The main window looks like this:2 2 What you see in the various screen shots in this manual might not match exactly what you see on your own screen, as the user interface may have changed since the shots for the manual were taken. Also, most screen shots are of the Mac version, but the Windows screens are very similar, with the same controls. © 2007 Marc Rochkind. All rights reserved. 2007-02-24 ImageIngester User’s Manual Version 2.1.03 Page 10 You’ve probably already tried the Start button, and I’ll explain the other controls later. The big text box in the middle is the log that shows ingestion status messages, error messages (such as a JPEG or raw that didn’t pass validation), and final totals about the number of images ingested, the number converted to DNG, and other interesting facts. The most important thing you’ll ever see there is the message at the end that tells you that ingestion was successful. That means all of the images were copied, backed up, and verified. Preferences and Preference Sets There are a lot of ImageIngester preferences, so they’re split up into tabs for Folders, Apps, Naming, Ingestion, and Data. For an example, the Folders tab is shown on page 15. You can save an entire collection of preferences into a named Preference Set that you can recall whenever you need it. In effect, that sets all the preferences to what they were when you last set them under that name. You can keep one set for each camera type (SLR, point-and-shoot, etc.), or one set for each of your photographic pursuits (commercial, art, family), or whatever you like. With one exception, any changes you make to preferences when a given Preference Set is selected are automatically saved in that set. The exception is the Update Check option on the Preferences-Apps panel, which applies to all Preference Sets. There’s no “save” button for Preference Sets; think of saving as occurring automatically whenever you make a change. © 2007 Marc Rochkind. All rights reserved. 2007-02-24 ImageIngester User’s Manual Version 2.1.03 Page 11 You can choose the active Preference Set from the drop-down on the Preferences panel or the main window, but you can create a new one or delete an existing one only from the options on the drop-down on the Preferences panel. The Tools Menu Here’s the Tools menu on the Mac; the Windows Tools menu has one more choice, the Preferences item. All of the choices on the Tools menu except for Macro Lab and Preferences on Windows are available in IIP only. Basic Features (II and IIP) Copying Images Four Folders ImageIngester deals mostly with four folders, although the two backup folders are optional: 1. Card Folder: Where the images to be ingested are located. It’s usually on a card, either still in the camera or mounted on a card reader attached to the computer. You can ingest from any folder, though, not just ones on cards. Folders on hard drives, network drives, CDs, and DVDs all work OK. 2. Primary Folder: Where the ingested images are placed. It’s nearly always on a hard drive. There can be multiple primary folders if the images are distributed by date or image number. 3. Two Backup Folders: Where backups of ingested images are kept. You can back up images before they’ve been converted to DNG (pre-conversion backup), or after (post-conversion backup), or both. If you’re not converting raws, or for non-raw images (e.g., JPEGs), the two backups are essentially the same. The first two folders are discussed in this section (Copying Images); the backup folders are discussed on page 14. If you have a pre-conversion backup folder, images are copied: • from the card to the pre-conversion backup folder, then from there to • the primary folder, then from there to • the post-conversion backup folder, if you have one. If you don’t have a pre-conversion backup folder, images are copied: © 2007 Marc Rochkind. All rights reserved. 2007-02-24 ImageIngester User’s Manual Version 2.1.03 Page 12 • from the card to the primary folder, then from there to • the post-conversion backup folder, if you have one. If you have neither pre- nor post-conversion backup folders, the only copying is from the card to the primary folder. Choosing the Card Folder Choosing the card folder is straightforward, especially in comparison to the complicated way the Primary image folder is determined. You set the card folder in one of three ways: 1. You can set it to a specific folder on the Preferences-Folders panel (see page 15). 2. You can it to “[user choice],” which means that the actual folder is chosen when you press the Start button to start ingestion. 3. You have Auto Ingest turned on (page 14), which sets the card folder to a card that’s inserted. If none is, pressing the start button does what it normally does (#1 or #2 above). To set the card folder to “[user choice],” press the Choose Card button on the Preferences-Folders panel and press the Cancel button. If the card folder is set to “[user choice]” and a card is mounted (assuming autoingestion was turned off or ImageIngester wasn’t running when the card was inserted), a popup dialog will give you the choice of ingesting from that card, or from some other folder. If no card is inserted, you’ll go straight to the choose-folder dialog. !Tip: Usually you’ll want to set the card folder to “[user choice].” It’s fairly rare to want to ingest from the same fixed folder all the time. Choosing the Primary Root and Destination Folders Choosing the primary folder is complicated, because it involves an interaction between: • The Primary Root Folder chosen on the Preferences-Folders panel, • The Destination Folder chosen on the main window, and • The folder arrangement chosen on the Preferences-Naming panel. These three form a hierarchy: The Primary Root Folder is at the top level, the Destination Folder is under it, and the folder arrangement is under the Destination Folder. For some examples, see the pictures starting on page 20. Normally, you’ll set the Primary Root Folder to the top-level folder where you want all your images kept, regardless of client, project, date, or anything else. For example, on the Mac and Windows Vista, I might set this to /Users/marc/Pictures, a directory that’s automatically created for each user. On Windows XP, I’ve created the © 2007 Marc Rochkind. All rights reserved. 2007-02-24 ImageIngester User’s Manual Version 2.1.03 Page 13 folder C:/Pictures. You’re free to choose any folder you like, but take into account whether it’s subject to your regular backup, since it will hold all of your ingested images. By default, the Destination Folder is set to “.” (dot), which means that it doesn’t cause an actual folder to be created under the Primary Root Folder. If you want to keep different folders for different purposes (e.g., commercial, art, family, weddings), you might want to choose an appropriate Destination Folder under the Primary Root Folder. For example, if you set the Destination Folder to “Family” and the Primary Root Folder is set to /Users/marc/Pictures, then ingested images will go under /Users/marc/Pictures/Family. In practice, the only real difference between the Primary Root Folder and the Destination Folder is that the former is relatively stable and is set on the Preferences-Folders panel, whereas the latter is often changed from ingestion-toingestion and can be set on the main window. The Destination Folder doesn’t even have to be under the Primary Root Folder. If it isn’t, then the Primary Root Folder plays no role in determining the ingestion folder. The backup folder(s) will be nested more deeply as a result, but that’s not a serious problem. Once you’ve set up the Primary Root and Destination Folders, the folder arrangement you set on the Preferences-Naming panel will determine what additional folders, if any, will be created to organize ingested images by date, client/project, file number, or whatever you want. Choosing the folder arrangement is discussed on page 19. !Tip: If you’re confused about the distinction between the Primary Image Folder and the Destination Folder, just leave the Destination Folder set to “.” and set the Primary Image Folder on the Preferences-Folders panel. How ImageIngester Copies Images ImageIngester copies all the files it finds in the card folder, and in all subfolders of the card folder. This includes not only image files (JPG, NEF, CR2, MOV, etc.) but any other files that happen to be present, whether they’re image files or not. With IIP you can exercise more fine-grained control over what kinds of files are copied with an include/exclude filter, discussed on page 35. Files known to be in raw format are passed through Adobe DNG Converter to convert them to DNG if you’ve enabled that feature (page 25). Currently, these image types are CR2, CRW, DCR, EEF, KDC, MRW, NEF, ORF, PEF, RAF, RAW, SRF, TIF, and X3F. For the latest information, go to ImageIngester.com/ImageIngester/technotes.php, where the current list is posted. If you’ve enabled a pre-conversion backup (page 14), files are copied from the card folder to the backup folder, and then from there to the primary folder. The second copy (from backup to primary) is done by DNG Converter, if enabled, for raws, and directly by ImageIngester for non-raws and for raws if DNG conversion is disabled. If you haven’t enabled a pre-conversion backup, files are copied directly by ImageIngester from the card folder to the primary folder, and DNG conversion is © 2007 Marc Rochkind. All rights reserved. 2007-02-24 ImageIngester User’s Manual Version 2.1.03 Page 14 disallowed. (That is, you can do DNG conversion only if you also have a preconversion backup.) Once all copying to the primary folder(s) is complete, an additional copy is made to the post-conversion backup if you’ve enabled it. All copies have their file modification times set to those of the original files in the card folder. This goes for DNGs produced by DNG Converter, too. As noted on page 5, one of ImageIngester’s design principles is that the contents of an image file are never altered. Internally, ImageIngester’s copying routines make sure that every copy is bit-for-bit identical to the original. (Not) Erasing the Card ImageIngester doesn’t do it, for two reasons: (1) It’s not a good idea to erase or reformat the card on a computer—it’s better to do it in the camera, and (2) since there’s no code in ImageIngester to erase the card, you’ll never do it by accident if you make a mistake setting the Preferences. Automatic Ingestion If you check Auto Ingest on the Preferences-Ingestion panel, ingestion starts automatically, without your having to press Start, when you insert an image card or connect a camera while ImageIngester is running. However, if you launch ImageIngester with a card or camera already mounted, it prompts you before ingesting. If you check Auto Eject, the card or camera is ejected after a successful ingestion. Thus, if you have several cards, you can ingest them automatically by simply inserting and removing them, without having to interact with ImageIngester at all. !Tip: You’ll usually want to enable Auto-Eject, since there’s nothing more to be done with a card after ingesting it, but you’ll probably want to disable Auto-Ingest unless you have a stack of cards to ingest. That way you get a chance to check the Preferences and set up the metadata before ingestion starts. Backing Up Images ImageIngester’s backup feature allows you to make a second copy, or even a third, on a device other than the card and wherever the primary folder is. © 2007 Marc Rochkind. All rights reserved. 2007-02-24 ImageIngester User’s Manual Version 2.1.03 Page 15 You set the backup folders on the Preferences-Folders panel: The pre-conversion backup also allows you to save the original raws (e.g., NEFs) if you’re converting to DNG. (Alternatively, you can embed the original raw in the DNG; see page 25.) It also contains everything else that’s ingested, such as JPGs. The post-conversion backup allows you to back up converted raws (as well as nonraws). If you’re not converting, the two backups are identical. If you’re only going to have one backup, it’s required to be the pre-conversion backup, but that’s the better one anyway, since it’s taken directly from the card. If you’re converting to DNG, you’re required to at least have a pre-conversion backup, since that’s from where Adobe DNG Converter takes its input.3 The post-conversion backup is always optional. The folder arrangement descending from the backup folders is identical to that of the primary folder, and all file names are the same, too. Remember that ImageIngester’s backups contain only ingested images, not any subsequent work you do after ingestion. !Tip: The pre-conversion backup is usually enough, since your regular backup will back up the primary folder eventually anyway. Add a FireWire hard drive to your system, and put the backup there, so that you’ll still have it if the main computer fails. Backing up over a network isn’t usually a good idea, as it will slow down ingestion too much. 3 Because of this, ImageIngester never erases your original raw files. They’re either in the primary folder or the pre-conversion backup folder. If you don’t want the originals, you’ll have to erase them yourself. © 2007 Marc Rochkind. All rights reserved. 2007-02-24 ImageIngester User’s Manual Version 2.1.03 Page 16 Renaming Images Just about every digital camera saves image files with names like DSC_1234.NEF. Sometimes you can change the first four characters, and exercise some control over the last four numbers, but nothing beyond that. ImageIngester can rename files for you, to incorporate the date, the time, the subject (or client, project, location, etc.), your initials, a sequence number, or any combination of those. You choose the naming options you want on the Preferences-Naming panel, which looks like this: Using the Image Naming Drop-Down The drop-down menu for the Image File Name has 20 or so choices for some common naming options. If none of those are quite right, you can design your own naming by using macros, which will be explained shortly. The first choice, Prefix_YYYYMMDD_0001, means that image file names will consist of: 1. the prefix you’ve typed into the field to the right of the drop-down (“MJR” in this case), followed by 2. an underscore, followed by 3. the modification date of the image file in the form YYYYMMDD (e.g., 20061229), followed by 4. another underscore, followed by 5. the filename number, which is the last four digits of the image file name on the card (e.g., 1234 if the name on the card was DSC_1234.NEF), followed by 6. a dot, followed by 7. the extension (part after the dot), which will be whatever was on the card or “DNG” if the file was converted to DNG. © 2007 Marc Rochkind. All rights reserved. 2007-02-24 ImageIngester User’s Manual Version 2.1.03 Page 17 Some other choices use other data: • Auto Number, which uses a sequence generated by ImageIngester that starts with 1 when you first install ImageIngester and continues from there, with each ingestion picking up where the previous one left off. You can set the starting number on the main window (see page 18). • Card file modification time, in the form hhmmss using the 24-hour clock. • A two-digit year, instead of a four-digit year. • The original filename, in case you don’t want renaming. An example file name is shown on the panel each time you make a choice, so you can just try the various choices to see what they do. For example: !Tip: The choice shown in this example, Prefix_YYYYMMDD_0001, is a good one to start with if you’re new to image renaming. It’s the one recommended by Peter Krogh in The DAM Book.4 Using Image Naming Macros Actually, ImageIngester’s renaming is controlled by macros, and all the choices on the drop-down do is automatically set up appropriate macros. So, for more flexibility, you can just edit the macros directly. A macro is a symbol or group of symbols that get replaced by actual data. For example, the ImageIngester macro {@datetime} gets replaced by the file modification date and time in the form YYYYMMDD_hhmmss. ImageIngester has dozens of macros, but only a few of them are useful for file naming. Others are more useful for folder naming (page 19), and still others help insert metadata (e.g., keywords, copyright notice) into metadata templates (page 28). The best way to learn what macros do is to check the Show Macros checkbox (shown above) and then see what the various drop-down options do. For example, here are the macros for the Prefix_YYYYMMDD_0001 choice: 4 The DAM Book: Digital Asset Management for Photographers (O’Reilly, 2005). Many of the concepts behind ImageIngester are based on Peter’s recommendations. Also check out the Krogh’s terrific web site, thedambook.com, which has an ImageIngester section in its forums. © 2007 Marc Rochkind. All rights reserved. 2007-02-24 ImageIngester User’s Manual Version 2.1.03 Page 18 This sequence consists of three macros, each surrounded by braces, and one literal character, which is the underscore between the second and third macros. (The first underscore is part of the prefix macro.) Here’s what the three macros mean: {@prefix,1,-1,_} This macro consists of the macro name, @prefix, followed by 4 arguments, which are 1, -1, and an underscore. For every macro, the 1st argument is the starting character, the 2nd argument is the number of characters to use (-1 means use them all), and the 3rd argument is literal text that should follow the macro only if it’s replaced by something. That way if you don’t have a prefix, the file name won’t start with an underscore. {@datetime,1,8} Recall that the {@datetime} macro by itself gets replaced by the date and time in the form YYYYMMDD_hhmmss. But, the 3rd argument means to use only the first 8 characters, so all we get is YYYYMMDD. {@filename,-4} If the 1st argument is negative, it counts from the end, not the beginning. So this macro gets replaced by the last 4 characters of the file name, which is the file name number. Put it all together and you get the prefix, an underscore if the prefix isn’t empty, the date (without the time), and the file name number. For example, MJR_20061229_0235.NEF. (You always get an extension.) Everything you need to know about macros is in the Reference section, starting on page 49. !Tip: Wait until you’ve used ImageIngester for a while before you get into macros. Just use the drop-down choices. About Dates and Times The image naming and folder arrangement drop-downs use the {@datetime} macro to access the image file’s modification date and time. Depending on your OS, files may also have a creation date/time and a last-accessed date/time, but ImageIngester can’t get at those. Inside the file, there are also two EXIF date/times (DateTimeOriginal and DateTimeDigitized) and one TIFF DateTime. The two EXIF date/times are immutable once the image is captured, but the TIFF Date/Time changes when the file’s contents are rewritten (e.g., if a JPEG is changed in Photoshop and then saved). © 2007 Marc Rochkind. All rights reserved. 2007-02-24 ImageIngester User’s Manual Version 2.1.03 Page 19 You can get the EXIF DateTimeOriginal via the {@exif.datetime} macro. (Macros are discussed on page 49.) If you’re ingesting from a card, rather than a folder on your hard drive, the file modification date/time will be nearly the same as the EXIF DateTimeOriginal (certainly within a few seconds), and it’s faster for ImageIngester to access, which means faster ingestions. Setting the Auto Number and Wrapping You can set the starting Auto Number, used for the for the next ingestion to whatever you like by typing into the Starting Number field on the main window: The Auto Number is used for image naming drop-down choices such as Prefix_YYYYMMDD_3456 and for the {@sequence} macro, which that choice uses. (More on macros on page 49.) The maximum Auto Number is 999999, and then it wraps back to zero. However, if you use fewer than 6 digits, wrapping will occur earlier. For example, if you use just 4 digits, as in the drop-down choice Prefix_YYYYMMDD_3456, then wrapping will occur when you’ve reached 9999, since the next number is 10000 whose rightmost 4 digits are 0000. The Starting Number is incremented by the number of images ingested, even if Auto Numbers aren’t used in file or folder naming. Name Conflicts ImageIngester never overwrites an existing file. If, after renaming, a file with that name already exists, a sequence number (e.g., "_001") is appended to the file name to make it unique. (This sequence number is unrelated to the Auto Number.) Arranging Images Into Folders Recall from page 12 that the folder that images are ingested into is determined by the Primary Root Folder, which contains the Destination Folder, which contains the folder arrangement. “Folder arrangement” means the scheme you’ve chosen to distribute your images into folders, according to date, or client/project, or numberrange folders, or whatever you want. You make your choice on the PreferencesNaming panel. One way to think about the Primary Root Folder versus the folder arrangement is that the Primary Root Folder determines where the images go, and the folder arrangement determines how they’re organized. The Destination Folder, if you’ve set it to anything other than “.” (the default), is a little of both, depending on how you use it. As with image file names, there are some basic folder arrangement choices on a drop-down on the Preferences-Naming panel: © 2007 Marc Rochkind. All rights reserved. 2007-02-24 ImageIngester User’s Manual Version 2.1.03 Page 20 Folder Arrangement Drop-Down Choices Here’s what the various choices do; remember that each folder arrangement described is created under the Primary Root Folder and Destination Folder: YYYY/MM/YYYY-MM-DD This arranges images in a three-level hierarchy according to image file modification date: 4-digit year, month, and date in the form year-month-day. Images from multiple ingestions can go into the same folders, since the images could be in the same year and/or month and/or day. For example, if the Primary Root Folder is /Users/marc/Pictures and the Destination Folder is Family, two image files from 2006-12-30 would be arranged like this: The folder 2006-12-29, whose contents isn’t shown, is presumably from an earlier ingestion; other folders aren’t shown. © 2007 Marc Rochkind. All rights reserved. 2007-02-24 ImageIngester User’s Manual Version 2.1.03 Page 21 YYYY/YYYY-MM-DD This arrangement is similar, but the month folder is absent: YYYY/MM/YYYY-MM-DD subject This is the same as the year-month-date arrangement above, except that the subject is appended to the date folder. You enter the subject (e.g., Thanksgiving) on the IIP Metadata Panel: II (non-Pro) doesn’t allow you to enter a subject because it has no Metadata Panel, so this folder arrangement choice isn’t useful. © 2007 Marc Rochkind. All rights reserved. 2007-02-24 ImageIngester User’s Manual Version 2.1.03 Page 22 An example folder arrangement is: YYYY/YYYY-MM-DD subject This arrangement skips the month folder: 0420-0511 (number range) This arrangements creates a new folder for each ingestion and names it according to the range of filename or auto numbers corresponding to the image files ingested. For example: © 2007 Marc Rochkind. All rights reserved. 2007-02-24 ImageIngester User’s Manual Version 2.1.03 Page 23 For more about number-range folders, see page 24. client/project/0420-0511 This arrangement also uses number-range folders, but there are two additional levels above the number-range folders: client and project, both set on the ImageIngesterPro main window (not available in II): For more about tracking clients and projects, see page 31. Here’s an example of a client/project/number-range folder arrangement: [none] (Destination Folder only) This choice puts the images directly in the Destination Folder. Since you can choose the Destination Folder on the main window, it’s an easy way to decide © 2007 Marc Rochkind. All rights reserved. 2007-02-24 ImageIngester User’s Manual Version 2.1.03 Page 24 at ingestion time where to put your images. For example, you might create and choose a Destination folder named “Family/Thanksgiving – 2006,” which would result in an arrangement like this: !Tip: Number range folders are what Peter Krogh recommends in The DAM Book (see footnote at bottom of page 17). I like YYYY/YYYY-MM-DD folders better, because I shoot many fewer images a day (most days none at all) than he does. You’re free to do it any way you like, of course. About Number-Range Folders Unlike any other ImageIngester folder arrangement, it’s guaranteed that every ingestion will use a unique number-range folder, so a letter is appended to the folder name to make it unique if a previous ingestion happened to create a folder with the same number range. You can use number-range folders even if you’re not incorporating a filename or auto number into the image file name—the two features are entirely independent. It’s perhaps unusual to use number range folders if the image file names aren’t numbered correspondingly, but there’s no requirement to do so. A set of controls to the right of the Preferences-Naming panel affects number-range folders: The first set of radio buttons determine whether filename or auto numbers are used. If filename numbers are used, they’re taken from the second 4 characters of the filename, as though the {@filename,1,4} macro were used. (This matters if you’re ingesting from a hard drive and you’ve renamed the original files.) © 2007 Marc Rochkind. All rights reserved. 2007-02-24 ImageIngester User’s Manual Version 2.1.03 Page 25 If you choose Auto Numbers, you can set whether the number range should be composed of 4-, 5-, or 6-digit numbers. That is, 3456-3481, 23456-23481, or 123456-123481. If the card has a lot of images on it (say, more than 500), you can partition the number range folders so there are no more than a maximum number of images per folder. For example, if you check Partition and enter 400 in the edit field, instead of getting all 2000 images in a single folder named, say, 123456-125455 (assuming 2000 images), you’ll get 5 folders named 123456-123855, 123856-124255, 124256124655, 124656-125055, and 125056-125455, each containing 400 images. Using Folder Arrangement Macros As with image naming (page 17), the folder arrangement drop-downs really just expand into macros, which you can see by checking the Show Macros checkbox. Macros are explained in detail starting on page 49, but you might find it illuminating to look at the macros for the drop-down choices, even though they may not make much sense until you’ve read the macro reference material: Choice Macro Equivalent YYYY/MM/YYYY-MM-DD {@datetime,1,4}/{@datetime,5,2}/{@datetime,1,4}{@datetime,5,2}-{@datetime,7,2} YYYY/YYYY-MM-DD {@datetime,1,4}/{@datetime,1,4}-{@datetime,5,2}{@datetime,7,2} YYYY/MM/YYYY-MM-DD subject {@datetime,1,4}/{@datetime,5,2}/{@datetime,1,4}{@datetime,5,2}-{@datetime,7,2} {@qf.subject} YYYY/YYYY-MM-DD subject {@datetime,1,4}/{@datetime,1,4}-{@datetime,5,2}{@datetime,7,2} {@qf.subject} 0420-0511 (number range) {@numberrange} client/project/0420-0511 {@client.name}/{@project.name}/{@numberrange} [none] (Destination Folder only) . Converting Images to DNG Benefits of DNG DNG is Adobe’s Digital Negative Format, which is a universal raw format. In principle, any camera’s native raw format can be converted to DNG. In practice, nearly all can be because Adobe updates its conversion software several times a year to handle new formats. DNG is more than just a raw format. It’s a single-file container that can hold: • • • raw camera data converted to a universal format the original raw file (e.g., NEF, CR2) a JPEG thumbnail © 2007 Marc Rochkind. All rights reserved. 2007-02-24 ImageIngester User’s Manual • • • • Version 2.1.03 Page 26 a medium or full-size JPEG preview metadata (e.g., keywords, copyright notice) EXIF data (e.g., shutter speed, ISO, focal length) Camera Raw settings The JPEG preview (Peter Krogh calls is “a pretty good print”) is perhaps the most overlooked feature. For many purposes, such as viewing a slideshow, a DNG-aware application like iView Media Pro can access the already-created JPEG preview without generating a new one and without your having to keep additional derivative files around. If you make further adjustments in Adobe Camera Raw, you can arrange for the JPEG preview to be automatically updated. For more about the benefits of a DNG-based workflow, read Chapter 1 of The Dam Book (see footnote on page 17 of this manual, or read it for free at thedambook.com/TheDAMBook_Chapter1.pdf) or the web page barrypearson.co.uk/articles/dng. A few cameras, such as the Leica M8, use DNG as their native raw format. With the current DNG Converter, version 3.6, you can pass these DNGs through DNG Converter to get a JPEG preview, but then you don’t get metadata or Camera Raw settings applied (via sidecars). If you don’t pass these DNGs through, you don’t get the preview, but Adobe Camera Raw and Lightroom will pick up the sidecars. (Sidecars are discussed later in this section.) I’ve chosen not to pass these DNGs through DNG Converter, because it’s time consuming, because Lightroom doesn’t use the JPEG previews (or update them), and because you can use ACR to generate the previews. If they were passed in, it would ruin the only opportunity to apply metadata and Camera Raw settings. Installing DNG Converter ImageIngester converts raws to DNGs by invoking Adobe DNG Converter. It’s a free application, but you have to download it and install it yourself. The web page adobe.com/products/dng and the instructions and download links. Once DNG Converter is installed, go the ImageIngester Preferences-Apps panel and press the Choose Converter button to locate it so ImageIngester can find it. DNG Converter Preferences The DNG-conversion preferences are on the Preferences-Apps panel: Check the Run DNG Converter checkbox if you want DNG Converter to process raw image files. The types of files passed to it are listed on page 13. Recall from page 15 that you’re required to have a pre-conversion backup if you want to run DNG Converter. If you check Verify-only, the DNGs produced are thrown away and the original raw files are copied to the primary folder; this has the effect of verifying raw files, since DNG Converter will report any formatting errors, without actually converting to DNG (except temporarily). © 2007 Marc Rochkind. All rights reserved. 2007-02-24 ImageIngester User’s Manual Version 2.1.03 Page 27 The drop-down selects what size JPEG preview you want, if any. Finally, check Embed-raw if you want the original raw file to be embedded in the DNG. You can recover it later by running the DNG Converter application directly (that is, not from within ImageIngester) and pressing its Extract button. If you are converting to DNG, the pre-conversion backup will contain the original raw files (in addition to non-raw files), and the post-conversion backup, if you have one, will contain the DNGs (in addition to non-raw files). If you’re not converting to DNG (no raw files, or Run DNG Converter unchecked, or Verify-only checked), the preand post-conversion backups contain copies of the same files. Two DNG Converter options are set by ImageIngester and can’t be changed using ImageIngester preferences: Compressed (lossless) and Preserve Raw Image. The latter has to do with whether the raw data is stored in its original, “mosaic” format, and is independent of whether you want the original raw file embedded (which you can set with an ImageIngester Preference). When to Convert to DNG Some photographers who process a lot of images find that they prefer to do their initial processing in Adobe Camera Raw or Bridge on the original raw image, before they convert it to DNG. Then they convert the raws to DNG all at once in Bridge. They find that if they convert to DNG earlier, such as with ImageIngester, then the time to remake the JPEG preview when they leave Adobe Camera Raw is excessive. (Apparently, Bridge does the initial conversion to DNG in the background, but remaking JPEG previews is done in the foreground, locking out other Bridge processing.) If you want to delay conversion to DNG, either don’t run DNG Converter at all in ImageIngester, or run it with Verify-only checked, and convert to DNG later, outside of ImageIngester. !Tip: Let ImageIngester convert to DNG, unless you find that preview remaking in Bridge is a problem. Even then, let ImageIngester at least verify raws if you can afford the extra ingestion time that running DNG Converter takes. Sidecars and Conversion to DNG If you use ImageIngester’s metadata template (II and IIP) and/or Camera Raw settings (IIP only) features, an XMP sidecar file is created for every ingested image. If you convert to DNG, the XMP data is included in the DNG, and the XMP is automatically erased by DNG Converter. This happens whether you convert to DNG with ImageIngester or later on (e.g., from Bridge). For non-DNG raws and non-raws (e.g., JPEGs), the XMP sidecar files created by ImageIngester stay around. Adobe applications such as Photoshop and Lightroom will read them, as will certain other applications, notably iView Media Pro. © 2007 Marc Rochkind. All rights reserved. 2007-02-24 ImageIngester User’s Manual Version 2.1.03 Page 28 Verifying Images ImageIngester can automatically verify that raw images are in the proper format by running DNG Converter on them, either to convert them to DNG or just to verify them, as explained in the previous section. In addition, you can check Verify JPEGs on the Preferences-Apps panel to have JPEGs (JPG file extension) verified. If either verification fails, an error message will show up on the main window. Neither verification provides a guarantee that the image is OK, but they will detect gross file errors that might have resulted from an improperly-written or improperlycopied card. If you get such as error, try ingesting from the card again and then check the ingested image files visually to make sure they’re OK before you erase the card. If the second ingestion also fails, you might try to recover the images using recovery software; Google “image recovery” for some possibilities. !Tip: Keep Verify JPEGs checked. Launching a Viewer You can arrange for an external application to be launched when ingestion is completed by choosing it in the Preferences-Apps panel. If you don’t want an application launched, press the Choose Viewer button and then cancel the dialog that results, which will set the viewer preference to "[none]." ImageIngester will attempt to pass to the viewer the folder that you most recently ingested to. This tends to work well with Bridge on the Mac. With other applications, and on Windows even with Bridge, the application may not open to the right folder, although it should still open. Using a Static Metadata Template Static and Dynamic Metadata Templates ImageIngester can automatically apply metadata from a template to each file as it's ingested. It doesn’t matter what kind of file it is (NEF, JPG, TIF, etc.) as long as the extension is exactly three characters, which is true of all image files written by a camera to a card. The way ImageIngester applies a template is by writing a sidecar file for each image that has exactly the same file name (e.g., MJR_20070101_3256) but with an XMP extension. If you’re converting raws to DNGs, the sidecars will be incorporated into the DNGs and then erased (explained on page 27). If the image to be ingested already has a sidecar, it stays with the image, being renamed as necessary to keep it connected with the image, and a new sidecar isn’t generated by ImageIngester. There are two kinds of templates: static and dynamic. Static templates contain fixed data which will be exactly the same for every ingested image; that is, the template is just copied literally to the sidecar. Dynamic templates are handled similarly, except that they’re scanned for macros. The macros used for file and folder names (pages © 2007 Marc Rochkind. All rights reserved. 2007-02-24 ImageIngester User’s Manual Version 2.1.03 Page 29 17 and 25) aren’t very useful in templates, but many others are, such as those for IPTC data. The template is still the same for every image, but the sidecar might be different for different images, since macro processing occurs. Moreover, the same dynamic metadata template can be used by different photographers, since the information in it such as the copyright notice is inserted by a macro and doesn’t have to be literally entered into the template. Static templates (II and IIP) are covered in this section, and dynamic templates (IIP only) are on page 32. !Tip: Dynamic metadata templates are really useful; static templates are awkward because you’ll either need to keep creating them, or you’ll do without some useful metadata that you could be applying at ingestion time. Consider upgrading to ImageIngesterPro if you haven’t already done so. You can have as many metadata templates as you like. A drop-down menu on the main window makes it easy to vary the template from ingestion to ingestion. Typically, you use this to insert standard static metadata such as your contact and copyright information, but not image-specific information such as the caption. It is practical to have separate static templates for each project however, which is why there's that drop-down menu. To read more about applying common metadata and where it fits into the workflow, see Chap. 5 of The DAM Book (see footnote at bottom of page 17 in this manual). Entering Special Characters On Windows, a non-ASCII character, such as ©, Ñ, and ü, has to be preceded by an escape character (Unicode 194) if it’s to appear in a metadata template, because the Adobe XMP specification requires that the template be coded in UTF-8. The escape character may be entered by holding down the Alt key and typing the 4 digits 0194 on the numeric keypad. You’ll see the escape character appear as Â. (Do not press the Esc key on your keyboard—that’s for a different purpose entirely.) You’ll need the escape character when entering data in the Database panel or the Metadata panel (IIP features) or the main window Notes field, or when entering characters in a metadata template with a text editor. You don’t need it when entering special characters in the Photoshop File Info panel (see next section), as Photoshop supplies it automatically. Mac users don’t usually have to worry about the escape character, as it’s inserted automatically on the Database and Metadata panels. They might need the escape character when editing a metadata template with a text editor, depending on whether the editor is aware of UTF-8. If you omit the escape character, you’ll get an error message in the main window log when you ingest, like this one: Invalid character context: ... content.description}
©</rdf:li> </r ... ERROR: Generated sidecar (XMP file) contains invalid character. Precede it with Alt+0194 (Â). © 2007 Marc Rochkind. All rights reserved. 2007-02-24 ImageIngester User’s Manual Version 2.1.03 Page 30 Creating and Applying a Static Metadata Template You set up a metadata template with Photoshop (CS or newer) or Photoshop Elements (3 or newer).5 Here's what you do (both programs are called Photoshop for simplicity): 1. Create a new image from within Photoshop. It doesn't matter what its size, background, etc., are. The only reason for starting with a new image is so that it won't have any residual metadata. 2. Choose File Info from the File menu and enter the metadata into the forms. 3. Click the button at the upper right of the File Info window and choose Save Metadata Template (see screen shot, below). 4. Choose a name and save the template. It's saved in a standard place, and ImageIngester will know where to find it. (For this example, I called it "Contact Info Only.") Then start ImageIngester and choose the template from the menu, like this: If ImageIngester is already running, you can choose "[refresh]" to get the menu updated. If you don't want any metadata added to your images, choose "[none]". 5 Don’t use Bridge, or else your ImageIngester 1.x sidecars might contain image-altering Camera Raw settings that will cause strange effects, such as unwanted cropping. This isn’t a problem with ImageIngester 2.x and ImageIngesterPro, but it’s still a good idea to avoid using Bridge to create a metadata template. © 2007 Marc Rochkind. All rights reserved. 2007-02-24 ImageIngester User’s Manual Version 2.1.03 Page 31 !Tip: You can create a new template from an existing one just by choosing the existing one from the File Info panel’s template menu. Checking For Updates If you check Update Check on the Preferences-Apps panel, ImageIngester checks for an update once a week. If you get a notification that an update is available, you can download it from the ImageIngester web site, which you can get to easily by choosing ImageIngester Web Site from the Help menu. Advanced Features (IIP only) Tracking Clients, Projects, Cards, and Ingestions Database Tables for Clients, Projects, and Cards Most ingestion utilities treat each ingestion as an isolated event, but IIP knows that ingestions occur from a card (usually) and are part of a project on behalf of a client. There's a Database panel, accessible from the Tools menu, that you can use to add descriptions of clients, projects, and cards. Corresponding drop-down menus on the main window (see page 10) let you pick the client, project, and card prior to starting an ingestion. Then data about the ingestion is recorded and is associated with the project (and hence client) and the card. You can view the ingestion data on the Database panel. For any table other than the Ingestions table, you add a record with the + button, and you delete a record with the – button. Fields are edited in place, like on a spreadsheet. (Some fields can’t be edited.) There are some restrictions on what you can delete; for example, you can’t delete a client record if there are still projects for that client. You can get to the Database panel quickly by choosing the Manage item on the main-window drop-downs for client, project, and card, or by pressing the Ingestions button on the main window. Also, the IPTC and UserData drop-downs on the Metadata Panel (page 35) have Manage items. Recall that the client and project are also useful in folder arrangements and appear in one of the drop-downs on the Preferences-Naming panel (page 23). All database data is kept in an SQLite database which you can access directly to import it into Excel or for other purposes. Details are on page 55. Ingestion Notes Prior to ingesting, you can enter notes on the main window that are recorded with the other ingestion data in the database. You can view or edit ingestion notes on the Database panel. The notes are also accessible with the {@notes} macro and are incorporated into the supplied dynamic metadata template ImageIngester.xmp (see page 32). © 2007 Marc Rochkind. All rights reserved. 2007-02-24 ImageIngester User’s Manual Version 2.1.03 Page 32 IPTC and UserData Database Tables The built-in IIP database has four tables that correspond to the IPTC panels as used in the Adobe Bridge and Photoshop File Info panels, and as described in a PDF at www.iptc.org/std/Iptc4xmpCore/1.0/documentation/Iptc4xmpCore_1.0-docCpanelsUserGuide_13.pdf. These tables are IPTCcontact, IPTCcontent, IPTCimage, and IPTCstatus. For a list of the fields and how you use them in a macro, see the reference material on macros starting on page 49. A fifth table is called UserData and has 8 fields that you can use for whatever you want. The field names are fixed (id and field1 through field7) and can’t be changed, but the data they contain is up to you. The IPTC tables are useful for relatively static data, such as the information (address, emails, etc.) associated with a contact. The IPTCcontact table has a natural identifier, the creator field. For the other four, there’s an additional field called "id" that you can put any identifying name or phrase you want into. These identifying fields (creator or id) populate the drop-down menus on the Metadata panel (page 35), which also contains the Catalog Sets and Keywords. Nothing at all is done with IPTC and UserData data except to provide values for macros, mainly for use in dynamic metadata templates. On Windows, don’t forget that special characters need to be escaped, as explained on page 29. Using a Dynamic Metadata Template With IIP, you can put macros into a dynamic metadata template and have them processed for each image that gets a sidecar file. The macros are processed separately for each image—not just once per ingestion. So you can, if you want, put image-specific data, such as the original filename ({@filename} macro) in the metadata. !Tip: Per-image macros ({@filename}, {@datetime}, {@sequence}, and {@exif.datetime}) don’t work in metadata templates in Mac version 2.1.02 and earlier and Windows version 2.1.08 and earlier. They do in versions 2.2 and above. Supplied Dynamic Metadata Template The easiest way to use dynamic metadata templates is with the supplied template, ImageIngester.xmp, which is installed automatically when you run ImageIngester for the first time. (You still have to choose it from the drop-down on the main window.) It already has macros in it for the most useful IPTC data, as well as macros for keywords, iView Media Pro catalog sets, and the Quick Fields job, subject, and location, which appear on the Metadata panel by default. To see where the macros are used in ImageIngester.xmp, launch Photoshop or Bridge, select an image, and choose File Info from the File menu. Then use the menu at the upper right (small arrow) to choose the ImageIngester template, and you can see where macros appear. For example: © 2007 Marc Rochkind. All rights reserved. 2007-02-24 ImageIngester User’s Manual Version 2.1.03 Page 33 To use this dynamic template, set ImageIngester as your metadata template on the ImageIngester main window, choose the metadata you want in the ImageIngester Metadata panel (page 35), and your metadata will get applied to each ingested image. Creating a Dynamic Metadata Template You create a dynamic metadata exactly as you create a static one, as explained on page 30, except you type macros into the Photoshop File Info fields instead of static data, like this: (This picture is from an earlier beta version. The macro {@project} has been replaced by {@project.name}.) You may find it convenient to use the supplied ImageIngester template as a starting point. Bring it up in the File Info panel as explained in the previous section. The macros {@catalogsets} and {@keywords} are specifically designed for handling lists of catalog sets and keywords. However, you're not restricted to using only the {@keywords} macro in the Photoshop File Info (XMP) Description panel's Keywords field, as shown in the picture. It uses the Project as a keyword, in addition to any keywords checked in the dialog (see next section). © 2007 Marc Rochkind. All rights reserved. 2007-02-24 ImageIngester User’s Manual Version 2.1.03 Page 34 Similarly, on the Photoshop File Info (XMP) iView MediaPro panel, you can code the Catalog Sets field like this: {@catalogsets}; {@client.name}|{@project.name} This would use a 2-level hierarchy of Client and Project as a catalog set, in addition to the catalog sets checked in the dialog (see next section). The ISO Country Code field on the Bridge/Photoshop IPTC Image panel isn't large enough to contain the corresponding {@IPTCimage.countrycode} macro, so you'll have to enter that yourself by editing the metadata template. It's already coded in the ImageIngester.xmp template, however, and you can open ImageIngester.xmp in a text editor to see how to code it. See page 57 for information on where to find it. On Windows, don’t forget that special characters need to be escaped, as explained on page 29. Establishing Adobe Camera Raw Settings Once you've saved one or more Camera Raw settings in Adobe Camera Raw, you can choose the settings you want from a drop-down on IIP's main window. If you've also chosen a metadata template, the Camera Raw settings will be placed inside the resulting XMP sidecar by IIP. If you're converting to DNG also, DNG Converter will incorporate the Camera Raw settings, along with the rest of the template's metadata, into the DNG. What's more, DNG Converter will use the Camera Raw settings when creating its JPEG Preview. If you're not converting to DNG, the settings in the sidecar are still effective, and they're applied by Bridge when it builds its cache and by Camera Raw. Camera Raw settings are honored by Lightroom, but IIP doesn’t yet have the ability to place Lightroom Develop settings on IIP’s main-window drop-down. If you made a Camera Raw settings choice from the menu in IIP, but not a metadata template, a sidecar containing only the Camera Raw settings will be synthesized. To begin, you save the settings in Camera Raw: You must save to the Settings folder, which is the default location. ImageIngesterPro won't look anywhere else for them. You choose the settings from the ImageIngesterPro main window. Choose Refresh if the settings don't appear. © 2007 Marc Rochkind. All rights reserved. 2007-02-24 ImageIngester User’s Manual Version 2.1.03 Page 35 When you view the images in Bridge, you'll see your Camera Raw settings in the metadata window: Finally, in Camera Raw, its settings selection will be Image Settings, indicating that the image contains (or, the sidecar contains) Camera Raw settings. You can leave them as is, make adjustments, choose other settings, etc. Camera Raw settings (along with other irrelevant data, such as EXIF) present in the metadata template will be ignored. Any Camera Raw settings will be replaced by those you’ve chosen from the main-window Camera Raw Settings drop-down, or eliminated entirely if you’ve chosen “[none].” Entering Data into the Metadata Panel Catalog Sets and Keywords You can define and check Catalog Sets, for iView MediaPro, and Keywords, for Bridge, iView MediaPro, and possibly other applications. Press the Metadata button on the main window to open the Metadata panel (for keywords, IPTC and UserData selections, and Quick Fields, too). Use the + and – buttons at the bottom to add or delete a Catalog Set or Keyword. Double-click a name to change it. © 2007 Marc Rochkind. All rights reserved. 2007-02-24 ImageIngester User’s Manual Version 2.1.03 Page 36 The checked items apply to all images ingested until they're changed. It isn't possible to vary the settings per image. Catalog Sets and Keywords, and which are checked, are part of a Preference Set. The items you check become the values for the {@catalogsets} and {@keywords} macros. To make them effective, you have to enter those macros in the appropriate places in your dynamic metadata template (page 32) or use the supplied template ImageIngester. There isn't any way to import Catalog Sets and/or Keywords from iView MediaPro or other applications. The Metadata panel is opened automatically if you left it opened when you last quit ImageIngesterPro, and its position is remembered, so you can arrange in on the screen as you like for convenient access and it should stay put. Quick Fields You can certainly enter data that varies frequently, such as location, into the IPTCimage table's location field, and that makes sense for locations that you use often. But, if there's no need to keep the location in the database, you can just enter it into one of five Quick Fields at the bottom of the Metadata panel. Three of these are initially set up for Job, Location, and Subject, but you can change the labels from the Preferences-Data panel. (But, if you do, the corresponding macros in the supplied dynamic metadata template, ImageIngester.xmp, will no longer work. You’ll have to change them.) The current setting and the previous 9 are saved in a Preference Set, and they're kept in most-recently-used order. So, for example, selecting a location you've recently used from the menu is midway between having to type it each time and pulling it from the database according to your selection in the IPTCimage menu. © 2007 Marc Rochkind. All rights reserved. 2007-02-24 ImageIngester User’s Manual Version 2.1.03 Page 37 Nothing at all is done with Quick Field data except to provide values for macros, mainly for use in metadata templates. What Metadata Goes Where? There are a lot of places to enter metadata in IIP: the metadata template, the database, the catalog sets/keywords checkboxes on the Metadata panel, and Quick Fields on the Metadata panel. Where you put what depends on how often it changes. Put fixed information, such as your name, address, and copyright notice, in the IPTC tables in the database. You can add multiple records for different purposes (e.g., commercial, art, family) or for different photographers. Then use the IPTC dropdowns on the Metadata panel to choose the records for a specific ingestion. Since your choices are kept in the Preference set, you’ll probably also want to organize your Preference sets so that choosing a Preference set automatically also chooses the appropriate IPTC records. For metadata that varies with the ingestion, such as location and subject, use the Quick Fields on the Metadata panel. Also use that panel to set the Catalog Sets and Keywords for each ingestion. You can’t use IIP to set metadata that varies with the image (e.g., rating), because you can’t preview the images in IIP and because the metadata you enter applies to the entire ingestion. With II, there’s only one place to enter metadata: Into the static metadata template. Filtering By Image Type By default ImageIngesterPro (and ImageIngester) ingests every file it finds in the tree of folders below the Card Folder. However, you can specify a list of file extensions to include, and all other files are skipped. Or, you can specify extensions to exclude, and those are skipped, all others being ingested. Separate the extensions (upper or lower case) by a space. For example: © 2007 Marc Rochkind. All rights reserved. 2007-02-24 ImageIngester User’s Manual Version 2.1.03 Page 38 Handling Multi-Camera Shoots Introduction This section describes the Multi-Camera Shoot feature of IIP, available by choosing Multi-Camera from the Tools menu. The basic idea is to first ingest the images on all the cards shot by all the cameras, and then to re-ingest them in date/time order. Re-ingestion should assign them sequential file names so that when ordered by name the images are in the order in which they were shot. You can do this with II or IIP without using the Multi-Camera Shoot feature provided: 1. 2. 3. You incorporate the date and time into the file name so that the image files sort appropriately, and The cameras' clocks are perfectly synchronized, and You either use a folder-naming scheme that puts all the images into the same folder, or you manually move the images from all the cards to the same folder, so that the names sort together. Things get complicated if you want to use image-file names that don't incorporate the time (e.g., MJR_20060914_1234), or the clocks are off a bit, or you want to use number-range folders and don't want to have to move the images. IIP’s Multi-Camera Shoot feature is designed to make things very easy and, therefore, very reliable. The basic workflow is: 1. 2. 3. 4. You ingest the cards into whatever folders you want, using whatever IIP settings you want. The only restriction is that all folders comprising the same shoot must have the same parent folder. Number-range folders are ideal. When everything is ingested, you bring up the Multi-Camera Shoot panel and choose the folders that comprise the shoot. You can see the earliest and latest date/time for the images in each folder: You correct the file date/times, if necessary, using an adjustment tool built-into the Multi-Camera Shoot panel. (More on that later.) You re-ingest the images, but this time all the images (from all cards) are ingested in a single ingestion, in order by date/time. You should use © 2007 Marc Rochkind. All rights reserved. 2007-02-24 ImageIngester User’s Manual Version 2.1.03 Page 39 an auto-number in the file names so that they will sort in the order they were ingested, and then they will then also be in date/time order. The rest of this page explains the details. Step 1: Synchronize the Cameras (Optional) You don't have to synchronize the cameras, since it's fairly easy to adjust the date/times later, but you won't have to make any adjustments if the clocks are synchronized. Alternatively, if it's too much trouble to bring up the menus for all the camera bodies and synchronize them, just put the cameras on a table, leaving the lens caps on if you like, and fire the shutters as close to simultaneously as you can. That will give you an initial image for each camera that you can use to determine how much to adjust the date/time of the image files later on (see below). For example, in a demo for this page, I placed a Casio EX-S500 and a Nikon D-70 on my desk and fired both shutters at once, producing these two images: The file modification time on the card for the D70 image on the left was 1:34:08 and for the Casio on the right it was 1:32:58. But, since I fired the shutters together (not even aiming the cameras, as you can see), the image file times tell me that the clocks are off by 1:10. That's all I need to know. If I didn't have a contemporaneous set of pictures, I could still make the adjustments, but then I'd have to look at one or more images to try to guess how far the clocks are off. I then proceeded to use the cameras to shoot a computer screen showing the time, generally going back and forth between cameras, but sometimes using the same camera twice in a row. In the following steps, I'll show how I used the Multi-Camera Shoot panel to put the images in time order, using the pictures of the clock as a check that the results are correct. One of the screens looked like this: (Part of the spelled-out date is cut off because I had characters enlarged in my browser, and the web site's coding couldn't handle it properly. But the time is accurate.) © 2007 Marc Rochkind. All rights reserved. 2007-02-24 ImageIngester User’s Manual Version 2.1.03 Page 40 Step 2: Ingest All Cards The next step is to ingest all the cards for the shoot, from all cameras, any way you want to. Step 3: Open the Multi-Camera Shoot Panel and Choose Folders Next you choose Multi-Camera on the Tools menu to open the Multi-Camera Shoot panel. You can leave it up if you want while you operate other parts of the IIP interface. In particular, you'll often want to adjust the Preferences just before you reingest. Most often, you'll probably press the Choose button to choose the folders that contain the images comprising the shoot. Choose all the relevant folders at once (on a Mac, holding down the Shift and/or Command keys to make multiple selections). All the folders must have the same parent folder. If you choose incorrectly, just press Choose and do it again. If you've put all the folders for the shoot in the same parent folder, which makes a lot of sense, then you just select all the folders in that parent folder. (Choosing folders normally takes just a few seconds, so I didn't bother to implement ways to choose a few at a time or to remove individual chosen folders from the list.) Step 4: Check Date/Times Once all the folders for the shoot are listed in the table, examine the starting and stopping date/times for each folder to see if they're correct, or at least correct enough so that the images files will sort into the right sequence. Note that these are the date/times for the image files in the folder, not the date/time of the folder itself, which is irrelevant. How close the date/times have to be is up to you. For a wedding, you'll want the times to be very accurate, because some events, such as cutting the cake, may be heavily photographed and need to be in sequence. If you're personally handling the cameras, probably accuracy to within 10 seconds or a bit more is OK, since that's about how long it would take you to switch cameras and frame the shot. It's important to be able to tell which folders go with which cameras. If you're using number-range folders with file-name numbers, and the numbers used by the cameras are sufficiently spread out, then that's all you'll need. Otherwise, it's better to incorporate the camera name or some other identifier into the folder name. For example, when you ingest, choose a distinct card name for each camera, and incorporate it into the folder name like this: {@card.name}-{@numberrange} Note that, for number-range folders, the {@numberrange} macro must always be last. In my example, I knew that the folder 0000-0360 was the Nikon and the folder 0350-0363 was the Casio. (The 0000 came from an extra ingested file that was present in the Nikon card's root folder. I should have chosen the DCIM folder. I didn't correct my error because I knew that all the images were going to be re-ingested anyway.) © 2007 Marc Rochkind. All rights reserved. 2007-02-24 ImageIngester User’s Manual Version 2.1.03 Page 41 In the view of the Multi-Camera Shoot panel shown above, I could see that the camera times were off, since I knew that the both cameras shot their first image at the same time. So, I had to make an adjustment. Step 5: Adjust Date/Times (Optional) To adjust the Date/Times for the image files in one or more listed folders, you select the folders in the table. In the demo, I selected only the first folder, but, if I had multiple folders from the Nikon, I would have selected them all, since they all should get the same adjustment. After all, the Nikon and Casio clocks are very accurate; they're just set incorrectly. When you select a row, the adjustment controls appear: The first Start Date/Time appears in the time control. This is the earliest date/time for any file in the first selected folder. Next, you adjust the date/time in the control to match whatever date/time it needs to be. In this case, it's easy, since both folders should have exactly the same Start Date/Time. So, I set the Date/Time in the control to 1:34:08 and pressed the Adjust button. Now you see why I shot that first image by pressing both shutters at the same time. © 2007 Marc Rochkind. All rights reserved. 2007-02-24 ImageIngester User’s Manual Version 2.1.03 Page 42 Pressing the Adjust button brought up this alert: After pressing Adjust in the alert, the listed information is changed, showing the adjustment, but also indicating with the ± symbol that the actual file modification date/times haven't yet been changed (just the times that appear in the table): The Adjust column shows the adjustment in seconds (positive or negative). If you've changed the time in the control but haven't yet pressed the Adjust button, you can set the control back to the file date/time with the Reset button. You can continue to make adjustments to other folders as needed. Generally, you may need to adjust one or more folders for each camera other than the camera you're using for your standard. So, if you have four cameras, you will need to make at most three adjustments. You can cancel all adjustments that haven't yet been synchronized to files (indicated by the presence of the ± symbol) with the Clear Adjustments button. Step 6: Synchronize Adjustments to Files (Optional) When you're satisfied with the adjustments, press the Sync Files button to change the actual modification date/time of the image files. This can't be undone, but you can adjust the date/times a second time if needed. You don't have to wait until all adjustments are completed before synchronizing. You can synchronized each camera's folders as soon as you've adjusted them, or wait until the end, or any combination you prefer. You get this alert when you press the Sync Files button: © 2007 Marc Rochkind. All rights reserved. 2007-02-24 ImageIngester User’s Manual Version 2.1.03 Page 43 After synchronizing, the ± symbol is removed and the adjustment amounts become zero: Step 7: Re-Ingest After the files are synchronized and you're satisfied with the date/times, you press the Re-Ingest button to re-ingest the images in the listed folders, in date/time order. The files are guaranteed to be ingested in date/time order regardless of the file names. That is, the alphabetical order of the names need not be the same as the date/time order, which is why the Multi-Camera Shoot feature is so much more useful and less error-prone than an ordinary ingestion. You do want the results of the re-ingestion to be preserved in the file names, however, so it's best to use a naming scheme that puts an auto-number in the primary sorting position, perhaps preceded by a date. Names of the form MJR_YYYYMMDD_nnnn (where nnnn is the auto-number) are OK, as are simpler names like MJR_nnnn, or even nnnn. But a name that uses the file-name number probably won’t work, since the resulting files when ordered by name might be in the wrong order. In practice, you'll probably want to use one Preference Set (e.g., Multi-Camera-1) for the initial ingestions of a multi-camera shoot, and a second Preference Set (e.g., Multi-Camera-2) for the re-ingestion. For my demo, I put the date/time in the name in addition to the auto-number, so I could easily check my work by just looking at the names. I used this macro sequence for my file names: {@prefix,1,-1,_}{@sequence,-4}_{@datetime} When re-ingesting you can use whatever folder scheme you want (e.g., date folders, number-range folders), but bear in mind that mixing the output from a Multi-Camera © 2007 Marc Rochkind. All rights reserved. 2007-02-24 ImageIngester User’s Manual Version 2.1.03 Page 44 Shoot re-ingestion with other images may defeat the purpose of the date/time ordering. It's probably best to use number-range folders based on auto-numbers, perhaps with partitioning if you have a lot of images. Remember that with numberrange folders you're guaranteed that each ingestion will get a fresh folder (or multiple folders if you're partitioning). For evidence that the Multi-Camera Shoot processing worked, here are some of the shots shown in Bridge, sorted by file name. You can see that the auto-number order (shown at the end of the file names) is the same as the time order, which was the objective. (The images are crooked and blurry because I was holding each camera with one hand, which is very difficult with the little Casio, and not really bothering very much to aim. This proves that, however wonderful the Multi-Camera Shoot feature is, it won't do anything about the quality of your shots. They'll be in the right order, though.) © 2007 Marc Rochkind. All rights reserved. 2007-02-24 ImageIngester User’s Manual Version 2.1.03 Page 45 More About Workflow ImageIngester and DAM Workflow This section is for readers of Peter Krogh's The DAM Book: Digital Asset Management for Photographers (see footnote at bottom of page 17). If you're not familiar with the book, you may want to read it a bit before continuing with this page. (Even better: Read the whole thing—it's a terrific book!) Where ImageIngester Fits In the DAM Workflow In the workflow diagram the appears in Chap. 1 of the book, ImageIngester takes over most of the work at the top right, as shown in the following diagram: Diagram from The DAM Book: Digital Asset Management for Photographers by Peter Krogh (www.thedambook.com) Used with permission. ImageIngester ImageIngester can save the original raw files as DNGs, but it can't do the other things in the Adobe Bridge box, which is why the arc cuts through that box. The next section provides more details on what ImageIngester can do and how the DAM workflow in the book needs to be modified. ImageIngester and the Editing Workflow Chap. 6 ("The Editing Workflow") of The DAM Book starts with his suggested work order (! means that IIP can do the step): 1. 2. 3. 4. 5. 6. 7. 8. 9. 10. 11. 12. 13. Ingest to computer ! In the field, save the card's images to a digital wallet Back up ! Build cache in Bridge Verify files (he does it visually, in Bridge) ! Erase cards Sort images if from multiple cards ! Rename files ! Apply copyright and bulk metadata ! Rate images (with stars) Adjust in Camera Raw Apply keywords, etc. ! Create DNGs ! © 2007 Marc Rochkind. All rights reserved. 2007-02-24 ImageIngester User’s Manual Version 2.1.03 Page 46 14. Back up DNGs ! 15. Save original raw files, if desired ! 16. Catalog images (he uses iView Media Pro, and so do I) ImageIngester can do the steps marked with a ! automatically, but obviously it doesn't do them all. The problem is that, relative to Krogh's workflow, the steps ImageIngester does are intermixed with the ones it doesn't, so it's not obvious how you can use ImageIngester and then pick up from there. To maximize the use of ImageIngester, and therefore to maximize the amount of automation (and time savings for you), we need to reorder the steps. Step 2, saving to a digital wallet, can just as easily be done before ImageIngester runs, and probably should be done then if your in the field and ingestion will be delayed. Since with ImageIngester it's not necessary to do a visual check in Bridge to verify the images, it's not necessary to do step 4 (build cache) that early. Krogh likes to erase the cards as soon as it's safe to do so (step 6), to avoid later confusion. But, postponing this until ImageIngester finishes is a minor change. Krogh’s step 7, sort images, is much more easily done by IIP’s multi-camera shoot feature (page 38) after ingesting all the relevant images. This leaves us with just one remaining issue: Should ImageIngester make the DNGs, which is the way I like to do it, or should that be postponed to be done by Camera Raw? There's a Preference in ImageIngester that allows DNG Converter to be run only for verification, without ingesting the resulting DNGs; the original raws are copied to the primary folder. So, you can certainly do what Krogh does and postpone DNG creation. A Modified DAM Workflow The modified workflow then looks like this: Preceding ImageIngester: 2. Save images to digital wallet, if in the field With ImageIngester (one-click or zero-clicks): 1. 3. 5. 8. 9. 12. 13. 14. 15. Ingest to computer Back up Verify files (automatically) Rename files Apply copyright and bulk metadata Apply keywords, etc. (Those that apply to the entire ingestion.) Create DNGs Back up DNGs Save original raw files, if desired With ImageIngester (after all relevant images are ingested): 7. Sort images if from multiple cards using IIP’s multi-camera shoot feature (page 38). With the camera(s), anytime after ingestion: 6. Erase (or reformat) cards © 2007 Marc Rochkind. All rights reserved. 2007-02-24 ImageIngester User’s Manual Version 2.1.03 Page 47 With Bridge, Camera Raw, and your cataloging app: 4. 10. 11. 12. 16. Build cache in Bridge and review images Rate images (with stars) Adjust in Camera Raw Apply keywords, etc. (Those that apply to individual images.) Catalog images You don’t have to do things exactly this way—it’s only a guide. You’ll want to work out for yourself the workflow that make the most sense. A Simplified Workflow I work with very few images compared to Krogh, or any pro or busy amateur, so the time to regenerate previews in the DNGs isn't significant for me, and I like the convenience of converting to DNG very early. Since ImageIngester makes the previews and DNGs for me, I go straight from IIP to iView Media Pro, and go from there to Bridge or Photoshop only when I'm ready to do some work on the images, which for me might be days or even weeks later. This also makes sense, even to Krogh, if you work with JPEGs, rather than raws. In detail, my simplified workflow is like this: • I set ImageIngester's Preferences to convert to DNG (not verify only!), fullsize JPEG previews, and auto eject (along with the backup folder, etc.). • I set ImageIngester's primary folder to somewhere in the tree in my main iView catalog, and I set it for Auto-Update in iView. (Or, a higher-level folder is set for Auto-Update, which works just as well.) • For most of my cameras, I always remove the card from the camera and insert it into a SanDisk "ImageMate 12 in 1" card reader. For my Casio Exilim EX-S500, I dock it in its cradle and press the USB button on the cradle. (I could put the Casio's card in the ImageMate as well, but the dock came with the camera and it's the only way to charge the battery anyway.) • ImageIngester automatically senses the mounted card. When I press Start it goes to work (renames the files, makes a backup, converts raws to DNGs, adds bulk metadata, verifies JPEGs, and puts the final images in dated folders where iView can discover them). • When I'm ready (finished browsing the web, answering email, etc.), I go to iView, which has discovered the images and displayed them on the screen. (Or, sometimes I'm already in iView because I'm doing some tagging and organizing.) If I don’t want to wait, I right-click the folder in iVieew and choose Update Folder Now. • If I want to do some quick image processing, I right-click one or more of the DNGs to open them in Photoshop (Camera Raw, actually). I usually select them all again in Camera Raw if they're similar, so I can make some rough adjustments to the whole set. Sometimes I then select them one-by-one to do some cropping. (The great thing about Camera Raw here is that nothing I do changes the image permanently, so I can go back and do it right later if © 2007 Marc Rochkind. All rights reserved. 2007-02-24 ImageIngester User’s Manual Version 2.1.03 Page 48 the image is worth it and if I have the time. There's nothing equivalent for JPEGs,6 so I find raw more convenient than JPEG, not less.) I then press the Done button in Camera Raw. I usually don’t open any images in Camera Raw, which opens them in Photoshop, unless I’m going to do some more work on the image or print it. • Going back to iView, with the images still selected, I choose Rebuild Item on the Action menu to get a new set of thumbnails. (I think iView eventually gets around to doing this itself, but I usually don't want to wait.) If I double-click on an image in iView, I go to the Media View, when I can see the JPEG preview, either the original put there by DNG Converter (as run by ImageIngester), or the modified one updated by Camera Raw. At this point I'm at a stopping place. The images are backed up, and will get backed up again when my normal nightly backup works on the primary folder. (My ImageIngester backup folder is on an external drive, separate from the one that my nightly backup uses.) I put the card back in the camera and format it, so it's ready for more shooting. I put in keywords, assign images to catalog sets, and do other maintenance in iView as I get around to it. Even if I never do, the images are accessible by date both logically in iView and physically, because of where ImageIngester put them, so I can easily find what I'm looking for. When I do go to Photoshop to work on a DNG or JPEG (from the Casio) image, I save it as a PSD file in the same dated directory that the original was in (where iView shortly discovers it). If I want a JPEG from Photoshop, I save that there, too, as a copy. I print directly from Photoshop, so I don't normally bother saving a JPEG unless I need to put it on a web site or email it to someone. I never overwrite the JPEG that came from the camera. I rarely use Bridge, because iView give me a view of my images and because I use Photoshop as my gateway to Camera Raw. When Lightroom is released, I’ll probably very rarely use Photoshop, since I can print directly from Lightroom (which Camera Raw can’t do). I don’t know yet whether Lightroom will replace my use of iView Media Pro. I should emphasize that this Simplified Workflow works for me only because I have very few images. With more volume, it becomes too inefficient, and you have move towards Krogh’s DAM Workflow (previous section). ImageIngester and Lightroom ImageIngester works fine with Lightroom, whether DNGs are generated to bind metadata and Camera Raw settings to the raw file, or whether they’re left in a sidecar that sits next to the native raw (or JPEG). Keywords work as expected, but Catalog Sets, which are unique to iView MediaPro, are not picked up by Lightroom. 6 Photoshop CS3 and Lightroom can both process JPEGs exactly as they do raws, so this distinction goes away. © 2007 Marc Rochkind. All rights reserved. 2007-02-24 ImageIngester User’s Manual Version 2.1.03 Page 49 It appears that Lightroom will even bind metadata and Camera Raw settings to native DNGs (ones that came straight from a camera, such as a Leica M8), something that DNG Converter (as of Version 3.6) does not do. (Lightroom has its own ingestion capability, but IIP’s is much more powerful.) Reference Material Macros Macros are used in metadata templates, file names, and folder names. Macro Format Macros are of the form: {@name,start,length,delimiter} where the last three parameters are optional. If delimiter is present, length must be present also; if length is present, start must be present also. When coding a macro, you should treat spaces as significant. For example, “{ @notes }” won't work—it has to be “{@notes}”. You can get away with spaces around the start and length, but it's better to treat spaces as significant always. The macro is replaced in the text in which it appears by the definition of name, as explained below, starting from character start (the first character is numbered 1) and continuing for length characters. A length of -1 means the rest of the text (e.g., an infinite number). Thus, the macros {@notes}, (@notes,1}, and {@notes,1,-1} are equivalent. If the combination of start and length begin before the text or go beyond its end, the extra part is ignored. A negative start means that it's counted from the end, with -1 being the last character. For example, {@filename,-4} is replaced by the last 4 characters of the filename, or fewer if it has fewer characters. The last parameter, delimiter, is appended to the end of the replacement text if the replacement text was non-empty. It's useful in situations like {@qf.subject,0,-1, -- }{@qf.location} which would be replaced by something like “Boulder” if qf.subject is empty. This is cleaner than {@qf.subject,0,-1,} -- {@qf.location} which would be replaced by “ -- Boulder”. The name part of the macro has one of four forms: {@simplemacro} {@qf.quick_field_label} {@table.field} {@exif.field} © 2007 Marc Rochkind. All rights reserved. 2007-02-24 ImageIngester User’s Manual Version 2.1.03 Page 50 !Tip: The best way to see how the various macros are used is with the Macro Lab (page 53). You can also use the Macro Lab to select and copy macros so you can paste them into your metadata template. Macro Examples The following table shows examples illustrating most of the features explained in the previous section. It’s a good idea to study this table carefully. The filename in this case is ABCD0001. Macro {@filename} {@filename,1} Replacement ABCD0001 ABCD0001 {@filename,2} {@filename,-1} BCD0001 1 {@filename,-3} 001 {@filename,6} 001 {@filename,1,4} {@filename,2,3} {@filename,-4,1} ABCD BCD 0 {@filename,-4,4} 0001 {@filename,5} {@filename,5,4} 0001 0001 {@filename,5,100} 0001 abc{@filename,-4,4,_}def abc0001_def abc{@filename,50,1,_}def abcdef abc{@filename,50,1}_def abc_def Explanation Entire filename From character 1 to end; same as entire filename From character 1 to end From character 1 counting backwards from the end to the end From character 3 counting backwards from the end to the end From character 6 to end; same as {@filename,-3}, but only because filename is 8 characters From character 1 for a length of 4 characters From character 2 for a length of 3 characters From character 4 counting backwards from the end for a length of 1 character From character 4 counting backwards from the end for a length of 4 characters From character 5 to the end From character 5 for a length of 4 characters; same as {@filename,5}, but only because filename is 8 characters From character 5 for a length of 100 characters, but there are fewer than 100 characters remaining abc and def are outside of a macro, so they appear literally; macro is filename from character 4 counting backwards from the end for a length of 4 characters, followed by an underscore because the rest of the macro is non-empty Similar to previous example, but underscore in macro does not appear because rest of macro (non-existent character 50 for a length of 1 character) is empty Similar to previous example, but underscore does appear because it is a literal character, not a conditional character inside a macro Simple Macros These are the simple macros of the form {@simplemacro}: © 2007 Marc Rochkind. All rights reserved. 2007-02-24 ImageIngester User’s Manual Version 2.1.03 Page 51 catalogsets The checked Catalog Sets. See the section “Catalog Sets and Keywords” on page 35. This macro is only useful in metadata templates, because its replacement uses XMP syntax. datetime The date and time of the original image file in the form YYYYMMDD_hhmmss, where hh is in 24-hour time. Note that this is the modification date and time of the file itself, not anything (e.g., EXIF data) from inside the file. You'll rarely want the entire datetime; for example, {@datetime,1,8} is replaced by just the date part, and {@datetime,10} or {@datetime,-6} by just time part. You can use other parameters to pick off the year (as many digits as you want), month, etc. Does not work in metadata templates in Versions earlier than 2.2; see Tip on page 32. filename The original file name of the image without the extension. For files copied from a card that meets the DCF standard, it will always be 8 characters, with the last 4 being a number. Does not work in metadata templates in Versions earlier than 2.2; see Tip on page 32. keywords The checked Keywords. See the section “Catalog Sets and Keywords” on page 35. This macro is only useful in metadata templates, because its replacement uses XMP syntax. notes The Notes entered on the main window. numberrange Replaced by a special code that's replaced by the actual numberrange of images (e.g., "2301-2455") when used in a folder name. Not useful in other contexts. Whether the range is formed from filename numbers or automatically-generated numbers is controlled by radio buttons on the Preferences-Naming panel. If used in a folder name, the numberrange macro must be last. Does not work in metadata templates because the number range isn’t known until ingestion is completed. prefix The contents of the Prefix edit field on the Naming tab of the Preferences panel. sequence A 6-digit automatically-generated sequence number, using the starting number as set on the main window. Use subscripting to get fewer than 6 digits; for example, {@sequence,-3} is replaced by the rightmost 3 digits. Does not work in metadata templates in Versions earlier than 2.2; see Tip on page 32. © 2007 Marc Rochkind. All rights reserved. 2007-02-24 ImageIngester User’s Manual Version 2.1.03 Page 52 Quick Field Macros For the Quick Field macros, the quick_field_label is what is set in the preferences. For example, if you've labeled the 4th Quick Field "Art Director", you would reference it in a metadata template macro as {@QF.Art Director} (or, if you prefer, {@qf.art director}). Capitalization doesn't matter, but you do need the space if you have a space in the label. If you change the label, you also have to change the macro. Database Macros For the database macros, here are the tables and their fields. You can also see the fields on the Database panel. In each case, the selection on the drop-down on the main window or Metadata panel determines the row to be accessed. card name, description, inservice_dt client name, description, created_dt ingestion ingestion_sk (unique ingestion ID), ingested_dt, notes IPTCcontact creator, title, address, city, state, post, country, phones, emails, websites IPTCcontent id, headline, description, keywords, subjectcode, writer IPTCimage id, genre, scene, location, city, state, country, countrycode IPTCstatus id, title, job, instructions, provider, source, copyright, rights project name, description, created_dt, checklist UserData id, field1, field2, field3, field4, field5, field6, field7, field8 EXIF Macros The only EXIF macro available is {@exif.datetime}, which is in the same format as {@datetime}, but accesses the EXIF DateTimeOriginal field. It works with JPEGs, TIFFs, and most raw formats, including DNG. It's best not to use this macro when ingesting from a card, because it causes a second read of the image, and the image file's datetime (accessible via the {@datetime} macro) usually serves just as well. (If the two are different on the card, the differences is probably only a second or two.) With files on a hard drive that may have been copied or edited, however, {@exif.datetime} is sometimes very useful. Does not work in metadata templates in Versions earlier than 2.2; see Tip on page 32. © 2007 Marc Rochkind. All rights reserved. 2007-02-24 ImageIngester User’s Manual Version 2.1.03 Page 53 If there is no EXIF data, or no EXIF DateTimeOriginal field, the file date/time is used, which is equivalent to {@datetime}. Macro Lab Choose Macro Lab on the Tools menu to bring up the Macro Lab where you can view all the available macros and see what they get replaced by. Initially, the left pane lists all of the available macros. Press the Run button to see their replacements in the right pane. You can also type your own text and macros in the left pane, and even paste in a metadata template you've prepared. (You'll have to copy it from a text editor, as the Macro Lab can't open files for itself.) Press the Show All button to get the initial comprehensive macro list back into the left pane. The following are Macro Lab "Show All" example macros on the left, with their replacement text on the right: card card card.name: {@card.name} card.inservice_dt: {@card.inservice_dt} card.description: {@card.description} client card.name: D200 #002 (SanDisk 2GB) card.inservice_dt: 2006-10-22 08:55:02 card.description: client client.name: {@client.name} client.created_dt: {@client.created_dt} client.description: {@client.description} ingestion client.name: Client_001 client.created_dt: 2006-07-12 15:27:43 client.description: ingestion ingestion.ingestion_sk: {@ingestion.ingestion_sk} ingestion.ingested_dt: {@ingestion.ingested_dt} ingestion.notes: {@ingestion.notes} project ingestion.ingestion_sk: 504 ingestion.ingested_dt: 2007-01-01 16:28:28 ingestion.notes: project project.name: {@project.name} project.created_dt: {@project.created_dt} project.description: {@project.description} project.checklist: {@project.checklist} IPTCcontact IPTCcontact.creator: {@IPTCcontact.creator} IPTCcontact.title: {@IPTCcontact.title} IPTCcontact.address: {@IPTCcontact.address} © 2007 Marc Rochkind. All rights reserved. project.name: Project_001 project.created_dt: 2006-07-12 15:27:43 project.description: project.checklist: DAM-Book IPTCcontact IPTCcontact.creator: John Smith IPTCcontact.title: photo assistant IPTCcontact.address: 123 Main St. 2007-02-24 ImageIngester User’s Manual Version 2.1.03 Page 54 IPTCcontact.city: {@IPTCcontact.city} IPTCcontact.state: {@IPTCcontact.state} IPTCcontact.post: {@IPTCcontact.post} IPTCcontact.country: {@IPTCcontact.country} IPTCcontact.phones: {@IPTCcontact.phones} IPTCcontact.emails: {@IPTCcontact.emails} IPTCcontact.websites: {@IPTCcontact.websites} IPTCcontact.city: Mytown IPTCcontact.state: AZ IPTCcontact.post: 12345 IPTCcontact.country: USA IPTCcontact.phones: 123-456-7890 IPTCcontact.emails: [email protected] IPTCcontact.websites: basepath.com IPTCcontent IPTCcontent.id: {@IPTCcontent.id} IPTCcontent.headline: {@IPTCcontent.headline} IPTCcontent.description: {@IPTCcontent.description} IPTCcontent.keywords: {@IPTCcontent.keywords} IPTCcontent.subjectcode: {@IPTCcontent.subjectcode} IPTCcontent.writer: {@IPTCcontent.writer} IPTCcontent IPTCcontent.id: Content_0001 IPTCcontent.headline: IPTCcontent.description: IPTCcontent.keywords: IPTCcontent.subjectcode: IPTCcontent.writer: IPTCimage IPTCimage IPTCimage.id: {@IPTCimage.id} IPTCimage.genre: {@IPTCimage.genre} IPTCimage.scene: {@IPTCimage.scene} IPTCimage.location: {@IPTCimage.location} IPTCimage.city: {@IPTCimage.city} IPTCimage.state: {@IPTCimage.state} IPTCimage.country: {@IPTCimage.country} IPTCimage.countrycode: {@IPTCimage.countrycode} IPTCstatus IPTCstatus.id: {@IPTCstatus.id} IPTCstatus.title: {@IPTCstatus.title} IPTCstatus.job: {@IPTCstatus.job} IPTCstatus.instructions: {@IPTCstatus.instructions} IPTCstatus.provider: {@IPTCstatus.provider} IPTCstatus.source: {@IPTCstatus.source} IPTCstatus.copyright: {@IPTCstatus.copyright} IPTCstatus.rights: {@IPTCstatus.rights} UserData IPTCimage.id: Empty IPTCimage.genre: IPTCimage.scene: IPTCimage.location: IPTCimage.city: IPTCimage.state: IPTCimage.country: IPTCimage.countrycode: IPTCstatus IPTCstatus.id: Status_0002 IPTCstatus.title: IPTCstatus.job: IPTCstatus.instructions: IPTCstatus.provider: IPTCstatus.source: IPTCstatus.copyright: IPTCstatus.rights: UserData UserData.id: {@UserData.id} UserData.field1: {@UserData.field1} UserData.field2: {@UserData.field2} UserData.field3: {@UserData.field3} UserData.field4: {@UserData.field4} UserData.field5: {@UserData.field5} UserData.field6: {@UserData.field6} UserData.field7: {@UserData.field7} UserData.id: UserData_0001 UserData.field1: UserData.field2: UserData.field3: UserData.field4: UserData.field5: UserData.field6: UserData.field7: Quick Fields qf.Job: {@qf.Job} qf.Subject: {@qf.Subject} qf.Location: {@qf.Location} qf.Quick Field 4: {@qf.Quick Field 4} qf.Quick Field 5: {@qf.Quick Field 5} Quick Fields qf.Job: qf.Subject: qf.Location: qf.Quick Field 4: qf.Quick Field 5: Simple Macros CatalogSets: {@catalogsets} Keywords: {@keywords} Notes: {@notes} Simple Macros CatalogSets: Keywords: Notes: Filename (sample data): {@filename} Datetime (sample data): {@datetime} Sequence (sample data): {@sequence} UniqueID (sample data): {@uniqueid} NumberRange (sample data): {@numberrange} Prefix: {@prefix} EXIF Macro EXIF datetime: {@exif.datetime} Filename (sample data): ABCD0001 Datetime (sample data): YYYYMMDD_hhmmss Sequence (sample data): 123456 UniqueID (sample data): ABCDEF0123456 NumberRange (sample data): 0420-0511 Prefix: MJR EXIF Macro EXIF datetime: yyyymmdd_HHMMSS Useful Examples Filename, 1st 4 characters: {@filename,1,4} Filename, last 4 characters: {@filename,-4} Date: {@datetime,1,8} Year, 4 digit: {@datetime,1,4} Year, 2 digit: {@datetime,3,2} Month: {@datetime,5,2} Day: {@datetime,7,2} Time: {@datetime,10} Hour: {@datetime,10,2} Minute: {@datetime,12,2} Second: {@datetime,14,2} Sequence, 2 digit: {@sequence,-2} Sequence, 3 digit: {@sequence,-3} Sequence, 4 digit: {@sequence,-4} Sequence, 5 digit: {@sequence,-5} Useful Examples Filename, 1st 4 characters: ABCD Filename, last 4 characters: 0001 Date: YYYYMMDD Year, 4 digit: YYYY Year, 2 digit: YY Month: MM Day: DD Time: hhmmss Hour: hh Minute: mm Second: ss Sequence, 2 digit: 56 Sequence, 3 digit: 456 Sequence, 4 digit: 3456 Sequence, 5 digit: 23456 Example File Names MJR_{@datetime,1,8}_{@filename,-4} MJR_{@datetime}_{@filename,-4} MJR_{@datetime,1,8}{@datetime,10}_{@filename,-4} MJR_{@datetime,1,4}-{@datetime,5,2}-{@datetime,7,2} {@datetime,10,2}:{@datetime,12,2}:{@datetime,14,2}_{@filename,-4} MJR_{@datetime,1,8}_{@sequence,-4} {@datetime,1,8}-{@qf.subject,1,-1,-}{@sequence,-5} Example File Names MJR_YYYYMMDD_0001 MJR_YYYYMMDD_hhmmss_0001 MJR_YYYYMMDDhhmmss_0001 MJR_YYYY-MM-DD hh:mm:ss_0001 © 2007 Marc Rochkind. All rights reserved. MJR_YYYYMMDD_3456 YYYYMMDD-23456 2007-02-24 ImageIngester User’s Manual Version 2.1.03 Page 55 Database IIP keeps its table data (e.g., cards, ingestions, IPTCstatus) in an SQLite3 database. You can access the data directly with a copy of an open-source application called SQLite Database Browser or with SQLite3 itself, both of which you can download for free. It's risky to change any data, unless you know exactly what you're doing, since inconsistent data can mess up IIP. But there's never a problem if all you want to do is read (or export) data. (II doesn’t use a database.) The location of the database on various platforms is given on page 57. Accessing the Database with SQLite Database Browser The easiest way to access the database directly is with the SQLite Database Browser, available for OS X and Windows (and other platforms on which IIP doesn’t run), which can be downloaded from sourceforge.net/projects/sqlitebrowser. After you download and install the Browser, you open the ImageIngester database, and you’ll see a window like this: To export data, choose Table as CSV file from the File menu, choose the table (e.g., ingestion), and then choose the output file (e.g., ingestion.csv). You can read the relatively standard CSV (“comma-separated values”) data in lots of applications, such as Excel. Here are a few lines from an example ingestion.csv file (the first line is folded for readability in this manual): "ingestion_sk","card_id","project_id","number_start","number_stop", "image_count","notes","ingested_dt","result" "1","1","1","-1","-1","9","","2006-07-14 12:34:39","SUCCESS" "2","1","1","0","0","0","","2006-07-14 12:48:23","Ingestion stopped" "3","1","1","1","3219","9","","2006-07-14 12:48:43","SUCCESS" "4","1","1","876","884","9","","2006-07-14 12:49:16","SUCCESS" "5","1","1","-1","-1","9","","2006-07-14 12:53:44","SUCCESS" "6","1","1","0","0","0","","2006-07-15 13:47:30","No card chosen" "7","1","1","0","0","0","","2006-07-15 13:48:40","Terminated with error" © 2007 Marc Rochkind. All rights reserved. 2007-02-24 ImageIngester User’s Manual Version 2.1.03 Page 56 Accessing the Database with the SQLite3 Command-Line Tool To learn how to access data with the SQLite3 tools and SQL language, either read the documentation at www.sqlite.org or buy the excellent book The Definitive Guide to SQLite (Michael Owens, Apress, 2006). To access the database with SQLite3, follow these steps: 1. You need a copy of the SQLite3 command-line program. For Windows, go to www.sqlite.org, click the "download" link, and download the command-line program "sqlite-3_3_8.zip" (version number may be higher). For Mac OS X, the command-line program sqlite3 is shipped with the OS, so you don't need to download it. (OS X versions earlier than 10.4 may not have it, but those earlier versions won't run ImageIngester anyway.) 2. On Windows, open the downloaded ZIP file and copy (or extract) the sqlite3.exe file to some folder, such as C:\Program Files\SQLite. Create the folder first if necessary. 3. On Windows, go to the Control Panel Folders applet, click the View tab, and check "Show hidden files and folders." Otherwise it will be too hard to find ImageIngesterPro's database file. 4. Navigate with Windows Explorer (XP or Vista) or the Mac Finder to the SQLite3 database file ii_main.sqlite3. Its location may vary with your system; see page 57. 5. On Windows, right click on ii_main.sqlite3, and choose Open. From the dialog, choose "Select a program", browse to the sqlite3.exe program you installed, and use it to open the ii_main.sqlite3 file. On the Mac, open the Terminal application, type "sqlite3 " (don't forget the space after the command name, and don't press Return) and then drag the file ii_main.sqlite3 from the Finder (previously located in Step 4) to the Terminal application, so the path becomes the file-name argument after "sqlite3 " (which you just typed). Then hit Return. The command line should look something like this: $ sqlite3 /Users/marc/Library/Application\ Support/ImageIngesterPro/ii_main.sqlite3 You can also just type the whole command line, but that's much too hard. 6. You should now be in the sqlite3 command, opened to the ImageIngesterPro database. Type ".tables" (don't forget the leading dot) to see a list of tables: $ sqlite3 /Users/marc/Library/Application\ Support/ImageIngesterPro/ii_main.sqlite3 SQLite version 3.3.6 Enter ".help" for instructions sqlite> .tables IPTCcontact IPTCimage UserData client project IPTCcontent IPTCstatus card ingestion step sqlite> 7. Once you're in sqlite3, you can execute any session or SQL commands (see the SQLite3 references, above). One particularly useful thing to do is to export the ingestions table in comma-separated-value (CSV) format for import into a spreadsheet (e.g., Excel) or database program. © 2007 Marc Rochkind. All rights reserved. 2007-02-24 ImageIngester User’s Manual Version 2.1.03 Page 57 8. To export data, you need to set the output file name and the mode, and then issue an SQL select statement, like this: sqlite> sqlite> sqlite> sqlite> sqlite> .output /Users/marc/file.csv .mode csv select * from ingestion; .output stdout An absolute path is used for the file name so it can be found later. If you specify plain "file.csv" it will be a challenge to discover what folder it's been created in. The path shown (replace "marc" with your own user name) works on OS X and Windows Vista. For Windows XP, use something simple like "C:\file.csv". A problem with the CSV output from sqlite3 is that values that contain quotes don't have their quotes properly escaped, which may cause problems when you import the data into another program. If that's the case, open the CSV file in a text editor and fix the quotes. (If you use the SQLite Database Browser, as explained in the previous section, the CSV file is OK and won’t require fixing.) The file.csv file should look something like this (first few lines shown): 1,1,1,-1,-1,9,"","2006-07-14 12:34:18","SUCCESS" 2,1,1,-1,-1,9,"","2006-07-14 12:34:39","SUCCESS" 3,1,1,0,0,0,"","2006-07-14 12:48:23","Ingestion stopped" 4,1,1,1,3219,9,"","2006-07-14 12:48:43","SUCCESS" 5,1,1,876,884,9,"","2006-07-14 12:49:16","SUCCESS" You can open the file in Excel or in many other applications. Accessing the Database with ODBC If you can locate an ODBC (“open database connectivity”) SQLite3 driver for your system, you can access the database directly from within many applications, including Excel. Try Googling “sqlite odbc driver.” You might start with www.chwerner.de/sqliteodbc. (I haven’t tried any SQLite3 ODBC drivers, so I can’t provide support.) Locating Preferences, Databases, and Templates This section documents where Preferences and Templates are normally located. Note that Adobe software, such as Photoshop and Bridge, have the ability to locate templates and Camera Raw settings in various folders that you can select, but IIP looks only in the default location, as indicated in the table. The notation [user] in a path is a placeholder for your user name. For II, substitute ImageIngester for ImageIngesterPro. On Windows, you probably need to change a Folder Options setting in order to see your Application Data folder. Open the Control Panel Folder-Options applet, click the View tab, and set the option for “Show hidden files and folders,” like this: © 2007 Marc Rochkind. All rights reserved. 2007-02-24 ImageIngester User’s Manual Version 2.1.03 Page 58 Mac OS X Preferences /Users/[user]/Library/Preferences/ImageIngesterPro/main/[pref] where [pref] is the name of the Preference set. Database (IIP only) /Users/[user]/Library/Application Support/ImageIngesterPro/ii_main.sqlite3 Metadata Templates /Users/[user]/Library/Application Support/Adobe/XMP/Metadata Templates Camera Raw Settings /Users/[user]/Library/Application Support/Adobe/CameraRaw/Settings Windows XP Preferences C:\Documents and Settings\[user]\Application Data\ImageIngesterPro\main\[pref] where [pref] is the name of the Preference set. Database (IIP only) C:\Documents and Settings\[user]\Application Data\ImageIngesterPro\ii_main.sqlite3 Metadata Templates C:\Documents and Settings\[user]\Application Data\Adobe\XMP\Metadata Templates Camera Raw Settings C:\Documents and Settings\[user]\Application Data\Adobe\CameraRaw\Settings © 2007 Marc Rochkind. All rights reserved. 2007-02-24 ImageIngester User’s Manual Version 2.1.03 Page 59 Windows Vista Preferences C:\Users\[user]\AppData\Roaming\ImageIngesterPro\main\[pref] where [pref] is the name of the Preference set. Database (IIP only) C:\Users\[user]\AppData\Roaming\ImageIngesterPro\ii_main.sqlite3 Metadata Templates C:\Users\[user]\AppData\Roaming\Adobe\XMP\Metadata Templates Camera Raw Settings C:\Users\[user]\AppData\Roaming\Adobe\CameraRaw\Settings Acknowledgements Thanks to Dave Coffin for dcraw (www.cybercom.net/~dcoffin/dcraw). And, of course, to Peter Krogh for The DAM Book and for hosting the ImageIngester forum at thedambook.com/smf. Change History The following lists major changes in each version of this manual. Minor edits aren’t listed. (These are changes to the manual, not to the app—see ImageIngester.com for those.) 2.1.03 Information about per-image macros (see 2.1.02, below) changed to indicate that they work properly in II and IIP 2.2 and above. 2.1.02 Added information about ImageIngester mode in IIP (page 4); about per-image macros (such as {@filename}) not working in metadata templates (page 32); deleted section about getting new and old file names into metadata which was added in version 2.1.01; added note about keywords in Lightroom (page 48). 2.1.01 Added information about entering special characters (page 29); basing a new metadata template on an existing one (page 31; other mentions of this technique were already present in version 2.1.00); getting new and old file names into metadata (page 34); Folder Options on Windows to see Application Data paths (page 57); ingesting from cameras that use DNG as their native format, such as the Leica M8 (page 25); use with Lightroom (page 48). 2.1.00 Original. © 2007 Marc Rochkind. All rights reserved. 2007-02-24