1
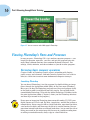
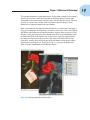
1
AL
Welcome to Photoshop!
In This Chapter
䊳 What you need to know to work with Photoshop
MA
TE
䊳 What you need to know about installing Photoshop
RI
䊳 What Photoshop does very well, kind of well, and just sort of, well . . .
A
TE
D
dobe Photoshop is, without question, the leading image-editing program
in the world. Photoshop has even become somewhat of a cultural icon.
It’s not uncommon to hear Photoshop used as a verb (“That picture is obviously Photoshopped!”), and you’ll even see references to Photoshop in the
daily comics and cartoon strips. And now you’re part of this whole gigantic
phenomenon called Photoshop.
CO
PY
RI
GH
Whether you’re new to Photoshop, upgrading from Photoshop CS3 or earlier,
or transitioning from Elements to the full version of Photoshop CS4
or Photoshop CS4 Extended, you’re in for some treats.
Photoshop CS4 has an intriguing new look that enables
you to do more, and do it more easily, than ever. Before
I take you on this journey through the intricacies of
Photoshop, I want to introduce you to Photoshop in a
more general way. In this chapter, I tell you what
Photoshop is designed to do, what it can do
(although not as capably as job-specific software),
and what you can get it to do if you try really, really
hard. I also review some basic computer operation
concepts and point out a couple of places where
Photoshop is a little different than most other programs. At the end of the chapter, I have a few tips for
you on installing Photoshop to ensure that it runs
properly.
10
Part I: Breezing through Basic Training
Exploring Adobe Photoshop
Photoshop is used for an incredible range of projects, from editing and correcting digital photos to preparing images for magazines and newspapers to
creating graphics for the Web. You can also find Photoshop in the forensics
departments of law-enforcement agencies, scientific labs and research facilities, and dental and medical offices, as well as in classrooms, offices, studios,
and homes around the world. As the Help Desk Director for the National
Association of Photoshop Professionals (NAPP), my team and I solve problems and provide solutions for Photoshop users from every corner of the
computer graphics field and from every corner of the world. People are doing
some pretty amazing things with Photoshop, many of which are so far from
the program’s original roots that it boggles the mind!
What Photoshop is designed to do
Adobe Photoshop is an image-editing program. It’s designed to help you edit
images — digital or digitized images, photographs, and otherwise. This is the
core purpose of Photoshop. Over the years, Photoshop has grown and developed, adding features that supplement its basic operations. But at its heart,
Photoshop is an image editor. At its most basic, Photoshop’s workflow goes
something like this: You take a picture, you edit the picture, and you print the
picture (as illustrated in Figure 1-1).
Figure 1-1: Basic Photoshop: Take photo, edit photo, print photo. Drink coffee (optional).
Whether captured with a digital camera, scanned into the computer, or created from scratch in Photoshop, your artwork consists of tiny squares of
color, which are picture elements called pixels. (Pixels and the nature of digital imaging are explored in depth in Chapter 2.) Photoshop is all about changing and adjusting the colors of those pixels — collectively, in groups, or one
at a time — to make your artwork look precisely how you want it to look.
(Photoshop, by the way, has no Good Taste or Quality Art filter. It’s up to you
Chapter 1: Welcome to Photoshop!
to decide what suits your artistic or personal vision and what meets your
professional requirements.) Some very common Photoshop image-editing
tasks are shown in Figure 1-2: namely, correcting red-eye and minimizing
wrinkles (both discussed in Chapter 9); and compositing images (see
Chapter 10).
Astronaut image courtesy of NASA
Figure 1-2: Some common Photoshop tasks.
New in Photoshop CS4 is the powerful ability to rotate the image on screen
while you’re working. Not rotate the image itself — Photoshop has had that
capability for ages — but to rotate the appearance of the image in the workspace. This is especially handy when doing delicate masking and painting,
enabling you to orient the image on screen to best suit your stroke. As you
can see in Figure 1-3, while you’re rotating, a red arrow indicates the image’s
true “up.” Double-clicking the Rotate tool icon in the Toolbox restores the
image’s orientation. (This feature is not available on older computers with
less powerful video cards.)
Figure 1-3: Rotate while you work, without damaging the image’s quality!
11
12
Part I: Breezing through Basic Training
Over the past few updates, Photoshop has developed some rather powerful
illustration capabilities to go with its digital-imaging power. Although
Photoshop is still no substitute for Adobe Illustrator, Photoshop certainly
can serve you well for smaller illustration projects. (Keep in mind that
Photoshop is a raster art program — it works with pixels — and vector artwork is only simulated in Photoshop.) Photoshop also has a very capable
brush engine, which makes it feasible to paint efficiently on your digital
canvas. Figure 1-4 shows a comparison of raster artwork (the digital photo,
left), vector artwork (the illustration, center), and digital painting (right). The
three types of artwork can appear in a single image, too. (Simulating vector
artwork with Photoshop’s shape layers is presented in Chapter 11, and you
can read about painting with Photoshop in Chapter 14.)
Figure 1-4: You can use Photoshop with raster images, vector artwork, and even to paint.
Photoshop CS4 includes some basic features for creating Web graphics,
including slicing and animations (but Web work is best done in a true Web
development program, such as Dreamweaver). Photoshop’s companion program Adobe Bridge even includes the Output panel to help you create entire
Web sites to display your artwork online and PDF presentations for on-screen
display, complete with transition effects between slides. (Read about Bridge’s
Output panel’s capabilities in Chapter 16.)
Other things you can do with Photoshop
Although Photoshop isn’t a page layout or illustration program, you certainly
can produce simple brochures, posters, greeting cards, and the like using
Chapter 1: Welcome to Photoshop!
only Photoshop. (See Figure 1-5.) One of the features that sets Photoshop
apart from basic image editors is its powerful type engine, which can add,
edit, format, and stylize text as capably as many word-processing programs.
Photoshop even has a spell check feature — not bad for a program that’s
designed to work with photos, eh?
Even if you don’t have the high-end video features found in Photoshop CS4
Extended, you can certainly supplement your video-editing program with
Photoshop CS4 (even if Photoshop can’t open and play movies you capture
with your video camera). From Adobe Premiere (or other professional video
programs), you can export a series of frames in the FilmStrip format, which
you can open and edit in Photoshop.
Photoshop CS4 and Photoshop CS4 Extended
Although there have been different versions
of Photoshop for years (Photoshop versus
Photoshop LE versus Photoshop Elements), as
with the prior release of Photoshop, Adobe is
offering two different versions of Photoshop
CS4. Photoshop CS4 and Photoshop CS4
Extended both have all of Photoshop’s powerful
image-editing, vector-drawing, painting, and
type capabilities. Photoshop CS4 Extended also
includes some very specialized, highly technical features for use in science, research, and
video editing, and for use with 3D modeling programs. (These features are introduced in
Chapter 17.)
So, if you have Photoshop CS4 rather than
Photoshop CS4 Extended, should you feel
cheated or like a second-class citizen? Nope!
Unless you specifically need those extended
features, there’s no real reason to purchase
them. But what if you got Photoshop CS4
Extended as part of a Creative Suite or Adobe
Bundle package of software — did you pay for
something you don’t need? Well, sort-of-yeahbut-not-really. The folks who’re really paying
extra for the extended features are those who
purchase Photoshop CS4 Extended as a standalone program. The additional cost they pay
funds the research and development of the
extended features.
So why didn’t I get to choose between
Photoshop CS4 and Photoshop CS4 Extended
when I ordered my Bundle or Suite? Buying
software shouldn’t be as complicated as, say,
ordering a cup of coffee. (Caf, de-caf, half-caf?
Latte, espresso, cappuccino? White, brown, or
raw sugar? Cream, half-and-half, milk, or skim?
Small, medium, large, super, or el grosso
maxmo?) It could get quite confusing. Imagine
trying to wade through all of the thousands of
products if Adobe marketed every possible
combination as a separate Bundle or Suite or
Studio! You’d spend so much time trying to find
your perfect bundle, you’d never get to use the
software.
13
14
Part I: Breezing through Basic Training
Figure 1-5: You can use Photoshop to create cards, posters, and brochures.
If you don’t have specialized software
Admittedly, Photoshop CS4 just plain can’t do some things. It won’t make you
a good cup of coffee. It can’t press your trousers. It doesn’t vacuum under the
couch. It isn’t even a substitute for iTunes, Microsoft Excel, or Netscape
Navigator — it just doesn’t do those things.
However, there are a number of things for which Photoshop isn’t designed
that you can do in a pinch. If you don’t have InDesign, you can still lay out the
pages of a newsletter, magazine, or even a book, one page at a time. (With
Bridge’s Ouput panel, you can even generate a multipage PDF document from
your individual pages.) If you don’t have Dreamweaver or GoLive, you can
use Photoshop to create a Web site, one page at a time, sliced and optimized
and even with animated GIFs. You also have tools that you can use to simulate 3D in Photoshop CS4, such as Vanishing Point (see Chapter 10).
Page layout in Photoshop isn’t particularly difficult for a one-page piece or
even a trifold brochure. Photoshop has a very capable type engine, considering the program is designed to push pixels rather than play with paragraphs.
Chapter 1: Welcome to Photoshop!
Photoshop even shows you a sample of each typeface in the Font menu.
Choose from five sizes of preview (shown in Figure 1-6) in Photoshop’s
Preferences➪Type menu. However, you can’t link Photoshop’s type containers, so a substantial addition or subtraction at the top of the first column
requires manually recomposing all of the following columns. After all, among
the biggest advantages of a dedicated page layout program are the continuity
(using a master page or layout) and flow from page to page. If you work with
layout regularly, use InDesign.
Figure 1-6: Font previews in five delicious flavors!
Dreamweaver is a state-of-the-art Web design tool, with good interoperability
with Photoshop. However, if you don’t have Dreamweaver and you desperately need to create a Web page, Photoshop comes to your rescue. After
laying out your page and creating your slices, use the Save for Web & Devices
command to generate an HTML document (your Web page) and a folder filled
with the images that form the page (see Figure 1-7). One of the advantages to
creating a Web page in Dreamweaver rather than Photoshop is HTML text.
(Using Photoshop, all the text on your Web pages is saved as graphic files.
HTML text not only produces smaller Web pages for faster download, but it’s
resizable in the Web browser.)
15
16
Part I: Breezing through Basic Training
Figure 1-7: You can create an entire Web page in Photoshop.
Viewing Photoshop’s Parts and Processes
In many respects, Photoshop CS4 is just another computer program — you
launch the program, open files, save files, and quit the program quite normally. Many common functions have common keyboard shortcuts. You
enlarge, shrink, minimize, and close windows as you do in other programs.
Reviewing basic computer operations
Chapter 3 looks at Photoshop-specific aspects of working with floating
panels, menus and submenus, and tools from the Options bar, but I want to
take just a little time to review some fundamental computer concepts.
Launching Photoshop
You can launch Photoshop (start the program) by double-clicking an image
file or through the Applications folder (Mac) or the Start menu (Windows).
Mac users can drag the Photoshop program icon (the actual program itself)
to the Dock to make it available for one-click startup. You can find the file
named Adobe Photoshop CS4 inside the Adobe Photoshop CS4 folder, inside
the main Applications folder. (Chapter 3 shows you the Photoshop interface
and how to get around in the program.)
Never open an image into Photoshop from removable media (CD, DVD, your
digital camera or its Flash card, Zip disks, jump drives, and the like) or from a
network drive. Always copy the file to a local hard drive, open from that drive,
save back to the drive, and then copy the file to its next destination. You can
open from internal hard drives or external hard drives, but to avoid the risk of
losing your work (or the entire image file) because of a problem reading from
or writing to removable media, always copy to a local hard drive.
Chapter 1: Welcome to Photoshop!
Working with images
Within Photoshop, you work with individual image files. Each image is
recorded on the hard drive in a specific file format. Photoshop opens just
about any image consisting of pixels as well as some file formats that do not.
(File formats are discussed in Chapter 2.) Remember that to change a file’s
format, you open the file in Photoshop and use the Save As command to
create a new file. And, although theoretically not always necessary on the
Mac, I suggest that you always include the file extension at the end of the filename. If Photoshop won’t open an image, it might be in a file format that
Photoshop can’t read. It cannot, for example, open an Excel spreadsheet or a
Microsoft Word DOC file because those aren’t image formats — and
Photoshop is, as you know, an image-editing program. If you have a brandnew digital camera and Photoshop won’t open its Raw images, check for an
update to the Adobe Camera Raw plug-in at
www.adobe.com/products/photoshop/cameraraw.html
You will find installation instructions for the update there. (Make sure to read
and follow the installation instructions exactly.)
Saving your files
You must use the Save or Save As command to preserve changes to your
images. And after you save and close an image, those changes are irreversible. When working with an important image, consider these three tips:
⻬ Work on a copy of the image file. Unless you’re working with a digital
photo in the Raw format (discussed in Chapter 7), make a copy of your
image file as a backup before changing it in Photoshop. The backup
ensures that should something go horribly wrong, you can start over.
(You never actually change a Raw photo — Photoshop can’t rewrite the
original file — so you’re always, in effect, working on a copy.)
⻬ Open as a Smart Object. Rather than choosing File➪Open, make it a
habit to choose File➪Open As Smart Object. When working with Smart
Objects, you can scale or transform multiple times without continually
degrading the image quality, and you can work with Smart Filters, too!
⻬ Save your work as PSD, too. Especially if your image has layers, save it
in Photoshop’s PSD file format (complete with all the layers) before
using Save As to create a final copy in another format. If you don’t save a
copy with layers, going back to make one little change can cost hours of
work.
If you attempt to close an image or quit Photoshop without saving your work
first, you get a gentle reminder asking whether you want to save, close without saving, or cancel the close/quit (as shown in Figure 1-8).
17
18
Part I: Breezing through Basic Training
Keyboard shortcuts
Keyboard shortcuts are customizable in Photoshop (check out
Chapter 3), but some of the basic
shortcuts are the same as those you
use in other programs. You open,
copy, paste, save, close, and quit just
as you do in Microsoft Word, your
e-mail program, and just about any
other software. I suggest that you
Figure 1-8: Photoshop reminds you if you
keep these shortcuts unchanged,
haven’t saved changes to an image.
even if you do some other shortcut
customization.
Photoshop’s incredible selective Undo
Here’s one major difference between Photoshop and other programs. Almost
all programs have some form of Undo, enabling you to reverse the most
recent command or action (or mistake). Like many programs, Photoshop
uses the Ô+Z/Ctrl+Z shortcut for Undo/Redo and the Ô+Option+Z/Ctrl+Alt+Z
shortcut for Step Backward, which allows you to undo a series of steps (but
remember that you can change those shortcuts, as described in Chapter 3).
Photoshop also has, however, a couple of great features that let you partially
undo.
Painting to undo with the History Brush
You can use Photoshop’s History Brush to partially undo just about any filter,
adjustment, or tool by painting. You select the History Brush, choose a history state (a stage in the image development) to which you want to revert,
and then paint over areas of the image that you want to change back to the
earlier state.
You can undo as far back in the editing process as you want, with a couple of
limitations: The History panel (where you select the state to which you want
to revert) holds only a limited number of history states. In the Photoshop
Preferences➪General pane, you can specify how many states you want
Photoshop to remember (to a maximum of 1,000). Keep in mind that storing
lots of history states takes up computer memory that you might need for processing filters and adjustments. That can slow things down. The default of 20
history states is good for most projects, but when using painting tools or
other procedures that involve lots of repetitive steps (such as touching up
with the Dodge, Burn, or Clone Stamp tools), a larger number (perhaps as
high as 60) is generally a better idea.
Chapter 1: Welcome to Photoshop!
The second limitation is pixel dimensions. If you make changes to the image’s
actual size (in pixels) with the Crop tool or the Image Size or Canvas Size
commands, you cannot revert to prior steps with the History Brush. You can
choose as a source any history state that comes after the image’s pixel
dimensions change but none that come before.
Here’s one example of using the History Brush as a creative tool. You open a
copy of a photograph in Photoshop. You edit as necessary. You use the Black
and White adjustment on the image to make it appear to be grayscale. In the
History panel, you click in the left column next to the step immediately prior
to Black and White to designate that as the source state, the appearance of
the image to which you want to revert. You select the History Brush and
paint over specific areas of the image to return them to the original (color)
appearance (see Figure 1-9). There you have it — a grayscale image with
areas of color, compliments of the History Brush!
Figure 1-9: Painting to undo with the History Brush.
19
20
Part I: Breezing through Basic Training
Reducing to undo
with the Fade
command
Immediately after
applying a filter or
adjustment or using
most of Photoshop’s
tools, you can choose
Edit➪Fade and change
the opacity or blending
mode with which the
previous step was performed. You might, for
example, apply a sharpening filter and then
choose Edit➪Fade
Unsharp Mask to
change the blending
mode from Normal
to Luminosity.
(Sharpening only the
Figure 1-10: Compare the original blur with a reduction using
luminosity of your
the Fade command.
image, whether with
this technique or in the
Lab color mode, prevents unwanted color shifts along edges in your images.
Color modes are discussed in Chapter 6.) Or you might apply the Motion Blur
filter and then choose Edit➪Fade Motion Blur (yes, the name of the command
actually changes for you) to reduce the opacity of the blur to 75%. That gives
you the appearance of a back-and-forth motion while leaving the subject
more readily recognizable (see Figure 1-10).
Installing Photoshop: Need to know
If you haven’t yet installed Photoshop CS4 (or the Adobe Creative Suite), here
are a few points to keep in mind:
⻬ Install only into the default location. Photoshop is a resource-intensive
program. Installing it into the default location ([harddrive]➪Applications
on a Mac and C:\Program Files for Windows) ensures that it has
access to the operating system and hardware as necessary. Installing
into any other location or attempting to run Photoshop across a network can lead to frustrating problems and loss of work in progress.
⻬ Disable all spyware and antivirus software before installing. Antivirus
software can intercept certain installation procedures, deeming them to
be hazardous to your computer’s health. That can lead to malfunctions,
crashes, lost work, frustration, and what I like to call Computer Flying
Across Room Syndrome. If you use antivirus software (and if you use
Chapter 1: Welcome to Photoshop!
Windows, you’d better!), turn it off before installing any program, especially one as complex as Photoshop. You might find the antivirus program’s icon in the Windows taskbar; or you might need to go to the Start
menu, use All Programs to locate the antivirus software, and disable it.
On Mac, check the Dock. And don’t forget to restart your antivirus software afterward! If you already installed Photoshop and antivirus software was running at the time, I urge you to uninstall and reinstall.
(Reinsert the Photoshop CS4 CD and launch the installer to use the builtin uninstall feature.)
⻬ If you use autobackup software, shut it down, too. Never run autobackup software when installing software. Like antivirus software, it can
also lead to problems by interfering with the installer.
⻬ Connect to the Internet and activate right away. It’s best to run the
Photoshop installer while your computer is connected to the Internet.
That enables Photoshop’s activation process to happen right away,
making sure you can get started as soon as the installer finishes.
⻬ If you have third-party plug-ins, install them elsewhere. Third-party
plug-ins — those filters and other Photoshop add-ons that you buy from
companies other than Adobe — can be installed into a folder outside the
Photoshop folder. You can then make an alias (Mac) or shortcut
(Windows) to that folder and drag the alias/shortcut to Photoshop’s
Plug-Ins folder. (If you have a multibutton mouse, right-click the folder to
create an alias/shortcut; Control+click if you’re still using a one-button
mouse.) Why install outside the Photoshop folder? Should you ever
need to (gasp!) reinstall Photoshop, you won’t need to reinstall all your
third-party plug-ins. Just create a new alias/shortcut and move it into
Photoshop’s new Plug-Ins folder.
⻬ Check for plug-in updates. Go to the manufacturer’s Web site for each
of your third-party plug-ins and check for updates. This is especially
important if you’re using an Intel-based Mac. Unless the plug-ins have
been updated (“Universal”), they won’t run. There’s a workaround, however. In the Finder, go to [harddrive]➪Applications➪Adobe Photoshop
CS4. Right-click or Control+click on the program icon and choose Get
Info. In the Get Info window, select the option Open Using Rosetta.
Photoshop will run more slowly, but you’ll have your un-updated thirdparty plug-ins available. When the plug-ins are finally updated (or you
decide speed is more important), re-open Get Info and deselect the Open
Using Rosetta box.
⻬ If you have lots of plug-ins, create sets. Plug-ins require RAM (computer memory that Photoshop uses to process your editing commands).
If you have lots of plug-ins, consider dividing them into groups according to how and when you use them. Sort (or install) them into separate
folders. (Hint: Plug-ins that you use in many situations can be installed
into multiple folders.) When you need to load a specific set, do so
through the Photoshop Preferences➪Plug-Ins pane by designating a
second plug-ins folder and relaunching Photoshop.
21
22
Part I: Breezing through Basic Training
⻬ If you love fonts, use a font management utility. If you have hundreds
of fonts (over the years, I’ve somehow managed to collect upward of
7,500 fonts), use a font-management utility to create sets of fonts according to style and activate only those sets that you need at any given time.
Too many active fonts can choke the Photoshop type engine, slowing
performance. The Mac OS has Font Book built right in, or you can use
the excellent Suitcase Fusion from Extensis (www.extensis.com).
Extensis also offers Suitcase for Windows.