1
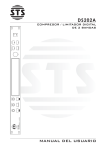
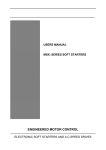
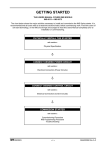
CAAS Audio
Elysian 100 Mono-Block Amplifier
(E100)
User Manual
Table of Contents
Important Safety Instructions.................................................................................................3
Specification...........................................................................................................................4
The Reference standard E100 features:.....................................................................................4
Brief Description.....................................................................................................................5
Getting Started.......................................................................................................................6
Installation (To ensure adequate heat dissipation).......................................................................6
The Mains Supply........................................................................................................................6
The Input Output Options.............................................................................................................6
Operation.....................................................................................................................................7
Warm Up Period...........................................................................................................................7
Partnering Equipment & Components..........................................................................................7
Ground Lift & Ground Loops........................................................................................................7
Basic Operation......................................................................................................................8
Front Panel Overview...................................................................................................................8
Rear Panel Overview...................................................................................................................8
Trouble Shooting & Maintenance.........................................................................................10
Troubleshooting.........................................................................................................................10
Maintenance..............................................................................................................................10
Warranty (3 Year Guarantee)..............................................................................................11
Page 2
Important Safety Instructions
1. PLEASE READ THESE INSTRUCTIONS CAREFULLY.
2. Keep these instructions safe, heed all warnings and follow all instructions.
3. To reduce the risks of electric shock please do not remove the cover, there are no user serviceable parts
inside.
4. Do not use this equipment near water and take care not to let objects or liquids fall into the product.
5. Clean only with a dry cloth.
6. Do not install near any heat sources such as radiators, heat registers, stoves, or other apparatus that
produce heat.
7. Do not operate the amplifier in ambient temperatures below 00C or above +350C.
8. If you are using a cart or stand please make sure you adhere to CAAS Audio’s minimum recommended
ventilation (see below in the getting started section).
9. Do not block any ventilation openings. Install in accordance with the manufacturer’s instructions (see
below in the getting started section).
10. This appliance should be earthed so only use it with the CAAS supplied power cord. Never operate
without an earth connection.
11. Protect the power cord from being walked on or pinched, particularly at plugs, convenience receptacles,
and the point where they exit from the apparatus.
12. A mains lead or plug with an exposed conductor is dangerous so if this is seen, please dispose of
immediately.
13. The Elysian 100 is protected by a 3.15A slow blow fuse situated in the rear mains inlet panel just above
the inlet socket. Replace only with the same specification fuse (3.15A slow blow)
14. When switching the unit off at the main socket or rear mains inlet switch, do not turn the unit back on for
at least 1 minute. Rapid switching on and off may result in the blowing of the protection fuse.
15. Only use attachments/accessories specified by the manufacturer.
16. Unplug this apparatus during lightning storms or when unused for long periods of time.
17. Refer all servicing to qualified service personnel.
18. To reduce the risk of fire or electric shock, do not expose this apparatus to rain or moisture.
19. Only connect cables (speaker and/or input) when the amplifier is powered off at the mains. Never
connect & disconnect cables while the amplifier is turned on.
20. The amplifier has no output protection as these circuits can degrade the amplifiers performance. Do not
short the speaker terminal as this could damage the amplifier.
21. The amplifier has no input overload protection as these circuits can degrade the overall amplifier
performance. Take care when connecting input cables and only do so while the amplifier is powered off.
22. The amplifier is fitted with over-temperature protection. The amplifier should never operate at over 600C,
however thermal shut off protection will disconnect the amplifier from the mains supply should the
temperature rise above 700C. If this happens you will need to wait for the amplifier to cool to below 550C
before it will reset. Ventilation requirements must then be checked.
Page 3
Specification
All specifications are subject to change at any time. Single Channel Mono-block Amplifier.
Gain
Frequency Response:
Maximum Input
Maximum Output
Rated Output
Peak Output Current
Input Impedance
Output Impedance
Input Sensitivity
Speaker Impedance
Total Harmonic Distortion
Transient Intermodulation
Output SNR (A-WTD)
Slew rate
Output DC Offset
Power Consumption
Mains Voltage
Fuse Rating
Operating Temperature
Thermal Cut-off Protection
Input Connectors
CAAS Link Trigger
Output Terminals
Mains Transformers
Dimensions
Weight
25.5dB (into 8ohms)
0.8Hz to >300kHz (-3dB) DC Coupled
10Hz to 50kHz (+/-0.1dB)
10V peak
44V peak
100W into 8ohms (1st 20W Class A)
200W into 4ohms
>50A (10ms cycle every 200ms)
33kohms (single ended RCA)
66kohms (balanced XLR)
0.1ohm
1.6V RMS single ended (for 100W output into 8ohms)
Any (output power will vary)
<1% @1kHz (100W into 8ohms)
<1% @1kHz (200W into 4ohms)
<0.01% @1kHz (1W, 0dBW into 8ohms)
Too low to measure
Better than 90dB (0dBW output, input grounded)
100V/us (No input filter, max output)
<10mV
100W (Idle), 400W (max)
<0.5W trigger high (amp power down mode)
220V to 240Vac
T3.15A, 250V (slow blow)
45 degrees C - 55 degrees C
25 - 35 degrees C above ambient.
70 degrees C (Reset at 55 degrees C)
1 x Unbalanced gold plated RCA
1 x Balanced silver plated XLR
12V DC to turn off (0V for on)
2 x High current gold plated
1 x 300VA (toroidal) & 1 x 50VA (toroidal)
140mm high, 260mm wide, 340mm deep.
11kg / channel
The Reference standard E100 features:
1.
CAAS Audio's proprietary "Coupled Symmetric Drive" (CSD) open loop, voltage gain
topology.
2. Bespoke Voltage amplifier Perfect Isolating "VPI" driver stage.
3. DC coupled from input to output (NO capacitors in the signal path).
4. A true zero feedback design (NO global or local feedback).
5. Six bespoke, discrete regulated power supplies with over 100,000uF of power supply
capacitance.
6. Separate transformers and power supply for the voltage amplifier and current amplifier.
7. The application of RF circuit design, layout and stability techniques.
8. Ultra low Transient Intermodulation Distortion (TIM).
9. Linear phase response with zero feedback essential for a truly open sound with high clarity,
detail and dynamic.
10. CAAS Link 12V trigger for automated sleep mode.
Page 4
Brief Description
The Elysian 100 series mono-block amplifier is a statement in audio design, an elegantly
minimalist, aesthetically pleasing mono-block power amplifier housing a true state of the art, ZERO
global and ZERO local feedback, ultra wide bandwidth, Class A operating amplifier circuit.
The Elysian 100 incorporates CAAS Audio's proprietary short signal path, minimal component, two
stage, DC coupled, voltage gain topology "CSD" (Coupled Symmetric Drive). The Elysian 100 uses
a fully symmetric DC coupled design from the input right through to the output. By taking
advantage of the higher bandwidth, speed and lower distortion offered by a two stage fully
symmetric topology, a true zero feedback system can be employed thus producing one of the most
dynamic, open, transparent and realistic sound you'll ever hear.
The Elysian 100's voltage amplifier circuit is based on CAAS Audio's "CSD" topology. The input
stage consists of a fully balanced symmetrical differential stage with a small voltage gain using
ultra high linearity complimentary transistor pairs, operating in class A mode with NO feedback
except emitter degeneration. This stage drives a balanced symmetrical push pull voltage amplifier
stage again operated in class A mode with NO feedback and a moderate voltage gain. Input stage
current sources are coupled and our proprietary non-intrusive DC servo circuit which continuously
fine tunes these current sources (at an ultra low sub sonic frequency) to maintain a very low DC
output level.
The Elysian 100's output stage consists of a bespoke Voltage amplifier Perfect Isolating "VPI"
driver stage driving five complementary pairs of high bandwidth transistors biased heavily towards
Class A and running open loop (NO feedback). At normal listening levels the Elysian 100 will
always be running in Class A mode. In fact the Elysian100 will deliver over 20 watts of pure Class
A power into an 8 ohm load. If extra power is required the Elysian 100 will seamlessly move into
Class A/B operation and deliver over 100W into 8 ohms and 200W into 4 ohms.
This biasing technique results in lower power consumption, lower heat output and an extended
component life time over that of a conventional Class A amplifier, while delivering superior
performance.
Each Elysian 100 houses six separate power supplies. Each Channel has six independent
bespoke discrete regulated, very high speed, very low output impedance, high current delivery
power supplies. Four for the voltage amplifier stages and two for the current amplifier output stage.
Six years of R&D coupled with novel circuit topologies, the most linear components available, an
attention to detail and a no compromise philosophy has culminated with The Elysian 100 and a
giant leap forward in audio reproduction.
Page 5
Getting Started
Thank you for purchasing a CAAS Audio Elysian 100 Power Amplifier. The Elysian range have
been designed to meet the highest standards of performance, sound and build quality.
The Elysian 100 Mono-Block Power Amplifier should arrive in a well packaged box weighing
slightly in excess of 10kg. This should mean that your Elysian 100 arrives in pristine order. If this is
not the case please contact CAAS Audio immediately.
While unpacking, please take care to always lift with bent knees and a straight back, using
your leg muscles to lift, in accordance with government HSE guidelines.
Installation (To ensure adequate heat dissipation)
The Elysian 100 is a single channel power amplifier, for use in a stereo system you will require two
(2) Elysian 100 amplifiers. For use in a 5.1 system you will require five (5) Elysian 100 amplifiers.
The Elysian is heavily biased towards class A and therefore will need to dissipate significant power
as heat. For this reason adequate ventilation is mandatory. If the Elysian 100 is running too hot to
touch you should power off the unit immediately, leave time for it to cool down and then increase
the ventilation around the amplifier. Never install the amplifier near any other heat sources.
Place the Elysian 100 in its preferred listening position, taking care to insure that it has adequate
ventilation (CAAS recommend > 20cm all around & >30cm above), is not close to any heat
radiating sources and is installed on an equipment stand capable of supporting in excess of the
Elysian’s 11kg weight. Do not use fans to try and cool the amplifier as this will adversely affect the
internal temperature feedback system. Do not operate the amplifier in ambient temperatures below
0 degrees C or above 35 degrees C.
Ensure when connecting the power cable that any extension leads necessary are rated at 13A or
above. (Do not use extension cables unless totally necessary).
The Mains Supply
The Elysian 100 is available in two standard mains input versions the 240V UK and European and
the 120V USA. Please check the rear of your unit to make sure the right input voltage is marked.
For normal music or AV operation the average output power level of the Elysian is much lower than
rated. A reasonable listening level tends to be around 1W, while a quite loud listening level would
still only be below 50W. This means that under normal operation the Elysian will only be using a
fraction of its maximum power rating from the mains supply and will operate with significantly
reduced power dissipation (approximately 100W per channel). When operating at audio output
levels of 200W or higher the amplifier could use up to 400W per channel from the mains supply.
The Input Output Options.
The Elysian 100 has single ended (RCA) and balanced (XLR) inputs on the rear of the unit. Both
inputs are DC coupled directly to your pre-amplifier (this is done for maximum sound quality) so
please ensure that the pre-amplifier does not exhibit a large output DC offset. It is very
IMPORTANT that the input select toggle switch (on the rear) is set in the right position (Up for XLR,
down for RCA). Do not operate the amplifier with this switch in the wrong position.
Page 6
Connect the speaker cables using either banana plugs or spade connectors (preferable) to the
appropriate terminals (white for ground / return and red for live). Observe the flow polarity of your
speaker cables. Only ever connect and disconnect the cables while the amplifier is powered off.
Take care not to short circuit the connectors or cables at any time as this may damage the
amplifier's output stage. Once you are certain that all cables are correctly fitted at both ends, you
are ready to power up the Elysian 100.
Operation
Power the Elysian 100 by turning the switch on the rear to the ON (I) position. This is a mechanical
switch and will disconnect the product from the main supply. Once turned on the front LED will
illuminate.
Warm Up Period
Although the Elysian 100 will produce exceptional performance from the first time it is switched on,
this performance will improve as components settle in. The greatest improvement to performance
will occur in the first 50 hours of operation. After 100 hours or so the amplifier performance will
remain consistently high.
Each time the amplifier is switched on, the Elysian 100 will require at least 20 minutes to reach its
optimum operating temperature (around 50 degrees C).
Partnering Equipment & Components
The Elysian 100 amplifiers are a perfect match for CAAS Audio's DAS or EAS. Take care when
choosing a pre-amplifier to partner the Elysian 100. If your pre-amplifier is a passive unit with high
output impedance, it may not be best suited to the @30kohm input impedance that the Elysian 100
offers. For the best results, CAAS Audio recommends partnering the Elysian 100 with a low output
impedance pre-amplifier (200ohms or less) like the Elysian EAS.
The Elysian 100 has a low output impedance and hence a good to high damping factor, therefore
speaker cable choice may be less critical than some amplifiers. Never the less, to maximise the
audio performance, CAAS Audio recommend keeping speaker cable lengths to an absolute
minimum and ensuring that both left and right speaker cables are identical in both length and type.
The Elysian 100 can drive practically any loudspeaker you can name with exceptional results.
Therefore we have no real recommendations here, except take care with the power rating of your
speaker (especially for low impedance speakers) as the Elysian 100 is capable of delivering over
200W into low impedance speakers. If run at this level for a significant period, the amplifier may
run too hot and require a period of rest.
Ground Lift & Ground Loops
The Elysian 100 is not fitted with a ground lift switch. CAAS Audio believe the practice of
disconnecting grounds to be detrimental to the overall system quality and in some instances
dangerous. The Elysian 100 has been designed to minimise internal ground loops and reduce the
effect of connecting equipment ground loops. The Elysian 100 should operate with no audible
mains hum. If mains hum (and or ground noise) is present when a pre-amp is connected, the
resulting noise is due to the preceding pre-amp and or source component, not the Elysian 100.
Page 7
Basic Operation
Front Panel Overview
1
1. The Power on LED: When the unit is powered on this LED will illuminate.
Rear Panel Overview
1
5
3
4
6
2
7
1.
2.
3.
4.
5.
6.
7.
Mains Power Switch
Unbalanced (Single ended) Input (gold plated RCA socket)
Balanced Input (silver plated XLR socket)
Balanced / Unbalanced select toggle switch
Gold plated, high current, Speaker Output Terminals (spade or banana)
Mains AC Power Inlet & Fuse just above
CAAS Link 12V Trigger
Page 8
1. Mains Power Switch
Disconnects power to the AC Input Connector. Set this switch to off (“O”) when making or
breaking connections to the amplifier.
2. Unbalanced Input (Single ended RCA)
Provides an unbalanced audio input for the speakers connected to the corresponding audio
channel output. Connect to either a Pre-amp output or CAAS Audio DAS “Vol” (volume) output.
Never connect directly to a line level output, such as a CD Player or DAS “DAC” (line level)
output as this will provide maximum volume and may damage equipment. NEVER CONNECT
BOTH RCA AND XLR INPUTS AT THE SAME TIME.
3. Balanced Input (XLR)
Provides a balanced audio input for the speakers connected to the corresponding audio
channel output. Connect to a Pre-amp output. Never connect directly to a line level output,
such as a CD Player output as this will provide maximum volume and may damage equipment.
NEVER CONNECT BOTH RCA AND XLR INPUTS AT THE SAME TIME.
4. Balanced / Unbalanced Select switch
IMPORTANT: If the unbalanced input is used, this switch must be switched down towards the
RCA input. If the balanced input is used, this switch must be switched up towards the XLR
input. Make sure the switch is pointing towards the input being used. Up for XLR
(balanced) and down for RCA (unbalanced). It is important that this switch it set to the
correct position, if it is not the amplifier will not operate correctly. NEVER CONNECT BOTH
INPUTS AT THE SAME TIME.
5. Speaker Output Terminals
Provide audio output for the speakers. OUTPUT connectors can accept bare speaker wires,
banana plug connectors, or certain spade connectors. When using bare speaker wires, loosen
the connector, insert the wire into the top of the receptacle, then tighten the connector. The
same procedure should be used for spade connectors. Banana plugs should be inserted into
the outward-facing receptacle. Use heavy gauge speaker cable to ensure low-impedance
connections between the amplifier and the speakers. Observe correct speaker polarity.
6. Mains AC Power Inlet Connector
The AC input connector provides power to the unit with the supplied power lead. Do not use an
extension lead (unless appropriately rated). For optimal performance, use an isolated power
receptacle with adequate current (13 amps). Line voltages ≥20% above the specified voltage
may damage the amplifier. Line voltages ≤20% below the specified voltage may also damage
this amplifier.
7. CAAS Link
CAAS Link is a proprietary control system design to allow connection and control between
CAAS Audio products. The Elysian 100 CAAS link incorporates a 12V trigger. When 12V DC is
applied to the CAAS Link the Elysian 100 will switch into low power mode ( sleep mode ). This
is designed for use with other CAAS Audio control equipment such as the EAS. Note: The
main power switch must be ON for the CAAS link to operate.
The connection is via a 3.5mm jack socket. The polarity is not critical, CAAS Audio use 12V on
the centre pole and GND on the outer sleeve. It is recommended that the Elysian 100 are
powered up (taken out of sleep mode) at least 20 minutes before listening, this allows the amps
to get up to temperature and operate at their maximum potential.
CAAS Audio seriously recommend that you take extreme care to not cause short circuiting
when connecting and disconnecting speaker cables. This practice should always be
performed while the amplifier is turned OFF / Powered down.
Page 9
Trouble Shooting & Maintenance
Troubleshooting
The front panel LED is not lit.
1. Make sure the rear panel power switch is set to ON (“I”).
2. Make sure the power cable fuse has not blown.
3. Make sure the T3.15A fuse in the rear of the amplifier has not blown.
4. If the amplifier was very hot it may have caused the thermal cut-off to activate. Turn the
amplifier OFF and let it fully cool down (20 minutes or more) before turning ON again.
5. If the above does not solve the problem then contact CAAS Audio.
The amplifier is not passing audio.
1. Check that the front panel LED is illuminated.
2. Power the amplifier OFF. Allow the amplifier to cool before powering it on again.
3. Check the speaker cable connections and the input cable connections.
4. If the above does not solve the problem then contact CAAS Audio.
The amplifier is outputting distorted sound.
1. Reduce system volume level.
2. Check the airflow around the amplifier and provide additional space for cooling.
3. Make sure speakers are not short circuited.
4. Turn the amplifier OFF at the rear (mains input) and back ON after 20 minutes.
5. If the above does not solve the problem then contact CAAS Audio.
The amplifier and other electrical devices in the listening room suddenly lose power.
1. Reset the circuit breaker for the listening room.
The amplifier is continuously running over temperature (above 60 degrees C).
1. Check the airflow around the amplifier and provide additional space for cooling.
2. Make sure that the amplifier is not place near a heat source (a radiator etc..).
3. Turn the amplifier OFF at the rear (mains input) and back ON after a 20 minutes.
4. If the above does not solve the problem then contact CAAS Audio.
The amplifier is continuously running under temperature (below 35 degrees C).
1. Check that the amplifier is not placed in a draft or near a cooling fan
2. Turn the amplifier OFF at the rear (mains input) and back ON after 20 minutes.
3. If the above does not solve the problem then contact CAAS Audio.
The amplifier is turned OFF but the front LED is still illuminated after 1 minute.
1. This indicates that the amplifier has been turned ON and then OFF in rapid succession.
Turn the amplifier back ON and wait for 5 minutes before turning it OFF again.
Note: Visit www.caasaudio.com for answers to frequently asked questions and additional
troubleshooting information.
Maintenance
The following routine maintenance should be performed on a periodic basis:
Clean the exterior surfaces of the unit with a soft, dry, lint-free cloth. Do not use alcohol, benzene,
acetone-based cleaners, or strong commercial cleaners. Do not use a cloth made with steel wool
or metal polish. If the unit is exposed to a dusty environment, a low-pressure blower may be used
to remove dust from its exterior.
Page 10
Warranty (3 Year Guarantee)
To reduce the risk of fire, electrical shock or other injuries, the user should not attempt to service the Elysian
100 (E100). Please do not open the E100. There are no user serviceable parts inside the E100. Opening the
E100 will invalidate any warranty offered. Servicing must be referred to qualified service personnel only.
This warranty is offered in relation to purchases made in the United Kingdom, Eire and European Economic
Area (EEA) only and shall be governed by the laws [applying in the country in which purchase of the product
takes place]. Consumer statutory rights applying under the laws [pertaining in the country of purchase] shall
not be adversely affected by any terms and conditions contained herein. All CAAS Audio products are
covered by a standard 3-year manufacturers’ warranty. This covers parts and labour, subject to terms &
conditions. This warranty is not transferable outside the European Economic Area.
If a CAAS Audio product is defective in normal domestic use, due to a fault in materials or workmanship,
CAAS Audio will at its discretion (and subject to the terms contained herein) either repair or
replace it free of charge within a reasonable time after return of such product to CAAS Audio during the
warranty period. This warranty is offered to the first purchaser only and covers the cost of parts and
associated labour required to correct such defects in materials or workmanship arising and advised to your
retailer or CAAS Audio during a period of three (3) years from the original date of purchase.
This Warranty does NOT cover:
1. Damage to CAAS Audio products while in possession of a shipper, retailer, or consumer and not
caused by defects in materials or workmanship.
2. Damage or defects caused by abnormal or unreasonable use (including repairs or alterations of
products by a person or company other than CAAS Audio.
3. Damage to CAAS Audio products arising due to or from normal wear and tear.
4. Damage resulting from misuse, neglect, abuse, accidents, acts of nature, improper installation,
improper removal or cleaning.
5. Damage resulting from failure to follow the instructions in the user manual or repair or attempted
repair by unauthorised personnel or company.
6. Initial set-up, check-ups or charges incurred for installation of the product.
7. Any cause other than a product defect due to a fault in materials or workmanship.
8. Any product where the serial number has been defaced, modified or removed.
9. Any CAAS Audio product purchased outside the European Economic Area.
Note: The term “Damage” includes, malfunction, deterioration and failure to meet specifications.
CAAS Audio will pay for all parts and labour covered by this warranty. The purchaser must pay all shipping
charges if it is necessary to return the product to CAAS Audio or your retailer. However, if the required
repairs are covered by this warranty CAAS Audio will pay for the return shipping to any destination within the
UK & Eire. Whenever warranty service is required you must present the original dated sales receipt or other
proof of purchase.
The equipment should be packed in its original packing. Do not return your product to CAAS Audio without
consulting and approval from CAAS Audio. If you are returning any product, you should use a reputable
carrier - do NOT post. CAAS Audio cannot accept responsibility for the unit while in transit to the retailer or
CAAS Audio.
Please ensure that your equipment is insured by you during any transit or shipment for repair.
This warranty applies from the date of purchase for the duration of three (3) year. Under no circumstances
will this change. If a product is returned for repair or servicing or other, the remainder of the warranty from
the original date of purchase is the warranty given on the repair, service or other and NOT a further three (3)
year warranty.
Page 11