1
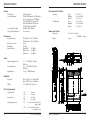
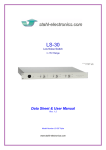
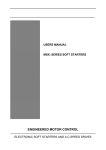
CDU 5211 Series
CDU 5211 Series
CD-ROM Drive
User’s Manual
NOTE: This manual is subject to change without notice.
Revision 1
Copyright 2001 - Sony Australia
Printed in Australia
Owner’s Record
The model and serial numbers are located on the topside of the drive. Record these
numbers in the space provided below. Refer to them whenever you call upon your sales
representative regarding this product.
Model No._________________
Serial No. _______________
WARNING
To prevent fire or shock hazard, do not expose the unit to rain or moisture.
To avoid electrical shock, do not open the cabinet.
Refer servicing to qualified personnel only.
CAUTION
The use of optical instruments with this product will increase eye hazard.
The use of controls or adjustments or performance of procedures other than those
specified herein may result in hazardous radiation exposure.
This unit uses CD-ROM discs with the following mark.
When you use this unit as an audio CD player, use compact discs
with the following mark.
CAUTION
LASER RADIATION WHEN OPEN.
DO NOT STARE INTO BEAM
This label is located on the drive unit’s
internal chassis.
ATTENTION
Dieses Etikett befindet sich auf dem inneren
Chassis des Laufwerkes
RAYONNEMENT LASER EN CAS D’OUVERTURE.
NE PAS REGARDER DANS LE FAISCEAU.
CAUTION
VORSICHT
ADVARSEL
ADVARSEL
VARNING
VARO!
© 2001 - Sony Australia
INVISIBLE LASER RADIATION WHEN OPEN. DO NOT
STARE INTO BEAM OR VIEW DIRECTLY WITH OPTICAL
INSTRUMENTS.
UNSICHTBARE LASERSTRAHLUNG, WENN ABDECKUNG
GEÖFFNET. NICHT IN DEN STRAHL BLICKEN, AUCH
NICHT MIT OPTISCHEN INSTRUMENTEN.
USYNLIG LASERSTRÅLING VED ÅBNING SE IKKE IND I
STRÅLEN-HELLER IKKE MED OPTISKE INSTRUMENTER.
USYNLIG LASERSTRÅLING NÅR DEKSEL ÅPNES. STIRR
IKKE INN I STRÅLEN ELLER SE DIREKTE MED OPTISKE
INSTRUMENTER.
OSYNLIG LASERSTRÅLNING NÄR DENNA DEL ÄR
ÖPPNAD. STIRRA EJ IN I STRÅLEN OCH BETRAKTA EJ
STRALEN MED OPTISKA INSTRUMENT.
AVATTAESSA OLET ALTTIINA NÄKYMÄTTÖMÄLLE
LASERSÄTEILYLLE. ÄLÄ TUIJOTA SÄTEESEEN ÄLÄKÄ
KATSO SITÄ OPTISEN LAITTEEN LÄPI.
© 2001 - Sony Australia
This label is located on the top of
the drive.
Dieser Aufkleber befindet sich an
der Oberseite des Gehäuses.
1
ACKNOWLEDGMENTS & TRADEMARKS
All contents are subject to change at any time without notice. No responsibility is
assumed for its use; nor for infringements of patents or other rights of third parties and
no patent or license is implied hereby.
All trademarks are the property of their respective owners.
INFORMATION
You are cautioned that any changes or modifications not expressly approved in this
manual could void your warranty covering this equipment.
Note: This equipment has been tested and found to comply with the limits for a Class
B digital device, pursuant to Part 15 of the FCC Rules. These limits are designed to
provide reasonable protection against harmful interference in a residential installation.
This equipment generates, uses, and can radiate radio frequency energy and, if not
installed and used in accordance with the instructions, may cause harmful interference
to radio communications. However, there is no guarantee that interference will not
occur in a particular installation. If this equipment does cause harmful interference to
radio or television reception, which can be determined by turning the equipment off
and on, the user is encouraged to try to correct the interference by one or more of
the following measures:
Re-orient or relocate the receiving antenna.
Increase the separation between the equipment and receiver.
Connect the equipment into an outlet on a circuit different from that to which
the receiver is connected.
Consult the dealer or an experienced radio/TV technician for help.
CLASS 1
LASER PRODUCT
LASER KLASSE 1
PRODUKT
This CD-ROM Drive Unit is classified as a CLASS 1
LASER PRODUCT.
The CLASS 1 LASER PRODUCT label is located on the
top of the drive.
Safety Notice
1.
Do not install or operate the product in high temperature, humidity or dusty
environment.
2.
Do not attempt to open the cover to repair the product yourself.
3.
Never spill liquid of any kind on the product.
4.
Always follow instructions on this manual under operating the product.
5.
To prevent exposure to laser emanations (harmful to human eyes), do not
attempt to disassemble this unit.
6.
Hold CD discs by their edges. Do not touch the surface of the discs.
7.
The drive is designed to be incorporated into a computer-based system or
unit which has an enclosing cover. Using the drive alone or in any other
configuration is prohibited.
Caution:
Use of controls or adjustments or performance of procedures other than those
specified herein may result in hazardous radiation exposure.
2
© 2001 - Sony Australia
© 2001 - Sony Australia
3
CONTENTS
Warnings and Precautions
7
Introduction
8
Features ............................................................................................................8
Software Requirements....................................................................................9
Using the Drive
10
Front Panel .....................................................................................................10
“Maximum Speed Choice” function..............................................................11
Installing the Drive
12
System Requirements.....................................................................................12
Hardware Installation.....................................................................................12
Connections & Settings .................................................................................13
Connecting the IDE cable ..............................................................................14
Trouble Shooting
15
Specifications
16
General...........................................................................................................16
Performance ...................................................................................................16
Audio..............................................................................................................16
Reliability.......................................................................................................16
Power Requirements ......................................................................................16
Environmental Conditions .............................................................................17
Dimensions & Mass.......................................................................................17
4
© 2001 - Sony Australia
© 2001 - Sony Australia
5
WARNINGS & PRECAUTIONS
WARNING - Possible voiding of Warranty
Please be aware that cracked, deeply scratched or other poor quality discs used in
this drive may cause damage to the drive and / or the data on the disc. Such discs
may break at high speed rotation. If full care is not exercised in relation to this
matter you may void the warranty of this product.
PRECAUTIONS
·
·
·
·
·
·
6
© 2001 - Sony Australia
Do not attempt to open the drive and service it. Removing the cover may
cause exposure to harmful laser beams and electrical voltages. User is recommended to get service by returning the defected drive back to the original
vendor where the drive is purchased.
Use the original packing for transporting the drive or sending back for
service. The original packing were designed and tested to protect your drive
under rough conditions.
Do not put this CD-ROM drive in direct sunlight, on heat units, or near
electrical appliances which draw large amounts of current.
Keep your discs clean. Using soft, dust-free cloth to clear the surface of the
disc.
Do not drop or jolt the drive.
Keep the area around the CD-ROM drive clean from dust, smoke, and other
contaminants.
© 2001 - Sony Australia
7
INTRODUCTION
INTRODUCTION
Features
The CDU 5211 is an internal CD-Rom (Compact Disc - Read Only
Memory) drive unit designed for use with personal computers. It comes
with the following features:
General
•
Speed: 52X max / 40X default.
•
“Maximum Speed Choice” function.
•
40 Pin ATAPI - IDE interface.
•
5 1/4 inch half-height drive form factor.
•
Power loading and eject of a disc.
•
ABS (Auto Balance Spindle) to reduce noise and vibration.
•
128 KB of buffer memory.
•
Power saving functions.
•
Vertical mount ability.
•
Small CPU bandwidth consumption.
•
Software volume control.
•
Easy audio CD-DA control button.
Supported Disc Formats
The CD 5211 is a “Multiread” compliant drive and can read data in each
of the following formats:
CD-DA, CD-ROM Mode-1, CD-ROM/XA Mode-2 Form-1 &
Form-2, CDI-Ready, Photo-CD, Karaoke-CD, Video CD (MPEG-1),
Enhanced CD, CD Extra, I-Trax CD, CD-Text, UDF.
Media Types
Software Requirements
Reading Data
For your computer to recognise your new CD-Rom drive and to be able to
access data from it, the correct device drivers must be installed.
Most modern operating systems such as Microsoft® Windows 95™,
Windows 98™, Windows ME™, Windows NT4™ and Windows
2000™ along with most versions of Linux and OS/2™ include these
drivers as standard in the operating system, hence no additional drivers are
required for reading discs on these operating systems.
Windows 3.xx™ and MS-DOS™
If you require the drive to be recognised by Microsoft Windows 3.xx or
MS-DOS you will need to install the MS-DOS™ device driver. It can be
downloaded from our support web site:
http://www.sony.com.au/support/itp
NOTE: If using Windows 95 or later and you have previously
installed the MS-DOS device driver it is recommended that you disable
or remove MS-DOS device driver as it will decrease performance.
CD-ROM, CD-R and CD-RW.
12cm & 8cm discs.
Audio
•
•
8
Outputs 16-bit digital data over the ATA interface.
Audio line output (rear panel) and headphones jack (front panel) for
audio CD playback.
© 2001 - Sony Australia
© 2001 - Sony Australia
9
USING THE DRIVE
USING THE DRIVE
Front Panel
“Maximum Speed Choice” function
The CDU-5211 has a Maximum Speed Choice function where the user can select between
maximum speeds of 40X or 52X.
The drive always defaults to 40X.
To activate 52X operation press and hold the Stop/Eject button for 5 seconds.
The drive will then read the current disc at 52X speed.
When the disc is ejected the drive will default back to 40X operation.
2
1
3 4
5
6
7
1 - Earphone Jack
Stereo mini-jack for headphones and/or powered speakers.
2 - Volume
Control volume of earphone jack. This control has no effect
on rear panel audio output.
3-
Control
Emergency Eject In case the Eject button isn’t working, insert a small
It is recommended that 52X operation only be activated under the following conditions
You are confident that the disc been used is in good condition and
free from marks and scratches.
The disc is well balanced and does not have thick printed ink or
adhesive labels attached to its surface.
The disc is not physically damaged in any maner.
paper clip into this hole to eject the tray.
Note: Turn off the power before doing this manual ejection.
Discs that have the above characteristics may reduce maximum transfer speeds due to
excessive disc vibration at 52X.
4 - On/Busy LED
The On/Busy LED will be flashing while the CD-ROM
drive is busy.
NOTE: Physically damaged discs may void warranty - refer to “Warnings &
Precautions” on page 7 of this manual.
5 - Disc Tray
The user can open or close the disc tray by pressing the
Open/Close button.
6 - Play/Skip
Will start playing of an Audio-CD or Skip to next track if
already playing an Audio-CD.
7 - Stop/Eject/Speed Will eject the tray if a CD-ROM is playing.
Will stop an Audio-CD playing, pressing it again will eject
the tray as usual.
Pressing this button can also change the max drive speed.
The default max speed is 40X. Press and hold for 5 seconds
to change the drive speed from 40X to 52X.
Tray out disc will reset drive speed from 52X to 40X
automatically.
10
© 2001 - Sony Australia
© 2001 - Sony Australia
11
INSTALLING THE DRIVE
INSTALLING THE DRIVE
System Requirements
Connections and Settings
To ensure stable performance, the following system specifications are recommended.
There are three pairs of jumpers, MA (Master), SL (Slave) and CS (Cable Select) on
the rear panel of your CD-ROM drive. Figure 1 shows the location of each jumper.
OS
Interface
DOS 6.xx or higher, Windows 3.1x, 95/98/ME/2000/
NT 4.0, OS/2 Warp 3.0 or higher.
Vacant IDE interface connector
NOTE: To operate the drive using DOS 6.xx or higher you will need to
install the DOS device drivers. These are available for free download
from our support web site:
http://www.sony.com.au/support/itp
Rear of Drive
Cable Select
Slave
Master
Analogue
Audio
Digital
Audio
DC
C S M
S L A
RCCL
POWER
HOST INTERFACE
39
40
1
2
+5
G
G
+12
Hardware Installation
Please refer to your PC’s user manual and follow their guidelines for adding
hardware components. Always follow their anti-static precautions.
1
Set the Master/Slave jumper on CD-ROM rear panel (refer to figure 1)
2
Locate an empty drive bay and slide the CD-ROM drive into the bay. Secure
with four screws.
3
Connect the power supply cable to the CD-ROM drive. (Ensure the pin
definition of power connector is the same as shown in figure 1).
4
Connect the 40 pin IDE / ATAPI cable to the CD-ROM drive according to the
description in figure 1 (Note: Pin 1 on the cable is generally indicated by a
red stripe along the edge of the ribbon cable).
5
Connect the sound cable from the Analog Audio on the rear panel of
CD-ROM to your sound card (if you have a sound card in your system).
6
Follow you PC’s user manual to re-assemble your PC.
C
S
S
L
M
A
Master Device
(Factory default setting)
C
S
S
L
M
A
Slave Device
Figure 1
CS (CSEL)
If your system supports the CS setting you can set the jumper to the “CS” position. The
Master/Slave setting will then be made automatically depending on your hardware
Configuration. No jumper is then required on the “MA” or “SL” pins.
NOTE: For optimum performance on Windows based systems the drives DMA
setting in the device manager should be enabled. Refer to your Systems help
menu for assistance.
12
© 2001 - Sony Australia
© 2001 - Sony Australia
13
INSTALLING THE DRIVE
TROUBLE-SHOOTING
Connecting the IDE cable
Most PC systems can connect up to 4 devices on the IDE ports. Your PC should consist
of a “Primary IDE Bus” and a “Secondary IDE Bus” each of which can have two
devices connected to it - a “Master device” and a “Slave device” Refer Figure 2
If you experience any trouble during installation or normal use of your CD-ROM
drive, please refer to the following information.
You will find further information on our support web site:
http://www.sony.com.au/support/itp
In most PC systems, the hard disk drive is set as the “Master Device” on the “Primary
IDE Bus”, this should not be altered.
Symptoms
Action
If available it is recommended that you connect the CD-ROM drive as the “Master
Device” on the “Secondary IDE Bus”.
CD drive not recognised by system.
The CD-ROM drive can also be set as the “Slave Device” on either bus if both of the
“Master Device” possibilities have been taken by other devices. Some devices such as
CD writers and DVD drives may be required to be set as the “Master Device”, in this
case it is OK to set the CD-ROM drive as the “Slave Device”.
Check IDE interface connections.
Check the MASTER/SLAVE settings of
all devices.
The disc tray will not open .
Disable the “lock eject” feature software
of the operating system.
Shut power down and use emergency
eject hole to eject disc.
Cannot read data on discs.
Check the surface of CD media, always
keep it clean and free from scratches.
Check the quality of CD media.
Check if other discs or music CD’s
are reading OK.
Is Disc inserted upside down?
Could disc be a UDF formatted
disc? Check if a UDF reader is installed.
No sound.
Check sound cable connections.
Check the volume settings of the drive
and operating system volume controls.
Are speakers turned on?
Appears to have no power.
Device 2
(Slave)
Device2
(Slave)
Hard Disk
(Master)
Device 1
(Master)
Check DC power cable connection.
Secondary IDE Bus
Primary IDE Bus
PC Mother Board
Figure 2
14
© 2001 - Sony Australia
© 2001 - Sony Australia
15
SPECIFICATIONS
General
Host Interface
Acceptable Formats
Acceptable Media Types
Acceptable Disc Diameters
Performance
Rotational Speeds
Random access time
Data Buffer
Burst Data Rate
SPECIFICATIONS
ATA-PI compliant.
CD-DA, CD-Rom mode 1, CD-Rom/XA
mode 2 form 1 & form 2, CD-I Ready,
Video CD (MPEG-1), Karaoke CD,
Photo CD, Enhanced CD, CD extra,
I-Trax CD, CD-Text and UDF.
CD-Rom, CD-R, CD-RW,
12 cm and 8 cm.
Environmental Conditions
Operating
Non Operating
Temp
Humidity
Altitude
Temp
Humidity
Altitude
5°C to 45°C
10% to 80% RH
0 ~ 3,500 m
-35°C to 60°C
10% to 90% RH
0 ~ 12,500 m
Dimensions & Mass
Dimensions
CD-Rom, Max - 52X, 7800 KB/sec.
CD-Rom, Max - 40X, 6,000 KB/sec.
80 ms.
128 KB.
Ultra DMA33.3 MB/sec.
DMA mode 2- 16.6 MB/sec.
PIO mode 416.6 MB/sec.
145.8 x 41.3 x 190 mm
(WxHxD +/- 0.5mm)
Weight
0.9Kg
5. MECHANICAL DRAWINGS
Audio
Earphone Output (Front)
Line Output (Rear)
Digital Output
0.7 +/- 0.2 VRMS @ 33Kohms,
1KHz, 0db
0.7 +/- 0.2 VRMS @ 47Kohms,
1KHz, 0db
5.0 Vp-p - SPDIF Standard
Reliability
Error Rate
MTBF
Mode-1 (ECC on) 10 -12 Block/Bit
Mode-2 (ECC off) 10 -9 Block/Bit
70,000 POH @ 25% duty cycle
Power Requirements
Operation Max
Sleep Average
Voltage Requirements
+5V
+12V
+5V
+12V
+5V
+12V
16
=
1.0 amps
=
1.5 amps
=
0.03 amps
=
0.01 amps
+/- 5% and less than 100m Vp-p
ripple voltage
+/- 10% and less than 200m
Vp-p ripple voltage
© 2001 - Sony Australia
© 2001 - Sony Australia
17