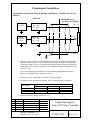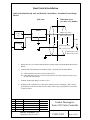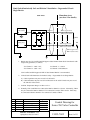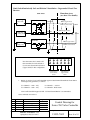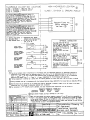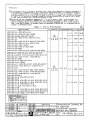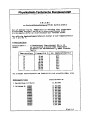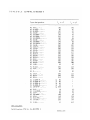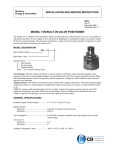
1
Siemens Energy & Automation INSTALLATION AND SERVICE INSTRUCTION SD760 Issue: 4 August 2005 Supersedes Iss. 3 ValvePACTM Series 760 Intelligent Valve Control Our Positioners Control the Best Valves & Actuators in the World SD760 TABLE OF CONTENTS TABLE OF CONTENTS SECTION PAGE 1.0 INTRODUCTION ................................................................................................................................................... 1.1 SPECIFICATIONS ............................................................................................................................................ 1.2 MODEL DESIGNATION .................................................................................................................................. 1.3 OPTIONS ........................................................................................................................................................... 1.4 PRODUCT SUPPORT ....................................................................................................................................... 1-1 1-2 1-5 1-6 1-6 2.0 INSTALLATION ..................................................................................................................................................... 2-1 2.1 SHIPPING AND STORAGE ............................................................................................................................. 2-1 2.2 MECHANICAL INSTALLATION ................................................................................................................... 2-1 2.2.1 Procedure .................................................................................................................................................. 2-3 2.2.1A Rising Stem Actuator ............................................................................................................................ 2-3 2.2.1B Rotary Actuator ..................................................................................................................................... 2-3 2.3 RETAINING CLIP INSTALLATION ............................................................................................................... 2-5 2.4 PNEUMATIC CONNECTIONS ........................................................................................................................ 2-6 2.4.1 Piping ....................................................................................................................................................... 2-7 2.4.2 Instrument Air Requirements ................................................................................................................... 2-8 2.5 ELECTRICAL CONNECTIONS ....................................................................................................................... 2-8 2.5.1 Non-Hazardous Locations ........................................................................................................................ 2-8 2.5.2 Hazardous Locations .................................................................................................................................. 2-8 2.5.3 EEx ia ....................................................................................................................................................... 2-10 3.0 CALIBRATION ..................................................................................................................................................... . 3.1 CAM INSTALLATION AND INDEXING ....................................................................................................... 3.1.1 Cam Identification .................................................................................................................................... 3.1.2 Procedure .................................................................................................................................................. 3.2 CALIBRATION EQUIPMENT NEEDED ........................................................................................................ 3.2.1 Zero Adjustment ....................................................................................................................................... 3.2.2 Span Adjustment ........................................................................................................................................ 3-1 3-1 3-1 3-2 3-3 3-3 3-3 4.0 OUTPUT OPTIONS ................................................................................................................................................ 4.1 INSTALLATION ............................................................................................................................................... 4.2 ELECTRICAL CONNECTIONS ....................................................................................................................... 4.2.1 Mechanical Limit Switches and Proximity Sensors ................................................................................. 4.2.2 4-20 mAdc Current Feedback Board Option ............................................................................................ 4.2.3 1K Potentiometer Feedback Option ......................................................................................................... 4.3 CALIBRATION ................................................................................................................................................. 4.3.1 Mechanical Limit Switches and Proximity Sensors ................................................................................. 4.3.2 4-20 mAdc Current Feedback Board Option.............................................................................................. 4.3.3 1K Potentiometer Feedback Option ........................................................................................................... 4.4 INDICATORS .................................................................................................................................................... 4.4.1 Beacon Indicator ...................................................................................................................................... 4.4.2 Flat Indicator ............................................................................................................................................ 4.5 I/P CONVERTER .............................................................................................................................................. 4.5.1 Wiring ...................................................................................................................................................... 4.5.2 Calibration ................................................................................................................................................ 4.6 OUTPUT CAPACITY SPOOL KITS ................................................................................................................ 4-1 4-1 4-2 4-2 4-3 4-4 4-4 4-4 4-5 4-6 4-7 4-7 4-8 4-8 4-8 4-9 4-10 5.0 MAINTENANCE ..................................................................................................................................................... 5.1 FILTER SCREENS ............................................................................................................................................ 5.2 SPARE AND REPLACEMENT PARTS............................................................................................................. 5.3 RETURN FOR REPAIR ...................................................................................................................................... 5-1 5-1 5-1 5-1 August 2005 i TABLE OF CONTENTS SD760 LIST OF ILLUSTRATIONS FIGURE PAGE 2-1 Installation Dimensions ............................................................................................................................................. 2-2 2-2 Controller Mounting and Feedback Pin Connection ................................................................................................. 2-4 2-3 Retaining Clip Position ............................................................................................................................................. 2-6 3-1A and 3-1B Indexing of CW and CCW Cams ........................................................................................................... 3-1 3-2 Standard Cam Characteristics .................................................................................................................................... 3-2 3-3 Calibration Adjustments ............................................................................................................................................ 3-4 4-1 PC Board Installation ................................................................................................................................................ 4-2 Mechanical Limit Switches ......................................................................................................................................... 4-3 Typical 4-20 mA Feedback Option Loop with Load ................................................................................................ 4-4 Maximum Loop Load vs. Loop Supply Voltage ....................................................................................................... 4-5 1K Feedback Potentiometer Schematic ..................................................................................................................... 4-6 Potentiometer Gear Bracket Alignment .................................................................................................................... 4-7 4-20 mA Loop Calibration ........................................................................................................................................ 4-8 Beacon Indicator ....................................................................................................................................................... 4-9 Flat Indicator ............................................................................................................................................................. 4-10 Wiring for I/P Converter ......................................................................................................................................... 4-11 Output Capacity Spool Kit ...................................................................................................................................... 4-1 4-2 4-3 4-4 4-4 4-5 4-6 4-7 4-8 4-9 4-10 LIST OF TABLES TABLE PAGE 1-1 Specifications ............................................................................................................................................................ 1-2 1-2 Option Specifications ................................................................................................................................................ 1-3 1-3 Options ...................................................................................................................................................................... 1-6 2-1 2-2 2-3 2-4 2-5 2-6 Pneumatic Connections ............................................................................................................................................. 2-7 Maximum Input Parameters ........................................................................................................................................ 2-9 Electrical Parameters ............................................................................................................................................... 2-10 Temperature Class T4 ............................................................................................................................................. 2-10 Temperature Class T5 ............................................................................................................................................. 2-11 Temperature Class T6 ............................................................................................................................................. 2-11 3-1 Calibration Equipment .............................................................................................................................................. 3-3 4-1 4-2 4-3 4-4 4-5 ii Switch Terminal Block Connections ......................................................................................................................... Equipment Needed .................................................................................................................................................... Switch Position for Reverse or Direct Action ........................................................................................................... Equipment Needed for 1K Feedback Potentiometer Option ...................................................................................... Connections for 1K Feedback Option ....................................................................................................................... 4-3 4-5 4-5 4-6 4-7 August 2005 SD760 TABLE OF CONTENTS ADDITIONAL INFORMATION Parts List ........................................................................................................................................................... 16300-125PL Assembly Drawing ............................................................................................................................................... 16300-125 Declaration of Conformity Moore Products Co. Control Drawing .................................................................................................................. 15032-7602 Sensycon Connection Diagram .................................................................................................................................... 900842 Pepperl + Fuchs Installation Drawing .................................................................................................................... 116-0035q PTB Certificates of Conformance ......................................................................................... Ex-93.C.2104 X, Ex-83/2022 X Changes for Revision 4, August 2005 Significant changes are indicated by change bars in the page margins. Some of these changes are listed below. Removed material may not be marked by a change bar. 1. Trademark statements and symbols updated throughout. 2. Product Support section updated. ValvePAC is a trademark of Siemens Energy & Automation, Inc. Other trademarks are the property of their respective owners. Viton® is a registered trademark of DuPont Performance Elastomers. All product designations may be trademarks or product names of Siemens Energy & Automation, Inc. or other supplier companies whose use by third parties for their own purposes could violate the rights of the owners. Siemens Energy & Automation, Inc. assumes no liability for errors or omissions in this document or for the application and use of information in this document. The information herein is subject to change without notice. Procedures in this document have been reviewed for compliance with applicable approval agency requirements and are considered sound practice. Neither Siemens Energy & Automation, Inc. nor these agencies are responsible for repairs made by the user. August 2005 iii SD760 INTRODUCTION 1.0 INTRODUCTION The Series 760P & 760E Valve Controllers are cam characterized, double-acting, pneumatic or electro-pneumatic valve controllers that accept a 3-15, or 4-20 mA input signal and convert it to a pneumatic output to position a control valve actuator. The controllers can be used with either rectilinear or rotary, single or double acting actuators. A selection of cam profiles and feedback levers is available. A spool valve is used to load the actuator for positioning in response to an input signal. Mechanical feedback is provided by a characterized cam. Cam profiles are available for linear, equal percentage, or quick opening operation. A blank profile cam is available for custom applications. Rectilinear action can range from 1/2" to 6" in length. The feedback shaft and characterized cam can be replaced in the field to configure the positioner for use with either a rectilinear or rotary actuator. No additional parts are necessary to change between single or double acting actuators, or direct or reverse action. Figure 2-1 , Installation Dimensions, shows the connection ports. August 2005 1-1 INTRODUCTION SD760 1.1 SPECIFICATIONS TABLE 1-1 Specifications 760P Pneumatic Positioner Temperature Range Ingress Connections 0.5 scfm (typical) 18 scfm (Cv = 0.6) Supply (1/2 pressure gain of std.) 9 scfm (Cv = 0.3) Supply 3-15 psig, 3-27 psig Span Zero Hysteresis Deadband Repeatability Supply Pressure Effect 1-2 0.6 scfm (typical) 9 scfm (Cv = 0.3) Feedback Configuration Pressure Gain Linearity (Independent) 760E Electro/Pneumatic Positioner -40 to 85°C NEMA 4X, IP65 Pneumatic - 1/4” NPT Gauge - 1/8” NPT Electrical - 3/4” NPT, - M25 (optional) Exhaust - 1/4” NPT Epoxy/Polyester powder coat Single or double acting Direct or reverse 150 psig max. Finish Output Configuration Action Supply Pressure Air Consumption Flow Capacity Standard Spool Flow Capacity High Flow Spool Flow Capacity Lo Flow Spool Input Signal Feedback Signal Common * Up to 50% Split range 90 degree rotary standard 1/2” to 6” rectilinear optional Cam characterization 160 %/% @ 60 psig supply std. (800 psi/psi) Adjustable -60 to +25% of normal span Adjustable -10 to +60% of normal span 0.5% of normal span (typical) 0.75% of normal span (typical) 4-20 mA 0.75% of normal span (typical) 1.0% of normal span (typical) Less than 0.25% of span Within 0.5% valve travel Less than 0.2% valve travel for a 5 psig change in supply pressure August 2005 SD760 INTRODUCTION Materials of Construction Electrical Classification FM Approval CSA Certification: Stainless Steel, Aluminum, Brass, Nickel Plated Brass, Nickel Plated Steel, Polyphenylene Sulfide, Silicone, Silicone on Fiberglass, Neoprene on Nylon, Viton® fluoroelastomer, Viton® fluoroelastomer on Nomex®, Epoxy Polyester powder Coat, Glass Filled Nylon, Polycarbonate, Bronze, Steel Intrinsically Safe, Entity: Class I, Div. 1, Groups A, B, C, D; Class II, Div. 1, Groups E, F, G; Class III, Div. 1, when installed in accordance with Moore Products Co. drawing 15032-7602 rev.1; NonIncendive: Class I, Div. 2, Groups A, B, C, D. Suitable for: Class II, Div. 2, Groups E, F, G; Class III, Div. 2. Intrinsically Safe: Class I, Div. 1, Groups A, B, C, D; Class II, Div. 1, Groups E, F, G; Class III, Div. 1, when installed in accordance with MPCo drawing 15032-7602. Suitable for: Class I, Div. 2, Groups A, B, C, D; Class II, Div. 2, Groups E, F, G; Class III, Div. 2 CENELEC: EEx ia IIC T4/T5/T6 SIRA: Ex N IIC T5 * For installations in hazardous locations adhere to guidelines of Control Drawing 15032-7602 for temperature limitations. August 2005 1-3 INTRODUCTION SD760 TABLE 1-2 Option Specifications All percentages are based on full span of output, unless otherwise noted. Temperature Range Configuration Linearity Hysteresis Deadband Repeatability Supply voltage effect Ambient temperature effect Zero / Span Power Requirements Power Rating Temperature Range Configuration Power Rating Mechanical life Connections (per switch) Repeatability 4-20 mA Feedback -40° to 85° C 4-20 mA DC output, direct or reverse acting Less than 1.0% Less than 0.5% Less than 0.25% Within 0.3% less than 0.01% for 5V change in supply Less than 1.0% per 50° F change 55 to 150 degree input range for full span 10 to 36 Vdc 1K Ohm Potentiometer -40° to 85° C Resistive output, direct or reverse acting Less than 1.0% Less than 0.5% Less than 0.25% Within 0.3% Less than 1.0% per 50° F change 0 to 915 Ohm over 90 degree input rotation 1 Watt max. Mechanical Limit Switches -40° to 85° C Two switches, infinite setpoint resolution 10A@125/250 Vac, 10A@24 Vdc, 0.1A@125 Vdc 1 million cycles no load, 100,000 full load Normally open, Normally closed, Common Within 0.3% valve travel span Proximity Sensors -20° to 85° C Two sensors, infinite setpoint resolution See barrier manufacturer instructions Essentially infinite See barrier manufacturer instructions Within 0.3% valve travel span 1.2 MODEL DESIGNATION Each Controller has a nameplate identifying the model number, bill of material, and input range. The following decodes the model number on the nameplate. Before installing or servicing a Controller, review the nameplate information. 1-4 August 2005 SD760 INTRODUCTION Basic Model No. 76 Valve Controller 0 Standard Product - No Private Label A-Z Reserved for OEM Private Label Products Input E1 4 to 20 mAdc Input Option - P2 3-27 / 6-30 psi P1 3 to 15 psig is now available. P4 20 to 100kPa P5 0.2 to 1.0 Bar P6 0.2 to 1.0 kg/cm2 Action 1 1/2 to 4 inch stroke (60° cams) 2 3 to 6 inch stroke (60° cams) 3 1/4 turn - 1/2 inch square shaft (90° cams) 4 1/2 to 2 inch stroke (60° cams) 5 1/4 turn - NAMUR (90° cams) E 1/2 to 4 inch stroke lever with (1) 90° linear cam F 2 to 6 inch stroke lever with (1) 90° linear cam S 1/4 turn NAMUR shaft with set of (3) 60° cams Enclosure (with 3/4 inch NPT conduit connection) A Standard B With Beacon Indicator (for Action selections with 90° cams) C With Stroking Speed Adjusters D With Stroking Speed Adjusters and Beacon Indicator (for Action selections with 90° cams) J With Flat Indicator (for Action selections with 60° cams) K With Flat Indicator (for Action selections with 90° cams) L With Stroking Speed Adjusters and Flat Indicator (for Action selections with 60° cams) M With Stroking Speed Adjusters and Flat Indicator (for Action selections with 90° cams) Enclosure (with M25 conduit connection) (Electrical Classification for N & 8 only) E Standard F With Beacon Indicator (for Action selections with 90° cams) G With Stroking Speed Adjusters H With Stroking Speed Adjusters and Beacon Indicator (for Action selections with 90° cams) N With Flat Indicator (for Action selections with 60° cams) P With Flat Indicator (for Action selections with 90° cams) R With Stroking Speed Adjusters and Flat Indicator (for Action selections with 60° cams) S With Stroking Speed Adjusters and Flat Indicator (for Action selections with 90° cams) Flow Capacity A Standard (Cv = 0.3) B High Flow (Cv = 0.6) C Low Gain (Cv approximately ½ standard flow gain) Environmental Construction A Standard Temperature C High Temperature (760P with no electrical options) (-30 to 150° C) (-20 to 300° F) E Ozone Resistant with Viton® fluoroelastomer and iso-elastomeric spring F Ozone Resistant with Viton® fluoroelastomer and standard spring Gauges N Not Required G Gauges (not available with Hi-Temp Environmental Construction) Limit Switches N Not Required 1 Mechanical 2 Proximity Switches (NAMUR Std.) Feedback N Not Required 1 Potentiometer - 1K 2 4 - 20 mAdc Feedback Design Level A Electrical Certification (Refer to Specifications) N Non Approved 7 FM/CSA/SIRA Ex N /CENELEC, EEx ia (3/4 NPT conduit only)** 8 CENELEC, EEx ia/SIRA Ex N (3/4 NPT or 25mm conduit** 76 0 E1 5 A A N G N N A N Sample Model No. ** Consult factory before ordering. August 2005 1-5 INTRODUCTION SD760 1.3 OPTIONS Options are installed either in the field by the user or at the factory. User installation of options is explained in section 4.0 of this Instruction. The following options are available: TABLE 1-3 Options TYPE Flat Indicator Hi-VisTM Beacon Indicator Internal Limit Switches Internal Position Feedback Position Transmitter DESCRIPTION Flat lens and indicator provide a rough visual indication of valve position. Beacon lens and indicator provide a rough visual indication of valve position; used only on rotary actuators. Two Mechanical SPDT , or two NAMUR proximity switches. A Feedback pot to monitor valve position (1K ohm for 90 degree rotary applications; 666 ohms for 60 degree rectilinear applications). Two wire position transmitter provides 4-20mA output proportional to valve position. Requires 10 - 36 V external loop. 1.4 PRODUCT SUPPORT This section provides the Internet site addresses, e-mail addresses, telephone numbers, and related information for customers to access Siemens product support. When contacting Siemens for support: x Please have complete product information at hand: For hardware, this information is provided on the product nameplate (part number or model number, serial number, and/or version). For most software, this information is given in the Help > About screen. x If there is a problem with product operation: Is the problem intermittent or repeatable? What symptoms have been observed? What steps, configuration changes, loop modifications, etc. were performed before the problem occurred? What status messages, error messages, or LED indications are displayed? What troubleshooting steps have been performed? Is the installation environment (e.g. temperature, humidity) within the product’s specified operating parameters? For software, does the PC meet or exceed the minimum requirements (e.g. processor, memory, operating system)? x A copy of the Service Instruction, User’s Manual, or other technical literature for each involved product should be at hand. The Siemens public Internet site (see the table) has current revisions of technical literature, in Portable Document Format, for downloading. x To send an instrument to Siemens for repair, request a Return Material Authorization (RMA). IMPORTANT An instrument must be thoroughly cleaned (decontaminated) to remove any process materials, hazardous materials, or blood born pathogens prior to return for repair. Read and complete the Siemens RMA form(s). 1-6 August 2005 SD760 INTRODUCTION TABLE 1-4 Contact Information Telephone NORTH AMERICA Fax E-mail Hours of Operation Public Internet Site Repair Service +1 800 569 2132, option 2 for Siemens-Moore brand instruments +1 215 283 6358 [email protected] 8 a.m. to 4:45 p.m. eastern time Monday – Friday (except holidays) www.sea.siemens.com/ia +1 215 646 7400 extension 3187 Outside of North America see the Siemens web site at www.sea.siemens.com/ia; locate “Customer Support Process Instrumentation” and click the Contact Tech Support link to access the Global Support link. August 2005 1-7 SD760 INSTALLATION 2.0 INSTALLATION Operating temperature limits are stated in the Specifications section of this Instruction. The temperature in the selected location must not exceed the specified operating temperatures. CAUTION Exceeding the specified operating temperature limits can adversely affect performance and safety, and may cause damage to the Controller. The Controller will need to be calibrated before being put into service. 2.1 SHIPPING AND STORAGE If the controller is to be stocked, stored, or shipped to another location prior to piping, make sure that the factory installed plastic plugs remain in the pneumatic ports to prevent entry of moisture, dirt, or other contaminant. 2.2 MECHANICAL INSTALLATION Refer to Figure 2-1 for dimensions and mounting hole locations. August 2005 2-1 INSTALLATION SD760 RISING STEM APPLICATION ROTARY APPLICATION 7.840 (199,14) 6.190 (157,24) 0.25 (6,35) 6.190 (157,24) 6.490 (164.84) INPUT SHAFT FOR RECTILINEAR APPLICATIONS 0.45 (11,43) 0.50 (12.7) SQUARE INPUT SHAFT FOR ROTARY APPLICATIONS 0.58 (14,73) RIGHT VIEW FRONT VIEW ROTARY APPLICATION 8.713 (221.3) 2.00 4.00 6.00 2.396 (60,86) .325 (8,26) VALVE 2 1 2 3 4 M6 X 1 4 HOLES .31 DP 1.968 (50.00) BOLT CIRCLE BACK VIEW 1.117 (28,37) 1.404 (35,66) INPUT EXHAUST VALVE 1 1/4 NPT (TYPICAL) 3/4 NPT OR M25 ELECTRICAL CONDUIT CONNECTION SUPPLY NAMUR INPUT SHAFT FOR ROTARY APPLICATIONS RIGHT VIEW 3.818 (96,99) .466 (11,84) 7.482 (190,04) BOTTOM VIEW 760DIMG.DS4 FIGURE 2-1 Installation Dimensions 2-2 August 2005 SD760 INSTALLATION 2.2.1 Procedure To facilitate the alignment of the feedback shaft mechanism it may be necessary to loosen the cam locking mechanism. See section. 3.1.2. For feedback connection between controller and actuator, refer to either A or B below depending upon type of actuator to be used. A. Rising Stem Actuator Feedback lever must be perpendicular to actuator stem with actuator at mid-stroke. Connection between actuator stem and feedback lever is typically made using a slotted bracket attached to actuator stem and a feedback pin attached to the slotted bracket. The slotted bracket must be rigid and motion must be transferred without deflection. Figure 2-2, details A and B show the feedback pin fixed to the slotted bracket, the preferred method. The distance from the centerline of the feedback pin to the centerline of the input shaft must equal .866 x actuator stroke. Figure 2-2, detail C shows feedback pin fixed to the feedback lever, an alternate method that causes an increase in linearity error of approximately 2%. The distance from the centerline of the feedback pin to the centerline of the controller input shaft must equal actuator stroke. B. Rotary Actuator Couple the specified rotary input shaft to actuator shaft. Shaft centerlines must be in-line to minimize friction and binding as shafts rotate. Rigidly mount the controller to actuator to prevent relative motion. The controller may be mounted in any orientation. August 2005 2-3 INSTALLATION SD760 ACTUATOR ACTUATOR STEM SLOTTED BRACKET FEEDBACK PIN CONTROLLER FEEDBACK LEVER A. CONTROLLER MOUNTING AND PREFERRED METHOD OF CONNECTING FEEDBACK PIN FEEDBACK LEVER SLOTTED BRACKET INPUT SHAFT EQUAL TO STROKE 760-110.DS4 EQUAL TO 0.866 x STROKE B. PREFERRED METHOD OF STROKE SETTING FOR FEEDBACK PIN CONNECTION. FEEDBACK LEVER SHOWN AT MID-STROKE. C. METHOD OF CONNECTING FEEDBACK PIN AND STROKE SETTING FIGURE 2-2 Controller Mounting and Feedback Pin Connection 2-4 August 2005 SD760 INSTALLATION 2.3 RETAINING CLIP INSTALLATION The retaining clip is used in rectilinear applications to hold the feedback pin securely to the pressure side of the feedback lever slot, even at small cam pressure angles. This prevents excessive play in the linkage and limits the amount of error introduced into the system through the linkage. 1. Before installing the spring clip in the intended application, you must determine which side of the feedback lever slot the pin contacts during the valve stroke. 2. Install the controller. See section 2.2.1A. 3. Install the cam in the proper orientation for the intended service. See section 3.1. 4. Determine which side of the feedback lever slot the pin contacts as the cam is rotated in the direction that causes the range spring to compress. This is the side that the spring clip must force the pin to when it is installed. IMPORTANT The clip must be positioned such that the pin sits in the innermost side of the clip slide area at mid-stroke. See Figure 2-3C. Figure 2-3 A shows the correct installation of the retaining clip for pressure on the upward side of the feedback lever slot. Figure 2-3 B shows the same for the downward side of the slot. It may be necessary to separate the feedback pin from the lever to facilitate installation. August 2005 2-5 INSTALLATION SD760 RETAINING CLIP FEEDBACK LEVER FEEDBACK PIN UPWARD POSITION #1 DOWNWARD POSITION #1 UPWARD POSITION #2 DOWNWARD POSITION #2 B. Downward Mounting Positions A. Upward Mounting Positions 30.00° Mid-stroke Position Slide Area C. Feedback Pin Slide Area FIGURE 2-3 Retaining Clip Position 2.4 PNEUMATIC CONNECTIONS Pneumatic connections are shown in Figure 2-1 and listed below: V2 - output to actuator. Pressure in V2 increases with increasing input signal. S - supply pressure to system. 2-6 August 2005 SD760 INSTALLATION V1 - output to actuator. Pressure in V1 decreases with increasing input signal. E - exhaust port. Can be piped away from positioner. DO NOT PLUG. I - input port. Plugged in 760E electronic valve controllers. WARNING Plugging or applying pressure to the Exhaust port will damage the unit and may cause personal injury. Pressure in excess of 150 psi in the V1, V2, or Supply ports may cause damage to the controller. Supply pressure to the controller must not exceed actuator maximum pressure rating. Pressure in excess of 35 psi may cause the input gauge to go out of calibration. Input pressure of 120 psi may cause the input gauge to burst. Refer to the Table 2-1 to determine the required pneumatic connections between the Controller and the actuator. TABLE 2-1 Pneumatic Connections ACTUATOR TYPE Single acting Single acting Double acting CONTROLLER ACTION CONNECTIONS Direct acting (output increases with increasing input signal) Reverse acting (output decreases with increasing input signal) --- Connect V2 and plug V1 Connect V1 and plug V2 1. Note actuator position desired for minimum input signal to controller. 2. Connect V2 to actuator port that causes actuator to move away from position noted in above step. 3. Connect V1 to remaining port. 2.4.1 Piping All pneumatic connections are 1/4" NPT (1/8” for gauges). User supplied materials: Scale free piping at least 1/8" ID for standard flow models and 1/4" ID for high flow models. 1/4" NPT pipe fitting is needed for each connection used. Use care not to over-torque the fitting when tightening (12 ftlb. maximum). 1/4" pipe plug to plug the unused port for single acting actuators. Piping recommendations: Blow out all piping before connections are made to prevent dirt, chips, or debris from entering the controller. Use pipe sealant sparingly and only on male threads. A non-hardening sealant is strongly recommended. Note: Pipe sealing tape is not recommended. Connect the controller to a source of clean, oil-free instrument air. Instrument air requirements are given in the following section. Failure to do so will increase the possibility of a malfunction or deviation from specified performance. August 2005 2-7 INSTALLATION SD760 2.4.2 Instrument Air Requirements Instrument quality air must be supplied to the Controller. CAUTION Synthetic compressor lubricants in the air stream at the controller may cause it to fail. There are many types of synthetic lubricants. Some may not be compatible with the materials used in the construction of the controller. Wetting of these materials by such an oil mist or vapor may cause them to deteriorate. This can result in failure of the controller. A list of materials used in the controller is found in the SPECIFICATIONS section. Requirements for a quality instrument air supply can be found in the Instrument Society of America's "Quality Standard for Instrument Air" (ISA-S7.3). Basically this standard calls for the following: Particle Size - The maximum particle size in the air stream at the instrument should be no larger than 3 microns. Dew Point - the dew point, at line pressure, should be at least 10° C (18° F) below the minimum temperature to which any part of the instrument air system is exposed at any season of the year. Under no circumstances should the dew point, at line pressure, exceed 2° C (35.6° F). Oil Content - The maximum total oil or hydrocarbon content, exclusive of non-condensables, should not exceed 1 ppm under normal operating conditions. 2.5 ELECTRICAL CONNECTIONS 2.5.1 Non-Hazardous Locations An installation in a non-hazardous location should be in accordance with the current editions of applicable National and all Local Electrical Codes. CE Approved EN5008-1 and EN5008-2; See Declaration of Conformity at back of this document. Shielded cable is required. 2.5.2 Hazardous Locations An installation in a hazardous location must be in accordance with the current editions of applicable National and all Local Electrical Codes. For installation in hazardous locations the Controller or Controller Modules (Options) must display the following: The NEC or CEC hazardous location(s) for which the equipment is approved. The FM or CSA logo. Hazardous location classifications appropriate to the installation. Before installing a controller in a hazardous location, the need for energy limiting barriers and consideration of the FM entity parameters must be reviewed. When electrically installing a Controller in a hazardous area, adhere to the guidelines on the control drawing, 15032-7602, included in the back of this document. A typical system consists of a Controller installed in a hazardous area, energy limiting barriers installed in a non-hazardous location, and interconnecting shielded twisted-pair wiring. 2-8 August 2005 SD760 INSTALLATION WARNING Modifications to the Controller or installation of non-approved options will void the electrical approval. FM and CSA Hazardous Location Precautions This section provides FM/CSA hazardous locations precautions that should be observed by the user when installing or servicing the equipment described in this manual. Precautions - English For Division 1 hazardous locations, WARNING Substitution of components may impair intrinsic safety. For Division 2 hazardous locations. WARNING Explosion Hazard - Substitution of components may impair intrinsic suitability for Class I, Division 2. When the equipment described in this manual is installed without safety barriers, the following precautions should be observed. Switch off the power at its source (in non-hazardous location) before connecting or disconnecting power, signal or other wiring. Précautions - Français Emplacements dangereux de Division 1 AVERTISSEMENT LA SUBSTITUTION DE COMPOSANTS PEUT COMPROMETTRE LA SÉCURITÉ INTRINSÈQUE Emplacements dangereux de Division 2 AVERTISSEMENT RISQUE D’EXPLOSION - LA SUBSTITUTION DE COMPOSANTS PEUT RENDRE CE MATÉRIEL INACCEPTABLE POUR LES EMPLACEMENTS DE CLASSE I, DIVISION 2 Lorsque l’appareil décrit dans la notice ci-jointe est installé sans barrières de sécurité, on doit couper l’alimentation électrique a la source (hors de l’emplacement dangereux) avant d’effectuer les opérations suivantes branchement ou débranchement d’un circuit de puissance, de signalisation ou autre. Sira Certification Service Special conditions for safe use (denoted by ‘X’ after certificate No.) 1. The following table shows the maximum input parameters. a b c Sensycon I/P Converter: 4-20 mA terminals: Proximity switches: August 2005 Ii = 120 mA Ui = 42 V dc; Ii = 40 mA; Co = 34 nF; Lo = 40 mH Ui = 25 V 2-9 INSTALLATION d SD760 Limit switch terminals: TABLE 2-2 Maximum Input Parameters Voltage (V) 30 36.5 42 55 Co (nF) 220 121 83 40 Max. Current (A) 140 100 75 50 Lo (mH) 4 8 14 25 2.5.3 EEx ia SPECIAL CONDITIONS FOR SAFE USE (denoted by ’X’ after certificate No.) 1. The ‘X’ suffix to the certificate number is there to draw attention to the various permitted Temperature Classes and the non-standard ambient temperature ranges, as detailed on the following pages. Certificate of Conformity SCSNo. Ex 97D2141X. Temperature Classification The Temperature Classification of the apparatus depends upon; the ambient temperature required, what configuration of component parts are fitted, and the electrical input parameters. The following tables describe the permutations permitted under the various conditions. The electrical parameters permitted for each piece of apparatus, in a particular maximum ambient temperature are shown as A, B, C, D, E and F and represent the following: TABLE 2-3 Electrical Parameters A Ui = 30 V Ii = 110 mA Pi = 0.78 W Ci = 49 nF Li = 20 µH B Ui = 15.5 V Ii = 76 mA Pi = 242 mW Ci = 40 nF Li = 35 µH C Ui = 30 V Ii = 400 mA Pi = 1.3 W D Ii = 80 mA Pi = 0.92 W E Ii = 69 mA Pi = 0.63 W F Ii = 42.6 mA Pi = 0.24 W The minimum ambient temperature is -40°C except when the proximity switches are fitted when it is reduced to -20° C. TABLE 2-4 Temperature Class T4 TEMP. CLASS. T4 APPARATUS SENSYCON I/P CONVERTER 4-20 mA PCB OR POTENTIOMETER PROXIMITY SWITCHES OR LIMIT SWITCHES 2-10 TERMINAL BLOCK CONVERTER TERMINALS MAXIMUM AMBIENT TEMPERATURE ° C 85 80 75 70 65 60 55 50 40 Ii = 100 mA Ii = 150 mA Ii = 150 mA Ii = 150 mA Ii = 150 mA Ii = 120 mA Ii = 120 mA Ii = 150 mA Ii = 150 mA TB1 1, 2, 3 A TB1 1, 2, 3 E TB2 1, 2, 3 TB2 4, 5, 6 TB2 1, 2, 3 TB2 4, 5, 6 C C C C E E E E E E D B B B B B B B B B B B B B B C C C C C C C C C C C C C C August 2005 P A R A M E T E R S SD760 INSTALLATION TABLE 2-5 Temperature Class T5 TEMP. CLASS. T5 APPARATUS SENSYCON I/P CONVERTER TERMINAL BLOCK CONVERTER TERMINALS 4-20 mA PCB OR POTENTIOMETER TB1 1, 2, 3 PROXIMITY SWITCHES OR LIMIT SWITCHES TB2 1, 2, 3 TB2 4, 5, 6 MAXIMUM AMBIENT TEMPERATURE ° C 85 80 75 70 65 TB1 1, 2, 3 TB2 1, 2, 3 TB2 4, 5, 6 F C C C C F C C F C C 60 55 50 40 Ii = 60 mA Ii = 60 mA Ii = 60 mA Ii = 100 mA Ii = 120 mA F F F F E B B B B B B C C C C C C C C 60 55 50 40 Ii = 50 mA Ii = 60 mA Ii = 60 mA C C P A R A M E T E R S TABLE 2-6 Temperature Class T6 TEMP. CLASS. T6 APPARATUS SENSYCON I/P CONVERTER 4-20 mA PCB OR POTENTIOMETER PROXIMITY SWITCHES OR LIMIT SWITCHES TERMINAL BLOCK CONVERTER TERMINALS MAXIMUM AMBIENT TEMPERATURE ° C 85 80 75 70 65 TB1 1, 2, 3 TB1 1, 2, 3 F TB2 1, 2, 3 TB2 4, 5, 6 B B TB2 1, 2, 3 TB2 4, 5, 6 C C C C C C C C C C C C C C P A R A M E T E R S C C Perform the following steps to install the Controller in a hazardous location. Note that barriers may not be needed in an installation. 1. Install Controller as detailed in the preceding sections. 2. Install energy limiting barriers in the non-hazardous area. Refer to the barrier manufacturer's instructions and to the appropriate connection diagram in the control drawing found in the back of this manual. 3. Install conduit for wiring to Controller. Install pull boxes as needed and remove burrs and sharp edges from conduit tubing. 4. Install wiring between Controller and barriers per the control drawing found in the back of this manual. Ground the Controller. A barrier must be grounded and the resistance to ground must not exceed 1 ohm. 5. Install the wiring between barriers and output terminals of the Controller driving device. 6. Check all signal and ground connections before applying power. 7. Proceed to Calibration section. August 2005 2-11 INSTALLATION 2-12 SD760 August 2005 SD760 CALIBRATION 3.0 CALIBRATION Calibrate a controller before placing it in service and after repair. 3.1 CAM INSTALLATION AND INDEXING NOTE The 760 is shipped with the linear cam installed. The controller must be mounted before proceeding with this section of the instructions. Use this procedure when changing INPUT SHAFT CAM LOWER CAM INDEX UPPER CAM INDEX CAM FOLLOWER BEARING CAM LOCKING NUT INDEXING OF CW CAM CAM LOCKING SCREW INDEXING OF CCW CAM the cam or cam lobe. FIGURE 3-1A FIGURE 3-1B FIGURE 3-1A and 3-1B Indexing of CW and CCW Cams 3.1.1 Cam Identification Three cam profiles are available as standard. Letter designations are used on each cam for identification. The letters L, EP and QO designate the type of cam lobe profile [i.e., (L) linear, (EP) modified equal percentage, or (QO) quick opening]. The letters CW and CCW denote the lobe of the cam to be used depending on feedback shaft rotation for increasing input signal. Figure 3-2 shows the standard cam characteristics. August 2005 3-1 CALIBRATION SD760 80 Equal Percentage 60 Linear 40 Quick Opening MG00405b % Valve Motion (0% = Minimum Actuator Pressure) 100 20 0 0 20 40 60 80 100 % Input Signal (Direct Acting, Scale Reversed if Reverse Acting) FIGURE 3-2 Standard Cam Characteristics 3.1.2 Procedure NOTE The cam is designed to allow 10% over/under-range (negative 9 degrees). However, if under range is used, the zero and span will be slightly interactive. Refer to Figure 3-1A and 3-1B for Cam and associated hardware identification. 1. Remove cover. 2. Remove beacon indicator and extension shaft if installed (refer to Figure 4-2) 3. Loosen cam locking screw. 4. Loosen knurled cam locking nut. 4. Index cam as follows: a) Use the lobe marked CW for clockwise cam rotation with increasing input signal. b) Use the lobe marked CCW for counterclockwise cam rotation with increasing input signal. For the following steps, refer to Figure 3-1A when using the CW lobe of a cam or to Figure 3-1B when using the CCW lobe of a cam. Ensure that valve actuator is seated in the position corresponding to zero percent input signal. Carefully align minimum input index line on the cam with cam follower bearing. 5. Tighten knurled cam locking nut. 3-2 August 2005 SD760 CALIBRATION 6. Tighten cam locking screw. 7. Proceed to section 2.4, Pneumatic Connections. 3.2 CALIBRATION EQUIPMENT NEEDED TABLE 3-1 Calibration Equipment ITEM Pressure regulator, adjustable from 0 to 30 psig (760P only) Test gauge, 0 to 30 psig Small slotted screwdriver Current Source (4-20 mA) 760E only Ammeter (4-20 mA) 760E only QUANTITY 1 1 1 1 1 NOTE Elevating the zero and suppressing the span will provide more valve seating force. For example, setting the zero at 2% input and spanning at 98% input will assist the valve in closing tightly and opening fully. Figure 3-3 locates the calibration adjustments. 3.2.1 Zero Adjustment 1. Apply supply pressure to controller (Supply pressure must not exceed the pressure rating of the actuator). 2. Set input signal to zero % (e.g.: 4 mA or 3 psig). 3. Loosen the zero lockscrew. 4. Turn the zero set screw ( >0< ) to achieve desired valve position. 5. Tighten zero lockscrew. 3.2.2 Span Adjustment 1. Set the input to 100% (e.g.: 20 mA or 15 psig). 2. Loosen the span lockscrew. 3. Turn the span set screw ( |<->| ) until the valve is at the desired position. 4. Tighten span lockscrew. 5. Set the input to zero %. Verify that the zero has not changed. Adjust as necessary. August 2005 3-3 CALIBRATION SD760 ZERO ADJUSTMENT ZERO LOCK SCREW SPAN LOCK SCREW SPAN ADJUSTMENT FIGURE 3-3 Calibration Adjustments 3-4 August 2005 SD760 OPTIONS 4.0 OUTPUT OPTIONS Controller must be calibrated before proceeding. Refer to section 3.0. 4.1 INSTALLATION CAUTION The temperature in the intended operating location must not exceed the specified operating temperature limits as follows: Mechanical Limit switches -40°C to +85°C, Proximity Sensors -25°C to +85°C, 4-20 mA Feedback -40°C to +85°C, 1K Feedback 40°C to +85°C. For installations in hazardous locations adhere to guidelines of Control Drawing 15032-7602. PC Board: All options are built off of a common circuit board platform. The PC board is held in place by three #8-32 x 1/4” screws, mounted to hex standoffs. To install the board, first insert and tighten the three standoffs (two long, one short) into the three bosses as shown in Figure 4-1. Tighten to approx. 18 in-lb. If the board includes either the 4-20 mA or 1K potentiometer feedback option, loosen the two mounting screws for the potentiometer bracket and rotate the bracket counter-clockwise (see Figure 4-6). This provides clearance while installing the board. Mount the board to the three standoffs using the #8-32 x 1/4” screws provided. STANDOFF SCREW LONG STANDOFF STANDOFF SCREWS LONG STANDOFF SHORT STANDOFF 760-124.ds4 FIGURE 4-1 PC Board Installation NOTE The controller cam must be properly indexed and the unit calibrated before proceeding. Refer to Section 3. If the board includes either of the limit switch options, install the extension shaft next. Refer to the Figure 4-2 and place the compression washer onto the 1/4-20 threads of the input shaft. Then install and tighten the extension shaft until the compression washer is completely flat. Approx. 15 in-lb. August 2005 4-1 OPTIONS SD760 Spread the limit switch actuator cams by pinching the two tabs and slide them onto the extension shaft, one on top of the other as illustrated in Figure 4-2. Align the two actuator cams with their respective switches. LIMIT SWITCHES EXTENSION SHAFT COMPRESSION WASHER LIMIT SWITCH ACTUATOR CAMS FIGURE 4-2 Mechanical Limit Switches 4.2 ELECTRICAL CONNECTIONS Refer to Section 2.5 for installation in hazardous locations. All wiring must be in accordance with applicable national and local electric codes for the intended circuit load. The 4-20 mA Feedback option and the voltage feedback option will have to be calibrated before electrical connections are made. 4.2.1 Mechanical Limit Switches and Proximity Sensors The mechanical limit switches are rated for 10A @ 125/250 VAC, 10A @ 24 VDC, 0.1A @ 125 VDC. The switch connections for both the mechanical limit switches and the proximity sensors are accessed through a six pole terminal block. The terminal connections are labeled as shown in Table 4-1. 4-2 August 2005 SD760 OPTIONS TABLE 4-1 Switch Terminal Block Connections Terminal 1 2 3 4 5 6 Mechanical Switches Lower Switch N.C. (normally closed) Lower Switch N.O. (normally open) Lower Switch Com (common) Upper Switch N.C. Upper Switch N.O. Upper Switch Com Proximity Sensors Lower Sensor “+” --- Not Used --Lower Sensor “-” Upper Sensor “+” --- Not Used --Upper Sensor “-” CAUTION The proximity sensors are not intended to carry load current - DO NOT WIRE SENSORS DIRECTLY TO ASSOCIATED APPARATUS. The proximity switches must be used in conjunction with a switch transfer barrier. The barrier provides either dual transistor outputs or dual relay outputs depending on the model. In order to comply with intrinsic safety approvals, the Pepperl + Fuchs ® proximity switches must be used with an approved Pepperl + Fuchs ® switch transfer barrier. Refer to the model 760 Control Drawing, 15032-7602 (available upon request), for recommended approved barriers, specifications and wiring installation diagrams. Follow instructions supplied with the barrier for correct wiring of the Proximity Sensors to the barrier. 4.2.2 4-20 mAdc Current Feedback Board Option The 4-20 mA option connections are made through a three pole terminal block. A DC loop power supply minimum 10 V, maximum 36 V must be used. See chart in Figure 4 for a maximum loop load based on supply voltage. The terminals labeled V1 and V2 are used for the 4-20 mA loop, V3 is not used. Polarity is not important. Recommended wiring is twisted shielded pairs, 22AWG or larger. Refer to Control Drawing 15032-7602 for installation in hazardous locations. 4-20 mA Feedback Option 10-36 VDC R load - See chart FIGURE 4-3 Typical 4-20 mA Feedback Option Loop with Load August 2005 4-3 OPTIONS SD760 1200 ohm Max. Loop Load 50 ohm 10 VDC Loop Supply Voltage 36 VDC FIGURE 4-4 Maximum Loop Load vs. Loop Supply Voltage 4.2.3 1K Potentiometer Feedback Option The potentiometer is rated 1 Watt @ 70°C. Do not exceed 32 mA or 32 Volts. The 1K Feedback option connections are made through a three pole terminal block. The terminal connections V1, V2, and V3 are detailed in Figure 4-5. Feedback Potentiometer V1 Terminals V2 Clockwise valve travel V3 FIGURE 4-5 1K Feedback Potentiometer Schematic For voltage feedback, connect reference voltage to terminals V1 and V3, and use V2 to measure output voltage. 4.3 CALIBRATION 4.3.1 Mechanical Limit Switches and Proximity Sensors Install the board with the switches as described above. With valve and actuator at first desired limit position, squeeze the tabs on one of the cams, and rotate in the direction of valve rotation until the switch triggers. Set valve and actuator at second desired limit position, squeeze the tabs on the second cam, and rotate in the direction of valve rotation until the switch triggers. 4-4 August 2005 SD760 OPTIONS 4.3.2 4-20 mAdc Current Feedback Board Option Equipment needed. TABLE 4-2 Equipment Needed Item Ammeter Jeweler’s Screwdriver Small Slotted Screwdriver Quantity 1 1 1 Set actuator and valve to 50% +/- 5%. The potentiometer is a continuous turn potentiometer without end stops so you need not worry about damage from rotating past the end of it’s range. Loosen, but do not remove, the potentiometer bracket screws. Swing the potentiometer away from the input gear, and rotate the potentiometer gear until the alignment mark is aligned with the input gear. See Figure 4-6. Mesh gears lightly to eliminate backlash and tighten bracket mounting screws. The alignment mark should mesh within two gear teeth of the centerline of the gears as illustrated in Figure 4-6. POTENTIOMETER CAM LOCKNUT POTENTIOMETER BRACKET AND LOCKING SCREW ALIGNMENT MARK INPUT GEAR CAM CAM LOCKNUT LOCKING SCREW FIGURE 4-6 Potentiometer Gear Bracket Alignment The 4-20 mA feedback action is determined by a switch on the circuit board. Set switch position for reverse or direct acting according to Table 4-3. TABLE 4-3 Switch Position for Reverse or Direct Action Switch Position 1 2 Shaft Rotation for 4-20 mA Output CW CCW For example, while looking at the front of the 760 controller, if you want the output to increase from 4 mA to 20 mA as the input shaft rotates CCW, then the switch should be set to position 2. August 2005 4-5 OPTIONS SD760 Connect a loop power supply with an ammeter in series to terminals V1 and V2 as in Figure 4-7. (Polarity not important.) Ammeter 10-36 VDC 4-20 mA V1,V2 Feedback option FIGURE 4-7 4-20 mA Loop Calibration Set valve to the desired 4mA position. Set 4 mA output with the trimpot labeled BIAS. Set valve to the desired 20 mA output position. Set 20 mA output with trimpot labeled SPAN. Rotate the input shaft back to the 4 mA position and verify that the zero position output has not changed. Adjust as necessary with the BIAS trimpot. 4.3.3 1K Potentiometer Feedback Option Equipment needed. TABLE 4-4 Equipment Needed for 1K Feedback Potentiometer Option Item Ohm-meter Small Slotted Screwdriver Quantity 1 1 Set actuator and valve to 50% +/- 5%. The potentiometer is a continuous turn potentiometer without end stops so you need not worry about damage from rotating past the end of it’s range. Loosen, but do not remove, the potentiometer bracket screws. Swing the potentiometer away from the input gear, and rotate the potentiometer gear until the alignment mark is aligned with the input gear. See Figure 4-6. Mesh gears lightly to eliminate backlash and tighten bracket mounting screws. The alignment mark should mesh within two gear teeth of the centerline of the gears as illustrated in Figure 4-6. Each tooth on the potentiometer gear represents 128 ohms of potentiometer resistance. Set valve to 0% position and check resistance between V2 and V1, and between V2 and V3 with ohmmeter. One of these two readings will be high, and one will be low. If low end resistance is less than 0 ohms (false reading) or greater than 130 ohms, disengage and rotate the potentiometer gear by one tooth until the resistance is between 0 and 130 ohms. Direct or reverse acting - resistive feedback: Use Table 4-5 to determine correct terminal connections for intended use. For example, if you want the resistance to increase with clockwise input shaft travel (Direct CW), connect to terminals V1 and V2. 4-6 August 2005 SD760 OPTIONS TABLE 4-5 Connections for 1K Feedback Option Action Direct Direct Reverse Reverse Direction of Input Shaft Travel CW CCW CW CCW Use these terminals V1, V2 V2, V3 V2, V3 V1, V2 4.4 INDICATORS 4.4.1 Beacon Indicator LENS LENS CLAMPING PLATE AND GASKET INDICATOR EXTENSION SHAFT LENS CLAMPING PLATE RETAINING SCREWS FIGURE 4-8 Beacon Indicator Use the following procedure to re-install the Beacon Indicator after the unit has been calibrated: 1. Place the compression washer onto the 1/4-20 male threads of the input shaft. Screw the extension shaft onto the input shaft. Tighten the extension shaft until the compression washer is completely flat (approximately 15 in-lb.). 2. Carefully press the indicator onto the top of the extension shaft. 3. Apply the minimum input signal (3 psi or 4 mA) to the valve controller. 4. Rotate the indicator as appropriate. 5. Reinstall cover. 6. Check that the correct message, “OPEN” or “CLOSED” appears in all the windows. August 2005 4-7 OPTIONS SD760 4.4.2 Flat Indicator LENS LENS CLAMPING PLATE AND GASKET INDICATOR COMPRESSION WASHER LENS CLAMPING PLATE RETAINING SCREWS 760-133.ds4 EXTENSION SHAFT FIGURE 4-9 Flat Indicator Use the following procedure to re-install the Flat Indicator after the unit has been calibrated: 1. Place the compression washer onto the 1/4-20 male threads of the input shaft. Screw the extension shaft onto the input shaft. Tighten the extension shaft until the compression washer is completely flat (approximately 15 in-lbs.). 2. Install the indicator onto the top of the extension shaft. Install hold down screw but do not tighten. 3. Apply the minimum input signal (3 psi or 4 mA) to the valve controller. 4. Rotate the indicator as appropriate. Tighten hold down screw. 5. Re-install cover. 6. Check that the indicator appears in the proper position. 4.5 I/P CONVERTER 4.5.1 Wiring See Section 2.5 for general and hazardous location wiring requirements. 1. Attach the input leads (recommend 22 AWG shielded, twisted pair wire minimum) to the + and - connections of the I/P converter terminal strip. The wire should enter the controller through the conduit connection and be routed through the wire clamp. 2. Attach the wire clamp with its screw. 4-8 August 2005 SD760 OPTIONS INPUT LEADS WIRE CLAMP SCREW 760-115A.ds4 WIRE CLAMP FIGURE 4-10 Wiring for I/P Converter 4.5.2 Calibration It is not necessary to calibrate the I/P transducer; however, calibration adjustments are available. The I/P transducer can be adjusted by following the procedure outlined below. The I/P accepts a 4-20 mA signal. Verify the output of the I/P converter as follows: 1. Connect a 0-30 psi test gauge to the 1/8 in. NPT input connection. 2. Apply supply pressure to the supply connection. 3. Apply a 4 mA input signal. Any deviation in the output signal from 3 psi can be corrected with the zero adjustment screw ( >0< ). 4. Increase the input signal to 20 mA. Any deviation in the output signal from 15 psi can be corrected with the range potentiometer ( |<->| ). Perform the valve controller zero and span functions as described in Section 3.0 (Calibration). August 2005 4-9 OPTIONS SD760 4.6 OUTPUT CAPACITY SPOOL KITS 1. Remove I/P Transducer if so equipped. 2. Remove spool block retaining clip. 3. Remove spool block retaining screws. 4. Remove spool block assembly being careful not damage the gasket. Leave gasket in place on the enclosure. 5. Place spool block assembly in a clean area. 6. Remove new spool from container and insert into top of new spool block with the long journal end in first. Spool block should be orientated with the vent hole to the left side as shown in illustration on back page. 7. Position spool block assembly into enclosure and secure with retaining screws. Tighten retaining screws to 20 in. lbs. of torque. 8. Engage bottom end of spool retaining clip into bronze bushing in underside of beam assembly. Insert top end of spool retaining clip into countersink on end of spool at top of spool block. 760-115E.ds4 SPOOL BLOCK SPOOL BLOCK RETAINER SCREW SPOOL RETAINING CLIP FIGURE 4-11 Output Capacity Spool Kit 4-10 August 2005 SD760 MAINTENANCE 5.0 MAINTENANCE The Controller requires no routine maintenance. It is highly recommended that quality instrument air be used as described in section 2.2.2 Instrument Air Requirements. The filter screens may require periodic cleaning. The frequency of their cleaning is conditional depending on the quality of instrument air used. It is also recommended that the end user perform periodic functionality tests in accordance with the critical nature of the application. 5.1 FILTER SCREENS Filter screens are located in the V1, V2, and supply ports. Refer to the Parts List at the back of this Instruction. 1. Turn air supply off. 2. Remove a screen with a scribe by carefully pulling on and around the edge of a screen. 3. Insert a new screen until it bottoms using an object, such as the eraser end of a pencil, that will not cause damage. 5.2 SPARE AND REPLACEMENT PARTS Refer to the parts list at the back of this Instruction for a list of replacement parts and an exploded view. Spare and replacement parts are available from any of the addresses in the warranty statement. Refer to the parts list for recommended on-hand spare parts. 5.3 RETURN FOR REPAIR To Return for Repair Call the Service Department at (215) 646-7400, ext. 4RMA (4762) weekdays between 8:00 a.m. and 4:45 p.m. Eastern Time to obtain an RMA (Return Material Authorization) number. Mark the RMA number prominently on the outside of the shipment. When calling for an RMA number, provide the reason for the return. If returning equipment for repair, failure information (e.g., error code, failure symptom, installation environment) will be requested. A purchase order number will also be needed. Material Safety Data Sheet A Material Safety Data Sheet (MSDS) must be included with each item being returned that was stored or used where hazardous materials were present. Packaging Package assembly in original shipping materials. Otherwise, package it for safe shipment or contact the factory for shipping recommendations. The 4-20mA Feedback Option Board must be placed inside a static shielding bag to protect it from electrostatic discharge if returned separately. August 2005 5-1 MAINTENANCE SD760 WARRANTY (a) Seller warrants that on the date of shipment the goods are of the kind and quality described herein and are free of nonconformities in workmanship and material. This warranty does not apply to goods delivered by Seller but manufactured by others. (b) Buyer's exclusive remedy for a nonconformity in any item of the goods shall be the repair or the replacement (at Seller's option) of the item and any affected part of the goods. Seller’s obligation to repair or replace shall be in effect for a period of one (1) year from initial operation of the goods but not more than eighteen (18) months from Seller’s shipment of the goods, provided Buyer has sent written notice within that period of time to Seller that the goods do not conform to the above warranty. Repaired and replacement parts shall be warranted for the remainder of the original period of notification set forth above, but in no event less than 12 months from repair or replacement. At its expense, Buyer shall remove and ship to Seller any such nonconforming items and shall reinstall the repaired or replaced parts. Buyer shall grant Seller access to the goods at all reasonable times in order for Seller to determine any nonconformity in the goods. Seller shall have the right of disposal of items replaced by it. If Seller is unable or unwilling to repair or replace, or if repair or replacement does not remedy the nonconformity, Seller and Buyer shall negotiate an equitable adjustment in the contract price, which may include a full refund of the contract price for the nonconforming goods. (c) SELLER HEREBY DISCLAIMS ALL OTHER WARRANTIES, EXPRESS OR IMPLIED, EXCEPT THAT OF TITLE. SPECIFICALLY, IT DISCLAIMS THE IMPLIED WARRANTIES OF MERCHANTABILITY, FITNESS FOR A PARTICULAR PURPOSE, COURSE OF DEALING AND USAGE OF TRADE. (d) Buyer and successors of Buyer are limited to the remedies specified in this article and shall have no others for a nonconformity in the goods. Buyer agrees that these remedies provide Buyer and its successors with a minimum adequate remedy and are their exclusive remedies, whether Buyer's or its successors’ remedies are based on contract, warranty, tort (including negligence), strict liability, indemnity, or any other legal theory, and whether arising out of warranties, representations, instructions, installations, or non-conformities from any cause. (e) Note: This article does not apply to any software which may be furnished by Seller. In such cases, the attached Software License Addendum applies. 5-2 August 2005 PARTS LIST Drawing No. 16300-125PL SERIES 760 VALVE CONTROLLER ITEM NO. PART NO. DESCRIPTION QUANTITY 1a 1b 1c 1d 2 3a 3b 4 5 6 7 8 9 10a 10b 11 12a 12b 13 14 15 16a 16b 16c 17a * 17b * 18a 18b 19 * 20 21 * 22 * 23 24a 24b 24c 24d 24e 25 26 27 28 29 30 31 * 32 * 33 34 35 36 37* 40a 40b 16300-521 16300-525 16300-104 16300-106 16300-56 16300-531 16300-533 16300-332 16300-344 16300-225 16300-368 16300-336 16300-57 1-5845 1-1822 16300-129 16300-60 16300-63 16300-68 16300-69 16300-70 16300-54 16300-55 16300-153 16300-251 16300-239 16300-45 16300-46 16300-241 16300-327 16300-47 2938-69 16300-227 16300-406 16300-409 16300-443 16300-447 16300-448 16300-231 16300-232 16300-141 16300-331 16300-80 3175-223 2938-136 2938-217 16300-429 4658-11 1-1905 1-1822 16300-354 16300-211 16300-334 Enclosure Base, Std. (3/4 NPT Conduit) Enclosure Base, Opt., for Speed Adjusters (3/4 NPT Conduit) Enclosure Base, Std. (M25 Conduit) Enclosure Base, Opt. for Speed Adjusters (M25 Conduit) Sleeve Bearing Enclosure Cover, Std. Enclosure Cover for Beacon Indicator Cover Gasket Sled Assembly Cam Follower Assembly Lever Assembly Span Adjusting Screw Zero Lock Block Screw, 10-32 x 1/2 Lg., Slotted Cone Point Screw, 8-32 x 1/4 Lg., Fillister Head Span Adjusting Screw Cam, Linear, Rectilinear Input Cam, Linear, Rotary Input Lower Cam Index Upper Cam Index Cam Lock Knob Spool Block, Std. Capacity Spool Block, Hi-Capacity Spool Block, Lo-Capacity Gasket, Std., Neoprene/Nylon Gasket, Opt., Fluorosilicone/Dacron Spool, Std. & Lo-Capacity Spool, Hi-Capacity Spool Clip Diaphragm Stud Diaphragm, Neoprene/Nylon O-Ring Booster Cover Input Shaft, Square Rotary Input Shaft, NAMUR Rotary Input Shaft, Rectilinear 2” Input Shaft, Rectilinear 4” Input Shaft, Rectilinear 6” Manifold Plate Block Manifold Gasket Spring Seat Spring, 3-15 psig Beam Assembly Cover Screw O-Ring, Opt. Speed Adjusters O-Ring, Std. Washer Retaining Ring Screw, 8-32 x 7/16 Lg., Flat Head Screw, 8-32 x 1/4 Lg., Fillister Head I/P Converter (760E only) Manifold Plate, 760P Manifold Block, 760E 1 1 1 1 1 1 1 1 1 1 1 1 1 2 1 1 1 1 1 1 1 1 1 1 1 1 1 1 1 1 1 1 1 1 1 1 1 1 1 1 1 1 1 4 4 1 1 1 6 1 1 1 1 Page 1 of 2 PARTS LIST ITEM NO. Drawing No. 16300-125PL PART NO. DESCRIPTION QUANTITY 41a 1-2355 Screw, (760P) 10-32 x 3/8 Lg., Binding Head 41b 1-2830 Screw, (760E) 10-32 x 2 1/4 Lg., Binding Head 42 3175-280 Beam Screw 43 1-1905 Screw, 8-32 x 7/16 Lg., Flat Head 44 1-2364 Screw, 10-32 x 3/8 Lg., Slotted Hex. Washer Head 45 12334-138 Washer 46 1-2000 Screw, 8-32 x 3/4 Lg., Binding Head 47 16300-92 Shipping Plug 48 1604-41 Shipping Plug 49 2155-225 Filter Screen 50 16300-233 Speed Adjusters w/16300-525 Enclosure 51 16300-79 Adapter Plate with screws 52a 16300-404 Shaft Extension, Opt., (for Alarms w/o Indicator) 52b 16300-405 Shaft Extension, Opt., (for Beacon Indicator) 53 16300-246 Limit Switch Actuator Cams 54 16300-109 Screw Standoff, Long (for Optional PC Board) 55 16300-197 Screw Standoff, Short (for Optional PC Board) 56a 16310-21 Opt. Limit Switches & 4-20 mAdc Feedback Circuit Board 56b 16310-22 Opt. Limit Switches & 1K Feedback Pot. Circuit Board 56c 16310-23 Opt. Proximity Switches & 4-20 mAdc Feedback Circuit Board 56d 16310-24 Opt. Proximity Switches & 1K Feedback Pot. Circuit Board 56e 16310-25 Opt. 4-20 mAdc Feedback Circuit Board 56f 16310-26 Opt. 1K Feedback Pot. Circuit Board 56g 16310-27 Opt. Limit Switches Circuit Board 56h 16310-28 Opt. Proximity Switches Circuit Board 57 1-1822 Screw, 8-32 x 1/4 Lg., Fillister Head 58 16300-49 Beacon Indicator 59 16300-52 Beacon Lens 60 16377-87 Beacon Retaining Plate 61 16300-86 Lens Gasket 62 1-1924 Screw, 8-32 x 1/2 Lg., Flat Head 63 12444-2 Gauge, 0-160 psig 64 9105-8 Clamp (760E ) 65 1-1820 Screw (760E ) 8-32 x 1/4 Lg., Binding Head 66 14418-7 Washer 67 5-819 Beacon Upper Label 68 5-820 Beacon Lower Label 69 4658-12 Retaining Ring 70a 16300-538 NEMA 3R Vent, Std. 70b 16161-110 NEMA 4X Vent, Opt. 71a 16300-62 Cam, Equal Percentage, Rectilinear Input Shaft 71b 16300-65 Cam, Equal Percentage, Rotary Input Shaft 72a 16300-61 Cam, Quick Opening, Rectilinear Input Shaft 72b 16300-64 Cam, Quick Opening, Rotary Input Shaft 73 1-1865 Screw, 8-32 x 3/8 Lg., Binding Head 74 12444-1 Gauge, 0-30 psig 75 20027-299 Star Washer 76 1-7268 Lockwasher, #8, Ext. Tooth 77 3175-264 Screw 78 6937-26 Spring 79 16300-34 Disc 80 16300-35 Disc 81 1-3256 Screw, 1/4-20 x 1/2 Lg., Flat Socket Head Cap * Recommended on-hand spare part. Include nameplate information when ordering. Page 2 of 2 1 1 2 4 1 1 2 1 4 4 2 1 1 1 2 2 1 1 1 1 1 1 1 1 1 3 1 1 1 1 4 2 1 1 1 1 1 1 1 1 1 1 1 1 1 1 1 1 1 1 1 1 2 December 1999 Safe Area Hazardous (Classified) Location Class I, Division 1, Groups A, B, C, D Class II, Division 1, Groups E, F, G Class III, Division 1 1. Refer to the “model number” label located under the cover in order to identify the configuration of 760 Valve Controller in terms of options it is equipped with. Follow thereafter the installation instructions below for the particular 760 Valve Controller configuration. 2. After selecting the configurations of the intrinsically safe loops for the particular configuration of 760 Valve Controller, refer to Sheet 2 of this Control Drawing to determine the Temperature Code of Controller. I/P Module Pot. Proximity Limit Warning: Failure to follow the above instructions may impair suitability of 760 Valve Controller for use in Hazardous Locations Installation Instructions: 1. If 760 Valve Controller is equipped with 4-20 mA feedback option, refer to the sheet 3 of 13 of this control drawing. Certification Agency Controlled Document option, refer to the sheets 4 to 7 of 13 of this control drawing. 3. If 760 Valve Controller is equipped with Limit Switch #1 option, refer to the sheets 8 to 11 of 13 of this control drawing. 4. If 760 Valve Controller is equipped with Proximity Switch #1 option, refer to the sheet 12 of 13 of this control drawing. 5. If 760 Valve Controller is equipped with Limit Switch #2 option, refer to the sheets 8 to 11 of 13 of this control drawing. 6. If 760 Valve Controller is equipped with Proximity Switch #2 option, refer to the sheet 12 of 13 of this control drawing. 7. If 760 Valve Controller is equipped with I/P option, refer to the sheet 13 of 13 of this control drawing. No Changes Allowed Without Reference to the Appropriate Certifying Agency 2. If 760 Valve Controller is equipped with Potentiometer (1K) General Intrinsically Safe Installation Notes 1) Shielded Cable is required and the shield shall be connected as shown. The unterminated end of the shield shall be insulated. 2) The series 760 Valve Controller shall not be connected to, under normal or abnormal conditions, a source of supply that exceeds 250 Vrms or 250 Vdc with respect to earth ground. 3) The user is responsible for compatibility and approval of the user provided associated apparatus. 4) Entity installation requirements (where applicable): Vmax ≥ Voc; Imax ≥ Ioc; Ca ≥ Ci + Ccable; La ≥ Li + Lcable. 5) Installation must be in accordance with applicable electrical codes, refer to ISA RP12.6 for guidance. 6) Caution: use cables suitable for 5° C above surrounding ambient. 7) These instructions are provided for conformance with FM and CSA Certifications only. Notes for Installation in Division 2 Locations 1) Limit switches and potentiometers must be installed as intrinsically safe (with barriers). See sheets 8 to 11 for limit switches or sheets 4 to 7 for potentiometer installation notes. 2) Caution: use cables suitable for 5° C above surrounding ambient. Rev Date Details Approved Title 2 9 Oct. 97 As Certified J. Sweeney Control Drawing for 3 19 Feb. 98 As FM Approved J. Sweeney Series 760 Valve Controller 4 20 April 98 Minor corrections J. Sweeney Moore Products Co. Spring House PA, USA 19477 Drawing No. 15032-7602 Sheet 1 of 13 Temperature Code and Ambient Temperature Range for Series 760 Valve Controller Determine the options that have been installed in your Series 760 Valve Controller by checking the label that is under the cover. Compare the option(s) installed to Table 1 to determine Model 760 Temperature Code and Ambient Temperature Range. Table 1: Determination of Temperature Code and Permissible Ambient Temperature Range Option or Combination of Options: Temperature Ambient Code Temperature Range 4-20 mA Feedback Option T3C -40°C to +85°C 4-20 mA Feedback and Limit Switch #1 and #2 T3C -40°C to +85°C 4-20 mA Feedback and Proximity Switch #1 and #2 T3C -25°C to +85°C 4-20 mA Feedback and I/P Module T3C -40°C to +75°C 4-20 mA Feedback and Limit Switch #1 and #2 and I/P Module T3C -40°C to +75°C 4-20 mA Feedback and Proximity Switch #1 and #2 and I/P T3C -25°C to +75°C Module Potentiometer Option None -40°C to +85°C Potentiometer and Limit Switch #1 and #2 None -40°C to +85°C Potentiometer and Proximity Switch #1 and #2 None -25°C to +85°C Potentiometer and I/P Module T3C -40°C to +75°C Potentiometer and Limit Switch #1 and #2 and I/P Module T3C -40°C to +75°C Potentiometer and Proximity Switch #1 and #2 and I/P Module T3C -25°C to +75°C Limit Switch #1 and #2 None -40°C to +85°C Limit Switch #1 and #2 and I/P Module T3C -40°C to +75°C Proximity Switch #1 and #2 None -25°C to +85°C Proximity Switch #1 and #2 and I/P Module T3C -25°C to +75°C I/P Module T3C -40°C to +75°C Rev 2 3 4 Date 9 Oct. 97 19 Feb. 98 20 April 98 Details As Certified As FM Approved Minor corrections Moore Products Co. Spring House PA, USA 19477 Approved J. Sweeney J. Sweeney J. Sweeney Title Control Drawing for Series 760 Valve Controller Drawing No. 15032-7602 Sheet 2 of 13 4-20 mA Feedback Board Installation 4-20 mA Feedback Board Intrinsically Safe Installation Hazardous Area (see sheet 1 for details) Safe Area Control Room Equipment. Barrier Voc Isc Ca La + TB1- V1 - TB1 - V2 Barrier must be CSA Certified and FM Approved single channel grounded shunt - diode Zener Barrier or single channel Isolating Barrier 4-20 mA Feedback Board Entity Parameters: Vmax, or Vt 30 V Entity Installation requirements: Vmax or Vt ≥ Voc, Imax or It ≥ Isc, Ca ≥ Ci + C cable, La ≥ Li + Lcable 4-20 mA Feedback Board Imax, It 225 mA Ci 49 nF Li 44 uH 4-20 mA Feedback Board Division 2 FM Approved and CSA Certified: Maximum Voltage: Current: 42 V 4 - 20 mA 4-20 mA Feedback Board Ambient Temperature Range: See Sheet 2 of 13 Rev 2 3 4 Date 9 Oct. 97 19 Feb. 98 20 April 98 Details As Certified As FM Approved Minor corrections Moore Products Co. Spring House PA, USA 19477 Approved J. Sweeney J. Sweeney J. Sweeney Title Control Drawing for Series 760 Valve Controller Drawing No. 15032-7602 Sheet 3 of 13 Potentiometer Installation Potentiometer Intrinsically Safe and Division 2 Installation - Grounded Circuit Two Barriers Safe Area Hazardous Area (see sheet 1 for details) Power Supply 6 V max. Barrier #1 Voc ≤ 10V Isc ≤ 0.2A Voltage Measuring Circuit Barrier #2 Voc ≤ 10V Isc ≤ 0.2A TB1 -V3 TB1-V2 TB1 - V1 1. Barriers #1 and #2 must be CSA Certified and FM Approved single channel grounded ShuntDiode Zener Barriers with Voc and Isc parameters as indicated. Alternatively, instead of two single Channel Barriers, one CSA Certified and FM Approved Dual Channel grounded Shunt Diode Barrier (with Voc and Isc parameters, for each channel as indicated for Barriers #1 and #2) may be used. CSA Certified and FM Approved MTL 710 Single Channel grounded Shunt Diode Zener Barrier is recommended for use as Barriers #1 and #2. 2. Connections to the terminals TB1-V1 and TB1-V3 may be swapped. 3. Potentiometer Cable Parameters for Intrinsic Safety - Grounded Circuit Two Barriers: Gas Groups A&B C&E D, F & G Capacitance 0.22 uF 0.90 uF 2.40 uF Maximum Values Inductance 110 uH 440 uH 880 uH L/R Ratio 35 uH per Ohm 140 uH per Ohm 280 uH per Ohm 4. Ambient Temperature Range: See Sheet 2 of 13. Rev 2 3 4 Date 9 Oct. 97 19 Feb. 98 20 April 98 Details As Certified As FM Approved Minor corrections Moore Products Co. Spring House PA, USA 19477 Approved J. Sweeney J. Sweeney J. Sweeney Title Control Drawing for Series 760 Valve Controller Drawing No. 15032-7602 Sheet 4 of 13 Potentiometer Intrinsically Safe and Division 2 Installation - Grounded Circuit Dual Channel Barrier Hazardous Area (see sheet 1 for details) Safe Area TB1-V3 Power Supply 6 V max. Channel 1 Dual Channel Barrier Channel 2 Voltage Measuring Circuit TB1-V2 TB1-V1 1. Barrier must be CSA Certified and FM Approved dual channel grounded Shunt Diode Zener Barrier with output safety parameters, as follows: Voc Channel 1 - Channel 2 ≤ 10V; Voc Channel 2 - earth ≤ 10V; Voc Channel 1 - earth ≤ 10V; Isc Channel 1 or Channel 2 ≤ 0.2A. CSA Certified and FM Approved MTL760 Dual Channel, star connected Barrier, is recommended. 2. Connections to the terminals TB1-V1 and TB1-V3 may be swapped. 3. Potentiometer Cable Parameters for Intrinsic Safety - Grounded Circuit Dual Channel Barrier: Gas Groups A&B C&E D, F & G Capacitance 0.30 uF 0.90 uF 2.40 uF Maximum Values Inductance 110 uH 440 uH 880 uH L/R Ratio 35 uH per Ohm 140 uH per Ohm 280 uH per Ohm 4. Ambient Temperature Range: See Sheet 2 of 13. Rev 2 3 4 Date 9 Oct. 97 19 Feb. 98 20 April 98 Details As Certified As FM Approved Minor corrections Moore Products Co. Spring House PA, USA 19477 Approved J. Sweeney J. Sweeney J. Sweeney Title Control Drawing for Series 760 Valve Controller Drawing No. 15032-7602 Sheet 5 of 13 Potentiometer Intrinsically Safe and Division 2 Installation - Ungrounded Circuit Three Barriers Hazardous Area (see sheet 1 for details) Safe Area Power Supply 9V max. Barrier #1 Voc ≤ 12 V Isc ≤ 0.08A Voltage Measuring Circuit Barrier #2 Voc ≤ 12 V Isc ≤ 0.08A TB1 - V3 TB1 -V2 Barrier #3 Voc ≤ 12V Isc ≤ 0.08A TB1 - V1 1. Barriers #1, #2 and #3 must be CSA Certified CSA and FM Approved single channel grounded Shunt Diode Zener Barriers with Voc and Isc parameters as indicated. CSA Certified and FM Approved MTL 766 Single Channel Barrier is recommended for use as barrier #1, #2 and #3. 2. Connections to the terminals TB1-V1 and TB1-V3 may be swapped. 3. Potentiometer Cable Parameters for Intrinsic Safety - Ungrounded Circuit Three Barriers: Gas Groups A&B C&E D, F & G Capacitance 0.125 uF 0.57 uF 1.52 uF Maximum Values Inductance 110 uH 440 uH 880 uH L/R Ratio 49 uH per Ohm 190 uH per Ohm 390 uH per Ohm 4. Ambient Temperature Range: See Sheet 2 of 13. Rev 2 3 4 Date 9 Oct. 97 19 Feb. 98 20 April 98 Details As Certified As FM Approved Minor corrections Moore Products Co. Spring House PA, USA 19477 Approved J. Sweeney J. Sweeney J. Sweeney Title Control Drawing for Series 760 Valve Controller Drawing No. 15032-7602 Sheet 6 of 13 Potentiometer Intrinsically Safe and Division 2 Installation - Ungrounded Circuit Two Dual Channel Barriers Hazardous Area (see sheet 1 for details) Safe Area Constant Current Supply Channel 1 Dual Channel Barrier #1 Channel 2 TB1-V3 TB1-V2 Channel 1 Voltage Measuring Circuit Dual Channel Barrier #2 Channel 2 TB1-V1 1. Barriers #1 and #2 must be CSA Certified and FM Approved dual channel grounded Shunt Diode Barriers with output safety parameters, as follows: Voc (Uo) Channel 1 - earth ≤ 9V; Voc (Uo) Channel 2 - earth ≤ 9V; Isc (Io) Channel 1 or Channel 2 ≤ 0.1A. CSA Certified and FM Approved MTL 761 Dual Channel Barrier is recommended as Barrier #1 and #2. 2. Connections to the terminals TB1-V1 and TB1-V3 may be swapped. 3. Potentiometer Cable Parameters for Intrinsic Safety - Ungrounded Circuit Two Dual Barriers: Gas Groups A&B C&E D, F & G 4. Rev 2 3 4 Capacitance 0.31 uF 1.32 uF 3.52 uF Maximum Values Inductance 110 uH 440 uH 880 uH L/R Ratio 35 uH per Ohm 140 uH per Ohm 280 uH per Ohm Ambient Temperature Range: See Sheet 2 of 13. Date 9 Oct. 97 19 Feb. 98 20 April 98 Details As Certified As FM Approved Minor corrections Moore Products Co. Spring House PA, USA 19477 Approved J. Sweeney J. Sweeney J. Sweeney Title Control Drawing for Series 760 Valve Controller Drawing No. 15032-7602 Sheet 7 of 13 Limit Switch Installation Limit Switch Intrinsically Safe and Division 2 Installation - Grounded Circuit Single Barrier Hazardous Area (see sheet 1 for details) Safe Area Barrier Indicator (relay, etc.) TB2-6 (Upper Switch) TB2-3 (Lower Switch) COM Power Supply TB2-4 (Upper Switch) NO TB2-1 (Lower Switch) NC TB2-5 (Upper Switch) TB2-2 (Lower Switch) 1 Barrier must be CSA Certified and FM Approved single channel grounded Shunt-Diode Zener Barrier. 2. Limit Switch Cable Parameters for Intrinsic Safety - Grounded Circuit Single Barrier: A) Cable Capacitance may not exceed Ca of the barrier. B) Cable Inductance may not exceed La of the barrier or the cable L/R ratio may not exceed the L/R ratio of the barrier. Rev 2 3 4 3. Ambient Temperature Range: See Sheet 2 of 13. 4. Normally, TB2-1 and TB2-4 are connected to ground as shown. Alternativly, TB2-2 may be grounded if no connection is made to TB2-1 and/or TB2-5 may be grounded if no connection is made to TB2-4. Date 9 Oct. 97 19 Feb. 98 20 April 98 Details As Certified As FM Approved Minor corrections Moore Products Co. Spring House PA, USA 19477 Approved J. Sweeney J. Sweeney J. Sweeney Title Control Drawing for Series 760 Valve Controller Drawing No. 15032-7602 Sheet 8 of 13 Limit Switch Intrinsically Safe and Division 2 Installation - Ungrounded Circuit Single Barrier Hazardous Area (see sheet 1 for details) Safe Area Power Supply 24 V max. Channel 1 Barrier TB2-6 (Upper Switch) TB2-3 (Lower Switch) COM Indicator (relay, etc.) TB2-4 (Upper Switch) Channel 2 NO TB2-1 (Lower Switch) NC TB2-5 (Upper Switch) TB2-2 (Lower Switch) 1. Barrier must be CSA Certified and FM Approved dual channel shunt-diode Zener Barrier with output safety parameters, as follows: Voc Channel 1 - earth ≤ 28V; Voc Channel 2 - earth ≤ 28V; Isc Channel 1: ≤ 0.093A Isc Channel 2: Diode Return. CSA Certified and FM Approved MTL787 dual channel Barrier is recommended. 2. Limit Switch Cable Parameters for Intrinsic Safety - Ungrounded Circuit Single Barrier: A.) Cable Capacitance may not exceed Ca of the barrier. B.) Cable Inductance may not exceed La of the barrier or the cable L/R ratio may not exceed the L/R ratio of the barrier. Rev 2 3 4 3. Ambient Temperature Range: See Sheet 2 of 13. 4. Normally, TB2-1 and TB2-4 are connected to Barrier channel 2 as shown. Alternativly, TB2-2 may be connected to Barrier channel 2 if no connection is made to TB2-1 and/or TB2-5 may be connected to Barrier channel 2 if no connection is made to TB2-4. Date 9 Oct. 97 19 Feb. 98 20 April 98 Details As Certified As FM Approved Minor corrections Moore Products Co. Spring House PA, USA 19477 Approved J. Sweeney J. Sweeney J. Sweeney Title Control Drawing for Series 760 Valve Controller Drawing No. 15032-7602 Sheet 9 of 13 Limit Switch Intrinsically Safe and Division 2 Installation - Ungrounded Circuit Two Barriers Hazardous Area (see sheet 1 for details) Safe Area Power Supply 24 V max. Barrier #1 TB2-6 (Upper Switch) Channel 1 TB2-3 (Lower Switch) TB2-4 (Upper Switch) Channel 2 Indicator (relay, etc.) COM TB2-1 (Lower Switch) NC Barrier #2 NO TB2-5 (Upper Switch) Indicator (relay, etc.) TB2-2 (Lower Switch) TB2 Note that connection is made to all three terminals for Limit Switch #1 (Lower Switch) and Limit Switch #2 (Upper Switch) in this configuration. 1 2 3 Limit Switch #1 (Lower Switch) Circuit 1. 4 5 6 Limit Switch #2 (Upper Switch) Circuit Barrier #1 must be CSA Certified and FM Approved dual channel Shunt-Diode Zener Barrier with output safety parameters, as follows: Voc Channel 1 - earth ≤ 28V; Voc Channel 2 - earth ≤ 28V; Isc Channel 1: ≤ 0.093A Isc Channel 2: Diode return. CSA Certified and FM Approved MTL 787 Dual Channel Barrier is recommended. Notes continued on next sheet. Rev 2 3 4 Date 9 Oct. 97 19 Feb. 98 20 April 98 Details As Certified As FM Approved Minor corrections Moore Products Co. Spring House PA, USA 19477 Approved J. Sweeney J. Sweeney J. Sweeney Title Control Drawing for Series 760 Valve Controller Drawing No. 15032-7602 Sheet 10 of 13 2. Barrier #2 must be CSA Certified and FM Approved ground referenced Barrier with output safety parameters, as follows: Voc < 28V (channel to earth) Isc: Diode return. CSA Certified and FM Approved MTL 786 Diode Return Barrier is recommended. 3. Barrier #1 and Barrier #2 must be of the same polarity, either both positive or both negative. 4. Connections to the following terminals may be swapped: A) TB2-1 and TB2-2 5. B) TB2-4 and TB2-5 Limit Switch Cable Parameters for Intrinsic Safety - Ungrounded Circuit Two Barriers: A) Cable Capacitance may not exceed Ca of the corresponding Barrier. B) Cable Inductance may not exceed La of the corresponding Barrier or the cable L/R ratio may not exceed the L/R ratio of the corresponding Barrier. 6. Rev 2 3 4 Ambient Temperature Range: See Sheet 2 of 13. Date 9 Oct. 97 19 Feb. 98 20 April 98 Details As Certified As FM Approved Minor corrections Moore Products Co. Spring House PA, USA 19477 Approved J. Sweeney J. Sweeney J. Sweeney Title Control Drawing for Series 760 Valve Controller Drawing No. 15032-7602 Sheet 11 of 13 Proximity Switch Pepperl & Fuchs GmbH Model NJ2-V3-N Installation Instructions Proximity Switch Intrinsically Safe Installation: 1. Safe Area CSA Hazardous Area (see sheet 1 for details) TB2 CSA Certified Single or Dual Channel Pepperl & Fuchs Switch Isolator Models: KHA5-aExb, KHA6-aExb, or KHD2-aExb 7 8 9 10 11 a = OT1/, RS1/, RTA/, RW1/, SOT-, SR-, SRT-, SR2-, SS1/, SS2/, ST-, TA1/, or TA2/. b = 1, 2, 1.P, 2.P, 2.GS.P or 1.2S.P. 12 1 1 2 2 3 3 4 4 5 5 6 6 CSA Certified Pepperl & Fuchs Proximity Sensor Model NJ2-V3-N #1 CSA Certified Pepperl & Fuchs Proximity Sensor Model NJ2-V3-N #2 2. FM: See P&F Drawing 116-00359 Proximity Switch Installation in Division 2: Certification CSA Division 2 FM Division 2 Input Ratings 25 V, 0.05A Maximum Maximum Voltage 25 V Proximity Switch Ambient Temperature Range: See Sheet 2 of 13 Rev 2 3 4 Date 9 Oct. 97 19 Feb. 98 20 April 98 Details As Certified As FM Approved Minor corrections Moore Products Co. Spring House PA, USA 19477 Approved J. Sweeney J. Sweeney J. Sweeney Title Control Drawing for Series 760 Valve Controller Drawing No. 15032-7602 Sheet 12 of 13 I/P Module Installation Instructions I/P Module Intrinsically Safe Installation: 1. CSA I/P Module: CSA Certified Sensycon Type 22/06-65. It is intrinsically safe when connected as per attached Sensycon Control Document No. 900842, Page 4 of 4. 2. FM See Sensycon Drawing No. 900842 I/P Module Installation in Division 2: Certification CSA Division 2 FM Division 2 Input Ratings Current 4-20 mA, 8V maximum, 0.15A maximum Current 4-20 mA I/P Module Ambient Temperature Range: See Sheet 2 of 13. Rev 2 3 4 Date 9 Oct. 97 19 Feb. 98 20 April 98 Details As Certified As FM Approved Minor corrections Moore Products Co. Spring House PA, USA 19477 Approved J. Sweeney J. Sweeney J. Sweeney Title Control Drawing for Series 760 Valve Controller Drawing No. 15032-7602 Sheet 13 of 13 INSTRUCTION ADDENDUM SDA760-3 Rev: 1 February 1999 Series 760 Valve Controller ESD Cautions INSTRUCTIONS INVOLVED SD760 Installation And Service Instruction for Series 760 Valve Controller, Issues 1 and 2 INTRODUCTION The following statements apply to all sections of SD760. CAUTION Electrostatic discharge (ESD) can damage the semiconductor devices on circuit boards. A properly grounded conductive wrist strap must be worn whenever a circuit board with semiconductor devices is handled or touched. A service kit with a wrist strap and static dissipative mat is available from Moore (PN 15545-110). Equivalent kits are available from both mail order and local electrical supply companies. Typically, these kits contain instructions for proper use of the kit components. In addition, you should assume that any procedure that requires handling or touching a circuit board is prefixed with the following step: Place a conductive wrist strap on your wrist and connect its ground lead to an unpainted area on or inside the Model 760. A circuit board with semiconductor devices must be placed in a static-shielding bag when not installed in the valve controller. n Siemens Energy & Automation INSTRUCTION ADDENDUM SDA760-5 Rev. 1 September 2004 Model Series 760 Valve Positioner Supplemental Instructions for ATEX Certified Models This addendum amends the technical data provided in SD760 Installation and Service Instruction, ValvePAC Series 760, Intelligent Valve Control. It provides details concerning the installation, operation, and servicing of ATEX certified equipment (European ATEX Directive 94/9/EC, Annex II, 1.0.6) described in the above referenced instruction. Included here are the Declaration of Conformity and Sira certificates. IMPORTANT The product’s certifications are listed on its nameplate. Always refer to this nameplate before installing, operating, or servicing the product. The information in this addendum supersedes that provided in the above referenced instruction. The product’s date of manufacture is shown on a label inside the cover. See the referenced instruction to remove the cover. This addendum addresses equipment and protective systems intended for use in potentially explosive atmospheres and is applicable to the European Union. For installations in explosive atmospheres in other locations, see the referenced instruction or contact Siemens; see the Siemens Internet site at http://www.sea.siemens.com/ia/support/incs_sm.html. The following statements apply to equipment covered by certificate numbers Sira 03ATEX2577X (attached) and Sira 03ATEX4578X (attached): 1. The equipment may be used in a hazardous area with flammable gases and vapours with apparatus groups IIC, IIB, and IIA and with temperature classes T1, T2, T3, T4, T5, and T6. 2. The equipment is certified for use in ambient temperatures in the range of -25°C to +85°C (-40°C for applications not requiring EEx nL or proximity switches) and should not be used outside this range. 3. Installation shall be carried out in accordance with the applicable code of practice by suitably trained personnel. 4. The equipment is not intended to be repaired by the user. Repair of this equipment shall be carried out by the manufacturer in accordance with the applicable code of practice. SDA760-5 5. If the equipment is likely to come into contact with aggressive substances, then it is the responsibility of the user to take suitable precautions that prevent it from being adversely affected, thus ensuring that the type of protection is not compromised. 1) Aggressive Substances: e.g. acidic liquids or gases that may attack metals or solvent that may affect polymeric materials. 2) Suitable Protection: e.g. regular checks as part of routine inspections or establishing from the material’s data sheet that it is resistant to specific chemicals. 6. Certificate 03ATEX2577X has an “X” suffix that indicates that special conditions of certification apply. Intrinsically Safe (EEx ia) applications must be installed in accordance with the Special Conditions for Safe Use declared in Certificate Sira 03ATEX 2577X. Siemens Energy & Automation, Inc. assumes no liability for errors or omissions in this document or for the application and use of information included in this document. The information herein is subject to change without notice. Procedures in this document have been reviewed for compliance with applicable approval agency requirements and are considered sound practice. Neither Siemens Energy & Automation, Inc. nor these agencies are responsible for repairs made by the user. 2 SDA760-5 3 SDA760-5 4 SDA760-5 5 SDA760-5 6 SDA760-5 7 SDA760-5 8 SDA760-5 9 SDA760-5 10 SDA760-5 11