1
ENGLISH
Qucik Start Guide
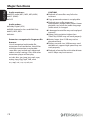
1. What’s in the box?
AV290DVD with speakers
EN
PL
User manual
Instrukcja obsługi
User manual
Remote Control 2x AAA baterries
Unit
A/V cable
FM antenna wire
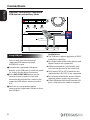
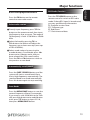
2. Connect - basic connection
CAUTION!
Connect at least speakers and FM antenna
DO NOT OPEN
RISK OF ELECTRIC SHOCK
ACHTUNG!
NICHT ÖFFNEN
LEBENSGEFAHR
UWAGA!
1,(27:,(5$û
R<=<.2325$ĩ(1,$
FM antenna
Left speaker
Right speaker
ENGLISH
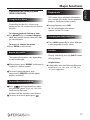
3. Setup
A
B
C
D
E
F
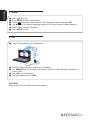
Press to turn on.
Press SETUP to enter Setup menu.
Select
Language Setup tab then “OSD Language” option and press OK.
Use keys to select a language option in the menu and press OK to confirm.
Adjust other settings if needed
Press SETUP to exit.
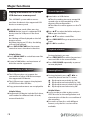
4. Use
A Copy multimedia files to USB memory.
B Connect USB memory to USB port in AV290DVD
C Use keys to navigate in the menu. Choose in “Files Manager” file that you
want to play
D Press OK to start playback.
E To stop playback, press STOP.
CAUTION!
Refer to the user manual for more information.
Introduction
1 Product Overview
1 Safety Information
2 User manual
3 Software upgrade
3 Symbols used on the device
4Setup
Connections
5
6
7
8
Connecting speakers and antenna
Connecting the power cord
Optional: Connecting TV
Optional: Connecting a supported USB
devices and memory cards
Major functions
13Playable Discs
13Playable Content
15Basic radio playback controls
16Playing discs
16Basic playback controls
17Operations for video playback (DVD/
VCD/SVCD)
18Playing multimedia files from the USB
device or memory card
Setup Menu Options
19Language Setup menu
19Video setup menu
20Audio setup menu
21General Setup menu
Functional Overview
9 Front and Rear panel
10Remote Control Unit RCU290
Troubleshooting
Getting Started
Specification
11Step 1: Inserting batteries into the
Remote Control
11Step 2: Setting up the TV
12Step 3: Setting language preference
Glossary
ENGLISH
Contents
Product Overview
Thank you for purchasing the AV290DVD.
This user manual provides step-by-step
instructions for installing and using your
new system.
With this unit, you can:
watch video from DVD/VCD/SVCD or USB
devices
enjoy audio from discs or USB devices
view pictures from discs or USB devices
listen to FM radio
Other features:
USB 2.0 HOST port (for USB storage
devices)
Card reader SD/MMC
Safety Information
Please observe all warnings and
instructions on the equipment and
contained in these operating instructions.
Please carefully read this user’s manual
before using the device.
To avoid electric-shock hazards, do not
open the cabinet, refer servicing to
qualified personnel only. If cabinet is
opened warranty will be invalid.
Please switch off completely the device
during thunder, during abnormal
phenomenon, before cleaning it and in
case it remains out of service for a long
period.
Do not expose the device under the
sunlight. And keep it away from the heat
source or humid environments. Do not
block ventilation holes of the device so
that air can circulate freely.
Please place the device in horizontal and
stable conditions, keeping it away from
vibrating.
If device is moved from warmer place to
a colder one some problem might occur.
Please switch off the device and turn it on
after 1 or 2 hours.
Keep the device away from flower
vases, tubs, sinks, etc., in order to avoid
damaging the equipment. Do not touch
power supply with wet hands.
Don’t put any objects on the device.
Be sure to turn the device off and
disconnect the AC power cord before
cleaning the receiver surface. If the
surface is dirty, wipe clean with a cloth
which has been dipped in a weak soap/
and/water solution and wrung out
thoroughly, and then wipe again with a
dry cloth.
Do not connect cables while power is
plugged.
1
ENGLISH
Introduction
Introduction
ENGLISH
User manual
Do not use damaged cables for
connections: you could cause fires.
Please switch off completely the device
while making all connections.
The product purchased is a sophisticated
electronic device which is not suitable for
children under 18 years.
We do not assume responsibility for
damages caused to people or object,
deriving from use of the device made by
people under 18 years.
Ferguson has used all the available
means to ensure the latest information
regarding its products. Ferguson does not
give a warranty regarding the contents
of this User Manual and waives any
implied warranties regarding market
value or fitness for specific purposes. The
information contained herein provide
guidelines allowing the operation and
maintenance of the receiver.
Ferguson reserves the right to make
changes, corrections or to translate
the User Manual without giving prior
notice of such changes. Therefore, it is
recommended that users visit our website
regularly to receive the latest information.
IMPORTANT!
All the information contained in this
manual was correct at the time of
publication. However, as our engineers
are always updating and improving the
product, your device’s software may
have a slightly different appearance or
modified functionality than presented in
this manual.
l
To obtain the most current user manual
Visit the Ferguson website
www.ferguson-digital.eu to check the
availability of the latest version of user
manual. Please visit the FAQ section too.
2
Software upgrade
Periodically Ferguson may issue software
upgrade to enhance your user experience.
l
To download and install the latest
software to Ferguson
Visit the Ferguson website
www.ferguson-digital.eu to check the
availability of the latest software upgrade.
ENGLISH
Introduction
Symbols used on the device
CAUTION!
DO NOT OPEN
RISK OF ELECTRIC SHOCK
ACHTUNG!
NICHT ÖFFNEN
LEBENSGEFAHR
UWAGA!
NIE OTWIERAĆ
RYZYKO PORAŻENIA
The caution risk of electrical shock - do
not open symbol
This symbol tells you that you are
not allowed to open the device. Only
authorized (service) technicians are
allowed to open the box.
The CE mark
This mark tells you that the device is
following the provisions of Council
Directive 2004/108/EC on the
approximation of the laws of the Member
States relating to the electromagnetic
compatibility and the provisions of
Council Directive 2006/95/EC on the
approximation of the laws of the Member
States relating to low voltage and
electrical safety.
The double insulation symbol
This symbol tells you that the device is
electrically safe within the normal use of
the device as stated in the safety chapter.
The RoHS mark
This mark tells you that the device is
following The Directive on the Restriction
of the Use of Certain Hazardous
Substances in Electrical and Electronic
Equipment 2002/95/EC (commonly
referred to as the Restriction of Hazardous
Substances Directive or RoHS)
3
Introduction
ENGLISH
Setup
Finding a suitable location
– Place the set on a flat, hard and stable
surface.Do not place the set on a carpet.
– Do not position the set on top of other
equipment that might heat it up (e.g.
reciever or amplifier).
– Do not put anything under the set (e.g.
CDs, magazines).
– Install this system near the AC outlet
and where the AC power plug can be
reached easily.
Space for ventilation
– Place the apparatus in a location
with adequate ventilation to prevent
internal heat buid up.Allow at least 10 cm
clearance from the rear and the top of the
set and 5 cm from the left and right to
prevent overheating.
10cm
5cm
4
10cm
5cm
Avoid high temperatures, moisture,
water and dust
– Apparatus shall not be exposed to
dripping or splashing.
– Do not place any sources of danger on
the apparatus (e.g., liquid filled objects,
lighted candles).
ENGLISH
Connections
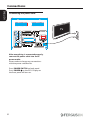
Connecting speakers and antenna
CAUTION!
DO NOT OPEN
RISK OF ELECTRIC SHOCK
ACHTUNG!
NICHT ÖFFNEN
LEBENSGEFAHR
UWAGA!
1,(27:,(5$û
R<=<.2325$ĩ(1,$
FM antenna
Left speaker
Right speaker
IMPORTANT!
For optimal sound, use the supplied
speakers only.
Connect only speakers with impedance that is the same or higher than
the supplied speakers. Refer to the
Specification section of this manual.
Connect speakers
AInsert the connector of the wire
completely into scoket. Insert the right
speaker wire to “R”, left speaker wire to “L”.
Connect FM antenna
For optimal reception, fully extend and
adjust the position of the antenna.
For better FM stereo reception, connect
an outdoor FM antenna to the ANT FM
jack.
The unit does not support MW radio
reception.
AConnect the supplied FM wire antenna to
the ANT FM socket on the unit.
5
Connections
ENGLISH
Connecting the power cord
TV
CAUTION!
DO NOT OPEN
RISK OF ELECTRIC SHOCK
ACHTUNG!
NICHT ÖFFNEN
LEBENSGEFAHR
UWAGA!
NIE OTWIERAĆ
RYZYKO PORAŻENIA
After everything is connected properly,
connect the power cable into an AC
power outlet.
Never make or change any connections
with the power switched on.
Press POWER SWITCH on back panel.
Press POWER on the RCU. Display on
the front panel will turn on.
6
ENGLISH
Connections
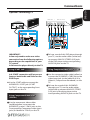
Optional: Connecting TV
TV
AUDIO
IN
Audio R Audio L
Y
Pb/Cb Pr/Cr Video Input
R - audio - L
Y
Pb/Cb Pr/Cr Video In
TV
TV IN
VIDEO IN
CAUTION!
DO NOT OPEN
RISK OF ELECTRIC SHOCK
ACHTUNG!
NICHT ÖFFNEN
LEBENSGEFAHR
UWAGA!
NIE OTWIERAĆ
RYZYKO PORAŻENIA
CAUTION!
DO NOT OPEN
RISK OF ELECTRIC SHOCK
ACHTUNG!
NICHT ÖFFNEN
LEBENSGEFAHR
IMPORTANT!
You only need to make one video
connection from the following options,
depending on the capabilities of your
TV system.
Connect the player directly to the TV.
Using SCART Jack
A SCART connection will let you use
features both Audio and Video on the
DVD Player.
Use the SCART cable to connect the
AV290DVD’s SCART jack (SCART
OUTPUT) to the corresponding Scart
input jacks on the TV.
Using Component Video Jacks
(Y Pb Pr)
UWAGA!
NIE OTWIERAĆ
RYZYKO PORAŻENIA
BTo hear sound of this DVD player through
your TV, use the audio cables (white/red)
to connect ANALOG STEREO (L/R) jacks
of the DVD player to the corresponding
AUDIO IN jacks on the TV.
Using Composite Video Jacks (CVBS)
AUse the composite video cable (yellow) to
connect the AV290DVD’s CVBS jack to the
video input jack (or the labled as A/V in ,
Video In, Composite or Baseband ) on the
TV.
BTo hear the sound of this AV290DVD
through your TV, use the audio cables
(white/red) to connect ANALOG STEREO
(L/R) jacks of the Ariva player to the
corresponding AUDIO IN jacks on the TV.
AUse the component video cables
(red/blue/green) to connect the
AV290DVD system’s Y Pb Pr jacks to the
Corresponding Component video input
jacks (or labeled as Y Pb Pr) on the TV.
7
Connections
ENGLISH
Optional: Connecting a supported
USB devices and memory cards
Using USB port
Helpful hints:
The USB port supports playback of JPEG/
audio files/video files.
You can only view the content of
supported USB devices through
AV290DVD system.
Not all portable audio/video players and
AConnect the supported USB device
one card can be read at the same time.
directly to the USB port on the front panel
(as shown on the above illustration).
BPress DVD/USB/CARD button on the
remote control in order to view and
automatically play the files stored in the
supported USB device, memory card or
disc.
CYou have to stop playback before
removing the supported USB device from
the USB port.
8
digital cameras are supported.
While connected to a card reader, only
Only format FAT16, FAT32 partitions are
supported by USB. NTFS is not supported
Part of external hard disk drives without
separate power supply may not work.
If the USB device does not fit into the USB
port, a USB extension cable is required.
ENGLISH
Functional Overview
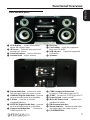
Front and Rear panel
A VFD display - Shows information
about the current status
B IR Sensor - Point the remote control
towards this sensor
C Function buttons - various functions
D Volume knob - adjust volume
E Disc tray
F Card reader- Input the supported
flash card. SD, MMC
G USB 2.0 port - Input the supported
USB device
H Speakers
A Stereo Audio Out- connect to audio
left and right input of a stereo system
B COAXIAL (Digital Audio Out)- connect
to coaxial audio input of an amplifier
C S-Video - connect to S-Video
compatible device
D OPTICAL (Digital Audio Out)- connect
to coaxial audio input of an amplifier
E Component Video Out - connect to
YPbPr input of a TV
F CVBS (Composite Video Out)-
connect to CVBS video input of a TV
G SCART- connect to SCART input of a TV
H Power Switch - power on/off
I Main (AC Power Cord) - connect to a
standard AC outlet
J FM Antenna Interface
K Stereo Audio In- connect to audio left
and right input of a stereo system
L L/R SPEAKER Out
9
Functional Overview
ENGLISH
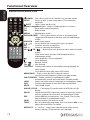
Remote Control Unit RCU290
POWER- Turns the system on or switches it to standby mode
SETUP - Enters or exits system setup menu (TV connection
required)
EJECT - Open / close the disc tray
Numeric keypad 0-9, 10+- Selects numbered items in a menu
T/F - Enter radio station frequency
FM -Radio mode
MEDIA - Mediaplayer mode
DVD/USB/CARD - Access the contents of disc or the connected
supported USB device or memory card (in mediaplayer
mode)
AUDIO IN - audio input mode
- Cursor buttons for moving left, right, up, down.
OK - Confirms an entry or selection
VOL +− - Increase / decrease the volume
CH+
/ CH−
- Skips to the next/ previous radio station (in radio
mode)
- Skips to the next/ previous title/chapter/track (in
mediaplayer mode)
- Starts playback / Pauses playback
-Stops playback
TU−
- Reverse search
- Fast forward
TU+
TITLE/RDS- Display information on the display during playback (in
radio mode)
- To go back to show title menu DVD-video
MENU/SAVE- Enter or exits the DVD-video disc menu
- save the current frequency of band (in radio mode)
SUB-T/SEARCH- Enable subtitle (in mediaplayer mode)
- Automatically search and store bands (in radio mode)
LANG - Selects an audio track or language (in mediaplayer mode)
OSD- Display information on the screen during playback
MUTE - Turn on/off sound
ANGLE / CD-RIP - Converting CD-audio tracks to MP3 files to USB
device.
QPLAY - Skip the initial DVD-video title, menu or warnings (work if
the disc supports this function) (in mediaplayer mode)
DSP - Select different sound presets: Live, Dance, Classic, Jazz,
Pop and Rock (in mediaplayer mode)
LOUD - Set the loudness function on or off
TONE - Bass or treble adjusting mode. Press the button VOL +− to
adjust the level of bass or treble.
DEFAULTS- In ``No Disc`` status, press the button to return to the
factory settings (TV connection not required)
10
Step 1: Inserting batteries into the
Remote Control
AOpen the battery compartment.
B Insert two batteries type R03 or AAA,
following the indications(+ -) inside the
compartment.
CClose the cover.
Using the Remote Control to operate
the Player
AAim the Remote Control directly at the
remote sensor (IR) on the front panel.
Step 2: Setting up the TV
IMPORTANT!
Make sure you have completed all the
necessary connections.
APress POWER SWITCH on back panel
and then POWER
Ferguson on.
on the RCU to turn
BTurn on the TV and set it to the correct
video source. You should see the
Ferguson background screen.
The TV Remote Control may have a
button or switch that chooses different
video modes.
BDo not put any objects between the
Remote Control and AV290DVD while
operating the Player.
CAUTION!
Remove batteries if they are
exhausted or if the Remote Control is
not being used for a long time.
Do not use old and new or different
types of batteries in combination.
Batteries contain chemical
substances, so they should be disposed
properly.
CIf you are using external equipment, (eg.
audio system or receiver), turn it on and
select the appropriate input source for
the Fergusona player output. Refer to the
equipment owner’s manual for detail.
Selecting the TV system that
corresponds to your TV
This Player is compatible with NTSC, and
PAL.
APress SETUP.
BPress to select Video tab
CPress to highlight TV System, then
press .
DPress to highlight one of the avaible
options.
ESelect a setting and press OK.
11
ENGLISH
Getting Started
Getting Started
ENGLISH
Step 3: Setting language
preference
The language options are different
depending on your country or region. It
may not correspond to the illustrations
shown on the user manual.
Setting the OSD language
APress SETUP.
BPress to select Language Setup tab.
CPress to highlight Menu Language,
then press .
DPress to select a language and press
OK.
12
IMPORTANT!
If the inhibit icon (ø) appears on the
TV screen when a button is pressed, it
means the function is not available on
the current multimedia content or at the
current time.
Playable Discs
Your AV290DVD will play:
Digital Video Discs (DVDs)
Video CDs (VCDs)
Super Video CDs (SVCDs)
Digital Video Discs +
Recordable[Rewritable] (DVD+R[W])
Compact Discs (CDs)
ENGLISH
Major functions
Playable Content
File Systems
FAT (FAT16 and FAT32)
ISO-9660 and partly UDF on CD/DVD
discs
Video containers
MPEG-1/2 Program Stream (MPG, MPEG)
MPEG-4 Part 14 (MP4)
VOB
AVI
Video codecs:
Most video codecs are supported up to
576p resolution.
XviD (except 3 warp-point GMC)
MPEG-1
MPEG-2 ML@MP
MPEG-4 ASP
Subtitle formats:
SRT (SubRip)
SMI (Sami)
SUB (MicroDVD, SubViewer2)
SSA (SubStationAlpha)
TXT (SubRip, Sami, MicroDVD,
SubViewer2, SubStationAlpha)
IDX
Some user-created subtitles may not
work properly
Some special characters are not
supported
HTML tags are not supported
A movie file and external subtitle file must
be located in the same folder.
Photo formats :
JPEG, HD JPEG (baseline)
13
Major functions
ENGLISH
Audio containers:
MPEG audio (MP1, MP2, MP3, MPA)
ASF (WMA)
OGG
Audio codecs:
Dolby Digital (AC3)
WMA (except lossless and WMA Pro)
MP1, MP2, MP3
Vorbis
Extensions recognized in Ferguson file
browser.
List of recognized multimedia file
extensions are listed below. Not all files
with those extensions are playable some files may include not supported
codecs and/or settings. Files with other
extensions player will not play.
avi, dat, divx, jpe, jpeg, jpg, mp3, mpe,
mpeg, mpg, ogg, ogm, vob, wma
ass, mpl, smi, ssa, srt, sub, txt
14
CAUTION!
Playback of some files may fail or be
incorrect
Copy protected content is not playable.
Playback may suffer temporary
interruptions (image freeze, faster/slower
playback, etc) when the audio language
(audio track) is changed
A damaged movie file may not be played
correctly
Videos with resolution higher than
720x576@25/30P may not work properly
Movies larger than 2 GiB may not be
played correctly
Playing a movie via a USB/memory card
that doesn’t support high speed may not
work properly.
Playback of movie files with video bitrate
over 5 Mbps may be incorrect
Basic radio playback controls
Press the FM button on the remote
control to enter radio mode.
Select radio station
ADirectly input frequency: press T/F the
button on the remote control, then input
the frequency that you want. The range of
FM frequency is from 87.50 MHz to 108.00
MHz.
RDS Radio Function
Press the TITLE/RDS button on the
remote control to switch to RDS radio
mode. If there RDS signal is broadcasted,
you may get following information:
PS: Program service name.
PTY: Program type.
RT: Radio text.
CT: Clock time and date.
BSelect the band by pressing TU- or
TU+ button: the button will adjust the
frequency up or down one step (one step
of FM= 0.05MHz).
CSelect saved stations by pressing the
number buttons. For example, press 10+
button twice, 5 button once, and you
have selected the 25th saved station.
Press the CH- or CH+button to switch to
the previous or next band.
Automatically search bands
Press the SUBT./SEARCH button, and the
system will start to search bands from
low to high frequency automatically. The
searched bands are saved automatically.
Press this button again to stop searching.
Save Bands
Press the MENU/SAVE button to save the
current frequency of band. For example,
if you want to save 99.30 MHz in the 28th
cell, press 10+ button twice and 8 button
once, press T/F button to input 9 9 3 0,
then press MENU/SAVE button.
15
ENGLISH
Major functions
Major functions
ENGLISH
Playing discs
Basic playback controls
Press the MEDIA button on the remote
control to enter mediaplayer mode.
All operations described are based on
Remote Control use.
AConnect the power cords of the
AV290DVD and TV to a power outlet.
BTurn on the TV power and set to the
correct Video in channel.
CPress POWER
Pausing playback
to turn on the AV290DVD.
The Ferguson background screen
appears on the TV.
DPress EJECT on the front of the
AV290DVD player or EJECT
the remote control.
ADuring playback, press
to pause
playback and display a still picture.
Sound will be muted.
BTo resume normal playback, press
.
button on
EPlace a disc into the disc tray with the
lable facing up,then press EJECT .
For double-sided discs, load the side
you want to play facing up.
FPlayback will start automatically. If not
press PLAY/PAUSE .
16
Use and OK button to navigate
in the menu.
Selecting file
Press
/
to go to the previous or
next file
Stopping playback
Press
Operations for video playback
(DVD/ VCD/SVCD)
Playback info
Using the Disc Menu
OSD menu shows playback information
(for example, file name, current playback
progress, audio and video codecs).
Depending on the disc, a menu may
appear on the TV screen once you load in
the disc.
To select a playback feature or item
Use keys or numeric keypad (0-9; 10+) on the remote, then press OK
to start playback.
To access or remove the menu
Press MENU on the remote.
During playback, press OSD
A list of available information
appears on the TV screen.
Changing the Audio Language
Press LANG repeatedly to select different
audio language or audio tracks.
Subtitles
Repeat play mode
The repeat play options vary depending
on the media type.
AWhile playing, press REPEAT continuously
to choose a repeat options.
Display subtitle by pressing SUB-T button
during plaback.
Helpful Hints:
Subtitle files with the following filename
extensions (.srt, .smi, .sub, .ssa, .idx, .txt,
.ass) are supported.
BTo cancel repeat playback, press
continuously REPEAT until the repeat
mode is tuned off.
Forward/Reverse Searching
APress
during playback to select
the required speed: 2X, 4X, 8X, 16X, 32X
(backward or forward)
Sound will be muted or intermittent.
BTo return to normal speed, press
.
17
ENGLISH
Major functions
Major functions
ENGLISH
Playing multimedia files from the
USB device or memory card
This AV290VD system able to access
and view the data in the supported USB
device or memory card.
AIn mediaplayer mode (after pressing
MEDIA button) inserti a supported USB
device into the USB port on the front
panel.
A dialog will be displayed on the left
bottom corner.
When playing an ISO disc, the dialog
will not be displayed.
BPress DVD/USB/CARD on the remote
control to access the data in the drive.
Helpful Hints:
Press MENU/SAVE to switch between flat
and folder view.
A total of 300 folders and maximum of
648 titles can be supported.
Compatibility of USB device
The USB port does not support the
connection of other USB device except
the supported USB device.
The USB port can supports the playback
of JPEG/music files/AVI files.
Copy protected contents are not playable.
Helpful Hints:
Supported USB device include: flash drive,
card readers for different kinds of cards,
external hard disk.
General Operation
ALoad a disc or USB device.
The disc reading time may exceed 30
seconds due to the complexity of the
directory/file configuration.
The data disc menu appears on the TV
screen
BPress to select the folder and press
OK to open the folder.
CPress to select a track/files.
DPress PREV/NEXT to go to previous/next
page.
EPress OK to confirm.
Playback selection
During playback ,you can;
Press PREV/NEXT to select the previous/
next track/file in the current folder.
Press PlAY/PAUSE repeatedly to pause/
resume playback.
Rotating Pictures
During playback, press to
rotate the picture on the TV screen.
:
:
:
:
flip the picture verticaly by 180º
flip the picture horizontally by 180º
flip the picture anti-clockwise by 90º
flip the picture clockwise by 90º
Helpful Hints:
It may not be possible to play certain
JPEG disc due to the configuration and
characteristics of the disc or condition of
the recording.
For multi-session discs with different
formats, only the first session will be
available.
18
Setup is carried out via the TV, enabling
you to customise the AV290DVD to suit
your particular requirement.
ENGLISH
Setup Menu Options
Video Setup Menu
AIn mediaplayer mode, press SETUP.
Language Setup menu
BPress to select ‘Video Setup Page’
icon.
AIn mediaplayer mode, press SETUP.
BPress to select “Language Setup’”
icon.
VIDEO SETUP
VIDEO OUTPUT
TV MODE TV DISPLAY
TV TYPE
COLOR SETTING
LANGUAGE SETUP
OSD LANGUAGE
AUDIO
SUBTITLE
DISC MENU
POL
POL
POL
POL
RGB
16”9
AUTO
GOTO VIDEO SETUP PAGE
Switching the YUV/RGB
GOTO LANGUAGE SETUP
OSD language
This menu contains various language
options for display language on the
screen.
DVD-Video Audio, Subtitle, Disc Menu
This setting allows you to toggle the
output of the video signal between RGB
(on SCART) and YPbPr (on Component).
AIn ‘Video Setup Page’, use keys to
highlight {VIDEO OUTPUT}, then press .
S-Video - Select this for S-Video (S-VHS)
connection
YPbPr - Select this for Y Pb Pr connection
These menus contain various language
options for audio, subtitle and disc menu
which may be recorded on the DVD.
RGB - Select this for SCART connection
BUse keys to press OK to confirm
your selection.
Warning:
When the AV290DVD is set to Y Pb
Pr (YUV), some TV may not properly
synchronise with player on the SCART
connector.
19
Setup Menu Options
ENGLISH
Setting the TV Display
The picture shape can be adjusted to fit
your TV and the format must be available
on the playback disc. Otherwise, the TV
display will not affect the picture during
playback.
AIn ‘Video Setup Page’, use keys to
highlight { TV Display }, then press .
BUse keys to select a setting:
{ 4:3 Panscan }
Select this for a full-height picture with
the sides trimmed.
{ 4:3 Letterbox }
Select this for a ‘wide-screen’ display with
black bars on the top and bottom.
{ 16:9 }
Select this for wide-screen TV (frame ratio
16:9).
C Press OK to confirm.
TV Type
Audio Setup menu
AIn mediaplayer mode, press SETUP.
BPress to select ‘Audio Setup Page’
icon.
AUDIO SETUP
ANALOG AUDIO SETUP
DIGITAL AUDIO
EQUALIZER
GOTO AUDIO SETUP PAGE
Analog Output Setup
This options allows you to set the stereo
analog output of your AV290DVD.
AIn ‘AUDIO SETUP PAGE’, press keys to
This menu contains the options for
selecting the colour system that matches
the connected TV.
highlight {ANALOG AUDIO SETUP}, then
press twice.
{Stereo} - Select this when output
delivers sound from only the two front
speakers.
{LT/RT} - Select this option if your
AV290DVD is connected to a Dolby Pro
Logic decoder. Surround sound will be
like in a movie theatre only if movie disc
was recorded in the Dolby Pro Logic
format.
BUse keys to select a setting and
press OK to confirm.
20
Digital Audio Setup
The options included in Digital Audio
Setup are: { Digital Output } and { LPCM
Output }.
AIn ‘Audio Setup Page’, use keys to
General Setup menu
AIn mediaplayer mode, press SETUP.
BPress to select ‘General Setup Page’
icon.
highlight { Digital Audio Setup }, then
press .
BUse keys to select an option.
CPress to enter into the submenu.
DPress keys to select a setting.
l{ Digital Output }
Select this if you connect to a
multichannel decoder/receiver.
{ SPDIF/Off } - To deactivate the digital
audio output. For example, if you use the
AUDIO OUT sockets to connect to a TV or
stereo system.
{ SPDIF/RAW } - Select this if the connected device has a built-in multichannel decoder that supports one of the
multichannel audio format (Dolby Digital,
MPEG-2).
{ SPDIF/PCM } - Select this if the connected device is not capable of decoding multichannel audio. Ferguson will convert the
Dolby Digital and MPEG-2 multichannel
signals to PCM (Pulse Code Modulation).
Helpful Hint:
If { Digital Output } is set to { SPDIF/RAW },
all audio settings except MUTE are invalid.
l
{ LPCM Output }
Select this if you connect to a PCM
compatible receiver. Discs are recorded
at a certain sampling rate with the higher
sampling rate, the better sound quality.
{ 48K } - Select this if the playback disc is
recorded at a sampling rate of 48kHz.
{ 96K } - Select this if the playback disc is
recorded at a sampling rate of 96kHz.
GENERAL SETUP
ANGLE MARK
CLOSE CAPTION
SCREEN SAVER
LAST MEMORY
VERSION
DEFAULT
ON
OFF
ON
ON
GOTO GENERAL SETUP PAGE
Restoring to original settings
Setting the { Default } function will reset
all options and your personal settings
to the factory defaults, except your
password for Parental and Disc Lock.
AIn ‘Preference Page’, use keys to
highlight { Default }, then press to
select { Reset }.
BPress OK to confirm.
All settings will now reset to factory
defaults.
Helpful Hint:
To restore factory settings when TV is not
connected press DEFAULTS button on
RCU.
21
ENGLISH
Setup Menu Options
Troubleshooting
ENGLISH
WARNING
Under no circumstances should you try to repair the system yourself, as this will
invalidate the warranty. Do not open the system as there is a risk of electric shock.
If a fault occurs, first check the points listed below before taking the system for
repair. If you are unable to remedy a problem by following these hints, consult your
dealer for help.
Problem
Solution
No power
– Check if the AC power cord is properly connected.
– Press the POWER on the RCU to turn on the power.
No picture
– Refer to your TV’s manual for correct Video In channel selection.
– Check if the TV is switched on.
No sound or distorted sound
– Adjust the volume.
– Check that the speakers are connected correctly.
No audio at digital output
– Check the digital connections.
– Check if your receiver can decode Dolby Digital, DTS and if not,
please make sure the digital output is set to LPCM.
– Check if the audio format of the selected audio language
matches your receiver capabilities.
The player does not respond to the
Remote Control
– Aim the Remote Control directly at the sensor on the front of the
player.
– Reduce the distance to the player.
– Replace the batteries in the Remote Control.
– Re-insert the batteries with their polarities (+/– signs) as indicated.
Player does not respond to some
operating commands during playback.
– Operations may not be permitted. Refer to the user manual
No sound during movies playback
– The audio codec may not be supported by the Ferguson
The contents of the USB flash drive
cannot be read
– The USB flash drive format is not compatible with the player.
– Drive is formatted with a different file system.
Slow operations of the USB flash
drive
– Big file size or high resolution USB flash drive takes longer time
to read and display on the TV screen.
22
Specifications
FM radio
Mediatek MT1389J
ENGLISH
Processor
87.50 MHz to 108.00 MHz
Cabinet
Loader
Dimensions (w x h x d) 511 x 258 x 250 mm (main unit
Sanyo HD850
with speakers)
Set Weight
Connections
Scart Output
Euroconnector
YPbPr Output
3x Cinch
CVBS Output
Cinch (yellow)
Audio Output
2x Cinch
Audio Input
2x Cinch
Digital Output SPDIF
1x coaxial
1x optical
Port USB
1x USB 2.0 High Speed type A
card reader
1x SD/MMC
Approximately 7,5 kg
Power consumption
Power Supply Rating
110-240V; 50/60Hz
Power consumption
60 W max
Specifications subject to change without prior
notice
23
Glossary
ENGLISH
Composite (CVBS) - Low quality analogue
video signal format. Can carry PAL signal..
Component (YPbPr) - Higher quality analogue
video signal format. Splits the video signal into
three components to maintain signal clarity
and capable of carrying high definition video
up to 1080p. Component is rapidly being
phased out in favour of digital video via HDMI.
Aspect ratio: The ratio of vertical and horizontal
sizes of a displayed image. The horizontal vs.
vertical ratio of conventional TVs is 4:3, and
that of widescreens is 16:9.
Disc menu: A screen display prepared for
allowing selection of images, sounds, subtitles,
multi-angles, etc recorded on a DVD.
JPEG: A very common digital still picture
format. A still-picture data compression system
proposed by the Joint Photographic Expert
Group, which features small decrease in image
quality in spite of its high compression ratio.
XviD: MPEG-4 based video compression
technology, that can shrink digital video to
sizes small enough to be transported over the
internet, while maintaining high visual quality.
Container. The multimedia container file is
used to identify and interleave different data
types. Simpler container formats can contain
different types of audio codecs, while more
advanced container formats can support
multiple audio and video streams, subtitles,
chapter-information, and meta-data (tags) —
along with the synchronization information
needed to play back the various streams
together. There are many container formats,
such as AVI, Matroska (MKV), MOV, MP4, OGM,
WAV, etc.
Analog: Sound that has not been turned into
numbers. Analog sound varies, while digital
sound has specific numerical values. These
jacks send audio through two channels, the
left and right.
24
Digital: Sound that has been converted into
numerical values. Digital sound is available
when you use the DIGITAL AUDIO OUT
COAXIAL or OPTICAL jacks. These jacks send
audio through multiple channels, instead of
just two channels as analog does.
PCM (Pulse Code Modulation): A system for
converting analog sound signal to digital
signal for later processing, with no data
compression used in conversion.
S/PDIF - Format for carrying audio digitally over
either optical (TOSLINK) or electrical (Coaxial)
cable. Can carry high quality DTS or Dolby
Digital audio.
TOSLINK - Standardised optical fibre
connection system invented by Toshiba.
Typically used to connect the Player to a AV
receiver for pass-through of HiFi audio. When
we refer to digital optical we mean S/PDIF via
TOSLINK.
Dolby Digital (or AC-3) - It isa surround sound
system developed by Dolby Laboratories
containing up to six channels of digital
audio (front left and right, surround left and
right, center and subwoofer). It is a required
standard of both Blu-Ray and DVD and the
most widely supported. It is a ‘lossy’ format
so is of a lesser quality than the studio
original. Surround sound up to 5.1 channel is
supported. The Dolby Digital audio track can
either be decoded (downmixed) to stereo
in the Player or digitally bitstreamed direct
(passthrough) to a compatible AV receiver (via
TOSLINK/Coaxial/HDMI) for decoding.
DTS (Digital Theater System) - is a required
standard of both Blu-Ray and DVD players
and is widely regarded to produce audio
quality superior to Dolby Digital. Up to 5.1
channel surround sound is supported. DTS is
a ‘lossy’ compression standard so the audio
is of a lesser quality than the original studio
recording. The DTS audio track can either be
decoded (downmixed) in the Player to stereo
or digitally bitstreamed direct (passthrough)
to a compatible receiver (via TOSLINK/Coaxial/
HDMI) for decoding.