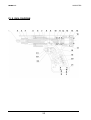
1
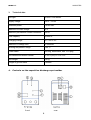
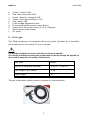
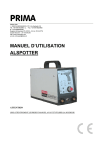
PRIMA
PRIMA S.R.L.
Via Garibaldi, 28 – 35020 ALBIGNASEGO (PD), ITALY
Tel. +39 049 8625963 DDI - Fax. +39 049 8625968
Italian Tax Registration No. 00069400281
Padua Business Register, Registration No. PD 43705 – R.E.A. Registration PD 247779
Full paid-up share capital €100,000.00
http: www.primasald.com
e-mail: [email protected]
ALSPOTTER
USER MANUAL
PLEASE NOTE
BEFORE USING THE W ELDER, PLEASE READ THIS MANUAL CAREFULLY
ALSPOTTER
PRIMA S.r.l.
CONTENTS
A. Introduction
B. Warranty
C. Description of the capacitive discharge spot welder
1. Identification
2. General information
3. Technical data
4. Controls on the capacitive discharge spot welder
5. Gun
D. Appropriate and inappropriate uses
1. Appropriate uses
2. Inappropriate uses
E. Procedures
F. Commissioning
1. Connection to the power supply board
__ ______
2. Adjusting the welder
3. Welding combinations
4. How to achieve a properly welded joint
a. Characteristics of the support surface
b. Positioning of the pieces
c. Using the gun
5. Operations to be avoided
G. Safety measures
1. Safety devices installed on the welder _____________
2. Checking the safety device_________________________________
H. Fault finding
I. Maintenance
1. Cleaning operations to be carried out by specialist personnel
2. Scheduled maintenance operations
3. Unscheduled maintenance and repairs
J. Emergency situations
1. Due to fire
2. Due to equipment faults
K. Technical documentation
L. Residual risks
M. Noise levels
N. Spare parts
O. Information on disposal
P. Guidance on understanding the safety regulations
page 3
3
4
4
5
6
6
7
8
8
8
8
9
9
10
10
11
11
11
11
12
12
12
13
15
15
17
17
18
18
18
18
18
18
19
19
20
20
Wiring diagram
ALSPOTTER spare parts
ALSPOTTER spare parts diagram
List of component of P.I.S. gun
P.I.S. gun diagram
List of periodic checks to be carried out on the capacitive discharge spot welder
2
21
22
23
24
25
26
ALSPOTTER
PRIMA S.r.l.
A.
Introduction
The capacitive discharge spot welder, which is equipped with a pin-welder gun, is
intended for use in body shops to correct dents in sheet aluminium or iron through the
use of an inertia hammer.
This manual has been drafted in order to provide the necessary information and
guidance to guarantee safe use of the unit. All users of the unit should read this manual
carefully before the unit is commissioned and should take care to respect all of the
instructions and guidelines set out here.
The capacitive discharge spot welder has been designed and manufactured for use in
combination with the supplied welding gun to carry out welding operations.
The information given in this manual should be followed closely. Any alternative use of
the unit is contrary to the purposes for which it has been constructed.
B.
Warranty
On taking delivery of the capacitive discharge spot welder, please check to ensure
there are no defects. Should you discover any defects, please make sure these are
noted down as per the legal guidelines. The warranty, which lasts for two years from
the date of delivery, covers all of the parts of the unit that are not subject to wear-andtear.
Please note that any unauthorised opening of, or tampering with, the unit will
invalidate the warranty, the CE mark and the manufacturer’s declaration, and will
release the manufacturer from any liability arising from damage to persons or property
that may result from the unauthorised opening of, or tampering with, the unit. In
addition, the manufacturer shall not be deemed liable for damages in any of the
following cases:
•
•
•
Incorrect maintenance
Failure to carry out scheduled maintenance
Improper use of the capacitive discharge spot welder.
PRIMA S.r.l. does not provide any guarantees in relation to this manual. PRIMA S.r.l.
reserves the right to make changes to this manual (to correct spelling errors or
inaccurate content, or to reflect improvements in the programs or equipment). Any
variations will be included in subsequent editions of this manual. Under no
circumstances may PRIMA S.r.l. be held liable for direct, indirect, specific, accidental or
subsequent damages deriving from the use or incapacity to use the welder or this
manual.
Copyright © 2006 Prima S.r.l.
Via G. Garibaldi, 28
35020 Albignasego/PD - Italy
All rights reserved. First edition 2006. Printed in Italy.
3
ALSPOTTER
PRIMA S.r.l.
C. Description of capacitive discharge spot welder
1.
Identification
The welder features an identification plate displaying – along with the CE marking – the
following information:
Name and address of the manufacturer.
4
ALSPOTTER
PRIMA S.r.l.
2.
General information
As shown in Fig.1, the capacitive discharge spot welder must be attached to a gun in
order to carry out welding operations. This creates a welding system composed of the
following elements:
(1)
(2)
(3)
(4)
(5)
(6)
(7)
capacitive discharge spot welder
ground cable
gun connection cable
contact gun
control cable
base plate
pin to be welded inserted in the gun.
FIG. 1
5
ALSPOTTER
PRIMA S.r.l.
3.
Technical data
Unit type
ALSPOTTER welder
Supply voltage
230 V – 50 Hz
Absorbed power
0.6 kW max
Maximum no-load voltage
15 V
Maximum permissible contact resistance
100 Ω
Total capacity
33,000 uF
Charging voltage
40 – 200 V DC
Maximum re-charge time
12 seconds
Working temperature range
0-40 °C
Power cable
2m-long, detachable, with 10 A plug
Unit dimensions without handle
l x d x h (cm) 15 x 32 x 22
Unit weight
8.0 kg
Length of ground cable
3 metres
4.
Controls on the capacitive discharge spot welder
front
rear
6
ALSPOTTER
PRIMA S.r.l.
a.
b.
c.
d.
e.
f.
g.
h.
i.
j.
Yellow ‘contact’ LED.
Red ‘start command’ LED.
Green ‘capacitor charged’ LED.
Yellow ‘overheat protection’ LED.
Red ‘mains’ LED.
Load voltage adjustment dial.
Illuminated bipolar mains power switch.
Housing for two power fuses (3.15 A, delayed)
Mains power cable socket
Air vents.
5.
P.I.S. gun
The 35kg contact gun is equipped with a pin-holder (spindle) for a threaded
pin measuring no more than 40 mm in length.
!
It is strictly prohibited to remove the limit pin from any spindle.
It is strictly prohibited to insert pins longer than 40 mm by altering the spindle as
this could compromise the safety of the system.
Gun type
Contact
Maximum weldable diameter
4 mm Al – 5 mm Fe
Gun weight (with cable)
1.9 kg
Cable length
4m
The gun is fitted with a tripod to ensure it remains in a vertical position.
7
ALSPOTTER
PRIMA S.r.l.
D.
Appropriate and inappropriate uses
1. Appropriate uses
The capacitive discharge spot welder is designed and built for the welding of pins
through the process of contact arc-welding using the supplied welding gun, as
described in this manual. Any other use of the capacitive discharge spot welder is
contrary to the purposes for which it has been constructed.
!
CAUTION
If the capacitive discharge spot welder is fitted with specific devices or modified for
specific purposes, it must undergo new compliance testing.
2. Inappropriate uses
The capacitive discharge spot welder is not intended to be used at supply voltages and
frequencies other than those shown on the identification plate.
The supplied gun must be used in conjunction with the original tripod and spindles.
Non-original accessories or accessories of different types or sizes should not be used.
The welder as supplied is not designed for use in automatic welding cycles. The safety
of the welder/gun will be compromised if opened or tampered with.
E.
Procedures
The welding process exploits the fusion of a small, cylindrical, base-material droplet
that forms under the pin when a suitably calibrated current is passed through the
system.
Due to the minimal energy used, the weld produced in this way is not subject to the
problems associated with arc-welding or resistance welding, such as surface
deformation or thermal stress. It is important that the droplet on the pin is not inserted
into small depressions or engravings in the base material.
The welder is essentially constituted by an electronic control circuit that supplies the
electrical capacitors with a voltage proportionate to the diameter of the pins to be
welded.
At the user’s command, the power module delivers the capacitive discharge current on
the pin/base-piece assembly, causing the fusion of the pin droplet and, due to the light
pressure exerted on the droplet, creating a weld once the fused material solidifies.
8
ALSPOTTER
PRIMA S.r.l.
F. Commissioning
1.
Connection to the power supply board
!
WARNING
Before supplying the welder with power, it is advisable to ensure that the electrical
power supply system has been set up properly – i.e. that it is fitted with a yellow/green
ground cable and a high-sensitivity differential switch.
DO NOT USE EXTENSION CABLES AND DO NOT PLUG THE UNIT INTO A MULTI-PLUG SOCKET.
USE HAZARD SIGNAGE TO INDICATE ANY ENCLOSURES CONTAINING LIVE PARTS.
!
PLEASE NOTE
The working voltage of the system is 230 V, 50 Hz, Monophase.
!
CAUTION
Before supplying the welder with power, it is advisable to ensure that the electrical
power supply system has been set up properly – i.e. that it is fitted with a yellow/green
ground cable and a high-sensitivity differential switch.
o
Connect the two-pin gun-control plug to the corresponding connector panel on the
front of the welder, then tighten the retaining ring nut.
o
Insert the ground lead into the corresponding socket and tighten slightly by turning it
clockwise, and attach the clamp – fitted to the other end of the cable – to the base
piece to be processed.
o
Insert the power supply lead (connected to the gun) into the socket with the gun
symbol and tighten slightly by turning clockwise.
o
Connect the unit to the mains, taking care to ensure that the unit’s on/off switch is in
the ‘off’ position (position 0).
o
Before turning the unit on, turn the power dial anti-clockwise as far as possible.
o
Activate the system by switching the on/off switch to position 1 (the ‘on’ position)
and ensure that the LEDs have the following statuses:
9
ALSPOTTER
PRIMA S.r.l.
Yellow ‘overheat protection’ LED
Red ‘mains’ LED
Green ‘status OK’ LED
Yellow ‘contact’ LED
Red ‘trigger’ LED
2.
Off
On
On once charged
Off
Off
Adjusting the welder
Consult the table showing the voltage/diameter combinations, and then adjust the dial
to match the figure shown in the table. These figures are indicative, and once the user
has become proficient in using the unit, they may be freely adjusted in order to achieve
the most effective weld on the pieces in question.
!
WARNING Under no circumstances may the manufacturer of the welder be
held liable for damage to persons or property resulting from poor-quality welding.
!
CAUTION
To ensure that the weld has the desired levels of mechanical
resistance, the levels must always be verified using destructive and/or non-destructive
mechanical tests.
Make a new welded joint and check it both visually and mechanically by applying
vertical traction to the welded pin.
The welding process involves the following three phases:
1. the gun, with the pin inserted, is put in position
2. the weld command is given and the electrical arc is activated
3. the droplet under the pin fuses and the fusion area expands to encompass the
entire surface of the pin.
1
2
3
1
3.
Welding combinations
As indicated in the table, it is possible to weld together materials that share a similar
composition. The most common combinations are:
ferrous materials
⇔
aluminium
⇔
with stainless steels
aluminium
10
ALSPOTTER
PRIMA S.r.l.
4.
How to achieve a properly welded joint
In order to achieve a properly welded joint, it is essential to ensure that certain criteria
are met in terms of the support surface, positioning of the pieces, status of the ground
plane and use of the gun.
a. Characteristics of the support surface
The support surface must be:
uncoated
free of oils or chemical agents
smooth or only slightly ribbed (less than or equal to around 70 x 10-6 m).
b. Positioning of the pieces
The pieces to be processed must be positioned on a solid, non-deformable surface in
order to ensure that the gun and the welded pins are perpendicular. Moreover, a solid
surface will prevent deformation, which is especially important if the piece in question is
of limited thickness.
c. Using the gun
First of all, select the pin holder that most closely matches the diameter of the pin to be
welded (φ 4 mm). Then adjust the overhang of the pin beyond the copper pin holder by
around 2-3 mm by moving the limit screw, which will then be blocked by the counter
nut.
It is then necessary to insert the adjusted pin holder into the gun, tightening the nut
using the box spanner while also ensuring that the tripod feet are stable.
Move the pin into the desired position by applying light vertical pressure on the gun,
thus compressing the contrast spring until the support feet are sitting stably on the
piece to be processed.
The precompression of the spring can be adjusted by turning the ring nut on the gun
clockwise to increase or anticlockwise to decrease. The level of precompression is
shown by the indicator on the left-hand side. Adjusting the precompression changes the
speed at which the pin is immersed into the welding bath, thus ensuring optimum
results.
While maintaining the chosen gun position, pull the trigger to initiate the welding cycle
and then remove it from the welded pin vertically, without twisting the gun, which could
damage the pin holder.
It is good practice to ensure that the pin holder is properly attached to the pin in order to
avoid damage to the external surface of the pin.
!
PLEASE NOTE:
A pin holder that is suffering from internal wear due to excessive use could result in the
generation of a current arc between itself and the pin inserted into it, dispersing the
welding energy and, as a result, wearing down the crest of the thread.
5.
Operations to be avoided
11
ALSPOTTER
PRIMA S.r.l.
OPERATIONS TO BE AVOIDED
CONSEQUENCES
Using the unit without first putting on
fireproof garments, protective goggles,
protective/insulating gloves and eardefenders.
- Physical harm to the user
Using the unit under humid conditions
- Damage to the unit
- Risk of electric shock for the user
Using the unit at the same time as other
welding devices (particularly highfrequency devices such as inverters)
- Dangerous interference
Locating the ground connection at some
distance from the welding area
- Damage to the unit and the
premises
Using sanders or grinders in the vicinity
of the welding unit
Making any changes to the pin holder
(spindle) or to the gun in general
-
Electrical damage to the unit
caused by the aspiration of ferrous
residues
- Risk of electrical shock for the user
G. Safety measures
1.
Safety devices installed on the capacitive discharge spot welder
a.
The welder is fitted with a contact-resistance measurement circuit, which permits
the welding current to flow only when the resistance is at a suitable level to provide a
good contact between the pin to be welded and the ground plate. As such, with the gun
connected to the other pole of the welding circuit, when the pin is being inserted into
the gun or the gun is being moved around at some distance from the surface onto
which the pins are to be welded, the uncovered metal parts of the gun are not live.
When the trigger is puller to start the welding cycle, the resistance of the welding circuit
is measured and, if the resistance is lower than the upper threshold set by the
manufacturer, the capacitive discharge current starts to flow, causing the pin to be
welded.
b. The capacitor charge circuit is fitted with an automatic discharge device, which is
activated whenever the welder is turned off using the on/off switch or the power is cut
for another reason, thus preventing the unit from storing dangerous levels of electrical
charge.
c. Do not attempt to access the internal parts of the welder if the power cord is
inserted.
d. Always wear suitable protective (electrically insulated) gloves, ear-defenders (earprotectors or ear-plugs) and eye-protectors (goggles) when using the welder.
12
ALSPOTTER
PRIMA S.r.l.
ENSURE THAT:
the electrical power supply for the capacitive discharge spot welder is equipped with a
high-sensitivity ( I ∆N = 30 mA) differential switch, as well as an appropriate grounding
system, in order to prevent indirect contact.
C1 CE identification plate
C2 ‘Warning! High Voltage’ sign
2. Checking the safety device
!
WARNING: It is essential to conduct the checks described in this manual on
the protection circuit in order to guarantee the safety level prescribed by the
manufacturer.
It is, therefore, essential to follow the procedure set out below:
with the unit off, connect the ground cable to the unit and attach the clamp to a
metallic base that is sufficiently large to contain the plate and to resist the insulation
test:
o
o
o
o
o
o
connect the power cord to the gun socket
do not, under any circumstances, attach the control cable
switch the machine on and check that:
the red ‘mains’ LED is lit
the yellow ‘overheat’ LED is off
the green ‘charge-complete’ LED is lit
13
ALSPOTTER
PRIMA S.r.l.
o the yellow ‘contact’ LED is off
o the red ‘trigger’ LED is off
o insert a pin into a suitable spindle and press the gun onto the metal support to
check that the yellow contact LED lights up;
o SUBSEQUENTLY, REMOVE THE GUN AND PLACE THE SUPPLIED INSULATION-TEST PLATE (P)
BETW EEN IT AND THE METAL BASE – W HEN THE TRIGGER IS PULLED THE YELLOW CONTACT LED
SHOULD NOT LIGHT UP, THUS VERIFYING THAT THE W ELDING SYSTEM IS BLOCKED IF THE
RESISTANCE VALUE RISES EVEN SLIGHTLY ABOVE 27Ω, W HICH IS W ELL BELOW THE RESISTANCE
THAT W OULD BE GENERATED DUE TO A FAILURE ON THE PART OF THE USER TO MAKE THE
NECESSARY CONTACT.
!
WARNING: When using the welder, it is essential to wear protective (electrically
insulated) gloves.
If the yellow contact LED does light up under the circumstances described above, it is
essential to stop using the unit immediately and to contact the supplier or the
manufacturer.
14
ALSPOTTER
PRIMA S.r.l.
H.
Fault finding
FAULT
POSSIBLE CAUSES
Cannot make welds
Defective trigger
Power cable broken
Control cable broken
Ground cable broken
Welder defective
The welder has entered
Vents blocked by foreign
overheat-protection mode bodies
Uneven welds
Worn spindle
Ground clamps loose or out
of position
Pins have broken free
Insufficient pressure on the
spring
Cables loose
Inadequate load voltage
Gun not vertical
Dirty surfaces
I.
CORRECTION ACTION
Check trigger LED status
Check contact LED status
Contact technical support
Remove any foreign bodies /
Contact technical support
Replace spindle
Check and reposition
Increase pressure
Tighten cables
Adjust as per the table
Check the height of the
support feet
Clean the surfaces
Maintenance
!
CAUTION: before attempting any maintenance operations, always ensure
that the power cord (230 V mains) has been disconnected.
Disconnect the power
cord
15
ALSPOTTER
PRIMA S.r.l.
!
CAUTION: The capacitive discharge spot welder is equipped with an
automatic capacitive discharge system that is activated as soon as the power supply is
cut.
When the protective housing (upper casing) is opened, ensure that the red LED on the
circuit board is off, thus confirming that discharge is complete.
Capacitor discharge LED
(off = discharged)
The capacitive discharge spot welder must be maintained in order to ensure that it
remains safe and continues to function properly.
Always use original spare parts. Do not carry out any operations that modify the
capacitive discharge spot welder.
Any operations to adjust the functional parameters of the welder by altering the internal
circuits should only ever be carried out directly by the manufacturer.
!
WARNING: If the safety circuit is defective, stop using the welder immediately and
contact the manufacturer to arrange a repair.
To extend the unit’s active life, ensure that:
o the cables (ground, gun power supply, gun control and unit power supply) are
properly insulated
o the rubber covers of the power and control plugs are not worn
o the screws and internal parts of the plugs on the cables are tight
o the screws on the ground clamp are tight
o the unit is cleaned regularly (both inside and out).
16
ALSPOTTER
PRIMA S.r.l.
1.
Internal cleaning operations to be carried out by specialist personnel
!
CAUTION :
Failure to carry out the maintenance operations prescribed
by the manufacturer will expose the user of the welder to serious risks.
To clean the unit effectively it is necessary to:
2.
disconnect the unit from the power supply
disconnect the ground, power-on and gun cables
unscrew the cross-head screws that hold the upper casing in place, then raise the
casing, taking take to disconnect the internal ground connection
do not touch the parts located above until you have checked that the red LED on the
inner side of the circuit board is fully off
avoid touching the parts located below until you have verified the complete absence
of any voltage on the capacitors using a tester (200 V DC FS)
remove any internal impurities using dehumidified compressed air at a maximum
pressure of two bars.
Scheduled maintenance operations
Operation
Frequency
Check integrity
of cables
Daily
Person
responsible
User
Check
effectiveness of
signage/LEDs
Check the
contact
resistance safety
circuit
Daily
User
Monthly
User
Daily
User
Every 6
months
User
Check for wear
on the gun
spindle
Clean the welder
17
Method
Check that the welding unit’s electrical
cables have not been subject to
abrasions or cuts, which can
compromise performance.
Checks that the signage is accurate
and that the LEDs are working
properly.
Every 100 hours of use, check that the
welder’s contact resistance safety
circuit is working properly by using the
appropriate plate, as described in the
relevant paragraph above.
Check that there is not excessive play
between the spindle and the pin.
As specified in the paragraph on
cleaning the welder.
ALSPOTTER
PRIMA S.r.l.
3.
Unscheduled maintenance and repairs
Description
Adjusting the circuit board
parameters
Substitution/repair of the contact
resistance safety circuit
Person
responsible
Technical
support
Technical
support
Operational
training level
Specialised
operation
Specialised
operation
Notes
J. Emergency situations
1.
Due to fire
!
CAUTION: Do not carry out welding operations in the vicinity of flammable or
combustible material.
Welding operations may produce sparks of incandescent material, which – if they come
into contact with flammable items – may result in a fire.
A fire extinguisher should be located in the vicinity of the workstation. The extinguisher
should be suitable for electrical equipment, and should be used if a rapid intervention is
required and appropriate.
2. Due to equipment faults:
As prescribed in the periodic maintenance guidelines, the contact resistance safety
circuit should be checked regularly. If the device is not functioning properly, stop using
the unit immediately and contact technical support.
K. Technical documentation
The following are enclosed with the manual:
♦
♦
♦
♦
Exploded diagram of the welder
List of spare parts for the welder
Wiring diagram
List of spare parts for the contact gun
L. Residual risks
!
WARNING If the use and maintenance guidelines set out in the manual are
not followed closely, there is a risk of electrocution (risk of electric shock).
18
ALSPOTTER
PRIMA S.r.l.
!
PLEASE NOTE If protective gloves are not worn when handling the gun and
there is a malfunction of the safety circuit, the user may be exposed to the risk of direct
contact with high-voltage (240 V) metal parts.
!
PLEASE NOTE During welding, high levels of noise are generated. For this
reason, the user should wear ear-defenders.
!
PLEASE NOTE The pulses of electrical current that are generating during
use of the unit generate strong electro-magnetic fields. Prohibit access to those with
pacemakers and do not use sensitive electronic equipment.
M.
Noise levels
The level of noise produced is heavily dependent on the working environment. The
table below shows the most common noise levels:
Capacitor
charging
68 dB(A)
Welding
Welding
pins φ 3 mm pins φ 8 mm
89 dB(A)
96 dB(A)
The cables of the welding circuit should be kept separate and should not be pulled
tight. This is to avoid the risk of creating electrodynamic actions of repulsion and
attraction between the cables, which would generate high levels of noise during the
discharge phase.
!
PLEASE NOTE The level of noise produced is heavily dependent on the
type of support surface on which the welding operations are to be carried out. The user
is responsible for checking the noise levels before commencing the welding operations.
N. Spare parts
In relation to spare parts, the capacitive discharge spot welder should be repaired and
maintained by the specialist technical support team.
19
ALSPOTTER
PRIMA S.r.l.
O. Information on disposal
When decomissioning the capacitive discharge spot welder, regulations on
differentiated waste disposal must be adhered to fully, with particular reference to:
the removal of the identification plate
the making safe of the welder by cutting the power cord
the transfer to differential disposal experts of the materials constituting the main
body of the unit
Parts from the capacitive discharge spot welder must not be used as replacement parts
for other machinery or equipment.
The decommissioning date must be noted in the maintenance manual.
P.
Guidance on understanding the safety regulations
THE SAFETY SYMBOLS IN THIS MANUAL ARE USED TO SIGNIFY THE FOLLOW ING:
!
W ARNING:
INDICATES A POTENTIAL RISK THAT COULD CAUSE SERIOUS DAMAGE
TO THE USER
!
CAUTION: indicates a minor risk or an improper use of the capacitive
discharge spot welder
!
PLEASE NOTE: indicates the possibility that the capacity discharge spot
welder could become damaged
20
ALSPOTTER
PRIMA S.r.l.
ALSPOTTER: WIRING DIAGRAM
Pulsante Pistola: Gun trigger
Pistola: Gun
Massa: Ground
Filtro e fusibile: Filter and fuse
Linea 230 V DC: 230 V DC Line
PE: Ground
Neutro: Neutral
Ventola 12 V DC: 12 V DC Fan
Fusibili 3.15 A ritardato: 3.15 A delayed fuses
Fusibili 6.3 A ritardato: 6.3 A delayed fuses
21
ALSPOTTER
PRIMA S.r.l.
ALSPOTTER: LIST OF REPLACEMENT PARTS
Code
Description
Q.ty
1 33 20 01 Illuminated bipolar switch
1
2 33 30 05 33,000 uF 200 V capacitor
1
3 33 50 03 Capacitor strap
1
2
4 33 60 01 Contact gun plug 25 mm , 2-pin
1
2
5 33 60 02 Ground cable plug 25 mm + grip
1
2
6 33 60 03 Female socket 25 mm panel
2
7 33 60 04 Control + numbered index
1
8 33 60 05 Male socket panel, 2-pin
1
9 33 60 06 Satin-finish front panel
1
10 33 60 07 Aluminium bracket, gun output
1
11 33 60 08 Aluminium bracket, capacitor
2
12 33 60 09 Aluminium bracket, ground output
1
13 33 70 00 Control board
1
14 33 70 01 MOS.PWR.OUT. power module
1
15 33 70 02 Coated unit plate
1
16 30 70 03 80 x 80 12 V vent
1
17 30 70 04 200 VA power transformer
1
18 33 70 05 16 R 25 W resistance
2
19 33 70 06 Mains filter + 2 fuses, 3.15 A delayed
1
20 33 70 07 Power cable
1
21 33 70 08 Cover for coated unit plate
1
22 33 70 09 Plastic handle
1
22
ALSPOTTER
PRIMA S.r.l.
ALSPOTTER: SPARE PARTS DIAGRAM
23
ALSPOTTER
PRIMA S.r.l.
P.I.S. GUN: LIST OF COMPONENTS
N
Description
Q.ty
1
Pin holder (spindle)
1
2
Spindle tightening nut
1
3
Support spacer (tripod stand)
3
4
Dust cover
1
5
Cover-holder ring
1
6
Tripod-holder front ring
1
7
Gun axle
1
8
Cylindrical bearing
1
9
Tightening screw (diameter M 5 x 8)
2
10
Insulating spacer
1
11
Reset spring, diameter 28 x 22
1
12
Reset spring, diameter 22 x 35
1
13
Spring-holder cylinder with index
1
14
Threaded adjustment drum
1
15
Knurled ring nut
1
16
Rear screws M 3 x 8
2
17
Spring ring
1
18
Flexible unsheathed copper cable
1
19
Cable relief block
1
20
Fixing screw M 5 x 8
4
21
Cable-guide spring
1
22
Microswitch, normally on
1
23
Trigger-guide ring nut
1
24
Trigger with spring return
1
24
ALSPOTTER
PRIMA S.r.l.
P.I.S. GUN: DIAGRAM
25
ALSPOTTER
PRIMA S.r.l.
PRIMA
PRIMA S.R.L.
Via Garibaldi, 28 – 35020 ALBIGNASEGO (PD), ITALY
Tel. +39 049 8625963 DDI - Fax. +39 049 8625968
Italian Tax Registration No. 00069400281
Padua Business Register, Registration No. PD 43705 – R.E.A. Registration PD 247779
Full paid-up share capital €100,000.00
http: www.primasald.com
e-mail: [email protected]
REGISTER OF PERIODIC MAINTENANCE ON THE CAPACITIVE DISCHARGE SPOT WELDER
Operations scheduled by the manufacturer
TABLE OF CHECKS TO BE CARRIED OUT AFTER EVERY 100 HOURS OF USE
CHECK TO BE MADE
SPECIFICATIONS
OUTCOME SIGNATURE
Check the integrity of the insulation on the cables Visual inspection
that form the welding circuit
Check the full integrity and efficiency of the
insulating protection on the welding gun
Check that the contact resistance measuring
See relevant
circuit is working properly
paragraph
Check that the LEDs on the panel are working
properly
Check the condition of the signage on the welder
Check the condition of the protective gloves
Please note: copy the table shown above, compile the relevant
information, then enclose it as a page in the register.
Date
The user who conducted the checks
.......................................
.......................................
26