1
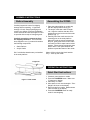
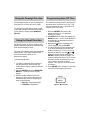
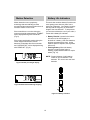
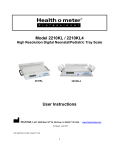
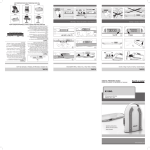
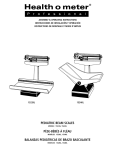
2210KL Neonatal Pediatic Scale 1 gram accuracy USER INSTRUCTIONS Rev. 20120516 THIS PAGE INTENTIONALLY LEFT BLANK. 2 Table of Contents Introduction ............................................. 4 Cautions & Warnings .............................. 4 Assembly Instructions Care and Maintenance Before Assembly ................................. 5 Cleaning .............................................. 13 Assembling the 2210KL ……...…... 5 Moving the Scale ................................. 13 Troubleshooting ................................... 13 Operation Instructions Specifications Quick Start Instructions ........................ 5 Console Keypad .................................. 6 Special Features ................................. 7 Using the Tare Function ……………… 8 Using the Weightlock Function ........... 8 Using the Reweigh Function ………….. 9 Using the Recall Function ................... 9 Programming Auto-Off Time .............. 9 Model 2210KL Specifications ...................................... 14 Warranty Model 2210KL Warranty ............... 15 How to Obtain Warranty Service ......... 15 Serial Number ..................................... 15 Motion Detection …………………......... 10 Battery Life Indicators .......................... 10 User Setting Options ………………….. 11 Battery Installation ……... ………..…... 11 Calibration ........................................... 12 3 Cautions & Warnings Introduction Health o meter® Professional scales by Pelstar LLC use the most sophisticated microprocessor technology available. Each precision instrument is designed to provide accurate, reliable and repeatable weight measurements, as well as many other features that make the weighing process simple, fast and convenient. Failure to comply with the following may void the warranty on the scale. This operations manual contains instructions for use of this scale. In order to achieve satisfactory results, the operator must read this manual thoroughly before using this scale. If any questions arise regarding this scale or its use, please contact Pelstar LLC. 4 To ensure proper operation of this electronic scale, this operator’s manual should be reviewed carefully before operation. Keep this manual available for future reference and also for use in the orientation of new personnel. If the scale becomes damaged, it should not be used until properly serviced. All repairs should only be performed by Pelstar LLC. Do not gas sterilize or autoclave the scale. Do not exceed the weight limit of 45 lbs. (20,000 g.) Scales contain delicate sensors. Do not bang into doors, walls, etc., as damage may result. No scale should be used for patient transfer. The manufacturer assumes no responsibility for patient injury or scale damage should this warning be ignored. Do not leave patients unattended on the scale. ASSEMBLY INSTRUCTIONS Before Assembly Assembling the 2210KL Carefully inspect the carton for shipping damage before unpacking. If significant damage is found, keep all packaging and contact your shipper or Pelstar immediately. Claims must be filed with the shipper as soon as possible after receipt of damaged goods. 1. Place the scale platform on a table top with the display buttons facing you. 2. The acrylic cradle has a built-in length rule. Align the cradle so that the rule is positioned over the back end of the scale platform (Fig. 1). 3. Carefully lower the cradle onto the four mounting pins on the scale platform. When the cradle is properly aligned with the pins, gently push down on the cradle over each pin until it snaps into its locked position. When properly positioned, there will be about a 3/8” space between the platform top and the bottom of the cradle. Carefully unpack the components from the shipping containers. Your scale has been shipped in one (1) carton and contains the following components: Scale Platform Acrylic Cradle Always lift the scale by the black handles only — never by the cradle. Six C-cell alkaline batteries are pre-installed in the scale platform Length rule OPERATION INSTRUCTIONS Quick Start Instructions 1. If desired, place blanket on cradle 2. Press blue ON/ZERO button. Make sure “0” appears on display. 3. Place baby on cradle. 4. Allow scale to lock onto the weight. “Prior Weight” will show on the display. 5. Remove baby from cradle. Measurement value remains on the display. 6. Press blue ON/ZERO button to ready scale for next weighing. Figure 1: Install Cradle 5 OPERATION INSTRUCTIONS Console Keypad The scale control console has five buttons. Note that some buttons perform multiple functions. ON/ZERO: Depress to turn scale on or reset to zero. TARE: Depress to zero out the weight of an object, such as a blanket, on the scale. Place the baby on the cradle and the console will display the net weight by automatically deducting the weight of the blanket. LB/GM: Depress to switch between pounds and ounces mode and grams mode or between pounds and ounces mode and kilogram mode (see User Setting Options section on how to switch from grams to kg or how to disable button). Secondary function is the up arrow and is used for menu selection. REWEIGH Depress while baby is on cradle to reweigh. RECALL: The last weight measurement can be recalled after scale has turned itself off and display is blank. Secondary function is the down arrow and is used for menu selection. MENU: Depress for advanced functions such as programming the length of the automatic time-off. Secondary function is the ENTER button and is used for menu selection. P r o P l u s LB/GM Figure 2: Readout Console Keypad (not to scale) 6 REWEIGH RECALL Special Features The 2210KL scale comes standard with these special features. 1. Auto-Zero: The scale will automatically display “0” when turned on. If the display reads between “-20 gram” and “20 gram” at any time, regardless of what is on the cradle, the scale will automatically reset to “0” after 8 seconds. 2. English/Metric Readout: With normal operation you may switch the display units between grams (or kilograms) and pounds at any time before or after a weighing. When turned on, the scale will display the last used unit of measure. 3. Tare Option: An object weighing more than 20 grams can be subtracted from the total weight to determine the net weight. 4. Weightlock: Any weight over 512 grams will lock in so that no further weighings can take place until Weightlock is deactivated. The measurement will display even after the baby is removed from the cradle so that the caregiver can attend to the baby rather than trying to remember the weight measurement. The value is retained even after the scale turns itself off. 5. Motion Detection: In most cases the scale will display a true, accurate weight based on a series of consistent and stable measurements. However, if a baby or object is moving on the platform, the scale may not achieve consistent readings that are required to give a “stable” weight. This condition is indicated by Weightlock not activating on the display. If the movement on the platform continues for seven seconds, the scale will automatically activate the motion detection feature and “AVERAGE WT” will be displayed on the console. Because of the movement on the platform, average weight indicates that the scale was not able to achieve a true measurement in line with the listed accuracy specification. However, the average weight deviation from the true weight of the baby will be minimal, based on the severity of the motion during the weight reading. 6. Auto-Off: As a battery saving feature, the scale will automatically turn off when not being used. The length of the Auto-Off timeout is programmable by the user. The factory setting is one minute. 7 Using the Tare Function Using the Weightlock Function When using this scale, the weight of any object, such as a blanket, accompanying the baby being weighed can be subtracted from the total weight to determine the net weight of the baby alone. The Tare function automatically performs this subtraction, avoiding the need for manual calculations. When using this 2210KL scale, the weight of any object over 512 grams will be locked on the display even after the baby has been removed from the cradle allowing the care provider to tend to the needs of the baby without having to remember the weight measurement. This value is stored and can be recalled even after the scale has turned itself off. TARE When the baby’s weight is locked, “PRIOR WT” is displayed (Fig. 5). The weight will remain displayed even after the baby is removed from the cradle. No further weighings can take place until Weightlock is deactivated. Figure 3: Tare button STABLE NET WT lb Weightlock is deactivated by depressing ON/ZERO or REWEIGH/RECALL (Fig 6). gram Figure 4: Net weight display STABLE 1. Turn the scale on and wait for the display to read “0”. 2. Place the object (i.e. blanket) on the cradle. The weight of the object will be displayed. 3. Depress the TARE button. “NET WT” and “0.0” will be displayed . If the object is removed from the platform, its weight will be displayed as a negative value. 4. Place the baby on the cradle with the object still on it. The readout will now display the baby’s net weight. 5. Depress ON/ZERO to return the scale back to normal weighing operation. lb gram PRIOR WT Figure 5: Weightlock display REWEIGH RECALL Figure 6: Reweigh/Recall button 8 Using the Reweigh Function Programming Auto-Off Time The Reweigh function is used to reweigh the baby while he or she is still on the cradle. The 2210KL has been preset at the factory to shut down after one minute of no use. This can be programmed from 12 seconds to 25 minutes to suit your needs. To reweigh, the baby should remain on the cradle and a weight measurement should be on the display. Simply press REWEIGH/ RECALL. 1. Depress ON/ZERO and wait for the display to show “0.0”. Do not place anything on cradle. 2. Hold MENU button down and depress the RECALL button. “Set-0” will be displayed along with the up and down arrows; the “0” will be flashing. 3. Depress the button repeatedly until “Set-3” appears, depress ENTER. 4. The Auto-Off time currently programmed in the scale will display as minutes and tenths of minutes (i.e. “03.2”); the far left digit will be flashing. Use the and buttons to set the desired value, press ENTER to advance to the next digit. For example, setting the time to “00.5” will turn the scale off after 30 seconds of no use; “02.0” will turn the scale off after 2 minutes; “25.0” will turn the scale off after 25 minutes. 5. Press ENTER when complete to save and return to normal weighing operation. Using the Recall Function The Recall function is used to recall the last weight measurement after the scale has shut down and the display is blank. The scale automatically stores the last weight measurement. This value is stored until a new measurement is taken or it is intentionally cleared. To recall a weight value: 1. The baby’s weight has been measured, the baby has been removed from the cradle and the display is blank (scale has shut down). 2. Depress ON/ZERO and then REWEIGH/ RECALL. The stored value will now display. 3. With the weight measurement in the display, the scale will be returned to the unlocked mode (ready for weighing) by either of the following: a. RECALL is depressed again b. ON/ZERO is depressed ENTER MENU Figure 7: Menu button 9 Motion Detection Battery Life Indicators Motion detection uses a proprietary technology that automatically provides accurate weight measurement when there is excessive motion on the cradle. This scale has excellent battery life with most users getting more than two years from a single set of batteries. Your battery longevity will vary with the frequency of use and the length of the Auto-Off timer. To help ensure you are never without the use of your scale, it comes with a battery life indicator. If there was little to no motion during the most recent weight measurement, “STABLE” will be displayed along with “PRIOR WT” (Fig. 8). Battery Pictorial: Located in the bottom left corner of the LCD display is a facsimile of a battery. With new batteries, all three segments will be dark. As the batteries become depleted, the segments will turn off. Flashing Battery: When the battery pictorial is empty and the frame is flashing, replace batteries within a couple weeks (Fig. 10). If there was considerable motion during the recent weight measurement, motion detection will activate after seven seconds and “AVERAGE WT” will be displayed along with “PRIOR WT” (Fig. 9). STABLE lb NOTE: Properly dispose of old batteries. Install six (6) new alkaline C-cell batteries. Do not mix new and used batteries. PRIOR WT gram Figure 8: Stable prior weight display lb gram PRIOR WT AVERAGE WT Figure 9: Motion detected during weighing Figure 10: Battery indicators 10 User Setting Options Battery Installation Your scale has three additional settings that you may customize for your specific needs. This scale is powered by six (6) standard disposable C-cell alkaline batteries. Scales will arrive with batteries installed. Use the following procedure when installing a new set of batteries: Tone on/off: A tone sounds whenever a weight is locked in or a button is pressed. (Factory setting is “on”.) LB/GM lock: The LB/GM button can be disabled so that the scale will weigh in only the selected unit of measure. (Factory setting is “unlocked”.) Gram/kg display: The metric unit of measure may be displayed in grams (i.e. 2541 gram) or kilograms (2.541 kg). (Factory setting is grams.) 1. Gently remove the cradle by pulling up on the cradle to unlock it from the platform mounting pins. 2. Remove the scale top cover by removing the six (6) screws (Fig. 11). 3. Locate the battery tray (in the rear center of the scale platform). It has a white cover that is held down with two screws. Remove the screws and cover. 4. The batteries may be held in place with tape. This was to add further protection during initial shipping and is no longer required. Remove old tape and batteries. 5. Insert new batteries. Note the orientation that is shown on the bottom of the battery tray. Press ON/ZERO to make sure the display powers up properly. 6. Replace the battery tray cover and screws, scale cover and cradle. To change any (or all) of these settings: 1. Depress ON/ZERO button and wait for the scale to display “0.0”. 2. Hold MENU button down and depress RECALL button. “Set-0” will be displayed and the “0” will be flashing. 3. Depress the button repeatedly until “Set-5” appears. Depress the ENTER button. 4. “11011” will display with the left most “1” flashing. This sets the Tone: “1” = on, “0” = off. Use the and buttons to input your desired setting. Press ENTER. 5. The second position will now be flashing. This disables the LB/GM button: “1” = unlocked, “0” = locked out. 6. The third and fourth positions are not currently used. Press ENTER twice. 7. The fifth (right most) position will now be flashing. This switches the display from gram to kilogram: “1” = gram, “0” = kg. Press ENTER. Example: If you desire to leave the tone on and disable the keypad so it only displays kilograms, the user settings would be “10010”. Figure 11: Removing scale cover 11 Calibration Your scale has been properly calibrated at the factory and should not require any further adjustments. The following procedure should be performed only to correct any error in calibration. Calibration is protected by a security code to avoid inadvertent access. For maximum accuracy, calibration must be done in grams. If you only have certified weights in pounds, convert them to grams (i.e. 10 pounds = 4536 grams). 1. Depress the ON/ZERO button on the console and wait for the display to show “0.0”. 2. Place an accurately known “sure” weight (3,000 to 5,000 grams. recommended) on the platform. If the display reads other than the known weight value by +/- 1 gram, then the scale is out of calibration. IMPORTANT NOTE: A “sure” weight is a weight that has been accurately calibrated and its license is traceable to NBS weights & measures. Weight room free weights are not normally suitable to use as check weights as they may vary from their stated value. If you do not have access to “sure weights”, use a weight that has been weighed on a scale you are sure is accurate. 3. Remove weight from platform. The calibration security code must be entered before attempting to calibrate the scale. Hold the MENU button down and press RECALL button. Release both buttons. “Set-0” will be displayed and the “0” will be flashing. 4. Depress the button repeatedly until “Set-2” appears. Depress the ENTER button. 5. Use the and keys to input “125” as the calibration security code. Press ENTER to advance to the next digit. After entering the third digit, press ENTER and the scale will return to normal weighing mode. The security code needs to be entered only once, unless the scale is powered off. Access to calibration is denied if the proper code is not entered. 6. With the known weight on the scale, press REWEIGH. Quickly, before WeightLock activates, hold the MENU button down and press RECALL button. Release both buttons. “Set-0” will be displayed and the “0” will be flashing. 7. Depress the button repeatedly until “Set-6” appears. Depress the ENTER button. 8. A weight value will display representing the current calculation of the known weight. The hundreds of pounds digit will be flashing. Use the and keys to input the proper value. Press ENTER to advance to the next digit. After entering the tenths of pounds digit, press ENTER and “-CAL-” will display while the scale calibrates itself. 9. The readout will then quickly show the old weight, then re-weigh to show the new calibration weight. 10.Remove weight and depress the ON/ZERO button. Wait for “0.0” to display and verify calibration by placing the same known weight back on the platform. Calibration Error Code “Err-4” Scale is below minimum calibration weight. Use at least 1000 grams to calibrate the scale. 12 CARE AND MAINTENANCE 2210KL Cleaning Procedures Troubleshooting Proper care and cleaning of the scale is essential to ensure a long life of accurate and effective operation. In addition to routine cleaning, include a regular check of all structural apparatus. Scale will not turn on Check that batteries are “seated” properly in battery tray as they may have shifted in shipping. See BATTERY INSTALLATION section on how to access the batteries and check their positioning. Check that fresh batteries are properly inserted into the battery tray. All external surfaces can be wiped clean with a damp cloth or tissue. A mild soap and water solution may be used as well. Wipe unit dry with a clean, soft towel. DO NOT immerse scale platform into cleaning or other liquid solution. DO NOT use isopropyl alcohol, other such solutions or sanitizing wipes to clean the display surface. Do not use abrasive cleaners.. Check overall appearance of the scale for any obvious damage or wear and tear. Incorrect weight readings Cradle is touching wall or other object and must be moving freely. To test, remove all objects from cradle. Turn scale on. Display should read “0”. Gently push down on the cradle with your finger and release. The display should show some weight value and then quickly return to “0”. Cradle is not level. Weight reading consistently too high or too low Check scale calibration and calibrate if necessary. Possible broken wire in the connector. Call the service department for further Moving the Scale The scale should be lifted by the two black handles only. For your added convenience, an optional wheeled cart is available. NOTE: The scale cradle should never be used for transporting a baby or objects. The cradle surface must be clear of any objects during transport. 13 SPECIFICATIONS 2210KL Scale Specifications DIMENSIONS Cradle Width Depth Height 24 inches (61 cm) 15 inches (38 cm) 3 inches (8 cm) Scale Assembly Width Depth Height Weight 26 inches (66 cm) 16.5 inches (42 cm) 7 inches (18 cm) 26 lbs. (11.8 kg) POWER REQUIREMENTS Batteries Battery Life (approx.) With 1 minute Auto-Off 6 C-cell Alkaline (9 V) 3 years (80,000 weight readings) OPERATING CONDITIONS 68 to 85 degrees F (20 to 30 degrees C) 0% to 85% relative humidity 700 to 1030 hPA atmospheric pressure Avoid exposure to high pressure water or steam STORAGE & TRANSPORTATION 14 to 122 degrees F (-10 to 50 degrees C) 0% to 85% relative humidity 500 to 1060 hPA atmospheric pressure Remove batteries if storing longer than 3 months SCALE DESCRIPTION Type Capacity Accuracy 0 - 11300 g (0 - 25 lb) > 11300 g (> 25 lb) Resolution 0 - 11300 g (0 - 25 lb) > 11300 g (> 25 lb) Strain Gauge 20000 grams (45 pounds) +/- 1g (+/- 0.1 oz) +/- 5g (+/- 0.1 oz) +/- 1g (+/- 0.1 oz) +/- 5g (+/- 0.1 oz) This scale is a “Latex-free” product. Degree of protection against electrical shock: Type BF 14 WARRANTY 2210KL 3-Year Limited Warranty This Health o meter® Professional scale is warranted from date of purchase against defects of materials or in workmanship for a period of three (3) years. If product fails to function properly, return the product, freight prepaid and properly packed to Pelstar, LLC (see “How To Get Warranty Service”, below, for instructions). If the manufacturer determines that a defect of material or in workmanship exists, the customer’s sole remedy will be repair or replacement of the scale at no charge. Replacement will be made with a new or remanufactured product or component. If the product is no longer available, replacement may be made with a similar product of equal or greater value. All parts including repaired and replaced parts are covered only for the original warranty period. Who is Covered? The original purchaser of the product must have proof of purchase to receive warranty service. Please save your invoice or receipt. Authorized dealers selling Pelstar products do not have the right to alter, or modify or any way change the terms and conditions of this warranty. Your warranty does not cover normal wear of parts or damage resulting from any of the following: negligent use or misuse of the product, use on improper voltage or current, use contrary to the operating instructions, abuse including tampering, damage in transit, or unauthorized repair or alternations. Further, the warranty does not cover Acts of God, such as fire, flood, hurricanes and tornadoes. This warranty gives you specific legal rights, and you may also have other rights that vary from country to country, state to state, province to province or jurisdiction to jurisdiction. Serial Number How to Get Warranty Service To Obtain Warranty Service make sure you keep your sales receipt or document showing proof of purchase. Call 1 (800) 638-3722 to receive a return authorization (RA) number, which must be included on the return label. Attach your proof of purchase to your defective product along with your name, address, daytime telephone number and description of the problem. Carefully package the product and send with shipping and insurance prepaid to: Pelstar, LLC Attention R/A#_____________ Repair Department 11800 South Austin Avenue, Unit B Alsip, IL 60803 Your model and serial numbers are located on the back of the scale. Take time to record the serial number for future reference when communicating with the service department. Model Number 2210KL Serial Number ___________________ Date Purchased ___________________ If your scale is not covered by warranty, or has been damaged, an estimate of repair costs or replacement costs will be provided to you for approval, prior to servicing or replacing. 15 This scale model is CSA-listed Medical Electrical Equipment for U.S.A. and Canada. CSA Symbol Legend: Degree of protection against electrical shock: Type BF. Caution or attention required. Risk of potential danger. Proper positioning of battery polarity. Direct electrical current. Pelstar LLC. 11800 South Austin Avenue,Unit B. Alsip, IL 60803 Phone: 708-377-0600 Toll free: 800-815-6615 Fax: 708-377-0601 www.homscales.com Health o meter® is a registered trademark of Sunbeam Products, Inc. used under license. We reserve the right to improve, enhance or modify Health o meter® Professional product features or specifications without notice. © Pelstar, LLC 2012 Rev 5