1
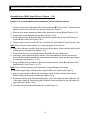
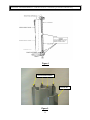
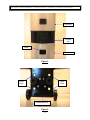
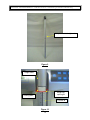
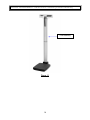
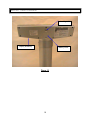
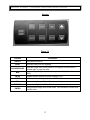
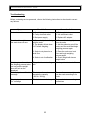
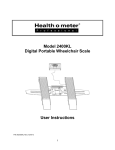
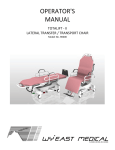
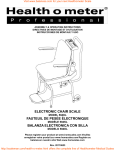
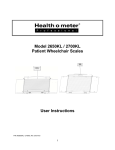
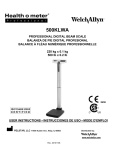
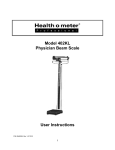
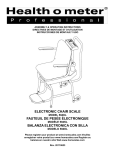
Model 500KL Eye Level Digital Beam Scale E112697 UL 60601-1 CSA C22.2 No. 601.1-M90 User Instructions PELSTAR, LLC 9500 West 55th St. McCook, IL 60525-7110 USA © Pelstar, LLC 2013 P/N UM500KL Rev 2-091913 1 www.homscales.com Model 500KL Thank you for your purchase of this Health o meter® Professional product. Please read this manual carefully, and keep it for easy reference or training. TABLE OF CONTENTS Caution and Warning.................................................................................................3 Specifications for This Scale / Definition of Symbols.................................................5 Certifications / Connectivity / Disposal ......................................................................6 Assembly Instructions 500KL Scale .........................................................................7 Setup / Batteries........................................................................................................15 Quick Start Instructions .............................................................................................17 Maintenance..............................................................................................................21 Calibration .................................................................................................................22 Troubleshooting ........................................................................................................23 Warranty....................................................................................................................24 Note: This scale has been factory calibrated, and does not require calibration prior to use. Please register your scale for warranty coverage at: http://homscales.com/product-support/technical-support/product-warranty-registration For User Instructions updates and revisions please go to: http://www.homscales.com 2 CAUTION AND WARNING When Operating this scale: To prevent injury and damage to your scale, please follow the enclosed user instructions to assemble and operate very carefully. Exercise caution when assembling the scale column. For accurate weighing, this scale must be placed on a flat, stable surface. For accurate weighing, verify before each use the proper operation according to the procedure described in this manual. Operating this scale at voltages and frequencies other than specified can damage the equipment and will void the warranty. Do not transport the scale with any weight on the platform. Do not exceed recommended weight limit of 500 lb / 220 kg for this scale. Do not use in the presence of flammable or explosive materials. For accurate weighing, if the “Lo” indicator activates, replace the batteries or switch to the optional AC adapter as soon as possible. If the scale becomes damaged, it should not be operated until properly serviced. All repairs should only be performed by authorized Health o meter® Professional service personnel. When replacing / inserting batteries, be sure to use all new batteries. To prevent patient injury, the patient must be attended throughout the entire weighing event. This equipment has been tested and found to comply with the EMC limits for the Medical Device Directive 93/42/EEC (EN 55011 Class A and EN 60601-1-2). These limits are designed to provide reasonable protection against harmful interference in a typical medical installation. The equipment generates, uses and may radiate radio frequency energy and, if not installed and used in accordance with these instructions, may cause harmful interference to other devices in the vicinity. However, there is no guarantee that interference will not occur in a particular installation. If this equipment does cause harmful interference with other devices, which can be determined by turning the equipment off and on, the user is encouraged to try to eliminate the interference by one or more of the following measures: o Reorient or relocate the receiving device. o Increase the separation between the equipment. o Connect the equipment into an outlet on a circuit different from that to which the other device(s) is connected. o Consult Customer Service or a field service technician for help. 3 CAUTION AND WARNING When operating this scale with the AC adapter: Operate this scale exclusively with the AC adapter provided by Health o meter Professional. Use of an unspecified adapter will void the warranty, and can pose a serious safety hazard. For use with AC adapter model ADPT30WA (International, plug kit) or ADPT31 (Domestic, USA). Prior to using this scale, inspect the AC adapter cord for cracking / fraying, or for broken / bent plug prongs. Prior to using this scale, ensure that the AC adapter is plugged into an outlet with the rated voltage appropriate for operation. Ensure that the AC adapter outlet is wired to a circuit breaker or other protected power source. Ensure that the AC adapter and scale do not come in contact with liquids, excessive temperature, or excessive humidity. Unplug the AC adapter, and carefully store both the adapter and adapter cord before moving the scale. If the scale is being connected to another medical device, the power adapter must not be used. Disconnect the power adapter from the scale and use only the battery power. 4 SPECIFICATIONS FOR THIS SCALE General The Model 500KL eye level digital beam scale uses highly sophisticated microprocessor technology. Each precision scale is designed to provide accurate, reliable and repeatable weight measurements. In addition, each scale is designed to provide the user with features that make the weighing process simple, fast, and convenient. This scale is set up to use motion-sensing weighing technology in order to determine the actual weight of a moving patient. Weight can be displayed in pounds (lb) or in kilograms (kg). This scale can be powered using an AC adapter (not included), or by 6 - AA batteries (included). 500KL Scale Specifications Capacity and Resolution 500 lb x 0.2 lb (220 kg x 0.1 kg) Power Requirements 120 - 240AC, 50 - 60Hz - 9V DC adapter or 6 - AA batteries Environmental Operating temperatures: 50°F to 104°F (10°C to 40°C) Storage temperatures: 30°F to 122°F (0°C to 50°C) Maximum Humidity: 95% RH Physical Dimensions Scale (Overall Dimensions) Width: 12-¾” (32.4 cm) Depth: 20-½” (52.1 cm) Height: 43-½“ (110.5 cm) Platform (Standing Area) Width: 12-¾” (32.4 cm) Depth: 15-½” (39.4 cm) Height: 2-¼“ (5.7 cm) Weight: 11.9 lb (5.42 kg) DEFINITION OF SYMBOLS 40C Attention, Consult Accompanying Documents Temperature range (10°C to 40°C / 50°F to 104°F) AC to DC power supply (9V DC, 500mA) 10C Type BF Applied Parts Humidity range (10% - 95% RH) AC to DC power supply Atmospheric pressure range (500hPa – 1060hPa) 5 DC Connector Polarity CERTIFICATIONS / CONNECTIVITY / DISPOSAL Certification Descriptions Pelstar, LLC has been officially certified as a manufacturer of Health o meter® Professional medical devices to be in compliance with stringent legal requirements. The Pelstar, LLC quality assurance system covers the design, marketing, and distribution of specialized scales for the Healthcare Industry. Products carrying this symbol meet the requirements of: 1. Directive governing medical devices 93/42/EEC This product is tested to and meets the requirements of: 1. UL60601-1 First Edition: Safety for Medical Electrical Equipment 2. CSA C22.2 No. 601-1 M90: Medical Electrical Equipment 500KL Scale Connectivity Information To enable reliable transmission of weight, height, and Body Mass Index (BMI) data, this scale is designed to connect to a computer, monitor, or other electronic device via a built-in USB port. This connectivity helps minimize a source of potential medical errors caused by incorrectly copying and then recording patient data. This scale is EMR-EHR compatible. For more information regarding how to connect this scale to other electronic devices, please contact Health o meter® Professional Scales Technical Support, available during normal business hours at 1-800-638-3722. 500KL Scale Disposal This Health o meter® Professional scale must be disposed of properly as electronic waste. Follow the national, regional or local regulations which apply to you for disposal of electronic waste or batteries. Do not dispose of this device in the domestic waste stream. 6 500KL ASSEMBLY INSTRUCTIONS Before Assembly Each 500KL eye level digital beam scale is shipped disassembled in one carton. Carefully inspect the carton for shipping damage before unpacking. If damage is found, contact your shipper or a Health o meter® Professional representative immediately at 1-800-815-6615. Claims must be filed with the shipper as soon as possible after receipt of the package. The following information details what you will find inside the main carton as you unpack the parts for assembly. To prevent scratching any components, carefully remove each assembly from the carton and unwrap the packing materials. Set the carton aside for storage. To avoid damaging the scale parts when unpacking, do not use a box cutter, knife, scissors, or any sharp object to open the protective inner packaging. Parts List Carton (1) Scale platform (1) Upper column (w / display assembly) (1) Lower column (6) AA batteries (1) User instructions (1) Upper height rod (w / head assembly) (1) Lower height rod Tools Required Phillips head screwdriver (not included) 7 500KL ASSEMBLY INSTRUCTIONS (CONTINUED) Assembling the 500KL Scale (Refer to Figures 1 - 10) Caution: It is recommended that the assembly be performed by two persons. 1. Carefully remove the scale platform C and columns A and B from the carton. Place the scale platform and columns on a flat, level, and dry surface (see Figure 1). 2. Remove the 4 small screws and washers from the bottom of column B (see Figures 1 & 2). 3. Locate cable connector inside column A (see Figures 1 & 3). 4. While holding column A, slide the cable connector through the top of column B. The top of column B has a notch (see Figures 1 & 5). 5. Plug the cable connector into the RJ jack, located on the scale platform C (see Figures 1 & 4). Note: Ensure that the cable connector is correctly plugged into the RJ jack. 6. Align column A and column B. Snap the locking tab into place. Ensure that the locking tab is locked securely into place (see Figures 1 & 5). 7. Position and secure the connected columns A and B to the scale platform C. 8. Insert the 4 small screws through the bottom of the scale platform C screw holes and into column B. Ensure that washers are located between the screw heads and the scale platform C screw holes (see Figures 1, 6, & 7). 9. Using a Phillips head screwdriver, tighten the screws to secure column B to the base of the scale platform C (see Figure 1, 6, & 7). Note: Ensure that the screws are fully tightened to prevent damage to the scale. 10. Locate the upper height rod D and lower height rod E from the carton (see Figure 1). 11. Align the upper height rod D with the lower height rod E. Snap the locking tab into place. Ensure locking tab is securely locked (see Figures 8 & 9). 12. Position the bottom of the fully assembled height rod into the height rod opening G at the top of the upper column A. Press locking tab F inward to insert the height rod into the height rod opening G (see Figures 1 & 10). 13. The scale is now assembled and ready for use (see Figure 11). 8 500KL ASSEMBLY INSTRUCTIONS (CONTINUED) Figure 1 Screws and washers Column B Figure 2 9 500KL ASSEMBLY INSTRUCTIONS (CONTINUED) Column A Cable connector Figure 3 RJ jack Scale platform C Figure 4 10 500KL ASSEMBLY INSTRUCTIONS (CONTINUED) Column A Locking tab Notch Column B Figure 5 Screw holes Screw holes Scale platform C Figure 6 11 500KL ASSEMBLY INSTRUCTIONS (CONTINUED) Adaptor Jack Washer Screws Figure 7 Upper height rod D Locking tab Notch Lower height rod E Figure 8 12 500KL ASSEMBLY INSTRUCTIONS (CONTINUED) Fully assembled height rod Figure 9 Height rod E Height rod opening G Locking tab F Column A Figure 10 13 500KL ASSEMBLY INSTRUCTIONS (CONTINUED) Final assembly Figure 11 14 SETUP / BATTERIES Preparing the 500KL Scale for Use Replacing / Inserting Batteries 1. Remove the protective plastic film covering the display (the film says “FACTORY CALIBRATED”). 2. Unplug the optional AC adapter, if connected to a power source. 3. With a Phillips head screwdriver remove the screw from the battery compartment cover and remove the battery cover on the back of the display assembly by pressing the locking tab (see Figure 12). 4. Replace or install the batteries with new units. Health o meter® Professional recommends using an alkaline or lithium battery, rated for 130°F (54°C) operation. Do not use zinc-carbon batteries. 5. Re-attach the battery cover to the display assembly. 6. Ensure all objects are removed from the scale’s assembly, and then press the ON/OFF button to turn the scale on. The display will show “Start”, then “0.0” LB or “0.0” KG. Press the LB/KG button to select the weight mode (LB or KG). Note: This scale will always default to the settings and units last used (LB or KG). Note: If the set up procedure failed, refer to the troubleshooting instructions. If the problem is not corrected, refer to qualified service personnel. Warning: If the scale will not be used for some time, remove the batteries to avoid a safety hazard. Disposal of batteries must be performed in accordance with the prevailing national, regional or local regulations which apply to you. Optional AC Adapter 1. Connect the AC adapter (not included) into the adaptor jack on the scale platform C (see Figure 7). Warning: To avoid a safety hazard, use AC adapter model ADPT30WA (International, plug kit) or ADPT31 (Domestic, USA). 2. Plug the scale’s AC adapter into the power source. 3. When the AC adapter is disconnected from the scale, the scale will switch to battery power if batteries are installed. Note: If the set up procedure failed, refer to the troubleshooting instructions. If the problem is not corrected, refer to qualified service personnel. 15 SETUP / BATTERIES Locking tab Display assembly Battery cover Figure 12 16 QUICK START / OPERATING INSTRUCTIONS Keypad Figure 13 Function ON/OFF ZERO HOLD/RELEASE BMI Description Turns scale on and off. Tares the scale prior to a weighing. Holds the weight value of the patient on the display until the button is pressed again to clear the value. Prompts entry of height data to calculate patient’s Body Mass Index (BMI). LB/KG Toggles between pounds (LB) and kilograms (KG). CLEAR Clears the incorrect height input when in BMI mode. UP▲ Increases height input (0.5 in / 0.5 cm increments) DOWN▼ Decreases height input (0.5 in / 0.5 cm increments) ENTER Used to accept height value in BMI mode. Also releases the recall value and BMI value. 17 QUICK START / OPERATING INSTRUCTIONS (CONT) Auto-Off Function As an energy saving feature, the scale will automatically turn off after 2 minutes of inactivity. By default this function is enabled. Disable Auto-Off 1. While the scale is turned off, press and hold the HOLD/RELEASE button. 2. While holding the HOLD/RELEASE button, press the ON/OFF button to turn the scale on. 3. START will briefly appear on the display followed by “AOF=0”. 4. Auto-off is now disabled and the scale will remain on until the scale is manually turned off. Enable Auto-Off 1. While the scale is turned off, press and hold the HOLD/RELEASE button. 2. While holding the HOLD/RELEASE button, press the ON/OFF button to turn the scale on. 3. START will briefly appear on the display followed by “AOF=1”. 4. Auto-off is now enabled. KG and LB Lock Out Note: The default weighing mode for this scale can be changed from LB/KG to KG only or LB only. To Change Weighing Mode: 1. Press the ON/OFF button to turn the scale on. 2. Wait for “0.0” LB or “0.0” KG to appear on the display. 3. Press and hold the LB/KG button until the unit of measure begins to flash. 4. Release the LB/KG button and the scale will operate in the selected mode. 5. Repeat steps 3-4 to change the weighing mode to a different unit of measure as the default for use. 18 QUICK START / OPERATING INSTRUCTIONS (CONT) Weighing a Patient Note: When this scale is turned on, it will always default to the settings and units last used (LB or KG). 1. Make sure there is no object on the scale platform. 2. Press the ON/OFF button to turn the display assembly on. 3. Wait until the “0.0” LB or “0.0” KG appears on the display. 4. Ask the patient to step on the scale. The scale will begin to display weight information and will lock on the patient’s weight when the stable weight of the patient is determined. Depending on the movement of the patient on the scale, it may take several seconds for the scale to lock onto the weight. Caution: To prevent patient injury, the patient must be attended throughout the entire weighing event. 5. The weight may be held on the display by pressing the HOLD/RELEASE button. To release, press the HOLD/RELEASE button again. 6. After the weight measurement has been taken and is recorded, have the patient step off the scale. 7. Press the ON/OFF button to turn the scale off. BMI Function Body Mass Index is another name for Quetelet Index, a formula that is a convenient indicator of BMI with various exemptions, such as athletes, children, the elderly, and the infirm. Note: The scale will not calculate BMI for a patient that is 24 pounds (12 kg) or less. If a height is not entered for the patient within 30 seconds of pressing the BMI button, the scale will return to the normal weighing mode. 1. Make sure there is no object on the weighing platform. 2. Press the ON/OFF button to turn the scale on. 3. Wait until the “0.0” LB or “0.0” KG appears on the display. 4. Ask the patient to step on the scale. The scale will begin to display weight information and will lock on the patient’s weight when the stable weight of the patient is determined. Depending on the movement of the patient on the scale, it may take several seconds for the scale to lock onto the weight. 5. Once a weight has been displayed, while the patient is still on the scale, Health o meter® Professional recommends performing a second weighing by pressing the REWEIGH button. 6. After obtaining the patient’s weight on the scale, press the BMI button while the scale is on. 7. The scale will prompt you to enter the patient’s height. Use the keypad ▲ and ► buttons to enter the patient’s height. Note: When weighing in pounds, the height is displayed in inches. When weighing in kilograms, the height is displayed in centimeters. 8. Once height is keyed in, press the ENTER button. 9. The display will show the patient’s BMI. 10. Press the ENTER button to return to the normal weighing mode of the scale. 19 QUICK START / OPERATING INSTRUCTIONS (CONT) Zero Function When using this scale, the weight of an object, can be zeroed out allowing additional weight to be added and displayed. The zero function automatically performs this subtraction. Note: Ensure there are no objects on the scale platform. Zero (Push Button) 1. With all weight off the scale, press the ON/OFF button to turn on the scale. 2. Wait until the “0.0” LB appears on the display. 3. Set the unit (LB or KG). 3. Place the object on the scale. The display will show a value for the object’s weight. 4. Press the ZERO button. The word “TARE” will appear on the display, followed by “0.0” LB or “0.0” KG. 5. Place additional item (object) on the platform and only the weight of the additional item will be displayed. 6. When you remove the item from the platform “under” will be temporally displayed and then the displayed will return to “0.0” LB 20 MAINTENANCE Maintenance The following pages provide instructions for maintenance, cleaning, calibrating, and troubleshooting for the 500KL scale. Maintenance operations other than those described in this manual should be performed by qualified service personnel. Caution: Before first use, or after long periods of non-use, check the scale for proper operation and function. If the scale does not operate correctly, refer to qualified service personnel. 1. Check overall appearance of the total scale for any obvious damage, wear, and tear. 2. Inspect the AC adapter for cord cracking or fraying, or for broken/bent prongs. Note: This scale is an extremely sensitive weighing device. If the auto-off function is disabled, battery power will be consumed. Cleaning Proper care and cleaning is essential to ensure a long life of accurate and effective operation. Caution: Disconnect the scale from the AC adapter power source prior to cleaning the unit. 1. Clean all external surfaces with a clean damp cloth or tissue. Mild antimicrobial or antibacterial soap and water solution may be used. Dry with a clean soft cloth. 2. Do not immerse the scale into cleaning or other liquid solutions. 3. Do not use Isopropyl Alcohol or other solutions to clean the display surface. 4. Do not use abrasive cleaners. 21 CALIBRATION Calibration This scale has been factory calibrated, and does not require calibration prior to use. If required, the scale can be calibrated. Calibration of your 500KL scale is performed using kilograms (KG) or pounds (LB), according to the units of measure used upon entering into the calibration path. The following calibration assumes the scale is set to pounds, and 100 (40 kg) / 200 (80 kg) / 300 (120 kg) / 500 (200 kg) lbs is employed as the calibration standards. Scale Calibration ACTION DISPLAY SHOWS Press and hold the LB/KG and ZERO buttons at the same time, press the ON/OFF button to turn on the scale. “CAL” will briefly appear on the display, followed by five numeric numbers indicates you can calibrate. Release all three buttons. Press the ZERO button. “C-100” (for LB mode) or “C-40” (for KG mode) will flash on the display, followed by “0”. “CAL” followed by “XXXXX” Place 100 lbs or 40 kg on the scale. Five numeric numbers will appear. When calibration numbers stabilize, press the ZERO button. “C-200” (for LB mode) or “C-80” (for KG mode) will appear on the display, followed by “0”. “XXXXX” followed by “C-100” or “C-40” then “0” “XXXXX” followed by “C-200” or “C-80” then “0” Place 200 lbs or 80 kg on the scale. Five numeric numbers will appear. When calibration numbers stabilize, press the ZERO button. “C-300” (for LB mode) or “C-120” (for KG mode) will appear on the display, followed by “0”. “XXXXX” followed by “C-300” or “C-120” then “0” Place 300 lbs or 120 kg on the scale. Five numeric numbers will appear. When calibration numbers stabilize, press the ZERO button. “C-500” (for LB mode) or “C-200” (for KG mode) will appear on the display, followed by “0”. “XXXXX” followed by “C-500” or “C-200” then “0” Place 500 lbs or 200 kg on the scale. Five numeric numbers will appear. When calibration numbers stabilize, press the ZERO button. “END” will appear on the display, followed by “OFF”. The scale will automatically shut off. “XXXXX” followed by “END” then “OFF” . 22 TROUBLESHOOTING Troubleshooting Before contacting service personnel, refer to the following instructions to check and to correct any failures. Symptom Scale does not turn on Possible Cause Corrective Action 1. Dead battery 1. Replace batteries 2. Faulty electrical outlet 2. Use a different outlet 3. Bad power supply 3. Replace AC adapter 1. External object interfering with the scale 1. Remove interfering object from the scale 2. The display did not show “0.0” before weighing 2. Ask the patient to get off the scale, zero the scale and begin weighing process again 3. Scale is not placed on a level floor 3. Place the scale on a level floor and begin weighing process again 4. Scale is out of calibration 4. Check weight with known weight value Weighing is performed but the weighing process takes too long and the weight does not lock on the displayed The patient is not standing still Ask the patient to stand still The display shows “Over” message The load on the scale exceeds the capacity (500 lb / 220 kg) Remove the excess weight and use the scale according to its limits The display shows “Lo” message The batteries are discharged Replace batteries according to instructions Questionable weight or the scale does not zero 23 WARRANTY Limited Warranty What does the Warranty Cover? Health o meter® Professional scales are warranted from date of purchase against defects of materials or in workmanship for a period of two (2) years. If product fails to function properly, return the product, freight prepaid and properly packed to Pelstar, LLC (see “To Get Warranty Service”, below, for instructions). If the manufacturer determines that a defect of material or in workmanship exists, the customer’s sole remedy will be repair or replacement of the scale at no charge. Replacement will be made with a new or remanufactured product or component. If the product is no longer available, replacement may be made with a similar product of equal or greater value. All parts including repaired and replaced parts are covered only for the original warranty period. Who is Covered? The original purchaser of the product must have proof of purchase to receive warranty service. Please save your invoice or receipt. Pelstar dealers or retail stores selling Pelstar products do not have the right to alter, or modify or any way change the terms and conditions of this warranty. What is Excluded? Your warranty does not cover normal wear of parts or damage resulting from any of the following: negligent use or misuse of the product, use on improper voltage or current, use contrary to the operating instructions, abuse including tampering, damage in transit, or unauthorized repair or alternations. Further, the warranty does not cover natural disasters, such as fire, flood, hurricanes and tornadoes. This warranty gives you specific legal rights, and you may also have other rights that vary from country to country, state to state, province to province or jurisdiction to jurisdiction. To get Warranty Service make sure you keep your sales receipt or document showing proof of purchase. Call (+1) 800-638-3722 or (+1) 708-377-0600 to receive a return authorization (RA) number, which must be included on the return label. Attach your proof of purchase to your defective product along with your name, address, daytime telephone number and description of the problem. Carefully package the product and send with shipping and insurance prepaid to: Pelstar, LLC Attention R/A#_____________ Return Department th 9500 West 55 Street McCook, IL 60525 If your scale is not covered by warranty, or has been damaged, an estimate of repair costs or replacement costs will be provided to you for approval, prior to servicing or replacing. QNET BV HOMMERTERWEG 286 6436 AM AMSTENRADE THE NETHERLANDS PELSTAR, LLC th 9500 West 55 Street • McCook, IL 60525 • USA 1-800-638-3722 or 1-708-377-0600 PLEASE REGISTER YOUR SCALE FOR WARRANTY COVERAGE AT: http://homscales.com/product-support/technical-support/product-warranty-registration Health o meter® is a registered trademark of Sunbeam Products, Inc. used under license. ® Health o meter Professional products are manufactured, designed, and owned by Pelstar, LLC. ® We reserve the right to improve, enhance, or modify Health o meter Professional product features or specifications without notice. © Pelstar, LLC 2013 P/N UM500KL Rev 2-091913 24