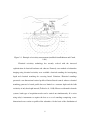
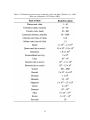
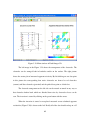
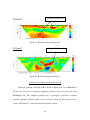
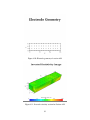
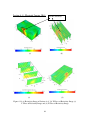
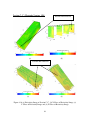
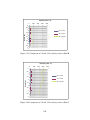
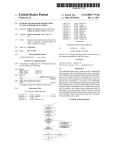
1
SUBSURFACE INVESTIGATIONS USING
HIGH RESOLUTION RESISTIVITY
by
DHARMATEJA MAGANTI
Presented to the Faculty of the Graduate School of
The University of Texas at Arlington in Partial Fulfillment
of the Requirements
for the Degree of
MASTER OF SCIENCE IN CIVIL ENGINEERING
THE UNIVERSITY OF TEXAS AT ARLINGTON
December 2008
ACKNOWLEDGEMENTS
The author would like to thank his supervising professor, Dr. Sahadat Hossain,
for all his guidance and unconditional support throughout the course of this research
effort.
Thanks are also extended to the other members of his thesis committee Dr.
Laureano R. Hoyos and Dr. Mohammad Najafi for their valuable advice and review of
this manuscript. In addition, the author would like to thank the faculty and staff of the
Department of Civil and Environmental Engineering at The University of Texas at
Arlington for their valuable assistance during his graduate studies.
The author also would like to thank all the geotechnical engineering graduate
students in this institution for all their help and support. Special thanks are also
extended to the Indian group for their worthy friendship and the good times.
The author would also like to thank his dearest friends for their worthy
friendship and the good times.
Finally, and most of all, the author would like to thank his parents for all their
love, encouragement, and great support. It is the best thing in his life to be a part of their
family.
July 29, 2008
ii
ABSTRACT
SUBSURFACE INVESTIGATIONS USING
HIGH RESOLUTION RESISTIVITY
DHARMATEJA MAGANTI, M.S.
The University of Texas at Arlington, 2008
Supervising Professor: MD. Sahadat Hossain
Electrical resistivity imaging has been proved to be well suited to produce
images of subsurface conditions because of the ability of the technique for detecting
resistive features and discriminating subtle resistivity variations in the soil media.
Electrical resistivity imaging survey was performed at E. Center Development in
Duncanville, Texas. The site was previously used as both commercial and residential
property. The majority of the land was used as residential property. City officials were
concerned about the presence of any contaminants at the site. Therefore, the objective
of the research is to investigate and find any possible contaminants at the site.
The survey was conducted using SuperSting R8/IP Multi-channel Resistivity
Imaging System to image the subsurface structure.
Both 2-D and 3-D electrical
resistivity imaging tests were conducted using dipole-dipole array at 2 feet, 5 feet and
20 feet electrode spacing. Earth Imager 2D and Earth Imager 3D software’s were then
iii
used to invert the apparent resistivity data. Based on the resistivity a subsurface profile
was developed.
A subsurface exploration program was conducted with a total of three test
borings, labeled BH-1 through BH-3, and were drilled by Apex Geoscience, Inc. under
the supervision of a UTA field representative. Three soil test borings were drilled in the
site: (1) To determine the presence of any contaminants, (2) To confirm and verify the
actual subsurface information.
The results obtained from resistivity imaging and three soil test borings were
compared. Based on the resistivity imaging and soil test boring no contaminants were
found at the site. The subsurface profile developed from resistivity imaging was verified
and confirmed by all the three soil test borings.
iv
TABLE OF CONTENTS
ACKNOWLEDGEMENTS.......................................................................................
ii
ABSTRACT ..............................................................................................................
iii
LIST OF ILLUSTRATIONS.....................................................................................
x
LIST OF TABLES.....................................................................................................
xv
Chapter
1. INTRODUCTION ………. ...........................................................................
1
1.1 Background and Importance....................................................................
1
1.2 Objective and Scope…… ........................................................................
4
1.3 Organization………….. ..........................................................................
5
2. LITERATURE REVIEW..............................................................................
6
2.1 Electrical Resistivity Development .........................................................
6
2.2 Electrical Resistivity Method ..................................................................
7
2.3 Theory………………..............................................................................
9
2.4 Resistivity imaging methods....................................................................
16
2.4.1 Two-Dimensional Imaging Methods ...............................................
20
2.4.1.1 Wenner Method .....................................................................
20
2.4.1.2 Wenner-Schlumberger Method .............................................
22
2.4.1.3 Dipole-dipole Method............................................................
23
2.4.1.4 Pole-dipole Method ...............................................................
24
v
2.4.1.5 Pole-Pole Method ..................................................................
26
2.4.2 Three-Dimensional Imaging Methods......................................
27
2.4.2.1 Pole-pole array .............................................................
27
2.4.2.2 Pole-dipole array ..........................................................
30
2.4.2.3 Dipole-dipole array ......................................................
30
2.5 2-D and 3-D Imaging Methods................................................................
31
2.5.1 2-D Method ...............................................................................
31
2.5.1.1 2-D Slide-along and Roll-along Technique .................
34
2.5.2 3-D Method ...............................................................................
35
2.5.2.1 3-D Roll-Along Technique ..........................................
35
2.6 Previous Work………………………………………………………….
38
2.6.1 Detection of sink holes using electrical resistivity imaging .....
38
2.6.2 Electrical resistivity imaging technique
for investigation of Landslide ..................................................
39
2.6.3 Electrical resistivity imaging technique to
delineate groundwater aquifer..................................................
41
2.6.4 Contaminant delineation at Lernacken, Sweden......................
43
2.6.5 Application of 3D electrical resistivity
imaging in an underground potash mine..................................
44
3. FIELD STUDIES……………………………………………………………
47
3.1 Site Description………… .......................................................................
47
3.2 History of the Site and Existing Site Conditions .....................................
49
vi
3.3 Site Geology………………. ...................................................................
50
3.4 Field Investigations…………..................................................................
51
3.5 High Resolution Resistivity.....................................................................
51
3.5.1 SuperSting R8/IP Equipment Description .......................................
52
3.5.1.1 Key Benefits ..........................................................................
54
3.5.1.2 Multi-channel Resistivity Imaging System ...........................
54
3.5.1.3 Power connector ....................................................................
55
3.5.1.4 Fuse holder.............................................................................
56
3.5.1.5 ON/OFF… .............................................................................
56
3.5.1.6 The Keyboard ........................................................................
57
3.5.1.7 The power supply ..................................................................
58
3.5.1.8 SuperSting electrode switch box ...........................................
58
3.5.1.9 Cables…….. ..........................................................................
60
3.5.1.10 Stainless steel electrode stakes ............................................
61
3.5.1.11 Electrode cable design .........................................................
61
3.5.2 Resistivity Survey Design................................................................
62
3.5.2.1 Line A 2-D Survey.................................................................
63
3.5.2.2 Line B 2-D Survey.................................................................
63
3.5.2.3 Line C 2-D Survey to the North West Corner .......................
64
3.5.2.4 Line D 2-D Survey to North East Corner ..............................
66
3.5.2.5 Section A-A’ 3-D Survey ......................................................
66
3.5.2.6 Section A-B 3-D Survey........................................................
67
vii
3.5.2.7 Section C-C’ 3-D Survey.......................................................
67
3.6 Data Acquisition and Data Inversion.......................................................
68
3.6.1 Data Acquisition ..............................................................................
68
3.6.2 Data Inversion…..............................................................................
69
3.6.2.1 Earth Imager 2D inversion and modeling software ...............
72
3.6.2.2 A data file is read ...................................................................
73
3.6.2.3 Data file is edited to remove noisy data.................................
74
3.6.2.4 Inversion is run ......................................................................
75
3.6.2.5 Removal of poorly misfit data ...............................................
75
3.6.2.6 Inversion results.....................................................................
76
3.6.2.7 EarthImager 3D - New Resistivity Inversion Software .........
79
3.7 Subsurface Investigation by Soil Drilling................................................
82
4. RESULTS AND DISCUSSION.....................................................................
86
4.1 Apparent Resistivity Imaging Results .....................................................
86
4.2 Inverted resistivity section results for 2-D...............................................
88
4.3 Inverted resistivity section results for 3-D...............................................
92
4.4 Comparison between 2-D and 3-D resistivity values with depth ............ 100
4.5 Effect of electrode spacing ...................................................................... 103
4.6 Drilling Results……................................................................................ 105
4.7 Relation between Resistivity with Moisture Content .............................. 106
4.8 Comparison between resistivity and drilling ........................................... 108
5. CONCLUSIONS…………. ........................................................................... 112
viii
REFERENCES…………..…….. .............................................................................. 113
BIOGRAPHICAL INFORMATION......................................................................... 118
ix
LIST OF ILLUSTRATIONS
Figure
Page
1.1
High Resolution Resistivity Image (Source: www.agiusa.com) ..................... 2
1.2
High Resolution Resistivity Equipment .......................................................... 3
2.1
Principle of resistivity measurement
(modified from Robinson and Coruh, 1988)................................................... 8
2.2
Basic definition of resistivity across a homogeneous block
of side L and area A with an applied current I and potential drop V
(Reynolds, 2000) ............................................................................................. 11
2.3
Point source of current at the surface of a homogeneous medium where C1
and C2 are the locations of the current Sources (Telford et al., 1990)............. 12
2.4
The sensitivity patterns for (a) pole-pole (b) Wenner (c) Schlumberger and
(d) dipole-dipole arrays (Loke, 1999) ............................................................. 17
2.5
Common arrays used in resistivity surveys and their geometric factors ......... 21
2.6
Two different arrangements for a dipole-dipole array measurement with the
same array length but with different “a” and “n” factors resulting in very
different signal strengths (Loke, 1999)............................................................ 23
2.7
Data measurement sequence using dipole-dipole array (Zhou, 1999) ............ 24
2.8
Forward and reverse pole-dipole arrays (Loke, 1999) .................................... 25
2.9
The arrangement of electrodes for 3-D survey................................................ 29
2.10
Two possible measurement sequences for a 3-D survey. The location of
potential electrodes corresponding to a single current electrode in the
arrangement used by (a) a survey to measure the complete data set and
(b) a cross-diagonal survey.............................................................................. 29
2.11
Outline sketch of computer controlled data-collection
system (Dahlin, 2001) ..................................................................................... 31
x
2.12
The use of the roll-along method to extend the area covered by a survey ...... 34
2.13
Slide-along technique...................................................................................... 34
2.14
Sketch of 3-D multi electrode survey layout (Dahlin and Bernstone 1997) ... 35
2.15
Using the roll-along method to survey a 10 by 10 grid with a resistivitymeter system with 50 electrodes. (a) Surveys using a 10 by 5 grid with the
lines orientated in the x direction. (b) Surveys with the lines orientated in
the y-direction (Loke, 1999). ........................................................................... 37
2.16
Schematic showing the basic principle of conducting a conventional dipole–
dipole resistivity survey (Van Schoor, 2002) .................................................. 38
2.17
RESTOM image resulting from the survey at Site (Van Schoor, 2002)......... 39
2.18
Study area after the landslide (Drahor, 2006) ................................................. 40
2.19
3-D fence diagram of the resistivity sections (Drahor, 2006) ......................... 41
2.20
Location of survey lines ( Hamzah, 2005) ...................................................... 42
2.21
Inverse model section for Olak 1 (a), Olak 2 (b) and Olak 3 (c) (Hamzah,
2005)................................................................................................................ 43
2.22
Lernacken sludge deposit. Example of inverted depth section, where this
profile was measured through sludge deposit (modified from Bernstone
and Dahlin, 1997) ............................................................................................ 44
2.23
Geometry of the underground mine drifts of the study area
(Eso and Oldenburg, 2006).............................................................................. 45
2.24
Plan view resistivity section of the recovered model taken at an elevation
of 10 meters above the back of the mine. The detected void is circled in red.
(Eso and Oldenburg, 2006).............................................................................. 46
3.1
An overview aerial photo showing the city of Duncanville (Courtesy of
Google Earth, 2006)......................................................................................... 47
3.2
A General Site Vicinity Map........................................................................... 48
3.3
Site location and view ..................................................................................... 48
xi
3.4
SuperSting R8/IP Multi-channel Resistivity Imaging System........................ 51
3.5
Single channel SuperSting R1......................................................................... 52
3.6
Eight Channel SuperSting R8 ......................................................................... 53
3.7
SuperSting R8/IP front panel .......................................................................... 54
3.8
The Switch Box and Amphenol connector ..................................................... 58
3.9
SuperSting/Switch box connection ................................................................. 59
3.10
Cable’s............................................................................................................. 60
3.11
Electrode stake and electrode switch .............................................................. 61
3.12
Electrode Switch ............................................................................................. 62
3.13
Line A Survey from West to East ................................................................... 63
3.14
Line B Survey from South to North ................................................................ 64
3.15
Line C survey along the channel ..................................................................... 64
3.16
Resistivity Imaging Locations......................................................................... 65
3.17
Line D Survey from West to East ................................................................... 66
3.18
Section A-A’ Survey from West to East ......................................................... 67
3.19
Section A-B Survey from West to East........................................................... 67
3.20
Section C-C’ Survey from West to East.......................................................... 68
3.21
Earth Imager 2D main window ....................................................................... 72
3.22
Raw resistivity data ......................................................................................... 74
3.23
Progress of inversion....................................................................................... 75
3.24
Data misfit Histogram ..................................................................................... 76
3.25
Inverted resistivity section .............................................................................. 77
xii
3.26
Measured and apparent resistivity pseudosections.......................................... 77
3.27
Convergence curve.......................................................................................... 78
3.28
Data misfit crossplot........................................................................................ 79
3.29
Main window of Earth Imager 3D .................................................................. 80
3.30
Apparent resistivity cross plot and 3D resistivity image................................. 81
3.31
Dynamic slices of resistivity ........................................................................... 82
3.32
Boring locations Plan ...................................................................................... 85
4.1
Apparent resistivity data for line A, Line B, Line C and Line D .................... 87
4.2
Apparent resistivity pseudosections and inverted resistivity
section for Line A............................................................................................ 88
4.3
Data misfit histogram for Line A .................................................................... 89
4.4
Convergence curve for Line A ........................................................................ 90
4.5
Data misfit Crossplot for Line A..................................................................... 90
4.6
Resistivity Image along Line A....................................................................... 91
4.7
Resistivity Image along Line B....................................................................... 91
4.8
Resistivity Image along Line D....................................................................... 92
4.9
Resistivity Image along Line C....................................................................... 92
4.10
Electrode geometry for Section A-B............................................................... 93
4.11
Inverted resistivity section for Section A-B.................................................... 93
4.12
Apparent resistivity crossplot for Section A-B ............................................... 94
4.13
Convergence curve for Section A-B ............................................................... 95
4.14
(a) Resistivity Image of Section A-A’ (b) X Slices of Resistivity Image
(c) Y Slices of Resistivity Image and (d) Z Slices of Resistivity Image......... 96
xiii
4.15
(a) Resistivity Image of Section A-B (b) X Slices of Resistivity Image
(c) Y Slices of Resistivity Image and (d) Z Slices of Resistivity Image......... 97
4.16
(a) Resistivity Image of Section C-C’ (b) X Slices of Resistivity Image
(c) Y Slices of Resistivity Image and (d) Z Slices of Resistivity Image......... 98
4.17
Comparison of 2-D and 3-D resistivity values at Point A............................... 100
4.18
Locations of Point A, Point B, Point C ........................................................... 101
4.19
Comparison of 2-D and 3-D resistivity values at Point B............................... 102
4.20
Comparison of 2-D and 3-D resistivity values at Point C............................... 102
4.21
Effective spacing for 3-D at Point A............................................................... 104
4.22
Effective spacing for 2-D ................................................................................ 104
4.23
Resistivity and Moisture content graph for 3D 5 feet and B-1 ....................... 107
4.24
Resistivity and Moisture content graph for 2D 2 feet and B-2 ....................... 107
4.25
Resistivity and Moisture content graph for 2D 2 feet and B-3 ....................... 108
4.26
Locations of boreholes on lines A, B and D ................................................... 109
4.27
Comparing results from Line A and B-1......................................................... 110
4.28
Comparing results from Line B and B-2 ......................................................... 110
4.29
Comparing results from Line C and B-3 ......................................................... 111
xiv
LIST OF TABLES
Table
Page
2.1 Electrical resistivity range of minerals, rocks and fluids (Telford et al.,
1990, Klein and santamarina 1997, Borcea 2002)........................................... 15
2.2 The median depth of investigation (z/e) for the different arrays. L is the
total length of the array (Edwards, 1977)........................................................ 20
2.3 Properties of electrode arrays (Bernard, 2004) ............................................... 27
3.1 Site Investigations Program ............................................................................ 83
4.1 General descriptions of each stratum .............................................................. 105
xv
CHAPTER 1
INTRODUCTION
1.1 Background and Importance
The use of geophysical methods for the evaluation of geohazard potential of a site
is increasingly becoming popular all over the world. During failure analyses, several
parameters are investigated by geologists and geotechnical engineers. However, they can
only obtain information at certain points, not a general “view” of site conditions. There
are some major drawbacks of using only drilling and sampling methods for site
investigations, which are described as follows:
•
Costly Investigations
•
Few useful data points (low data density)
•
Too much “interpretation” between data points
•
No continuous “picture” of the subsurface
•
Site impacts with no known source
(1) Drilling and sampling method provides a discontinuous subsurface picture and
can be a very tedious and expensive procedure (Zume et al. 2006). That is the reason why
an interest in applying nondestructive and noninvasive surface geophysical methods has
increased. Geophysical methods have the possibility to give an “image” of the
subsurface, as shown in Figure 1.1. Also, with the development of new software for the
interpretation of resistivity measurements, 2D and 3D “resistivity imaging” or “resistivity
1
tomography” is extensively used today in shallow geophysical investigation and
especially for geohazard study.
Figure 1.1: High Resolution Resistivity Image (Source: www.agiusa.com)
Two commonly used geophysical methods are Ground Penetrating Radar (GPR)
and High Resolution Resistivity (HRR) (Figure 1.2). GPR is a powerful tool, which
makes possible to find the groundwater level, distinguish different layers in a slope
material and even the rupture surface, and find cavities. GPR uses high frequency
electromagnetic waves, between 10 to 1200 MHz, which gives a resolution between 0.1
to 3 m. Thus, higher frequencies result in a higher resolution. In optimum cases, the
penetration is about 40-60 m and can reach 300 m in some special cases like dry
unweathered granite or ice. However, presence of clayey soils in DFW area makes it
difficult to interpret GPR data.
HRR is used for enhanced mapping of lateral and vertical variations in subsurface
moisture content, environmental contamination, and near surface geology. HRR can
accurately map ground water flow within earthen embankments and dams. It provides
2
finer details and greater depths (up to 50 meters or more) of investigation that traditional
Electromagnetic Induction (EMI) method. A typical HRR survey utilizes a multi-channel,
multi electrode automatic sequencing data acquisition system.
Figure 1.2: High Resolution Resistivity Equipment
(2) Electrical resistivity imaging (ERI) is a modified direct current method
(Khesin et al. 1996) and is based on the dependence of electrical resistivity of different
materials on the content of moisture and high conductive elements, porosity, temperature,
etc. (Aristodemou and Thomas-Betts 2000; Gawande et al. 2003; Guerin et al. 2004).
Electrical resistivity surveying is a popular geophysical exploration technique because of
its simple physical principle and efficient data acquisition. Traditional resistivity
measurements are carried out on earth’s surface with a specified array in order to obtain
apparent resistivity sounding curves, apparent resistivity profiling or apparent resistivity
pseudosections. All of which qualitatively reflect vertical or horizontal variations in
subsurface resistivity. This technique is widely used in groundwater, civil engineering
and environmental investigations. In the last decade, there have been great improvements
in computerized data acquisition systems and 2D and 3D inversion software. Therefore,
3
resistivity imaging has become an increasingly attractive exploration technique. Electrical
surveys may be a useful tool for the fast investigation of the geometry, water content and
fluid movement of subsurface. The resistivity method is one of the standard methods of
the geophysical prospecting for solution of shallow geological problems. Resistivity
images are created by inverting hundreds to thousands of individual resistivity
measurements (e.g., Loke and Barker, 1996a,b) to produce an approximate model of the
subsurface resistivity.
University of Texas at Arlington (UTA) has recently acquired a High Resolution
Resistivity equipment (Figure 1.2). The High Resolution Resistivity system is an 8channel recording instrument to carry out surface measurements for electric resistivity or
induced polarization imaging of the shallow subsurface of the earth. The system includes
a maximum use of 56 electrodes in a single layout. The maximum allowable distance
between two adjacent electrodes is 20 feet. Both line and grid acquisition configurations
are possible for 2D and 3D imaging. Penetration depths vary depending on average soil
resistivity and the number of electrodes in a single layout.
Electrical resistivity imaging was performed at E. Center Development in
Duncanville, Texas. The site was previously used as both commercial and residential
property. The majority of the land was used as residential property. City officials were
concerned about the presence of any contaminants at the site.
1.2 Objective and Scope
The objective of the current research is to investigate the utilization of High
Resolution Resistivity (HRR) in site investigations. The Specific research objectives are:
4
•
To identify the presence of any possible contaminants at the site
•
To calibrate the equipment for site investigations
•
To investigate the applications of HRR for the site investigations;
•
To compare 2-D and 3-D imaging methods;
•
To determine the effective spacing between the electrodes;
•
To investigate the site conditions using soil drilling method, and finally to compare
the resistivity and soil drilling results.
1.3 Organization
A brief summary of the chapters included in this thesis document is presented in
the following paragraphs.
Chapter 2 presents the concept of electrical resistivity imaging and a brief review of
available array methods in electrical resistivity imaging. This chapter also includes a
literature review of previous studies reported in the literature.
Chapter 3 is devoted to field studies which describe the SuperSting R8/IP Multi-channel
Resistivity Imaging System, survey design and drilling.
Chapter 4 describes comprehensive analysis of all electrical resistivity test results. This
chapter also includes the subsurface investigation test results
Chapter 5 includes a summary of accomplished work and the main conclusions.
5
CHAPTER 2
LITERATURE REVIEW
2.1 Electrical Resistivity Development
Electrical resistivity studies have evolved and been employed to study electrical
properties of rocks and materials in the subsurface. One of the earliest recorded electrical
conductivity studies in geology related fields have been performed by Gray and Wheeler
in 1720 and Watson in 1746 (Jakosky, 1950; Van Nostrand and Cook, 1966). Gray and
Wheeler measured electrical conductivities of various rocks, and Watson ascertained that
the ground conducts electricity (Van Nostrand and Cook, 1966). The next recorded series
of earth electrical property studies have been done by Robert W. Fox in 1830 (Van
Nostrand and Cook, 1966). He discovered the existence of natural electrical currents
within sulfide ore deposits and successfully measured the electrical current between his
copper plate electrodes (Van Nostrand and Cook, 1966). Several advanced experiments
based on Fox’s discovery had been performed by many scientists since Fox’s first
discovery. However, the early electrical conductivity and resistivity studies did not deal
with quantitative approaches. The first successful experiments of application of direct
currents to measure earth resistivity were conducted by Conrad Schlumberger in 1920
(Van Nostrand and Cook, 1966). Although the electrical resistivity/conductivity studies
with a geological approach had been conducted in the early eighteenth century, the
application of electrical resistivity methods came into wide use only after the advent of
6
computing technology in the 1970’s (Reynolds, 1997). The modern survey technologies
provide faster data collection and better data quality. One of the advanced method
examples is the Oklahoma State University proprietary Halihan/Fenstemaker technique,
which can provide high-resolution subsurface Electrical resistivity imaging images
(Halihan, et al. 2005).
2.2 Electrical Resistivity Method
Electrical resistivity is one of the oldest and most popular geophysical techniques
in electrical exploration, due to its ability to produce images of the subsurface efficiently
and effectively as a result of the availability of automated data-acquisition systems and
efficient user friendly inversion software. The first electrical resistivity survey was
performed in 1920’s by the Schlumberger brothers. Since then electrical resisitivity is one
of the methods of primary interest in measuring the electrical resistive properties of
earthen materials.
Electrical resistivity measurements are made by placing four electrodes in contact
with the soil or rock. A current is caused to flow in the earth between one pair of
electrodes (current electrodes) while the voltage across the other pair of electrodes
(potential electrodes) is measured (Figure 2.1). Electrical resistivity is defined as an
intrinsic electrical property of a material to oppose the flow of the electric current
(Schwartz, 2003); meanwhile, resistance is a ratio of the voltage potential difference and
the electrical current retardation which depends on inherent property of material and its
physical geometry (Reynolds, 1997). The measured quantity is called apparent resistivity.
7
Figure 2.1: Principle of resistivity measurement (modified from Robinson and Coruh,
1988).
Electrical resistivity technology has recently evolved with the increased
sophistication of electrical hardware and software. Formerly, two methods of subsurface
imaging using electrical resistivity were available: electrical sounding for investigating
depth and electrical trenching for assessing lateral Variations. Electrical soundings
presented a one-dimensional vertical profile of limited lateral control, whereas electrical
trenching generated a lateral profile but was limited to a constant depth and the bulk
resistivity of only that depth interval (Telford et al., 1990). However with multi-electrode
systems, both types of acquisition modes can be carried out simultaneously. It is easier
using today’s instruments to acquire the data as a set of soundings comprising a twodimensional cross-section or profile of the subsurface. On the basis of the distribution of
8
resistivity within a profile, an accurate interpretation of the subsurface geologic setting
can be made.
Electrical Resistivity Imaging (ERI) is a noninvasive geophysical technique that
is commonly used in near-surface exploration, characterization and monitoring. When
compared with the best geophysical methods, it provides inferior resolution but its merit
is the fact that it provides resistivity which is an important physical property.
2.3 Theory
Electrical resistivity is defined as an intrinsic electrical property of a material to
oppose the flow of the electric current (Schwartz, 2003); it is the opposite or reciprocal of
electrical conductivity. Resistance is a ratio of the voltage potential difference and the
electrical current retardation which depends on inherent property of material and its
physical geometry (Reynolds, 1997). The electrical resistivity is described by Ohm’s law
shown in equation (2.3.1) that shows that the electric field is the electrical resistivity
times the current density. The electric field can also be described by equation (2.3.2) that
says that the electric field is the gradient of a scalar potential (Telford et al., 1990).
Equation 2.3.1
J = σE
Equation 2.3.2
E = −∇V
Where:
•
J is the current density in ampere/m2
•
E is electric field in volt/m
•
∇ is the gradient
9
•
V is the scalar electric potential in volt and
•
Q is the charge in coulomb
Combining equation (2.1.1) with equation (2.1.2) gives the following equation:
Equation (2.3.3)
J = −σ∇V
Since for a steady current in a homogeneous medium ∇ .J=0, from equation (2.3.3)
Therefore,
Equation (2.3.4)
∇.(σ∇V ) = 0
The electric current flows in the subsurface by three different means which are
electronic, electrolytic and dielectric conduction. Since most of the mineral grains that we
encounter in geophysical surveying are insulators, and electrical resistivity operates at
low frequency, it is the second type of conduction that we observe, i.e. current flow by
ions such as in water and clay (Telford et al., 1990).
According to Ohm’s Law, resistance, R (Equation 2.3.5) and resistivity, ρ
(Equation 2.3.6) are defined by the following equations (Reynolds, 1997):
Equation 2.3.5
R = V (Ohm’s Law)
I
For a single current electrode at the surface of a homogeneous medium delivering I
amperes (and assuming that the air above has zero conductivity), the voltage measured at
a distance r will be (Telford et al., 1990);
10
Equation 2.3.6
V = ( 2Iρπ ) 1r
Where R is the resistance in ohms; V is the potential (voltage) difference in volts;
I is the electric current passing through the material in amps; ρ is the resistivity in ohmmeters; A is the cross sectional area of the material in meters square; L is the length of the
resistive material in meters.
Figure 2.2: Basic definition of resistivity across a homogeneous block of side L and area
A with an applied current I and potential drop V (Reynolds, 2000).
ERI survey is performed to measure the resistivity distribution of the subsurface.
Figure 2.3 shows a schematic diagram of an ERI survey (Telford et al., 1990). Electrical
resistivity method considers the subsurface geologic setting as a series of electrical
resistors that naturally inhibit an electrical current. The success of electrical resistivity
surveys lies in their ability to detect changes in the electrical field caused by these
11
resistors and, subsequently, to determine their locations, depths, and thicknesses. An
electrical current is applied to the ground through two source electrodes along this array,
and the potential difference (voltage drop) created at the surface is measured between two
receiving electrodes located at a known location and distance. The potential difference
produced as the current encounters earthen material (a resistor) is measured and used to
determine the resistivity of the material between the electrode pairs.
Figure 2.3: Point source of current at the surface of a homogeneous medium where C1
and C2 are the locations of the current Source respectively (Telford et al., 1990)
In field surveys, the resistivity of geological properties is determined by
measuring the electrical potential difference between electrodes, thus apparent resistivity
can be calculated from the measured voltage drop (V), the electric current induced into
the ground (I), and the geometric factor (K) which depends on the electrode configuration
type (Schwartz, 2003) (Equation 2.3.8):
12
Equation 2.3.8
ρa =
KV
I
By the superposition of the influence of the two current electrodes, at each voltage
electrode location, the apparent resistivity of the medium through which the current has
traveled (ρa) is calculated by the following equation, where ∆V is the measured voltage, I
is the input current.
ρ = 2π∇I V
a
Equation 2.3.9
(
1
1−1 −1 −1
r1 r 2 r 3 r 4
)
All the geological materials through which current travels alter the resistivity
measurements. Therefore the resistivity that we get is inaccurate, hence the term apparent
resistivity. In most cases today, multi-channel systems that have many more than four
electrodes are used, so that a large dataset can be collected without moving any
electrodes. The resulting data a pseudosection of the apparent resistivities below the
survey can be generated. Although the magnitude of resistivity and cause is important,
the information obtained from the lateral and vertical changes, (i.e., spatial distributions
of the data) is often more diagnostic. These spatial variations are boundaries from which
inference can be made regarding the distribution of the stratigraphy or sediment faces.
These changes are inferred as geologic boundaries that may actually be caused by one or
more of the following: a change in lithology, sediment grain size, or chemical boundaries
resulting from changes in water chemistry or moisture content. In all instances, the user
must determine if the results are possible given the existing knowledge of site conditions.
13
It is important, therefore, to have conceptual ideas of the geologic setting and the effects
it may have on the geophysical signature for a more accurate interpretation.
The electric current is commonly conducted through rocks and sediments by the
pore fluids, clay minerals, and metallic minerals in the rocks and sediments
(Reynolds,1997; Schwartz, 2003). Because properties of same rock/sediment types (e.g.
grain size, porosity, permeability, and clay mineral contents) can vary from locations to
locations, the resistivity range of different materials are shown in Table 2.1.
14
Table 2.1: Electrical resistivity range of minerals, rocks and fluids (Telford et al., 1990,
Klein ans santamarina 1997, Borcea 2002)
15
2.4 Resistivity imaging methods
For a few decades now, various electrode arrays like pole-pole (PP), pole-dipole
(PD), half-Wenner (HW), Wenner-α (WN), Wenner-Schlumberger (SC), Wenner-β
(WB), dipole-dipole (DD) and γ-array (Figure 2.5) have been used for electrical
exploration. Some of them are now frequently employed in 2-D and 3-D resistivity
imaging applications, namely PP, PD, SC, WN and DD (Dahlin 1996; Chambers et al.
1999; Storz, Storz and Jacobs 2000). The choice of the “best” array for a field survey
depends on the type of structure to be mapped, the sensitivity of the resistivity meter and
the background noise level (Loke, 2004).
The depth of investigation, the sensitivity of the array to vertical and horizontal
changes in the subsurface resistivity, the horizontal data coverage and the signal strength
are some of the characteristics of an array that are to be considered.
Depth of
investigation is an important parameter in any resistivity survey. Depth of investigation
depends on the type of instrument, electrode spacing and separation factor, property
contrast, body geometry, data coverage and signal-to-noise-ratio (Loke, 2004). The
sensitivity function basically tells us the degree to which a change in the resistivity of a
section of the subsurface will influence the potential measured by the array. The higher
the value of the sensitivity function, the greater is the influence of the subsurface region
on the measurement (Loke, 2004). The sensitivity values are found higher near the
electrodes, for all the arrays.
Figure 2.4 shows the sensitivity pattern for different arrays. The contour patterns
are different for the different arrays, at larger distances from the electrodes.
16
(a)
(b)
(c)
(d)
Figure 2.4: The sensitivity patterns for (a) pole-pole (b) Wenner (c) Schlumberger and (d)
dipole-dipole arrays (Loke, 1999)
17
The effective depth of a measurement is sequentially increased by increasing the
distance between the source electrodes and the receiving electrodes. The farther is
distance, the greater the vertical interval in which the bulk of the current flows. To
acquire data from a new, lateral position, the lateral location of these electrode pairs is
sequentially moved down the array after each measurement, and a new measurement is
taken at a new lateral location. As the electrode separation is incrementally changed or
moved and a new resistor or different geoelectric property is encountered, differences or
contrasts of resistivity are noted.
As stated above, the depth of investigation, the sensitivity of the array to vertical
and horizontal changes in the subsurface resistivity, the horizontal data coverage and the
signal strength are some of the characteristics of an array that are to be considered.
Depth of investigation is an important parameter in any resistivity survey. Depth of
investigation depends on the type of instrument, electrode spacing and separation factor,
property contrast, body geometry, data coverage and signal-to-noise-ratio (Loke, 2004).
The sensitivity function basically tells us the degree to which a change in the resistivity
of a section of the subsurface will influence the potential measured by the array. The
higher the value of the sensitivity function, the greater is the influence of the subsurface
region on the measurement (Loke, 2004). The sensitivity values are found higher near the
electrodes, for all the arrays.
In electrical methods, the depth of penetration is linked to the distance between
electrodes. For a set of 48 electrodes spaced at 5m, two segments with 24 electrodes each
are usually used, the resistivity meter being placed between both segments; the total
length of the cables is 240m. In a first approximation, for Dipole Dipole, Schlumberger
18
and Wenner arrays, the maximum depth of penetration is of the order of 20% of the total
length of the cable, or 50m in the present case. This depth is reached for the combination
of the two extreme left and the two extreme right electrodes of the profile, and the
measuring report plotting point corresponds to the bottom angle of the triangle of the
pseudo section. For a Pole Pole array, where one current and one potential electrodes are
placed at infinity, this depth reaches 90% of the total length, or 220m.
Table 2.2 gives the median depth of investigation for the different arrays. In
layman's terms, the upper section of the earth which is above the "median depth of
investigation" and the lower section of the earth have the same influence on the measured
potential and this tells us roughly about the depth we can see with an array. This depth is
not dependent on the measured apparent resistivity or the resistivity of the homogeneous
earth model. The depth models are probably good enough for planning field surveys even
it is strictly valid only for a homogeneous earth model. The actual depth of investigation
may be a bit different if there are large resistivity contrasts near the surface.
19
Table 2.2: The median depth of investigation (z e) for the different arrays. L is the total
length of the array (Edwards, 1977).
2.4.1 Two-Dimensional Imaging Methods
The most commonly used arrays for 2-D imaging surveys are (i) WennerSchlumberger, (ii) Schlumberger, (iii) pole-pole, (iv) pole-dipole and (v) dipole-dipole.
2.4.1.1 Wenner Method
This is a robust array type which was popularized by the pioneering work carried
by the University of Birmingham research group (Griffiths and Turnbull, 1985; Griffiths,
Turnbull and Olayinka, 1990). The Wenner array maintains a constant spacing between
the electrodes as shown in Figure 2.5. It is best suited for profiling because only one
electrode is moved for measurements.
Beard and Morgan (1991) found that the
expanding electrodes of the Wenner array create false analomous zones that complicate
interpretation. Figure 2.4 (b) shows that the sensitivity plot for the Wenner array has
almost horizontal contours beneath the center of the array. So, the Wenner array is
20
relatively more sensitive to vertical changes than to horizontal changes in subsurface
resistivity. Furthermore, the Wenner array has a moderate depth of investigation
compared to the other arrays. As seen in Table 2.2, the median depth of investigation for
Wenner array is approximately 0.5 times the spacing used. The geometric factor for
Wenner array is 2πa. The geometric factor is smaller when compared to all other arrays.
Wenner array has the strongest signal strength among all the arrays because the potential
electrodes are placed between the two current electrodes. The disadvantage of this array
for 2-D imaging surveys is it has relatively poor resolution as spacing between the
electrodes is increased. This method cannot take advantage of multi channel system as
only single channel is used during the testing.
Figure 2.5: Common arrays used in resistivity surveys and their geometric factors.
21
Note: The dipole-dipole, pole-dipole and Wenner-Schlumberger arrays have two
parameters, the dipole length “a” and the dipole separation factor “n”. While the “n”
factor is commonly an integer value, non-integer values can also be used.
2.4.1.2 Wenner-Schlumberger Method
One of the first arrays used in the 1920’s and still popular today is the
Schlumberger array. The most commonly used array for resistivity sounding surveys is
Schlumberger array. This array can be used on a system by arranging the electrodes with
a constant spacing as shown in Figure 2.5. The “n” factor for this array is the ratio of the
distance between the C1-P1 (or P2-C2) electrodes and the spacing between the P1- P2
potential pair. The sensitivity patterns of Schlumberger array and Wenner array vary
slightly. The Schlumberger array is moderately sensitive to both horizontal and vertical
structures which has a slight vertical curvature below the centre of the array, and also has
slightly lower sensitivity values in the regions between the C1 and P1, C2 and P2
electrodes. Hence, the Schlumberger array might be a good compromise between the
Wenner and the dipole-dipole array in the areas where both horizontal and vertical
structures are expected. The signal strength of Wenner array is high and the signal
strength of Schlumberger array is between Wenner array and dipole–dipole array. When
compared to the Wenner array, the median depth of investigation (with the same distance
between the outer (C1 and C2) electrodes) is about 10 % larger for Schlumberger array.
2.4.1.3 Dipole-dipole Method
The dipole-dipole array is logistically the most convenient in the field, especially
for the work over large areas and larger spacing’s between the electrodes. Dipole-dipole
provides the highest resolution and is most sensitive to vertical resistivity boundaries
(Griffiths and Barker, 1993). However, the data collected from dipole-dipole array are
22
easily affected by near-surface resistivity variations (Griffiths and Barker, 1993). Figure
2.6 shows the data collection sequence for the dipole-dipole array in an ERT
investigation. The symbol “a” denotes the unit spacing of electrodes, which is selected
based on the desired depth of penetration, the required resolution, and the type of array.
The electrode spacing and dipole separation are constant for each traverse (n) and
increases with each successive traverse. Larger electrode spacing provides data from
greater depths, but with poor resolution.
Figure 2.6: Two different arrangements for a dipole-dipole array measurement with the
same array length but with different “a” and “n” factors resulting in very different signal
strengths (Loke, 1999).
The sensitivity pattern in Figure 2.4(d) shows that the array is sensitive to
resistivity changes between the current electrodes pair as well as the potential electrodes
pair. As seen in the Figure 2.4(d), the sensitivity pattern is almost vertical. Therefore, the
dipole-dipole array is very sensitive to horizontal changes in resistivity. Thus the dipoledipole array gets good resolution for vertical structures, but relatively poor mapping for
horizontal structures.
23
Figure 2.7: Data measurement sequence using dipole-dipole array (Zhou, 1999).
2.4.1.4 Pole-dipole Method
The pole-dipole array is an asymmetrical array (Figure 2.5), unlike the other
common arrays and over symmetrical structures the apparent resistivity anomalies are
asymmetrical in the pseudosection. In some cases, the model obtained after inversion can
be influenced by the asymmetry in the measured apparent resistivity values. The effect of
the asymmetry can be eliminated by repeating the measurements by arranging the
electrodes in the reverse order (Figure 2.8). With the combination of “forward” and
“reverse” pole-dipole arrays, any bias in the model caused by the asymmetrical nature of
the array can be removed. The signal strength of pole-dipole array is significantly higher
when compared to the dipole-dipole array and also the pole-dipole array is not as
sensitive as pole-pole array to telluric noise, but the pole-dipole array has relatively good
horizontal coverage.
24
Figure 2.8: Forward and reverse pole-dipole arrays (Loke, 1999)
The pole-dipole array requires a remote electrode, the C2 electrode. The distance
between this electrode and the survey line should be sufficiently far. For the pole-dipole
array, the effect of the C2 electrode is approximately proportional to the square of ratio of
the C1-P1 distance to the C2-P1 distance. Hence the pole-dipole array is less affected by
the C2 remote electrode when compared to the pole-pole array. If the distance of the C2
electrode is more than 5 times the largest C1-P1 distance used, the error caused by
neglecting the effect of the C2 electrode is less than 5%. The exact error depends on two
factors, one being the location of the P2 electrode for the particular measurement and the
other is subsurface resistivity distribution. This is an attractive array for multi-electrode
resistivity meter systems with relatively small number of nodes because of its good
horizontal coverage. The signal strength lines between the Wenner and WennerSchlumberger arrays and Dipole-dipole arrays where dipole-dipole has the less signal
strength. For IP surveys, this array is an attractive alternative as the signal strength of this
array is higher then dipole-dipole array and also the EM coupling is lower when
compared with the Wenner and Wenner-Schlumberger arrays due to the separation of the
circuitry of the current and potential electrodes.
25
2.4.1.5 Pole-Pole Method
This array is not as commonly used as the Wenner, dipole-dipole and
Schlumberger arrays. In practice the ideal pole-pole array, with only one current and one
potential electrode (Figure 2.5), does not exist. To approximate the pole-pole array, the
second current and potential electrodes (C2 and P2) must be placed at a distance that is
more than 20 times the maximum separation between C1 and P1 electrodes used in the
survey. The effect of the C2 (and similarly for the P2) electrode is approximately
proportional to the ratio of the C1-P1 distance to the C2-P1 distance. If the effects of the
C2 and P2 electrodes are not taken into account, the distance of these electrodes from the
survey line must be at least 20 times the largest C1-P1 spacing used to ensure that the
error is less than 5%. In surveys where the inter electrode spacing along the survey line is
more than a few meters, there might be practical problems in finding suitable locations
for the C2 and P2 electrodes to satisfy this requirement. Another disadvantage of this
array is that because of the large distance between the P1 and P2 electrodes, it is can pick
up a large amount of telluric noise that can severely degrade the quality of the
measurements. Thus this array is mainly used in surveys where relatively small electrode
spacings (less than a few meters) are used. It is popular in some applications such as
archaeological surveys where small electrode spacings are used. It has also been used for
3-D surveys (Li and Oldenburg 1992).
This array has the widest horizontal coverage and the deepest depth of
investigation. However, it has the poorest resolution, which is reflected by the
comparatively large spacing
26
Various types of electrode combinations can be used, such as Dipole-Dipole,
wenner-Schlumberger, Pole-Pole arrays. Each type of combination has advantages and
limitations in terms of lateral resolution and vertical penetration for instance, as
summarized in table.
Table 2.3: Properties of electrode arrays (Bernard, 2004)
2.4.2 Three-Dimensional Imaging Methods
The pole-pole, pole-dipole and dipole-dipole arrays are frequently used for 3-D
surveys (Figure 2.9). This is because other arrays have poorer data coverage near the
edges of the survey grid (Figure 2.10). The advantages and disadvantages of the polepole, pole-dipole and dipole-dipole arrays that were discussed in 2-D surveys are also
valid for 3-D surveys. Two possible measurements for a 3-D survey are shown in Figure
2.10
27
2.4.2.1 Pole-pole array
Electrodes are usually arranged in a square grid with the same unit electrode
spacing in the x and y directions. To map slightly elongated bodies, a rectangular grid
with different numbers of electrodes and spacing in the x and y directions could be used.
The pole-pole electrode configuration is commonly used for 3-D surveys, such as the ESCAN method. The maximum number of independent measurements, nmax, that can be
made with ne electrodes is given by
Equation 2.3.10
nmax = ne (ne -1) / 2.
For instance, each electrode can be used as a current electrode and a potential
where all the other electrodes are measured. The reciprocity makes it necessary to
measure the potentials at the electrodes with a higher index number than the current
electrode. There are 300 possible measurements for a 5 by 5 electrodes grid and 1176 and
4500 for a 7 by 7 and 10 by 10 electrodes grids respectively. For commercial surveys,
grids of more than 10 by 10 would be more practical due to the wide coverage. It can take
several hours to make such a large number of measurements, particularly with typical
single-channel resistivity meters commonly used for 2-D surveys. To reduce the number
of measurements required without seriously degrading the quality of the model obtained,
an alternative measurement - "cross-diagonal survey" method can be introduced. Here the
potential measurements are only made at the electrodes along the x-direction, the ydirection and the 45 degrees diagonal lines passing through the current electrode.
28
Figure 2.9: The arrangement of electrodes for 3-D survey
The pole-pole array has two main disadvantages: First, it has a poor resolution.
Subsurface structures tend to be smeared out in the final inversion model. Second,
particularly for large electrode spacing, the second current and potential electrodes must
be placed at a sufficiently large distance from the survey grid.
Figure 2.10: Two possible measurement sequences for a 3-D survey. The location of
potential electrodes corresponding to a single current electrode in the arrangement used
by (a) a survey to measure the complete data set and (b) a cross-diagonal survey.
29
2.4.2.2 Pole-dipole array
An alternate to the pole-pole array for surveys grids of 12 by 12 and above is the
Pole-dipole array. It has a better resolving power and less susceptible to telluric noise
compared to the pole-pole array. Also, when compared to the dipole-dipole array, it has
significantly stronger signal strength. Although it has one “remote” electrode, the effect
of this electrode on the measurements is much smaller compared to the pole-pole array.
The pole-dipole array being an asymmetrical array, measurements are made with the
“forward” and “reverse” arrangements of the electrodes. The problem of low signal
strength for large values of the “n” factor (exceeding 8 to 10) can be avoided by
increasing the “a” spacing between the P1-P2 dipole pair, to get a deeper depth of
investigation with a smaller “n” factor. The use of redundant measurements with
overlapping data levels to increase the data density can in some cases help to improve the
resolution of the resulting inversion model.
2.4.2.3 Dipole-dipole array
It is used for grids which are larger than 12 by 12 due because the horizontal data
coverage at the sides is poor. The primary concern is the low signal strength. This
problem can be overcome with the procedure followed for the 2-D surveys i.e., increasing
the “a” spacing between the P1-P2 dipole to get a deeper depth of investigation as the
distance between the C1-C2 and P1-P2 dipoles is increased. Data can also be overlapped
for the same. In most cases a number of parallel 2-D survey lines are used for the
construction of 3-D data sets for the pole-dipole and dipole-dipole arrays.
30
2.5 2-D and 3-D Imaging Methods
2-D and even 3-D electrical surveys are now practical commercial techniques
with the relatively recent development of multi-electrode resistivity surveying
instruments (Griffiths et al. 1990) and fast computer inversion software (Loke 1994).
2.5.1 2-D Method
2D technique separates electrodes along a line and requires data to be recorded
with various electrode separations along a line. A dense data is important to cover
laterally (Griffiths and Barker, 1993; Dahlin and Loke, 1998). It means that in terms of
electrode separations it is a complex recovery of structures in the ground. To be practical
it would demand the use of automated multi-electrode data acquisition systems.
Figure 2.11: Outline sketch of computer controlled data-collection system (Dahlin, 2001)
A Computer-controlled data acquisition system (Figure 2.11) in general consists
of a resistivity instrument, a relay switching unit, a computer, electrode cables, various
connectors and electrodes (Overmeeren and Ritsema, 1988; Griffiths et al., 1990; Dahlin,
1993). For example two or more components exist in the same box, e.g. a computer
31
integrated with the instrument. A few systems employ intelligent switches at each
electrode take-out instead of a central switching unit. Usually the number of electrode
channels of the switching device would range from around 25 to 64. In which the
electrode take-out spacing varies from less than 1 to 25m or more. This depends on the
application itself. In field survey the electrode cables are rolled out and electrodes are
connected to it, after which the data acquisition software automatically checks the
electrode contact and scans through a pre-defined measurement protocol. Extension of
the line is achieved through a roll-along technique, in which part of the layout is shifted
for example, by quarter of the total layout length and new measurements are added.
Resistivity sounding method has a major limitation because it does not take into
account horizontal changes in the subsurface resistivity. A relatively accurate model is a
two-dimensional (2-D) model as it changes the resistivity in the vertical as well as in the
horizontal direction. In this case, it is assumed that resistivity does not change in the
direction that is perpendicular to the survey line.
This would be a reasonable assumption, especially for surveys over elongated
bodies. Penetration model should be even more accurate, but at the present time, 2-D
surveys are economically practical compromise between obtaining very accurate results
and keeping the survey costs down.
One of the new innovations is the mapping of areas with moderately complex
geology using 2-D electrical imaging/tomography (Griffiths and Barker 1993). Usually
such surveys are usually carried out with 25 or more electrodes which are connected to a
multi-core cable. A laptop microcomputer along with an electronic switching unit is used
to automatically select the relevant four electrodes for each measurement.
32
Currently, field techniques and equipment used in 2-D resistivity surveys are fairly well
developed. Quite a number of international organizations provide the necessary field
equipment commercially. Approximately this equipment costs about US$15,000. A few
institutions have even constructed manually operated switching units at a nominal cost by
using a seismic cable. Normally a constant spacing between adjacent electrodes is used
which is attached to an electronic switching unit which in turn is connected to a laptop
computer.
A laptop is used to record the sequence of measurements to take, the type of array
to use and other survey parameters. As different resistivity meters use different formats
for the control file, there is a need to refer to the manual for the system. After reading the
control file, the computer program then automatically selects the appropriate electrodes
for each measurement. In a typical survey, most of the fieldwork is in laying out the cable
and electrodes. After that, the measurements are taken automatically and stored in the
computer. Most of the survey time is spent waiting for the resistivity meter to complete
the set of measurements.
In a typical 1-D resistivity sounding survey usually involves about 10 to 20
readings; while 2-D imaging surveys involve about 100 to 1000 measurements. There is
also a vast difference of cost between a typical 2-D survey and 1-D sounding survey. 2-D
electrical imaging surveys can give useful results that are complementary to the
information obtained by other geophysical method. For instance, seismic methods can
map undulating interfaces effectively, but would have difficulty in mapping discrete
bodies such as boulders, cavities and pollution plumes. Ground radar surveys can provide
more detailed pictures but have very limited depth penetration in areas with conductive
33
unconsolidated sediments, such as clayey soils.
A conjunction of two-dimensional
electrical surveys and seismic or GPR surveys provide comprehensive and
complementary information about the subsurface.
2.5.1.1 2-D Slide-along and Roll-along Technique
One technique used to extend horizontally the area covered by the survey, particularly for
a system with a limited number of electrodes, is the roll-along method. After completing
the sequence of measurements, the cable is moved past one end of the line by several unit
electrode spacings. All the measurements which involve the electrodes on part of the
cable which do not overlap the original end of the survey line are repeated (Figure 2.12).
Figure 2.12: The use of the roll-along method to extend the area covered by a survey
In slide-along technique (Figure 2.13) the entire cables are moved forward.
Subsections B and C are sampled with the same command file as that of subsection A.
zones 1 and 2 are sampled unnecessarily. Zones 3 and 4 are missing a large number of
data points. A roll-along survey is faster than side-along survey and has better model
resolution at the bottom of the section.
Figure 2.13: Slide-along technique
34
2.5.2 3-D Method
Now a days 3-D surveys are a subject of active research, yet not reached the level
of 2-D surveys which are used in routine. This is because the survey cost of 3-D survey in
an area is very high then that of 2-D survey. In near future, two developments can be
made to 3-D surveys which might cut down the cost effectively. One is to reduce the
survey time by the development of multi-channel resistivity meters that enables taking
more than one reading at a time. Secondly, to use faster microcomputers and enable the
inversion of very large data sets to be completed within a reasonable time, where the
dataset can be with more than 8,000 data points and survey grids of greater than 30 by 30.
In theory, a fully 3-D resistivity survey using a 3-D interpretation model should give the
most accurate results as all geological structures are 3-D in nature.
Figure 2.14: Sketch of 3-D multi electrode survey layout (Dahlin and Bernstone 1997).
2.5.2.1 3-D Roll-Along Technique
Mostly, to cover a reasonably large area, the commercial 3-D surveys will
probably involve grids of at least 16 by 16. A 16 by 16 grid will require 256 electrodes
which is more than that available on many multi-electrode resistivity meter systems. One
35
method to survey such large grids with a limited number of electrodes is to extend the
roll-along technique used in 2-D surveys to 3-D surveys (Dahlin and Bernstone 1997).
Figure 2.14 shows an example of a survey using a multi-electrode resistivity-meter
system with 50 electrodes to survey a 10 by 10 grid. Initially the electrodes are arranged
with the longer lines orientated in the x-direction in a 10 by 5 grid (Figure 2.15 a).
Measurements are made primary in the x-direction. With some possibilities, some
measurements are taken in diagonal directions. Next the entire grid is moved in the ydirection. The 10 by 5 grid now covers the second half of the 10 by 10 grid area. The 10
by 5 grid of electrodes is next orientated in the y-direction (Figure 2.15 b). Now the
measurements are made primary in y-direction.
36
Figure 2.15: Using the roll-along method to survey a 10 by 10 grid with a resistivitymeter system with 50 electrodes. (a) Surveys using a 10 by 5 grid with the lines
orientated in the xdirection. (b) Surveys with the lines orientated in the y-direction (Loke,
1999).
37
2.6 Previous Practical Applications
2.6.1 Detection of sink holes using electrical resistivity imaging
The site is located near Centurion, south of Pretoria, South Africa, the surface
expression with a diameter of about 30 m of a known sinkhole could be seen. Van Schoor
(2002) Conducted 2-d electrical resistivity imaging (RESTOM) technique for solving the
sinkhole problem. Using the dipole – dipole electrode configuration, RESTOM survey
was conducted. In RESTOM survey, two surface electrodes, A and B, spaced 8 m apart
and positioned at one end of the profile (Figure 2.16), are involved in introducing a
direct-current field into earth. For several adjacent potential electrode pairs, Mi and Ni,
by incrementally increasing the distance from the current electrode positions, potential
difference measurements were acquired. The Potential difference profile is acquired with
AB positions advanced by 8 m, with MN electrode spacing of 4 m. This process is
repeated until the AB positions are advanced to about 30 m past the area of interest
(perceived sinkhole edge). A total profile length of approximately 100 m was surveyed.
Figure 2.16: Schematic showing the basic principle of conducting a conventional dipole–
dipole resistivity survey (Van Schoor, 2002)
For the iterative inversion scheme, the data set is used as input. A commercially
available software package RESITOMO developed by DMT (Germany) (Kemna et al.,
1996) was used for the inversion. The image in Figure 2.17 clearly maps the sinkhole
38
structure that affected the road at this site. Within the basin-shaped Zone, the two cavities
can be seen. Thesr are the two smaller, locally resistive zones (at electrode positions 11–
13 and 16–19, respectively). Therefore, this paper illustrates that, in order to detect and
map the known sinkholes in dolomitic areas, RESTOM is a geophysical tool well suited.
Figure 2.17: RESTOM image resulting from the survey at Site (Van Schoor, 2002)
2.6.2 Electrical resistivity imaging technique for investigation of Landslide
In 2003, in the Soke district of Aydin located in the Aegean Region of Turkey, a
landslide occurred after a heavy rainfall. To determine the landslide geometry, a 2-D
resistivity survey was carried out along three lines using a Wenner electrode
configuration. By using Wenner configuration, data is acquired using a 30-electrode
cable which is 5 m apart. To process the data using RES2DINV, a 2-D tomographic
inversion technique was employed which is based on the smoothness-constrained least
squares inversion of pseudo-section data (Tripp et al. 1984; deGroot-Hedlin and
Constable 1990; Sasaki 1992; Loke and Barker 1996). The smoothness-constraint
algorithm will result in a solution with smooth resistivity changes. In this algorithm, the
subsurface is divided into rectangular blocks and each block has constant resistivity.
39
Using iterative Scheme, by minimizing the difference between observed and calculated
pseudo-sections, the resistivity of each block is evaluated. The calculated pseudo-sections
can be obtained by either finite-difference or finite-element methods (Coggon 1971; Dey
and Morrison 1979).
Figure 2.18: Study area after the landslide (Drahor, 2006)
The slope-forming material was saturated, as the survey was performed right after
a heavy rain.
This condition affected the resistivities in the subsurface and lower
apparent dataset resistivities are obtained. For the determination of the failure surface and
presence of a fault in the Soke landslide area, the resistivity data is inverted. According to
ERT result in Line-3, it is in rotational form, and the depth to failure surface varies
between 5 and 15 m. The borehole results added to the confirmation of the presence of a
fault in the site. The water saturated zones which are indicated by low resistivities were
identified. Moreover, the ERT was successful in detection of the consolidated and
unconsolidated geologic units, which might have potential for future landslides.
40
Figure 2.19: 3-D fence diagram of the resistivity sections (Drahor, 2006)
2.6.3 Electrical resistivity imaging technique to delineate groundwater aquifer
Next example is in the Banting area of Malaysia to delineate groundwater aquifer
and marine clay layer. The study area consists of Quaternary deposits of Beruas, Gula
and Simpang Formations which overlie the sedimentary bedrock of Kenny Hill
Formation. The uppermost layer is Beruas Formation which mainly consists of clay,
sandy clay and peat of Holocene fluviatile-estuarine deposits. The underlying Gula
Formation represents Holocene marine to estuarine sediments which mostly consist of
clay and minor sand. The Simpang Formation is a Pleistocene deposit comprised of
gravel, sand, clay and silt. The Kenny Hill Formation consists of a monotonous sequence
of interbedded shales, mudstones and sandstones. A 2-D geoelectrical resistivity
technique was used. In this survey, 61 electrodes were arranged in a straight line with
constant spacing (10 m) and connected to a multicore cable.
41
Figure 2.20: Location of survey lines (Hamzah, 2005)
Wenner electrode configuration was used because it provides a good vertical
resolution and gives clear image for groundwater and sand-clay boundaries as horizontal
structures. The 2-D resistivity data of subsurface material for each survey line was
calculated through inverse modeling and then compared with borehole data. Resistivity
measurements were carried out along several survey lines in SW–NE, EW and NW–SE
directions (Figure 2.20). The results of this study show the delineation of the aquiferous
sand and gravel zone lying below the marine clay in the study area. Additionally, clay
lenses were also detected. Bedrock surface was successfully mapped quite precisely at
about 40–70 m depth. The resistivity interpretation clearly shows the thickness of the
aquifer zone about 10–30 m. The results of this study further demonstrate that the
42
resistivity imaging is an effective tool for defining the thickness of groundwater aquifers
and mapping of bedrocks with relatively shallow depth.
Figure 2.21: Inverse model section for Olak 1 (a), Olak 2 (b) and Olak 3 (c) (Hamzah,
2005)
2.6.4 Contaminant delineation at Lernacken, Sweden.
Next example is Lernacken sludge deposit in southern Sweden, at the abutment of
the Oresund bridge under construction. It consists of fill material of limestone quarry
waste and till, which rests on top of glacial till and bedrock consisting of tertiary
limestone. There is also municipal waste, and industrial sludge has been deposited in
ponds dugout in the fill. Heavily contaminated groundwater is present, with organic
compounds and heavy metals as major contaminants (Bernstone and Dahlin, 1997).
43
Figure 2.22: Lernacken sludge deposit. Example of inverted depth section, where this
profile was measured through sludge deposit (modified from Bernstone and Dahlin,
1997).
Resistivity investigations were conducted along 10 lines separated by 20m over
the sludge deposit. An example of the resulting inverted resistivity sections is shown in
Figure 2.22. The sections that are outside the sludge deposit are rather homogeneous in
the upper part (not shown here). The low-resistivity zone coming in from the west, seen
at lower depths in all the sections, is due to the saltwater front from the near by Oresund.
A number of low-resistive zones corresponding to sludge ponds are clearly visible in the
sections within the sludge deposit (exemplified in Figure 2.22).
2.6.5 Application of 3D electrical resistivity imaging in an underground potash mine
The study area is located at the mine level within the Prairie Evaporite, and is
shown in Figure 2.23. The area had previously experienced a water inflow, and
mitigation efforts had been undertaken. However mine personnel were interested in
ascertaining whether the water entering the evaporate formation in the area is descending
44
down from the Second Red Bed, and if so the location of descent, or if the water is
traveling horizontally through the evaporite prior to arriving in the area. An active
underground mine presents a difficult environment to collect high quality electrical
resistivity measurements. In a 2D survey, a pseudo-section can be created which
encapsulates the spatial relationship between the data and which can also be used to
visually gauge the coherency of the data. The 3D acquisition geometry here does not lend
itself to the creation of pseudo-sections. Electrical measurements were collected using an
Iris Syscal resistivity meter with 96 electrodes. The often complex, yet limited,
distribution of drifts in an underground mine poses a difficulty for designing a
geophysical survey which has the ability to both detect and resolve resistivity variations
in 3D. There is often very little geometry available for deploying electrodes and the
available geometry is deficient. Applying standard suites of resistivity arrays has proven
to be insufficient for resolving 3D models in these environments and a more involved
survey design process is required.
Figure 2.23: Geometry of the underground mine drifts of the study area (Eso and
Oldenburg, 2006)
45
3D ERI survey techniques in a challenging underground mining environment
were employed. The resulting resistivity models show the distribution of conductive wet
salt in the area, and a known void was successfully imaged.
Figure 2.24: Planview resistivity section of the recovered model taken at an elevation of
10 meters above the back of the mine. The detected void is circled in red. (Eso and
Oldenburg, 2006)
46
CHAPTER 3
FIELD STUDIES
3.1 Site Description
Duncanville is a city in Dallas County, Texas (USA). Duncanville is a suburb of
Dallas and is part of the Best Southwest area. The city of Duncanville (Figure 3.1) is
located just minutes from downtown Dallas and 20 minutes from Fort Worth. The site is
located at 300 E. Center Street, Duncanville, Texas. Figure 3.1 presents a general site
vicinity map. The site is located approximately three hundred fifty (350) feet east of the
intersection of N. Main Street and E. Center Street.
City of Duncanville
Figure 3.1: An overview aerial photo showing the city of Duncanville (Courtesy of
Google Earth, 2006)
47
The site is located in a low-density residential and retail area. The surrounding
area is predominantly residential with retail shops located along E Center Street. The site
is comprised of a green field covered by small grasses. There are several trees and a
channel line. The channel is dried out. However, broken drainage pipe passes under the
site.
Figure 3.2: A General Site Vicinity Map.
The surrounding area is sparsely developed with retail and residential.
To the East: N. Merrill Avenue is located along the eastern side of the subject property.
The area is sparsely developed with single family homes surrounded by trees.
South: Trees line the property with some single family homes adjoining the subject site.
E. Center Street runs along this side.
West: Two two-story buildings are located beyond a parking lot.
48
North: E. Cherry Street is at the north side. Small residential subdivisions are located
beyond the site.
3.2 History of the Site and Existing Site Conditions
The site was previously used as both commercial and residential property.
However, the majority of the land was used as residential property. Based on the
drawings provided by the City, presence of a backfilled swimming pool was located at
the center of the property. However, city officials were concerned about the presence of
possible contaminants at the site.
Currently, the site, located at 300 E. Center Street, is a vacant lot (Figure 3.3).
The City has recently completed demolition of all the old buildings and structures at the
site. The site is bounded by E. Center Street on the south, E. Cherry Street on the north,
N. Merrill Avenue on the east and a commercial property on the west.
Figure 3.3: Site location and view
49
The ground surface gradually slopes toward the northeast corner of the site,
where a water drain is located. An inspection of the lined channel did not indicate
evidence of surface contamination. This is the broken portion of an underground pipe. A
pole mounted transformer is located on the site. The transformer did not have a visible
sign indicating the dielectric fluid was poly-chlorinated biphenyl (PCB) free. The
transformer appeared in good condition without signs of leaking. The northeast corner of
the site is currently being used as fill soil and pipe line storage area.
3.3 Site Geology
The Duncanville E. Center Development site is located within the Austin Chalk
Formation. In general, the Austin Chalk Formation consists of chalk, mostly microgranular calcite, massive, some interbeds and partings of calcareous clay. Due to its
whiter color and greater induration, Austin chalk formation is the most readily
distinguishable of the several formations of the Upper Cretaceous, which are mostly
unconsolidated clays. These facts make it a most important datum point in differentiating
the strata of the Upper Cretaceous and are of special value in aiding in the determination
of the depth of underground waters.
The formation consists of beds of impure chalk containing 85 per cent or more of
carbonate of lime, interstratified with softer beds of Marl. It is usually of an earthy
texture, free from grit, and when freshly exposed easily cut with a handsaw. Under the
microscope the material shows calcite crystals, particles of amorphous calcite, and the
50
shells of foraminifers, mollusks, echinoids, and other marine organic debris, such as
usually constitute chalk formations.
The saturated subterranean portions of the rocks have a bluish color, but the airdried indurated surfaces are glaring chalky white. The air-dried rock usually weathers in
large conchoidal flakes, with an earthy fracture. Occasionally small nests of pyrites of
iron occur in the fresh rock. On weathered surfaces these are usually altered into round
balls of marcasite an inch or less in diameter. Streams of rust from these locally discolor
the face of the rocks in places. The Austin chalk was called magnesian limestone by some
of the earlier writers, and is still so called by some persons. Only a small percentage of
magnesia is found in it.
3.4 Field Investigations
Field investigations in the site were conducted using both High Resolution
Resistivity (HRR) imaging and Soil drilling. 2-D resistivity imaging along four profiles
were carried out over the site using Dipole-Dipole configuration. In addition, three 3-D
resistivity imaging were carried out. Three boreholes were drilled in the site to confirm
the site conditions and verify HRR imaging results.
3.5 High Resolution Resistivty
The High Resolution Resistivity system is an 8-channel recording instrument to
carry out surface measurements for electric resistivity or induced polarization imaging of
the shallow subsurface of the earth. The system includes a maximum use of 56 electrodes
51
in a single layout. The maximum allowable distance between two adjacent electrodes is
20 feet. Both line and grid acquisition configurations are possible for 2D and 3D imaging.
Penetration depths vary depending on average soil resistivity and the number of
electrodes in a single layout.
3.5.1 SuperSting R8/IP Equipment Description
The new SuperSting R8/IP 8 (Figure 3.4) channel multi-electrode resistivity and
IP imaging system released at SAGEEP 2000 continues to sell all over the world. The
SuperSting is a breakthrough product from the market leader Advanced Geosciences.
Most multi-electrode resistivity instruments are one-channel instruments and therefore
take one reading for each current injection. The SuperSting used is an 8-channel
instrument and can therefore takes up to eight readings for each current injection.
Therefore the equipment is up to eight times faster than the one-channel instruments.
Figure 3.4: SuperSting R8/IP Multi-channel Resistivity Imaging System
52
The SuperSting also incorporates productivity features designed to enhance
efficiency in the field for doing resistivity and IP imaging surveys. Such features are;
selectable electrode spacing in the instrument, built in roll-along, possibility to shut off
electrodes in case the profile ends up against an obstacle, re-addressing of the electrodes
in the field and much more.
The SuperSting is a multi electrode system. A multi electrode system is a system
where a large number of electrodes are attached to the instrument. The SuperSting
consists of single channel and eight channel instruments.
Figure 3.5: Single channel SuperSting R1
The single channel instrument has one receiver. Thus, for each current injection, the
potential can only be measured between two electrodes. Therefore, when using a single
channel instrument only four electrodes, two for current and two for potential, are used for
each measurement.
The 8-channel instrument has eight receivers. Therefore, for each current injection
the potential between nine electrodes can be measured simultaneously, thus speeding up the
measurement process. We used SuperSting R8 as a multi channel instrument, which is much
faster in the field than single channel instrument.
53
Figure 3.6: Eight Channel SuperSting R8.
3.5.1.1 Key Benefits
The major benefits of SuperSting R8 Multi-channel resistivity imaging system are:
•
•
•
•
•
•
•
•
•
•
8 channel simultaneous measure capability, cuts field time dramatically.
High power transmitter. Can use both 12V and 24V batteries for added power.
Field adapted rugged construction. Built to last in real conditions.
Easy to use menu driven system.
The best accuracy and noise performance in the industry.
Large capacity internal memory for storage of measurement results.
User programmed measure cycles can be loaded into memory from a PC and later
executed in the field.
Directly controls the Multi-Channel Swift Dual Mode Automatic Multi-electrode
system.
Induced Polarization mode records 6 individual IP chargeability windows.
Manual measurements are available via four banana pole screws on the top of the
instrument for connecting current and potential electrodes. Manual measurement
array types include: Resistance, Schlumberger, Wenner, Dipole-dipole, Poledipole, and Pole-pole.
3.5.1.2 Multi-channel Resistivity Imaging System
The SuperSting is a memory earth resistivity instrument. The controls, the display
and the connectors are all located on the front panel.
54
Figure 3.7: SuperSting R8/IP front panel
1.
2.
3.
4.
5.
6.
7.
Power connector.
Fuse holder.
O/I (OFF/ON).
Night light, used to illuminate the display during poor light conditions.
Connector for optional external transmitter.
Indicator light for main and booster mode.
Connectors for communication with optional external transmitter, also used for
firmware upload.
8. Liquid crystal display (LCD) window with 16 text lines of 30 characters each.
9. Keyboard.
10. Connectors for Swift cable 1 and 2 or to connect one or two switch boxes.
11. Positive and negative current terminals (A and B). For use with banana
connectors or stripped wire.
12. Positive and negative potential terminals (M and N). For use with banana
connectors or stripped wire.
13. Test terminal for use with banana connector or stripped wire.
14. Connector used for serial communication with a PC, used for data download and
command file upload.
15. On SuperSting R8/IP connector for future development.
3.5.1.3 Power connector
One or two external 12 V DC batteries power the instrument. The batteries are
connected to the instrument front panel connector by the special power cable delivered
with the instrument. The power cable has a pig-tail connector for the boost battery.
55
Main mode, the instrument is powered by one 12 V battery and the instrument operates
in the range 0-100 Watt, the Main indicator light is on.
Boost mode, the instrument is powered by two 12 V batteries and the instrument operates
in the range 0-200 Watt, the Main and Boost indicator light is on.
Office mode, when the instrument is used in an office environment it is powered by a
Power Supply delivered with the instrument. The Power Supply is connected to the mains
(100-250 V AC at 50-60 Hz input power) and the front panel connector marked “Power”.
To turn the instrument on in this mode use the ON/OFF switch on the Power Supply.
Note that the front panel ON/OFF switch will not work when the instrument is powered
by the Power Supply.
In this mode the processor is working but the transmitter is unable to transmit any
current and the instrument is therefore not able to take any readings. Downloading of
data, uploading of command files and instrument firmware is possible in this mode.
3.5.1.4 Fuse holder
The main fuse holder is located on the front panel of the instrument. The fuse is a
20 Amp/32 V, 1 ¼”x ¼” fuse.
3.5.1.5 ON/OFF
When the battery is attached, turn the instrument on, by turning the I/O (On/Off)
switch to the I (On) position. The following message will be displayed:
Advanced Geosciences, Inc. SuperSting
Hardware initializing
56
After a short moment the main menu will replace the text. The instrument can be
turned off at any time and will keep its current settings until it is turned on again. Data in
the memory will not be lost when the instrument is shut off or disconnected from the
battery.
Note that the instrument, in order to save battery, as default will automatically
shut off if no keyboard action has been detected for 5 minutes. The automatic shut off
function will cause no loss of data or instrument setting. The automatic shut off function
can be disabled or the time setting can be changed on menu 6/4/1. The shut off time can
be set for any time between 1-60 minutes.
3.5.1.6 The Keyboard
The keyboard has 20 tactile keys.
Alphanumerical keys are used to enter letters and numbers and to select options
on the different menus. To enter letters select the first, second or third letter on the key by
first pressing F1, F2 or F3. For example to enter the word STING press, F1 1, F2 1, F3 9,
F2 5 and F1 9.
The menu key is used to go up one step in the menu system.
The function keys, F1, F2 and F3 are used to select certain functions.
The measure key, marked MEA is used to start the measurements.
The combination contrast adjustment key and back space key is located in the
top right corner of the keyboard. The LCD is sensitive for temperature and may turn pale
or too dark with change of ambient temperature. To adjust the contrast to a suitable level,
the contrast key should be pressed repeatedly.
The enter key is used to enter or select data.
57
3.5.1.7 The power supply
The power supply is used when the SuperSting is used in an office environment,
for example connected to a PC for data download, command file upload or flash memory
upload. It can handle 100-250 V AC at 50-60 Hz input power.
The power supply has an ON/OFF switch, which is used to turn on and off the
SuperSting when the instrument is powered by the power supply. Note that the ON/OFF
switch on the SuperSting front panel does not work when the instrument is powered in
this manner.
3.5.1.8 SuperSting electrode switch box
In some applications it is not economically feasible to use the intelligent smart
electrodes, in such cases switch box is used with passive cables and electrodes to form a
central switching system. When using the switch box any cable can be used to connect to
the electrode stakes.
Figure 3.8: The Switch Box and Amphenol connector
58
The switch box (Figure 3.8) available is 56 electrode switching capability for the
SuperSting R8/IP. SuperSting R8/IP is available with built-in switch box for 28 and 56
electrodes.
The switch box has two Amphenol (male and female) connectors (black plastic
type) and two female MS3476L18-32S connectors (metal type) as in Figure 3.8. On the
SuperSting models with built in switch capacity the MS3476L18-32S connectors are
placed on the right side of the instrument enclosure. The Amphenol connectors are used
to connect the switch box to the SuperSting instrument or daisy-chaining to other switch
boxes in order to control more electrodes.
Figure 3.9: SuperSting/Switch box connection
The MS3476L18-32S are used to connect the electrodes to the instrument, use
mating connector MS3476L18-32P. The connector marked “Low address cable” is used
to address electrodes 1-28. Pin 1 of the connector should be connected to electrode 1, pin
59
2 to electrode 2 and so on. The connector marked “High address cable” is used to address
electrodes 28-54. Pin 1 of the connector should be connected to electrode 28, pin 2 to
electrode 29 and so on. An adapter is delivered with the switch box, for connecting the
female connector of a passive cable to the female connector of the switch box.
3.5.1.9 Cables
It is not advisable to use any unshielded cable to connect to the electrode stakes.
Crosstalk between members of the cable may be a serious problem causing coherent
noise in the data. Since the noise is coherent it is impossible to distinguish from real data.
Figure 3.10: Cable’s
It is not advisable to use “seismic cables” to connect to the electrode stakes. The
reason is that a seismic cable is not designed to transmit electrical current but to transmit
a small voltage signal in the millivolt range. Since the signal voltage in the seismic
application is low there is no reason to protect the wires from cross talk between
members. In the electrical resistivity application current are driven into the ground with
up to 400 V and at the same time the response is measured on other cable members in the
millivolt range.
60
3.5.1.10 Stainless steel electrode stakes
For manual resistivity work using four cable reels and four stakes, the stainless steel
electrode stakes are sufficient. The cables are connected to the electrodes with a solid copper
Muller-clip soldered to the cable as seen in Figure 3.11. When the electrode distance is short
at shallow surveys, the electrodes should not be pushed too deep into the ground in order to
avoid changing the geometry (the electrode is supposed to be a point source). In these cases,
electrodes should not be kept deeper into the ground than about 5% of the distance between
the electrodes.
Figure 3.11: Electrode stake and electrode switch
3.5.1.11 Electrode cable design
The Swift cable used for automatic resistivity or resistivity/IP survey. The cable
has a number of electrode switches (smart electrodes) mounted, most commonly at equal
intervals along the cable. The electrode switches are numbered consecutively along the
61
cable. The number of each electrode switch is marked on the cable beside the switch.
Each electrode switch also has this number, or address, stored in its memory.
Figure 3.12: Electrode Switch.
3.5.2 Resistivity Survey Design
The Electrical Resistivity Imaging (ERI) technique was selected as a primary
sampling method in this investigation because of its portable, economy, and practicable
advantages in an urban area. The resistivity imaging was conducted between august 16,
2007 and December 31, 2007 in the vicinity of the City of Duncanville, Texas, USA. The
locations of the ERI survey lines were chosen based on the locations of previous and/or
present details of the site as presented by the city of Duncanville. Both two dimensional
(2D) and three dimensional (3D) investigations were conducted for the site. Three (3) 3D
resistivity imaging surveys and four (4) 2D resistivity imaging surveys (Figure 3.16)
were conducted in the site. The 3D imaging areas are identified and presented in Figure
3.16 as: Section A-A’, Section A-B and Section C-C’. The 2D imaging sections are
identified and presented in Figure 3.13 to 3.15 as: as Line A, Line B, Line C and Line D.
62
3.5.2.1 Line A 2-D Survey
The Line A survey is close to E. Center Street. The resistivity imaging was
conducted with 5 ft electrode spacing and using the Dipole-Dipole Array. The survey was
conducted West to East as shown in the Figure 3.13. The total length of the survey line
W
E. Center Street
LINE A
E. Cherry Street
was 275 feet.
E
Figure 3.13: Line A Survey from West to East
3.5.2.2 Line B 2-D Survey
Line B is close to N. Merrill Ave. The resistivity imaging was conducted with 2 ft
electrode spacing and using the Dipole-Dipole Array. The survey was conducted South to
North as shown in the Figure 3.14. The total length of the survey line was 112 feet.
63
E. Center Street
E. Cherry Street
N
LINE B
S
Figure 3.14: Line B Survey from South to North
3.5.2.3 Line C 2-D Survey to the North West Corner
Line C is close to N. Merrill Ave. The resistivity imaging was conducted with 2 ft
electrode spacing and using the Dipole-Dipole Array. The survey was conducted
Southeast to Northwest as shown in the Figure 3.15. The total length of the survey line
was 112 feet.
E. Cherry Street
NE
Figure 3.15: Line C survey along the channel
64
LINE C
E. Center Street
SW
Line B
E. Center Street
N. Merrill Ave.
140ft
Section A-B
Section A-A’
130ft
Line A
260ft
40ft
275ft
65ft
Line C
Section C-C’
E. Cherry Street
112ft
112ft
Line D
Figure 3.16: Resistivity Imaging Locations
65
3.5.2.4 Line D 2-D Survey to North East Corner
Line D is close to S. Hastings Street. The resistivity imaging was conducted with
2 ft electrode spacing and using the Dipole-Dipole Array. The survey was conducted
North to South as shown in the Figure 3.17. The total length of the survey line was 112
N
LINE D
E. Center Street
E. Cherry Street
feet.
S
Figure 3.17: Line D Survey from West to East
3.5.2.5 Section A-A’ 3-D Survey
Section A-A’ is close to E. Center Street. The Electrical Resistivity Imaging was
conducted with 20 ft electrode spacing and using the Dipole-Dipole Array. The data
recorded during the imaging was transferred to a computer. Finally, the Earth Imager 3D
software was used to analyze the obtained data from the field.
66
E. Center
Street
E. Cherry
Street
SECTION A-A’
Figure 3.18: Section A-A’ Survey from West to East
3.5.2.6 Section A-B 3-D Survey
Section A-B is close to E. Center Street and within section A-A’. The Electrical
Resistivity Imaging was conducted with 5 ft electrode spacing and using the Dipole-
E. Center Street
E. Cherry Street
Dipole Array.
SECTION A-B
Figure 3.19 Section A-B Survey from West to East
3.5.2.7 Section C-C’ 3-D Survey
Section C-C’ is close to E. Cherry Street. The Electrical Resistivity Imaging was
conducted with 5 ft electrode spacing and using the Dipole-Dipole Array.
67
E. Center
Street
E. Cherry
Street
SECTION C-C’
Figure 3.20: Section C-C’ Survey from West to East
3.6 Data Acquisition and Data Inversion
3.6.1 Data Acquisition
The research project used a 56 electrode AGI Sting/Swift R8 Earth Resistivity
Meter to collect the apparent resistivity data. The 56 electrodes are on four interconnectable electrode cables with 14 electrodes each. The electrodes are separated by 20
feet of cable. For each surveys with smaller spacing’s, the excess cable is simply laid out
to one side of the survey line.
The AGI system uses ‘smart’ electrodes. Each ‘smart’ electrode can be passive or
act as the A, B, M, or N, electrode for a resistivity measurement. The ‘smart’ electrodes
are controlled by a user modifiable command file on the String.
The electrodes make electrical contact with the ground by being connected to a
metal spike that has been driven into the ground. Laying the electrode on a ‘shelf’, a 10
cm length of angle iron welded across the stake provides the electrical connection
68
between the electrode and the stake. The electrode is held on the ‘shelf’ by an elastic
band.
Sometimes the compromise between depth of investigation and resolution
produced an overall electrode line length that was shorter than the horizontal extent of the
intended survey. Conducting ‘roll-along’ surveys extend the length of these surveys. A
‘roll-along’ survey begins by collecting a standard data set. A number of electrodes, for
example 14, are then moved from the beginning of the survey line to the end of the
survey line without moving any of the other electrodes. Data is again collected in what
would be a spatially overlapping data set; however, a special command file avoids
collecting redundant data. This ‘hop scotching’ of electrodes from the front of the survey
line to the end can be repeated any number of times and therefore extend a survey line to
any length.
3.6.2 Data Inverion
Computer program Earth Imager 2D and Earth Imager 3D (Advanced
Geosciences, Inc., 2006) was used to invert the apparent resistivity data. Earth Imager
2D and Earth Imager 3D are large and complex programs with many user modifiable
inversion parameters. The software manual provides a detailed explanation of each
parameter and its influence on their inversion process.
Resistivity surveys measure injected current (I) through transmitting electrodes
and potential difference (voltage V) between two receiving electrodes. Measured current
and voltage together with electrode geometry (K) may be converted into apparent
resistivity. Normalized voltage by current (V/I) and ρ a data are equivalent quantities
than can be transformed back and forth with the help of a geometric factor K.
69
The goal of resistivity survey is to image a subsurface resistivity distribution
which is closely correlated with subsurface geology. The subsurface resistivity
distribution (or its reciprocal electrical conductivity) is the model parameter in the
inversion.
The model is the partial differential equation that governs the relationship
between data and model parameters.
Forward modeling is defined as the process of predicting the data on the basis of
the known distribution of model parameter, electrode configuration and model. It is a
mapping from the model space to the data space. Forward modeling creates synthetic data
sets. Forward modeling is also known as forward simulation, forward problem, and
forward solution.
Inversion is defined as the process of determining the estimates of the model
parameter on the basis of the data and the model. Inversion is a mapping from data space
to model space, and it reconstructs the subsurface resistivity distribution from measured
voltage and current data. Inversion is also known as inverse modeling, inverse
simulation, and inverse problem.
The resistivity data inversion proceeds as follows
1) A starting resistivity model is constructed based on either the average apparent
resistivity, or apparent resistivity distribution, or user assumption, or a priori
knowledge of subsurface resistivity distribution.
2) A virtual survey (forward modeling) is carried out for a predicated data set over
the starting model. The initial root mean squared (RMS) error at the zero-th
iteration may be calculated at this step.
70
3) A linearized inverse problem is solved based on the current model and data misfit
for a model update (∆m)
4) The resistivity model is updated using a formula like this: mi+1 = mi + (∆m) . The
model parameter m consists of electrical conductivity of all model blocks in the
finite difference or finite element mesh. The symbol I is the iteration number.
5) A forward modeling (virtual survey) is run based on the updated model for a
updated predicted data set.
6) A new RMS error is calculated between the predicated data and the measured
data.
7) If any of version stop criteria is satisfied, the inversion is stopped. Otherwise
repeat the steps (3) to (7).
Forward modeling is the process which undergoes in the software. In forward
modeling we are dealing with a 2D/3D problem here, that is, a 2D earth model but a 3D
electrical field due to point source. It has become a standard practice to solve 2D/3D
resistivity forward modeling problem using numerical methods by discretization of the
domain of investigation.
The governing 3D partial differential equation is Fourier- transformed into a 2D
equation to reduce computing time. The forward solution can be obtained by solving the
2D partial differential equation in the Fourier transform domain:
∂
∂x
(σ ∂∂Vx )+ ∂∂Z (σ ∂∂VZ ) − K 2σV = − I .δ ( x).δ ( z )
Where V is the scalar electrical potential in the Fourier transform domain, and I is
the electric current source, k is the wavenumber in the transform domain. σ is electric
71
conductivity as a function of (x, z). Both finite difference and finite element methods
were implemented.
3.6.2.1 Earth Imager 2D inversion and modeling software:
EarthImager 2D is the new standard for affordable Resistivity Imaging software.
With this software data collected with the AGI SuperSting earth imaging resistivity
instruments can be interpreted into easy to read 2D earth sections. The processed data can
be converted to various types of files and can be processed into reports.
Main Window of EarthImager 2D is shown in the Figure 3.21. EarthImager is
based on Windows 32-bit platforms. Its user-friendly graphical user interface.
Figure 3.21: Earth Imager 2D main window
72
The order of main menus is basically that of inversion steps. That is, the inversion
with EarthImager, in general, consists of these steps:
•
A data file is read,
•
Data file is edited to remove noisy data,
•
Inversion is run;
•
Inversion results are viewed, and
•
The inversion results are saved and printed.
3.6.2.2 A data file is read
Read Data menu item from the File menu should be chosen. Then the data file is
allowed to process. After reading data successfully, EarthImager will display either
an apparent resistivity pseudosection for surface survey. For apparent resistivity
pseudosections shown in Figure 3.21, the color scale is logarithmic. There is a
vertical exaggeration of the depth scale. The text font, number of colors, and Figure
title can be changed. The grid dots showing the plotting location of measurements
may be turned on and off, and the grid dot size and color are changeable. The larger
black squares on the surface show the electrode locations and are also editable. This
is the raw resistivity data.
73
Figure 3.22: Raw resitivity data
3.6.2.3 Data file is edited to remove noisy data
After loading the data file, data editing statistics may be checked by choosing the
menu item Edit Editing Statistics. The number of data flagged for removal is counted
based on the Criteria for Data Removal in the Initial Settings Window. Any edits from
the Electrode Editor or manual editing will be added to this number. But any change in
the Criteria for Data Removal will reset this number.
There are three ways to identify and remove noisy data. In the first approach,
some possibly bad electrodes would be singled out for removal. The second approach is
based on the initial data trimming threshold on the Initial Settings window. The noisy
74
data will be automatically removed based on the threshold. In the last approach, noisy
data would be identified and removed by the user manually with the mouse clicks and
Delete key.
3.6.2.4 Inversion is run
Inversion can be started by either clicking the green tool button or choosing the
menu Inversion | Start Inversion. At the bottom of the window, there are two progress
bars showing the progress of the inversion (Figure 3.23). The overall progress is shown
by the first progress bar to the left, and the progress within one iteration is shown by the
second one to the right.
Figure 3.23: Progress of inversion
3.6.2.5 Removal of poorly misfit data
At the end of inversion, a data misfit histogram can be displayed by choosing
View | Convergence and Data Misfit | Data Misfit Histogram (Figure 3.24). The
horizontal axis shows the absolute value of the relative data misfit that is defined as the
ratio the difference between the calculated and measured data to the measured data
(apparent resistivity).
In general, any data with a relative data misfit greater than 50% may be
considered as a poorly fit data and should be removed. The user should also take the error
distribution into consideration. In the Figure 3.24 below, 36% can be used as the removal
75
threshold that is represented with a vertical blue line. The data with a misfit larger than
the threshold will be removed after clicking the Remove button.
To set a removal threshold, any of the arrow keys (Left, Right, Up and Down)
may be used. The Left and Down arrow keys will decrease the threshold. The status bar
at the bottom shows the number of data to be removed, and total number of data points.
To remove poorly fit data, an appropriate misfit threshold should be set, and
Remove button is clicked, and then Inversion is started again. If the Cancel button is
clicked, the threshold selection will have no effect in the following inversion.
Figure 3.24: Data misfit Histogram
3.6.2.6 Inversion results
Figure 3.25 shows a single inverted resistivity section at a user-specified iteration
for both surface and borehole data sets. When the mouse pointer moves on the inverted
76
resistivity section, its X location, Depth and Resistivity value are shown on the bottom
status bar of the main window.
Figure 3.25: Inverted resistivity section
Figure 3.26 shows measured and calculated apparent resistivity pseudosections
and inverted resistivity section at a user-specified iteration.
Figure 3.26: Measured and apparent resistivity pseudosections
77
Convergence curve is submenu item under Convergence and Data Misfit and it
shows an XY chart of root mean squared (RMS) error in percentage versus iteration
number.
Figure 3.27: Convergence curve
Data misfit cross plot is a submenu item under Convergence and Data Misfit. A
crossplot is another good way to show data misfit. If a calculated apparent resistivity fits
corresponding measured apparent exactly, the data point must lie on the green line. The
horizontal axis is the logarithm of measured apparent resistivity and the vertical axis is
the logarithm of calculated or modeled apparent resistivity. Because the logarithm of a
negative number is undefined, an absolute value is then used. A square of four colors at
the lower right corner of the image is the legend showing the signs of measured and
calculated apparent resistivities. For example, if both measured and calculated data are
positive, the data point is black. If both are negative, the data point is green.
78
Figure 3.28: Data misfit crossplot.
3.6.2.7 EarthImager 3D - New Resistivity Inversion Software
This software inverts reisistivity data acquired with electrodes arranged in
boreholes and/or on the surface and presents a 3D volume of inverted resistivity data with
advanced volume rendering technique. The final resistivity or IP image-volume can be
rotated in any orientation, zoomed in and out, and translated to anywhere inside the
image window in order to see the volume of interest in detail. Colors representing areas
of less interest can be made transparent so that the shape of a pollution plume, for
example, can be visible.
Similar steps as in Earth Imager 2D are followed in Earth imager 3D also. Main
Window of EarthImager 3D is shown in the Figure 3.29.
79
Figure 3.29: Main window of Earth Imager 3D
The left image in the Figure 3.29 shows the arrangement of the electrodes. The
electrodes can be arranged both in boreholes and/or on the surface. The right picture
shows the scatter plot of measured apparent resistivity. By left clicking on one data point
in this picture the corresponding four active electrodes are showed as red electrodes
(current) and blue electrodes (potential) and the picked data point as a black dot.
The electrode arrangement on the left side can be rotated or turned in any way so
that electrodes further back, which are blocked from view by electrodes closer, can be
seen. The inversion is started by clicking on the green button with the arrow.
When the inversion is started a crossplot of measured versus calculated apparent
resistivities (Figure 3.30) is shown to the left. Ideally all of the dots should end up on a 45
80
degree line for noise-free data and error-free numerical modeling. The right image shows
a 3D volume of inverted resistivity. Resistivity inversion is an iterative process. These
two images will update at the end of each iteration.
Figure 3.30: Apparent resistivity cross plot and 3D resistivity image
These dynamic slices (Figure 3.31) are a powerful tool for interactive data
interpretation. Any of three slices may be turned on or off. Any slice can be moved along
the axis to sweep through the entire volume in search for anomalies. A left mouse
clicking on a slice would reveal the x, y, z coordinate and corresponding resistivity value.
In addition, EarthImager also shows a stack of four static slices in either X, Y or Z
orientation.
81
Figure 3.31: Dynamic slices of resistivity
3.7 Subsurface Investigation by Soil Drilling
A subsurface exploration program was conducted on October 22, 2007. A total of
three test borings, labeled BH-1 through BH-3, were drilled by Apex Geoscience, Inc.
under the supervision of a UTA field representative. The drilling was performed using a
truck-mounted rig. Test boring locations were approximately located in the field by the
UTA representative relative to existing site features and are indicated on Figure 3.32 and
Table 3.1. The locations were selected based on the resistivity imaging.
The resistivity imaging showed few locations with very high resistivity and was
anomalous compared to the other sections of the sites. Also, resistivity imaging showed
82
possibility of presence of hard soil or rock materials at 2 ft to 15 ft below the ground
surface. Therefore, to confirm materials present at the anomalous locations and site
geology, the soil test boring locations were decided and soil samples were collected from
those locations.
Table 3.1 – Site Investigations Program
Boring
BH-1
Ground Surface Penetration
Elevation (ft)
Depth (ft)
0.0
15
BH-2
0.0
15
BH-3
0.0
15
Soil samples were obtained using a standard split-spoon sampler and the Standard
Penetration Test (SPT) in general accordance with the procedures described in American
Society for Testing and Materials (ASTM) D1586-90. Driving resistances from the SPT
tests (i.e., blow counts) were recorded on the boring logs. The SPT utilizes a 140-lb
hammer falling 30 inches to drive a 2-inch outside diameter (O.D.) split-spoon barrel
sampler for 18 inches. At the completion of drilling, test borings were backfilled with
drill cuttings. However, drilling was done using only soil drilling equipment and rock
coring was not done as part of the site investigations.
Soil samples were obtained using a standard split-spoon sampler and the Standard
Penetration Test (SPT). The Standard Penetration Tests aims to determine the SPT N
value, which gives an indication of the soil stiffness and can be empirically related to
many engineering properties. The test is conducted inside a borehole. A 'split spoon'
83
sampler is attached to the bottom of a core barrel and lowered into position at the bottom
of the borehole. Split-spoon samplers are used for taking samples for lithological
descriptions, geotechnical analyses that do not require undisturbed samples, and chemical
analysis. Spit-spoons consist of a barrel that is attached to a drive tip. Sampling is
accomplished by attaching the spit-spoon to the end, lowering it to the bottom of a
borehole, then driving it into the soil with a geotechnical hammer.
84
BH - 2
BH - 1
BH - 3
Figure 3.32: Boring locations Plan
85
CHAPTER 4
RESULTS AND DISCUSSION
4.1 Apparent Resistivity Imaging Results
Figure 4.1 shows the apparent resistivity data for all the lines down to a maximum
depth of about 15.7 meters. When data is transferred to a computer from the SuperSting, the
results of resistivity measurement is transferred and stored in as sting files (.stg file). The
files stored contain the apparent resistivity data. Reading the data successfully, the software
will display a measured apparent resistivity pseudosection for surface survey as shown in
Figure 4.1. The apparent resistivity data emphasizes nearer surface features in its
measurements. Therefore, this map is a reflection of the shallower subsurface materials
(generally residual soils, fill, or weathered bedrock). It has been assumed that apparent
resistivity data reflects primarily variations in the depth to bedrock, but also variations in
soil porosity, moisture content, and clay content. The larger black squares on the surface
show the electrode locations and are also editable.
86
LINE A
LINE B
LINE C
LINE D
Figure 4.1: Apparent resistivity data for Line A, Line B, Line C and Line D
87
4.2 Inverted resistivity section results for 2-D
The raw field data or measured apparent resistivity data were processed using
EarthImager 2D. This computer program uses a leastsquares inversion to convert
measured apparent resistivity values to true resistivity values and plots them in crosssection. The program creates a resistivity cross-section, calculates the apparent
resistivities for that cross-section, and compares the calculated apparent resistivities to the
measured apparent resistivities. The iteration continues until a combined smoothness
constrained objective function is minimized. The measured apparent resistivity
pseudosection, calculated apparent resistivity pseudosection and inverted resistivity
section for LINE A are shown in Figure 4.2.
Figure 4.2: Apparent resistivity pseudosection and inverted resistivity section for LINE A
88
At the end of inversion, the data misfit histogram is displayed to remove the
poorly fit data. The horizontal axis shows the absolute value of the relative data misfit
that is defined as the ratio of the difference between calculated and measured data to the
measured data. In Figure 4.3, 6% is used as removal threshold that is represented by blue
line and click remove button and start inversion again.
Figure 4.3: Data misfit histogram for Line A
Figure 4.4 shows an XY curve of root mean squared (RMS) error in percentage
versus iteration number which is called the convergence curve. As seen, RMS error for
Line A in Figure 4.4 drops from 14.4% to 2.77 % i.e. less than 3%, implying a good fit
between them and hence reasonable accuracy of inverted resistivity section.
89
Figure 4.4: Convergence curve for Line A
Figure 4.5 shows the crossplot of Line A which is another good way to show data
misfit. The horizontal axis is the logarithm of measured apparent resistivty and vertical
axis is the calculated apparent resistivty. As most of the data points lie on the green line,
the calculated apparent resitivity fits corresponding measured apparent resistivty.
Figure 4.5: Data misfit Crossplot for Line A
90
A similar trend is followed for data misfit histogram, crossplot and convergence
curve in all the 2D Lines. The resistivity cross sections (Figure 4.6, 4.7, 4.8 and 4.9) are
modeled from apparent resistivity data collected in the dipole-dipole array mode. Since
electrical current will follow the path of least resistance, distortions may be created by
low resistivity features outside the plane of data collection.
Possible Hard Material
2D Line A
Figure 4.6: Resistivity Image along Line A
2D Line B
Possible Hard Material
Figure 4.7: Resistivity Image along Line B
91
Possible Hard Material
2D Line D
Figure 4.8: Resistivity Image along Line D
2D Line C
Possible Hard Material
Figure 4.9: Resistivity Image along Line C
4.3 Inverted resistivity section results for 3-D
Electrode geometry of Section A-B is shown in Figure 4.10. As in Earthimager
2D the raw field data or measured apparent resistivity data were processed using
EarthImager 3D. This computer program uses a leastsquares inversion to convert
measured apparent resistivity values to true resistivity values and plots them in crosssection. The Figure 4.11 shows the inverted resistivity section.
92
Figure 4.10: Electrode geometry of section A-B
Figure 4.11: Inverted resistivity section for Section A-B
93
Figure 4.12 shows the crossplot of Section A-B, which shows the data misfit. The
horizontal axis is the logarithm of measured apparent resistivty and vertical axis is the
calculated apparent resistivty. As most of the data points lie on the 45 degree line, the
calculated apparent resitivity fits corresponding measured apparent resistivty. If all the
points fall on the 45 degree line, a perfect data fit with zero RMS error is achieved.
Figure 4.12: Apparent resistivity Crossplot for Section A-B
94
Convergence graph is shown in Figure 4.13. The graph shows XY curve of root
mean squared (RMS) error in percentage versus iteration number. As seen, RMS error for
section A-B in Figure 4.4 drops from 43.7% to 8.83 % i.e. less than 9%, implying a good
fit.
Figure 4.13: Convergence curve for Section A-B.
All the 3D sections follow a similar trend. The Inverted resistivity sections are
modified from the measured apparent resistivity with dipole-dipole array mode and
inverted resistivity sections are shown below.
95
Section A-A’ (Electrode Spacing 20 ft)
(a)
Possible Anomaly
(b)
(d)
(c)
Figure 4.14: (a) Resistivity Image of Section A-A’, (b) X Slices of Resistivity Image, (c)
Y Slices of Resistivity Image and (d) Z Slices of Resistivity Image
96
Possible Anomaly
Section A-B (Electrode Spacing 5ft)
(a)
(b)
Possible Anomaly
(c)
(d)
Figure 4.15: (a) Resistivity Image of Section A-B, (b) X Slices of Resistivity Image, (c)
Y Slices of Resistivity Image and (d) Z Slices of Resistivity Image
97
Section C-C’ (Electrode Spacing 10ft)
(a)
Possible Hard material
(b)
Possible Hard material
(c)
(d)
Figure 4.16: (a) Resistivity Image of Section C-C’, (b) X Slices of Resistivity Image, (c)
Y Slices of Resistivity Image and (d) Z Slices of Resistivity Image
98
The resistivity cross sections and lines are modeled from apparent resistivity data
collected in the dipole-dipole array mode. Since electrical current will follow the path of
least resistance, distortions may be created by low resistivity features outside the plane of
data collection.
From the results, lowest resistivity values (less than 50 ohm-meters) are
interpreted as thick soil layers, which may also be higher in moisture content.
Conversely, shallow bedrock, especially more competent rock, has higher resistivity
anywhere from orange to red (low to mid 100’s ohm-meters). Thus, higher resistivity
values would be expected over a greater portion of the map where competent rock was
present at depth.
99
4.4 Comparison between 2-D and 3-D resistivity values with depth.
The Figure 4.18 shows the top view of the site with a 2-D Survey Shown by the
red line and two 3-D surveys at 5 feet and 20 feet electrode spacing shown by the green
and blue lines respectively. Since the distance between the Line A, Section A-A’ and
Section A-B are negligible as can be seen in the Figure 4.18, three points are taken and
resisitivity-depth relationship graphs are plotted for 2-D (5 feet electrode spacing), 3-D (5
feet electrode spacing) and 3-D (20 feet electrode spacing) for each point.
Resistivity ( Ohm - m)
0
200
400
600
800
0
0.5
1
2D - 5 Feet
Depth (m)
1.5
3D - 5 Feet
2
3D - 20 Feet
2.5
3
3.5
4
4.5
5
Figure 4.17: Comparison of 2-D and 3-D resistivity values at point A
100
Figure 4.18: locations of Point A, Point B and Point C
101
Line A
Section A-BE.
65ft
Point
B
Center
260ft
275ft
Point C
Section AA’
Point A
E. Cherry Street
N. Merrill Ave.
140ft
Resistivity ( Ohm - m)
0
200
400
600
800
Depth (m)
0
0.5
1
2D - 5 Feet
1.5
2
2.5
3
3.5
3D - 5 Feet
3D - 20 Feet
4
4.5
5
Figure 4.19: Comparison of 2-D and 3-D resistivity values at Point B
Resistivity ( Ohm - m)
0
200
400
600
800
0
0.5
1
2D - 5 Feet
1.5
3D - 5 Feet
Depth (m)
2
2
3D - 20 Feet
2.5
3
3.5
4
4.5
5
Figure 4.20: Comparison of 2-D and 3-D resistivity values at Point C
102
The resistivity results at point A (Figure 4.17) for a 2-D survey with 5 feet and 3D survey with 5 feet spacing are very similar (almost overlapping). However, the results
for 3-D survey with 20 feet spacing are not matching with 2-D survey for 5 feet spacing.
Similar trend was observed at point B (Figure 4.19) and point C (Figure 4.20).
Based on these limited data, the resistivity results for 2-D and 3-D data using
same electrode spacing provide very close results. Therefore, using 2-D with 5 feet
spacing or 3-D with 5 feet spacing should provide us the same results.
4.5 Effect of electrode spacing
Resistivity imaging was conducted at the same location using different electrode
spacing to know effect of spacing between the electrodes on the quality and resolution of
resistivity results. The effect of spacing was investigated for both 2-D and 3-D. 2-D
imaging was conducted for 2 feet and 5 feet electrode spacing, whereas 3-D imaging was
conducted for 5 feet and 20 feet electrode.
Figure 4.21 presents the resistivity imaging results for 3-D survey with 5 feet and
3-D survey with 20 feet electrode spacing at point A. The results shows the quality of
images of the known layer does show some degradation to practical significance as we
increased the spacing by a factor of 4, and also the data-collection time increases with
spacing nearly exponentially. Figure 4.22 shows the resistivity-depth relationship for 2-D
survey with 2 feet and 5 feet electrode spacing. The hand results did not vary
significantly when 2-D imaging was done using 5 feet and 2 feet spacing.
103
Effective Spacing for 3d
Resistivity ( Ohm - m)
0
20
40
60
80
0
0.5
1
3D - 5 Feet
1.5
3D - 20 Feet
Depth (m)
2
2.5
3
3.5
4
4.5
5
Figure 4.21: Effective spacing for 3-D at point A
Figure 4.22 Effective spacing for 2-D
Based on the results it can be summarized that, closer the electrode spacing the
better is the resolution. Therefore, 5 feet electrode spacing in 3D gives better resolution
when compared to 20 feet. In case of 2D there is not much of difference between 2 feet
and 5 feet electrode spacing. Any one of them should produce good results.
104
4.6 Drilling Results
During drilling collected soils were visually classified and soil borings were
maintained. Soil samples were generally taken at 2-foot depth intervals in each boring.
All samples were transported to the laboratory for further review and laboratory testing.
The subsurface conditions, as interpreted from the field investigation program,
indicate a subsurface profile consisting of a layer of Miscellaneous Fill underlain by
weathered and disintegrated rock formation. The Miscellaneous Fill layer, as described
below, overlies the entire site and extends as much as 5 ft (in borehole BH-3) below the
ground surface. Weathered rock consists mainly of dense sands. The weathered rock is
underlain by very hard Limestone.
The recent test boring data indicates the following generalized soils strata underlie
the site to the depths investigated at soil boring locations. . The strata designations do not
imply continuity of materials described, but reflect the general description of the
subsurface materials at the site (table 4.1).
Table 4.1: General descriptions of each stratum.
Stratum A:
(Fill Soil)
From the ground surface to Brown clay and sand FILL,
the depths of 2.5 ft to 5 ft
generally loose to dense
sand (N = 5 to 15/3”)
Stratum B:
(Disintegrated/Weathered
Rock)
Below Stratum A to depths Dense to very dense brown
of about 14.5 feet
and light brown colored
LIMESTONE material (N
= 19 to 30/2”)
Below Stratum A and Light brown colored
Stratum B to the maximum LIMESTONE material,
depth of boring at 15 feet
generally hard (N = 30/1”)
Stratum C:
(Hard Soil or Rock)
105
4.7 Relation between Resistivity and Water Content
`
Figure 4.23, 4.24 and 4.25 presents the measured electrical resistivity and
moisture content versus depth at each borehole location. At location B-1 (Figure 4.23),
the moisture content decreases within the elevation, and then it increases. In the same
elevation range, the resistivity starts to increase and then it decreases. The inverse
relationship between electrical resistivity and moisture is evident from these results. At
location B-2 (Figure 2.24), moisture content is low close to the surface, then it increases
to an elevation, and finally shows decreasing trend at the bottom of the borehole. The
decrease in resistivity with increase in moisture is also observed at this location. The
trend for the moisture content of location B-3 is also the same as shown in Figure 4.25. A
general trend of slightly decrease of the moisture with the depth is observed. This is
correlated with the slight increase of resistivity with depth.
106
0
0.5
1
D e p th (m )
1.5
2
Moisture content
2.5
resistivity
3
3.5
4
4.5
5
0
10
20
30
40
50
60
70
Resistivity (Ohm - m) and Moisture Content (%)
Figure 4.23: Resistivity and Moisture content graph for 3d 5feet and B-1
0
0.5
1
D ep th (m )
1.5
2
Moisture content
2.5
resistivity
3
3.5
4
4.5
5
0
10
20
30
40
50
60
Resistivity (Ohm - m) and Moisture Content (%)
Figure 4.24: Resistivity and Moisture content graph for 2d 2feet and B-2
107
0
0.5
1
D e p th (m )
1.5
2
Moisture content
2.5
resistivity
3
3.5
4
4.5
5
0
20
40
60
80
Resistivity (Ohm - m) and Moisture Content (%)
Figure 4.25: Resistivity and Moisture content graph for 2d 2 feet and B-3.
4.8 Comparison between Resistivity and Drilling
Based on the 3D resistivity imaging for Sections A-A’ and A-B, UTA observed
an anomalous location along the E. Center Street. Initially, the anomaly was observed
while resistivity imaging was conducted using electrode spacing 20 ft (Section A-A’).
However, based on the results from Section A-A’, another 3D resistivity imaging was
conducted (Section A-B, electrode spacing 5 ft) within Section A-A’ area to get a better
resolution and to identify the possible anomaly. The new section also showed the same
anomaly. Therefore, to further verify the site condition a 2D resistivity imaging (Line A)
was conducted along the anomalous location and it was found that the anomaly was
mainly due to possible presence of relatively dense weathered Limestone only 2 ft below
108
the ground surface and presence of hard Limestone at about 15 ft below the ground
surface. The other three 2D imaging showed the similar trend.
Line B
140ft
112ft
130ft
Line D
Figure 4.26: Location of boreholes on lines A, B and D
109
Section A-B Section A-A’
BH-3
260ft
40ft
275ft
65ft
BH-1
Section C-C’
E. Cherry Street
BH-2
However, to confirm and verify the actual subsurface information, a soil test
boring program was completed and three soil test borings were drilled as shown in Figure
4.26. All three soil test borings confirmed the trend that was observed during the
resistivity imaging as shown in Figures 4.27, 4.28 and 4.29. However, no contaminants or
environmental conditions were found in any soil samples that were collected during
drilling.
Maximum boring depth = 15 feet
Presence of hard material
Figure 4.27: Comparing results from Line A and B-1
Maximum boring depth = 15 feet
Presence of hard material
Figure 4.28: Comparing results from Line B and B-2
110
Maximum boring depth = 15 feet
Presence of hard material
Figure 4.29: Comparing results from Line D and B-3
111
CHAPTER 5
CONCLUSIONS
Based on comprehensive analysis of the test results following conclusions can be
drawn from the present thesis work.
•
Based on the resistivity imaging and soil test boring, no contaminants were found
at the site.
•
The resistivity imaging shows the presence of weathered Limestone was present
only 2 ft below the ground surface and hard Limestone was present at about 15 ft
below the ground surface.
•
Based on the resistivity results, 5 feet electrode spacing in 3D gives better
resolution when compared to 3-D 20 feet. In case of 2D there is not much of
difference between 2 feet and 5 feet electrode spacing. Any one of them should
produce good results.
•
The resistivity results for 2-D and 3-D data using same electrode spacing provide
very close results. Therefore using 2-D with 5 feet spacing or 3-D 5 feet spacing
should provide us similar results.
•
A trend is observed between moisture content and resistivity results. As the
moisture content decreases the resistivity increases and vice versa.
•
The three soil test borings confirmed the site profile that was observed during the
resistivity imaging.
112
REFERENCES
1. Dahlin, T., 1993. “On the automation of 2D resistivity surveying for engineering
and environmental applications.” Doctoral Thesis, ISRN LUTVDG/TVDG–
1007–SE, ISBN 91-628-1032-4, Lund University, 187pp.
2. Dahlin, T., Bernstone, C., 1997. “A roll-alongtechnique for 3D resistivity data
acquisition with multi-electrode arrays.” Proceedings SAGEEP’97, Reno,
Nevada, Vol. 2 March 23–26 1997, pp. 927–935.
3. Zume JT, Tarhule A, Christenson S (2006) “Subsurface imaging of an abandoned
solid waste landfill site in Norman,” Oklahoma. Ground Water Monit Remediat
26(2):62–69.
4. Khesin B, Alexeyev V, Eppelbaum L (1996) “Interpretation of geophysical fields
in complicated environments bookseries.” Modern approaches in geophysics, vol
14. Kluwer, Dordrecht.
5. Loke MH, Barker RD (1996a) “Practical techniques for 3D resistivity surveys and
data inversion.” Geophys Prospect 44:499–523.
6. Loke MH, Barker RD (1996b) “Rapid least squares inversion of apparent
resistivity pseudosections by a quasi- Newton method.” Geophys Prospect
44:131–152.
7. Dahlin T (2001) “The development of DC resistivity imaging techniques.”
Comput Geosci 27:1019–1029.
113
8. Guerin R, Munoz ML, Christophe A, Laperrelle C, Hidra M, Drouart E, Grellier S
(2004) “Leachate recirculation: moisture content assessment by means of a
geophysical technique.” Waste Manag 24:785–794.
9. Gawande NA, Reinhart DR, Thomas PA, McCreanor PT, Townsend TG (2003)
“Municipal solid waste in situ moisture content measurement using an electrical
resistance sensor.” Waste Management 23:667–674.
10. Advanced Geosciences, Inc. 2004.”Instruction Manual for EarthImager 2D
Version 1.7.4. Resistivity and IP Inversion Software.” P.O. Box 201087, Austin,
Texas 78720. Tel. (512) 335-3338, Fax (512) 258-9958, www.agiusa.com.
11. Jakosky, J.J., 1950. “Exploration geophysics.” Trija Pub. Co., Los Angeles,
1195pp.
12. Van Nostrand, R. and Cook, K.L., 1966. “Interpretation of resistivity data.”
Geological Survey Professional paper; 499. U.S. Govt. Print. Off., Washington,
pp. 310.
13. Halihan, T., Paxton, S., Graham, I., Fenstemaker, T. and Riley, M., 2005.
“Postremediation evaluation of a LNAPL site using electrical resistivity imaging.”
Journal of Environmental Monitoring: JEM, 7(4): 283-287.
14. Schwartz, F.W. and Zhang, H., 2003. “Fundamentals of Ground Water.” John
Wiley & Sons, New York, 592 pp.
15. Reynolds, J.M., 1997. “An introduction to applied and environmental
geophysics.” John Wiley & Sons, New York, 796 pp.
114
16. Robinson, E.S. and Coruh, C., 1988. “Basic Exploration Geophysics,” Wiley,
New York, 562pp.
17. Telford, W. M., Geldart, L. P. and Sheriff, R. E., 1990, Applied Geophysics
Second Edition: Cambridge University Press.
18. Reynolds, John M., 2000 “An introduction to applied and environmental
geophysics.” John Wiley & Sons Ltd.
19. Borcea, L. (2002). “Electrical Impedance tomography.” Institute of physics
publishing, Inverse Problems, 18: p.99-136.
20. Klein, K. A., and Santamarina, J. C. (1997). “Methods for broad-band dielectric
permittivity measurements (soil water mixtures, 5 Hz to 1.3 GHz).” Geotechnical
Testing Journal, 20(2): P.168-178.
21. Griffiths, D.H., Turnbull, J., Olayinka, A.I., 1990. “Twodimensional resistivity
mappingwith a computer-controlled array.” First Break 8 (4), 121–129.
22. Griffiths, D.H., Barker, R.D., 1993. “Two-dimensional resistivity imaging and
modelling in areas of complex geology.” Journal of Applied Geophysics 29, 211–
226.
23. Dahlin, T., Loke, M.H., 1998. “Resolution of 2D Wenner resistivity imaging as
assessed by numerical modelling.” Journal of Applied Geophysics 38 (4), 237–
249.
24. Overmeeren, R.A., van Ritsema, I.L., 1988. “Continuous vertical electrical
sounding.” First Break 6 (10), 313–324.
115
25. Loke, M.H., 1999. “Time-lapse resistivity imaging inversion.” Proceedings of the
5th Meeting of the Environmental and Engineering Geophysical Society (in
press).
26. Van Schoor, M., 2002. “Detection of sinkholes using 2D electrical resistivity
imaging.” Elsevier Science B.V.
27. Kemna, A., Engels, O.G., Martin, U.I., 1996. “RESITOMO Resistivity
Tomography v 2.0 User Manual, Software Package for 2.5D-Modelling and 2DInversion of DC-Resistivity Measurements.” Harbour Dom GmbH, Ko¨ln,
Germany.
28. Coggon JH (1971) “Electromagnetic and electrical modelling by the finite
element method.” Geophysics 36:132–155.
29. Dey A, Morrison HF (1979) “Resistivity modelling for arbitrarily shaped two
dimensional structures.” Geophys Prospect 27:106–136.
30. Drahor, M.G., 2006, “Application of electrical resistivity tomography technique
for investigation of landslides: a case from Turkey.” Environmental Geol (2006)
50: 147–155.
31. R. A. Eso., D. W. Oldenburg., 2006. “Application of 3D electrical resistivity
imaging in an underground potash mine.” Golder Associates Ltd.
32. Dahlin T., 1996. “2D resistivity surveying for environmental and engineering
applications.” First Break, 14, 275-284.
33. Loke, M.H., 1999. “2-D and 3-D electrical imaging surveys.”
34. Edwards L.S., 1977. “A modified pseudosection for resistivity and inducedpolarization. Geophysics,” 42, 1020-1036.
116
35. Griffiths, D., Turnbull, J., Olayinka, A., 1990. “Two-dimensional resistivity
mapping with a computer-controlled array.” First Break 8, 121–129.
36. Li, Y., Oldenburg, D., 1992. “Approximate inverse mappings in DC resistivity
problems.” Geophysical Journal International 109, 343–362.
37. J. Bernard., O. Leite., and F. Vermeersch., 2004 “Multi-electrode resistivity
imaging for environmental and mining applications.” IRIS Instruments.
117
BIOGRAPHICAL INFORMATION
Dharmateja Maganti was born on January 9th, 1984 at the City of Hyderabad;
India. He received her bachelor degree in Civil Engineering from Jawaharlal Nehru
University, India in June 2005. With the great motivation and enthusiasm for developing
higher-level skills and knowledge in the area of civil engineering, he decided to pursue
M.S. graduate studies majoring in geotechnical engineering at The University of Texas at
Arlington. In January 2006, he was admitted to the Department of Civil Engineering at
The University of Texas at Arlington as a Masters candidate. During his studies, he had
the opportunity to work as a graduate teaching assistant under the supervision of Dr.
Shahadat Hossain. Mr. Dharmateja Maganti has successfully completed all requirements
for the Degree of Masters of Science in Civil Engineering.
118