1
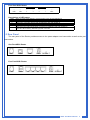
ADSL Router
Installation Guide
Contents
1 Panel Illustration....................................................................................................1
1.1 Single-Port ADSL Router Front Panel Indicators and Descriptions.................1
1.2 Four-Port ADSL Router Front Panel Indicators and Descriptions ...................1
1.3 Rear Panel ......................................................................................................2
2 Package Contains .................................................................................................3
3 Hardware Installation ............................................................................................3
4 Driver Installation ..................................................................................................4
1. Panel Illustration
1.1 Single-Port ADSL Router Front Panel Indicators and Descriptions
Place the Router in a location that permits an easy view of the LED indicators shown in the front panel.
Single-Port ADSL Router
○ ○ ○
DATA
ADSL
○ ○ ○
LLK
LAC
USB
PWR Descriptions of LED status
DATA
ADSL
LLK
LAC
USB
PWR
When router is transferring data between Internet and router, this LED will be flashing.
When connection with Internet (ADSL Connected) is established, this LED will light up.
When this LED is flashing: NO ADSL physical connection
When connection 10/100MB with end user is established, this LED will light up. When router is
transferring data between router and end user, this LED will be flashing.
When 100MB connection to end-user is established, this LED will light up.
When an active USB cable is connected with router, this LED will light up.
When an active power adapter is connected with router, this LED will light up.
Single-Port ADSL Router
○
○ ○
ADSL
DATA
LAN
○ USB
○
PWR
Descriptions of LED status
ADSL
DATA
LAN
USB
PWR
When connection with Internet (ADSL Connected) is established, this LED will light up.
When this LED is flashing: NO ADSL physical connection
When router is transferring data between Internet and router, this LED will be flashing.
When connection 10/100MB with end user is established, this LED will light up. When router is
transferring data between router and end user, this LED will be flashing.
When an active USB cable is connected with router, this LED will light up.
When an active power adapter is connected with router, this LED will light up.
1.2 Four-Port ADSL Router Front Panel Indicators and Descriptions
Four-Port ADSL Router
○
DATA
○
ADSL
○
○
4x
3x
○
2x
○ 1x
○ USB
○
PWR
Descriptions of LED status
DATA
ADSL
4x
3x
2x
1x
USB
PWR
When router is transferring data between Internet and router, this LED will be flashing.
When connection with Internet (ADSL Connected) is established, this LED will light up.
When this LED is flashing: NO ADSL physical connection
When port 4 connection with end user is established, this LED will light up.
When port 3 connection with end user is established, this LED will light up.
When port 2 connection with end user is established, this LED will light up.
When port 1 connection with end user is established, this LED will light up.
When an active USB cable is connected with router, this LED will light up.
When an active power adapter is connected with router, this LED will light up.
ADSL Full-Rated Router
1
Four-Port ADSL Router
LAN
○ ○ USB
4
○
PWR
○ 3
○ 2
○ 1
○
ADSL
Descriptions of LED status
PWR
USB
4
3
2
1
ADSL
When an active power adapter is connected with router, this LED will light up.
When an active USB cable is connected with router, this LED will light up.
When port 4 connection with end user is established, this LED will light up.
When port 3 connection with end user is established, this LED will light up.
When port 2 connection with end user is established, this LED will light up.
When port 1 connection with end user is established, this LED will light up.
When connection with Internet (ADSL Connected) is established, this LED will light up.
When this LED is flashing: NO ADSL physical connection
1.3 Rear Panel
The rear panel of the Router provides access to the power adapter cord connection as well as the port
connections.
One Port ADSL Router
USB
LINE
LAN
PWR
DEFAULT
Four Port ADSL Router
LINE
USB
1X
2X
3X
4X
PWR DEFAULT
ADSL Full-Rated Router
2
2. Package Contains
Open the shipping carton and carefully remove all items. In addition to this quick installation guide,
ascertain that you have:
•One ADSL Router
•One telephone cable (RJ11)
•One network cable (RJ45)
•One USB cable
•One Software CD
•One power adapter
3. Hardware Installation
This section discusses the cable connections you will need to make in order to use the router. When
selecting the location for the router, allow room to access the router so that you can see the LED indicators on
the front panel.
It may be convenient for you to locate the router near the PC that you intend to use for initial configuration
of the router
1) Connect router to LINE
Plug the provided RJ-11 cable into LINE port on the back panel of the router and insert the other end into
splitter or wall phone jack.
2) Connect router to LAN
Plug RJ-45 Ethernet cable into LAN port on the back panel of the router and insert the other end of the
Ethernet cable on your PC’s Ethernet port or switch / hub.
3) Connect router to power adapter
Plug power adapter to PWR port on the back panel of the router and the other end to a power outlet.
ADSL Full-Rated Router
3
4. Driver Installation
Before setup ADSL Router, you have to setup network connections.
Click “Start” and select “Control Panel→Network and Internet Connections→Network Connections
→Internet Protocol (TCP/IP) Properties→Properties”, then select “Obtain an IP address automatically”
and “Obtain DNS server address automatically”.
Connect system and ADSL Router with Ethernet cable or USB cable.
1) If router is connected through USB cable, detect new hardware window appears, click “Cancel”. Then
insert the CD to install USB driver. If router is connected through Ethernet cable, go to step 2) for the
detail setting.
For Windows 98SE and ME:
ADSL Full-Rated Router
4
For Windows 2000 and XP:
Insert the CD, front page of Easy Setup window will appear, if router is connected with USB cable, click
“Install USB Driver”, software kit will automatically install USB driver.
Install USB Driver: If router is connected through USB cable, click here to install USB driver.
Quick Setup: If router is connected through Ethernet cable or after USB driver is loaded, click here to
set the ADSL Router.
User Manual: This CD provides Easy Setup and ADSL Router manual. Easy Setup describes the
installation procedures via Quick Setup utility and ADSL Router describes detailed router setup and
configuration.
Adobe: Click here to install Acrobat Reader 6.0.
Panda: Click here to start Panda Anti Virus program.
ADSL Full-Rated Router
5
After USB driver installed, the window below will appear, then press “OK” to reboot the computer. After
the computer reboot ok, go to step 2) for detail setting.
2) Click “Quick Setup” to set the router,
a) Select the country when setup window appears,
ADSL Full-Rated Router
6
b) If your country is not on the list, please click “
” to next page and select “Other”,
c) After complete country selecting, the window below appears, then select the ISP,
d) After xcomplete ISP selecting, the window below appears and then enter your account “User Name,
Password and Password Confirm” then click “
” to next page,
ADSL Full-Rated Router
7
e) Confirm router settings and click “
” to next page.
Attention: After you complete all settings, please wait 30 seconds for router reboot automatically.
3) If your country is not on the list, please click “other” to go to Router Setup Utility for the detail setting.
ADSL Full-Rated Router
8
a) After you click “other”, then the window below will appear and press “ok”
b) When window below appears, enter “admin” and password. If you forget your password, you can
press “Default” on the back panel of the router and hold for 2 seconds to reset router to factory default
settings. Default password is “conexant”. Then you will be in Conexant Router setup Utility.
c) Please refer to User Manual for the detail setting.
ADSL Full-Rated Router
9
d) Please click “Submit” that in the end of the web page after you complete every setting.
e) After you complete all settings, please click “Save Settings / Reboot” to save you setting.
Attention: Please wait 30 seconds for router reboot
ADSL Full-Rated Router
10