1
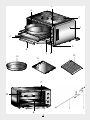
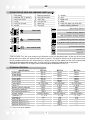
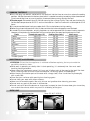
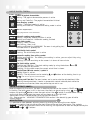
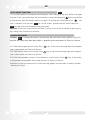
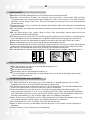
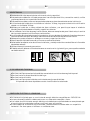
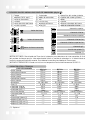
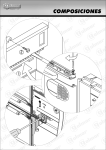
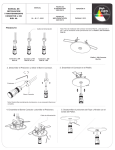
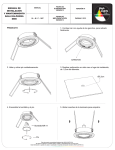
GB-ES-PT
3
4
2
1
5
9
6
7
10
11
c
d
e
4
8
12
GB
WARNINGS
ÜPay attention to minimum health and safety requirements.
ÜThis appliance is not intended for use by persons (including children) with reduced physical,
sensory or mental capabilities, or lack of experience and knowledge, unless they have been given
supervision or instructions concerning use of the appliance by a person responsible for their
safety.
ÜThe appliance is not intended to be operated by means of an external timer or separate remotecontrol system.
ÜKeep the electrical cable of your oven away from the hot areas; do not let them touch the
appliance. Keep them away from sharp sides and heated surfaces.
ÜUsage of your appliance creates moisture and heath in the room it is placed, make sure that your
kitchen is ventilated well. Maintain the natural ventilation ducts properly.
ÜDo not touch hot parts with bare hands and keep children well supervised.
ÜWhen the oven is hot never touch the oven glass by hand.
ÜBefore starting to use your appliance, keep curtain, tulle, paper or inflammable things away from
your appliance. Do not keep combustible or inflammable things in or on the appliance.
ÜUse your oven production for cooking purpose. Please do not use except for purpose.
ÜThe pop-up knobs absolutely must be run push-off mode as following pictures for which models
have pop-up knob.
IF YOUR OVEN DOES NOT OPERATE
Please check the plug of power supply cord has a well connection with wall socket or not.
Please check the electric network.
Please check the fuse.
Please check power supply cord for any damage problems.
If you can not solve the problem, please apply manufacturer supplier services agent.
ELECTRICAL CONNECTION & SECURITY
EYour oven is adjusted in compliance with 230-240 Volt AC, 50 Hz (for SA will be 220-240V,60
Hz), electrical supply, and requires a 16 Amp (for England 13 Amp) fuse. If the mains are
different from this specified value, contact an electrician or your authorised service.
EIsolation switches for the oven must be accessible to the end user with the oven in place.
EShould you need to replace the 16 Amp plug top (for England 13 Amp), please ensure you rewire
the plug as follows; - Brown wire to the Live terminal
- Blue wire to the Neutral terminal
- Yellow & Green wire to Earth
EElectrical connection of the oven should only be made using sockets with Earth system installed
(for England B.S. Approved sockets with Earth system), and in compliance with Regulations. If
there is no proper socket with Earth in place, immediately contact a qualified electrician. The
Manufacturer will not be responsible for damage or injuries that can arise because of
inappropriate supply outlets with no earth system.
EIf your electric supply cable gets defective, it should definitely be replaced by the authorized
service or qualified electricians in order to avoid from the dangers.
EElectrical cable should not touch the hot parts of the appliance.
EThe oven should be using a well ventilation place and should be install on flat ground.
EPlease operate your oven in dry atmosphere.
5
GB
DESCRIPTION OF OVEN AND COMMAND PANEL (page 4)
123456-
Oven body
Hotplate (36 lt. option)
Command panel
Cavity
Glass lid of oven
Handle
0
90
80
70
60
0
10
20
30
40
50
789101112-
Heating elements
Command knobs
Oven legs
Circular tray
Oven tray
Wire grid
MAX
80
120
Swords
Spit
Motor slot
Hook
Place the oven tray onto the
bottom heating element.
top heating element
timer knob
bottom heating element
top and bottom heating element
40
220
abcde-
bottom heating element with fan
thermostat knob
C
top & bottom heating element with fan
180
0
PR
grill heating element
oven control knob
turnspit (*)
hotplate(*)
TIMER KNOB: Turn the timer knob to right direction to set for requested level. At the end of the time
period which has been set, there will be a warning sound. The electric would cut off automatically and
also the cooker would turn off automatically. In order to turn off the cooker set the timer knob to zero
point or set the oven knob to zero point. It helps setting the period of cooking time as requested.
THERMOSTAT KNOB: It can supply oven center temperature between 50-220 °C
TECHNICAL FEATURES
Specifications
Outer width
Outer depth
Outer height
Inner width
Inner depth
Inner height
Thermostat
Timer (*)
Bottom heating element
Top heating element
Gril heating element (*)
Supply voltage
Turbo fan (*)
Turnspit (*)
Oven lamp
Hotplate Ø80 mm (*)
Hotplate Ø145 mm (*)
Hotplate Ø180 mm (*)
M32 Series
480 mm
358 mm
332 mm
364 mm
315 mm
240 mm
50 - 250°C (MAX)
0 - 90 dk.
650 W
650 W
1300 W
220-240 V, 50-60 Hz.
13 - 15 W
4W
---------------------
(*): Only exist some models.
6
M36 Series
520 mm
440 mm
360 mm
397 mm
385 mm
240 mm
50 - 250°C (MAX)
0 - 90 dk.
650 W
650 W
1300 W
220-240 V, 50-60 Hz.
13 - 15 W
4W
15 W
450 W
1000 W
1500 W
M42 Series
590 mm
470 mm
330 mm
440 mm
420 mm
240 mm
50 - 250°C (MAX)
0 - 90 dk.
800 W
600 W
1200 W
220-240 V, 50-60 Hz.
13 - 15 W
4W
15 W
----------------
GB
COOKING TIMETABLE
ÜPut in the plug into electric socket which has earthed. Set the timer to manual or automatic cooking
position. Set the thermostat to the heat level which is needed according to cooking table shown below.
If you have set the timer as manual position, there would be a warning sound at the end.
ÜTo make yogurt: Please boil the milk. Wait for warming the milk up slightly. Then add yeast to the milk.
Set the oven temperature to 40-50 °C and run the turbo fan. Cook in an oven with a closed pot for 3/3.5
hours.
ÜIt is recommended to pre-heat your cooker for 8-10 minutes before starting cooking.
ÜDefrosting at room temperature is that it does not alter the taste and appearance of the food.
ÜIn models that have hotplates, only big hotplate can not be operated with the oven heating elements.
However, all hotplates can be operated at the same time when the oven heating elements are off.
Foods
Cookie
Cream cake
Pie
Cake
Macaroni
Fish
Lamb
Mutton
Veal
Turkey
Chicken (parts)
Cooking time (min.)
20-35
25-45
20-40
25-35
20-30
40-50
90-120
90-120
90-120
45-55
75-100
Thermostat range (°C)
150-170
170-190
180-220
160-180
190-210
190-220
190-220
200-230
200-230
200-230
200-230
Shelf range
Middle shelf
Middle shelf
Middle shelf
Middle shelf
Middle shelf
Middle shelf
Middle shelf
Middle shelf
Middle shelf
Middle shelf
Middle shelf
MAINTENANCE and CLEANING
~WARNING: Ensure that the appliance is switched off before replacing the lamp to avoid the
possibility of electric shock.
EWhile oven is operating or shortly after it starts operating, it is extremely hot. You must avoid
touching heating elements.
ENever clean the interior part, panel, lid, trays and all other parts of the oven by the tools like hard
brush, cleaning mesh or knife. Do not use abrasive, scratching agents and detergents.
EAfter cleaning the interior parts of the oven with a soapy cloth, rinse it and then dry thoroughly
with a soft cloth.
EClean the glass surfaces with special glass cleaning agents.
EDo not clean your oven with steam cleaners.
ENever use inflammable agents like acid, thinner and gasoline when cleaning your oven.
EDo not wash any part of your oven in dishwasher.
EDo not use harsh abrasive cleaners or sharp metal scrapers to clean the oven door glass since they
can scratch the surface, which may result in shattering of the glass.
OVEN LAMP
glass protection
lamp (15 W, T: 300°C)
7
GB
USE OF DIGITAL TIMER(*)
Screen symbols :
Symbol of yoghurt fermentation
Flashing : The yoghurt fermentation process is active
Flashing and Fade-Out : The yoghurt fermentation finished
Warm keeping symbol:
Flashing : The warm keeping is active
Flashing and Fade-Out : Temperature setting mode is active
Мигает индикация :
«регулирование тепла активно»
M
C
Automatic cooking mode symbol :
Flashing : Automatic cooking function is active
Flashing and Fade-Out : Automatic cooking finished
Oven mode symbol :
Flashing : Oven is active
Not Flashing : Oven is off
Flashing and Fade-Out: WARNING ! The oven is not getting hot,.
the mode switch is probably off
Child-Safety Lock symbol:
Flashing: The child-safety lock is active
Automatic cooking time setting symbol:
Flashing and Fade-Out : The cooking time setting is active , you can adjust it by using
the buttons
Flashing: The time remaining on the screen is in terms of hour-minute
The clock setting symbol:
Flashing and Fade-Out : The clock setting mode, by using the buttons
and
you can make the adjustment.
Flashing : On the clock screen the current actual time is shown.
Remind timer (Minute counter ) symbol is
Alerting: Alarm is active.
Flashing : The adjustment can be made by
and buttons or the alerting time is up.
И, или истело время сигнализации.
Flashing and Fade-Out: The oven heaters are in use to raise the adjusted heat. After
reaching the adjusted heat, it works as termostatic control indicator,alerts while the
resistances are inversion,fades away while they are not in use.
WHEN ELECTRICTY COMES :
When the electricity first came , the oven is deactive,the clock on the screen is 00:00 and
Is flashing. The heat screen is off. In that case, the clock can be set up by using
and
buttons and pushing M button makes the oven active.If the M button is pushed before setting
up the right time, the time on the screen will be shown up as the right time.
Please read 'CLOCK TIMING'section to set up the clock later on.
PS.: Please see the ' YOGHOURT FERMENTATION' section if the electricity goes off while
making yoghurt
M
MENU BUTTON :
It is possible to move between adjusting menus by pushing and leaving the menu button.
Alignment is cooking time,minute counter alert time and the real time clock menu. The symbols
(
) belong to adjustment menu will be flashing, the adjustment of them will be possible by the
possible by the
buttons.
8
GB
PS.: Pushing the button for a long time means going out from the position of the time adjusted
Cooking ( automatic) . ( Please see the revelant pharagraph below) .
TIME ADJUSTMENT:
starts blinking
You can step in the time adjustment menu by pushing M button 3 times.
and the clock is setting up by the
button, pushing these buttons for a long time
makes the clock set up quickly. The clock adjustment mode will end after around 5 seconds by
Itself.
YOGHURT FERMENTATION FUNCTION:
Yoghourt fermentation function ,if there is no cooking function in use, is getting started by
Button and ,
symbol alerts and by the same
button it ends.
As a default factory adjustment the fermentation has been set as 5 hours. The remaining time
For the fermentation is shown on the time screen. Unless
button is cancelled (
is on the
screen) , user can adjust the remaining time.
In order to change the duration of the fermentation:
Press the button
it will start flashing.
Adjust the duration by pressing the
button on the screen (the duration cannot be set
under 5 hours or over 10 hours)
When the fermentation process is finished, the alarm will sound and the
icon will start
flashing on the screen. By pressing the M button you can terminate the process or change
the duration.
EXCEPTIONS:
If the oven temperature is over 60 C the fermentation process will not start. You will hear a
warning tone and the phrase “hot” will be visible on the screen.
When power is cut off during fermentation, 3 beeps will sound and the remaing time (before the
electricity was cut off)
will appear flashing.
As mentioned above, the
button can be used to terminate the fermentation or to change the
remaining duration.
KEEPING WARM FUNCTION
The keeping warm function will be activated when pressing the
button. You will see the
icon on the screen. With this function, the oven temparature will be 80 C and will be kept
constant, however the temperature will not be indicated on the screen. Changing the
temperature is not possible (the C button is non-functional) By pressing the
button again,
this function will be canceled.
C
SETTING THE COOKING HEAT:
Besides the yogurt and keeping warm function you can use it for cooking as well. When pressing
C The button, the
icon will start flashing next to the temperature.
By pressing
and
you can set the temperature between 50 C and 230 C (if you don't have
a set temperature, the preset factory temperature of 190 C will appear)
In order to switch off the temperature indication on the screen or to disable it, press and hold
the
C
button. The temperature will disapear and the oven heaters will turn off.
PERSONOLIZING THE FACTORY HEAT SETTINGS:
In order to change the preset factory temperature of 190 C, press C and M at the same time
until you hear a short beep.
9
GB
ATTENTION
The icon
means that the oven is in funtion. In other words, if the function OFF is not seen
on the screen, it means that it is always turned on.
The icon
flashing on the screen means that the oven isn't getting hot although there is a
adjusted temperature on the screen or the fermentation process or warm keeping function is
activated. At the beginning of this alert 3 times beep tones are heard for only 1 time.
Please make sure that the function switch is in OFF position, after having set the switch to the
preferred cooking mode the oven begins to heat and after a while the symbol becomes fixed.
Manual cooking
When the switch is set to the preferred position and the temperature is fixed according to the
description above the cooking process begins and continues until the user finishes it.
AUTOMATIC COOKING ( TIME ADJUSTED)
By entering the cooking time you can programme you oven so that it will be
off automatically.
Press the button
M
one time. The
icon starts to flash.By using the buttons
Please set the cooking time ( Max. 10 Hours)
icon will appear on the screen.
In any moment of the programm you can finish the cooking by pressing the
seconds. The icon
and
M
button for 3
will disappear on the screen. In this case the cooking will take so long
until the oven is switched off by the user. ( Manual cooking mode)
After finishing of the cooking time automatically the icon
will appear on the screen with a
acoustic alarm. ( The acoustic alarm will be heard for 7 minutes as long as any button is not
pressed)
The
icon will flash until the
M
button is pressed and the oven will be deactivated. By
pushing the button the oven will come to the manual mode, the
icon will disappear.
Attention : do not forget to set the switch to the OFF position.
REMINDER TIMER SETTING
With this function at the end of the adjusted time the oven clock alarm starts to sound and lets
know that the time is over. At the end of this time the oven is not switched off.. The
is pressed 2 times , the
icon starts to flash , by using the
and
M
button
buttons the preferred
time is set . The maximum setting alarm time is 23 hours and 59 minutes. After 5 seconds the
icon
Becomes fixed on the screen and the time beging to run. After the time setting is over
the alarm begins to sound. The
icon begins to flash on the display. By pushing any button
the alarm sound can be switched off and the symbol disappears on the display. If the alarm
isn't stopped , it will automatically finish after 7 minutes.
10
GB
CHILD PROOF FUNCTION
This function prevents any attempts to change your timer settings by key lock. While child proof
function is ON, none of the keys will be functioning unless you keep push . By the cancellation
of the key lock, keys will become able to use back. To activate the Child Proof, push
(app. 3 seconds) until you see
key
icon on the screen. To deactivate the Child Proof push
same key until icon disappears from the screen.
Attention: If the alarm rings while Child Proof is active, it can be put to silence by pushing any
key. Safety Lock function will continue.
FAILURE MESSAGES
Flashing
; It means your oven is not warming. Be sure that Function Switch is not at 0
position and check your oven door closed. If problem continues please call Technical Service.
Err1 Heat Sensor open-circuit failure; Push
key. If the failure message does not disappear
M
from screen please call Technical Service
Err2 Heat Sensor short-circuit failure; Push
M
key. If the failure message does not disappear
from screen please call Technical Service
Err3 Oven heat exceeds maximum limits electronic circuit failure; Push
M
key. If the failure
message does not disappear from screen please call Technical Service
Attention: At the first moments of a failure message appears on the screen, a fleeting audible
warning will sound
11
DE
WARNHINWEISE
ÜBeachten Sie die Mindestbedingungen für die Gesundheit und die Sicherheit.
ÜPersonen (einschließlich Kinder), die aufgrund ihrer physischen, sensorischen oder geistigen
Fähigkeiten oder ihrer Unerfahrenheit oder Unkenntnis nicht in der Lage sind, das Gerät sicher zu
benutzen, sollten dieses Gerät nicht ohne Aufsicht oder An-weisung durch eine verantwortliche
Person benutzen.
ÜDieses Gerät darf nicht mit Hilfe eines externen Zeitschalters oder einer separaten Fernbedienung
betrieben werden.
ÜDas Stromkabel Ihres Backofens vor Wärme schützen und den Kontakt des Kabels mit Ihrem Gerät
vermeiden.
ÜBei der Beschädigung des Kabels sollte es durch den zuständigen Service oder durch eine
qualifizierte Personen ersetzt werden.
ÜDie Benutzung Ihres Geräts führt zur Erhöhung der Feuchtigkeit und der Wärme im Aufstellungsort.
Daher die Belüftung Ihrer Küche beachten. Die Belüftungskanäle ordnungsgemäß instandhalten.
ÜDie warmen Teile nicht mit der bloßen Hand berühren und Kinder von diesen Teilen fern halten.
ÜWenn der Backofen warm ist, das Glas des Backofens keineswegs berühren.
ÜVor der Inbetriebnahme Ihres Geräts die Gegenstände wie Vorhang, Gardine und Papier sowie jegliche
brennbaren Stoffe entfernen. In oder auf Ihrem Gerät keine brenn- und entflammbare Stoffe lassen.
ÜIhr Gerät nur zum Backen benutzen. Bitte Ihr Gerät nicht zweckfremd benutzen.
ÜBei der Modellen mit Pop-up-Taste ist die Pop-up-Taste erst dann zu schalten, wenn sie draußen ist.
FALLS IHR BACKOFEN NICHT FUNKTIONIERT,
Bitte kontrollieren Sie, ob das Anschlußkabel eingesteckt ist.
das Stromnetz kontrollieren.
die Sicherung kontrollieren.
kontrollieren, ob das Stromkabel beschädigt ist.
Falls das Problem nicht beseitigt ist, bitte wenden Sie sich an den zuständigen Service oder
einen Sachverständigen an.
STROMVERBINDUNG UND SICHERHEIT
EIhr Gerät erfordert eine Absicherung von 16 Ampere. Es ist empfehlenswert, daß Ihr Gerät
gegebenenfalls durch eine qualifizierte Personen installiert wird.
EIhr Gerät wurde für eine Stromstärke von 230 V, 50 Hz eingestellt. Falls die Werte abweichend
davon sind, bitte Kontakt mit dem zuständigen Service aufnehmen.
EDie Stromverbindung Ihres Geräts darf nur mittels einer geerdeten Steckdose erfolgen, die
ordnungsgemäß installiert ist. Falls es im Aufstellungsort Ihres Geräts keine geerdte Steckdose
gibt, bitte sofort Kontakt mit einer qualifizierten Person nehmen. Die Herstellerfirma übernimmt
keinerlei Verantwortung für die Schäden wegen der nicht geerdten Steckdosen.
EBeim Ausfall Ihres Stromkabels muß Ihr Kabel durch den zuständigen Service oder durch eine
qualifizierte Personen ersetzt werden, um mögliche Gefahren zu vermeiden.
EDas Stromkabel darf nicht an erhitzte Teile Ihres Geräts kommen.
EBitte Ihr Gerät in einem gut belüfteten Räumen benutzen und auf einem flachen Untergrund
betreiben.
EBitte Ihr Gerät in einem trockenen Raum betreiben.
12
ES
ADVERTENCIAS
ÜPreste atención a los requerimientos mínimos de salud y seguridad.
ÜEste producto no debe ser utilizado por personal con discapacidad física, sensorial o mental, o niños
ya que requieren de una supervisión de adultos.
ÜEste producto no debe usarse con temporizador externos o otros elementos de control a distancia.
ÜSi la corriente del fusible de su instalación es inferior a 16 Amp, haga que un electricista calificado la
adapte a un fusible de 16 Amp.
ÜMantenga el cable de su horno alejado de áreas calientes y no permita que toque el artefacto.
Manténgalo alejado de bordes afilados y superficies calientes.
ÜSi el cable de suministro de energía está dañado, debe ser reemplazado por el fabricante, el servicio
técnico u otras personas calificadas para evitar daños.
ÜLa utilización de este artefacto genera humedad en el lugar donde está colocado. Asegúrese de que su
cocina esté bien ventilada. Mantenga adecuadamente los conductos de ventilación natural.
ÜNo toque las partes calientes sin proteger sus manos y supervise a los niños.
ÜNunca toque el vidrio del horno con sus manos cuando esté caliente.
ÜQuite todo el envoltorio antes de utilizar el artefacto, y no deje materiales combustibles o inflamables
dentro de o sobre él.
ÜUtilice el horno únicamente para cocinar.
ÜEl botón retractil debe ser utilizado solo como se muestra en la siguiente figura, para aquellos modelos
con botón retractil.
SI SU HORNO NO FUNCIONA
Por favor, verifique que el enchufe esté bien conectado al suministro de energía de la pared.
Por favor, revise la conección eléctrica del lugar.
Por favor, revise el fusible.
Por favor, verifique que el cable de suministro de energía no esté dañado.
Si no puede solucionar el problema acuda al servicio técnico autorizado.
CONECCIÓN ELECTRICA Y SEGURIDAD
ESu horno esta ajustado para un suministro de energía eléctrica compatible con 230V./50 Hz.
ELa toma de energía eléctrica debe contar con una adecuada conección a tierra.
ESi el cable de suministro de energía eléctrica esta defectuoso o dañado debe ser reemplazado por
el servicio técnico autorizado o persona calificada para evitar daños.
EEl horno debe ser utilizado en lugar ventilado y correctamente instalado sobre un asuperficie
horizontal. Por favor opere su horno en un ambiente seco.
12
ES
DESCRIPCION DEL HORNO UND PANEL DE COMANDOS (página 4)
123456-
Cuerpo
Hotplate (36 lt. opt.)
Panel de comandos
Cavidad
Puerta de vidrio del horno
Asa de la puerta
0
90
80
70
60
0
10
20
30
40
50
789101112-
Calentador
Botón de comandos
Pie
Circular tray
Bandeja del horno
Wire grid
80
220
120
Horquillas del asador giratorio
Espeton del asador giratoiro
Motor
Gancho
Ubique la bandeja del horno
sobre el calentador inferior.
elemento superior
boton de timer
elemento inferior
elemento inferior+superior
40
MAX
abcde-
C
boton de termostato
elemento inferior+fan
elemento inferior+superior+fan
180
0
PR
elemento gril
boton de horno comandos
función de spiedo (*)
hotplate (*)
BOTON DE TIMER: Gire el botón de Timer hacia la derecha para seleccionar el niver requerido. Al final
del período de tiempo que ha sido seleccionado habrá un sonido de advertencia. La electricidad se
cortará y se apagará automáticamente. Para detener la cocción gire el botón de Timer a cero.
BOTON DE TERMOSTATO: Puede suministrar una temperatura central del horno entre 50-250 °C.
CARACTERISTICAS TECNICAS
ESPECIFICACIONES
Ancho Exterior
Profundidad Exterior
Altura Exterior
Ancho Interior
Profundidad Interior
Altura Interior
Termostato
Timer (*)
Calentador Inferior
Calentador Superior
Calentador Grill (*)
Suministro Voltaje
Turbo ventilador (*)
Siedo (*)
Lámpara del Horno (*)
Hotplate Ø 80 mm (*)
Hotplate Ø 145 mm (*)
Hotplate Ø 180 mm (*)
M32 Series
480 mm
358 mm
332 mm
364 mm
315 mm
240 mm
50 - 250°C (MAX)
0 - 90 dk.
650 W
650 W
1300 W
220-240 V, 50-60 Hz.
13 - 15 W
4W
---------------------
(*): Opcional
13
M36 Series
520 mm
440 mm
360 mm
397 mm
385 mm
240 mm
50 - 250°C (MAX)
0 - 90 dk.
650 W
650 W
1300 W
220-240 V, 50-60 Hz.
13 - 15 W
4W
15 W
450 W
1000 W
1500 W
M42 Series
590 mm
470 mm
330 mm
440 mm
420 mm
240 mm
50 - 250°C (MAX)
0 - 90 dk.
800 W
600 W
1200 W
220-240 V, 50-60 Hz.
13 - 15 W
4W
15 W
----------------
ES
TIEMPOS DE COCCIÓN
ÜEnchufe el cable de alimentación al tomacorriente que debe contar con una adecuada conexión a
tierra. Coloque el temporizador en posición de cocción manual o automática. Establezca el
termostato al nivel de calor requerido según la tabla de cocción que aparece más abajo. Si
configura el temporizador en posición manual, escuchará un sonido de advertencia al final.
ÜPara hacer yogurt: Hierva la leche. Espere a que la leche se caliente un poco, luego agregue la
levadura. Configure la temperatura del horno a 40-50º C y encienda el ventilador turbo. Cocine al
horno en un recipiente cerrado por 3/3,5 horas.
ÜSe recomienda precalentar el horno por 8-10 minutos antes de empezar la cocción.
ÜEn aquellos modelos con placas, solo las placas grandes pueden ser utilizadas con los elementos
calefactores del horno, todas las placas pueden ser utilizadas al mismo tiempo siempre y cuando
los elementos calefactores del horno se encuentren apagados.
Comidas
Galletas
Torta de crema
Tarta
Torta
Macaroni
Pescado
Cordero
Oveja
Ternera
Pavo
Pollo (Presas)
Tiempo de cocción (min)
20-35
25-45
20-40
25-35
20-30
40-50
90-120
90-120
90-120
45-55
75-100
Termostato (°C)
150-170
170-190
180-220
160-180
190-210
190-220
190-220
200-230
200-230
200-230
200-230
Posiciones
Media
Media
Media
Media
Media
Media
Media
Media
Media
Media
Media
MANTENIMIENTO Y LIMPIEZA
EDesconecte el enchufe del suministro de energía eléctrica.
EMientras el horno esta en funcionamiento o enseguida que comienza a funcionar esta
extremadamente caliente, evite tocar los elementos calientes.
ENunca limpie las partes interiores de su horno, panel, bandejas o ninguna otra parte con
herramientas, cepillos duros ni cuchillos. No utilice productos abrasivos.
ELuego de limpiar las partes interiores del horno con un trapo enjabonado, enjuaguelo y séquelo
con un trapo suave.
ELimpie las superficies de vidrio con productos especiales para limpieza de vidrios.
ENo limpie su horno con limpiadores abrasivos.
ENunca utilice productos inflamables como ácidos, thiner o gasolina para limpiar su horno.
ENo utilice lavavajillas para lavar ninguna de las partes del horno.
LAMPARA DEL HORNO
(15 W, T: 300°C)
cristal de protección
14
PT
AVISOS
Preste atenção aos requisitos mínimos de saúde e segurança.
ÜEsse produto não deve ser utilizado por pessoas com problemas físicos, sensoriais ou mentais, ou por
pessoas que não tenham conhecimentos necessários evitando assim riscos contra a sua segurança.
Estes conselhos também se aplicam às crianças.
ÜEsse produto não deve ser utilizado com um temporizador externo, ou com painel de controlo
individuais à distância.
ÜSe a taxa actual do fusível nas suas instalações é menos que 16 AMP, recorra a um electricista
qualificado para proceder à instalação de um fusível de 16AMP.
ÜMantenha o cabo eléctrico do seu forno longe das áreas quentes, não deixe que as mesmas toquem o
aparelho. Mantenha o cabo afastado de arestas afiadas e superfícies quentes.
ÜSe o cabo de alimentação se encontrar danificado deve ser substituído pelo produtor, um dos seus
agentes de serviços ou um técnico qualificado semelhante por forma a evitar estragos.
ÜO uso do seu aparelho cria humidade e bolor no local em que é colocado. Certifique-se que a sua
cozinha é bem ventilada. Mantenha as condutas naturais de ventilação próprias.
ÜNão toque as partes com as mãos e mantenha supervisão nas crianças.
ÜQuando o forno está quente nunca toque no vidro do forno com a mão.
ÜAntes de começar a usar o seu aparelho, mantenha cortinas, tule, papel ou material inflamável não
mantenha combustível ou material inflamável dentro ou em cima do aparelho.
ÜUse o seu forno apenas para cozinhar. Por favor não use com outro propósito se não este.
ÜOs manípulos pop-up devem ser colocados em posição normal como indicado nas imagens que se
seguem, isto para os modelos que têm manípulos pop-up.
SE O SEU FORNO NÃO FUNCIONAR
Verifique se a ficha do cabo de alimentação tem uma ligação correcta com a ficha de parede.
Verifique a rede eléctrica.
Verifique o fusível.
Verifique se existem danos no cabo de alimentação.
Se não conseguir resolver o problema, solicite agentes de serviço do fornecedor ou um técnico
semelhante qualificado.
CONEXÃO ELÉCTRICA E SEGURANÇA
O seu forno tem uma voltagem de 10Amp. Caso seja necessária uma instalção, esta deve ser realizada
por um técnico electricista qualificado.
EO seu forno está ajustado em conformidade com fornecimeto eléctrico de 230 V ac 50 Hz. Se a
alimentação for diferente do valor especificado, contacte os serviços autorizados.
EA ligação eléctrica do forno deve apenas ser feita pelo sistema de fichas com terra, instalado em
conformidade com os regulamentos. Se não existir este sistema no local em que colocar o seu forno,
contacte imediatamente um electricista qualificado. O produtor não deve nunca ser responsável pelos
danos causados que possam surgir devido ao facto de não existir um sistema de fichas ligados à terra.
ESe o seu cabo de alimentação estiver danificado, deve ser substituído por um serviço autorizado ou
electricistas qualificados, por forma a evitar perigos.
EOs cabos eléctricos não devem entrar em contacto com as partes quentes do aparelho.
EO forno deve ter uma boa ventilação e deve ser instalado em terreno plano.
EUse o seu forno numa atmosfera seca.
15
PT
DESCRIÇÃO DO FORNO E PAINEL DE CONTROLO (Página 4)
123456-
Estrutura
7- Resistências
Hotplate (36 lt opt.)
8- Botões de Comando
Painel de Controlo
9- Pé do Forno
Cavidade
10- Circular tray
Tampa de Vidro do Forno 11- Tabuleiro do Forno
Manípulo
12- Wire grid
0
90
80
70
60
0
10
20
30
40
50
80
220
120
cima das resistências inferiores.
Resistência superior
Botão Relógio
Resistência inferior
Resistências superiores e inferiores
40
MAX
a- Swords
b- Spit
c- Motor slot
d- Hook
e- Coloque o tabuleiro do forno por
C
Resistência inferior com turbo
Botão Termostato
Resistências superiores
e inferiores com turbo
Grelhador
180
0
PR
Botão de Comandos
Espeto (*)
Hotplate (*)
BOTÃO TEMPORIZADOR: Rode o botão temporizador para a direita para escolher o nível que deseja. No
final do período que seleccionou, irá ouvir um sinal de aviso a indicar que i tempo terminou. O forno
eléctrico iria cortar automaticamente e, além disso, também o fogão se desligaria de forma automática.
Para desligar o fogão defina o botão do temporizador para o ponto zero ou rode o botão para o ponto zero.
In order to turn off the cooker set the timer knob to zero point or set the oven knob to zero point. Ele ajuda
a definir o tempo para cozinhar como desejar.
BOTÃO DO TERMOSTATO: O forno poderá atingir uma temperatura entre os 50-250 graus.
CARACTERÍSTICAS TÉCNICAS
Especificações
Largura exterior
Profundidade exterior
Altura exterior
Largura interior
Profundidade interior
Altura interior
Pojemność piekarnika
Timer(*)
Resistência inferior
Resistência superior
Resistência da grelha(*)
Voltagem
Ventoinha Turbo(*)
Turnspit(*)
Lâmpada do forno(*)
Hotplate Ø80 mm (*)
Hotplate Ø145 mm (*)
Hotplate Ø180 mm (*)
M32 Series
480 mm
358 mm
332 mm
364 mm
315 mm
240 mm
50 - 250°C (MAX)
0 - 90 dk.
650 W
650 W
1300 W
220-240 V, 50-60 Hz.
13 - 15 W
4W
--------------------16
M36 Series
520 mm
440 mm
360 mm
397 mm
385 mm
240 mm
50 - 250°C (MAX)
0 - 90 dk.
650 W
650 W
1300 W
220-240 V, 50-60 Hz.
13 - 15 W
4W
15 W
450 W
1000 W
1500 W
M42 Series
590 mm
470 mm
330 mm
440 mm
420 mm
240 mm
50 - 250°C (MAX)
0 - 90 dk.
800 W
600 W
1200 W
220-240 V, 50-60 Hz.
13 - 15 W
4W
15 W
----------------
PT
COOKING TIMETABLE
ÜColoque a ficha na tomada que tem ligção à terra. Defina o temporizador para a posição de cozinhar
qutomático ou manual. Regule o termostato para o nível de calor que é necessário de acordo com a
tabela de cozinhar apresentada abaixo. Se definir o temporizador manualmente, ouvirá um som de aviso
no final.
ÜPara fazer yogurt: ferva o leite. Aguarde para que o leite aqueça lentamente. De seguida adicione
fermento ao leite. Regule a temperatura do forno para 40-50 graus e ligue a ventoinha. Cozinhe num
forne num recipiente fechado durante 3/3.5 horas.
ÜRecomendamos que faça um pré-aquecimento do seu forno antes de comoçar.
ÜNos modelos que têm placas eléctricas, somente a placa grande não pode funcionar com os elementos
de aquecimento do forno. No entanto, todas as placas podem funcionar ao mesmo tempo, quando os
elementos de aquecimento do forno estão desligados.
Alimentos
Bolachas
Bolo creme
Tarte
Bolos
Massas
Peixe
Cordeiro
Carneiro
Vitela
Peru
Galinha (Partes)
Nível de termostato (°C) Tempo cozinhar (min)
20-35
150-170
25-45
170-190
180-220
20-40
160-180
25-35
190-210
20-30
190-220
40-50
190-220
90-120
200-230
90-120
200-230
90-120
200-230
45-55
200-230
75-100
Nível tabuleiro
tabuleiro meio
tabuleiro meio
tabuleiro meio
tabuleiro meio
tabuleiro meio
tabuleiro meio
tabuleiro meio
tabuleiro meio
tabuleiro meio
tabuleiro meio
tabuleiro meio
LIMPEZA E MANUTENÇÃO
EDesligue a ficha do forno da tomada.
EEnquanto o forno está em funcionamento ou brevemente depois de começar a funcionar está
extremamente quente. Deve evitar tocar os elementos quentes.
ENunca limpe a parte interior, o painel, a tampa, o tabuleiro e todas as outras partes com escovas duras
ou facas. Não use agentes nem detergentes abrasivos.
EApós limpara as partes interiores do forno com um pano embeido em sabão , enxague e seque com um
pano suave.
ELimpe as superfícies de vidro com um detergente especial para vidros.
ENão limpe o forno com materiais de vapor.
ENunca use ácidos inflamáveis como ácidos e gasolina para limpar o forno.
ENão lave nenhuma parte do seu forno na máquina de lavar louça.
LÂMPADA DO FORNO
Protecção do Vidro
(*): Ops.
17
Lâmpada (15 W, T: 300°C)