1
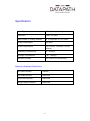
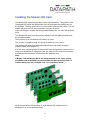
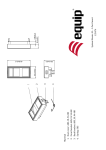
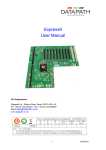
Mosaic-HQ User Manual Datapath Limited Alfreton Road Derby, DE21 4AD, England Tel: +44 (0) 1332 294441 Fax: +44 (0) 1332 290667 Email: [email protected] Web: www.datapath.co.uk 26 Oct 2009 Content Content ............................................................................................................. 2 Introduction ....................................................................................................... 3 Unpacking ......................................................................................................... 4 Specification ...................................................................................................... 5 Maximum Displayed Resolutions .................................................................. 5 Installing the Mosaic-HQ Card ........................................................................... 6 How To Connect Inputs ..................................................................................... 9 Composite Inputs .......................................................................................... 9 RGB Inputs ..................................................................................................10 HD YPrPb Input ...........................................................................................10 Software Installation .........................................................................................11 From The Datapath CD ................................................................................11 From The Datapath Web Site: .....................................................................11 Datapath Limited ..............................................................................................12 Technical Support ........................................................................................12 Copyright Statement ....................................................................................12 2 Introduction Designed to be used with the Datapath Vantage4-SIP card, the Mosaic-HQ is a PCI video capture card that provides a combination of 4 standard and 4 HD video windows for video wall applications that require high quality video overlays. The overlay windows can be positioned and sized anywhere on the video wall. 3 Unpacking Your packing box should contain the following items: The Mosaic-HQ PCI video capture card. 1 x SIP-Cable 1 x BNC16 16 Way BNC splitter cable. 4 x MRGB-Cable RGB cable with 15 Way D connector. Notes: All plug-in cards are static sensitive and are packed in anti-static materials. Please keep the card in its packaging until you are ready to install. We recommend that you do not discard the packing box until you are completely satisfied with the Mosaic-HQ, and it is fully installed and working correctly. We also recommend that you make note of the serial number of the card in a prominent place before you plug the card into the computer. This should hasten any query should you need to contact our Technical Support Department. The serial number is displayed on the card and the box label. 4 Specification Card Type PCI 2.2 compliant adapter Card Size 100 x 319 (mm) Max number of overlay windows 8 x Composite or 8 x S-Video Power consumption 25 watts Power requirements +3.3V at 2A, +5V at3A, +12V at 250mA. Operating Temperatures 0 - 35 deg C Storage Temperatures -20 - 70 deg C Relative Humidity 5% to 90% non-condensing Maximum Displayed Resolutions SD Video Window 720x288 HD Video Window 1280x1024 RGB Video Window 1280x1024 Single Display Channel 1200x1024 5 Installing the Mosaic-HQ Card The Mosaic-HQ outputs digital video onto a high speed bus. The graphics card (Vantage4-SIP) takes the digital video from the high speed bus and puts it on the displays. The high speed bus runs from card to card via SIP cables. The SIP cables are short and can be connected in only one direction. When you design a system that incorporates Mosaic-HQ, you must follow these rules: The Mosaic-HQ cards must be grouped together and the graphics cards must be grouped together. There can be up to four Mosaic-HQ cards in a group. The number of graphics cards in a group is limited by your system. The Mosaic-HQ cards must be positioned with their heat sinks facing the graphics cards (see Diagram 2). You can have multiple groups of Mosaic-HQ cards and graphics cards but for a video to be displayed on a graphics card, the video source must be connected to a Mosaic-HQ card that is connected to the graphics card. Note: If Mosaic- HQ and Mosaic-SQ16 are being installed in the same system, the Mosaic-HQ cards MUST be installed after the Mosaic-SQ16 cards, i.e furthest away from the Vantage4 card. See illustration below. Up to sixteen Mosaic SQ windows or eight Mosaic HD windows can be displayed on a screen simultaneously. 6 Install and configure all the required graphics cards in the system, carefully following the installation instructions. Ensure that your multi-screen system is working correctly before installing the Mosaic-HQ card. Note: You are likely to need a flat blade and a Phillips head screwdriver for the intallation so please ensure you have these to hand before you begin. Power down your complete system (including peripherals) at the PC and the main power supply. Disconnect all the cables connected to the PC, noting the positions for correct reconnection after the Mosaic-HQ card is installed. Carefully remove the cover from your PC. Locate an available PCI slot to install your Mosaic-HQ card next to your graphics card. Holding the card firmly by its top edge at each end of the card’s length, slide it into the slot. Care should be taken when sliding the card into the PCI slot. Using the retaining screw, secure the bracket to the back panel. Connect the SIP-Cable from the Mosaic-HQ card to graphics cards. The headers on the Mosaic-HQ cards are marked J9 and J10 and should be connected to the graphics cards as follows: Connect the J9 header on the Mosaic-HQ to the J7 headers on the graphics card. The SIP cable is delicate and great care should be taken when fixing it and removing from the cards. The diagram (1) on the following page shows the location of the headers on each of the cards: Diagram 1 7 Diagram 2 8 How To Connect Inputs BNC16-Cable MYPRPB-Cable MRGB-Cable Composite Inputs Composite inputs are connected to the BNC-16 splitter cable which is attached to the 26 Way D Conector on the Mosaic-HQ card. The Luma part of a S-Video input is connected to the leads numbered 1-8 on the BNC16-Cable and the chroma part is connected to the leads numbered 916. For example: For the first composite input the Luma would be connected to lead number 1 and the chroma would be connected to the lead numbered 9. For the second composite input The luma would be connected to the lead numbered 2 and the chroma connected to the lead numbered 10 and so on up to a maximum of 8 composite inputs. If you are using a single Mosaic-HQ, the input numbers specified in the software correspond to the labels on the splitter cable. (1-8) If you have connected more than one Mosaic-HQ, connect inputs 1-8 to the Mosaic-HQ closest to the graphics card. Connect inputs 9-16 to the next Mosaic card and so on. Mosaic-HQ card provides the 75ohm termination for each input. The links should be fitted to apply termination. (All links are fitted as standard.) 9 RGB Inputs A maximum of four RGB inputs can be connected to the Mosaic-HQ card using the MRGB-Cable via the four 10 Way Connectors. The RGB input numbers specified in the software (1-4) relate to input one being the top 10 way connector to input 4 being the bottom 10 way connector. The Mosaic-HQ can display RGB video up to 30fps. HD YPrPb Input A maximum of four HD YPrPb inputs can be connected to the Mosaic-HQ card using the MYPRPB-Cable via the four 10 Way Connectors. The HD input numbers specified in the software (1-4) relate to input one being the top 10 way connector to input 4 being the bottom 10 way connector. The MYPRPB-Cable is connected to the source as follows: Lead number 1 is connected to the Pr output. Lead number 2 is connected to the Y output. Lead number 3 is connected to the Pb output. The four 10 way connectors can be used to connect any combination of RGB and HD inputs. 10 Software Installation The Mosaic-HQ driver is installed on your system with the Vantage4 driver (Version 2.06B and above) using one of the following methods: The Datapath Software Installation Suite CD supplied with the Mosaic-HQ Card. The Datapath Web Site. (Periodic checks for driver updates is strongly recommended). From The Datapath Software Installation Suite CD Insert the Datapath CD into your CD ROM drive, the CD will autorun. Select Install Drivers… and the Driver Install wizard will detect which Datapath cards you have in your machine and install the required drivers. Follow the Installation Wizard instructions as prompted. From The Datapath Web Site: The most up to date Mosaic-HQ drivers can be downloaded from the web site www.datapath.co.uk/DRIVERS/DriverInstall.zip and installed using the Driver Install Wizard. Follow the Installation Wizard instructions as prompted. Once the installation is complete, reboot the system. 11 Datapath Limited Datapath has a long and very successful history in the computer graphics industry. Datapath has been designing and supplying high performance, high quality graphics display systems to the worlds largest and most demanding companies and institutions since 1982. Datapath was one of the founding companies of multi screen Windows acceleration using single and multi board solutions. Now, using the very latest display technology Datapath offers some of the world's leading multi screen graphics accelerators for the most demanding applications. As new technology advances, so we at Datapath improve the performance and functionality of both our hardware and software to give our customers more. Following a continuous development program, we pride ourselves on our support and responsive nature towards all our customers and their changing needs. As more sophisticated equipment and techniques become readily available, so we are there to exploit the power and potential that this technology presents. Technical Support You can access our technical support staff by email or by using the Problem Report form on the support page on the Datapath Web Site, usually with a response within 24 hours (excluding weekends). Via Email: Send an email to [email protected] with as much information about your system as possible. To enable a swift response we need to know the following details: Specification of the PC - including processor speed Operating System Application Software Datapath Hardware / Software The exact nature of the problem - and please be as specific as possible. Please quote version and revision numbers of hardware and software in use wherever possible. Copyright Statement © Datapath Ltd., England, 2006 Datapath Limited claims copyright on this documentation. No part of this documentation may be reproduced, released, disclosed, stored in any electronic format, or used in whole or in part for any purpose other than stated herein without the express permission of Datapath Limited. Whilst every effort is made to ensure that the information contained in this manual is correct, Datapath Limited make no representations or warranties with respect to the contents thereof, and do not accept liability for any errors or omissions. Datapath reserves the right to change specification without prior notice and cannot assume responsibility for the use made of the information supplied. All registered trademarks used within this documentation are acknowledged by Datapath Limited. 12 UK Headquarters and Main Sales Datapath Ltd., Alfreton Road, Derby, DE21 4AD, UK Tel: +44 (0) 1332 294441 Fax: +44 (0) 1332 290667 Email: [email protected] http://www.datapath.co.uk/ French Office Datapath France , 7 rue des Pinsons, 78990 Elancourt Tel: +33 1 30 13 89 34 Fax: +33 1 30 13 89 35 Email: [email protected] 13