1
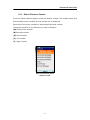
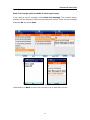
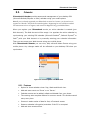
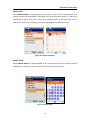
User Guide For Java Phone Users Version 1.0 -1- Warning and Disclaimer Every effort has been made to make this document as complete and accurate as possible, but no warranty is implied. The information provided is on an “as is” basis. We assume neither liability nor responsibility to any person or entity with respect to any loss or damage arising from the use of this product or the information contained in this document. Trademarks Microsoft Outlook and Microsoft Outlook Express are either registered trademarks or trademarks of Microsoft Corporation in the United States and/or other countries. Palm is a trademark of Palm Inc. Lotus® Notes is a registered trademark of IBM -2- CONTENTS 1. About This Manual...................................................................................................................... 1 2. iPhonebook Overview................................................................................................................. 1 3. Features...................................................................................................................................... 2 4. Getting Started............................................................................................................................ 2 5. Privacy and Security ................................................................................................................... 2 6. Choosing Contacts/Events for Download ................................................................................... 3 7. Using iPhonebook....................................................................................................................... 5 7.1. Register Using your Mobile Phone ......................................................................................... 5 7.2. Login ....................................................................................................................................... 6 8. Main Menu .................................................................................................................................. 7 8.1. Contacts .................................................................................................................................. 7 8.1.1. Features ......................................................................................................................... 8 8.1.2. Search Contacts............................................................................................................. 8 8.1.3. Select / Browse a Contact............................................................................................ 11 Placing a Call ........................................................................................................................ 14 8.1.4. Sync Contacts .............................................................................................................. 14 8.1.5. Manage Contacts ......................................................................................................... 15 8.2. Calendar................................................................................................................................ 17 8.2.1. Features ....................................................................................................................... 17 8.2.2. Calendar Main Menu .................................................................................................... 18 9. Corporate Feature:- .................................................................................................................. 22 9.1. Un-Answered Meeting: ......................................................................................................... 22 9.2. Shared Meeting Event: ......................................................................................................... 23 9.3. Meeting Event: ...................................................................................................................... 24 10. Settings ................................................................................................................................. 25 10.1. Edit Registration Info:............................................................................................................ 25 10.2. Sync Settings: ....................................................................................................................... 26 11. Help....................................................................................................................................... 28 12. Corporate Feature:................................................................................................................ 29 12.1. Corporate Account ................................................................................................................ 29 12.1.1. Corporate User............................................................................................................. 29 12.1.2. Associate Corporate User ............................................................................................ 29 12.1.3. Search for Associate Corporate User .......................................................................... 29 12.1.4. Add New Corporate User ............................................................................................. 31 12.1.5. Edit Selected User Account ......................................................................................... 32 12.1.6. DeleteMember ......................................................................................................... 33 12.1.7. Import Corporate Users ........................................................................................... 35 12.1.8. Add/Manage Groups................................................................................................ 36 12.1.9. Send Text Message to Phone ................................................................................. 36 12.1.10. Change Password/PIN............................................................................................. 37 12.1.11. Personal Contacts Sync .......................................................................................... 37 12.1.12. Allow Application Access ......................................................................................... 38 12.1.13. Allow Manage Contacts ........................................................................................... 40 12.1.14. Restrict Manage Contacts ....................................................................................... 40 12.1.15. Set Auto Sync Settings ............................................................................................ 40 -3- 12.2. Calendar: .............................................................................................................................. 41 12.2.1. Adding an Event ........................................................................................................... 41 Edit Event/Delete Event: ....................................................................................................... 45 12.2.2. Day View ...................................................................................................................... 46 12.2.3. Month View................................................................................................................... 46 Track Meetings: .................................................................................................................... 47 Check Invitations:.................................................................................................................. 49 12.2.4. Search Calendar .......................................................................................................... 50 13. Validations for the Menu Fields ............................................................................................ 52 14. Additional Support................................................................................................................. 53 -4- iPhonebook User Guide 1. About This Manual This manual covers iPhonebook, a combination of Contacts and Calendar application for use on JAVA™ enabled MIDP 2.0, JSR 75 supported mobile phones. The manual describes how to: • Get started with the iPhonebook service • Use iPhonebook on the mobile phone The manual assumes you are familiar with basic menu navigation of your mobile phone and use of mobile phone keys to enter text. 2. iPhonebook Overview iPhonebook is a mobile phone data service that wirelessly connects you to your Address book and Calendar. The application enables you to search for contact information, select a phone number and connect the call. Additionally, you can select a subset of contacts from web interface to download directly to the phone’s native address book. The Application enables you to organize your Calendar events using your mobile phone. You can search for events, add new events and also edit existing events. When you register for iPhonebook service, an online address book and online calendar is created (your Web Account). You can populate the online contacts and calendar by synchronizing your existing PIM (typically Microsoft Outlook®, Outlook Express®, Lotus Notes® or Palm™ on your desktop) with the Web Account. Alternatively, you may choose to manually enter contact data and calendar events, into the Web Account or import your contacts from an existing CSV file. For registration, log on to http://www.remoba.com. Once you are registered, you will be directed to the free synchronization software download page (that must be downloaded from the Remoba Website). This enables you to synchronize your existing Contacts and PC PIM Calendar events and access them from your phone or from your Web Account. You can also register through mobile by selecting New -1- iPhonebook User Guide Registration. 3. Features o Account Registration through mobile o Easy setup: Download the application, Configure and Login. o Ability to Save and Retrieve Contacts o Ease in maintaining Contacts and Calendar information. o Quick access to contacts/calendar events information o A powerful search feature to search for online contacts and online calendar events. o Update the account information such as email id/phone number/pin o Saves contact information such as: o Names o Numbers o Email Address o Phone address book can be synchronized with the web account on Server. o Contacts and Calendar in web account can be synchronized to desktop PIM (Personal Information Manager). 4. o Stores six weeks cache of data for quick viewing, without network access. o Restores calendar information if the PC data is lost. Getting Started There are three easy steps to get started with iPhonebook: 1. Purchase iPhonebook using your mobile phone from MEDIANet. 5. Privacy and Security -2- iPhonebook User Guide Your contact data is saved on servers that are available 24 hours a day, 7 days a week. The servers are physically secure and located within a co-location facility with controlled access. Our privacy policy prohibits the company from accessing the information or using the data for any purpose other than iPhonebook functions. In short, your contacts remain private and secure. 6. Choosing Contacts/Events for Download The process for downloading Contacts to your phone’s native address book: 1. Upload Contacts/Events from your PC PIM (Microsoft Outlook, Outlook Express, Lotus notes and Palm desktop) to Web Account. 2. Upload Contacts/Events from your iPhonebook Web Account to your phone. Note: The space available on the phone’s native address book is limited. Additionally, different handsets have different address book capacity limitations. Please refer to your Phone’s user manual to check for your phone’s address book capacity Figure 1: Downloading Contacts -3- iPhonebook User Guide Uploading Contacts/Events from your PC PIM (Microsoft Outlook, Outlook Express, Lotus notes and Palm desktop) to Web Account Using the synchronization software, the Contact information or Event data on the desktop PIM will be uploaded to the Web Account and vice-versa. Figure 2: Adding Calendar Events -4- iPhonebook User Guide 7. Using iPhonebook When iPhonebook is launched for the first time on your phone, a Welcome screen is displayed. Click OK. On getting started, the iPhonebook user Menu is displayed. Figure 3: Welcome Screen The Introduction link reviews the steps that need to be taken, in order to get started. You have an option to Register for an account using your mobile phone. 7.1. Register Using your Mobile Phone From the iPhonebook User Menu Screen select New Registration to register your account as you configure on Web Interface. On selecting the New Registration option you get a registration Screen. You need to enter the details in the following fields: o First name: Enter your First Name. o Last name: Enter your Last Name. o Phone Number: Enter your mobile Phone number. o PIN Number: Enter a four digit PIN Number. o Email ID: Enter the valid email Id. o Password: Enter the relevant Password. o Security Question: Choose a security question to remember your Email Id and Password. -5- iPhonebook User Guide Security Answer: Enter the valid security answer for the chosen security question. Note: The steps for registration process are the same on both the phone and Web Interface. You can register either from your phone or on the Web by going to https://remo.xpherix.com/remo Figure 4: Registration 7.2. Login If you have already followed the Getting Started instructions in the previous section, go directly to Existing User Login. If not, refer to Getting Started. 1. Select Existing User Login from the user Menu. 2. Enter your mobile phone number and PIN, chosen during registration. Press Ok to continue. 3. On a successful login, the Main Menu will be displayed. If you enter a wrong Phone/PIN, you will be asked to enter the new Phone/PIN. -6- iPhonebook User Guide Figure 5: Login Screen Figure 6: Login Phone Number PIN Number Screen 8. Main Menu Once login you can see Main Menu with Contacts, Calendar, Settings & Help options 8.1. Contacts This will wirelessly connect you to your contacts in MS Outlook/MS Outlook Express or Palm software, while allowing you to manage all your contact information on the server from the Mobile Phone. You can choose a subset of your contacts to download directly to your phone’s native address book. When you register for IPhonebook service, an online address book is created (your Web Account). You can populate the online address book by synchronizing your existing PIM contacts (typically Microsoft Outlook®, Outlook Express®, Lotus Notes® or Palm™) with the Web -7- iPhonebook User Guide Account. Alternatively, you may choose to manually enter contact data through the Web Account or import your contacts from an existing CSV file. Figure 53: Contacts Option from Main Menu 8.1.1. Features • Quick access to contact information • Search contacts by First name, Last name or Company • Update the account information such as email id/phone number/PIN • Save contact information such as: - Names - Numbers - Email Addresses • Synchronize your phone contact information with the web account address book. • Existing contacts can be accessed from your phone as well as the Web Account. • Manage the Server address book from the Phone itself. 8.1.2. Search Contacts iPhonebook allows you to do an online search of all contacts in your Web Account. Use this feature to access infrequently used contacts or any data apart from phone numbers and email addresses such as address or notes. From the Contacts Main Menu, select Search Contacts. The Search Contacts screen is displayed. -8- iPhonebook User Guide A search can be done based on Last Name, First Name or Company. Only one of these fields needs to be populated to receive search results. However, usage of more fields will yield more precise search results. Figure54: Search Contacts The Search Contact display shows three available fields. To search for a contact, enter at least one character (alpha/numeric) in any of the three fields (Last Name, First Name and Company). The first field highlighted is the Last Name. Use the up/down button to scroll between fields. Enter the relevant information and select Search, to start the search. For example, if the Last Name is selected and “R” is entered as the search key for Last Name with no other fields entered as shown in the figure. Figure 55: Search by Last Name screen -9- iPhonebook User Guide On selecting OK, the Search Results screen appears after a few seconds. Using our example, the first ten contacts that contain R in the Last name field will be displayed. Figure 56: Search Results If the desired contact is not found, then you may refine the search by entering more specific search criteria. If only one contact is found, the phone numbers for the contact are immediately displayed. If no contacts are found, a message is displayed: “No matches found. Press Select to modify your search.” Press OK to return to Search Contacts screen. Figure 57: Search Results Failure - 10 - iPhonebook User Guide 8.1.3. Select / Browse a Contact From the Search Results display, select the desired contact. The contact name and all associated phone numbers for that contact will be displayed. Select any of the given numbers to automatically dial that number. The phone numbers for a contact are (in order of display): (M) Mobile phone number (B) Business number (H) Home number (F) Fax number (P) Pager number Figure 58: Contact’s phone Numbers screen - 11 - iPhonebook User Guide Details Select Details to browse through other contact information of this particular contact. The following fields will be displayed: Email Address Company Name Address (street address, city, state, country, zip code) Figure 59: Details display Add to Phone If you want to add the contact to your phone’s native address book, press Add to Phone. The contact’s phone numbers and email addresses (if present) will be saved on the phone for quick access later. Figure 60: Floating Menu from Details screen - 12 - iPhonebook User Guide Send Text message option (available in select regions only) If you want to send a message, select Send Text message. The contact’s phone numbers will be displayed. Select the desired phone number. Enter the text message and press OK and select Send. Figure 61: Text Message Screen Press Back to go Back to the previous screen to go to Main Menu screen. - 13 - iPhonebook User Guide Placing a Call Once a contact’s phone numbers are displayed, select the desired phone number to make a call. (Mobile, business, home or fax).You may also use the Green Call button from your mobile. Figure 62: Selecting a number 8.1.4. Sync Contacts The Sync Contacts option is used to synchronize contacts on your phone with contacts in your Web Account. On selecting Sync Contacts from Contacts Main Menu screen, the selected contacts from your Web Account are downloaded to your phone’s native address book and any newly added or edited contacts from your phone are uploaded to your Web Account, which are then synchronized to your PC PIM using the PC Sync software). Before you use the Sync Contacts option to download contacts to your phone, you must select the contacts from your web account that you wish to download. - 14 - iPhonebook User Guide Figure 63: Sync Contacts option 8.1.5. Manage Contacts Manage Contacts allows you to manage all your contact information on the server from the Mobile Phone. On selecting the Manage Contacts from the Contacts Main Menu screen, you get View Server Contacts screen. On clicking the desired alphabet from the list, a list of contacts with the chosen letter is displayed. You can also view all the existing contacts available on the server by selecting All Contacts option. You can even download the contacts available on server from your phone. To do so, check the box against the contacts and select the Options LSK from the Contacts List screen. Choose Mark to Download from the list of options. The contact selected is downloaded to the phone from the web interface. This is indicated by an icon against the contact. - 15 - iPhonebook User Guide Figure 64: Manage Contacts option - 16 - iPhonebook User Guide 8.2. Calendar iPhonebook Calendar provides access and management of your desktop PIM (Microsoft Outlook/Express or Palm) calendar using your mobile phone. Note: If you’ve already registered your iPhonebook account for Contacts, you do not have to register for Calendar – they both are created together. Registering for one is all that’s needed. For instructions on how to register, refer section for Register Using your Mobile Phone When you register your iPhonebook service, an online calendar is created (your Web Account). The Web Account will be empty. You populate the online calendar by synchronizing your existing PIM calendar (Microsoft Outlook®, Outlook Express® or Palm®) with your Web Account or by manually entering your calendar information. Then you can access your Web Account using your mobile phone. With iPhonebook Calendar you can view, add, edit and delete Events using your mobile phone. Any changes made will be reflected on your desktop PIM when you synchronize. Figure 65: Calendar Option from Main Menu 8.2.1. Features • Option for three calendar views: Day, Week and Month view. • Add and save events on ‘Phone’ or on ‘Server’. • Calendar events can be added, edited and deleted from your phone. • Time-saving auto complete feature for common words. This avoids manual entry every time. • Stores six weeks cache of data for fast, off network access. • Restores calendar information/reminders if the PC is corrupted. • Add and store events offline. - 17 - iPhonebook User Guide • Admin can schedule events and send messages to Corporate Groups. Additionally an Administrator has options to add a Calendar event and then designate that event as a Meeting event or Shared meeting event A shared meeting event allows the administrator to set up a meeting event on the Calendar and then allow all members to share that event. Members can then view the event on a shared calendar. 8.2.2. Calendar Main Menu On selecting Calendar option from the iPhonebook Main Menu, you are navigated to the Calendar screen. A list of menu options is displayed; Figure 66: Calendar Main Menu Add Event: Select Add Event to add a new event. Enter the details in the “Title”, “Start Date”, “Time”, “Duration” and “Notes” fields respectively and select Options LSK. You have options to save the events on your Phone or on the Server. The events saved on Phone are highlighted in green color and events saved on Server are highlighted in black color. - 18 - iPhonebook User Guide Figure 67: Add Event option Day View: Select Day View to go to day view screen. The events of the current day are displayed. Use the right/left arrow keys on your phone’s key pad to navigate to the next or previous day. Use the up/down keys to scroll between events. On adding the events, select Options LSK from the Day View screen. From the Day View screen you get the list of options such as Refresh Data, Add Event, Week View, Month View and Go to Date. Select any existing event on the Day View screen. You get the list of options to update or delete the event on the Server or on the Phone as shown in the figure. Figure 68: Day View Details - 19 - iPhonebook User Guide Week View: Select Week View to view the details of the event (if any) for the current week. The regular events are highlighted in light blue color and the events saved on Phone are highlighted in green color and if there are multiple events on the same day at the same time, then such conflicting events are highlighted in a dark blue color. Figure 69: Week View Details Month View: Select Month View to view the details of the current month with the regular events highlighted in blue color and the events on Phone with a green color. Figure 70: Month View - 20 - iPhonebook User Guide Search Event: Select Search option to search for an event from the existing set of events on your calendar. A search can be done based on options such as Title, Start Date and End Date. Only one of these fields needs to be populated to receive search results. However, for more precise search results input as many search keys as possible. If the search results in no match, then a message “No match found’ is displayed. Figure 71: Search Event options - 21 - iPhonebook User Guide 9. Corporate Feature The additional feature present in Calendar is as: o Un- Answered Meeting o Shared Meeting Event o Meeting event 9.1. Un-Answered Meeting: Select Un-Answered Meeting to view the details of the Meeting invitation event and also to reply to the invitation. We can view the Details of the Un-Answered meeting, reply by Accepting, Tentative or Decline the invitation by giving some description. Figure 78: Main Menu Figure 78: Answered Meeting Figure 79: Un-Answered Menu Figure 79: description to add in reply - 22 - iPhonebook User Guide 9.2. Shared Meeting Event: A shared meeting event allows the administrator to set up a meeting event on the Calendar and then allow all members to share that event. Members can then view the event on a shared calendar. Figure 80: Day View Figure 81: Shared Event Details - 23 - iPhonebook User Guide 9.3. Meeting Event: The Meeting Invitation Event is that event, which are Accepted or Tentative reply by user. This event only be deleted once they are Accepted or Tentative a meeting event. Figure 80: Day View Figure 81: Meeting Event Details - 24 - iPhonebook User Guide 10. Settings Navigate to the Settings option from the Main Menu. Figure 72: Settings option The following options are displayed on selecting Settings option. Figure 73: Settings Menu 10.1. Edit Registration Info: On selecting Edit Registration Info, you are requested to enter the PIN. Enter the PIN that you used at the time of Registration. On entering the PIN, you are navigated to the Edit registration Info screen. Select Edit Email Info option. The existing Email Id is displayed. Edit the Email Id. Enter the new password if necessary and press Done to save the changes. Select Edit Phone Number option. The existing Phone number is displayed. Edit the number with new phone number and - 25 - iPhonebook User Guide enter the new PIN number. Press Done on the LSK to save the new changes. On selecting Edit Preference option, The existing Carrier and Time zone is displayed. Figure 74: Edit Setting Options 10.2. Sync Settings: You may use the sync settings feature to ensure that automatic sync of your phone’s contacts are done periodically by the application. You may choose the Daily/Weekly auto sync settings. At the designated time of the day or week based on the option chosen, the application will initiate an automatic sync of the contacts from the Phone to the Server, ensuring that all the latest contact information is saved periodically without you having to worry about doing the sync manually. However, if the phone is switched off or network connectivity is not available at that time, the changes are not uploaded. The auto-sync is triggered as soon as the phone is switched on. ¾ Manually: Auto Sync is turned off and user can do backup manually. - 26 - iPhonebook User Guide ¾ Daily: Automatic syncs are done by the application daily at time selected by the user. ¾ Weekly: Automatic syncs are done by the application weekly once at time and day selected by the user. Figure 75: Auto Sync Options Figure 76: Daily Setup - 27 - Figure 26b: Weekly Setup iPhonebook User Guide 11. Help To view the information about the each of the functionalities of iPhonebook, navigate to Main Menu select Help option. You can view the information for Figure 77: Help Options - 28 - iPhonebook User Guide 12. Corporate Feature: 12.1. Corporate Account Corporate account allows iPhonebook application users to access corporate contacts and events. Corporate Admin defines the 'Associated Corporate User'. All the associated members receive a copy of the admin contacts and events. Admin decides which of the contact and events should be allowed to download to the member phones. Only an administrator can define the corporate members. Admin manages the members using admin interface. 12.1.1. Corporate User A ‘Corporate User’ is a registered user with Remoba. Any user can register an account by accessing www.remoba.com. A registered user gets an access to sync the contacts and events from computer (Running on windows and manages contacts using Microsoft Outlook, Microsoft Outlook express, Lotus notes or Palm desktop ) to the phone. The phone should have iPhonebook (Contacts and Calendar). 12.1.2. Associate Corporate User An ‘Associated Corporate User’ is the member that belongs to a corporate group. Corporate Administrator adds a member to the group. Associated members receive a copy of the corporate contacts maintained by the corporate admin. Associated member can synchronize corporate contacts on to the phone. Any changes members does to the corporate contacts are not reflects Admin contacts. Admin overwrites any changes the members do. Along with admin shared corporate contacts, associated users can maintain their own copy of the personal contacts. When admin removes the associate user from the group then all the corporate contacts are deleted from the associated corporate user’s account. 12.1.3. Search for Associate Corporate User To search an existing Corporate User, select one of the members from the alphabetical list or use one of the two search functions: The A-Z Legend Search Select a letter from the Alphabet Legend (A-Z) to display all of your members' names beginning with that letter. Selecting "All" lists all of your members in - 29 - iPhonebook User Guide alphabetical order. Use "Next" and "Previous" to move from page to page to view all the members with names beginning with that letter. Note: By default, names are displayed in the order: First Name - Last Name. This can be changed to Last Name, First Name under the options tab. Field Search Select the "Corporate User Accounts" tab. The Field Search area is located below the A-Z Legend. Enter your keyword(s) in either of the three search fields: "Last Name", "First Name", or "Company/Organization". To submit your search select the "Search" button or use the "Enter" key on your keyboard. The members that match the search criteria will be displayed in alphabetical order. Select the name you wish to display details. Use "Next" and "Previous" to move from page to page. Note: You can view the ‘Associated Corporate User’ and ‘Unassociated Corporate User’ by selecting the desired option from the Show drop down list. - 30 - iPhonebook User Guide 12.1.4. Add New Corporate User To add a new user click "Add New Corporate User" button and enter all the information relevant to the ‘Corporate User’ in the given fields. Once you complete entering the details, select the "Save Member Account” button at the bottom of the page. The New Member is added to the Member list. - 31 - iPhonebook User Guide 12.1.5. Edit Selected User Account To Edit an Account, select the desired Account name from the list. Select the "Edit Selected User Account" button. The Edit Member Account page appears and you can make the appropriate edits. When finished, select the "Save" button to save the changes or select the "Cancel" button to exit from this screen - 32 - iPhonebook User Guide 12.1.6. Delete Member To delete a member, from the list, choose the member(s) and hit ‘Delete Selected User Account’. This will remove the member account information from the System. After this, the user account is terminated and will no longer allow access to contacts or events. Both web interface and Phone logins are disabled. - 33 - iPhonebook User Guide - 34 - iPhonebook User Guide 12.1.7. Import Corporate Users To import an existing member account, click Import Member button. Import your member Accounts page is displayed. You need to follow three steps to Import the account. 1. Export your contacts to .csv file. 2. Browse the .csv file. 3. Press Import Now to import the contacts from the .csv file. Your member list is imported now. One member is imported only one. Each member must have unique email address and phone number for import to be successful. Imported members are by default not associated with the corporate group. Corporate admin adds the member to the group. Corporate admin can only see or manage the members from same domain. System identifies domain from corporate admin's registered email address. - 35 - iPhonebook User Guide 12.1.8. Add/Manage Groups Admin can create groups with group name and description. S/he has the rights to assign the groups to associate member or groups to Contacts. 12.1.9. Send Text Message to Phone Corporate admin can send the text message alerts to the associated members on contact updates or account changes. To send a message text to the selected members, press 'Send Text Message to Phone' button. On the "Send Text Message" page, enter the message before selecting the target user from ‘Selected Members’ and hit 'Send'. Cancel will cancel the send process. To send the text message to all the associated members, without selecting any contacts click on 'SEND Message'. On the "Send text message" screen it by default select option all 'associated members'. Enter the message and hit 'Send'. - 36 - iPhonebook User Guide 12.1.10. Change Password/PIN Corporate admin can Password/PIN of all the associated members of ‘All Groups’ or a particular group. To change values press ‘Change Password/PIN’ button. In ‘Change Password/PIN’ screen enter new values in password/pin field and select ‘Update’. 12.1.11. Personal Contacts Sync This option allows the Administrator to selectively provide personal sync options to members. It also ensures that some members can synchronize only corporate contacts but not their personal contacts to their phone, which will save airtime minutes. Allow Personal Contacts to sync Admin can use this setting to allow a member to synchronize his/her personal contact list from the Phone. - 37 - iPhonebook User Guide Restrict Personal Contacts to sync Admin can use this setting to restrict a member from synchronizing his/her personal contacts list from the Phone. Subsequent synchronizations will only synchronize the corporate contacts from Phone with the Server. 12.1.12. Allow Application Access This feature allows the administrator to control the application access of members. The administrator can choose to provide Full access, Limited access or Prohibit access completely. o Allow Full App Access : Provides full access to the User with no restriction on use of any feature of the application - 38 - iPhonebook User Guide o Restricted App Access: User will be able to access only specified features of the applications and will not be able to access and use the ‘Settings’ feature of iPhonebook that contains the Auto sync settings etc. o Do not allow App Access: User will not have access to the iPhonebook application itself and will not be able to synchronize or use the iPhonebook application till such time that the Administrator provides either ‘Restricted Access’ or ‘Full Access’. Note: The application is not removed from the Phone but will still be resident on the device in a dormant state. The various options for application access are shown in the screen below - 39 - iPhonebook User Guide 12.1.13. Allow Manage Contacts The Admin can set permissions for individual members and allow/disallow contact download to phone. To set permissions, the Admin must check the box against the members to whom the download contacts permission must be granted. Select Members, click on Allow Manage Contacts tab. Once permission is granted, the member can download all contacts to Phone. This is indicated by the word ‘YES’ in the ‘Manage Contacts’ column. The Allow Manage Contacts applies to the Associated members only. 12.1.14. Restrict Manage Contacts The Admin can restrict the permission to the member to download contacts to phone. To restrict manage contacts the Admin must select the member who is already assigned permission from the members’ list. Then click on ‘Restrict manage contacts’. This is indicated by the word ‘NO’ in the ‘Manage Contacts’ column. 12.1.15. Set Auto Sync Settings Admin can set Auto Sync time for associated members. The new settings are sent to phone with login response and ‘Auto Sync’ time is scheduled automatically. If the associated member is has ‘Access Privilege’ as ‘Restricted App Access’ then he cannot change the Auto Sync settings. - 40 - iPhonebook User Guide 12.2. Calendar: 12.2.1. Adding an Event Admin can create three types of events - Meeting event, Shared meeting event and a Regular event. Meeting event: To add a meeting Event, select the ‘Add’ option. The Add Event screen will be displayed. Scroll down to each field and enter the detail. The ‘Add event’ screen is shown below. - 41 - iPhonebook User Guide Figure: Admin Add Event screen To add a meeting event click on ‘Invite Members’. This will display a list of all associated members belonging to that Group along with the Group names. Admin can select the Group names to invite. The ‘Invite members’ page is shown below: - 42 - iPhonebook User Guide Figure: Admin Invitee page After selecting the invitees from the list, click on ‘Save List’ button. This will add the selected members to the Invitees list and return to the ‘Add Event page’. Use cancel to cancel your selection and return to Calendar Event page. Note: After the meeting event is added, invites are sent via SMS and Email to invited members. Associated members can check for such invitations by clicking on the ‘Check Invitations’ tab. Shared Meeting Event: A shared event of meeting event is an event that can be shared amongst members. This enables all members or members of the group to have access to the shared event. To add a Shared meeting event, click on ‘Share Event’. This will display a list of all associated members. The Shared Meeting event page with a list of associated members is shown below: - 43 - iPhonebook User Guide Figure: Shared Meeting event Adding Associate members: Select members from the list and then click on ‘Add shared Member’ to add the selected associated members to the list. Now proceed to add an event. Now this event is shared among all the associated members under that list. An application SMS will be sent to all members once the event is shared with associated members. This will add the shared event to the respective associated member’s calendar. Note: 25 members per page are displayed on the associate members list. Use the ‘Next’ and ‘Previous’ buttons to navigate to the next or previous 25 of the list. Normal Event: In the Calendar Month view, an ‘Add’ link is available for each day on the Calendar which can be used to add an event for that particular day. Alternatively you may use the ‘Add event’ under the ‘Day view’ to add an event. You must provide the following information to create a new calendar event: Title* Date* Start Time and Duration* - 44 - iPhonebook User Guide Location Notes* Repeating Event* (daily, weekly, monthly, day of month or none) Reminder time (how much time prior to event occurrence) Note: * indicates required fields A new event can also be created from the Mobile Phone by adding information to all the above mentioned. Enter the proper information for the Event. Save changes to create a new calendar event. Note: We strongly recommend against using the Admin account from the phone or the desktop. Regular Events created by admin on the Phone or desktop are termed personal information of the Admin and hence may not be shared amongst members. On the Remoba portal, you may also create a recurring event with different recurring types. This feature is not available when creating an event from your Mobile phone. Available recurring types are: ‘Recurs every day’, ‘every week on a particular day’, ‘recurs every month on a particular day’ and ‘recurs every year on a particular day of the month’, or choose recurrence patterns like ‘Repeats every fourth Sunday of every fourth month’. Choose Text message reminders, by clicking on the ‘Options’ tab, if you would like to be reminded about an impending event via a SMS sent to your phone. Once done, select ‘Save’ to add the event or choose ‘Cancel’ to return to Day View. Note: Admin can convert normal meeting to a shared/meeting event. Edit Event/Delete Event: You can edit an event or meeting event by clicking on Title of the event link. Once you are done with editing the event, view the invite section. Click on Invite to modify the meeting invite, Choose the Notify option to send an updated status to all invitees. Choose the Do not Notify option if you don’t want to send an update on the change to invitees. Once you are done with all changes, use the ‘Save’ button to save the event. Choose the “Delete’ option to delete the selected meeting event and return to month view. Click on the Details link to display a pop-up window that contains details of invitees for a particular meeting event. - 45 - iPhonebook User Guide Figure: Edit/Delete event 12.2.2. Day View Select a day to view events for that particular day. The day’s events are listed by the hour. Clicking on the hour, will for example, 02:00 PM will open the Add Event page. Selecting the Event Title link will open the Event for editing. You may also use the Add Event link to add an event. To return to the Monthly View, select the Month link in the upper left corner. 12.2.3. Month View The Calendar Month View in your Web Account shows a display similar to that of a printed calendar. A full month is shown; the current date is highlighted with a yellow box. Additionally, the week number is indicated on the far left. For example, for this year, 2007, April 6 falls on the 14th week of the previous year. The display also enables you to scroll between months using the Next and Previous links located on the page. The month view page is as shown below. The Add Event link is available against each day on the calendar. - 46 - iPhonebook User Guide Figure: Month view Track Meetings: Click on the Track Meetings link to navigate to the page where you can track all your meeting events. You can view the list of meetings with Title, From Date, Event Description, Event Type and Invitee Status (Accept/Decline/Tentative). - 47 - iPhonebook User Guide Figure: Track Meetings Clicking on the Meeting title will allow you to view the complete details of that event. Use the Next and Previous button to navigate to the next 25 or previous 25 events. Click on Status, to view responses received for the respective meetings. Edit selected – Use this option to edit a meeting event Delete selected – Use this option to delete the selected meeting event. Clicking on this will pop up a notification window asking for confirmation to send a cancel notification to all the invitees. Once you confirm the deletion, that meeting is deleted and a ‘meeting cancelled’ notification is sent to all invitees. You can sort events by ascending or descending order of dates by clicking on the arrow on the Title. - 48 - iPhonebook User Guide Check Invitations: Click on Check Invitations link on top of the page, which will take you to the list of Invitations for meetings displayed with the Title, Event Date, Event Description, Note and response Status (Accept/Decline/Tentative) • Click on a Meeting title, to view complete details of that event. • Use the Next and Previous button to navigate to the next 25 or previous 25 events. • Accept Selected – Use this option if you wish to accept a meeting invite. You may add a note if you wish. Once you accept, that event is automatically added to your Calendar but you will not be able to edit or delete this event since you are not the owner of that event. • Reject Selected – Use this to reject meeting invite(s). Such events are not added to your Calendar. • Tentative Selected – Use this to mark meetings as tentative. The same response will be seen by the organizer of the meeting. • You can sort events by ascending or descending order of dates by clicking on the arrow on the Title. - 49 - iPhonebook User Guide Figure: Check Invitations 12.2.4. Search Calendar You can search for an event by providing the ‘From Date’ and ‘To Date’, which will search and display all calendar events matching the search criteria. Events are displayed with Title, event date, description, and event type. Click on the ‘Search’ to initiate the search on the events. On the Search results screen, use the Edit and Delete options to edit or delete an event Click on the Event Title to view complete details for that event. You can edit or delete only one event at a time. You can sort events by ascending or descending order of dates by clicking on the arrow on the Title. - 50 - iPhonebook User Guide Figure: Search Calendar - 51 - iPhonebook User Guide 13. Form validations for Text entry fields The menu fields for all the options follow standard norms. The following is a brief description for the menu fields and the type o Last Name: The Last Name option accepts only the alphabets up to a maximum of 50 characters. Numeric values are not acceptable. o First name: The First Name option also accepts only up to a maximum of 50 characters. Numeric values are not acceptable. o Email Id: The email address should be complete along with symbols (if any). For example: [email protected] o Password: The maximum number of characters allowed for password entry is 5. This option accepts all the symbols except “#” and “%” symbols. o Phone Number: The Phone Number should be a 10 digit number. o PIN Number: PIN accepts a maximum of four digits only. Note: The validations for the above menu fields are same all over in every Main Menu option. - 52 - iPhonebook User Guide 14. Additional Support On the Mobile Phone You can access the help feature by selecting Help from the menu options. On your iPhonebook Web Account Log on to your iPhonebook Web Account for details on synchronizing Contacts and Calendar. A Help link is available in the upper right corner of every web page that provides complete details about the Web Account. Web and Email Support Additional support, frequently asked questions and troubleshooting guides are available on www.remoba.com. (Click on the link provided for U.S. Customer Signup/Login). Email support is available at [email protected]. - 53 -