1
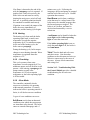
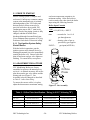
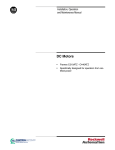
IBC
IBC Technologies Inc.
Vancouver, Canada
VFC Modulating Gas Boilers
•
•
•
•
Model VFC 35-90 (natural gas)
Model VFC 50-130 (natural gas)
Model VFC 35-100LP (propane)
Model VFC 45-130LP (propane)
INSTALLATION AND OPERATING INSTRUCTIONS
WARNING: If the information in this manual is not followed exactly, a fire or
explosion may result causing property damage, personal injury, or loss of life.
Do not store or use gasoline or other flammable vapours and liquids or other
combustible materials in the vicinity of this or any other appliance.
Should overheating occur or the gas supply fail to shut off, do not turn off or
disconnect the electrical supply to the pump. Instead shut off the gas supply at a
location external to the appliance
WHAT TO DO IF YOU SMELL GAS:
•
•
•
•
•
Do not try to light any appliance.
Do not touch any electrical switch; do not use any phone in your building.
Immediately call your gas supplier from a nearby phone. Follow the gas
supplier’s instructions.
If you cannot reach your gas supplier, call the fire department.
Installation and service must be performed by a qualified installer, service
agency or the gas supplier.
VFCM-MANv2.0
TABLE OF CONTENTS
2.3
2.3.1
2.3.2
USER INTERFACE........................ 17
Keypad Functions.............................. 17
Indicator Lights ................................. 18
1.
INSTALLATION ...................... 3
1.1
GENERAL..........................................3
1.2
CODE REQUIREMENTS ................3
3.
STARTUP ..............................19
1.3
Location ..............................................4
3.1
PRIOR TO START-UP .................. 20
1.4
1.4.1
1.4.2
1.4.3
Venting ................................................4
Applications .........................................5
Category IV Venting..........................10
Closet Installations .............................10
3.2
ADJUSTMENT FOR ALTITUDE 20
4.
MAINTENANCE AND
TROUBLESHOOTING...........21
1.5
Water Piping.....................................10
1.6
Gas Piping.........................................12
1.7
1.7.1
1.7.2
1.7.3
Electrical Connections .....................13
Mains Hook-up ..................................13
Thermostat wiring ..............................14
Thermostat Heat Anticipator..............14
2. BOILER SYSTEMS AND
OPERATION................................. 14
2.1
2.1.1
2.1.2
ELECTRONIC CONTROL
MODULE..........................................14
Logged Data.......................................14
Glossary of Terms ..............................15
2.2
2.2.1
2.2.2
2.2.3
2.2.4
2.2.5
2.2.6
SEQUENCE OF OPERATION ......15
Standby ..............................................15
Purging...............................................15
Ignition...............................................15
Heating ...............................................16
Circulating..........................................16
Error Mode.........................................16
IBC Technologies Inc.
4.1
4.1.1
4.1.2
BOILER MAINTENANCE............ 21
General Care...................................... 21
Inspection .......................................... 21
4.2
4.2.1
4.2.2
4.2.3
4.2.4
4.2.5
4.2.6
4.2.7
4.2.8
4.2.9
COMPONENT DESCRIPTION.... 22
Fan/Blower........................................ 22
Gas Valve .......................................... 22
Mass Airflow Sensor......................... 22
Oxygen Sensor .................................. 22
Flow Switch ...................................... 22
Hi-Limit............................................. 22
Transformer....................................... 22
Temperature Sensors ......................... 23
Control Module ................................. 23
4.3
4.3.1
4.3.2
TROUBLESHOOTING GUIDE.... 23
Preliminary Checks ........................... 23
Troubleshooting Electronic
Components....................................... 24
Troubleshooting With the Control
Module .............................................. 25
Detailed System Checks.................... 28
4.3.3
4.3.4
-2-
VFC Modulating Boilers
1. INSTALLATION
1.1 GENERAL
Table 1 - Connections
VFC modulating boilers are low
pressure, fully condensing units having a
variable inputs ranging from 35 MBH
(35,000 Btu/hr) to 130 MBH. The
boilers are approved for either Direct
Vent (sealed combustion) or Category
IV (indoor air) applications, providing a
great degree of installation flexibility.
The installer must clearly indicate the
vent category for the installation on
the rating plate using an indelible
marker. See section 1.4 - Venting.
Figure 1. shows outer case dimensions
and piping and electrical holes. Use this
diagram to find a suitable location for
the boiler. (see also Section 1.3 Location.)
34" [864mm]
G
1” NPT
B
water inlet
1” NPT
C
gas
½” NPT
D
electrical power
3/4”
E
thermostat
3/4”
F
pump
3/4”
G
combustion air
4.0"
H
exhaust vent
4.0"
Where required by jurisdiction,
installation must conform to the
Standard for Controls and Safety
Devices for Automatically Fired Boilers,
ANSI/ASME CSD-1. If there is any
conflict in the above requirements, then
the more stringent requirement will
apply.
FOR YOUR SAFETY
Do not store or use gasoline of other
flammable vapors and liquids in the
vicinity of this or any other appliance.
In Canada, installations must conform to
the current CAN/CGA B149 and the
Canadian Electrical Code Part 1 CSA
C22.2 No. 1.
H
Figure 1. Dimensions/Connections
IBC Technologies Inc.
water outlet
Installation must conform to local codes,
or in the absence of these, with the latest
editions of the National Fuel Gas Code
ANSI Z223.1 and the National
Electrical Code ANSI/NFPA 70.
22.5" [572mm]
12" [305mm]
A
Gas manifold and controls met safe
lighting and other performance criteria
when boiler underwent tests specified in
ANSI Z21.13-2000 / CSA 4.9-2000.
A
Instructions to put the boiler in operation
are located on the inside surface of this
cover panel.
Size
1.2 CODE REQUIREMENTS
12" [305mm]
22.5" [572mm]
Description
-3-
VFC Modulating Boilers
•
1.3 Location
Keep boiler area free and
clear of combustible
materials, gasoline, and other
flammable vapours and
liquids.
•
•
•
VFC-series boilers are designed and
approved for wall or floor installation
(on combustible flooring), with
significant flexibility of location
provided with the available venting
options. The boiler can be placed in an
alcove, basement, closet or utility room.
•
Care must be taken not install the boiler
in areas where the combustion air source
is subject to chemical fouling.
Experience has shown that exposure to
corrosive chemical fumes such as
chlorinated and/or fluorinated
hydrocarbons can reduce the life of a
boiler. Cleaners, bleaches, air fresheners,
refrigerants, aerosol propellants, drycleaning fluids, de-greasers and paintremovers all contain vapours which can
form corrosive acid compounds when
burned in a gas flame. Airborne chorides
such as those released with the use of
laundry detergents are also to be
avoided. For this reason, the Category
IV (indoor air) venting option using air
surrounding the boiler should not be
used in a laundry room installation.
Table 2 - Clearance from Boiler Cabinet
Surface
Front
Rear
L. Side
R. Side
Top
Distance
from
Combustible
Surfaces
2”
0”
0”
2”
10”
Recommended
Distance for
Service
24”
0”
12”
18”
10”
Below the boiler, 12” is required to
provide clearance for the inlet and
exhaust venting together with the
required condensation trap. Legs are
available as an accessory for floormounting of the boiler; the 14” legs
provide the necessary clearance.
It is recommended that the boiler be
located in an area where water leakage
will not result in damage to the area. If a
location such as this cannot be found, a
suitable drain pan, should be installed
under the appliance. The boiler is not to
be installed above carpeting.
1.4 Venting
In addition to the foregoing, other
factors determining potential mounting
sites:
IBC Technologies Inc.
ensure minimum clearance
requirements for combustible
materials(see Table 2) are satisfied
36” clearance at the front is
recommended for adequate servicing
gas ignition system components
should be protected from water
(dripping, spraying, rain, etc.)
boiler should not be exposed to
water leaks from piping or
components located overhead
in a new construction installation,
particular action must be taken to
protect the boiler from dust;
combustion air should be drawn
from a CLEAN source (e.g.
outdoors) and the boiler should be
isolated from interior dust sources.
Do not seal boiler case openings
directly - allow for air circulation
and ventilation in the immediate
area.
All venting must be installed in
accordance with the requirements of the
-4-
VFC Modulating Boilers
any exhaust fans, such as range
hoods and bathroom exhausts, so
they will operate at maximum speed.
Do not operate a summer exhaust
fan. Close fireplace dampers.
jurisdiction having authority: in the USA
Part 7, Venting of Equipment of the
National Fuel Gas Code, ANSI 223.1,
latest edition, and any other local
building codes are to be followed. In
Canada, Part 7 - Venting Systems of the
B149 Code prevails. Where there is a
discrepancy between the installation
instructions below, and the code
requirements, the more stringent shall
apply.
d. Place in operation the appliance
being inspected. Follow the lighting
instructions. Adjust thermostat so
appliance will operate continuously.
e. After it has been determined that
each appliance remaining connected
to the common venting system
properly vents when tested as
outlined above, return doors,
windows, exhaust fans, fireplace
dampers and any other gas-burning
appliance to their previous
conditions of use.
IMPORTANT
When an existing boiler is removed from
a common venting system, the common
venting system is likely to be too large
for proper venting of the appliances
remaining connected to it.
At the time of removal of an existing
boiler the following steps shall be
followed with each appliance remaining
connected to the common venting
system placed in operation, while the
other appliances remaining connected to
the common venting system are not in
operation.
f. Any improper operation of the
common venting system should be
corrected so the installation
conforms with the National Fuel Gas
Code, ANSI Z223.1 - latest edition.
In Canada, all installations must
conform with the current CAN/CGA
- B149 Installation Code and/or local
codes.
a. seal any unused opening in the
common venting system.
When resizing any portion fo the
common venting system, the common
venting system should be resized to
approach the minimum size as
determined using the appropriate tables
in the National Fuel Gas Code, ANSI
Z223.1 - latest edition. In Canada, use
the CAN/CGA - B149 Installation Code.
b. Visually inspect the venting system
for proper size and horizontal pitch
and determine there is no blockage
or restriction, leakage, corrosion and
other deficiencies which could cause
an unsafe condition.
c. Insofar as is practical, close all
building doors and windows and all
doors between the space in which the
appliances remaining connected to
the common venting system are
located and other spaces of the
building. Turn on clothes dryers and
any appliance not connected to the
common venting system. Turn on
IBC Technologies Inc.
1.4.1 Applications
All VFC-series boilers are approved
with alternative venting options: either
Direct Vent or Category IV venting can
be used offering flexibility to meet the
specific requirements of the installation.
With the Direct Vent case, combustion
air is piped directly to the boiler’s air
-5-
VFC Modulating Boilers
Exhaust venting is to be connected
directly to the 2” NPT male threaded
stainless steel fitting on the bottom of
the pressure vessel using a 2" CPVC
NPT x Socket fitting (female threaded
adaptor or 90° elbow). A condensate trap
of CPVC and PVC shall be spliced into
the CPVC exhaust pipe at or near the
base of the boiler (see Figure 2).
intake from outdoors. Using the
Category IV alternative, air for
combustion is drawn from the indoor air
surrounding the boiler or drawn from
ventilated attic or crawl spaces.
The standard VFC boiler is shipped with
a high water temperature limit switch set
for 200°F.
Provided the maximum overall vent
length limit is not exceeded, the installer
may choose to vent the boiler through
the wall, directly through the roof or
upward using an existing - but otherwise
unused - chimney as a vent raceway (see
below).
Combustion air piping is connected at
the base of the boiler using a standard 2"
PVC coupler or elbow. Screen material
shall be placed at the inlet as appropriate
for the environment (e.g. insects, dust).
1.4.1.2 Vent Travel
Using the standard 2” piping, the boiler
can be sited up to 60 equivalent feet
from the vent termination. The actual
vent travel is reduced for fittings in
accordance with Table 3. - for example,
using 5 x 90º ABS long-sweep* elbows,
the maximum lineal measure is 35 feet.
Direct vent installations requiring longer
travel can be satisfied using 2½” or 3"
intake and vent piping (the latter subject
to an initial 10’ of 2” CPVC - which is
included in the limit for 2½” or 3" pipe).
All boilers are shipped with connectors
permitting attachment of 2” intake
piping.
It is a code requirement that the
rating plate reflect the nature of the
boiler vent configuration as installed.
To facilitate such venting installation
flexibility, VFC boilers are shipped
with the rating plate unmarked. The
installer shall indelibly mark the
appropriate box on the rating plate to
recognize the venting alternative
chosen.
Table 3 - Max. Venting Length
1.4.1.1 Intake/Exhaust Vent Material
Pipe Size
2”
2½” or 3"
90° elbow(CPVC/PVC)
45° elbow(CPVC/PVC)
90° elbow*(ABS)
45° elbow*(ABS)
The approved materials of construction:
For the exhaust vent• 2" CPVC Sch. 40 or 80 pipe (per
ASTM F441) and Sch. 40 or 80 fittings
for the initial 10 lineal feet of travel
• 2", 2½" or 3" Sch 40 CPVC or
PVC(ASTM D1785 or D2665);
alternatively: 2" or 3" ABS (Sch.
40/ASTM D2661 or F628) and fittings
thereafter;
If the 2½” or 3" piping alternative is
selected, a 3"x2" (or 2½” x 2” as
appropriate) bushing is to be used in the
inlet piping within 3 feet of the
combustion air line clearance hole at the
base of the boiler. Such 3’ interval
(which is part of the 90’ max. travel
For the inlet air - 2", 2½" or 3" PVC or
2" and 3" ABS are permitted.
IBC Technologies Inc.
Max. Equiv.Length
60’
90’
allow 8’ equiv.
allow 4’ equiv.
allow 5’ equiv.
allow 2.5’ equiv.
-6-
VFC Modulating Boilers
elbows and threaded union fittings. The
trap must be installed as follows:
• Must be 5”min in height (see Fig. 2.)
• Must be piped to within 3” of a
drain or be connected to a
condensate pump (using ½" PVC)
• Drainage line must slope down to the
drain at a pitch of ¼” per foot so
condensate runs towards the trap
• IMPORTANT! Fill trap with
water before boiler is first fired to
prevent exhaust fumes from
entering room. Never operate the
boiler unless the trap is filled with
water.
• Trap should be checked every 6
months. Clean and refill as
necessary.
distance) is allowed to provide space for
splicing in the optional 2” compatible air
filter unit. On the exhaust side, a 3" x 2"
(or 2½”- 2”) reducer must be placed in a
vertical section of the flue gas vent, to
avoid pooling of condensate.
Exhaust venting must slope down to the
trap/drain with a pitch of at least ¼” per
foot so condensate runs towards the trap.
Support should be provided every 2 to 3
feet for each of the intake and vent
piping. Insulate exhaust piping where it
passes through unheated space with
appropriate pipe insulation to prevent
freezing of condensates.
Ensure all venting components are clean
of burrs/debris prior to assembly. Care is
to be taken to avoid ingestion into the
fan of CPVC/ABS/ PVC debris left in
the combustion air piping.
All joints must be secured using CPVC,
PVC, or ABS/PVC solvent cement to
bond the respective pipe material. Use
solvent cement on the connector located
at the CPVC/ABS or PVC junction (e.g.
10’ along the exhaust piping). Follow
the cement manufacturer’s instructions
closely when joining various
components.
All vent connections must be liquid and
pressure tight. Test exhaust venting
connections, under fan pressure with
vent blocked, using a soap/water
solution prior to firing.
¼" vertical per
horizontal foot
1.4.1.3 Condensate Trap
A condensate trap must be installed at
the base of the boiler (or within 12” of
the first 90° exhaust line elbow), as
shown in Figures 2. (e.g. spliced into
the 2” PVC exhaust vent using a straight
2" tee or a 2” x ½” x 2” reducing tee).
The trap itself is formed using ½” PVC
pipe for the drop leg, with ½” PVC pipe,
IBC Technologies Inc.
fill with water
5" min.
to drain or condensate trap
Figure 2. Condensate Trap
Alternatives
-7-
VFC Modulating Boilers
1.4.1.4
Venting Passage Through
Ceiling and Floor
12" min.
The following instructions apply to 2”,
2½” and 3" piping:
• pipe clearances - no specific
requirements; follow local codes
• piping must be supported in the
flooring
• all piping must be liquid and
pressure tight.
36" min.
snow line
12" min.
2" min.
other than as listed, vents terminate in the sam
e manner as in figure 3. above.
Figure 4. Vent Terminations Through
a Flat Roof
1.4.1.5 Rooftop Vent Termination
Vents must terminate as follows:
• 12” above grade and normal snow
line to vent terminal bottom
• DO NOT exhaust vent into a
common venting system
(See Figures 3 & 4 for rooftop vent
terminations)
•
•
exhaust vent with screen
•
air intake 180° elbow
with screen face down
10 ft. or less
2 ft. min.
12"min.
•
12" min.
2" min.
snow line
24" min.
2" min.
•
Figure 3. Vent Terminations through
a Pitched Roof
1.4.1.6 Sidewall Vent Termination
Vents must terminate as follows:
minimum 12” from any building
opening
minimum 3’ above any forced air
intake located within 10’
minimum 4’ horizontally from (and
in no case above or below) unless 4’
horizontal distance is maintained,
from electric or gas meters,
regulators and relief equipment
not to be located over public
walkway, in a confined space, or
under any overhang or deck
vents must be installed such that flue
gas does not discharge towards
neighbor’s windows, or where
personal injury or property damage
can occur.
for Direct Vent installations
employing sidewall vent
terminations, both the inlet and
exhaust terminations shall be located
on the same plane (side) of the
building, with the exhaust outlet
placed above the inlet to avoid reingestion.
(See Figures 5,6, & 7 for side wall vent
terminations)
IBC Technologies Inc.
-8-
VFC Modulating Boilers
MIN. 24" TO
ANY OVERHANG
MIN. 12" TO ANY OPENING
MIN. 4’
HORIZONTAL
DISTANCE
FROM ANY
GAS OR
ELECTRICAL
MIN 36" TO
METER
INTAKE
MIN. 12"
SNOW LINE
Figure 5. Side Wall Venting
installation below average snow level
vent tee should be parallel to side wall.
intake should be swung to parallel
4−3/8"
with side wall.
minimum
min. 12" between
bottom of intake
and bottom of vent
12" min. clearance
to any overhang
FIELD SUPPLIED PLASTIC
STRAPPING MUST BE USED
TO SECURE THE VENT TO
THE STRUCTURE
5−1/2"
24−1/2"
18−1/2"
12"
12" min. above
average snow level
Figure 6. Side Wall Vent Terminations (Configuration 1)
2" or 3" ABS or 2", 2.5" or 3" PVC
4x 3" or 4x2½" reducing bushings as required
2" or 3" ABS or 2", 2.5" or 3" CPVC or PVC
3"x3"x2" ABS or PVC Tee (alt: 4x4x3 Tee)
If 3" venting is used, the exhaust line must be
reduced to 2½" immediately prior to entering the 4"
termination tee to allow adequate intake clearance.
Use a 3 x 2½" reducer and 4x2½ bushing
Figure 7. Side Wall Vent Terminations (Configuration 2)
IBC Technologies Inc.
-9-
VFC Modulating Boilers
Indoor combustion air must not expose
the boiler to contamination - see Section
1.3 - Location, above. In other respects,
Category IV venting is installed in the
same manner as for the exhaust side of
Direct Vent installations, except that
there is no 2½” extended travel vent
option in the Category IV configuration.
1.4.2 Category IV Venting
A category IV venting system is one in
which air for combustion is take from
the ambient air around the boiler. Vent
piping is run horizontally or vertically to
the outdoors.
1.4.2.1 Ventilation and Air Supply
To support combustion, an ample air
supply is required. This may require
direct openings in the boiler room to the
outside. If the boiler is not in a room
adjacent to an outside wall, air may be
ducted from outside wall openings.
Provisions for combustion and
ventilation air must be made as follows:
in the USA, in accordance with Section
5.3 Air for Combustion and Ventilation
of the National Fuel Gas Code, ANSI
Z223.1 (latest edition), or applicable
provisions of the local building codes; in
Canada, in compliance with CAN 1.4.3.
1.4.3 Closet Installations
The following lists are recommendations
for buildings of energy-saving
construction, fully caulked and weatherstripped:
Follow applicable Codes and good
piping practice. Any uninsulated hot
water pipes must be installed with a
minimum 1” clearance from combustible
materials.
•
•
•
•
For installations in a confined space
(such as a closet), ventilation openings
must be provided through a door or wall
to prevent excessive heat from building
up inside the space.
Minimum requirements:
• one opening within 12” of the ceiling
(100 sq. in. opening)
• one opening within 12” of the floor
(100 sq. in. opening)
1.5 Water Piping
an opening to the outside, within 18”
of the floor, but no less than 6” off
the floor, should be provided in the
room. Each opening should be
covered in a grill, and have an area
of 1” per 1,000 BTUh for ALL
APPLIANCES in the area.
Openings must not be closed or
reduced. Doors and windows used
for air supply must be locked open.
Mechanical draft exhaust or supply
fans are not to be used in or near the
boiler area
Boiler combustion and ventilation
airflow must not be obstructed
IBC Technologies Inc.
System piping is connected to the boiler
using the 1” NPT female threaded
fittings provided at the locations shown
on page 10. Typical piping systems are
shown in Figures 8, 9, &10.
A 30 psi pressure relief valve (¾” NPT)
is supplied for field installation in the
flow supply line, in the manner shown in
Figures 8, 9, & 10. Relief valve
discharge piping must terminate 6”
above a drain using plain un-threaded
end, or per local Code.
To avoid water damage, system piping
and components are not to be located
overhead the boiler.
- 10 -
VFC Modulating Boilers
hydronic flow check(s) o
zone valves to prevent
thermal circulation
air vent
contractor
supplied
system
circulator(s)
12−18"
system supply piping
air purger
diaphragm
expansion tank
stop & waste
or ball valve
#30
#15
system return piping
auto fill valve
12 psi min.
backflow
preventer
boiler feedwater
tee & boiler drain
for system purging
pressure
relief
valve
ball
valve
Figure 8. Sample Piping Schematic (1)
cold supply
flow
check
drain
system
supply
system return piping
aquastat
flow
check
hot
cold
pressure
relief
valve
indirect
domestic
water
heater
T&P
relief
Figure 9. Sample Piping Schematic (2)
note: wire aquastat or control contacts in series wit
parallel wired zone control end switches or pump relay
contacts.
air
eliminator
(additional zones)
wire to zone
valve end switches
or relay contacts
zones
diaphragm
expansion
tank
buffer/tempering
tank
pressure
relief
valve
Figure 10. Sample Piping Schematic (3)
IBC Technologies Inc.
- 11 -
VFC Modulating Boilers
calibrated to close with at 4.5 US gpm
and open at 4.0 US gpm.
The VFC boiler is designed for supply
water temperatures within the range
80°F to 180°F, with a 20°F rise. Water
flow rates and pressure drop (head in ft.
w.c.) associated with a 20°F maximum
rise (∆°T) for the respective VFC
models are as follows:
When installed in a low mass heating
system such as an in-floor radiant
application, the VFC-series boilers may
benefit through use of a buffer tank to
ensure a controlled supply temperature,
and to prevent short cycling. It is highly
recommended that a buffer tank be
included in any heating system in which
any single zone has radiative loading
lower than 1/3rd of the minimum input
of the boiler (i.e. at 35,000 BTU/hr, the
boiler should be buffered if any single
zone attached is below 12,000 Btu/hr).
Table 4 - Flow Rate
Model
Flow
(USgpm)
Approx.
Head (ft. wc)
VFC 35-90
9.0
5
VFC 50-130
13.0
10
VFC 35-100LP
10.0
6.5
VFC 45-130LP
13.0
10
Propylene glycol solution is commonly
used in a water heating loop where
freeze protection is required. Its density
is lower than that of water, resulting in
lower thermal performance at a given
flow and pressure. As a rule of thumb, a
50%:50% solution of propylene glycol
and water will require an increased
system circulation rate (gpm up 10%),
and system head (up 20%) to provide
performance equivalent to straight water.
Water flow rates must not be allowed to
fall below 6 gpm (35-90 & 35-100LP
series: 5 gpm) in any possible operating
condition (eg. single zone in use).
To achieve system flow rates and
temperatures within such limits, care
must be taken to select the appropriate
pump. Evaluate pressure drop across the
system, including the above head values
for the boiler itself. Ensure pump is
rated for the design circulating water
temperatures; some pumps have a
minimum water temperature rating
above the low temperature potential of
the boiler. Following installation,
confirm actual performance by
measuring ∆°T (under high and low flow
conditions) after establishing the correct
firing rate (see Section 2.2 – Check
Boiler Input).
Whether required by local Codes or
otherwise, it is recommended that piping
systems include a suitable check valve,
gate valve and feedwater regulator set at
12 psig. in the make-up water link with
the city main. Use of unions and gate or
ball valves at the boilers supply and
return water connections is
recommended to simplify servicing.
1.6 Gas Piping
The boiler requires an inlet gas pressure
of at least 4.0” w.c. for natural gas and
10.5" w.c. for propane. For either fuel,
the inlet pressure shall be no greater than
14.0” w.c. Confirm this pressure range
is available with your local gas supplier.
VFC-series boilers are supplied with a
integral low-water flow switch, which
allows installation of the boiler above
radiation level. The flow switch is
IBC Technologies Inc.
- 12 -
VFC Modulating Boilers
The inlet gas connection of the boiler’s
gas valve is 1/2” NPT (female).
The boiler and its gas piping shall be
leak tested before being placed into
operation.
Adequate gas supply piping shall be
provided with no smaller than 1/2” Iron
Pipe Size (IPS), in accordance with the
following chart:
The gas valve is provided with pressure
taps to measure gas pressure upstream
(supply pressure) and downstream
(manifold pressure) of the gas valve.
Note that manifold pressures vary in
accordance with firing rate with the
modulating series boilers.
Table 5 - Max. Pipe Length (ft)
Model
1/2” IPS
3/4” IPS
1” IPS
VFC 35-90
20
100
350
VFC 50-130
10
50
175
VFC 35-100LP
50
200
600
VFC 45-130LP
30
125
400
Table 6 - Manifold Pressures
Gas piping must have a sediment trap
ahead of the boiler’s gas valve (see
Figure 11.). A manual shutoff valve
must be located outside the boiler, in
accordance with local codes/standards.
All threaded joints in gas piping should
be made with a piping compound
resistant to the action of natural gas - do
not use Teflon tape. Use proper hangers
to support gas supply piping.
Natural Gas Units
0.5" - 3.5" w.c.
Propane Units
1.2" - 10.0" w.c.
All Electrical wiring to the boiler
(including grounding) must conform to
local electrical codes and/or National
Electrical Code, ANS/NFPA No. 70 –
latest edition, or The Canadian Electrical
Code, C22.1 - Part 1.
1.7.1 Mains Hook-up
Line-voltage wiring is done within the
field-wiring box. Referring to Wiring
Diagram on page 32, connect the boiler
to the mains power using a separate,
fused circuit and a disconnect means
within sight of the boiler. Use 14-gauge
conductors in BX cable or conduit
appropriately anchored to the boiler case
for both mains supply and pump circuits.
The transformer primary (black wire) is
connected to the neutral and line (hot)
wires. The red conductors for the pump
contacts should be wired into the
ungrounded leg of the pump circuit.
full size
sediment
trap
gas valve inside
Figure 11. Typical Gas Piping
The boiler must be disconnected or
otherwise isolated from the gas supply
during any pressure testing of the system
at test pressures in excess of 1/2 psig.
Dissipate test pressure prior to
reconnecting.
IBC Technologies Inc.
Range
1.7 Electrical Connections
install manual
main shutoff
valve 5 ft.
above floor
when required
by local code
union
Model / Fuel Type
Note: The combined current of all
pumps connected through the on-board
pump relay (red conductors) should not
exceed 10 amps.
- 13 -
VFC Modulating Boilers
1.7.2 Thermostat wiring
1.7.3 Thermostat Heat Anticipator
When installed in a non-zoned system,
the heat anticipator setting is dependant
on the gas valve installed in the boiler:
The Thermostat terminal block is located
on the control module. The thermostat
terminals should NOT be connected to
any other power source and should only
be connected to a room thermostat,
isolated, zone valve end switches or
circulator end switches. When using 3wire zone valves (non-isolated) the zone
valve end contacts must be isolated from
the thermostat terminals using an
appropriate relay.
Gas Valve
Anticipator
Current
Setting
White-Rodgers 36E27 0.5A
For zoned systems, each room
thermostat’s heat anticipator should be
adjusted to the current draw of its
associated zone valve.
2. Boiler Systems and Operation
2.1 ELECTRONIC CONTROL
MODULE
The electronic control module governs
ignition and flame safeguards, throttle
management, and mixture and
temperature control. Additionally, it
provides a user interface, and performs
data and error logging functions.
2.1.1 Logged Data
All data is permanently logged in the
controller, and cannot be altered except
on replacement of the controller.
Ignition Counter
The control module tracks the number of
successful ignitions in its lifetime.
Data may be downloaded at any time
from the controller by connecting the
optional IBC communications cable
between the optical link and a
microcomputer. Data includes the
following:
• Ignition counter
• Average water temperature
• Average output
• Gas usage meter
• Error log
Average Water Temperature
The control module tracks the water
temperature averaged over the lifetime
of the boiler.
Average Output
The control module tracks boiler output
averaged over the lifetime of the boiler.
Gas Usage Meter
The control module tracks the amount of
gas used in its lifetime.
Further information about the
communications interface can be found
in the user manual for that product.
Error Log
IBC Technologies Inc.
- 14 -
VFC Modulating Boilers
The error log contains the last 3 errors
detected by the controller.
2.2.1 Standby
Waiting for a boiler operating signal.
The boiler is off during this time.
2.1.2 Glossary of Terms
This glossary briefly defines some terms
used in the control module functions.
2.2.2 Purging
Prepurge
On a boiler operating signal, the boiler
automatically enters a prepurge cycle.
Call for Heat
The thermostat indicates that room
temperature is below the thermostat
setting. A Call for Heat AND a Heat
Required signal are needed to start the
boiler, and are defined as Heating
Enabled.
The fan starts and automatically adjusts
to a level suitable for ignition. Twenty
seconds later, the pump starts. After a
total of 30 seconds, the ignition cycle
begins.
Interpurge
Heat Required
Temperature sensors on the boiler
indicate that water temperature is below
the water temperature setpoint. A Call
for Heat AND a Heat Required
signal are needed to start the boiler, and
are defined as Heating Enabled.
The boiler enters an interpurge cycle if
ignition is unsuccessful. The fan and
pump continue to run, and ignition is
delayed by an additional 25 seconds.
Postpurge
The fan remains on for 10 seconds and
then reduces airflow to an ultra low flow
mode for 90 minutes unless pre-empted.
Heating Enabled
The boiler is powered and there is a Call
for Heat and Heat is Required. (If
the boiler is in an error mode, the boiler
will not start.)
The pump remains on for 5 minutes after
the heating cycle ends.
If the heating cycle ends as a result of
water temperature exceeding setpoint by
8°F, the postpurge will continue as
normal, but the boiler will enter the
circulating mode.
2.2 SEQUENCE OF OPERATION
The control module has 5 cycles during
normal operation, as well as an error
mode for problem detection:
1. Standby cycle
2. Purging
3. Ignition cycle
4. Heating cycle
5. Circulating cycle
6. Error mode
If there is a boiler operating signal any
time during this cycle, the postpurge
ends, and a prepurge begins, otherwise
the boiler will enter standby mode.
2.2.3 Ignition
After the prepurge, the gas valve opens
for 5.5 seconds.
Each state is explained below. A flow
chart for the sequence of operation can
be found in the back of the manual.
IBC Technologies Inc.
For the first 3 seconds a spark is
delivered to the burner. For the
remaining 2.5 seconds, the probe is in a
flame sensing mode, and the gas valve is
kept open.
- 15 -
VFC Modulating Boilers
minute error cycle. Following the
interpurge, the fan and pump are stopped
until the end of the error cycle. Normal
operation then resumes.
Hard Errors result when a condition
exists that may be a safety hazard. The
boiler enters an extended prepurge then
the fan and pump are stopped. The
boiler is in a lockout, and must be
checked and restarted by a service
technician.
If no flame is detected at the end of the
trial, the interpurge cycle is repeated. If
ignition fails 3 times successively, the
boiler locks out and must be reset by
shutting the main power switch off and
back on. A qualified technician should
be consulted to establish and remedy.
If ignition is successful, the output of the
boiler decreases immediately to
minimum, and the heating cycle begins.
2.2.4 Heating
The heating cycle lasts until the boiler
operating signal ends, or until water
temperature exceeds the setpoint
temperature by 8°F at minimum output.
At the end of the heating cycle, the
boiler enters a postpurge.
A soft error can be identified when the
error light and the boiler operating
light are on at the same time.
If the boiler operating light is not on
while the error light is on, the boiler is
in a hard error.
During the heating cycle, boiler output
changes to meet heating demands. Water
temperature is regulated about the
setpoint to ±3°F.
Table 7 lists the hard and soft errors
and their causes. Note that other
problems such as disconnected wires or
defective sensors may be the cause of
the error. Always check connections
and wiring first.
2.2.5 - Circulating
This cycle operates when water
temperature exceeds setpoint by 8°F at
minimum output, and call for heat is still
present. After entering a postpurge, the
pump remains on until water
temperature is 8°F below setpoint
temperature or the boiler operating light
is off has ended.
Section 3.6.3 - Troubleshooting With
the Control Module provides a detailed
troubleshooting list for each error
condition.
2.2.6 - Error Mode
The controller continually checks
sensors to see that they are operating
within normal parameters. If sensors
indicate the boiler is operating outside it
limits, it will declare an error condition.
2 types of error conditions can occur:
Soft Errors result when an abnormal
condition exists which does not present
an immediate safety hazard. The boiler
enters an extended interpurge and a 5
IBC Technologies Inc.
- 16 -
VFC Modulating Boilers
Hard Errors
Hi Limit
Table 7 - Soft and Hard Errors
Soft Errors
Temp.Probe Error
•
•
Low Air
•
•
•
Description
measured temp
exceeds max.
input temp. or
less than min.
input temp.
temp. sensor
defective or
disconnected
airflow is below
blocked vent
threshold.
Defective or
disconnected
mass flow sensor
Defective or
disconnected fan
•
Description
water temp. has
exceeded limit of
water temp.
switch.
Max. Ignition
Trials
•
boiler has failed
3 successive
ignition trials
Vent Hi-Limit
•
vent temperature
has exceeded
limit of vent
temp. switch.
2.3 USER INTERFACE
2.3.1 Keypad Functions
The keypad allows the user to change
the setpoint or operating mode of the
boiler.
Low Flow
•
low water flow
and vent limit
not exceeded
The boiler defaults to its normal
operating mode during power-up.
To change the setpoint temperature,
press and hold the key in the desired
direction until the setpoint is reached.
The most recent setpoint is retained in
the controller even if power is
interrupted.
IBC Technologies Inc.
- 17 -
VFC Modulating Boilers
2.3.2 Indicator Lights
Table 8 - Status Indicators
Flashing: Boiler is waiting
for a call for heat.
Off: Boiler is firing or
preparing to fire.*
On: Thermostat indicates
more heat is needed.
Off: Call for heat has
ended.
On: Boiler is in any mode
except standby, or a soft
error exists.
Off: Boiler is in standby
or lockout.
On: The error indicator
lights when a hard or soft
error exists (See section
2.2.6 Errors)
In most cases, one of the 4
indicators below will also
be flashing when an error
exists.
On: Boiler is on and temp.
sensors are functioning
normally.
Figure 12. Display
The numeric display labeled
temperature indicates the current water
temperature in °F or °C(toggle between
units by pressing and holding both keys
simultaneously). Pressing either button
individually displays the setpoint
temperature.
The left-hand column labeled heat
provides an illuminated display of the
output level of the boiler. The indicators
light up sequentially from bottom to top
as output increases.
The 8 indicators in the right-hand
column labeled status display various
conditions of the boiler. These
indicators are described in Table 8 Status Indicators.
On: Pump is running.
Flashing: pump is on but
no water flow detected
On: Fan is on.
Flashing: fan is moving
less air than normal
On: Boiler heating.
Flashing: gas valve is
open but no flame detected
*Provided there is power to the unit.
IBC Technologies Inc.
- 18 -
VFC Modulating Boilers
3. STARTUP
FOR YOUR SAFETY READ BEFORE OPERATING
WARNING:
If you do not follow these instructions exactly, a fire or
explosion may result causing property damage, personal injury or loss of life.
A. This appliance does not have a pilot. It is equipped
with an ignition device which automatically lights the
burner. Do not try to light the burner by hand.
B. BEFORE OPERATING smell all around the
appliance area for gas. Be sure to smell next to the
floor because some gas is heavier than air and will
settle on the floor.
WHAT TO DO IF YOU SMELL GAS
•
•
•
Do not try to light any appliance.
Do not touch any electric switch; do not use any
phone in your building.
•
If you cannot reach your gas supplier, call the
fire department.
C. Use only your hand to turn the gas control knob.
Never use tools. If the knob will not turn by hand,
don’t try to repair it, call a qualified service
technician. Force or attempted repair may result in
a fire or explosion.
D. Do not use this appliance if any part has been under
water. Immediately call a qualified service
technician to inspect the appliance and to replace
any part of the control system and any gas control
which has been under water.
Immediately call your gas supplier from a
neighbor’s phone. Follow the gas suppliers
instructions.
OPERATING INSTRUCTIONS
1. STOP! Read the safety information above on this
label.
5. Remove front cover from appliance.
2. Set the thermostat to lowest setting.
6. Turn gas control knob clockwise ¬ to Off.
3. Turn off all electric power to the appliance by
selecting main power switch to Off.
7. Wait five (5) minutes to clear out any gas. Then
smell for gas, including near the floor. If you smell
gas, STOP! Follow B in the safety information
above on this label. If you don’t smell gas, go to the
next step.
4.
This appliance is equipped with an ignition device
which automatically lights the burner. Do not try to
light the burner by hand.
8. Turn gas control knob counterclockwise « to On.
9. Replace front cover on appliance.
10. Turn on electric power to appliance by selecting
main power switch to On.
11. Set thermostat to desired setting.
12. If the appliance will not operate, follow the
instructions “To Turn Off Gas To Appliance” and call
your service technician or gas supplier.
TO TURN OFF GAS TO APPLIANCE
1. Set the thermostat to lowest setting.
2. Turn of all electric power to the appliance by
selecting main power switch to Off.
3. Remove front cover from appliance.
4. Turn gas control knob clockwise ¬ to Off.
5. Replace front cover on appliance
Also ensure items under the following caption 3.1 Prior to Start-up have been addressed.
IBC Technologies Inc.
- 19 -
VFC Modulating Boilers
3.1 PRIOR TO START-UP
and water temperature setpoint to its
minimum setting. Allow the boiler to
reach a steady state, then check the boiler
input using the following formula:
Ensure venting system is complete and
seal tested. Confirm any common venting
system at the installation site is isolated
and independent of the VFC boiler and
that any holes left from removal of a
previous boiler have been sealed. Fill
condensation trap to full 5” (min) neck
height. Check water piping system is fully
charged, and that all air has been
discharged through loosened bleed caps.
Use a minimum water pressure of 12 psig.
Perform a final check of electrical wiring.
Boiler Input Formula
3600
× HV(BTU/ft.) = INPUT
time
3.1.1 Test Ignition System Safety
Shutoff Device
With the boiler in operation, test the
ignition system safety shutoff device by
shutting the manual gas valve immediately
outside the boiler case. Ensure boiler has
shut off and error and gas valve lights are
flashing. To restart boiler, reset power.
time
= seconds for 1 cu. ft. of
gas through meter
HV
= heating value of gas as
provided by gas supplier
INPUT=
gas input(in BTU/hr)
3.2 ADJUSTMENT FOR ALTITUDE
VFC Modulating Boilers are factory
assembled to operate with natural gas at
sea level. As altitude increases, the orifice
plate between the gas valve elbow and the
mixing tube (see Figure 13. Gas
Assembly) must be changed as described
in Table 9 - Orifice Plate Sizing.
O rific e
P late
To ensure the correct orifice is in place,
adjust the thermostat to maximum setting,
Figure 13. Gas Assembly
Table 9 - Orifice Plate Identification / Sizing (in 0.001" following "D")
Model / Altitude
0 - 1,500'
1,501 - 3,000'
3,001 - 4,500'
VFC 35-90
M-A005-090SL-D208
M-A005-090A1-D212
M-A005-090A2-D215
VFC 50-130
M-A006-130SL-D250
M-A006-130A1-D255
M-A006-130A2-D259
VFC 35-100LP
M-A009-100SL-D139
M-A009-100A1-D142
M-A009-100A2-D144
VFC 45-130LP
M-A008-130SL-D159
M-A008-130A1-D162
M-A008-130A2-D164
IBC Technologies Inc.
- 20 -
VFC Modulating Boilers
4. MAINTENANCE AND TROUBLESHOOTING
4.1 BOILER MAINTENANCE
The owner is responsible for general care of
the boiler. Improper maintenance of the
boiler may result in a hazardous condition.
4.1.1 General Care
Keep combustible materials and flammable
liquids and vapours away from the boiler.
Keep vent terminals clear of obstructions
(snow, dirt, etc.).
For a list of suppliers for all components,
contact IBC Technologies or visit our
website at www.ibcboiler.com.
Burner
Visually inspect burner through sight glass.
Ensure flame is stable and without
excessive fluttering. Normal flame pattern
is evenly distributed over the burner
surface.
Annual inspection of the burner is not
necessary. If operating improperly, remove
burner and clean or replace.
Use a CO2 analyzer to determine proper
combustion. CO2 level should be 9.2% (for
natural gas) or 10.4% (propane) .
Pump
Check that the pump is on in normal
operation.
CAUTION: Label all wires prior to
disconnection when servicing controls.
Wiring errors can cause improper and
dangerous operation.
Gas Piping
Check for damage or leaks and repair as
needed.
4.1.2 Inspection
Control Module
Inspection of the boiler to be performed
annually by a qualified service technician.
Venting
Check that boiler operation is consistent
with the steps in section 2.2 - Sequence of
Operation.
Check vent terminals for and remove any
obstructions.
Check that water temperature setpoint is
satisfactory.
Check for holes or leaks in venting.
Replace venting as needed.
If a problem exists with the control module,
consult troubleshooting guide.
Examine for any signs of moisture caused
by sweating intake air pipes; insulate as
required.
Water
Check water pressure and temperature.
There should be no noticeable change if
boiler is functioning normally. Check for
any noise in the system.
Check water piping for damage or leaks and
repair as needed.
Air Filter
Replace or clean air filter annually.
Condensate Traps
Check condensate traps every 6 months for
water seal and blockages. If a blockage
exists, trap must be cleared and refilled.
IBC Technologies Inc.
- 21 -
Freeze Protection
WARNING: Do not use Ethylene
Glycol, automotive-type
antifreeze, or undiluted
antifreeze. This may result in
severe boiler damage.
VFC Modulating Boilers
volume must not exceed 50% of the total
volume of water in the system.
Use only antifreeze made specifically for
hydronic systems. Inhibited propylene
glycol is recommended. Antifreeze
Verify proper operation after servicing.
COMPONENT DESCRIPTION
A diagram of components and their
placement can be found at the end of this
manual.
4.2.4 Oxygen Sensor
Part#/Type: #VFCM-P008 / Potentiometric Oxygen Sensor
For a list of supplier for all components,
contact IBC Technologies or visit our
website at www.ibcboiler.com.
Function: Senses combustion quality and
signals controller for fine tuning of fan/gas
valve.
The following list provides a summary
description of major components:
4.2.1 Fan/Blower
Installation: Replace every 5 years.
Remove with 3/8" wrench. Apply gas tape
to threaded joint.
Part#/Type: #VFCX-P005 / RG130-0800
24 VDC blower
4.2.5 Flow Switch
Function: Moves combustion air and flue
gas products through the boiler and
venting.
Installation: The fan must be removed at
the flange and step washers.
4.2.2 Gas Valve
Type: White-Rodgers 36E27-201B (nat.
gas) or 36E27-202B (propane) Modulating
Electronic Governor (MEG) Valve.
Part#/Type: #VFCX-P002/ ½" NPT
paddle-type brass spst reed switch
Function: for confirmation of adequate
circulating water flow; shuts boiler off
when flowrate drops below US 4.0 gpm.
Installation: Ensure that arrow points
towards the pressure vessel; shift bar to
“NO” position.
4.2.6 Hi-Limit
Function: regulates and supplies gas for
gas/air mixing based on a signal from the
control module.
Installation: see Section 3.1 Gas Valve
Adjustment.
Part#/Type: #VFCX-HL200 / Therm-ODisc 37T_21, calibrated for 200°F, 15°F
differential.
Function: Shuts boiler off when water
temperature exceeds safety limit.
4.2.3 Mass Airflow Sensor
Part#/Type: #VFCM-P009
Installation: Mount with Honeywell
Tradeline #107408 Heat Conductive
Compound between the base of the hilimit switch and the mounting surface.
Function: Measures combustion airflow
4.2.7 Transformer
Installation: The mass airflow sensor fits
between the intake pipe and the mixing
tube, connected with 2 flexible couples.
Part#/Type: #VFCX-P006/ Hammond
DG2G control transformer; Alternate: Rex
Manufacturing CS100AW/X Primary- 120
VAC; Sec.- 24 VAC; 100VA
IBC Technologies Inc.
- 22 -
VFC Modulating Boilers
4.2.9 Control Module
Function: Provides 24 VAC for (1) the
control circuit and (2) AC to DC power
converter, to drive the brushless DC fan.
Part#/Type: #VFCM-M001
Function: See Section 2 for an
explanation of controller function.
Installation: See wiring & ladder
diagrams.
Installation: The 4 screws on the front
panel corners secure the cover. To remove
the unit from the mounting brackets,
ensure all wires are removed from the
control module. Remove the controller
from the brackets by removing the
thumbscrews on the left and the screws on
the right.
4.2.8 Temperature Sensors
Part#/Type: #VFCM-P007 (2 used)
Function: Senses water temperature.
Signals controller to adjust output
according to water temperature.
Installation: use 3/8" wrench to remove
and tighten.
4.3 TROUBLESHOOTING GUIDE
The troubleshooting section is divided into
2 sections:
potential error conditions as grouped into
the following categories:
•
•
•
•
•
Preliminary checks
Detailed systems review
Often, a problem can be identified and
solved through simple checks of the
basics: confirming the electrical power
supply, gas flow and resetting the
thermostat control. To extend the cover of
such preliminary checks, the boiler’s
control module offers a clear visual
display of the status of the various control
circuit components.
Should a problem remain unsolved after
applying the preliminary checks, proceed
to the detailed system review, using the
Troubleshooting Guide. The Guide covers
Ignition
Cycling
Temperature
Below each section is a list of Symptoms,
Diagnoses, and Remedies.
Also provided with this manual are 4
diagrams for use with troubleshooting
including
• electrical wiring diagram
• sequence of operations flowchart
• boiler component layout diagram
• troubleshooting flowchart
4.3.1 Preliminary Checks
The first step in troubleshooting this system should be to observe the control module display.
The right hand column of indicators display error conditions and sources of error as
described in Section 2.2.6 - Error Mode.
In addition to checking the display, the following list is a guideline for troubleshooting:
1. Confirm power to the boiler: check that control module display is on.
2. Check that boiler is not in a safety lockout. Check that control module display is
illuminated.
IBC Technologies Inc.
- 23 -
VFC Modulating Boilers
3. Ensure wiring is clean and secure.
4. Check that manual gas valve and boiler gas valve are open.
5. Confirm water systems is properly charged to 12 psig and pump is serviceable.
4.3.2 Troubleshooting Electronic Components
This section details the method for troubleshooting the non-standard electronic components
on the boiler including the mass airflow sensor and the temperature sensors.
4.3.2.1 Mass Airflow Sensor
If the mass airflow sensor is suspected of defect, remove the sensor and connector and send
both to IBC for testing.
4.3.2.2 Temperature Sensor
The resistance of the temperature sensors varies inversely with temperature. Connect an
Ohmmeter to the sensors as shown in Figure 14. Resistance should be between 3.5kΩ and
5.3 kΩ. Resistance should decrease with an increase in temperature.
Temperature Probe (threaded plug format)
Ohmmeter
Resistance:
Approximately 5.3kΩ
at room temperature
3.5kΩ at 100°F
Figure 14. Ohmmeter Check of Temperature Sensors
IBC Technologies Inc.
- 24 -
VFC Modulating Boilers
4.3.2.3 Fan/Blower
Fan speed is adjusted using a signal from the control module. Four leads are attached
between the fan and the controller. The red and blue leads supply power to the fan, and the
fan will not operate if these connections are lost. The black lead carries the signal from the
controller to the fan. If this connection is lost, the fan will operate at maximum speed. The
white lead is unused. This connection will not alter the operation of the fan.
Black
Table 10 - Fan Operation
Function
28Vdc. Positive power
terminal
28Vdc. Negative power
terminal
Signal from controller
White
Not used
Lead Color
Red
Blue
Troubleshooting
Fan will not function if
disconnected.
Fan will not function if
disconnected.
Fan will only operate at max.
speed if disconnected.
No effect on fan operation.
4.3.2.4 Flow Switch
Check resistance between flow switch leads. If resistance is very low, there should be water
flow. If resistance is very high, flow rate should be 4.0 USGPM.
4.3.2.5 Hi-Limit Switch
Check resistance between leads. If resistance is very low, temperature should be acceptable.
If resistance is very high, temperature should be out of bounds.
4.3.3 Troubleshooting With the Control Module
Note: Never attempt to repair the control module. If the control module is
defective, replace it immediately.
Airflow Error
Water circ. lamp flashing
Error and Boiler
Operating lamps on
Low Airflow
Boiler unable to ignite.
Partially blocked vent.
Water noise in vent.
Excess condensate in venting.
•
Check venting for obstructions and remove.
•
Check condensate trap for obstructions. Remove
obstructions and refill condensate trap with water.
Check vent length and size. Compare with Table 3
- Maximum Venting Length.
•
IBC Technologies Inc.
- 25 -
VFC Modulating Boilers
Mass Flow Error
Airflow flashing
Signal from mass airflow sensor is not being detected or is giving an
Error and boiler
Operating lamps on abnormal reading
Defective or disconnected
• Check wiring to mass airflow sensor and control
mass airflow sensor.
module.
• Check mass airflow sensor as explained in Section
3.6.2 - Troubleshooting Electrical Components.
Fan speed input to fan
• Check all wiring between fan and control module.
disconnected or fan is
Replace leads if necessary. If leads are intact,
defective.
replace fan or control module as necessary.
• Check fan as explained in Section 4.3.2.3 Troubleshooting Electrical Components.
Temperature Sensor Error
Temperature lamp
flashing
Water temperature exceeds operating temperature.
Error and Boiler
Operating lamps on
Current outlet temperature
• Check water flow
exceeds operating limit.
Defective or disconnected
• Check wiring to temperature sensor and control
temperature sensor.
module.
• Check temperature sensor as explained in Section
4.3.2.2 - Troubleshooting Electrical Components.
Waterflow Error
Water circ flashing
Error and boiler
Low water flow, vent limit not exceeded.
operating lamps on
Defective or disconnected flow • Check wiring to flow switch and control module.
switch.
• Check flow switch as explained in Section 4.3.2.4 Troubleshooting Electrical Components.
Improper piping.
• Refer to Section 1.4 - Water Piping for
recommended piping installation.
Undersized pump.
• Check manufacturer’s rating charts.
• Check temperature differential across heat
exchanger.
Restriction in water pipe.
• Check temperature differential across zone/heat
exchanger.
IBC Technologies Inc.
- 26 -
VFC Modulating Boilers
Hi Limit Error
Temperature lamp
flashing
Error lamp on
Water temperature exceeds hi-limit.
Boiler in lockout.
Defective or disconnected hi• Check wiring to hi-limit switch and control module.
limit switch.
• Check hi-limit switch as explained in Section
4.3.2.5 - Troubleshooting Electrical Components.
Low water flow not detected
• Check flow switch and connections. Ensure flow
by the flow switch.
switch connection on control module has not been
bypassed.
• Check for obstructions in water pipe.
Maximum Ignition Trials Error
Gas valve lamp
Boiler has failed to ignite on 3 successive attempts.
flashing
Error lamp on
Boiler in lockout.
No spark when igniting
• Check that igniter lead is secure at the control
Igniter probe/flame sensor
module and at the probe.
disconnected.
• Open manual gas shutoff and reset boiler.
Manual gas shutoff is closed.
• Adjust gap between igniter probe/flame sensor and
Gap between igniter probe and
burner to a distance of 3/16”
burner is too large.
Boiler ignites, but shuts off at • Ensure pressure vessel is grounded.
the end of the ignition trial
Improperly grounded pressure
vessel/burner.
Loose or defective igniter
• Check ignition cable. Ensure lead ends are secured
cable
to the control module and the igniter probe.
• Check the igniter probe/flame sensor is electrically
isolated from the vessel, and its ceramic insulator is
uncracked. Cracked ceramic will ground out the
current. Ensure vessel is electrically grounded, to
facilitate flame rectification.
Vent Hi-Limit Error
Vent temperature has exceeded the vent limit switch.
Error lamp on
Boiler in lockout
Low water flow and flow
• Check wiring to flow switch and control module.
switch signal has not been
• Check that flow switch has not been bypassed or
detected.
short circuited.
IBC Technologies Inc.
- 27 -
VFC Modulating Boilers
4.3.4 Detailed System Checks
Detailed Systems Troubleshooting
Symptom
Rapid Cycling
i) Gas valve clicks on and
off repeatedly when
igniting.
ii) Water noise in exhaust
venting
no other symptoms
IBC Technologies Inc.
Cycling Problems
Diagnosis
Remedy
Obstruction in Intake/
Exhaust venting.
Inspect vent terminals and
tubing. Clear any obstructions.
Excess Condensate in
venting.
• Obstruction in
condensate trap.
• Improper vent length.
• Improper slope to vent.
Check venting angles
Inspect and clean condensate
trap.
Check venting. Compare vent
length and diameter to Table 3Maximum Venting.
Incorrect anticipator setting Check operation. Refer to
or defective thermostat.
manufacturer’s instructions.
Check setting with ammeter.
Air in system (check for
Bleed/purge system as required.
flashing flowswitch lamp),
Confirm adequate pump size
of marginal water flow.
and temp rise in HX
Slow combustion air blower. Check that CO2 level is OK
9.2% nat. gas (10.4% for
propane)
Dirty burner/heat exchanger. Check pressure drop.
Insufficient water flow.
Refer to recommended piping in
• Improper piping.
Section 1.5.
Check manufacturer’s rating
• Undersized pump.
charts/check temperature
differential across heat
exchanger.
Check temperature differential
• Restriction in water
across zone/heat exchanger.
pipe.
Insufficient radiation.
Check actual amount of
radiation per zone and refer to
manufacturer’s rating tables.
Unit overfired.
Clock gas meter/check gas
pressure with manometer/ check
CO2 level.
Unit Oversized.
Refer to Load Calculation vs.
Boiler Output
Improperly set or defective
Check operation with
operating/safety controls
Ohmmeter/Voltmeter
- 28 -
VFC Modulating Boilers
Symptom
Noisy spark when igniting.
Boiler rumbles when igniting.
Ignition Problems
Diagnosis
Ignition lead is not firmly
connected.
Contaminants/moisture
on igniter probe/flame
sensor.
Poor gas/air mixture.
Fluctuating gas pressure/
gas pressure too high/too
low.
Boiler will not attempt to ignite.
i) Fan and pump are
operating normally.
ii) Fan and pump are off
No lights on display
iii) Fan off and pump on
Boiler ignites but shuts off
within seconds
Symptom
Fumes and High Humidity
IBC Technologies Inc.
Remedy
Reconnect ignition lead
Ensure probe is dry by rerunning post-purge;
otherwise, clean or replace
igniter probe.
Check CO2 in exhaust. Check
mass airflow sensor.
Check pressure with
manometer during ignition.
Check mass airflow sensor.
No power to ignition
control module.
Igniter probe/flame
sensor disconnected.
Blown fuse in ignition
module.
Defective Control
Module.
Check system wiring.
Check airswitch & air tubing.
Reconnect probe.
No power to boiler
Defective transformer.
Check line voltage
Check transformer.
Reconnect or replace as
needed.
Bad electrical grounding
of vessel defeats flame
rectification
Loose or bad igniter
cable
Confirm continuity between
pressure vessel and ground
terminal on Control Module.
Check and replace as required
Miscellaneous
Diagnosis
Improperly installed
condensate trap
Leak in CPVC/ABS/PVC
vent piping
Flue gas leak in heat
exchanger
- 29 -
Check fuse.
If blown, replace.
Check ignition output from
control module.
Remedy
Refer to installation/operation
instructions
Visually inspect using soap
solution
Visually inspect all
mechanical connections
VFC Modulating Boilers
Symptom
Insufficient heat.
Temperature Problems
Diagnosis
Operating temp. too low
Remedy
Boost setpoint per Section
2.3.1 above
Unit undersized
Refer to Load Calculation vs.
Boiler Output
Air trapped within system Bleed system as required.
Improper system piping
Refer to recommended piping
in Section 1.5.
System pump undersized Check pump manufacturer’s
data/check temp differential
across heat exchanger.
Poor gas/air mixing
Check CO2 level.
Defective thermostat.
Refer to manufacturer’s
instructions.
Incorrect gas/air orifices. Refer to orifice sizing table
Obstruction in condensate Inspect and clean condensate
drain.
drain.
Unit cycling on operating/ Check operation with
safety controls.
Ohmmeter/Voltmeter.
System radiation
Check manufacturer’s rating
undersized
tables for capacity per foot.
Temperature exceeds thermostat Incorrect anticipator
Check with Ammeter.
setting
setting
Thermostat not level.
Check level.
One or more zones do not heat
Air trapped within
Vent system/zone as required.
properly.
zone(s)
piping
Insufficient radiation/
Check actual length of pipe
excessive heat loss.
using radiation / heat loss
calculation.
Insufficient flow rate to
Check temperature drop
zone(s).
across zone.
Defective zone valve/
Check operation per
zone circulator.
manufacturer’s instructions.
One or more zones do not heat
Defective zone
Check operation per
properly.
thermostat.
manufacturer’s instructions.
Improper control wiring.
Check wiring per
manufacturer’s instructions.
Improper/obstructed
Check baseboard
baseboard radiation.
manufacturer’s instructions/
check at zone.
Operating limit set
Check limit setting/operation.
improperly.
IBC Technologies Inc.
- 30 -
VFC Modulating Boilers
Heating Enabled: Occurs with a call for heat and
heat is required.
Standby Cycle
Heat required: Heat is required as long as the
controller senses a requirement to raise or
maintain the current water temperature.
Call for heat: The room temperature is below the
thermostat temperature setting.
Fan off &
Pump off
Y
Timer countdown
complete?
N
N
Heating Enabled?
Y
Prepurge Cycle
Ignition Cycle
Gas valve
opens
Fan starts at
ignition level
More heat
required?
N
Y
Raise output
Lower output
Spark ceases
and flame
sensing begins
Pump starts
2.5 second
delay
10 second
delay
Flame
detected?
N
N
Heating disabled OR
Temperature 8°F above setpoint
at minimum output?
N
Y
Y
Postpurge Cycle
3 ignition trials?
Fan output set
to purge speed
Y
Fan and pump
continue
operating
Less heat
required?
N
Y
Spark for 3
seconds
20 second
delay
Interpurge Cycle
Heating Cycle
Close gas valve
10 second
delay
System
Lockout
25 second
delay
Fan output set
to min. speed
Set 90 min.
timer
Heat not required?
N
Pump off
Y
Actual water temp 8°F <
setpoint temperature
AND heating required?
N
Y
Sequence of Operation Flowchart for VFC Modulating Series Boilers
IBC Technologies Inc.
- 31 -
VFC Modulating Boilers
Wiring Diagram for VFC Modulating Series Boilers
IBC Technologies Inc.
- 32 -
VFC Modulating Boilers
3.
4.
2.
5.
6.
7.
1.
8.
11.
12.
13.
14.
Component Layout Diagram
1. Pressure Vessel/Heat Exchanger
2. Igniter Probe/Flame Sensor
3. Fan/Blower
4. Tridicator
5. Hi-Limit Switch
6. Outlet Temperature Sensor
7. Modulating Gas Valve (MEG)
8. Modulating Boiler Control Module
9. (not shown, under controller) Mass Airflow Sensor
10. (not shown, under controller) Airflow Homogenizer
11. 120V:24V Transformer
12. Oxygen Sensor
13. Inlet Temperature Sensor
14. Water Flow Switch
IBC Technologies Inc.
- 33 -
VFC Modulating Boilers
Installation Checklist
Model#:
Dealer Name:
Heat Loss:
BTU/ft.:
Water Tank #:
Installation Date:
Serial#:
BTUhr
ft. of Radiation:
# of Zones:
Total Radiation Output:
BTUhr
Electrical Information
Thermostat:
Supply Voltage:
Anticipator Setting:
Combustion Air Blower Amp Draw:
Volts
Amps
Amps
Boiler Information
Type of Gas:
CO2 reading:
%
in. w.c.
Air Intake Orifice Size:
Air Pressure Differential Across Air Intake Orifice Plate:
in. w.c.
Vent/Intake Piping
Actual Length
Pipe Size
Exhaust Vent Piping:
Air Intake Piping:
Operating Gas Inlet Pressure:
in.
in.
# of 90 and 45 Elbows
ft.
ft.
Water Pressure/Temperature
Temperature Rise Through Boiler
Space Heating:
°F
Domestic Hot Water:
°F
Operator Setting(A-E):
Flue Gas Temp.:
°F
Tridicator Gauge
Operating Pressure:
Operating Temp.:
Water Piping
Water Manifold Pipe Size
Supply:
Return:
Pipe Size to DHW Tank:
DHW Tank Aquastat Setting:
Differential Setting:
°F
°F
Valve Type to DHW Tank
Two-Way:
Three-Way:
System Pump Model #:
Additonal Pump Model #:
Expansion Tank Model #:
Expansion Tank Size:
System Bypass Type
Honeywell
Manual
None
Type of Air Elimination
Spirovent
Manual Air Bleed
Notes:
IBC Technologies Inc.
- 34 -
VFC Modulating Boilers
psig
°F