1
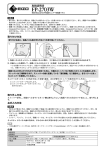
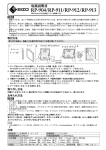
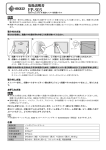
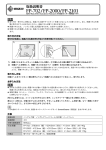
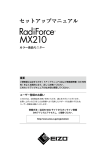
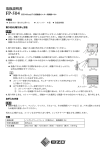
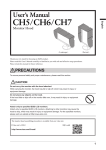
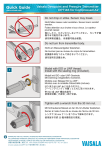
User’s Manual
取扱説明書
Panel Protector for EIZO 54 cm (21.3) inch class LCD Monitors
Note
EIZO 54cm (21.3 型) 液晶モニター用保護パネル
注意点
•• Surface of the panel protector catches the dirt (dust or finger prints) easily. Please use the enclosed gloves while
installing and removing the panel protector.
•• Please use the supplied masking tape and be careful not to scratch the LCD panel or the cabinet with the panel protector
during installation. Also please do not remove the panel protector often. It may scratch or result in damage to the LCD panel.
•• When using LCD monitor with optional panel protector, it is preferable to avoid using downwards. In this condition, the
panel protector might become bend or slip out from the monitor.
•• If using the Integrated Front Sensor after installation of a panel protector, be sure to execute correlation using RadiCS/
RadiCS LE. Refer to each User’s Manual for details.
●●Installation
Tape
2.
Separator
Cut
●●取付方法
取り付ける前に、液晶パネル面の汚れやほこりを取り除いてください。
Before installation, please remove dust and stains from the LCD panel.
1.
•• 保護パネルは、ほこりや指紋などの汚れが付きやすいため、取り付け/取り外しの際には付属の手袋をご使用ください。
•• 取り付け、取り外しの際には、付属の養生テープを使用し、液晶パネル面やキャビネットを傷つけないようご注意くださ
い。また、保護パネルを頻繁に取り外すことはおやめください。液晶パネル面が傷つく恐れがあります。
•• 保護パネルを装着した後は、液晶パネル面を下向きに傾けて設置しないでください。保護パネルが外れることがあります。
•• Integrated Front Sensorをご使用になる場合、保護パネル装着後、必ずRadiCS/RadiCS LEを使用してコレレーションを実行し
てください。詳細はRadiCS/RadiCS LE取扱説明書をご参照ください。
3.
1.
(1)
2.
セパレータ
(2)
Tape (blue)
テープ
①
Lever
Adhere the tape on long sides of the cabinet.
3.
②
テープ(青)
1. Strip the tape from the separator and adhere it on each edge of the cabinet (on the right and left).
きりかき
へら
1. テープをセパレータから剥がし、キャビネットの縁(左右)にテープを貼ります。
キャビネット長辺にテープを貼ります。
2. Set the panel protector into the grooves of the panel frame; the lower first (1), then the upper (2).
2. 保護パネルをキャビネットと液晶パネルの間に、①下部から②上部の順序で上下の溝にはめ込みます。
3. With the enclosed tool (Lever) set the tabs of the panel protector into the side grooves (4 tabs).
3. 付属のへらを使用して、保護パネルの左右のツメ(4箇所)を左右の溝にはめ込みます。
4. Strip the tape from the cabinet.
●●Removing
4. テープをキャビネットから剥がします。
The panel protector has a cut to fit on the sensor. Align the cut with the sensor position when installing the panel
protector. If installed in the wrong orientation, the sensor may be damaged.
Put the lever on the tabs of the panel protector and move it toward the LCD panel to install. Position the protector into the
LCD panel tightly without leaving an opening.
Put the lever on the tabs of panel protector and move it toward the cabinet to remove.
●●Cleaning
This product comes with a special cleaning cloth designed to remove stains from the panel.
If necessary stubborn stains can be removed by moistening part of the cloth with water to enhance its cleaning
power.
Note
•• Please be sure to keep the panel protector immobilized while cleaning it. Otherwise it may scratch the surface of the
LCD panel. To hold the panel protector by hand, use gloves or a soft cloth to avoid dust or finger prints.
•• Chemicals such as alcohol and antiseptic solution may cause gloss variation, tarnishing, and fading of the cabinet or
panel, and also quality deterioration of the image.
•• Never use any solvents or chemicals, such as thinner, benzene, wax, and abrasive cleaner, which may damage the
cabinet or panel.
Tips
•• The optional ScreenCleaner is recommended for cleaning the cabinet and panel surface.
●●Specification
Surface treatment
Reflectivity
Dimension/ Weight
Accessories
Anti-Reflective Coating (Both sides)
Coating strength 4H
Less than 1 %
Light transmission More than 95.0 %
436.3 mm (W) × 328.4 mm (H) × 1.2 mm (D) / Approx. 210 g
Lever (for Panel Protector), Gloves, Cleaning Cloth, User’s Manual, Masking tape 4 pieces (2 sets)
センサーの形状にあわせてきりかきがあります。きりかきとセンサーの位置が合うように取り付けてくださ
い。方向を間違えると、センサーが破損する恐れがあります。
へらを保護パネルのツメに当て、液晶パネル面側に倒すようにしてはめ込みます。液晶パネルとの間にすき
間があかないように、保護パネルをしっかりとはめ込んで密着させてください。
●●取り外し方法
付属のへらをキャビネット側に倒すようにして保護パネルの左右のツメをおこし、取り外します。
●●お手入れ方法
汚れのふき取りには、付属のクリーニングクロスをご使用ください。
落ちにくい汚れは、少量の水でしめらせた布で、やさしくふき取ってください。ふき取り後、もう一度乾いた布でふい
ていただくと、よりきれいな仕上がりとなります。
注意点
•• 汚れをふき取るときは、保護パネルが動いて液晶パネル面を傷つけないように、保護パネルを押さえてください。また、保
護パネルを押さえるときは、指紋などの汚れが付かないように、手袋や柔らかい布などを使用してください。
•• アルコール、消毒薬などの薬品は、キャビネットやパネル面の光沢の変化、変色、色あせ、画質の劣化などにつながる恐れ
があります。
•• シンナー、ベンジン、ワックス、研磨クリーナは、キャビネットやパネル面をいためるため絶対に使用しないでください。
参考
•• キャビネットやパネル面のクリーニングにはScreenCleaner(オプション品)をご利用いただくことをお勧めします。
●●仕様
表面処理
可視域反射率
寸法/質量
付属品
両面AR コーティング
表面硬度
4H
1%未満
可視光線透過率
95.0%以上
436.3mm(幅)×328.4.mm(長さ)×1.2mm(厚さ)/約210g
取り付け/取り外し用へら、手袋、クリーニングクロス、取扱説明書、養生テープ4枚(2セット)
用户手册
EIZO 54.1 cm(21.3 英寸)级别液晶显示器的屏幕保护膜
注意
• 屏幕保护膜的表面容易变脏(沾上灰尘或指印)。 安装/拆卸屏幕保护膜时应使用随附的手套。
• 请使用随附的胶带,安装时小心不要让屏幕保护膜划伤液晶面板或外壳。此外不要经常取下屏幕保护膜,否则可能划伤或
损坏液晶面板。
• 液晶显示器与选购的屏幕保护膜一起使用时,最好避免显示器面朝下。 否则屏幕保护膜可能会弯曲或从显示器上脱落。
• 若在安装屏幕保护膜后使用集成式前传感器,请务必使用RadiCS/RadiCS LE执行关联。参照各自的用户手册了解详情。
● 安装
安装之前,擦除液晶面板上的灰尘和污垢。
1.
胶带
2.
分离纸
3.
切口
(2)
胶带(蓝色)
(1)
杆
1. 从分离纸上撕下胶带,将其粘在外壳的左、右两边。
将胶带粘在外壳的长边。
2. 将屏幕保护膜卡入面板边框的槽中,先下(1)后上(2)。
屏保上有一个和传感器形状匹配的切口。安装屏幕保护膜时,将切口对准传感器位置。若方向弄错,可能会损坏
传感器。 If installed in the wrong orientation, the sensor may be damaged.
3. 用随附的工具(杆)将屏幕保护膜的(4个)凸起插入侧面凹槽。
把杆放在屏幕保护膜的凸起上,朝液晶面板移动,进行安装。将保护膜紧密地装入液晶面板,不要留下开口。
4. 从外壳上撕下胶带。
● 拆卸
把杆放在屏幕保护膜的凸起上,朝向外壳移动,将其取下。
● 清洁
清洁时请务必使屏幕保护膜保持不动。 否则可能划伤液晶面板表面。用手握住屏幕保护膜时,请使用手套或软
布,避免留下灰尘或指印。
本产品随附专用清洁布,用于清除保护膜上的污垢。
如有必要,请将小块布用水蘸湿,增强其清洁能力,以除去顽垢。
注意
• 本产品随附专用清洁布,用于清除保护膜上的污垢。 否则可能划伤液晶面板表面。
• 酒精、消毒液等化学试剂可能导致机壳或面板光泽度变化、失去光泽、褪色及图像质量降低。
• 切勿使用任何可能会损伤机壳或面板的稀释剂、苯、蜡和研磨型清洗剂。
注
• 建议使用选购的ScreenCleaner清洁机壳和面板表面。
● 规格
153 Shimokashiwano, Hakusan, Ishikawa 924-8566 Japan
Phone: +81 76 277 6792 Fax: +81 76 277 6793
Helmut-Grashoff-Strasse 18, 41179 Mönchengladbach, Germany
Phone: +49 2161 8210210 Fax: +49 2161 8210150
表面处理
防发射涂层(两面)
表面硬度
4H
反射率
小于1%
可见光透过率
大于95%
尺寸/ 净重
436.3 mm (宽度) × 328.4 mm (高度) × 1.2 mm (深度) / 约210 g
配件
杆(屏幕保护膜用),手套, 清洁布,用户手册,胶带4件(2套)
〒 924-8566 石川県白山市下柏野町 153 番地
http://www.eizoglobal.com
http://www.eizo.co.jp
Copyright © 2015 EIZO Corporation All rights reserved.
1st Edition-November, 2015
Printed in Japan.
00N0L944A1
(U.M-RP916-AL)