1
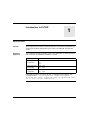
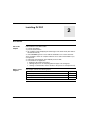
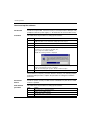
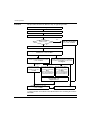
PL7DIF User Manual
eng
2
Table of Contents
About the Book . . . . . . . . . . . . . . . . . . . . . . . . . . . . . . . . . . . . . . . 5
Part I General information on the PL7DIF software . . . . . . . . . 7
At a Glance . . . . . . . . . . . . . . . . . . . . . . . . . . . . . . . . . . . . . . . . . . . . . . . . . . . . . . 7
Chapter 1
Introduction to PL7DIF . . . . . . . . . . . . . . . . . . . . . . . . . . . . . . . . . 9
General Points. . . . . . . . . . . . . . . . . . . . . . . . . . . . . . . . . . . . . . . . . . . . . . . . . . . . 9
Chapter 2
Installing PL7DIF. . . . . . . . . . . . . . . . . . . . . . . . . . . . . . . . . . . . . 11
At a Glance . . . . . . . . . . . . . . . . . . . . . . . . . . . . . . . . . . . . . . . . . . . . . . . . . . . . .
How to set up the software . . . . . . . . . . . . . . . . . . . . . . . . . . . . . . . . . . . . . . . . .
How to register PL7 DIF . . . . . . . . . . . . . . . . . . . . . . . . . . . . . . . . . . . . . . . . . . .
How to Transfer PL7 DIF User Rights from One Workstation to Another . . . . . .
Chapter 3
11
12
13
15
Limitations of the product PL7DIF . . . . . . . . . . . . . . . . . . . . . . 17
Limitations . . . . . . . . . . . . . . . . . . . . . . . . . . . . . . . . . . . . . . . . . . . . . . . . . . . . . . 17
Part II Interactive mode of usage . . . . . . . . . . . . . . . . . . . . . . . . 19
At a Glance . . . . . . . . . . . . . . . . . . . . . . . . . . . . . . . . . . . . . . . . . . . . . . . . . . . . . 19
Chapter 4
Interactive mode . . . . . . . . . . . . . . . . . . . . . . . . . . . . . . . . . . . . . 21
How to run PL7DIF in interactive mode. . . . . . . . . . . . . . . . . . . . . . . . . . . . . . . . 21
Chapter 5
Comparing two applications . . . . . . . . . . . . . . . . . . . . . . . . . . . 23
How to compare two applications . . . . . . . . . . . . . . . . . . . . . . . . . . . . . . . . . . . . 23
Chapter 6
Displaying the results . . . . . . . . . . . . . . . . . . . . . . . . . . . . . . . . 25
At a Glance . . . . . . . . . . . . . . . . . . . . . . . . . . . . . . . . . . . . . . . . . . . . . . . . . . . . .
Identifying the application . . . . . . . . . . . . . . . . . . . . . . . . . . . . . . . . . . . . . . . . . .
Application browser . . . . . . . . . . . . . . . . . . . . . . . . . . . . . . . . . . . . . . . . . . . . . . .
Analyzing the differences . . . . . . . . . . . . . . . . . . . . . . . . . . . . . . . . . . . . . . . . . .
Visual comparison method . . . . . . . . . . . . . . . . . . . . . . . . . . . . . . . . . . . . . . . . .
Chapter 7
25
26
28
30
31
Printing a comparison file . . . . . . . . . . . . . . . . . . . . . . . . . . . . . 37
How to print a comparison folder. . . . . . . . . . . . . . . . . . . . . . . . . . . . . . . . . . . . . 37
3
Chapter 8
Creating a comparison file . . . . . . . . . . . . . . . . . . . . . . . . . . . . 39
How to create a comparison file. . . . . . . . . . . . . . . . . . . . . . . . . . . . . . . . . . . . . . 39
Part III Batch usage mode. . . . . . . . . . . . . . . . . . . . . . . . . . . . . . . 41
At a Glance . . . . . . . . . . . . . . . . . . . . . . . . . . . . . . . . . . . . . . . . . . . . . . . . . . . . . 41
Chapter 9
Batch mode . . . . . . . . . . . . . . . . . . . . . . . . . . . . . . . . . . . . . . . . 43
General description of batch mode . . . . . . . . . . . . . . . . . . . . . . . . . . . . . . . . . . . 43
Chapter 10
Starting "batch" on a keyboard . . . . . . . . . . . . . . . . . . . . . . . . 45
How to start a "batch" on the keyboard . . . . . . . . . . . . . . . . . . . . . . . . . . . . . . . . 45
Chapter 11
Starting a programmed "batch" . . . . . . . . . . . . . . . . . . . . . . . . 47
How to program a "batch" . . . . . . . . . . . . . . . . . . . . . . . . . . . . . . . . . . . . . . . . . . 47
4
About the Book
At a Glance
Document Scope
This manual describes the installation and use of the PL7DIF software.
User Comments
We welcome your comments about this document. You can reach us by e-mail at
[email protected]
PL7DIF
5
About the Book
6
PL7DIF
General information on the
PL7DIF software
I
At a Glance
Aim
This Part provides general information on the PL7DIF software.
What's in this
Part?
This part contains the following chapters:
PL7DIF
Chapter
Chapter Name
Page
1
Introduction to PL7DIF
2
Installing PL7DIF
11
9
3
Limitations of the product PL7DIF
17
7
General information on the PL7DIF software
8
PL7DIF
Introduction to PL7DIF
1
General Points
Function
The PL7DIF software can be used to compare two PL7 multi-PLC applications (in
.STX format) for Micro and Premium PLCs: TSX, PCX and PMX, then view the
results.
Domain of
application
The comparison is made on all types of PL7 V4.x application, of version levels less
than or equal to the installed PL7 PRO V4.x version.
Equipped station
Level of applications compared
PL7 DIF V4.2 and
PL7 PRO V4.2
V4.0
V4.1
V4.2
PL7 DIF V4.2 and
PL7 PRO V4.3
V4.0
V4.1
V4.2
V4.3
PL7 DIF V4.2 and
PL7 PRO V4.4
V4.0
V4.1
V4.2
V4.3
V4.4
If the application does not respect this rule, a warning message appears. This
message reads PL7 access impossible. Comparison stopped.
Incorrect file format. Reopen and resave the application using
PL7 to ensure correct compatibility.
PL7DIF
9
Introduction to PL7DIF
Update
procedure
Limitations
To update your application:
Step
1
open your application with the most recent version of PL7 PRO installed on your
station
2
Click "YES" when asked if you want to update the input/output catalog
3
Save the application
PL7DIF cannot be used to write or modify PL7 applications.
PL7DIF cannot compare applications stored in the PLC (you must first download the
PLC applications:
l either using the PL7PRO workshop,
l or using a client application of the PL7 OLE Automation Server.
PL7DIF environment
Server
Description of
the necessary
environment
10
Action
Unload the
In order for PL7DIF to operate correctly, the PC must be configured as follows:
l Pentium type processor or above,
l minimum 64 Mb of RAM,
l PL7 Pro software version V4.0 or later.
PL7DIF
Installing PL7DIF
2
At a Glance
Aim of this
Chapter
Full installation of P17Diff includes:
l software installation
l present documentation
l two complete copies displaying the advantages of the batch mode (this mode is
described in Part III)
l and a README type file to assist with the installation of its various elements.
These examples, which are complete with their source code and available to you,
correspond to:
l a DOS type command file, which implicitly starts PL7DIF,
l a Visual Basic 5.0 application
l displaying all PL7DIF input pulses,
l allowing the process for comparing different types to be configured
l creating a command file, which is relative to the processes stated previously.
What's in this
Chapter?
This chapter contains the following topics:
PL7DIF
Topic
Page
How to set up the software
12
How to register PL7 DIF
13
How to Transfer PL7 DIF User Rights from One Workstation to Another
15
11
Installing PL7DIF
How to set up the software
Introduction
In order to set up PL7DIF, it is first necessary to correctly install PL7 PRO (SV 4.0)
(compliance with the system registry, i.e. PL7PRO must be saved as OLE server).
Procedure
This table shows the procedure for setting up the software.
Step
Action
1
Insert the compact disc into the correct drive.
Note: if the drive is set to automatic startup, proceed to step 5.
2
Click on the Start button.
3
Select the Execute command.
4
Enter the CD-ROM or DVD drive identifier (for example E),
Using the root, select directory PL7DIF_V42,
Type "\setup" then validate with OK
Result: The following window is displayed:
5
Validate the following two windows in order to save your name and organization,
and the setup language (French or English).
Note: The default program group is "Modicon Télémécanique"
6
Validate to complete the installation.
The installation is temporary (activation duration = 21 days). The following chapter,
entitled "PL7DIF protection", explains the procedure for making this installation
permanent.
Recommendations
In order to operate correctly, PL7DIF must be reinstalled every time the PL7 PRO
software is updated.
Reinstallation
procedure
This table shows the procedure for setting up the software.
12
Step
Action
1
Run "Setup.exe" to uninstall PL7DIF.
2
Update the PL7 PRO software.
3
Run PL7DIF again to reinstall it
PL7DIF
Installing PL7DIF
How to register PL7 DIF
At a Glance
PL7DIF
To obtain permanent user rights for the software, you must register it with Schneider
Electric. Once the software is installed, you have 21 days to register.
13
Installing PL7DIF
Procedure
This procedure describes the different steps in registering PL7 DIF.
Start PL7 DIF or the Registration Tool
Accept with Yes
Confirm at the welcome screen with Next
Yes
Do you have the
activation code?
Select
Enter the code received
then confirm with Next
No
Select Authorize this PC then confirm with Next
Select a registration method: By telephone, by fax, by e-mail or via
the Web then confirm with Next
Telephone, Fax, E-mail
Enter the required fields, the serial number
and the commercial reference (*) and
confirm with Next
Telephone
Telephone Schneider
Electric to obtain the
activation code, then
click OK
Web
Enter the required fields, the serial number
and the commercial reference marked on
the installation CD-ROM box, and confirm
with Register
Fax
Enter the fax number to
which the response is to
be sent and confirm with
Next.
A fax containing your
data is generated in text
format: Send this fax
E-mail
Enter the e-mail address
to which the response is
to be sent, and confirm
with Next.
An e-mail containing your
data is sent automatically
to the specified address.
Wait for the response from Schneider Electric and
restart PL7 DIF or the
Registration tool
Enter the activation code and
confirm with Next
Quit the procedure by clicking Finish
(*) These numbers are marked on the label inside the box containing the software
CD-ROMs.
14
PL7DIF
Installing PL7DIF
How to Transfer PL7 DIF User Rights from One Workstation to Another
Introduction
This function is used to transfer user rights from a source terminal to a new terminal
(destination), thus enabling PL7 DIF to be launched on it.
The transfer can be carried out using:
l A 3 1/2" floppy disk,
l A network.
Note: Once the access rights have been transferred, the source terminal can no
longer use PL7 DIF unless you save again or make a reverse transfer.
Following transfer of the rights to floppy or removable disk, if these rights are
altered before being transferred to the destination terminal, contact Schneider
Electric for a new registration.
PL7DIF
15
Installing PL7DIF
How to Perform a
Transfer
This procedure describes the different steps for transferring user rights.
Start the Registration Tool
Confirm at the welcome screen with Next
Select Authorization Transfer and confirm with Next
Select the transfer method: Network, disk,
(3 1/2" or removable disk with USB port) and confirm with Next
(for a disk transfer, insert a blank disk)
Using a removable disk
Using a disk
Insert the removable
disk into the USB
port
Choose drive (A: or the
letter associated with
the removable disk)
Using a network
Enter the name of the target
terminal and share the
PL7 DIF directory on this
terminal (with read rights),
then confirm with OK
On the target terminal, run the Registration Tool
Confirm at the welcome screen with Next
Select Authorization Transfer and confirm with Next
On the target terminal, note the PC identification number
On the current terminal, enter the same ID number and confirm
with OK
Using a disk
Using a network
On the target terminal, insert the
disk containing the rights, and
select Transfer authorization to
the terminal from disk
On the target and current terminals, quit the procedures by
clicking Finish
16
PL7DIF
Limitations of the product PL7DIF
3
Limitations
Introduction
The software PL7DIF has some limitations when operating comparaison of
application coming from PL7. There are different types of limitations. They are
classified in the table below.
Details on
limitations
The following table describes those limitations:
Components of a PL7 application
Description
Overview
This version of PL7 does not allow to process an
application located on several diskettes
Palliative: Re-generate this application on the PC
drive or on a network drive
Hardware configuration
PL7 does not detect if there is or not any memory
protection of a CPU card
Program
l When a program element in LADDER or
GRAFCET has a name including special
characters (such as é, è, à...), this section
cannot be opened in PL7
Palliative: It is possible to open it through
PL7PRO.
l When a program element is write-protected,
PL7DIF cannot do any protection on this
element. It is not accessible.
l When an element of a program has a diagnostic
option in its station properties, PL7DIF cannot do
any difference on this element.
Micro Application
PL7DIF
PL7DIF can exclusively be applied to Micro
applications written with the software PL7 Pro 4.0
and later.
17
Limitations of the product PL7DIF
18
PL7DIF
Interactive mode of usage
II
At a Glance
Aim
This Part introduces the man-machine interface of this mode and describes how to
carry out a comparison.
What's in this
Part?
This part contains the following chapters:
PL7DIF
Chapter
Chapter Name
Page
4
Interactive mode
21
5
Comparing two applications
23
6
Displaying the results
25
7
Printing a comparison file
37
8
Creating a comparison file
39
19
Interactive mode of usage
20
PL7DIF
Interactive mode
4
How to run PL7DIF in interactive mode
Procedure
The following table describes the procedure for running PL7DIF in interactive mode:
Step
Action
1
Click on the Start button.
2
Select the Programs command, then the Modicon Telemecanique group.
3
Double-click on "PL7DIF"
Security access management
OS
FPW
FPW
(?)
OS_LOADER PL7 Pro V4.4
PL7 Pro V4.4
PL7DIF STX Application comparison V4.2
Readme PL7 Pro V4.4
S XWAY Driver Manager
Note: The program is then loaded. It ends when the main PL7DIF window
appears.
PL7DIF
21
Interactive mode
22
PL7DIF
Comparing two applications
5
How to compare two applications
Procedure
The following table describes the procedure for a comparison:
Step
1
Action
Click on Compare
or select the Compare option in the File menu
PL7DIF
23
Comparing two applications
Step
2
Action
Then select the first and second applications using the selection windows:
Reminder: PL7DIF compares two applications that are accessible on IT supports
(network or internal disk, CD, DVD, floppy disk) and in .STX form.
Note: When the comparison is complete, the application browser appears.
Result: the differences are accessible via a three-tab folder:
l Presentation of the two applications’ differences in identity:
l Detailed presentation of the two applications’ program differences:
l Presentation of the differences for compiling a folder or saving in text file format:
Information
By default, the comparison is made in the ascending chronological order in which
the two STX applications were saved.
Application 1 is the oldest, application 2 is the most recent.
Order of comparison:
Step
Action
1
Select or deselect the Compare by date option in the Options menu.
Deselecting this option enables you to keep the comparison order defined by the
user.
Note: This option is kept as long as the user makes no change.
24
PL7DIF
Displaying the results
6
At a Glance
Aim of this
Chapter
Presentation and processing of results
What's in this
Chapter?
This chapter contains the following topics:
PL7DIF
Topic
Page
Identifying the application
26
Application browser
28
Analyzing the differences
30
Visual comparison method
31
25
Displaying the results
Identifying the application
Description
Presentation of information of the two applications. The differences are indicated by
a #.
Access
At the end of the comparison, the application characteristics are compared.
The identification tab is:
Illustration
Example of how the results are presented:
26
PL7DIF
Displaying the results
Information
Description of the collected information:
Address
Details
Application
Disk\path\file name
Station
Name of the station defined in PL7
Version
Application version
Date
Date the file was saved
Time
Time the file was saved
Application Identifier of downloaded information on the PLC.
identification Made up of 8 digital information units, which have the following purpose:
l station identification
l application identification related to the local I/O configuration
l application identification related to the remote I/O configuration
l application identification related to the PL7 code
l application identification related to the grafcet
l application identification related to the constants
l application identification related to the symbols
l application identification related to the reservation
PL7DIF
27
Displaying the results
Application browser
Description
The browser gives the structure of the two applications. The blocks that show the
differences are indicated using #.
Access
At the end of the comparison, a detailed description of the differences is presented.
The browser tab is:
It is necessary to open the directory tree by clicking on the '+' to display the blocks
containing the differences.
Illustration
28
Application browser:
PL7DIF
Displaying the results
Information
The information associated with application 1 is given in blue; application 2
information is given in red.
Meanings of the various symbols:
Symbol
Meaning
The part contains one or more differences, which can be displayed by
opening it. It is only when a symbol is present that the directory tree must be
opened.
This block contains one or more differences.
This section is only found in application 1.
This section is only found in application 2.
The programming language of this section is different in the two applications.
PL7DIF
29
Displaying the results
Analyzing the differences
Description
Detailed presentation of the difference(s) of one block.
Access
If you select a difference in the browser, PL7DIF will display the details of:
l the P17 graphics editor and extracts of the source files for hardware
configuration, and the sections programmed in ladder or Grafcet.
l extracts of the application's source code file in other cases
Illustration
Display of the details.
30
PL7DIF
Displaying the results
Visual comparison method
Procedure
This table describes the procedure for performing a visual comparison:
Step
Action
1
Run the comparison
2
Localize the blocks featuring the differences with the application browser.
3
Select a difference.
4
Analyze the differences using the application source extracts and PL7 graphical
editors opened automatically by PL7DIF
5
It is also possible to display only the differences.
Click on Partial
or select the Partial Display item in the Option menu
Note: This change in display mode may be made at any time.
To return to the previous mode, click Full
or select the Full Display item in the Option menu
Note: This option is kept as long as the user makes no change.
Note:The F7 and F8 keys can be used to switch from one difference to the other
in the same block (see special case for Grafcet).
PL7DIF
31
Displaying the results
Information on
full and partial
display
This option concerns the display in the MDI window:
l Full Display displays all the text of the comparison. It also includes the identical
blocks of the two applications.
With this display mode, if there are any differences the status bar includes the
position of the modification in the program section.
Example:
l
Partial Display displays only the differences. The successive differences are
separated by a white line and preceded by the marker flag.
Example:
l
Marking of the difference positioning
This unit includes three flags:
l the type of difference SUP (delete), INS (insert), MODIF (modify)
l its positioning in application 1
l its positioning in application 2
It is adapted to the type of menu concerned.
Summary of the types of display:
32
Module
Partial display (in the text)
Full display (in the status bar)
List or
Structured
Text
Sequence: (Top+n°, Sup)
Sequence: (Ins, Top+n°)
Sequence: (Top+n°, Top+n°)
Sup Top+n°
Ins
Top+n°
Modif Top+n° Top+n°
Ladder
Rung: (Top+n°, Sup)
Rung: (Ins, Top+n°)
Rung: (Top+n°, Top+n°)
Sup Top+n°
Ins
Top+n°
Modif Top+n° Top+n°
Grafcet
(Sup in Page n°)
(Ins in Page n°)
(Modif in Page n°)
Sup Page n°
Ins
Page n°
Modif Page n° Page n°
PL7DIF
Displaying the results
Difference in the
software
structure of the
application
Only the source code extracts of the applications can be used to localize the
differences.
For example, a different number of configured grafcet steps is indicated with:
Difference in a
section
validation
condition
The difference in section validation condition is indicated at application structure
level.
For example, in this cooking application, the drainage section condition had been
modified:
Difference in the
ladder section of
the application
Pl7DIF opens the respective Ladder sections of each application one-by-one (where
these exist) in order to perform a visual check. Using the editors, analyze the
differences in the rung(s) concerned.
Difference in the
Grafcet section
of the application
PL7DIF opens the Grafcet section of each application page-by-page (where these
exist) in order to perform a visual check. Using the editors, analyze the differences
in the page(s) concerned.
Note: The F7 and F8 keys can be used to go to the differences page-by-page. If a
page includes several modifications, you need to search for these in the textual
section or using the graphic editor.
Difference in the
ST or IL section
of the application
Only the source code extracts of the applications can be used to localize the
differences.
Difference in
DFB code
The analysis is made following the rules for the language used.
PL7DIF
33
Displaying the results
Difference in
variables
Only the source code extracts of the applications can be used to localize the
differences. The differences appear either at application structure level (software
configuration), or at variable level. This particularly applies for constants or the
configuration of predefined FB blocks.
The list of variables is broken down into two portions:
l It includes the modified (at symbol, comment level), deleted or inserted variables,
l In includes the variables that are unchanged between the two applications.
Note: In partial display, this second section is not present.
Difference
between the
functional
modules
34
Pl7DIF shows the differences for the functional modules but does not display the
details
PL7DIF
Displaying the results
Difference in
hardware
configuration
Pl7DIF opens the two PL7 editors for the visual check. The differences can then be
identified.
In this example, the configuration of the TSX CFY 21 module located in position 3 of
rack 1 is different.
Difference in
application
protection
A general difference in application protection is only indicated on application 1.
PL7DIF
35
Displaying the results
36
PL7DIF
Printing a comparison file
7
How to print a comparison folder
Description
PL7DIF
Printing a comparison folder is only possible from the folder sheet.
37
Printing a comparison file
How to print
This table describes the procedure for printing:
Step
1
Action
Click the "folder" tab
Result: the folder sheet appears.
2
Then select the blocks to include in the comparison folder:
The
The
button is used to include the block in the comparison folder.
button is used to exclude the block from the comparison folder.
3
Compile the folder with the button
4
Launch the printing of the comparison folder by clicking
or by clicking Print from the File menu.
Using the printout
38
The comparison folder features a legend that explains the symbolization used to
mark the differences.
The contents of the folder depends on whether the full display or partial display
option is selected.
A portion of the program excluded from the folder is indicated on printing.
PL7DIF
Creating a comparison file
8
How to create a comparison file
Description
Creating a comparison file is only possible from the folder sheet.
How to create a
comparison file
This table describes the procedure for creating a comparison file
Step
1
Action
Click the "folder" tab
Result: The file sheet appears.
2
Then select the blocks to include in the comparison folder:
The
The
button is used to include the block in the comparison folder.
button is used to exclude the block from the comparison folder.
3
Compile the folder with the button
4
Save the comparison file by clicking
menu.
PL7DIF
or by clicking Save from the File
39
Creating a comparison file
Operating the file
40
The comparison file is an ASCII-type text file. It can be displayed using an editor. It
includes the contents of the target file and the main differences window.
This file features a legend that explains the symbolization used to mark the
differences.
The contents of the file depends on whether the full display or partial display option
is selected.
A portion of the program excluded from the file is indicated on printing.
PL7DIF
Batch usage mode
III
At a Glance
Aim
This Part describes the advantages of this mode and the various programmed
commands available.
What's in this
Part?
This part contains the following chapters:
Chapter
9
PL7DIF
Chapter Name
Page
Batch mode
43
10
Starting "batch" on a keyboard
45
11
Starting a programmed "batch"
47
41
Batch usage mode
42
PL7DIF
Batch mode
9
General description of batch mode
At a Glance
PL7DIF
The software allows a "batch" operation to be launched directly using a command
without an interactive window.
PL7DIF is started in "basic task" mode, with no display and no possibility of operator
input.
This is the typical mode used, for example, to automate repetitive tasks or gain
access to information on how to manage the STX application versions. More
generally there is information on functional development on a higher level than
PL7DIF, followed up with processes (maintenance management, labeling the
causes of a regression for diagnostic purposes), which contain implementation
details specific to the PL7DIF and PL7PRO.
43
Batch mode
44
PL7DIF
Starting "batch" on a keyboard
10
How to start a "batch" on the keyboard
Procedure
This table describes the procedure for starting the "batch" on the keyboard:
Step
Syntax of the call
command
Action
1
Click on the Start button.
2
Select the Execute command
3
Locate the executable PL7Diff.exe using the Browse button
4
Type the PL7DIF call command
The PL7DIF call command contains the following fields:
The command fields
Description
The first field contains:
An indication of the type of
process
-d or -D for display
-p or -P for print
-s or -S for save
The next field:
The pathfile1 of application 1
It is made up of the file path and name of this application,
bound by the limits "and"
This is a chain of characters, which must be preceded by a
The next field:
limiter /
This is optional
This allows the user to define his/her own version item
for application 1
The next field:
The pathfile2 of application 2
It is made up of the file path and name of this application,
bound by the limits "and"
This is a chain of characters, which must be preceded by a
The next field:
limiter /
This is optional
This allows the user to define his/her own version item
for application 2
PL7DIF
45
Starting "batch" on a keyboard
The command fields
Description
The next field:
This is only present if the process type is a save.
It is the pathfileresult
It is made up of the file path and name of this application,
bound by the limits "and"
The next field:
This is only present if the process type is a save.
It is the pathfileresult
It is made up of the file path and name of this application,
bound by the limits "and"
Detail of the call
command
The following table details this command:
If you want to ...
the command is ...
Performance
Example
Start PL7DIF to
display
PL7DIF -d or -D
Opening the
"pathfile1" [/versionCML1] application
"pathfile2" [/versionCML2] browser
Result:
At the end of the
command, PL7diff
puts itself in
interactive mode as
previously described
to allow visual
intervention and
analysis.
PL7DIF -d
"c:\appli\four_a.stx" /009
"c:\appli\four_b.stx" /008
Start PL7DIF to
print
Printing the
PL7DIF -p or -P
"pathfile1" [/versionCML1] differentiation
"pathfile2" [/versionCML2] file in text
format, and
closing
PL7DIF
When the command PL7DIF -P
"c:\appli\four_a.stx"
has been given,
PL7diff works in basic "c:\appli\four_b.stx"
task mode and the
end of the operation is
indicated when the
file prints out
Start PL7DIF to
save
PL7DIF -s or -S
"pathfile1" [/versionCML1]
"pathfile2" [/versionCML2]
"pathfileresult"
"pathfileerror"
Saving the
differentiation
file in text
format, and
closing
PL7DIF
When the command
has been given,
PL7diff works in basic
task mode and the
end of the operation is
indicated when a
save file is created.
PL7DIF -s
"c\appli\CPT1_o.stx"
"c:\appli\CPT1.stx" /V2.d
"c:\cml\diff.rpt"
"c:\temp\diff.err"
Note: When PL7DIF is running the command, the user can carry out other tasks of
any kind on the computer.
Note: The product name is PL7DIF, the executable name is PL7Diff.
If the operation is Print or Save, we recommend you create a PL7DIF client
application (refer to the following chapter).
46
PL7DIF
Starting a programmed "batch"
11
How to program a "batch"
Introduction
PL7DIF
It is necessary to create a PL7DIF client application. You should be familiar with one
of the following languages, especially to use the OLE automation mechanism and to
deal with exceptions:
l Microsoft Visual Basic, version 5.0 or above,
l Microsoft Visual C++, version 4.2 or above.
47
Starting a programmed "batch"
Examples
Two examples, supplied with the product, illustrate how to use this start:
l First example: This is a DOS type command file (suffix .bat) which illustrates:
l how to create a call command for all process types,
l and string the call commands.
l Second example: This is a PL7DIF client application, written in Microsoft Visual
Basic, version 5.0, which allows:
l the type of process (display, print, save) to be recorded
l an application list file (configurable) to be generated in order to illustrate the
repetition of STX application comparison tasks without any intervention from
the operator. It starts PL7DIF in basic task mode successively on each
application pair.
The different screens below show the operating rules:
Man-machine interface:
Application
selection zone
Comparison
session activation
zone
Comparison result
composition and
activation zone
for STX applications
48
PL7DIF
Starting a programmed "batch"
Initialization of the call command fields
PL7DIF
executable path
Selecting 2
applications
Selecting
results file for
the "-s" option
Selecting report file
for the "-s" option
Operation settings stored in the PL7DIFF.INI file.
These values are saved when PL7DIF is started.
Execution of a call command
Activating PL7DIF
without applications
pre-selected
Activating PL7DIF with the "-d"
option to print results
Activating PL7DIF
with 2 selected
applications
Activating PL7DIF with the "-s"
option to save the differences
in the selected results file.
Display the corresponding
command
PL7DIF
49
Starting a programmed "batch"
Automatic stringing of a call command list
Selecting the current action type
Display the
command to be
added
Selecting
the file
containing
the list of
successive
comparison
PL7DIF sequential activation
of the different comparisons
saved in the list file
Manipulating list file
Note: This example is provided as an indication and must be adapted to your
specific applications and your safety needs.
Information: It is possible, among other things, to add to this example:
l the comparison of applications contained in the PLC, using the ConnectPLC,
UploadFromPLC, and DisconnectPLC methods described in the documentation
entitled PL7 OLE Server,
l planning the execution of a list of call commands contained in a file (start the
execution of a task using the date).
50
PL7DIF