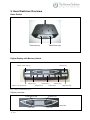
1
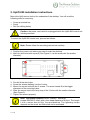
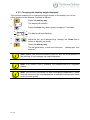
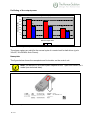
Contents
1.
Preface ................................................................................................................ 4
1.1
Intended use................................................................................................. 4
1.2 Uplift 800 control unit functionality................................................................. 4
1.3
Target group and previous knowledge ......................................................... 5
1.4
Symbols used in safety instructions.............................................................. 5
1.5
ISP (Intelligent System Protection) ............................................................... 6
1.6
Package contents ......................................................................................... 7
1.7
Unpacking .................................................................................................... 7
1.8
Safety instructions ........................................................................................ 7
1.8.1
General safety instructions.................................................................... 8
1.8.2
Important notes for OEMs ................................................................... 10
1.9
Important note for service........................................................................... 10
2. Uplift 800 installation instructions ....................................................................... 11
3. Commissioning .................................................................................................. 12
3.1 Uplift 800 sockets....................................................................................... 12
3.2
Commissioning procedure.......................................................................... 13
3.2.1
Connect drives .................................................................................... 13
3.2.2
Connect handswitch ............................................................................ 13
3.2.3
Connect mains supply ......................................................................... 13
3.2.4
System configuration (example) .......................................................... 14
4. Operating the Uplift 800 control unit .................................................................. 16
4.1
Basic functions ........................................................................................... 16
4.1.1
Upward desktop movement................................................................. 16
4.1.2
Downward desktop movement ............................................................ 17
4.2
Advanced functions .................................................................................... 17
4.2.1
Saving a desktop position ................................................................... 17
4.2.2
Adjusting the desktop to a saved position ........................................... 18
4.2.3
Changing the desktop height displayed............................................... 19
4.2.4
Manual reset – first and second motor group ...................................... 20
4.3
Software-dependent functions.................................................................... 22
4.3.1
Key lock............................................................................................... 22
4.3.2
Slow speed ranges.............................................................................. 22
4.3.3
Container- and Shelf-Stop positions.................................................... 23
4.3.4
Automatic drive recognition ................................................................. 25
4.3.5
Drive Back........................................................................................... 26
4.3.6
Duty cycle monitoring .......................................................................... 26
4.3.7
Change the displayed desktop position (cm or inch) ........................... 27
4.3.8
Cascading ........................................................................................... 27
4.3.9
Reset control unit to factory settings ................................................... 30
5. Sensor ............................................................................................................... 31
6. Programmable dongle ....................................................................................... 33
6.1 Parameterizing individual controls ......................................................... 33
7. Technical data ................................................................................................... 35
8. Appendix............................................................................................................ 37
8.1
Possible faults and remedies...................................................................... 37
8.2
Error messages on the handswitch display ................................................ 38
8.3
Click codes ................................................................................................. 40
9. Hand Switches Overview................................................................................... 41
LU – Hand Switch ................................................................................................. 41
2 of 44
Display overview ................................................................................................... 41
9.1. End of life disposal ..................................................................................... 43
9.2. Standards ................................................................................................... 44
9.3. Declarations of conformity .......................................................................... 44
9.4. Manufacturer .............................................................................................. 44
3 of 44
1. Preface
Dear Customer,
Thank you for choosing an electrically height-adjustable desk from 7KH+XPDQ 6ROXWLRQ
You are now in possession of a state-of-the-art product that compiles with all the relevant
safety requirements.
1.1 Intended use
Uplift 800 control units may only be used for the intended purpose, i.e. to control electric
height-adjustable desks. Only motors that meet 7KH+XPDQ6ROXWLRQ
specifications may be used to drive the lifting devices. The control units must
be installed, put into operation and their function checked by qualified personnel.
Using them to control other motors or installing them in products other than electric
height-adjustable desks is only permissible with the prior written consent of 7KH+XPDQ
6ROXWLRQ. Their basic function is upwards and downwards adjustment of the desktop,
which can be controlled with all the handswitches available.
1.2 8SOLIW control unit functionality
The Uplift 800 control units incorporate the following features (the availability of some of
the features depends on the handswitch used):
•
•
•
•
•
•
•
•
•
•
•
•
•
Control unit with 3 motor channels
High efficient switch mode power supply (SMPS)
Low standby power consumption, low field emission
Control units with US and EU input voltage available
Up to 2 motor groups
ISP (Intelligent System Protection)
Enhanced Drive Comfort
Container- and Shelf-Stop
Low speed area
InBox Diagnosis
LogicConnector DATA for sensors and cascading
Additional functions are available, depending on the handswitch model used
(e.g. saving desktop positions, adjusting the desktop to saved positions, etc.)
Depending on your needs, you have a choice of two switches for installation
underneath the tabletop and one tabletop switch.
4 of 44
1.3 Target group and previous knowledge
This user manual addresses the following people:
•
•
Technicians who assemble and put electric height-adjustable desks into operation
(by installing motors and control units, configuring control units, etc.)
Furniture assembly, service and maintenance personnel who put electric heightadjustable desks into operation in showrooms or at the customer’s
The following is required for installing, operating and configuring electric heightadjustable desks with Uplift 800 control units:
•
•
Basic mechanical and electrical skills (with suitable qualifications)
Reading the user manual
1.4 Symbols used in safety instructions
This user manual contains safety instructions with symbols to approach your
attention to possible dangers and residual risks. They indicate the following:
Danger: this warning symbol advises you of imminent danger to people’s
lives and health.
Failure to observe this warning may result in health problems, serious
injuries and damage to property.
Caution: th is w arning adv ises you of p ossible dang ers f rom el ectric
current.
Failure to observe this warning may cause injuries and damage to
property.
Note: t his sym bol adv ises you of important i nformation that m ust be
noted for operating the Uplift 800 control unit safely.
Danger: this warning advises you of a poss ible risk of body parts being
trapped or pinched in exceptional cases.
Failure to observe this warning may result in health problems, serious
injuries and damage to property.
Note: you must read the user manual.
5 of 44
1.5 ISP (Intelligent System Protection)
ISP is an electronic state-of-the-art protection system developed by 7KH+XPDQ6ROXWLRQ
It also substantially reduces the risk for fingers being trapped or pinched.
Danger: i n spi te of IS P bei ng i n p lace, there m ay sti ll be a r isk of
pinching in exceptional cases, as it is not o nly the control unit, but also
the inter action betw een th e m echanical and el ectronic syst ems that i s
responsible for cu tting ou t the m otor. In add ition, t he m echanical
components, motor and ambient conditions all affect cut-out sensitivity.
As the control unit distributer, 7KH+XPDQ6ROXWLRQ cannot therefore
eliminate this residual risk completely or accept any liability.
Note: the ISP-sensitivity and the IS P-cutoff value depend on the w hole
system (mechanical and electrical components).
Note: as soon as IS P has stopped th e el ectric he ight-adjustable desk
from moving, you can t hen o nly adj ust th e desktop in the o pposite
direction (the safety feature initially prevents you from adjusting the desk
in the same direction as triggered it).
Attention – Safety Notice: E ven w hen equi pped w ith a sensor , the
collision protection is by no m eans cons idered personal pr otection
equipment and may not be classified and described as such!
6 of 44
1.6 Package contents
The standard scope of delivery consists of one control unit.
1
Figure 1: Package contents
c Uplift 800 control unit
1.7 Unpacking
The Uplift 800 control unit comes packed in a cardboard box. To unpack, proceed as
follows:
1. Remove the cardboard.
2. Dispose of the packaging materials.
3. Keep the user manual at hand for the operators.
Note: ensure eco-friendly disposal of the packaging materials (separate
the plastic parts and cardboard for collection).
1.8 Safety instructions
This user manual contains safety instructions that draw your attention to any possible
risks, thus enabling safe operation of the Uplift 800 control unit. Please observe these
warnings and instructions at all times.
In this section you will find general safety instructions that do not refer to any
particular steps or procedures. You will find the work-specific safety instructions in
the relevant section of the manual. Additional warnings are given on the Uplift 800
control unit itself.
7 of 44
1.8.1 General safety instructions
Note: you m ust read t he us er m anual ca refully b efore installing or
operating the Uplift 800 control unit.
Caution: do not open the Uplift 800 control un it under any c ircumstances.
There is a danger of electric shock.
Caution: the Uplift 800 control unit is not designed for continuous operation.
Changing the desktop position without interruption must not ex ceed the
duty cycle indicated on the nameplate.
Caution: the Uplift 800 control unit may only be operated with mains voltage
as specified on the type plate.
Uplift 800 contro l u nits are also ava ilable fo r th e mains vo ltages used in
other countries.
Caution: only use the power cord sup plied with the contr ol unit. Check
that it is not dam aged. Do not ever ope rate the Uplift 800 control unit if the
power cord is damaged.
Danger: i t is not a llowed to connect self constructed p roducts to
7KH+XPDQ6ROXWLRQ motor co ntrols. To prev ent dam age of the unit
use only components suitable for 7KH+XPDQ6ROXWLRQ
motor controls.
Caution: befo re connecting a nd d isconnecting han dswitches, you m ust
unplug the power cord.
Caution: i n t he event of a m alfunction ( e.g. i f the c ontrol unit keeps
adjusting the desk bec ause a m ovement key has j ammed), pl ease
unplug the unit immediately.
Danger: do not ex pose the Uplift 800 control uni t to m oisture, dr ips or
splashes.
Danger: when changing the desktop pos ition there i s a ri sk of p inching.
You must therefor e e nsure that no peo ple o r objects are located in the
hazardous area or can reach into it.
8 of 44
Danger: when chang ing th e desktop position, the re may i n exceptional
cases be a ri sk of p inching in sp ite of the safety featur es. Y ou must
therefore a lways ensure that no peop le or obj ects are l ocated i n the
hazardous area or reach into it.
Danger: do not m odify or m ake any c hanges to t he co ntrol un it, the
controls themselves or handswitches.
Danger: do not operate the Uplift 800 control unit in a potent ially explosive
atmosphere.
Danger: i n th e eve nt of a fault (motor or component), w henever t he
desktop attem pts to adj ust the he ight it m ay move sl ightly bef ore th e
safety cut-out is tr iggered. P lease note tha t there i s a pote ntial r isk of
pinching in this case.
Danger: i ntelligent system pr otection (ISP) i s not ena bled dur ing a ll
resets (see 4.2.4). Please note that there is a potential risk of pinching in
this case.
Danger: thi s d evice is not intended f or us e by i ndividuals ( including
children) with limited physical, sensory or mental abilities or with a lack of
experience and/or l ack of ex pertise, un less they are sup ervised by a
person responsible for their safety or have received instructions from that
person on how to use the control unit.
Danger: children must be supervi sed at al l times to ensure that they do
not play with the control unit.
Danger: if the control unit’s power cord is damaged, it must be replaced
by the m anufacturer or customer service or similarly qualified person in
order to prevent any risks.
Note: only clean the Uplift 800 control unit with a dry or sl ightly moist cloth.
Before cleaning, you must always unplug the power cord.
Note: in case of a m ains pow er breakd own or i f th e pow er cord is
plugged off during the movement of the drives, a manual reset of th e
Uplift 800 may be necessary!
9 of 44
1.8.2 Important notes for OEMs
What we mean by OEMs are companies that purchase Uplift 800 control units from
7KH+XPDQ6ROXWLRQ and install them in their own products (e.g.
electric height-adjustable desks).
Note: for reasons of EU conformity and product safety, we advise you to
provide users of your products with a manual.
Note: w hen you sh ip your f inished pr oducts, encl ose a user m anual
containing all the safety instructions that consumers need to handle your
product safely.
Note: the user m anual for your f inished product m ust contai n the
following note: you m ust read the use r m anual b efore yo u oper ate the
product (electric height-adjustable desk).
Advise you r custom ers that the use r m anual m ust be kept at hand in
close proximity to the product (electric height-adjustable desk).
Danger: conduct a r isk ana lysis of yo ur product (e lectric he ightadjustable desk) so that you can re spond to any potential residual risks
(e.g. by chang ing des ign feat ures or a dding notes to the user m anual
and/or placing warnings on your product).
Note: ensure that no unauthorized i ndividuals (e.g. sm all c hildren,
people under the i nfluence of drugs, et c.) can ta mper with your product
or the control unit.
1.9 Important note for service
Danger: onl y us e or iginal s pare p arts. P arts may onl y be r eplaced by
qualified se rvice technicians, othe rwise the warranty/guarantee sha ll be
null and void.
Danger: i n the ev ent of a fa ult, p lease contact cust omer servi ce
immediately. On ly or iginal sp are pa rts m ay be used for repa iring the
control un its. P arts m ay onl y be replaced by qua lified se rvice
technicians, otherwise the warranty/guarantee shall be null and void.
10 of 44
2. 8SOLIW installation instructions
Mount the Uplift control unit on the underside of the desktop. You will need the
following tools for mounting:
•
•
•
Cross-tip screwdriver
Pencil
Drill (for drilling holes)
Caution: the power cord must be unplugged while the Uplift 800 control unit
is being mounted.
To mount the Uplift 800 control unit, proceed as follows:
Note: Please follow the mounting instructions carefully.
1. Position the control unit where you want it under the desktop.
2. Mark the drill holes with a pencil (See Figure 2: use the areas with the smaller
diameter).
Figure 2: Step 2
3. Pre-drill these two holes.
4. Screw the screws halfway into the 3 holes
5. Mount the control unit with the 3 screws. The screw heads fit to the bigger
diameters of the mounting holes.
6. Slide the control unit to the body stop of the 3 holes with the smaller diameter
(See Figure 2).
7. Tighten the screws properly.
Note: 7KH+XPDQ6ROXWLRQ recom mends l ens head
screws DIN7981C 4,8xL with a lens head diameter of 9,5mm. The length
L of th e screw shou ld fit to the us ed desk top. T he t ightening torque
depends on the wood, but 2Nm shall not be exceeded.
11 of 44
1.6 Package contents
The standard scope of delivery consists of one control unit.
1
Figure 1: Package contents
c Uplift 800 control unit
1.7 Unpacking
The Uplift 800 control unit comes packed in a cardboard box. To unpack, proceed as
follows:
1. Remove the cardboard.
2. Dispose of the packaging materials.
3. Keep the user manual at hand for the operators.
Note: ensure eco-friendly disposal of the packaging materials (separate
the plastic parts and cardboard for collection).
1.8 Safety instructions
This user manual contains safety instructions that draw your attention to any possible
risks, thus enabling safe operation of the Uplift 800 control unit. Please observe these
warnings and instructions at all times.
In this section you will find general safety instructions that do not refer to any
particular steps or procedures. You will find the work-specific safety instructions in
the relevant section of the manual. Additional warnings are given on the Uplift 800
control unit itself.
17 of 44
3.2 Commissioning procedure
Caution: the power cord must be unplugged while the Uplift 800 control unit
is being commissioned.
To commission a Uplift 800 control unit, proceed as follows.
3.2.1 Connect drives
Plug the motor cables into the relevant 8-pin motor sockets (M1, M2, and M3).
Note: when connecting the motor cables, you must strictly adhere to the
sequence M1, M2, M3.
3.2.2 Connect handswitch
Plug the handswitch into the 7-pin socket (HS).
Note: To o perate the tab le, w e offer the c onvenient LUD sw itch that
enables programming of di fferent settings along with a si mple Up/Down
switch, both o f w hich h ave un der t able m ounts, as w ell as a tab letopmounted Up/Down switch.
3.2.3 Connect mains supply
Caution: before you plug in the power cord, check the following again:
• The mains supply voltage must be as specified on the type plate
• All the components must be plugged into the right sockets
• The earthing cable must be connected
When the power cord is plugged in, the Uplift 800 control unit is operational.
Note: in case of a m ains pow er breakd own or i f th e pow er cord is
plugged off during the movement of the drives, a manual reset of th e
Uplift 800 may be necessary!
13 of 44
3.2.4 System configuration (example)
The figure below shows the socket assignment for a configuration example. This
configuration consists of:
c 1 Uplift 800 control unit
d 3 motors (shown inside the columns)
e HSC-KB-OD-2 handswitch
3
2
1
Figure 4: Configuration example
14 of 44
3.2.5 Reset
At initial start-up the product must be reset in order to commence operation.
When used in a table, the reset function facilitates moving all columns to the same
level at the bottom-most table position. This ensures that the desktop moves in
parallel to the ground level.
Additionally the standard version of the control saves the connected components,
such as columns or an optional sensor, in its memory. After the reset, changes in the
configuration will be recognized and classified as errors. The system will not move
before the saved condition has been restored.
Danger: During reset the collision protection is deactivated so that
there is no detection activity. This entails a higher risk of crushing.
Please make sure that there are no objects or persons in the danger
zone (defined as the entire lifting or moving range of all components)
and the danger zone is kept free.
3.2.6 Reset (manual reset)
To perfo rm a reset, the U p and D own keys of the sw itch need to be pressed l ong
enough to cause the system to move downwards and reach the bottom position.
and
As the contro l automatically sh ifts into ene rgy-saving m ode after a
few seconds, thi s mode must be deacti vated first. To do t his, briefly
press the Up or Down key.
Press and hold the Up and Down keys at the same time immediately
after the previous step.
After 2 seconds the reset beg ins, th e tab le m oves dow nward and
needs to be kept moving until it reaches its bottom position.
A successful reset operation i s followed by a double clicking sound
from the control.
Note: In o rder to reset the control to the factory setting you will need an
LUD switch or a dong le that has be en programmed with the respect ive
basic setting!
15 of 44
4. Operating the 8SOLIW control unit
To ensure safe operation of the Uplift 800 control unit, please observe the following
safety instructions:
Note: in case of a m ains pow er breakd own or i f th e pow er cord is
plugged off during the movement of the drives, a manual reset of th e
Uplift 800 may be necessary!
Caution: keep ch ildren aw ay from el ectric hei ght-adjustable d esks,
control units and handswitches. There is risk of injury and electric shock.
Caution: unplug the p ower cord d uring a thunderstorm or i f you do not
intend to use the desk f or a longer period. Th e cont rol u nit m ight
otherwise be damaged by power surges.
4.1 Basic functions
Note: the Uplift 800 control unit offers an ex tensive range of functions. The
availability of some functions depends however on the handswitch used.
This sect ion desc ribes the bas ic f unctions ava ilable w ith every
handswitch designed for use with Uplift 800 control units.
Note: the 2 bas ic func tions upw ard a nd downward m ovement are
available for both motorgroups separately. Please read the manual of the
used handswitch to see which buttons are linked to which motor group!
4.1.1 Upward desktop movement
This function enables you to adjust the desktop upwards. To change its position,
proceed as follows:
Press the desktop up key.
Keep pressing the key until the required desktop height is reached.
Note: the desktop will continue moving upwards until you release the key
or the maximum height is reached.
16 of 44
4.1.2 Downward desktop movement
This function enables you to adjust the desktop downwards. To change its position,
proceed as follows:
Press the desktop down key.
Keep pressing the key until the required desktop height is reached.
Note: the d esktop will continue moving downwards until you release the
key or the minimum height is reached.
4.2 Advanced functions
Note: you can only use the following functions of the Uplift 800 control unit if
you have a handswitch with memory position keys and a memory key.
4.2.1 Saving a desktop position
This function allows you to save a defined desktop height. One desktop height can
be saved per memory position key. To save a position, proceed as follows:
Note: if you are switching on the Uplift 800 control unit for the f irst time, all
the save d pos itions a re s et t o th e lowest desktop he ight (minimum
desktop position).
1.
Adjust the desktop to the position you want to save.
The display will show the desktop height (e.g. 73cm).
2.
Press the memory key.
The display will read S –.
3.
Press the required memory position key (e.g. 2).
The display will read S 2.
4.
The set deskt op pos ition w ill now be saved to the se lected m emory
position key.
You will hea r an audi ble doub le click an d after about 2 seconds the
saved desktop position will be displayed.
Note: using save d deskt op positions is on ly available fo r handswitches
with memory keys. The desi gn of the m emory posi tion keys var ies,
depending on the handswitch model used.
17 of 44
Note: i t is sof tware param eter de pendent w hich m otor grou p can
save/recall memory positions. If both motor groups are capable of saving
memory posi tions, the cur rent pos ition of both groups w ill be stored
(even if they are different). When recalling a stored position in this case,
both groups sta rt the ir m ovement at the same ti me, even i f thei r
movement direction is different.
4.2.2 Adjusting the desktop to a saved position
You can use this function to adjust the desktop to a saved height. To change to a
saved position, proceed as follows:
Note: av ailability of the double c lick fu nction depends on the so ftware
configuration of the control unit.
Option A (without double click function)
1.
Press the required memory position key (e.g. 2) and hold it down.
The desktop w ill m ove unti l it reac hes the saved posi tion. If you
release the key before the s aved position is reached, the desktop will
stop and the saved desktop position will not be reached.
2.
The deskt op has r eached t he saved p osition. N ow re lease t he
memory position key.
The display will read the current (saved) desktop position.
Option B (with double click function)
1.
Double click the required memory position key (e.g. 2).
2.
After the double click, the desktop will automatically adjust to the saved
position.
The display will show the current (saved) desktop position.
Danger: w hen you c hange the deskto p pos ition autom atically
(especially w ithout us ing p inch p rotection), there is a hi gher r isk of
pinching. Y ou m ust there fore ensu re that no peo ple o r o bjects are
located in the hazardous area or reach into it.
Note: if you pre ss anothe r key w hile th e desktop i s cha nging
automatically to a saved pos ition, it w ill sto p i mmediately. Y ou then
have to reactivate automatic desktop adjustment to a preset position.
18 of 44
4.2.3 Changing the desktop height displayed
This function enables you to change the height shown on the display, but not the
actual position of the desktop. Proceed as follows:
1.
Press the memory key.
The display will read S –.
2.
Press the Down key (down arrow) for approx. 5 seconds.
The display will start flashing.
3.
Adjust the hei ght d isplayed by p ressing t he Down (dow n
arrow) or Up key (up arrow).
4.
Press the memory key.
The he ight d isplay is now set to the new
entered.
desktop pos ition
Note: please note that this procedure does not alter the actual position of
the desktop. It only changes the height displayed.
Note: th is f unction i s on ly available for ha ndswitches w ith i ntegrated
display.
Note: this function i s available for both motorgroups separately. Please
read the manual of the used handsw itch to see which buttons are l inked
to which motor group!
19 of 44
4.2.4 Manual reset – first and second motor group
The LUD switch is designed to control two motor groups. This function is required for
controlling, for example, a tab le base, t he movement of which is being done via the
first tw o motor channe ls, and a screen lift, that i s contro lled vi a the th ird m otor
channel. In standa rd conf iguration the f irst motor group i s moved vi a the U p and
Down keys to the right, while the second motor group is controlled via the left Up and
Down keys on the LUD switch.
When the actual desktop position no longer corresponds to the height displayed or
you wish to use a configured control unit on another identical electric heightadjustable desk, you have to reset the lowest desktop position to the minimum
height.
To reset the first motor group, proceed as follows.
1.
As the control automatically shifts into energy-saving mode after a
few seconds, this mode must be deactivated first. To do this, briefly
press the Up or Down key.
2.
and
3.
Press and ho ld the U p and D own keys at the sam
e ti me
immediately after the previous step.
After 2 seconds the r eset beg ins, th e tab le moves do wnward and
needs to be kept moving until it reaches its bottom position.
Release the button(s). The electric height-adjustable desk can now
be used again normally.
Note: this function is available for the first motor group only.
20 of 44
To reset the second motor group, proceed as follows.
1.
Press the desktop down button of the second motor group.
Keep pressing it until the desktop has reached the lowest position
(programmed desktop position).
2.
Press the desktop down button of the second motor group
again and keep pressing it.
After abo ut 5 seco nds, t he desktop w ill s lowly m ove furt her dow n
until it reaches the absolutely lowest desktop position possible.
3.
Release the desktop down key. The e lectric he ight-adjustable
desk can now be used again normally.
Danger: i ntelligent system pr otection (ISP) i s not ena bled dur ing a ll
resets and limit position calibration. Please note that there is a potential
risk of pinching in this case.
Note: y ou can reset th e f irst m otor gro up too as sh own above.
Therefore, use the desktop down button of the first motor group.
Please read the manual of the used handswitch to see which buttons are
linked to which motor group!
21 of 44
4.3 Software-dependent functions
Note: prior to shipping, the Uplift 800 control unit is parameterized with the
software. The following functions are only available if the control unit has
been configured accordingly.
4.3.1 Key lock
With the key lock function, the control unit can be protected from inputs by the
handswitch which were done accidentally. To lock or unlock the handswitch keys, the
following steps are necessary:
1.
2.
Press S.
Press the T aste desktop down button of the second motor
group shortly afterwards.
If the key lock was active, it will be deactivated now.
If the key lock was inactive, it will be activated now.
Note: The key lock function is only possible with the memory handswith
HSF-MDF-4M4-KB.
If a movement key (Up/Down or Memory) is pressed when the key lock is active, the
control unit shows the active key lock by an acoustic signal with the relays (slow
double click after pressing a movement key)
Note: If the key lock is active, it will stay active even if the control unit is
disconnected from mains power and connected again at any point in
time.
4.3.2 Slow speed ranges
The safety area function causes the system to stop before reaching the bottom
position and resume the movement with reduced speed only after pressing the Down
key again until the bottom position has been reached.
The safety area function is also active when a container stop position has been
defined.
22 of 44
4.3.3 Container- and Shelf-Stop positions
These 2 features can be used to limit the movement area of the desktop (e.g. if a
container is placed underneath the desktop). A container stop position can be
defined in the lower half of the movement area, a shelf stop position in the upper half.
If a container stop position is set, this position will be the lower limit position. If a shelf
stop position is set, this position will be the new upper limit position. To store a
container stop / shelf stop position, go on as shown below:
1.
or
Move the desktop to the posi tion w here the contai ner stop/ she lf
stop position shall be stored. Do so by pressing the desktop down
or desktop up key until you reach the desired position.
Note:
A container stop position can only be stored in the lower half of the
movement area and a shelf stop in the upper half.
2.
Press S if you have a handswitch with memory function.
resp.
and
Press the desktop down and desktop up simultaneously if you
have a handswitch without memory function.
On the display ( handswitch w ith m emory functi on) S
displayed.
3.
– w ill b e
Press desktop up w ithin 5 seco nds and k eep it press ed fo r 3
seconds.
The Uplift 800 w ill c lick twice w hen the cont ainer stop/ she lf sto p
position is stored.
Note: These steps have to be done for a container stop and a shelf stop
position separately!
23 of 44
To deactivate the container stop/ shelf stop position go on as shown below:
1.
or
Move the desktop to any position in the lower half to deactivate the
container stop. / Move the desktop to any po sition in the upper half
to deactivate the shelf stop.
Do so by pr essing the desktop down or desktop up key un til you
reach the desired position.
2.
Press S if you have a handswitch with memory function.
resp.
and
Press the desktop down and desktop up simultaneously if you
have a handswitch without memory function.
On the display ( handswitch w ith m emory functi on) S
displayed.
3.
– w ill b e
Press desktop up w ithin 5 seco nds and k eep it press ed fo r 3
seconds.
The Uplift 800 w ill c lick once w hen the c ontainer stop / she lf stop
position is deactivated.
Note: These steps have to be done for a container stop and a shelf stop
position separately!
Note: this function is only available for motor group 1!
24 of 44
4.3.4 Automatic drive recognition
At i nitial start-up or after selecting the S0 menu the Uplift 800 motor control recognizes
the num ber of dri ves con nected. P rerequisite for th is i s success fully perfo rming a
reset.
Note: the funct ionality of the auto -detection is d epending o n the m otor
group settings in the so ftware par ameters of the Uplift 800. P lease con tact
7KH+XPDQ6ROXWLRQ for further information!
25 of 44
4.3.5 Drive Back
Note: the function Drive Back is only active, if a pi nch protection system
(ISP, s witches or p inch protection str ips) i s available and act ivated i n
software!
After a safety function is triggered by ISP, the desktop automatically moves about
40mm in the opposite direction. This immediately prevents any possible risk of
pinching.
Danger: i n spi te of ISP bei ng i n p lace, th ere m ay sti ll be a r isk of
pinching in exceptional cases, as it i s not only the cont rol unit, but a lso
the i nteraction betw een al l the com ponents i n the e lectric he ightadjustable desk that is responsible for cutting out the motor. In add ition,
the mechanical components, motor and ambient conditions all affect cutout sensitivity.
As the con trol unit distributer, 7KH+XPDQ6ROWXWLRQ does not have
an effect on t his residual risk and cannot therefore accept any
liability.
Please follow the safe ty instructions in the manual and t reat our product
with due care.
4.3.6 Duty cycle monitoring
Duty cycle monitoring means that when the control unit has been operating for a
defined period, it is switched off for a set time (e.g. after 2 minute of continuous
operation, the control unit is automatically disabled for the next 18 minutes).
For motors with higher current consumption (e.g. HW-drives), it is possible that the
duty cycle at higher currents (e.g. from 10A upwards) has to be lowered. The
threshold current at which the duty cycle has to be reduced can be parameterized.
26 of 44
4.3.7 Change the displayed desktop position (cm or inch)
With this function it is possible to change the displayed desktop position from
centimetres to inches or the other way around. The desktop position itself is not
affected by this function.
1.
Press the keys memory position 1, 2 and desktop up
at the same time. K eep the key com bination pressed
for about 3 seconds. Then release the keys.
The di splay will read S and any number, for i nstance
S 1.
2.
Press the desktop up key until the display reads S 5.
The display will show S 5.
3.
Press the memory key.
If the di splay was set to centi metres, it will be changed
to inches now.
If the di splay w as set to i nches, it w ill be c hanged to
centimetres now.
Note: after starting the m enu, the d isplay will read S and any number,
for instance S 1. The number depends on the parameters of the control
unit.
4.3.8 Cascading
Cascading enables you to operate up to 12 motors synchronously by connecting
multiple control units. A cascaded system acts in its basic functions like a single
control unit.
Note: It has to be set in advance by parameter if a control unit will be
used for cascading and how many control units are parts of the
cascaded system.
It is possible to connect handswitches to any of the control units in the cascaded
systems (it is also possible that each control unit has one handswitch). The only
relevant handswitch is the one where a button is pressed first to start any movement.
The control unit where this handswitch is connected to will be deemed as “Master
control unit”, all other control unit will be deemed as “Slave control units”. If a button
on a handswitch connected to any “Slave control unit” is pressed, the system will
stop due to safety reasons.
27 of 44
Note: If 2 motor groups are used, the 2 groups will move to memory
positions successively. That means that the first motor group will move to
a memory position at first, and afterwards the motors of the second
motor group will move to the memory position.
A cascaded system of 2 control units is shown below.
Figure 5: Cascaded system with 2 control units (up to 6 motors synchronously)
The cascading according to this model can also be used, if the power of a single
control unit is not enough. For instance, in this case the first 2 motors can be
connected to the first control unit and the third motor can be connected to the second
control unit.
The connection between the 2 control units is set up by the distribution cable
LOG-CBL-SYNC-500.
Note: If a KB safety sensor shall be connected to a control unit, the
distribution cable LOG-CBL-LC-DATA-Y is necessary. In a cascaded
system, at most one safety sensor can be connected to each control unit.
28 of 44
A cascaded system with 4 control units is shown below.
Figure 6: Cascaded system with 4 control units (up to 12 motors synchronously)
At each control unit, it is possible to use the distribution cable LOG-CBL-LC-DATA-Y
to connect at most one KB safety sensor to the control unit. In the picture above, the
cable is used at control unit 2 and 3 as an example.
29 of 44
4.3.9 Reset control unit to factory settings
With this function you can reset the control unit to its factory settings.
1.
Press the keys memory position 1, 2 and desktop up
at the same time. K eep the key com bination pressed
for about 3 seconds. Then release the keys.
The di splay will read S and any number, for i nstance
S 1.
2.
Press the desktop up key until the display reads S 0.
The display will show S 0.
3.
Press the memory key.
The control unit will be reset to its factory settings.
Note: after starting the m enu, the d isplay will read S and any number,
for instance S 1. The number depends on the parameters of the control
unit.
30 of 44
5. Sensor
The table base can be equipped with a safety sensor in order to provide highly
sensitive collision protection. As soon as the base experiences torsions of the type
generated by collisions and the sensor detects these torsions, an impulse will cause
the control unit to stop the movement and drive ca. 40 mm in the opposite direction.
Note: The sens itivity a nd th e ach ievable switch-off th reshold of t he
sensor depend on the entire system and is not the same in all places due
to design features.
Attention – Safety Notice: E ven w hen equi pped w ith a sensor , the
collision protection is by no m eans cons idered personal pr otection
equipment and may not be classified and/or described as such!
Note: The optimal positioning of the sensor must be adjusted to the base
type. Th e m ounting of the se nsor in a ran domly chosen po int m ay not
have the des ired r esult and can even hav e adverse effects on th e
tabletop m ovement due to i nadvertent tr iggering. S ensors can on ly be
installed once. Removal renders them inoperative.
Data
connector
Sensor
recognition
Sensor
After mounting the sensor at a defined location it will be connected with the control
unit via the data connector.
31 of 44
5.1 Training the Sensor
Note: Please strictly follow the order detailed below!
The sensor can only be trained to work with a control unit that still has its factory
setting and requires a reset to be activated. If this is not the case, the control unit
must be reset to its factory setting by using a dongle or via the S0 menu of the LUD
hand switch.
Step 1:
Connect the sensor with the control unit at the data connector before it
is connected with the mains.
Step 2:
Connect the control unit with the mains. The recognition of the control
unit is confirmed by a double clicking sound. This is followed by a
second double clicking sound ca. 3-4 seconds later which confirms the
recognition of the sensor. Performing a reset at this point will train the
sensor.
5.2 Untraining the Sensor
Note: Please strictly follow the order detailed below!
Untraining the sensor can only be done by using a dongle or via the S0 menu of the
LUD hand switch.
Step 1:
Disconnect the sensor from the control unit at the data connector. On
the plug (cable outlet) there is a rocker with a latch that has to be
pressed at its top end (using the fingertip or a small screwdriver or
similar tool) to remove the plug.
Press rocker at the top end in
direction of the arrow to remove
the plug
Step 2:
Data
connector
See section 6. Programmable Dongle for the steps required to untrain
the sensor by using a dongle.
Follow the steps shown in section 4.3.9 Reset Control Unit to Factory
Settings (S0 menu) to untrain the sensor via the S0 menu.
Step 3:
32 of 44
Performing a reset at this point will untrain the sensor.
6. Programmable dongle
The programmable device is a module that can be connected with the data connector
of the motor control. The dongle contains a memory to which a set of control
parameters can be saved.
Thus the dongle may be used to modify the factory-set parameters of a control.
6.1 Parameterizing individual controls
To parameterize individual controls (motor controls which are not part of a cascading
network), proceed as follows:
Note: Please strictly follow the order detailed below!
Step 1:
Disconnect the motor control from the mains power.
Note: At the start of the process the control must be without current. Also
the dongle must not be connected to the motor control!
Step 2:
Connect the dongle to the motor control (data connector).
Step 3:
Reconnect the power supply of the motor control.
As soon as the motor control is connected to mains power, you will hear a double
clicking sound from the motor control.
The control recognizes the dongle, performs a compatibility check, and automatically
starts the parameterization. During the parameterization the LED on the dongle
shines red.
Attention: D o not di
parameterization!
33 of 44
sconnect any p
lug-in connect ions dur ing
As soon as the parameterization process has finished, the LED on the dongle
changes to green and the motor control puts out a double clicking sound.
Note: Should the LED on the dongle still be red after parameterization,
the parameterization was not successful. In this case please start again
with step 1. Should the problem persist, please contact 7KH+XPDQ
6ROXWLRQ for support!
Step 1:
Unplug the dongle from the motor control.
The control is now parameterized and in its normal operating state.
Note: In some cases a manual reset has to be performed after
parameterization.
Note: Please read about how to perform a manual reset in the instruction
manual of your motor control .
34 of 44
7. Technical data
Supply voltage
Standby power, primary (typical)
Efficiency factor (typical)
Operating voltage for internal and external
electronics and Hall sensors
Precision of Motor current measurement
@ 100% Output Voltage and 4-8A per motor
EU: 207-255,4V / 50Hz
US: 90-127V / 50-60Hz
<0.7W
83% @ 300W input power
5VDC ±10% 250mA
±20%
Other cases
Contact 7KH+XPDQ6ROXWLRQ Ambient temperature
Relative humidity (for operation)
Storage and transport temperature
Relative humidity (for storage)
Protection class (with earth terminal)
IP class
Dimensions (L x B x H) [mm]
0-30°C
5-85% (non condensing)
-40-85°C
5-90% (non condensing)
I
IP20 / IP31 (according to design)
319 x 119 x 37
Tolerances
Control unit
according to DIN ISO 2768-1 c
Normal cycle 2/18:
2min move: 7A@33V
231W
Break: 18m
in
8A per motor channel
Maximum sum current restricted,
values shown above
See Figure 7 on page 36
600g
Max. current per motor channel
De-Rating for temperatures >30°C
Weight (typical)
35 of 44
De-Rating of the output power
400
De-Rating of the output power
360
Output power [W]
350
319
300
250
231
224
200
150
195
130
100
50
0
30 °C
45 °C
60 °C
Ambient Temperature
UP
DOWN
Figure 7: De-Rating for temperatures >30°C
The shown values are valid for the normal cycle of a control unit for belt drives (cycle
30s UP, 30s DOWN, 9min Pause).
Nameplate
The figure below shows the nameplate and its location on the control unit.
Note: t he deta ils o n the nam eplate depend on the Uplift 800 contro l un it
model (see technical data).
Figure 8: Nameplate
36 of 44
8. Appendix
In this section you will find detailed information on the following topics:
•
•
•
Possible faults and remedies
Error messages on the handswitch display
Click codes
8.1 Possible faults and remedies
Drives not working
Possible cause
Power cord is not connected
Drives are not connected
Poor plug contact
Control unit is defective
Handswitch is defective
Remedy
Plug the power cord into the control unit
Plug the motor cables into the control unit
Plug the motor cables, power cord and
handswitch in properly
Contact customer service
Replace the handswitch
Drives only operating in one direction
Possible cause
Remedy
Mains power breakdown or mains
Manual Reset*)
power is plugged off during
movement
Control unit is defective
Contact customer service
Handswitch is defective
Replace the handswitch
Drive is defective
Contact customer service
*) If movement is only possible downwards
Control unit or handswitch not working
Possible cause
Remedy
Power cord is not connected
Plug the power cord into the control unit
Handswitch is not connected
Plug in the handswitch
Control unit is defective
Contact customer service
Power cord is defective
Contact customer service
Handswitch is defective
Replace the handswitch
Poor plug contact
Connect the plugs properly
37 of 44
8.2 Error messages on the handswitch display
The display reads HOT.
Cause
Uplift 800 control unit is fitted with
overheating protection. Overheating
has caused it to stop the control unit.
Remedy
Wait until the control unit has cooled down
and HOT is no longer displayed. Uplift 800
control unit is then operational again.
The display reads E + an error code.
Cause
Remedy
There is an internal fault in Uplift 800 Proceed as indicated in the following error
control unit.
list.
Code
00
01
02
12
Description
Internal Error Channel 1
Internal Error Channel 2
Internal Error Channel 3
Defect Channel 1
13
Defect Channel 2
14
Defect Channel 3
24
25
26
48
49
60 C
62
Overcurrent motor M1
Overcurrent motor M2
Overcurrent motor M3
Overcurrent motor group 1
Overcurrent motor group 2
ollision protection
Overcurrent control unit
38 of 44
Remedy
Unplug power cord and contact the
customer service.
Unplug the control unit.
Fix the external short circuit.
Or
Plug in the correct motor to the motor
socket that shows the error.
Start the control unit again.
Remove jammed objects from the driving
area.
Desk might be overloaded Æ remove load
from desktop.
Contact customer service.
Code
36
37
38
61 A
55 S
56 S
67
70
71 A
81
Description
Plug detection in M1 motor
socket
Plug detection in M2 motor
socket
Plug detection in M3 motor
socket
ctuator changed
ynchronization lost motor
group 1
ynchronization lost motor
group 2
High voltage
Motor configuration changed
nti-Pinch configuration
changed
Internal error
Remedy
Plug in the correct motor to the motor
socket that shows the error.
Reset all motors.
Remove load from desktop.
Reset all motors;
If error occurs after reset again, contact
customer service
Unplug power cord and contact the
customer service.
See chapter 4.3.3.
See chapter to activate or deactivate the
anti-pinch configuration
Make a manual reset.
Unplug power cord and plug it in again
after a few seconds.
If this error occurs frequently, unplug the
power cord and contact the customer
service.
Danger: the PowerFail detection identifies m ains pow er br eakdowns
and saves a ll relevant data befo re the vo ltage fa lls be low a cri tical
threshold.
In some exceptional cases this storage is not possible and the error E81
is show n on the handsw itch d isplay ( if ava ilable) and the Uplift 800 cl icks
three times.
To rectify this error, a manual reset is necessary (see page 20).
39 of 44
8.3 Click codes
When the control unit is switched on the Uplift 800 uses its relays to inform the user
acoustically about the system state and the reason why the control unit was switched
off before. The table below shows which number of clicks corresponds to certain
information.
Number of clicks
State information
2x with short interval
(fast double click)
Normal operation:
No problems detected.
This signal will be put out only when the control unit is
connected to mains power.
Key lock active:
This signal will be put out every time if the desktop shall be
moved and the key lock is active. (Up/Down-Key or memory
keys)
Reset mode:
The system was put into reset mode.
This signal will be put out every time if the desktop shall be
moved in reset mode. (Up/Down-Key or memory keys)
Sensor missing:
The safety sensor is not connected to the control unit.
This signal will be put out every time if the desktop shall be
moved. (Up/Down-Key or memory keys)
Duty cycle exceeded:
This signal will be put out every time if the desktop shall be
moved downwards. (Down-Key)
2x with long interval
(slow double click)
2x with long interval
(slow double click)
3x with short interval
(fast triple click)
3x with long interval
(slow triple click)
Note: T he C lick codes that occu r w hen you store or deact ivate a
container-stop or shelf-stop position are shown in the chapter 4.3.3.
40 of 44
9. Hand Switches Overview
%DVLF6ZLWFK
Table-Up Key
Table-Down Key
Fig. 1: Keys at LU hand switch
'LJLWDO'LVSOD\ZLWK0HPRU\6ZLWFK
Table/2.
motorMotorgruppe
group Up
Tisch/2.
Table-Up Key
Tisch nach oben
nach oben
Position
Key 1 1
Positionstaste
Table/2. motor group Down
Position
Key 1
Speichertaste
Position Key 2
Position
Key 14
Positionstaste
Position Key 1
Table-Down Key
Fig. 2: Keys at LUD hand switch
Display overview
Containerstop -LED
Ergoflex-LED
Info-LED
Reset-LED
Fig. 3: Display at LUD
41 of 44
Lock-LED
'LJLWDO'LVSOD\6ZLWFK
Display
Table-Up Key
Fig. 4:Keys and Display at LO
42 of 44
Table-Down Key
9. Further information
9.1.
End of life disposal
When you no longer require the Uplift 800 control unit, please note the following for
disposal:
Note: the Uplift 800 m otor cont rol b ox i s e lectrical or electronic equ ipment
according to d irective 2002/9 6/EC and i s t herefore m arked with the
symbol depicted on the left.
Note: ensu re eco -friendly d isposal of all th e contr ol un it c omponents
(separate the plastic and electronic parts for collection).
Also ens ure ec o-friendly d isposal of a ll t he other com ponents ( drives,
cables, etc.).
43 of 44
9.2.
Standards
Europe
• DIN EN 60335-1:2002+A11:2004+A1:2004+A12:2006+A2:2006+A13:2008
• DIN EN 61000-6-3 / VDE 0839-6-3: 2007
• DIN EN 61000-6-2 / VDE 0839-6-2: 2006-03
• DIN EN 61000-3-2:2006
• DIN EN 61000-3-3:2007
• DIN EN 61000-4-6
• DIN EN 61000-4-5
• DIN EN 61000-4-4
• DIN EN 61000-4-3
• DIN EN 61000-4-2
• DIN EN 61000-4-11
• EN 13849-1 Teil 1
• EN 62233
Australia
• IEC 60335-1:2006
• DIN EN 61000-6-3*VDE 0839-6-3: 2007 09
• DIN EN 61000-6-2*VDE 0839-6-2: 2006 03
9.3.
Declarations of conformity
United States of America and Canada
• cULus 60950-1
• CSA C22.2 60950-1-03
Japan
• S-Mark
Note: this product is RoHS compliant according to directive 2002/95/EC!
Note: t his product is R EACH co mpliant accord ing t o d irective
2006/121/EC (Edict 1907/2006)
44 of 44