1
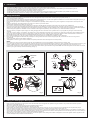
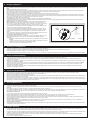
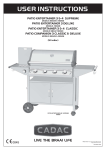
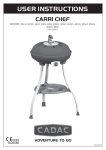
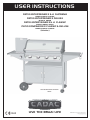
USER INSTRUCTIONS PATIO ENTERTAINER 3 & 4 SUPREME MODELS 98349 & 98352 PATIO ENTERTAINER 3 DELUXE MODELS 98348 PATIO ENTERTAINER 3 & 4 CLASSIC MODELS 98347, 98350 PATIO COMPANION 3 CLASSIC & DELUXE MODELS 98345 & 98346 (28 mBar) PATIO ENTERTAINER 4B SUPREME 98352 0845 LIVE THE BRAAI LIFE Please note: Your product may differ from the image on the front cover 503-0052 LEV2 CADAC EUROPE Ratio 26, 6921 RW Duiven, The Netherlands Tel: +31 26 319 7740 . Fax: +31 26 319 7743 . Email: [email protected] Website: www.cadaceurope.com CADAC UK Cadac House, Old Colliery Way, Beighton, Sheffield, S20 1DJ Tel: +441142300091 . Fax. +441142879879 . Email: [email protected] Website: www.cadaceurope.com CADAC SCHWEIZ AG Industriestrasse 16, 6055 Alpnach Dorf Tel: +41 41 672 90 36 . Fax: +41 41 672 90 39 . Email: [email protected] Website: www.cadac.ch CADAC GERMANY Am Groβmarkt 2, 67133 Maxdorf Tel.: +49 6237 4182928 . Fax: +49 6237 4182938 . Email: [email protected] Website: www.cadaceurope.com CADAC FRANCE 9 Bis Rue du Cot Pilot, 92200 Neuilly Sur Seine Tel: +33 603 704 673 . Email: [email protected] Website: www.cadaceurope.com CADAC SCANDINAVIA Fritz Schur Consumer Products A/S, Esplanaden 40, DK-1263 København Tel: +45 3396 0000 . Fax: +45 3396 0009 . Email: [email protected] Website: www.cadaceurope.com CADAC SOUTH EAST EUROPE Budimska 3, 11 000 Belgrade, Serbia Tel: +381 11 339 2700 . Email: [email protected] Website: www.cadac.rs CADAC AUSTRALIA CADAC-BBQ Pty Ltd . Australia Tel: 0420 503 967 . Email: [email protected] Website: www.cadacbbq.com.au CADAC NORTH AMERICA 1342 South Powerline Road, Bldg. 1 Deerfield Beach, FL 33442, USA Toll Free: 1-888 602 2322 or Tel: 1 954 956 2272 Fax: 1 954 971 3725 . Email: [email protected] Website: www.cadac-barbecues.com CADAC MIDDLE EAST Island View Distributors LLC, Al Reem 1 Street 5 Villa 26, Arabian Ranches, Dubai, UAE P.O. Box 17962 Dubai, UAE Tel: 00971 4 431 7153 . Fax: 00971 4 431 6892 . Email: [email protected] . [email protected] Website: www.ivdxb.com CADAC ZAMBIA Yunipat Distributors (Z) Ltd. Zambia P.O. Box 32327 Lusaka ZAMBIA Tel/Fax: +260211 845733 . Email: [email protected] Website: www.yunipatdistributors.co.zm CADAC NEW ZEALAND Riverlea Group (Pty) Ltd, New Zealand PO Box 11062, 11 Kells Place, Hamilton 3251, New Zealand Tel: +64 7 847 0204 Fax: +64 7 847 0205 Email: e. [email protected] Website: http://www.riverleagroup.co.nz CADAC SA P.O. Box 43196, Industria, 2042, South Africa Tel: +27 11 470 6600 . Fax: +27 11 472 9401 . Email: [email protected] Website: www.cadac.co.za IMPORTANT READ THESE INSTRUCTIONS CAREFULLY SO AS TO FIMILIARISE YOURSELF WITH THE APPLIANCE BEFORE USE. RETAIN THESE INSTRUCTIONS FOR FUTURE REFERENCE. FOR OUTDOOR USE ONLY! (FOR ASSEMBLY INSTRUCTION, SEE SEPARATE BOOKLET) 1. General This appliance complies with BS EN 498: 1998 This appliance shall only be used with an approved hose and regulator. The gas cylinder is to be used only in the upright position. Gas appliances require ventilation for efficient performance and to ensure the safety of users and other persons in close proximity. Use outdoors only! DK, FI, NO, NL, SE, AT, DE BE, ES, FR, IE, IT, PT, GB, CH Appliance categories I3B/P (30) I3+ (28-30/37) Allowable gases and operating pressure Butane @ 28-30mBar Propane @ 28-30mBar Butane/Propane mixtures @ 28-30mBar (South Africa @ 2.8kPa) Butane @ 28-30mBar Propane @ 37mBar Country of use Main BBQ Unit (Models 98345, 98346, 98347, 98348, 98349) 1.00 Jet number Butane - 270 grams/hour Butane - 270 grams/hour Nominal usage Gross nom. heat input per burner per burner 3.7 kW per burner (3.7kW x 3 = 11.1kW in total) 3.7 kW per burner (3.7kW x 3 = 11.1kW in total) Main BBQ Unit (Models 98350 & 98352) 1.00 Jet number Nominal usage Butane - 270 grams/hour per burner per burner Gross nom. heat input 3.7 kW per burner (3.7kW x 4 = 14.8kW in total) 3.7 kW per burner (3.7kW x 4 = 14.8kW in total) Butane - 270 grams/hour Side Burner (Applicable to models 98349 & 98352) Jet number Nominal usage Gross nom. heat input Gas supply sources 1,05 Butane - 325 grams/hour Butane - 325 grams/hour 4,5 kW 4,5 kW An approved hose and regulator connected to a refillable gas container not exceeding 13kg and 400mm in height, complying with local regulation in force Country name abbreviations AT = Austria ES = Spain IT = Italy BE = Belgium FI = Finland NL = Netherlands CH = Switzerland FR = France NO = Norway DE = Germany GB = United Kingdom PT = Portugal DK = Denmark IE = Ireland SE = Sweden GB 2. Introduction The CADAC Patio BBQ is designed for outdoor cooking enthusiasts, which makes it ideal for patio entertaining. The ease of use and the versatility of the interchangeable grills allow for a variety of cooking methods, whether you are entertaining a crowd or barbecuing for two. The BBQ Grid is ideal for barbecuing cuts of meat, kebabs, vegetables, chicken or fish. The Reversible Grill Plate is ideal for traditional breakfasts, stir-fries, pancakes, etc. The Warming Rack expands the cooking area and is great for warming breads and cooking jacket potatoes or stuffed vegetables. (Only available on certain models) The Side Burner is ideal for cooking food or making a sauce while barbecuing. (Only available on certain models) 3. Safety Information The hose and seal on the regulator must be checked for wear or damage before every use and before connecting to the gas cylinder (See Fig. 1). Do not move the appliance during use. Ensure the appliance is used away from flammable materials. Minimum safe distances are 1,2m above the appliance and 600mm to the rear and sides of the appliance (See Fig. 2). Do not use an appliance that is damaged, leaking or which does not operate properly. Ensure that the gas cylinder is connected or changed in a well ventilated area, preferably outdoors, away from any source of ignition such as open flames, and away from other people. Keep gas cylinders away from heat and flames. Do not place on a stove or any other hot surface. Ensure that the assembled unit is stable and does not rock. Do not cover or change the primary air supply apertures in the burners as this will affect the performance of the product and may lead to an unstable flame. In the event of burn back, where the flame burns back and ignites at the jet, immediately turn off the gas supply by first closing the control valve on the gas cylinder and then the appliance valve. After the flame is extinguished remove the regulator and check the condition of its seal, replace the seal if in doubt. Also check that the jet is not blocked. Replace if in doubt. Re-light the appliance as described in Section 6. Should the flame light back persistently, return the product to your authorised CADAC repair agent. If there is a leak on your appliance (smell of gas), turn off the gas supply, first at the control valve on the cylinder and then on your appliance by turning the control knobs fully clockwise. If you wish to check for leaks on your appliance, do it outside. Do not try to detect leaks using a flame. The correct way is to smear the joint with soapy water. If bubbles form, then there is a gas leak. Immediately turn off the gas supply firstly by closing the control valve on the gas cylinder and then the appliance valves. Check that all the connections are properly fitted. Re-check with soapy water. If a gas leak persists return the product to your CADAC dealer for inspection / repair. Do not modify the appliance or use it for anything for which it has not been designed. Any modification of the appliance may be dangerous. During use, part of the appliance will become hot, particularly the cooking areas and the hood. Avoid touching hot parts with your bare hands. The use of oven gloves is recommended. Keep young children away from the appliance at all times. This appliance consumes oxygen and needs ventilation for optimum performance and for the safety of those in close proximity. Note! Do not twist or pinch the hose. Ensure that it is routed away from the BBQ body so as to prevent deteriation / damage to the hose caused by heat. Fit one end of the low pressure hose onto the regulator nozzle and the other end onto the Patio BBQ nozzle by pushing it on as far as possible. Ensure the O’Ring is present, in good condition & fitted properly. Do not use the appliance without the O’Ring fitted. Firmly clamp hose into position using a hose clamp at both ends of the hose (See Fig. 1 & 3). Ensure that the connections are made securely and do not allow gas to leak. Check for gas leaks before using the Patio BBQ. Ensure that the appliance control valves are in the off position by turning the knobs fully clockwise to their stop (See Fig. 4). REGULATOR HOSE FIT HOSE CLAMP HERE - Flammable SEAL 1.2m Flammable 600 mm 600 mm CYLINDER VALVE 600 mm + Flammable Flammable Fig. 1 Fig. 2 OFF IGNITE / HIGH FIG. 3 ON Fig. 3 OFF LOW Fig. 4 4. Fitting and Changing the Gas Cylinder Before connecting the appliance to a gas cylinder, ensure that the rubber seal on the regulator is in position and in good condition. Carry out this check each time you fit the appliance to a gas cylinder (See Fig. 1). Blow out any dust from the cylinder opening to prevent possible blockage of the jet. Hang the cylinder on the cylinder bracket situated on the side of the trolley. Ensure that the gas cylinder is fitted or changed in a well ventilated location outdoors, away from any source of ignition such as naked flames, and away from other people. Make sure that the gas cylinder is kept upright at all times. Screw the regulator onto the cylinder until it is fully engaged. Hand tighten only. If there is a leak on your appliance (smell of gas), extinguish all sources of ignition in the vicinity of the appliance. If you wish to check for leaks on your appliance, use soapy water which is applied to the joints. A formation of bubbles will indicate a gas leak. Check that all the connections are securely fitted and re-check with soapy water. If you cannot rectify the gas leak, do not use the appliance. Contact your local CADAC stockist for assistance. When changing a gas cylinder, first close the cylinder valve and then the appliance valve, making sure the flame is extinguished, unscrew the regulator. Re-fit the regulator to a full cylinder following the same precautions as described above. 5. Using the Appliance Do not stand the cylinder on the ground when using the appliance or when it is connected to the appliance. It must be hanging from the cylinder bracket situated on the side of your BBQ. Use this appliance only on a firm level surface. Before use ensure that the drip tray is in place. It helps to place water or sand in the tray before using the appliance as the fat will drip into the water or sand and this will assist in preventing flaring. It will also assist in cleaning after use as the fat will be easier to remove from the surface of the drip tray. Never place sawdust or any other combustible material in or on the drip tray. Make sure that the cylinder is correctly fitted to the appliance and that the cylinder control valve is in the open position. To light the appliance using the automatic ignitor, push in and turn the control knob in an anti-clockwise direction until spring resistance is felt. Hold the knob in this position for 3 -5 secs to allow the gas to flow and then turn the knob fully anti-clockwise to the ON position. This will cause the automatic ignitor to light the burner. Should the burner not ignite turn the control knob to the OFF position and repeat the process until the burner ignites. Note! All burners are fitted with an automatic Ignitor. Cross lighting: To light the burners using Cross lighting, light the left hand burner as described above. To light the remainder of the burners, simply turn their control knobs to the HIGH position while ensuring that the lighting sequence is such that any burner to be lit up is directly adjacent to a burner which is already burning. Manual ignition: To light the burners manually, first remove the cast iron grill plate and the deflector plate directly underneath it. Strike a match and position it next to the left hand burner. Turn on the gas supply to that burner only by pushing the control valve in and turning it in an anti-clockwise direction. This will ignite the burner. Once the burner is ignited, AIR-INTAKE ADJUSTER carefully replace the deflector plate and cast iron grill plate. You will now be able to light the remainder of the burners as described in 'Cross lighting'. Use the control knobs to adjust the individual burner flame intensity to the desired level by LOCKING turning the knob anti-clockwise to increase the flame and clockwise to decrease it. If flaring SCREW occurs, first check that the primary air supply apertures in the burner mixing tube are not blocked. After use, first close valve on gas cylinder. When the flame has extinguished close the burner control valves on the appliance by turning control knobs fully clockwise. Using the air-intake adjuster: (See Fig. 5) A normal flame is blue and may have a yellow tip. If the flame is completely yellow, it may be that the air-intake adjuster is not correctly set. To set the air-intake adjuster, follow the steps below: BURNER Depending on where the appliance is operated, it may be necessary to set the air-intake Fig. 5 adjuster. To obtain a blue flame, loosen the locking screw and adjust the air-adjuster by rotating it clockwise or anti- clockwise until the desired flame is obtained. This process needs to be repeated on all the burners. 6. Cooking on the Appliance The grids and grills heat up evenly, searing meats and locking in their natural juices and flavours. When using the grill for the first time, lightly coat the cooking side of the grill / grills with oil before heating. This can be repeated after every wash. Preheat the grills before cooking. Lightly coat your food with oil, to prevent it sticking to the grill. For the best results, keep the lid closed while cooking, and only use 2 burners on HIGH. The heat inside the lid should not exceed 250°C (Not applicable to models 98345 & 98346) 7. Direct or Indirect Cooking Direct cooking is recommended for foods that can be cooked in less than 1/2 hour (e.g. steaks, fish fillets, chops, hamburger patties, etc.). Food is placed directly over the heat source. As juices from the food drip onto the deflector plate, it creates the "smoke" that gives the food that irresistible barbecue flavour. (Applicable to ALL models) Indirect cooking is similar to roasting and is recommended for whole meats (e.g. roasts, whole chickens, vegetables or even baking bread, etc) that need to be cooked slowly. (Not applicable to models 98345 & 98346) This is done by either turning down the heat source or by lighting the two side burners only and placing the food over the centre burner. (Not applicable to models 98345 & 98346) All cooking done in this manner requires the lid to be closed. With the lid closed the circulated heat ensures that the food is cooked evenly, much like a convection oven. (Not applicable to models 98345 & 98346) The built-in thermometer in the lid indicates the cooking temperature inside the barbecue and can be used to monitor and control the heat settings for excellent results. (Not applicable to models 98345 & 98346) 8. Caring for the Grill Plates The grill plates are coated with vitreous enamel. Whilst vitreous enamel is very durable, you will add years to its life if you use plastic or wooden utensils when cooking. Do not overheat the grill plate and always add a little cooking oil to the surface before use. Always allow the grill plate to cool before immersing it in water. Vitreous enamel is perfectly safe in the dishwasher, but the surface is so easy to clean that a quick hand wash does the trick. The use of abrasive detergents is not recommended, as this will permanently scratch or mark the surface. If through misuse, burned grease or food residue collects on the surface, it can usually be removed with warm water and mild detergent. In an extreme case, it can be removed by a thorough cleaning with a mixture of 3 tablespoons of bleach, 1 tablespoon of liquid detergent and 1 cup of water. Apply to the cooking surface with a sponge or plastic scrubbing pad. After cleaning, recondition the surface with a light wipe of oil before re-use. 9. General Maintenance There are no predetermined maintenance intervals for this appliance. It is dangerous to use an appliance with a cracked or perished seal and / or hose. Inspect both seals and hose regularly and replace if they are not in order, before using the appliance. If the appliance was in use, it will be hot. Allow to cool sufficiently before attempting any maintenance. The CADAC Patio BBQ is fitted with a CADAC Jet to regulate the correct amount of gas. Should the hole in the Jet become blocked this may result in a small flame or no flame at all. Do not attempt to clean the Jet with a pin or other such device as this may damage the orifice, which could make the appliance unsafe. Replacing a Blocked Jet Ensure that the cylinder valve is closed, then disconnect the appliance from the gas cylinder. Remove the grill plates. Remove the enamelled deflector plates to expose the burners. Remove the drip tray and the retaining screws of the affected burner. Remove the affected burner by lifting it out of its location taking care not to damage the control valve whilst doing so. This will expose the jet. Unscrew the blocked jet with a suitable spanner and replace it with a new jet. Do not use pliers on the jet as this may damage the jet making it unusable or impossible to remove. Do not over tighten as this may damage the Jet. To re-assemble, reverse the above procedure. Replacement of Hose The hose length should not be less than 800 mm and shall not exceed 1.2 m. Check the expiry date on the hose and replace when necessary. Fitting of a hose is described in Section 3. Only LPG hose that complies with BS 3212 may be used with this appliance. Replacement of Regulator It is important that the connection between the regulator outlet and the low pressure hose is tight and that it is secured with a metal hose clamp. Always check the joint for gas leaks as described in section 3 above before use. 10. Trouble Shooting A normal flame is blue and may have an orange or yellow tip. If the flame is completely yellow, it may be that the jet is not securely fitted. Re-tighten to give a gas tight seal. An overfilled gas cylinder can also cause large yellow flames. Cylinder should be returned to filling station and checked by weight. Check that the primary air supply apertures in the Burners are clear and free of obstructions. Also check that there are no obstructions inside the venturi. Remove the affected burner by lifting it out of its location (see 'Replacing a Blocked Jet' above). Remove whatever material is blocking the venturi, such as insect nests. If the flame power drops or the gas will not light, check that the gas cylinder still contains gas (shake to hear the noise made by a liquid). If there is still gas, the jet might have become blocked or partially blocked. If you suspect a blocked jet, follow the instructions above. 11. Cleaning The wire warming rack is removed by lifting it from the body and can be washed in a detergent solution. (Not applicable to models 98345 & 98346) To clean the enamelled deflector plates, wash them in a warm soapy water solution or a non-abrasive detergent. To clean the cooking plate, grill plate and drip tray, immerse in a soapy water solution to loosen the cooking residues and brush with a stiff brush. Rinse in clean water. To clean the body, simply wipe with a damp cloth using a little detergent, if necessary. Do not use abrasive cleaners or scourers as this will cause permanent damage to the painted surface. Even though stainless steel is remarkably resistant to tarnish and rust relative to ordinary steels, it still needs proper care. We recommend the following: After use, clean the stainless steel surfaces with clean water and a soft cloth. Where light cleaning is needed, a commercially available stainless steel cleaner with a soft cloth should be used. To repair minor tea staining or pitting, you can use a light, non-metallic scourer. It is important that you rub with the natural grain of the stainless steel surface to avoid leaving visible scratch marks. Between uses, it is a good idea to leave the barbeque covered to prevent dust and air borne salts settling on the stainless steel surfaces. If left for too long, these particles can act as rust centres. With a small amount of care, your investment in quality stainless steel will keep its beautiful finish as well as its value for a long time to come. 12. Storage Handle the appliance with care. Do not drop it. After use, wait until the appliance has cooled down, disconnect it from the gas cylinder and store in a cool dry place away from heat. Keep the hood closed when not in use as this will prevent the ingress of dirt and insects, which may affect the gas flow. 13. Spares and Accessories Always use genuine CADAC spares as they have been designed to give optimum performance. Spares and Accessories Description Jet (BBQ Unit) Surefire Lighter Jet (Side Burner) Reversible Grill Plate Cast Iron Grid - Small Part No. 1.00 601 1.05 98353 98355 Description Cast Iron Grid - Large Rotisserie - 3 Burner Rotisserie - 4 Burner Cast Iron Roast Pan Flame Tamer Part No. 98356 98354 98357 98358 98359 14. Returning the Appliance for Repair or Service Do not modify the appliance. This may cause the appliance to become unsafe. Any modifications will render the CADAC warranty null and void. If you cannot rectify any fault by following these instructions, contact your local CADAC distributor for inspection and / or repair. 15. Warrantee CADAC (Pty) Ltd hereby warrants to the ORIGINAL PURCHASER of this CADAC Gas Barbecue, that it will be free of defects in material and workmanship from the date of purchase as follows: Valves: Plastic parts: Enamel parts: Cast Iron: Painted Frames: Stainless Steel Burners: 5 Years No Warranty 5 Years 5 Years 1 Year 1 Year The warranty will only apply if the unit is assembled and operated in accordance with the printed instructions. CADAC may require reasonable proof of your date of purchase. THEREFORE, YOU SHOULD RETAIN YOUR SALES SLIP OR INVOICE. This Limited Warranty shall be limited to the repair or replacement of parts that prove defective under normal use and service and which on examination shall indicate, to CADAC's satisfaction, they are defective. Before returning any parts, contact the customer service representative in your region using the contact information provided with your manual or call 0860 223 220 (RSA only). If CADAC confirms the defect and approves the claim, CADAC will elect to replace such parts without charge. CADAC will return parts to the purchaser, freight or postage prepaid. This Limited Warranty does not cover any failures or operating difficulties due to accident, abuse, misuse alteration, misapplication, vandalism, improper installation or improper maintenance or service, or failure to perform normal and routine maintenance, including but not limited to damage caused by insects within the burner tubes, as set out in this owner's manual. Deterioration or damage due to severe weather conditions such as hail, hurricanes, earthquakes or tornadoes, discoloration due to exposure to chemicals either directly or in the atmosphere, is not cover by this Limited Warranty. There are no other express warrants except as set forth herein and any applicable implied warranties of merchantability and fitness are limited in duration to the period of coverage of this express written Limited Warranty. Some regions do not allow limitation on how long an implied warranty lasts, so this limitation may not apply to you. CADAC is not liable for any special, indirect or consequential damages. Some regions do not allow the exclusion or limitation of incidental or consequential damages, to this limitation or exclusion may not apply to you. CADAC does not authorize any person or company to assume for it any obligation or liability in connection with the sale, installation, use, removal, return, or replacement of its equipment; and no such representations are binding on CADAC. This Warranty applies only to products sold at retail. To enjoy and ensure longevity of your CADAC product, please refer to the cleaning and maintenance section of the user manual with particular attention to the care of the Stainless Steel. CADAC (Pty) Ltd www.cadac.co.za