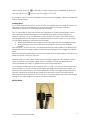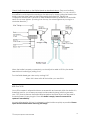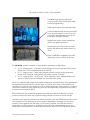
1
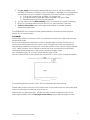
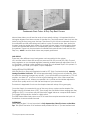
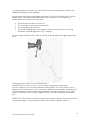
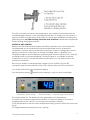
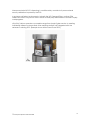
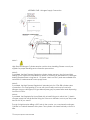
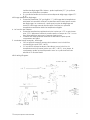
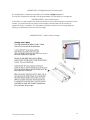
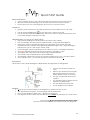
Wine Service Equipment Operations Guide Rev. 3 – May 2011 © ProWine Products 2003-2011 ProWine Products 4269 Lincoln Rd., Suite 100 Holland, MI 49423 616-494-0100 www.n2Vin.com PRECAUTIONS This is electrical equipment intended only for indoor use in dry locations. A polarized 3-blade grounding power cord is supplied. The power cord must be plugged into an appropriately grounded outlet. Extension cords may be used so long as their current rating is sufficient for this device and ground continuity is maintained. Do not place this equipment near sinks, saunas, or pools where there may be a risk of it falling into water. The refrigeration condenser is cooled by a fan which requires unobstructed flow. Please respect installation requirements to assure proper ventilation. Over time, it is possible that the fin coil condenser may become obstructed by an accumulation of dust and airborne debris. This will decrease system performance and may result in premature failure of the compressor. Annual inspection and cleaning of the condenser are recommended. The bottle connections in this equipment seal by manually-controlled expansion of a rubber bushing within the bottle neck. They are designed to work with conventional cork-sealed bottles, which are designed to withstand cork-insertion forces. Screw top closures (e.g. Stelvin) are characteristically used on bottles made of thinner glass and of varying inside diameters. Most screw top bottles should successfully seal when placed into this system, but exercise great care to guard against over tightening the seal and possible risk of breaking the bottle’s neck! This equipment may be operated without an electrical connection to provide non-refrigerated wine preservation and dispensing service at room temperature. In this instance, the glass door must be removed and stored safely to avoid mold and mildew growth within the cabinet. This equipment may be operated with thermostat settings elevated above ambient temperatures to prevent operation of the refrigeration. In this instance, the glass door must be removed and stored safely to avoid mold and mildew growth within the cabinet as well as to avoid interior warming by the lighting. Any servicing of this equipment necessitating removal of the lower front and back access panels must be performed with the power cord unplugged by persons familiar with ordinary precautions that must be exercised when working with open electrical and refrigeration devices. This equipment requires a compressed, inert gas supply that is to be procured independently of the sale of this equipment. High pressure gas cylinders require informed, attentive handling. Please have your supplier provide appropriate instruction. Please place the cylinder away from children’s access. The gas circuit in this equipment is designed to operate at pressures below 10PSIG (pounds), typically operating in a 4PSIG range. By virtue of its low-pressure Manual Taps, the fully ‘open’ gas distribution system is inherently safe against possible violent internal component rupture or wine bottle breakage as a result of over-pressurization. When OFF, the Master Gas Valve isolates the internal gas distribution circuit from the gas supply as well as from over-pressure protection of the Manual Taps. Gas regulators, therefore, must assure no more than 10PSIG is supplied to the equipment. n2Vin Setup and Operations Manual © 2008 2 n2Vin User Guide and Installation/Setup Manual 2 Congratulations! Your new professional quality n Vin® winebar will greatly enrich your wine appreciation experience. This refrigerated, sealed, inert-gas-based wine preservation and serving equipment is designed for the highest quality management of your opened wines, whether used commercially or personally. Introduction By way of introduction to your new equipment, we would like to discuss the fundamentals of wine preservation equipment by exploring the most frequently asked question: “How long will my wines last after opening and being placed in n2Vin?” The answer is dependent upon a number of variables that can limit or extend the life of your opened bottles. As a rule, with n2Vin, you should be able to rely on a window between four and eight weeks. Reasons for this range include the type and condition of wines put into the system, the handling of those wines prior to being put in the system and the quality of the gases used for preservation. Though there are exceptions, when you consider the nature of the wine itself, the vast majority of older vintage bottles are Reds. Reds simply hold up better, or, perhaps, better put, the desirable attributes of Red Wines maintain and often improve over time. Whites, as a rule, are typically made for consumption with 1-3 years of their production. When you open a bottle, put n2Vin’s Bottle Head into the neck, and seal it, you have done very little that is different from the professional handling of some of the world’s most precious vintages – some of which you may, in fact, own. Because of their natural cork closures, many old bottles suffer from seal degeneration and will be opened, topped off, and re-corked to be cellared to grow in value for many years to come. Prior to recorking, a quick flush or sparge of nitrogen (n2) gas is introduced into the bottle above the wine to expel as much oxygen-bearing air from the headspace as possible. In doing so, the act of ‘topping off’ a vintage bottle exposes the wine being poured to more oxygen than n2Vin ever will! Inert gas preservation systems do not medicate the wine. The gasses merely displace oxygen-rich air and provide pressure for dispensing the wine as the bottles remain sealed. Though n2Vin can use nitrogen, argon, and blends of either or both with CO2, the most practical gas is, has been, and always will be just plain nitrogen. n2/CO2 blends (commercially known as ‘beer-gas’ and/or ‘G-mix’) appear to offer an edge in longevity for some Whites and a few really young, thin Reds. The reason for this is that CO2 occurs naturally in the fermentation process in all wines, and, in some, imparts an integral, refreshing ‘tang’ and crispness to the palate - especially in fresh, citrusy, un-oaked whites. You’ll often see tiny bubbles of entrained gas rising from the bottom of a room-temp glass when filled with a White. Being more opaque, you don’t see it in most Reds. Moreover, it often isn’t there in anywhere near the same representation or significance. Because of the dominance of the stronger sensory impact of tannins in Reds, a small n2Vin Setup and Operations Manual © 2008 3 amount of entrained CO2 wouldn’t be particularly detectable, anyway. In the n2Vin system, if the gas introduced into the headspace contains a CO2 component, the gas molecules within the headspace and wine reach equilibrium and wines will be dispensed with a higher level of dissolved CO2 than they would with a nitrogen-only preservation gas. This certainly does not mean you are going to ‘carbonate’ your wines. Doing so requires pressures above 14psig before reaching a forced absorption level of CO2. n2Vin operates only around 4psig. But the fact remains that liquids interact molecularly with the gasses above and in contact with them. (That’s why we’re here in the first place - to reduce or eliminate that degenerative interaction with oxygen, right?) So with a negligible effect on Reds and an improved stabilization effect on young Whites, if you plan on long-hold Whites, an n2/CO2 blend may serve well. If your primary focus is Reds, as is generally the case with these systems, nitrogen is all you need! Because of its commercial exploitability, those who sell Argon, tout an unsupportable (snake-oil) benefit of Argon over Nitrogen that bears some discussion. The ‘logical’ appeal of their argument lies in the fact that Argon is heavier than air and ‘air’ is +/- 80% Nitrogen. The picture spun is that this heavy Argon gas ‘blankets’ the surface of the wine like a parfait. The reality is that all gasses are continuously blending, dissipating, into a mixture of themselves. There is no ground-level layer of Argon gas hugging the street simply because it is a heavier molecule. In fact, CO2 is actually an appreciably heavier gas than Argon! Even with the most sophisticated laminar-flow equipment designed to introduce gasses in strata, it’s a very short-term effect in the presence of any other gas. All gasses mix with each other. Because n2Vin easily connects to Argon cylinders as it does to Nitrogen, so you can experiment with gas options. “Sparging” is a term used in the wine industry to connote flushing air out of a vat to halt maturation and/or prevent oxygen degeneration of the wine in the container. The same beneficial technology was introduced in a micro-scale to the wine bottling industry several decades ago. Just before cork insertion, several jets of nitrogen are aimed into the bottle neck to displace (most) active, atmospheric gasses with an inert gas with the specific purpose of optimizing shelf life of the bottle. In close mechanical synchronization, as the nitrogen is jetted into and fills the ullage, the cork is pressed home to effect a seal. Though not necessary in most cases, n2Vin will permit similar sparging if the operator chooses to do so. Simply turn the gas valve on the Bottle Head ON as you are inserting the Bottle Head into the bottle. Nitrogen, then, is flowing directly down into the bottle, pushing most of the ambient air out around the untightened seal. And notice, too, that the physical dimensions of the Bottle Head Stem also fill most of that space! By the time you turn the Compression Wheel most of the oxygenated air will have been expelled leaving a very clean, non-degenerative headspace gas. While sparging may represent the best of the best practices, it will use more n2. Consider as well that the minor amount of oxygenated air remaining in that very small headspace will be readily converted to innocuous compounds by the natural and additive sulfites in most wines. Oenorganiphiles, particularly, may want to consider opening the n2 valve before sealing the bottle head. n2Vin’s closed, inert gas preservation design allows your wines to be opened once and, then, remain still and sealed until you’ve consumed them. This is the only preservation design approach than offers this superior benefit. Please do not combine the use of gas canister spritzers or vacuum devices with n2Vin. Spritzers and vacuum pumps do not offer much more in the way of preservation benefit than the sulfites in the wine already afford. n2Vin Setup and Operations Manual © 2008 4 These methods only ever offer minimal oxygen exposure reduction in the first place. Each time you want some wine from a bottle so-treated, you must re-open it and you fully reexpose the wine to oxygen-rich air – even more so when tilting the bottle to pour! The larger the liquid surface area exposed to air, the more oxygen is absorbed into the wine. You get a really large area of wine exposed to inrushing air when the bottle is tilted to pour: It’s on the order of 42 times the surface area exposure you see in that little 5/8” circle of wine under the cork. And with these other methods, you repeat that absorption exposure with every pour! Any vacuum pump outside of massive industrial & laboratory equipment is only ever going to partly evacuate the headspace. They don’t get as high as a 50% vacuum, even, but it’s a handy number for illustrative purposes. 18% of the air is oxygen. Vacuums do not selectively suck out oxygen. They suck out some of the air. The air that remains is still 18% oxygen; there’s just less of it. At that 50% vacuum level, after you pour one glass you will have X# of oxygen molecules still in the bottle. You vacuum. You now have ½ of X number of molecules in the headspace. You unseal and pour another glass. The amount of oxygen-rich air in the headspace has now doubled – with the second glass gone, there’s now twice as much air space in the bottle. You vacuum. You now have (½ x 2) x X number of O2 molecules remaining in the headspace. In other words, after vacuuming from the second pour, you have the same amount of oxygen molecules in the bottle as you would have if you’d done nothing after the first glass but simply recork the bottle! The partial vacuum designs are increasingly less effective with each glass. Each open-tilt-and-pour cycle adds oxygen into your remaining wine. When learning wine’s fine points with multiple small-portion samples these short pours are quite destructive, not only repeatedly increasing oxygen exposure at the surface, but agitating the wine to assure a thorough oxygen blending! Please see the illustration below. n2Vin exposes wine to the least possible amount of air – the ½ square-inch surface on the left. And in this sealed environment that’s all the exposure your wine will see. Summarily, though you should be able to count on 3 to 4 weeks of preservation with any wines handled with reasonable care and much longer with most wines, if you plan to consume a bottle over time for casual enjoyment and/or tasting comparisons, do not load the system with any wine previously opened and left untreated or treated by inferior preservation methods. Do not free-pour any wine from the bottle before sealing it with the n2Vin Bottle Head. And consider flipping the bottle head valve to ON while inserting the head if you are drinking organics or desire the longest possible preservation window for your wines. n2Vin Setup and Operations Manual © 2008 5 SYSTEM PRE-CHECKS & FAMILIARIZATION n2Vin was designed for simple reliable operation. Taking a moment to familiarize yourself with a few ‘working points’ will relieve your concerns and let you get into the enjoyment of your wines. Gas Valves are provided at two points: On the lower left of the Tap Panel is the master Gas Valve. Keep this OFF/DOWN when the system is not actively dispensing. You will notice a ¼” hole in the switch shield. This is for a lock pin that is available from ProWine Products and will enable you to use your own small ‘luggage lock’ to prevent tampering or unwanted use. When the gas valve is off, slide the pin above the toggle, lock it in place, and the gas cannot be turned on until the pin is removed. On a Hanger Rail at the top/back in the main refrigerated cabinet are the 5 Bottle Heads. Each has a valve on it. UP is ON. DOWN is OFF. When not connected to a bottle, these valves must be in the OFF/DOWN position or you will loose gas! When connected, the valves should be left in the ON/UP position. The Hanger Rail is for the purpose you’ll see when you first receive the system: You can hang unconnected Bottle Heads from their wine tube loops when not connected to bottles. Typically, except for brief moments during bottle changes, system cleaning and storage, you won’t be using these hangers a lot, but when you do you’ll be glad they are there. The stainless Bottle Deck is the floor of the refrigerated cabinet. You can lift it up and peek under it or remove it. Please note, when you put the Bottle Deck back into place, you need to make sure each tube set is in its crescent cut in the bottle deck. As a rule you won’t need to access this area, but if you spill some wine in the cabinet, it might run down into the pan below the deck and if it does, clean it up with a damp cloth to avoid unpleasant smells developing. n2Vin Setup and Operations Manual © 2008 6 The five Bottle Heads are sub assemblies consisting from top to bottom of the main body, a Compression Wheel, Spacer, Seal, and Bottom Nut – the piece that holds the parts above it in place. Always make certain the Bottom Nut is firmly hand-tight. This is a good time to do that before proceeding. The Thermostat in the mid-part of the dispensing faceplate is a combination of system ON/OFF switch, temperature regulator, light switch and a number of other advanced functions that you will find delineated below and further in Appendix FIVE. The Cover Plate hangs from the light box at the top of the refrigerated cabinet behind the glass door. As shipped, you’ll need to pry up the two hanger tabs on the back of the panel. They should be lifted to 30⁰-45⁰ so they can slip into the slots on the light shroud. The Drip Tray is shipped loose. Its function will be discussed in PLACEMENT below. Several important things must be set up before putting your wines in. This is an outline: 1. Please unpack, inspect, and allow the unit to stand upright for approximately 4 hours before plugging it into an electrical outlet following receipt. This precaution will help avoid possible damage to the compressor in the event the system was laid on its side in transportation. 2. Assess the location in which you will place the system. n2Vin Setup and Operations Manual © 2008 7 3. The gas supply was probably determined at the time of sale & included in your shipment or may be provided by your local dealer. It will need to be configured & connected to suit your installation. Appendix One shows typical configuration. a. If using high-pressure gas cylinders, you’ll need one. b. If using low pressure cylinders where available, be sure it is filled. c. Please see Appendix Two for gas suppliers. 4. You will need to do an initial cleaning, which is the same as long-term cleaning. 5. Plug in to a suitable outlet, and turn the unit on. (see comment 1 above!) 6. Connect some bottles and run through several areas of possible operatorpreference adjustment. The APPENDICES in this manual contain greater detail on several important subjects. Please do not overlook them. PLACEMENT Please make sure the surface on which you place the system is flat, fairly level and near an electrical outlet. This is a liquid dispenser; placement is best on impermeable surfaces. Finished wood furniture should be protected with a mat or poly cutting board under the equipment. Freestanding installations with good air circulation all around the cabinet can be placed on 16” deep surfaces, but be careful to assure that such a small surface is sufficiently stable and affords protection of the power cord and nitrogen supply. You will need roughly 18” of total counter depth if near a wall. Do not install the back of the cabinet any closer than 3” from a wall. It needs to breathe. The projecting power cord will ‘assist’ with this requisite back-wall spacing. Please make sure the vent slots at the lower back of the winebar are not obstructed and check occasionally to make sure they remain so. Examine the two-piece Drip Tray. The Drip Tray slips under the angled corners of the dispensing faceplate with the two large corner holes going under the angled corners. n2Vin Setup and Operations Manual © 2008 8 Condensate Drain Tubes At Drip Tray Back Corners Above these holes you will see the ends of some plastic tubing. It is important that the tubing be aligned over these corners of the drip tray. The tubes needn’t be stuck into the holes so long as they hang over the trap. The reason for this is that condensate forms on the chill plate and will melt during auto-defrost cycles. The melt-water, then, drain into the pan under the bottle deck where it is ducted to these tubes. In humid regions there can be an appreciable amount of condensate water. In addition if you spilled wine in the cabinet, it goes into the pan below the Bottle Deck and will also come out into the Drip Tray – when it and the drain tubes are properly positioned. GAS SUPPLY There are a few different ways inert gasses can be supplied to the system. n2’s and the wines in them like a very low pressure from 3-5 pounds (0.5 ATM). The red knob regulator on our standard regulator assembly enables pressure adjustment from 0 to 10 pounds – assuring a safe operating in range. Do not exceed 10psi in this system! It’s not good for your wine, your carpet, or your wallpaper. Setting REGULATOR PRESSURE: With the Red (Low Pressure) Regulator turned to OFF (fully Counterclockwise), open by turning Clockwise 3 full turns. This will be approximately 3 psig (pounds of pressure). From this point the pressure changes very quickly. ¼ turn will increase your pressure by 1.75 to 2 pounds. Just add 1/8th of a turn to be at a good starting point, then, after some trials, adjust up or down to suit. Where you operate it isn’t critical and should be adjusted to smooth flow quality and to suit the size and shape of your stemware. The sketch in Appendix One shows the simple schematic setup of the gas supply. Once the Supply is connected in one of the ways shown, make sure the Master Gas Toggle Valve is switched down (OFF). Then check the five Bottle Valves making sure they are Down (OFF). Your system may be fitted with Toggle Valves or compact Slide Valves. The Toggle will snap down similar to a light switch. The Slide Valve slides freely down most of its travel then requires an extra short push at the bottom to assure a leak-free seal. DISPENSING When filling a glass, it is very important to fully depress the Glass-Trip Lever on the Wine Tap. This opens the valve to its maximum and provides full flow. If you are hesitant and n2Vin Setup and Operations Manual © 2008 9 only depress the Lever a little, your wine will flow in a small rapid stream and become needlessly aerated (surface bubbles). We recommend putting a water-filled wine bottle in at this time. Please refer to “Bottle Heads” below. This water-filled bottle will serve as a practice run to increase your familiarization and comfort with the system. All vacant Bottle Valves must be OFF Turn the Valve on your practice bottle ON Turn the Master Gas Valve ON. Check the Red Regulator (if provided) to be sure it is 3 turns open (or if using separately-supplied regulators, set to ~3-4psig). Tilt a wine glass toward the Trip Lever on the Tap, and fully depress the glass against the Lever. Pull the glass back when it is at a desirable level. If the flow was too slow or too fast, you can adjust the regulator accordingly. Now try it again, but this time only depress the level slightly. This is the incorrect way to dispense, but it is illustrative of why it is incorrect: When only open slightly, the pressure at the small opening is concentrated something like a squirt gun, resulting in a thin, rapid stream of water (or wine). Pushing in again, but fully, you will see a gentle, controlled flow. INSPECT TAP CAPS: Please check to assure the round caps under the tap valve actuators are seated properly – snug clockwise rotation. (See arrow in diagram below.) n2Vin Setup and Operations Manual © 2008 10 The n2 is now ready to load as is discussed below, but it needs to be cleaned with the provided B-Bright cleaner, a safe, specialized formulation. So loading, for the moment, is going to require a couple empty wine bottles. It is also a dress rehearsal for loading and dispensing wines. An initial cleaning should be done at this time. Please refer to Appendix Three covering cleaning procedures. ELECTRICAL AND CONTROL Because the Gas and Electrical systems are entirely separate, wine can be preserved and dispensed as can all cleaning functions be performed without an electrical connection. However without an electrical connection, there is no refrigeration and no lighting. If the n2Vin is to be used in a climate-controlled cellar, it is possible to set temperature high to avoid compressor operation (and the heat output from it), while still providing power for the internal lighting. Contact ProWine or your dealer for special conditions such as this, as there are several modifications you can easily make to suit special circumstances. Be sure your model is in the appropriate voltage for your location. Plug the IEC (computer) end into the back inlet of the n2Vin and the other end into a wall outlet. You will see three bars in the temperature display. Push the leftmost button (Main Switch) holding it in until you hear a small chirp. Main Switch | Temp & Settings Temperature Display | Compressor |Light | Manual Defrost The system will be ON. The display will show (generally) room temperature. To protect the compressor against liquid lockup, a compressor delay of 2 minutes is programmed into the control. In two minutes the compressor will start. To set Temperature or see the current temperature setting, press the SET button once and let go. The target temperature setting will show - flashing. n2Vin Setup and Operations Manual © 2008 11 While flashing, Arrow UP Push the Light Switch (or DOWN ) to adjust temperature if needed & re-press Set. once to turn ON, again to turn OFF. A number of other Control Parameters can be accessed if needed. Please see Appendix FIVE for these settings. Loading Wines If you have cleaned the system, as you should, you already know this step. However, you will need to look at the placement of your wines relative to naturally-occurring temperature variations in the refrigerated environment. First, it is important to note that factory pre-calibration of system temperatures is done with a bottle placed at the midpoint of the Bottle Deck and is set according to a measure of liquid, not air, temperature at this position in the case. This means that the actual temperature of the wine in the midpoint bottle is what is shown on (or very close to) the digital reading of the thermostat controller. Wines placed behind the midpoint and to the right will be a few degrees cooler. Wines placed in front and to the left of the midpoint will be a few degrees warmer. Active Bottles – those in service – should be placed across the middle of the Bottle Deck. Unopened backup/storage bottles should be placed along the front edge of the Bottle Deck. Because the liquid temperature is much more stable than air temperature, it is best if you keep the system full most of the time. Whether whites or reds, please maintain a left right progression with deeper, mature wines on the left and younger, lighter wines on the right. Please see Appendix Four – “Wine Temperature Guide” for general rules of service temperature. If your backup bottles are not the same as those ‘on tap’, you can put them behind the active bottles so you can see the active labels, bringing everything forward a little, but bear in mind, those closest to the white evaporator at the back right will probably be a good bit colder than optimal & may need to be allowed to warm somewhat before reaching optimal serving temps. Of course, you can always adjust the main temperature setting UP a couple degrees as well to suit service operation. BOTTLE HEADS n2Vin Setup and Operations Manual © 2008 12 Check the Bottom Nuts on the Bottle Heads as described above. They must be firmly hand tight. Insert the Bottle Head into the neck of an opened bottle. You can do this in the cabinet or with the bottle standing on the drip tray by simply pulling the Head to the bottle. Insert the Wine Tube into the bottle seating the head fully. Tighten the Compression Wheel until it is difficult to slide the Bottle Head up and down in the bottle neck. Do not over tighten. (If looking from the top, the wheel tightens by turning in a clockwise direction.) When the bottle is properly connected, you should just be able to lift it by the bottle head without loosening or pulling it out. Turn the Bottle Head gas valve on by moving it UP. When this is done with all five bottles, you are n2Vin! BEST PRACTICES Your n2Vin creates in all practical terms an anaerobic environment within the bottle. It is, therefore, best for you to leave an empty bottle sealed in place (with the gas valve, now, OFF) than to remove the Bottle Head and allow the Wine Tube to be exposed to the environment for any length of time. If a bottle is empty, leave it connected or replace it immediately! As one bottle empties, it is best to change to a fresh bottle as quickly as possible. Please open the next bottle before removing the empty. n2Vin Setup and Operations Manual © 2008 13 n2Vin will preserve wines in their bottles, but will not preserve wine spilled into the drip tray or into the cabinet. Clean the Drip Tray by rinsing it in the sink and wipe up wine spills in the cabinet. Corked wines (TCA Taint) and wines spoiled in their bottles before opening can be ‘infectious’ to other wines in the system within a matter of only several days. If this were to occur, it is easily remedied by a repeat of the cleaning procedure, but would be disappointing and expensive if one wine were to ruin four others! Be sure to check newly opened bottles or their corks to avoid placing faulted wines in the system. A small amount of wine droplets will unavoidably remain in the barrel and underside of the Tap outlet and dry overnight if left there. Though this presents no significant health hazard, it is best to clean the outlet at the end of an evening’s use to avoid dried wine residues. ProWine offers properly sized swabs for this purpose, but the same effect can be done with a light towel, paper towel, cotton swab (Q-Tip), etc. if you are careful to make certain you do not leave cotton fibers at the Tap orifice! With towel or paper towel, twistwrap a small tight corner that will fit into the Tap barrel, moisten it with hot tap water and insert into the orifice with a twisting motion. Alternatively, use hot-water-moistened swabs in much the same way – making a circular motion to wipe the barrel thoroughly. Another method is to squirt a small, thin jet of warm water from a plastic kitchen spray bottle (set to ‘stream’, flooding the inside of the barrel sufficiently for a quick, clean rinse. The point is: Do not let dried wine residues build up on the Tap outlet. Handling the Wine Tubing (Draw Tubes) with dirty hands can be a cause of contamination that results in premature spoilage or changes in the wine due to airborne and contact environmental contamination – particularly omnipresent acetobacter bacteria, which could eventually change the wine to vinegar. With tens of thousands of bottles in highly successful service in inert gas preservation equipment, the incidence of such contamination is negligible, but remains a possibility. Combined with immediate bottle replacement, adopting a practice of cleaning hands or using a clean bar towel in your hand, if needed, to guide the end of the tube into the bottle will eliminate this possibility. n2Vin Setup and Operations Manual © 2008 14 n2-e and n2-Infinity Portion Control Models The n2-e single-portion electronic control system offers simple push-hold portion programming. Hold a glass below the selected outlet. Push the selected tap button and hold it in for approximately two seconds until you hear a double-beep tone. At this point wine will begin flowing. Release the button when the desired level in the glass is reached. Subsequent quick touches of the tap button will deliver the same volume of wine. Press OVERRIDE to engage Push-Hold dispensing of any volume at all taps. The n2-Infinity systems comprise of three distinct operating configurations: n2-I-3 – three-portion – capable of interfacing with many hospitality POS systems (back bar or POS-integrated self-serve station) n2-I-T – single portion – smart card sample-quantity-control system (pre-sales comp or VIP member tasting offering a preset number of tastes) n2-I-V – single portion – smart card – value debiting system (differentiable point values for each wine are debited from pre-paid user cards) n2-I-3 is a sophisticated system that requires calibration and initial setup to be performed by experienced personnel. The system does not require a full-time or real-time PC for operation, but can be connected to a PC to gather dispenser activity reports – locally or via remote modem access. Dispensing activity is automatically captured in the system’s included control module (ECU). After initial setup, the system will operate stand-alone to deliver a selection of three portions per tap with each tap’s portions being unique or common across all taps. Operators may elect to purchase the Infinity software suite (apx. $300 annual site-license with updates) for PC reporting and/or to make independent changes in the system’s portions. If an interface with the store’s POS system is desired, the software must be purchased and POS vendors or qualified house staff must activate dispenser control utilities and coordinate PLU’s and security permissions within the POS framework. When n2Vin Setup and Operations Manual © 2008 15 interconnected with POS, dispensing is conditioned by constraints of personnel and security validations imposed by the POS. In customer self-select environments, typically the VIP, Frequent Diner, or other CRM utilities are used in conjunction with in-house or third party administered Customer Loyalty card programs. n2-Infinity-3 allows operators a complete range from simple 3-glass service to creating individually tailored customer kiosk wine sampling stations fully integrated with the restaurant’s existing POS. (Example shown below used Future POS) n2Vin Setup and Operations Manual © 2008 16 APPENDIX ONE – Nitrogen Supply Connection Note 1: High Pressure Nitrogen Cylinders require caution when handling. Please consult your supplier for proper handling and connection precautions. Note 2: If provided, the High Pressure Regulator cylinder nipple uses an o-ring for hand-tight sealing. The o-ring must be inspected to assure no cracking or deformation to avoid gas leaking. Replacement o-rings are # -110 (read: “dash one-ten”) and are available from automotive, hardware and home-supply stores. Note 3: If provided, the High Pressure Regulator is intended only for CGA-580 cylinder valve connections. This configuration is for use with Inert Gasses and may be used with Nitrogen, Argon or Nitrogen/CO2 gas blends (beer gas) for preservation and dispensing functions in n2Vin. Note 4: If provided, the Regulator Set is pre-fitted with a barb fitting onto which the ¼” plastic nitrogen supply line will slip. Before fitting the Tube onto the Barb, look at your setup and be sure it is as you want it. Though it might require drilling a 3/8” hole in the counter, you can place the nitrogen Cylinder in a cabinet beneath the system. The cylinder can stand vertically or lie on its side. n2Vin Setup and Operations Manual © 2008 17 On most countertops of 24” or greater depth, the cylinder can lie or stand behind the back of the n2Vin cabinet. The plastic gas supply tube can be cut to suit your setup requirements and can be easily extended with similar vinyl tubing from hardware, etc. stores. You would need a barbfitting connector to connect additional tube to the existing tube furnished with the system. The spec for this: ¼” OD Vinyl tubing with an ID no larger than 0.170” (standard) + plastic, brass or stainless barb fittings to match the tube size. You can easily check new connections by immersing them in a small pan of water when the Nitrogen Gas Supply is ON. Note 5: For initial operation with the standard regulator combination, please turn the Red Pressure Adjustment Knob on the Low-Pressure Regulator to OFF, and, then, turn 3 full turns ON to reach approximately 3 PSIG initial delivery pressure. After some dispensing trials, adjust flow by turning the knob UP or DOWN in 1/8-turn increments to suit preferences. Note 6: If using Pony or Lecture cylinders or Leland Disposable Nitrogen Cylinders, remove the two top back screws and install the “J” Cylinder Cradle. Leland Disposables require a specialized, non-adjustable 5PSIG regulator. APPENDIX TWO – Gas Suppliers Most cities and towns have a number of compressed gas suppliers including those covering industrial, medical and hospitality requirements. The FDA, which establishes guidelines for food safety suggests nitrogen gasses used for food applications, “Food Grade” be 99.9% pure. This is not a particularly stringent requirement. What is most important is that the interior of the cylinder containing the gas is clean. AirGas Companies and their affiliated outlets abound. Store locators at: www.airgas.com and 866-924-7427 PraxAir: www.praxair.com and 716-879-4077 While pure Nitrogen is not commonly stocked at most medical-supply outlets, they can quickly order cylinders of a smaller, more convenient size, typically, more readily than industrial gas suppliers can – and for a higher cost. Again the valve specification is CGA580. High Pressure Disposable Cylinders and their specialized regulators are available from Leland, Ltd. www.lelandltd.com or 908-561-2000 (5PSIG fixed pressure output P/N 50043 with your choice of 18g Nitrogen cylinders P/N 88123 or 26g Argon cylinders P/N 88124) n2Vin Setup and Operations Manual © 2008 18 APPENDIX THREE – Cleaning Your n2Vin came with a container of Crosby and Baker “B-Bright” cleaning agent. This is a white powder consisting of Sodium Carbonate Peroxyhydrate or oxygen bleach. When mixed with water per instructions the solution becomes a slightly stronger concentration of hydrogen peroxide than that found in brown plastic bottles in grocery and pharmacy stores everywhere. Replacement containers of the B-Bright product are available from Presque Isle Wine Cellars - www.piwine.com - 814-725-1314. Sodium Carbonate Peroxyhydrate is the active agent in many tooth-whitening toothpastes and oral rinses. It is odorless and tasteless and leaves no harmful residue. The solution is most effective when mixed with hot tap water. Clip the Zip Ties holding the Bottle Heads to the upper back Hanger Rail at this time. Discard the cut Zip ties. Put one level teaspoon of B-Bright in a wine bottle and fill the bottle to its upper shoulder with hot tap water. Cover the top of the bottle with your thumb and shake to assure complete dissolution. Place a kitchen towel (folded) on the Bottle Deck. Confirm all Bottle Gas Valves are OFF. Confirm Master Gas Valve is ON and your gas supply is active. Connect the bottle normally to a Bottle Head, tighten the seal, turn the Bottle Gas Valve ON and dispense about one-ounce into a glass or cup. Turn the Bottle Gas Valve OFF, loosen the Bottle Head and hang on its position on the Bottle Head Hanger Rail letting the bottom of the tube drip onto the towel. Repeat with each of the five Bottle Heads. Drain and rinse the solution from the bottle, saving a small glass full to clean Taps in a moment**. Fill with warm water and rinse each line just as you did with the cleansing solution. Pour out the water from the wine bottle, and connect it empty to a Bottle Head as before – seal, gas valve on, etc. Now ‘dispense’. You will only get a few drops of clear water at the tubing is blown clear. Pickup the cleanser-soaked towel and wipe the Bottle Head Seals and wine tubing with it. Rinse the towel with clear water, ring it fairly dry, and wipe the Bottle Deck and any interior surfaces you might have splashed with the cleaning solution. **Before emptying the last of the cleaning solution from the glass, dip one of the Tap tip cleaning swabs into the solution and swab the interior of the Tap outlets with it. You are now ready to install your wines! This cleaning procedure should be performed every two or three months. If you are going to store the n2Vin, you must clean it as described above before storage! n2Vin Setup and Operations Manual © 2008 19 APPENDIX FOUR – Wine Temperature Guide (from www.intowine.com) 65°F / 18°C Australian Shiraz, California Cabernet Sauvignon, Rhône Wines, Vintage Port 63° / 17°C Bordeaux, Châeauneuf-du-Pape, Ribera delDuero, South African Pinotage and Catalonian, Chilean, and Australian Cabernet 61°F / 16°C Red Côte d'Or Burgandy, southern French Reds, southern Italian reds, Rioja, Toro, Australian and California Pinot Noir, Tawny and Ruby Ports 60°F / 15°C Côte Chalonnaise, Douro red table wines, young Zinfandel, Oregon Pinot Noir, New Zealand Cabernet and Pinot Noir, Oloroso and Cream sherries, Bual and malmsey Maderias 57°F / 14°C Chinon, Bourgueil, northern Italian and Washington State Cabernet Sauvignon, Valpolicella, young Chianti 54° - 55°F / 12 - 13°C Young Beaujolais, red Sancerre, Bardolino, Lago di Caldaro, young Spanish and Portuguese reds, vin de pays, etc. 50°F / 10°C California and Australian Chardonnay, Sauternes, top white Côte d'Or Burgundy, sweet German Wines, Rhine and Mosel Kabinett and Spätlese, Tokay, Australian liqueur Muscat, Italian oaked Chardonnay, oaked white Rioja, Fino and Amontillado Sherries, sercial Maderia, white Port 48°F / 9°C Good white Pessac-Léognan and Graves, north-eastern Italian whites, Washington State Chardonnay, Chilean Chardonnay, Australian Semillon, New Zealand Chardonnay 46°F / 8°C Alsace, Chablis, Côte Chalonnaise and mâconnais whites, dry German wines, Franken wines, Austrian Riesling, English wines, Australian Reisling, Cabernet and grenache rosé 45°F / 7°C Good Champagne and Sparkling wine, Sancere, new York State, Chilean and New Zealand Sauvignon Blanc 43°F / 6°C White Bordeaux, Muscadet, Anjou, other Sauvignons, Asti, unoaked white Roja 41°F / 5°C Qba German wines, Soave, young Spanish and Portuguese whites, Vinho Verde, Swiss Chasselas, Austrian Grüner Veltliner, cheap rosé n2Vin Setup and Operations Manual © 2008 20 APPENDIX FIVE – Controls and Wiring CONTROL In most cases no adjustment of the Control Parameters will be needed for most installations. n2Vin is pre-tested and pre-set at the time of assembly to 47⁰ F with a typical “E5” calibration value set to -8 on most units. For use with Red Wines at temperature ranges of 60-65⁰ the E5 value should be set to -4. To do so follow procedure #8 in the table above. E5 Offset values are most affected by the relative difference between the desired temperature setting in the cabinet and the ambient temperature of the room in which n2Vin is being used. If the n2Vin temperature is low and the room warm, greater loss of cool air to the environment will sometimes necessitate a recalibration of the E5 parameter. The same is true of localized heat or cold air contributions. The system could be positioned near a cool air conditioner vent or not far from a radiator, heat outlet, other equipment giving off heat, or, even, a window allowing warming sun infiltration – something to avoid! You can easily adjust the E5 Value if you find unexpectedly warmer n2Vin Setup and Operations Manual © 2008 21 or colder temperatures of your dispensed wines. This parameter is there to enable optimally precise temperature control over the service temperature of your wines. Please bear in mind that the preset is a negative number (-8). Raising the E5 Value will mean decreasing the integer value (-4 is a higher value than -8). If your wine, for instance, is a little cooler than you wish at a given setting, decrease the E5 value by 2-3 points and allow temperatures to stabilize for a couple of hours to note the effect of your adjustment. n2Vin Contrôleur de Température Digital Boutons de contrôle & indicateurs LED , , , - Désembuage manuel, de cabinet interne, Indicateurs LED - Lumière - Dégivrage manuel - Indicateur de réfrigération, - Indicateur du Dégivrage manuel Opération du Panneau Frontal 1. Régler la température Appuyez sur et la température déjà réglée est affichée. Appuyez sur ou pour modifier et sauvegarder la valeur nouvellement affichée. Appuyez sur pour sortir de l’ajustement et afficher la température interne actuelle. Si aucun nouveau bouton n’est appuyé dessus après 10 secondes, le système retourne aux opérations normales. 2. Allumer/ Éteindre: Appuyez sur et tenez-le pour 6 secondes pour éteindre le mode réfrigération. "--" sera affiché et tous les sorties de contrôle seront arrêtées. Appuyez sur pour 6 secondes encore et la température ambiante courante sera affichée. Le système rentrera alors en mode réfrigération après un temps de “E4” minutes. 3. Illumination: Appuyez sur et la lumière interne s’aluminera. Ré-appuyez dessus, il s’éteint. 4. Dégivrage manuel Débuter/ Arrêter: Appuyez sur et tenez-le pour 6 secondes. Ceci débutera le dégivrage ou résumera les opérations normales. 5. Réfrigération LED: Est ALLUMÉE quand le compresseur est en marche. Est ÉTEINTE quand le compresseur n’est pas en marche. CLIGNOTERA pendant un certain temps (Voir “E4”) avant que le compresseur s’allume. 6. Désembuage LED: Appuyez sur s’éteint. 7. Dégivrage LED: n2Vin Setup and Operations Manual © 2008 la lumière LED s’allume; Appuyez dessus encore, elle 22 Pendant le dégivrage, la lumière LED est allumée. Quand ça s’arrête de dégivrer, la lumière LED s’éteint. 8. Organisation des paramètres Pour entrer dans le mode d’organisation, appuyez sur et tenez-le pour 6 secondes. “E1” sera affichée clignotante. Appuyez encore sur pour sélectionner les paramètres: E2, E3, E4, E5, F1, F2, F4, C2, C3, C4. Appuyez sur ou et la valeur du paramètre sera affichée et pourra être modifiée et sauvegardée. Pour sauvegarder vos changements, appuyez sur pour 6 secondes avant procéder au paramètre suivant. Pour rejeter vos changements, n’appuyez sur aucun bouton pendant 10 secondes. Le système retournera aux opérations normales et la température ambiante sera affichée. Para Fonction E1 Limite de consigne de baisse Limite de consigne d’augmentation E2 Intervalle de Règlement -45°C -49°F Default Para Fonction Intervalle de Règlement 0 – 24 h. Default -30°C -22°F F2 Intervalle de temps de dégivrage 50°C = 122°F 30°C 86°F F4 Affichage – pendant le dégivrage (Voir détails de fonction) Unité de température. Échelle: Alarme de haute temp. 0 – Normal 1 – Valeur avant le dégivrage 0 0 = °C, 1 = °F 0 50°C 122°F 40°C 104°F 6 h. E3 Hystérésis de température 1° - 10°C 1° - 18°F 4°C 7°F C1 D4 Retardement du déclenchage du compresseur Compensation de la temp. ambiante Durée du dégivrage (max) 0 – 10 min. 2 min. C2 -10° - 10°C -18° - 18°F 0° C3 Alarme de basse temperature -45°C -49°F -40°C -40°F 1 – 60 min. 20 min. C4 Retardement de l’alarme 1 – 90 min. 60 min. E5 F1 9. Verrouillage des paramètres Appuyez sur . Si "LOC" est affiché, tenez-le pour 10 secondes pour verrouiller les paramètres. Si verrouillé, les paramètres seront affichés mais nonmodifiés. Si "OP" est affiché, le tenir pour 10 secondes déverrouillera les paramètres. Le défaut de l’usine est "OP" 10. Reprise du défaut de l’usine: appuyez sur simultanément pour 6 secondes, l’indicateur clignotera, tous les paramètres seront retournés aux défauts de l’usine. Détails de fonction 1. Contrôle de Température Après le retardement (“E4”), le compresseur commence à opérer quand la température ambiante est plus grande ou égale à la température réglée (“E1” or “E2”) + Hystérésis (“E3”) et sera éteint lorsque la température ambiante est moins que ou égale à la température réglée. Pour protéger le compresseur, il ne recommencera qu’après le montant de temps indiqué par le paramètre “E4”. 2. Fonctions de Dégivrage Après l’intervalle de temps de dégivrage (“F2”), le système entrera automatiquement dans le mode dégivrage, le compresseur s’arrête et la n2Vin Setup and Operations Manual © 2008 23 lumière de dégivrage LED s’allume. Après la période (“F1”), le système retourne aux opérations normales. Si vous désirez arrêter la fonction automatique de dégivrage, réglez “F2” à “0”. Affichage pendant le dégivrage: Quand le paramètre “F4” est réglé à “1”, l’affichage de la température ambiante est verrouillé, affichant sa dernière valeur avant que le mode de dégivrage n’a commencé. Après que le cycle de dégivrage est terminé, l’affichage normal résume après 3 minutes ou quand la température ambiante atteint la température réglée. 4. La fonction de l’alarme Quand la température ambiante est plus haute que “C2” ou plus basse que “C3”, l’alarme est initiée et sonnera après un temps de “C4”. Le son peut être arrêté en appuyant n’importe-quel bouton. L’alarme est fixée quand la machine est allumée et après que le compresseur est éteint. 5. Mode de travail anormale - Affichage "HH" est affiché lorsque le senseur de la sale est court-circuité ou surchauffé (plus que 150°F / 66°C). "LL" est affiché lorsque le senseur de salle est ouvert-circuit ou la température est trop basse (moins que -45°F / -43°C). A ce temps, le compresseur opère automatiquement avec un cycle de 45 minutes allumé et 15 minutes éteint. N2Vin Wiring Diagram n2Vin Setup and Operations Manual © 2008 24 APPENDIX SIX – Refrigeration Service Information The refrigeration compressor operates with standard R134a refrigerant. The system will perform optimally with approximately 3OZ (85 grams) of refrigerant. APPENDIX SEVEN – Decommissioning If the n2Vin is to be stored or be otherwise inactive and without being connected to wine bottles, it is essential that the system be thoroughly cleaned per the procedure in Appendix Three. In addition, it is advisable to prevent the door from closing tightly by placing a folded bar towel over the top edge. APPENDIX EIGHT – Interior Lamp Change n2Vin Setup and Operations Manual © 2008 25 WARRANTY ProWine Products warrants n2Vin Wine Service Equipment to the Original Buyer to be free of defects in Material and Workmanship for a period of One Year following original purchase date. ProWine will at its sole discretion replace or have serviced any components found to be defective. If replacement is deemed appropriate, Buyer is responsible for all transportation fees. If the system has a minor problem and is serviceable by the Buyer or third-party Refrigeration Service Firms on-premises, ProWine will cover component and shipping costs. If you bought your equipment through a dealer or distributor, please contact them for most immediate remedy. Any third-party on-premises service must be approved in writing or directly authorized by ProWine in advance of performance of such service. Certain exceptions apply to this warranty: Owners (and/or their operators) must follow the guidelines set forth in this Manual. Damage resulting from transportation, accident, misuse, and abuse is excluded from this Warranty. Owner-related operational issues not originating in manufacturing defect are excluded from this Warranty and are supported through our contact/support line 616-494-0100 This warranty is limited to the n2Vin product only and does not cover incidental and/or consequential damages as a result of defect, malfunction, or operator error. ACCESSORIES ProWine Products offers the following specialized accessories: Wine Sediment Strainer Screens - $2.00 each + shipping ScrewTop Bottle Adapter - $29.00 each or set of 4 for $99.00 + shipping Master Gas Lock Pin - $2.50 + shipping Tap Swabs – Set of 5 - $5.00 + shipping Commercial Cleaning Pump - $60.00 + shipping Custom Logo Panels - $200 for first with CAD/CAM setup - $50 for additional Please contact us at 616-494-0100 for additional information. n2Vin Setup and Operations Manual © 2008 26 Guide de Démarrage Rapide ENLEVER DE LA BOITE Coupez les deux sangles plastiques qui sont sur le carton et glissez la boite extérieure depuis l’unité n2Vin. Glissez la couverture plastique depuis l’unité et enlevez les accessoires qui sont détachés. Sortez le système de l’emballage de base et mettez-le sur un comptoir ou un stand. ALLUMER Branchez le cordon à la prise à l’arrière de la machine. Appuyez continuellement le bouton une fois que l’unité est allumée. Appuyez continuellement le bouton jusqu’à ce que la température clignote. Sélectionnez haut ou bas jusqu'à ce que la température désirée soit atteinte. Ré-appuyez sur pour allumer la machine, puis relâcher le bouton pour entrer la nouvelle valeur. L’ATTACHEMENT DU SOURCE DE L’AZOTE Coupez le l’attachement du tube d’azote à l’arrière du cabinet. Appuyez fermement le tube complètement sur le barbe régulateur- si vous utilisez un régulateur standard. Inspectez la rondelle sur la tête du cylindre sur le régulateur. Si elle a l’air normale, insérez et vissez la poignée dans la valve du cylindre fermement par main. Si la rondelle est endommagée, remplacez-la en premier.(#-110 – 3/8” X 9/16” X 3/32” mur). Installez le réservoir d’azote là où il ne tombera pas- verticalement ou horizontalement. Fermez le vis rouge sur le régulateur, puis ré-ouvrez-le 3 et 1/8 de tours. Il sera réglé maintenant à ~4 psi (psi = livre par pouce carré). Fermez la valve Maitre de Gaz (en bas à gauche du panneau de distribution). Fermez les cinq valves de tête de bouteille. Ouvrez la valve du cylindre d’azote pour que l’aiguille du manométrique ‘montant du contenu’ soit pointée vers plein- notez la position. Fermez la valve du cylindre d’azote pour vérifier qu’il n’y ait pas de fuites*. MONTER UNE BOUTEILLE Coupez et enlevez les cinq attachements qui tiennent les cinq têtes de bouteilles, laissant les têtes sur le crochet. Utilisez une bouteille d’eau pour le moment. Enlevez une tête du crochet et glissez-la et son tube dans la bouteille. Tournez la vis de Compression jusqu'à ce qu’elle soit ferme (vous devriez être capable de porter la bouteille par la tête de bouteille). Ouvrez la valve de tête de bouteille. Mettez la bouteille dans le cabinet. DISPENSER * Regardez l’aiguille, elle ne devrait pas avoir bougée. Allumez le Gaz Maitre (aiguille devrait baisser maintenant). Ré-ouvrez la valve du cylindre d’azote (aiguille devrait remonter maintenant). Appuyez un verre contre le robinet-déclencheur et remplissez le verre. n2Vin Setup and Operations Manual © 2008 27 Quick Start Guide REMOVE FROM BOX Cut the 2 plastic straps on the carton and slide the outer box up and off the n2Vin. Slide the protective plastic bag off of the n2Vin and remove loose accessories. Lift the system out of the packing base and put it on a counter or stand. POWER ON Plug the power cord into the rear inlet at the back of the cabinet, then to an outlet. Push & hold in POWER Button to turn system ON – release once ON. Push & hold SET until temperature flashes. Arrow up or down to desired temperature and re-press SET quickly to store the new value. NITROGEN SETUP (You did get a cylinder, right?) Clip the ziptie holding the nitrogen tube to the back of the cabinet. Push the nitrogen tube fully onto the regulator barb - if using standard regulator. Inspect the o-ring on the cylinder nipple on the regulator. If OK, insert & screw the handwheel into the cylinder valve tightening firmly hand tight. If the o-ring is damaged, replace it first. (#-110 – 3/8” X 9/16” X 3/32” wall) Put the nitrogen cylinder somewhere it won’t fall on your foot – standing or horizontal. Close RED regulator knob then reopen 3 1/8 full turns. That will be ~4psi. Turn Master Gas Valve (lower left of dispensing panel) DOWN/OFF. Turn or slide each of 5 Bottle Head Valves DOWN/OFF. Turn nitrogen cylinder valve ON to see contents needle move to full – note the position. Close cylinder valve – you are doing a quick connection leak check 1. BOTTLE SETUP Clip & remove the 5 zipties holding the 5 Bottle Heads, leaving Heads on Hanger Rail. Let’s just use a bottle of water for now! Remove one head from the hanger Rail and stick it & its tube into the bottle. (Bottle can be on counter.) Turn the Compression Wheel CCW until firm. You should be able to pickup the full bottle by the Bottle Head. Turn the Bottle Head valve ON. Put the bottle into the cabinet. DISPENSE 1 Look at the Contents Gauge on the Regulator. It should not have moved. Turn the Master Gas UP/ON – now the gauge needle should drop! Re-open the Nitrogen cylinder valve – gauge pops back up! Push a glass into the cup-trip Tap and fill it! You’re n2Vin! (OK water, but we’re close!) Got it? Great! What was that 20-25 minutes start to finish? Now do you and your wine a favor: Drink some & read this guide… n2Vin Setup and Operations Manual © 2008 28