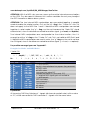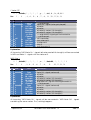
1
Denis Eismann © 2009
SuperDrumFX
Software Drum Workstation 1.4
Software Drum Workstation 1.4
FOREWORD .........................................................................................................................................4
WHY SDFX............................................................................................................................................4
COMMERCIAL SOFTWARE DRUM SAMPLER.........................................................................................4
FREEWARE SUPERDRUMFX.................................................................................................................4
INSTALLATION...................................................................................................................................5
UPDATING OLDER SDFX VERSIONS ....................................................................................................5
FIRST INSTALLATION ...........................................................................................................................5
SYSTEM ARCHITECTURE ...............................................................................................................7
BLOCK SCHEME OF SOUND GENERATION............................................................................................7
Redundant Blocks ............................................................................................................................7
Block Description ............................................................................................................................7
SIGNAL PATH OF SUPERDRUMFX .......................................................................................................8
SIGNAL PATH OF SUPERDRUMFX-DRY (WITHOUT EFFECTS)..............................................................8
SOUND PROGRAMS OF SDFX...............................................................................................................8
WAVE PLAYER ...................................................................................................................................11
Formats..........................................................................................................................................11
MIDI IMPLEMENTATION ....................................................................................................................11
Standard MIDI Configuration .......................................................................................................11
PREREQUISITE FOR RUNNING THE SDFX ...........................................................................................12
Examples for DAW Software .........................................................................................................12
Examples for Freeware VST/VSTi Hosts .......................................................................................12
OPERATION .......................................................................................................................................13
GRAPHICAL USER INTERFACE (GUI) .................................................................................................13
SDFX GUI Controls.......................................................................................................................13
SDFX Drum-Slot Types .................................................................................................................15
THE SYSTEM – SLOT ...........................................................................................................................21
SDFX SOUND PARAMETERS ..............................................................................................................22
Level...............................................................................................................................................22
Interval Control / IV Control .........................................................................................................22
IVC Vel...........................................................................................................................................22
Release...........................................................................................................................................22
Compander.....................................................................................................................................23
Pitch...............................................................................................................................................23
Pitch All, Pitch Hard, Pitch Norm, Pitch Soft ...............................................................................23
RND Pitch......................................................................................................................................23
Note................................................................................................................................................23
Expert.............................................................................................................................................24
Hard Hit, Normal Hit, Soft Hit ......................................................................................................24
X-Fade (Cross Fade) .....................................................................................................................24
HH Pedal .......................................................................................................................................24
Mix Level HH Close.......................................................................................................................25
SuperDrumFX
Software Drum Workstation 1.4
Side 2
Buzz Control (Snare Carpet) .........................................................................................................25
SDFX EFFECT PARAMETERS .............................................................................................................26
Reverb ............................................................................................................................................26
Delay..............................................................................................................................................27
Flanger...........................................................................................................................................28
SDFX SYSTEM PARAMETERS ............................................................................................................29
Performance Issues and Dynamic Polyphony Reduction ..............................................................29
Functioning of the Dynamic Polyphony Reduction .......................................................................29
PExp and PMul..............................................................................................................................29
SDFX Library and SDFX Library Path .........................................................................................30
Master Volume...............................................................................................................................31
Choke Function..............................................................................................................................31
Choke ON.......................................................................................................................................31
Choke OFF ....................................................................................................................................31
int. Choke CC.................................................................................................................................31
MIDI Rule 1 and 2 .........................................................................................................................31
MIDI Rules.....................................................................................................................................31
Examples for Choke- and MIDI Rules ...........................................................................................32
TIPS AND TRICKS TO PRODUCE BASIS SAMPLES.................................................................34
REQUIREMENTS ..................................................................................................................................34
PRODUCTION OF YOUR OWN SNARE SAMPLES ...................................................................................34
Sampling of the snare ....................................................................................................................34
Sampling of the snare carpet (alternating samples) ......................................................................34
Sampling of the snare position samples.........................................................................................35
Sampling of the rim shot samples ..................................................................................................35
Sampling of the cross stick samples...............................................................................................35
PRODUCTION OF YOUR OWN TOM SAMPLES .......................................................................................35
Sampling of the toms......................................................................................................................35
Sampling of the alternating tom samples.......................................................................................35
PRODUCTION OF YOUR OWN KICK SAMPLES ......................................................................................36
PRODUCTION OF YOUR OWN HIHAT SAMPLES ....................................................................................36
Sampling of the HH Foot samples (stepped hihat) ........................................................................36
Sampling of the HH Close samples (closed hihat).........................................................................37
Sampling of the HH Open samples (open hihat)............................................................................37
PRODUCTION OF YOUR OWN CYMBAL SAMPLES ................................................................................37
PRODUCTION OF YOUR OWN RIDE SAMPLES ......................................................................................37
Sampling of the ride rim samples (outer rim of the ride cymbals) ................................................37
Sampling of the ride bell samples (cup of ride cymbals) ...............................................................37
EPILOGUE ..........................................................................................................................................38
APPENDIX...........................................................................................................................................39
MIDI NUMBER TO MIDI NOTE CONVERSATION TABLE ...................................................................39
MIDI MESSAGE TYPES AND DATA BYTES (DB)* .............................................................................39
SuperDrumFX
Software Drum Workstation 1.4
Side 3
User Manual for SuperDrumFX
Foreword
The SuperDrumFX, following only called SDFX, is a software based drum sampler. The
SDFX was mainly developed to be used together with an electronic drum set (EDrum). The Goal of this project is to give the interested e-drummer a most realistic
drum sound, which eliminates sound weaknesses of the current on the market
available hardware based e-drum modules.
Why SDFX
Commercial Software Drum Sampler
The current on the market available Software-Drum samplers to simulate an acoustic
drum set (Drum Sample Library) have a big disadvantage, because you can’t
include your own drum samples. After a while you get bored with the included drum
sounds and you must buy new drum samples. In addition, the experienced ear can
identify each software-drum sampler already by the sounds of the basis sample. The
included drum sets generally consist of several layers of sound of the respective
drum. More than 32 layers (Sample layer) are often used for each drum to simulate a
realistic sound of the drum. Even if you could integrate your own base samples, there
would be another problem. Where do you get good quality drum samples? Making
these base samples takes a lot of time and requires you to be very experienced. You
could buy drum samples on CD/DVDs, however the uniqueness to your own sound
would be lost.
Freeware SuperDrumFX
The SDFX is freeware and does not cost anything. The goal is to simulate an acoustic
drum set with electronic means. It also can produce unusual (or unnatural) sounds
because of the way it produces the sounds. This is unlike available Software-Drum
samplers you can buy; the SDFX allows using your own samples, which gives you
almost unlimited sound (tone) diversity. Thus you can use the SDFX not just for a
specific style, but it gives the modern drummer or the producer a large bandwidth of
musical and stylish opportunities. The SDFX is using a maximum of three samples
layers for each drum to produce sound, which makes it easier to produce your own
basis samples. Nevertheless through skillful fading (Velocity-Crossfade) and random
manipulation of the pitch (Random Pitch) you can produce a sound, which is
normally only achieved by using more layers (Sample Layers). Furthermore, through
interval control of the drum and the use of alternating basis samples, you can
achieve a high grade of quality, which can supersede the sound quality of drum
software based on only sample layers.
SuperDrumFX
Software Drum Workstation 1.4
Side 4
Installation
Updating older SDFX versions
Get the following files from www.superdrumfx.com download area:
-
SuperDrumFX - Software Drum Workstation 1.4 (SuperDrumFX.dll) or
-
SuperDrumFX - Version 1.4 without FX (SuperDrumFX-Dry.dll)
(for legacy PC's without SSE support)
Attention:
Programs (fxb/fxp-files) of old SDFX versions need to be removed before starting the
installation process. Many DAW software saves SDFX program parameters within the
song or project. Because of this behavior, the SDFX plugin need to be removed from
existing songs or projects. If you don’t remove, your DAW software probably crashes
because of incompatible SDFX patch parameters. This will mainly happen, when
loading a song or project, which formerly containing an older SDFX plugin version
which you didn’t removed.
1. Just copy SuperDrumFX.dll or SuperDrumFX-Dry.dll into your VST/VSTi plugin
folder and overwrite the old dll-files.
2. Start your DAW software and reinsert the new SDFX plugin into your songs.
3. Set the SDFX’s MIDI channel to the track’s MIDI channel or vice versa.
4. In System-Slot, enter the full path to the SDFX sample library.
5. Repeat step 4. for all SDFX drum sets.
6. The SuperDrumFX v1.4 is ready to use.
First installation
Get the following files from www.superdrumfx.com download area:
-
SuperDrumFX - Software Drum Workstation 1.4 (SuperDrumFX.dll) or
-
SuperDrumFX - Version 1.4 without FX (SuperDrumFX-Dry.dll)
(for legacy PC's without SSE support)
-
SuperDrumFX drum sample library 1.0
(SDFX-Sample-Library.zip)
-
Update Patch for Drum - Sample- Library 1.0
(Library_Patch_v13.zip)
SuperDrumFX
Software Drum Workstation 1.4
Side 5
Optionally, you can also download:
-
SuperDrumFX program icons (SuperDrumFX.ico)
-
Newsound Sample - Library by J.W. Steffens (NewSoundDS_by_JW-Steffens.zip)
-
SAVI - Host for standalone operation (savihost.zip)
Installation:
1. Copy SuperDrumFX.dll or SuperDrumFX-Dry.dll into your standard VST/VSTi
plugin folder (probably created by your DAW software). All the other VST/VSTi
plugins, used by your DAW software, are located there.
(see section ”Prerequisite for running the SDFX”).
2. Extract the SDFX-Sample-Library.zip into a drive and folder of your choice.
3. Extract the Library_Patch_v13.zip into the ..\SDFX\ folder, where you have
extracted the SDFX-Sample-Library.zip.
4. Start your DAW software and open your song or project file.
5. Open the respective instrument/MIDI track’s plugin configuration and select
the SuperDrumFX or SuperDrumFX-Dry from plugin list.
6. Open the GUI (editor) of SuperDrumFX (if it’s not open yet).
7. Set the SDFX’s MIDI channel to the track’s MIDI channel or vice versa.
8. Select the System-Slot (“System”) in drop-down list at MIDI section of SDFX’s
graphical user interface.
9. At “SDFX Library Path”, enter the full path to the extracted SDFX sample library
completed by a backslash (“\”). (see section ”SDFX Library and SDFX Library
Path”).
10. Save the actual SDFX Program (“DW - Sonor Set”) as a patch (.fxp) or save all
patches as a bank (.fxb) later. Some DAW software use proprietary file formats
and file extensions but this doesn’t matter.
11. Attention: You need to set and save the library path for all SDFX Programs
(drum set patches) separately by using the DAW’s build-in patch or bank
saving functions.
12. The SuperDrumFX is ready to use.
SuperDrumFX
Software Drum Workstation 1.4
Side 6
System Architecture
Block Scheme of Sound Generation
*These blocks, depending on which drum, are available one, two or three times per voice.
Redundant Blocks
1-times:
Rim-Shot, Cross-Stick, Snare Carpet, Snare Position, Tom 1 Alternate,
Tom 2 Alternate, Floor Tom 1 Alt, Floor Tom 2 Alt
2-times:
Kick, HiHat, Cymbal 1, Cymbal 2 und Ride, Tom 1, Tom 2,
Floor Tom 1, Floor Tom 2
3-times:
Snare
Block Description
MIDI-IN:
The VSTi plugin MIDI input.
MIDI-Manipulator: Creates/changes Midi signals dependent of the incoming signal
MIDI-Filter:
Filters by Midi-channel, Midi-Note, Midi-Velocity (delimitation of
the sample layer).
MIDI2Volt:
Changes the incoming Midi signal to trigger-level (pulse,
percussion strength, pitch and so on).
Wave-Player:
If triggered plays the WAV Sample.
ADSR:
Envelope generator for Attack, Decay, Sustain, Release
Attack:
Time which passes to reach the full volume level.
Decay:
Settling time from Attack to sustain level.
Sustain:
Volume level till release of the keyboard button (lifting of
the drum sticks from E-Pad (Note-Off)
Release:
Decay time after release of the keyboard button (lifting of
the drum sticks from E-Pad (Note-Off)
VCA (DCA): Virtual voltage controlled amplifier.
(used for velocity and envelope generation)
Mixer:
Controls the volume level assigned to a drum, relative to overall level.
SuperDrumFX
Software Drum Workstation 1.4
Side 7
EQ:
2-Band – Shelving Equalizer for high pitch adjustment (10 kHz +/- 5dB)
and low pitch (80 Hz +/-15DB) for each drum (frequency adjustable).
FX:
Effect section for simulating reverb (hall & room), delay and flanger.
Two reverb generators, one delay and one flanger can be simulated
simultaneously .
AUDIO-OUT: Audio exit of VSTI-Plugin.
Signal Path of SuperDrumFX
MIDI IN
MIDI
Manip.
MIDI
Filter
MIDI 2 Volt
ADSR
VCA
Mixer
EQ
FX
Mix L / R
Kick L / R
Snare L / R
Toms L / R
Cymbals L / R
Signal Path of SuperDrumFX-Dry (without effects)
MIDI IN
MIDI
Manipulator
MIDI Filter
MIDI2Volt
ADSR
VCA
Mixer
EQ
Mix L / R
Kick L / R
Snare L / R
Toms L / R
Cymbals L / R
Sound Programs of SDFX
The basis of the sound production consists of the so called programs. The SDFX can
manage up to 16 programs. Furthermore can an indefinite number of programs be
managed with the load and save function of each VSTI-Host. Basically such a
program equates to a ready drum set. A SDFX program consists of following drum
menus (Drum, Cymbal, Mixer, FX).
Drum-Slot
Function
Kick
The kick pedal beater hits the head of the bass drum.
Snare
Flat drum with snares, which are strung over the bottom head.
Snare Carpet
Simulates the snares or the bottom mike sound. It will mixed together
with the snare sound. It contains two alternating samples.
SuperDrumFX
Software Drum Workstation 1.4
Side 8
Snare Position
Simulates position depending sound changes of the snare. It will mixed
together with the snare sound. It requires a Roland TD10, TD12 or TD20.
Rim Shot
Simulates a sound which is made when a stick hits the rim and the head
of the snare simultaneously.
Cross Stick
The sound, when you hit the stick softly on the rim of the snare
HH Foot
Kicked HiHat (foot kick on the HiHat – Pedal => the upper cymbal
presses quick to the lower cymbal).
HH Close
Produces a sound, which is made by hitting the stick on the rim of the
closed HiHat.
HH Open
Produces a sound, which is made by hitting the stick on the rim of the full
opened HiHat.
Tom 1
Blow to the middle of the head of the small hanging toms.
Tom 1 Alternate
Alternate sound for the blow on the small hanging tom and Tom1 mixed
in. It consists of two alternating samples.
Tom 2
Blow to the middle of the head of the medium hanging toms.
Tom 2 Alternate
Alternate sound for the blow on the medium hanging tom and Tom2
mixed in. It consists of two alternating samples.
Floor Tom 1
Blow to the middle of the head of the small floor-toms.
Floor Tom 1 Alt.
Alternate sound for the blow on the small floor-tom and floor Tom 1
mixed in. It consists of two alternating samples.
Floor Tom 2
Blow to the middle of the head of the big floor-toms.
Floor Tom 2 Alt.
Alternate sound for the blow on the big floor-tom and floor Tom 2 mixed
in. It consists of two alternating samples.
Cymbal 1
Blow to the left crash-cymbal. (or splash, gong, china, ride etc.)
Cymbal 2
Blow to the right crash-cymbal. (or splash, gong, china, ride etc.)
Ride Rim
Blow to the rim of the Ride – cymbal.
Ride Bell
Blow to the crest of the Ride – cymbal. (or cowbell, clave etc.)
Mixer - EQ
Controls the volume level between each of the drums. With the help of
the 2-band-equalizer the sound can be adjusted to each drum.
FX
Represents the hall/room effect. Readies the delay and flanger. Here
you can adjust the effect for each drum group.
System
Adjustments for the dynamic polyphony reduction. Path to the SDFX
Library. Total volume power, choke-function and adjusting the Midimanipulators.
The allocation of the drum slots to each of the drums of the drum set is only a
suggestion. The included demo programs adhere to these suggestions. Any sample
can be loaded in the sample-slots of each drum slot, if it is compatible with the
wave-players (see section ”Wave Player”).
SuperDrumFX
Software Drum Workstation 1.4
Side 9
You can save all parameters of the drum menus in a SDFX program. This includes the
global and specific parameters of the drum sets.
Following parameter types are saved in programs:
•
global and specific MIDI configurations
-
global:
-
•
•
•
specific:
FCC (control parameter for the feet pedal)
PCC (control parameter for the position recognition)
MIDI-Notes (assigned to each drum)
specific AUDIO configurations (depending on drum slot type)
-
Attack, Decay, Sustain, Release
-
Level, IV Control, IVC Vel, Pitch, RND Pitch, Compander, PAN, Expert
-
Rim & Stick DCA (velocity borders)
-
Soft/Normal/Hard - Samples (path and file name), Velocity Borders,
Pitch
Mixer configuration
-
•
Channel (MIDI-Channel)
Mixer-Level, Equalizer (High/Low) , Freq Hi, Freq Low
Effect configuration (FX)
-
Adjusting parameters for Reverb 1, Reverb 2, Delay and Flanger
-
Adjusting the effect level for the drum groups.
System configuration
-
Path to SuperDrumFX Drum Sample Library (SDFX Library Path)
-
dynamic polyphony reduction (Snare and Tom - PExp, PMul)
-
Overall volume for the whole drum set (Master Volume)
-
MIDI rules for the choke function. (Choke ON/OFF, int. Choke CC)
-
MIDI rules for any use. (MIDI Rule 1 / 2)
SuperDrumFX
Software Drum Workstation 1.4
Side 10
Wave Player
Formats
The SDFX wave player supports the following sample formats:
•
Stereo WAV 16-, 24 and 32 Bit 44 kHz
•
Mono WAV 16-, 24 and 32 Bit 44 kHz
These samples can be loaded and saved in the SDFX. All audio samples are loaded
into systems memory. Theoretically, there is no limit to the maximum sample length.
However the sample length impacts the SDFX speed. Therefore, the shorter the
sample the better the SuperDrumFX.
MIDI Implementation
In general is the standard-midi-adjustment the same as for the Roland E-Drummodules. You can change each adjustment (drum-slot) according to each e-drum
module and to your preferences.
Standard MIDI Configuration
MIDI channel:
1
Feet pedal (FCC):
4
Position control (PCC):
16
Choke function (internal Coke CC):
3
Shell/Cymbal
Note
MIDI Number
Kick
Snare, Snare Carpet, Snare Position
Rim Shot, Cross Stick
C1
D1
E1
36
38
40
HH Foot (underfoot HiHat)
HH Close (closed HiHat)
HH Open (open HiHat)
Tom 1, Tom 1 Alternate
Tom 2, Tom 2 Alternate
Floor Tom 1, Floor Tom 2 Alt.
Floor Tom 2, Floor Tom 2 Alt.
Cymbal 1
Cymbal 2
Ride Rim
Ride Bell
G# 1
F# 1, A# -1*
A# 1, D0*
C2
A1
G1
F1
C# 2, G2*
A2, E2*
F2
D# 2
44
42, 22*
46, 26*
48
45
43
41
49, 55*
57, 52*
53
51
* Right now the SDFX does not support any two-way-e-pads (dual, stereo) for HiHat
and Cymbals. That’s why HiHat and Cymbals are triggered by two Midi Notes. This
makes it easy to assign a drum to each cymbal-e-pad, because the e-drummodule does not need any assignment of notes.
SuperDrumFX
Software Drum Workstation 1.4
Side 11
Prerequisite for running the SDFX
The SDFX works with Microsoft Windows. It is a VSTi-plug-in, which means it can not run
alone and you need a host-program to run it. You can use the SDFX as a plug-in with
the host program and after some configuration changes it can be used. These host
programs must be able to load VSTi-plug-ins, meaning that they must have a VSTi
compatible interface. These VSTi-hosts are generally so called DAW-systems (digital
audio workstations), which have capable midi- and audio-sequences (like
recorders). However there are also VSTi hosts that specialize to be the basis for VSTi
plug-ins only. These kinds of VSTi-Hosts generally are missing the functions of a more
powerful DAW, which makes them smaller and faster. With them you can have a
VSTi-plug-in which acts like a standalone. Both types of VSTi-Hosts are available to be
purchased, as freeware or as open-source.
Examples for DAW Software
•
Cubase VST from Steinberg
•
Logic Audio from Emagic/Apple
(until version 5 WIN/MAC from version 6 only for MAC)
•
Samplitude from Magix
•
LIVE from Ableton
•
Sonar from Cakewalk
•
Reaper from Cockos
•
and more…
Examples for Freeware VST/VSTi Hosts
•
VSTHost and SAVIHost from Hermann Seib (Windows)
•
Cantabile Lite from Topten Software (Windows)
•
VSTServer from Kjetil Matheussen (Linux)
•
MiniHost from Tobias Fleischer aka „Tobybear“ (Windows)
•
and more…
Important:
You must have one of these programs to run SuperDrumFX.
SuperDrumFX
Software Drum Workstation 1.4
Side 12
Operation
Graphical User Interface (GUI)
SDFX GUI Controls
Control
Slider
Graphic
Description
The slider is the main tool of the SDFX. It consists of
the slider and the field (1.65). The slider has limits on
the max/min levels, so not every level can be
controlled with the slider.
In some cases levels beyond this slider’s limits need
to be adjusted and you have to put the number
directly into the field.
Drop-Down
With the drop-down you can change between
sample slots. You can also choose between
already existing parameter lists, which initialize, for
example Midi-, Velocity or control levels.
Button
Use the button to change between normal and
expert level of a drum-menu. It is not available for
all drum-slots.
Small Button
Switch between normal and expert mode. It is not
available in all drum-menus.
PAN - Regler
The pan-controller changes the stereo position of
each drum. Not available for all drum slots.
Sample-Slot
(extern/intern)
You can enter data and path info for each sample
in the Sample-Menus (extern). A click on the file
search icon (file icon with magnifying glass) opens
a dialog window. Here you can navigate through
the files and choose the desired WAV-sample
directly with the click of your mouse. The path and
data name will transfer automatically in the field of
the sample slot. If you click the small button (intern)
you can choose your sample from the SDFX Library
from the drop down list.
extern
intern
Level/Pitch/
Frequenzregler
SuperDrumFX
The Level/Pitch/Frequency controller is also a virtual
turn knob. It shows the pitch, a knob and an
optional field (5.00). You can use it to adjust the
pitch of the sample slots. Only when use with the
Mixer – EQ – Menu can you adjust the level and
frequency. The field can display a number.
Software Drum Workstation 1.4
Side 13
Instrument
Picture
The actual drum, associated with the instrument
picture, can simply be played by a click on the
picture. The instrument picture provides a virtual
velocity. The farther up the picture is clicked the
louder the assigned drum played. The farther
below the instrument picture is clicked the quieter
the associated drum playing.
The instrument picture is used primarily for
identification and prelisten of the associated drum.
loud
played loud... (MIDI-Velocity = 127)
medium loud
played medium loud... (MIDI-Velocity = 63)
silently
played silent... (MIDI-Velocity = 0)
SuperDrumFX
Software Drum Workstation 1.4
Side 14
SDFX Drum-Slot Types
The Single Layered Drum-Slot (1 Sample Layer)
This drum-slot-type has only one sample-slot and thus also just one sample layer. It
has an IVC (Interval Control). You can use it for drum slots: Snare, Position, Rim Shot
and Cross Stick.
The Single Layered alternating Drum-Slot (1 Sample Layer)
This drum-slot-type is a special type of the single layered drum slot and is usually used
together with one of the other associated drum slots. This drum-slot-type also has only
one sample-slot available and it does not have an IVC (Interval Control).
Instead of one, it gives you two sample slots. These will play alternately one after the
other. At the first hit it will play sample-slot Alternate 1, at the second hit it will play the
sample from sample-slot Alternate 2. At the third hit it will play sample-slot Alternate 1
SuperDrumFX
Software Drum Workstation 1.4
Side 15
again. At the 4th it will play sample-slot Alternate 2 again. This sequence can go on
indefinitely.
The samples of these drum-slot-types are normally mixed in with the samples of the
associated drum-slots. That’s why they are reacting to the same Midi notes as the
associated drum-slots. What is new is that the snare carpet samples (Carpet) can be
added to the drum-slots Kick, Tom1, Tom 2, Floor Tom 1 and Floor Tom 2. This gives a
more realistic sound.
Tip: If you let these drum-slot-types react to other midi notes, you can use them to
expand to even more drums or even other sounds.
Important: Because you can’t turn off the alternating, make sure that both drum slots
have a sample. I you don’t have a second sample, just use your sample in both slots.
You can use this drum-slot-type with Snare Carpet, Tom 1 Alternate, Tom 2 Alternate,
Floor Tom 1 Alt. and Floor Tom 2 Alt.
The Two Layered Drum-Slot (max. 2 Sample Layer)
This drum-slot-type gives you 2 sample slots with a maximum of two sample layers. It
supports the simple interval-control (IVC). These sample-slots do not have velocitylimit-drop-down elements. Instead it has a cross-fade-slider (X Fade), where you can
adjust percussion strengths.
This drum-slot-type comes with drum-slots Kick, Tom 1, Tom 2, Floor Tom 1, Floor Tom
2, HH Foot, HH Close, HH Open, Cymbal 1, Cymbal 2, Ride Rim and Ride Bell.
SuperDrumFX
Software Drum Workstation 1.4
Side 16
The Three Layered Drum-Slot (max. 3 Sample Layer)
This drum-slot-type gives you 3 sample-slots, which enables you to have three sample
layers. Each sample slot has also two velocity-limit-drop-down-elements, which can
be used in connection with the velocity-cross-fade-curves of the expert
configuration and the different sample layers. (see section “SDFX Sound
Parameters”)
It supports the normal (IVC) as well as the dynamic interval control (DIVC). With the
pitch regulators you can adjust the sound pitches individually. (see
section „Tips and Tricks for Making the Base Samples“)
A click on the expert button opens the expert configuration, in which the velocitycross-fade-curves can be adjusted.
Expert configuration of the three layered drum-slots
This drum-slot-type is only used with the drum-slot Snare.
SuperDrumFX
Software Drum Workstation 1.4
Side 17
The Mixer – EQ – Slot
This slot-type gives you a virtual mixer. Associated drum-tracks get bundled with
drums and can be adjusted for volume and with the 2-band-equalizers fine tuned.
Finally all the single drums of the drum sets/programs can be fine tuned to each
other. The Equalizer gives you two shelving filters to adjust the high and low
frequencies (Hi Hz, Low Hz). With the Hi and low controllers you can adjust the
intensity of the sound changes.
Important: The working frequencies are adjusted together for all equalizers of the
mixers. Thus they are valid for all EQ globals within a SDFX-program.
Combined Drum-Slots: (drum groups)
Shell/Cymbal
Kick
Drum-Slot
Kick
Snare
Snare, Snare Carpet, Snare Position, Rim Shot, Cross Stick
HiHat
HH Foot, HH Close, HH Open
Cymbal 1
Cymbal 1
Cymbal 2
Cymbal 2
Ride
Ride Rim, Ride Bell
Tom 1
Tom 1, Tom 1 Alternate
Tom 2
Tom 2, Tom 2 Alternate
Tom 3
Floor Tom 1, Floor Tom 1 Alt.
Tom 4
Floor Tom 2, Floor Tom 2 Alt.
Attention: Drastic changes on the controllers of the equalizer can destroy the
attached sound system. Especially dangerous are the changes from very low
SuperDrumFX
Software Drum Workstation 1.4
Side 18
frequency. Sometimes the real sound level is not even audible and can therefore
damage the components of the sound system. Please use the equalizer very
carefully.
The Pad – Slot
This slot type provides a virtual pad controller whose pads can be played by mouse
click. The pads have a virtual velocity. The farther up the pad is clicked the louder
the associated drum will playing. The farther below the pad is clicked the quieter the
respective drum will playing.
played loud... (MIDI-Velocity = 127)
played medium loud... (MIDI-Velocity = 63)
played silently... (MIDI-Velocity = 0)
The slot serves mainly to preview the entire SDFX program.
SuperDrumFX
Software Drum Workstation 1.4
Side 19
The FX – Slot
This slot-type is a virtual effect machine. The drum groups known by the Mixer-EQ-Slot
are used for effect adjustment (kick, snare, toms, cymbals). The FX-Slot gives you
three basic effect types (reverb, delay and flanger). The reverb effect (hall/room) is
there twice. That’s why you can for example do a reverb for the snare and another
reverb for the rest of the drum set.
For each effect group you can adjust the effect power with the slider. Thus can a
effect group have a max of 4 different effects (reverb1, reverb 2, delay and flanger).
The parameter adjustment (effect programs) of the effects are valid program wide
and therefore the same for all effect groups of the SDFX programs (drum sets). Only
the effect parts for each effect group can be adjusted separately. This is realistic and
similar to the limits of a real studio.
The following drum groups are combined to effect groups:
Effektgruppe
Kick
Snare
Toms
Cymbals
SuperDrumFX
Trommelgruppe
Kick
Snare
Tom 1, Tom2, Tom 3, Tom 4
HiHat, Cymbal 1, Cymbal 2, Ride
Software Drum Workstation 1.4
Side 20
The System – Slot
This slot shows adjustments for system intern functions. Adjustable is the path to the
“SuperDrumFX Drum Sample Library”, the dynamic polyphony reduction for snare
and tom-drum-slots, the master volume of the SuperDrumFX, the midi-controller and
the internal controller for the choke-function and two MIDI rules for the for the
incoming MIDI signals. All functions listed here are explained in more detail in the
chapter “SDFX System Parameters”.
Important: The system parameter are only saved for each associated SDFX-program
(drum set), just as the adjustments of the other drum-slots.
SuperDrumFX
Software Drum Workstation 1.4
Side 21
SDFX Sound Parameters
Level
Adjust the base volume of each drum track with the level-slider. You can use
numbers between -5 and +5. Depending on the sample material and with what it is
used levels between -1 and 3 are practical. You only should use the level-slider to
adjust the basic volume. If you need to adjust volume between the drums, use the
Mixer-EQ slot.
ATTENTION: A too high volume can destroy the attached sound systems.
Interval Control / IV Control
With this slider you can adjust the intensity of the interval controls. The interval
controls adjusts the swing-in speed (attack) of a drum. This happens depending on
the play speed. It accepts levels between 0 and 8. Null means that the interval
control is deactivated. The envelope shape of the drum swings therefore always in
full power in (right away in full volume level). Bigger levels mean that fast hits
(swinging in) are slower and slower hits are faster (swinging in). The 8 means that the
interval control effect is at its max. Realistic levels are between 4 and 6 depending
on the sample material.
IVC Vel
With the “IVC Vel”-slider you can influence how powerful the interval control is, which
adjusts the Velocity of a hit. The intensity of the interval control is dependent on how
powerful the hit is.
The influence of the “IVC Vel” – parameters gives following results:
•
The more powerful the hit, the weaker the influence of the interval control
=> with rapid following hits, the attack still stays strong (fast swinging in).
•
The weaker the hit, the stronger the influence of the interval control =>
rapid following weak hits are weakened in attack (rather slow swinging in)
Depending on the quality of the sample-materials and simulated drums, levels
between 1 and 2 are practical.
Attention: The “IVC Vel”-parameter and DIVC is only available in the drum-slots
Snare, Tom1, Tom2, Floor Tom1 and Floor Tom 2.
Release
With the release-slider you can adjust the sound release of the drum. Level between
0 and 8 are allowed. If you manually enter the level you can realize even longer
release times, however it could have a negative influence to the performance of the
SDFX. The null means an extreme short time and the 8 means a long release.
SuperDrumFX
Software Drum Workstation 1.4
Side 22
Compander
The compander-slider controls the sound volume from weak to strong hit. Level
smaller than 1 is compressing and levels greater than 1 are expanding (expander).
Levels from 0 to 2 are allowed. Depending on sample material and use, levels
between 0.500 and 1.2 are practical.
ATTENTION: Levels greater than 1 (Expander) can lead to above average sound
level, which can destroy the attached sound system. Thus use this parameter
carefully.
Pitch
The pitch-controller adjusts the pitch of the drum. Levels between 0 and 10 are
allowed. The standard level is 5 and means that the sample will be played in its
natural pitch. The null represents an extreme low pitch and 10 an extreme high pitch.
The pitch-parameter makes it possible for samples to be adjusted to unrecognizable
levels, which makes possible to be the basis for other sounds.
ATTENTION: The pitch controller is only available in one- or two layered drum slots.
Pitch All, Pitch Hard, Pitch Norm, Pitch Soft
These pitch-controllers work analog to the above mentioned pitch-controller. The
specialty with these controller are, that you can adjust either the master pitch of a
drum-slot (pitch all) or the pitch of each single sample-slots (hard, normal, soft) of a
drum set.
ATTENTION: The pitch controls are only available in the three layered drum slot.
RND Pitch
With the “RND Pitch”-slider you can influence how strong the SDFX owned chance
generator sets the pitch of the drum of a drum slot. Levels from 0 to 500 are allowed.
The null means no influence at all and 500 mean the maximum pitch influence.
Depending on sample-material and use, levels between 0 and 300 are practical.
Bigger levels produce an artificial sounding pitch change, which would be used for
sound effects.
TIP:
Turn the “RND Pitch”-slider to levels between 450 and 500 and listen to the
weird result.
Note
Use the notes-dropdown to influence how a drum responds to each midi-note.
Depending on drum type, this parameter has different standard values. Standard for
all SDFX-programs are the Roland e-drum-module assignments. (see section Midiconfiguration).
ATTENTION: The drum slots HH Close, HH Open, Cymbal 1 and Cymbal 2 each have
two notes-drop-down lists. (see section ”MIDI Implementation”)
SuperDrumFX
Software Drum Workstation 1.4
Side 23
Expert
With the expert-button you can switch between normal and expert level of a drumslot. In expert mode (if available) you can graphically adjust the velocity-cross-fadecurves of its sample-slot (hard, normal, and soft). Be careful that each curve has the
same number of curve points, so that you won’t get a wrong curve picture.
Unfortunately this is a bug, which I cannot fix.
ATTENTION: The expert–button (and expert configuration mode) is only available for
Snare drum-slot.
Hard Hit, Normal Hit, Soft Hit
You can enter the level or path to the samples or you can choose them from the
data button. Furthermore you have peer sample-slot two dropdown fields available
(Vel Lo and Vel Hi). You can adjust the lower (Vel Lo) and the upper (Vel Hi) velocity
limit with these dropdown fields for each sample-slot. Levels from 0 to 127 are
allowed for both dropdown fields. This is the same as for the MIDI velocity-parameters
(velocity=speed/strength of the hit).
The null of “Vel Lo” means that even a MIDI note with a extreme weak velocity will
trigger the associated sample. The max of 127 of “Vel Hi” means that even the
hardest hit will still be trigger the associated sample. If you set “Vel Lo” to 50 and “Vel
Hi” to 100, then the sample would only be played between 50 and 100. Weaker or
stronger hits would not be played. The velocity limits with the velocity-cross-fadecurves make it possible to realize different sample layers for each drum/drum-slot.
X-Fade (Cross Fade)
With the “X-Fade”-slider you can blend together samples in their sample-slots
according on their hit strengths. Therefore you can mix two sounds, like for example
weak and strong pushed bass drum (MIDI velocity). Levels between -5 and +5 are
allowed. The +5 means that only the “Hard Hit’ sample-slot is being played and it
does not matter which the strengths was used in the kick (MIDI velocity from 0 – 127).
The null would mean that with medium kick strengths (MIDI velocity = 63) both sounds
would be mixed in equal parts. The bass drum-sound would then be changed from
weak to strong kicked sound, if the kick/strengths would be changed from weak
(MIDI velocity = 0) to strong (MIDI velocity = 127). Positive levels change the
equilibrium towards “Hard Hit’ sample-slot and negative levels towards “Soft Hit”
sample-slot.
ATTENTION: The „X-Fade“-slider is only available within the two layered drum-slots.
HH Pedal
With the “HH Pedal "- slider is adjusted, how sensitive the HiHat-Slots on the transition
from closed to the open HiHat response. Values from 0100 to 2.00 are allowed. Depending on sample material, use or personal preferences, values between 1.5 and
0500 are practical. This parameter is only available in the "HH Open” – drum-slot.
SuperDrumFX
Software Drum Workstation 1.4
Side 24
Mix Level HH Close
With the "Mix Level HH Close" - control is adjusted, how strong the signal from the "HH
Close" - slots is added to the "HH Open” - slot. Values from 0 to 10 are allowed.
Depending on sample material and use, values between 0 and 10 are practical. This
parameter is only available in the "HH Open” – drum-slot.
Buzz Control (Snare Carpet)
With the "Small Button", such as Kick or Tom 1, the addition of snare carpet samples to
the respective drum slots can be switched on or off. If the button LED lights up, the
adding is activated. With the accompanying level controllers the volume of the
snare carpet portion (Buzz), for the respective slot drum set, is adjusted. Values from 0
to 10 are allowed. The "Buzz Control" – parameters are only available in the "Snare
Carpet " – drum-slot.
SuperDrumFX
Software Drum Workstation 1.4
Side 25
SDFX Effect Parameters
Reverb
Size
Here you adjust the width of the simulated room. Levels from 0 to 10 are allowed. The
null means no width and 10 means the max width of a room.
Damp
Here you adjust the intensity of the damping effect. The damping effect simulates
the natural sound absorption of walls in a room or hall. Depending on wall material,
the echo sound decays earlier on higher frequency than on lower frequency. Levels
of 0 to 10 are allowed. 0 means no damping effect and 10 means maximum
damping effect of the room.
Width
Here you adjust the lengths of the simulated room. Levels from 0 to 10 are allowed.
The null means no length and 10 means the max lengths of a room.
SuperDrumFX
Software Drum Workstation 1.4
Side 26
Delay
Level
Here you adjust the time gap between the original signal and the following echo.
Levels from 0 to 10 are allowed. The null means no echo and 10 means the maximum
time for the repeat of the echo.
Time
Here you can adjust the number of gradually softening repeating echoes. Levels
from 0 to 10 are allowed. The null means no echo and 10 means the maximum
repeating of the echo.
Feedback
Here you adjust the volume level of the echo in connection with the original signal.
Levels from 0 to 10 are allowed. The null means no echo and 10 means the maximum
echo volume.
SuperDrumFX
Software Drum Workstation 1.4
Side 27
Flanger
Rate
Here you adjust the velocity of the flanger effect (filter sweep). Levels from 0 to 10
are allowed. The null means extreme slow filter sweep and 10 means maximum
velocity of the filter-sweep.
Feedback
Control the intensity of the flanger effect (filter-sweep) here. Levels from 0 to 10 are
allowed. The null means no flanger effect and 10 means the maximum flangereffect.
SuperDrumFX
Software Drum Workstation 1.4
Side 28
SDFX System Parameters
Performance Issues and Dynamic Polyphony Reduction
The IVC- and DIVC- functions of the SDFX drum-slots require by the system a high
internal allocation of voices for each drum-slot (polyphony). This is necessary with
long and fast drum rolls so that the interval control does not fail. If this would happen
you would hear a “machine gun effect”. Specially affected are the long releasing
samples like the tom and cymbal. Some snare samples also release long and the
faster you play them the more voices you need. A high voice count also uses more
internal computing time, which affects the performance of the SDFX. Without the
IVC- and DIVC- functions, the SDFX could work with fewer voices per drum-slot and
therefore would use a lot less internal computing time.
To fix this problem dynamic polyphony reduction was built into SuperDrumFX. You
only need this reduction for drum-slots were you use slow release sounds, which also
can be played fast. The cymbal drum-slots are not one of them. Only the snare- and
tom drum-slots need this feature.
Functioning of the Dynamic Polyphony Reduction
The more voices are used for a drum-slot, at a given moment, the shorter the release
adjustment of the playing sample. This happens in real time and afterwards, meaning
already sounding samples are shortened afterwards depending on how many voices
are currently used. This way, an effective, almost inaudible reduction is possible,
which has a positive effect on the speed performance of the SDFX. You can adjust
the release, depending on the number of voices, with the parameters PExp and
PMul.
PExp and PMul
The PExp and PMul sliders are multipliers, which are being multiplied with the current
number of voices. The product of this multiplication is being subtracted from the
associated drum-slot release time. This calculation is done in real time, meaning
during playing of the associated drum-slot. Both “sliders”-values are also dependent
on the “release”-parameter in the associated drum-slot. Thus with “Snare PExp” it is
the “Release”-level in the snare drum-slot and with “Tom PExp” it is the “Release” parameter in the just played tom drum-slot. The standard level for PExp is 8.00 and for
PMul it is 0.005.
SuperDrumFX
Software Drum Workstation 1.4
Side 29
SDFX Library and SDFX Library Path
This field should be populated with the included “SuperDrumFX Drum Sample Library”
data path. The standard path is “C:\SDFX\” and means that the SDFX Library is
located on drive “C:” in folder “SDFX”. The last digit of the path must be “\” (back
slash) or the library cannot be found.
The folder tree of the SDFX Library looks like:
If the library was saved directly on drive “D:”, then the path is: “D:\SDFX\”.
If the library was saved to drive “M:” in folder “Audio” and folder “Drum Samples”,
then the path is: “M:\Audio\DrumSamples\SDFX\”.
If you created another folder with a unique name like “SuperDrumFX Samples” then
the path is: “M:\Audio\DrumSamples\SuperDrumFX Samples\”.
ATTENTION: You should not change the internal folder structure if possible. If you
want to include your own samples or folders into the library, or want to change a
folder or filename, then you have to adapt the text files, which are included in the
SDFX library (see below). Note that each row must be completed with a ";"
(semicolon). In case of blank lines, there should be at least one white space entered
before the ";" - character.
SuperDrumFX
Software Drum Workstation 1.4
Side 30
Master Volume
You can adjust the total volume of the SuperDrumFX with the “Master Volume” slider.
The standard level is 10. Levels between 0 (soft) and 10 (loud) are possible. This
volume adjusts the stereo exit mix L/R, as well as the single exits kick L/R, and snare
L/R, toms L/R and cymbals L/R.
Choke Function
The choking is a drum specific play technique where generally you hold the edge of
the cymbal with your hand after the cymbal has been hit. The sound of the cymbal is
therefore abruptly stopped. Because this effect is very popular in rock music and of
course also in live drumming, it was also implemented on e-drum systems. Here the
cymbal sound stops abruptly when the edge of the associated cymbal e-pad is
pressed together. Not all e-drum modules and not each e-drum pad support this
function.
Choke ON
In this field you can enter the MIDI rule for the “Choke ON” signal. The default entry is
„ *,KeyAft,*,*,127,127,n,*,ctrl,3,3,*,* “.
The exact meaning is explained in the chapter "MIDI Rules". Different MIDI signals can
be used for implementing the choke function.
Choke OFF
In this field you can enter the MIDI rule for the Choke OFF signal. The default entry is
„ *,NoteOn,*,*,*,*,n,*,ctrl,3,3,0,0 “. The exact meaning is explained in the chapter
"MIDI Rules". Different MIDI signals can be used for implementing the choke function.
int. Choke CC
With this drop-down-field, you can choose the MIDI control number for the internal
choke function. The default number is 3. The below shown “Choke ON” and “Choke
OFF” MIDI choke rules must be adjusted to the here shown number. Standard is 3.
MIDI Rule 1 and 2
You can enter MIDI rules in text fields “MIDI Rule 1” and “MIDI Rule 2” for the entire
SDFX-program. The default of “MIDI Rule 1” is *,NoteOff,*,*,*,*,n,*,NoteOff,*,*,*,* This
default does absolutely nothing and should only be used as an example for an input
text. This field can be left empty. The default for “MIDI Rule 2” is empty. The MIDIManipulator (which is adjusted here) is technically positioned right after the MIDI-IN.
It is useful to adapt exotic e-drum-modules with the SDFX and therefore improves
compatibility.
MIDI Rules
The MIDI-Manipulator, which represents the basis of the choke- and MIDI rules, is
mainly done with the SynthEdit Modul “DH MIDI Munger” from Dave Haupt. On Dave
Haupt’s web page you can find an exact explanation of this function as well as the
make of the filter rules of the “DH MIDI Munger”.
SuperDrumFX
Software Drum Workstation 1.4
Side 31
www.dehaupt.com/SynthEdit/DH_MIDIMunger/HowTo.htm
ATTENTION: With the MIDI rules you can screw up the entire internal communication
of the SDFX. Thus be careful. However this function could be the only way to adjust
the SDFX to exotic or older e-drum systems.
ATTENTION: The two internal MIDI manipulators are connected together in parallel
mode to realize the choke function. Thus set the "n" - flag in the “Choke Off” rule. This
does not apply to the MIDI Rule 1 and 2. Would the MIDI manipulators connected
together in serial mode, the "y" – flag must be set, because the “Note ON” signal
otherwise lost, since it would be converted to another signal. (y = Insert, n = Replace)
Two internal MIDI manipulators are used parallel for the choke function, thus it is
enough to set the “n”-flag on the “Choke Off” rule. This is not valid for MIDI Rule1 and
2. Would the MIDI manipulators are used in series, the “y”-flag must be set to not lose
the ON signal, since it would be converted to another signal. (y = insert, n = replace).
For possible message types see “Appendix”.
Examples for Choke- and MIDI Rules
Choke ON:
|
Nr.:
No.
1
2
3
4
5
6
7
8
9
10
11
12
13
* , KeyAft, * , * , 127 , 127 , n , * , ctrl , 3 , 3 , * , * |
1 ,
2
Rule
*
KeyAft
*
*
127
127
n
*
ctrl
3
3
*
*
, 3 , 4 , 5 , 6 , 7 , 8 , 9 , 10 , 11 ,12 , 13
MIDI
Channel
Type
DB 1 Min
DB 1 Max
DB 2 Min
DB 2 Max
y/n Flag
Channel
Type
DB 1 Min
DB 1 Max
DB 2 Min
DB 2 Max
Declaration
* = all channels
KeyAft = key aftertouch or p-press (key pressure)
all MIDI notes
all MIDI notes
from pressure value 127
to pressure value 127 (thus only 127)
n = original MIDI signal gets converted to:
* = all channels
MIDI controller
from channel 3
to channel 3
all values
all values
Explanation :
All incoming “MIDI Key Aftertouch "- signals (all channels and all notes) with a value
of 127, will be converted to “MIDI controller 3" - signals with the same value.
SuperDrumFX
Software Drum Workstation 1.4
Side 32
Choke OFF:
|
No.:
No.
1
2
3
4
5
6
7
8
9
10
11
12
13
* , NoteOn, * , * , * , * , y , * , ctrl , 3 , 3 , 0 , 0 |
1 ,
2
Rule
*
NoteOn
*
*
*
*
n
*
ctrl
3
3
0
0
, 3 , 4 , 5 , 6 , 7 , 8 , 9 , 10 , 11 ,12 , 13
MIDI
Channel
Type
DB 1 Min
DB 1 Max
DB 2 Min
DB 2 Max
y/n Flag
Channel
Type
DB 1 Min
DB 1 Max
DB 2 Min
DB 2 Max
Declaration
* = all channels
Note ON – signal (note gets played)
all notes
all notes
all velocity values (hit strengths)
all velocity values (hit strengths)
n = original MIDI signal gets converted to:
* = all channels
MIDI controller
from channel 3
to channel 3
from 0
to 0 (thus only 0)
Explanation :
All incoming “MIDI Note On "- signals (all notes and all hit strengths) will be converted
in MIDI controller 3" - signals with the value of 0.
MIDI Rule 1:
|
No.:
No.
1
2
3
4
5
6
7
8
9
10
11
12
13
* , NoteOff, * , * , * , * , n , * , NoteOff , * , * , * , * |
1 ,
2
Rule
*
NoteOff
*
*
*
*
n
*
NoteOff
3
3
0
0
, 3, 4 , 5 , 6 , 7 , 8 ,
MIDI
Channel
Type
DB 1 Min
DB 1 Max
DB 2 Min
DB 2 Max
y/n Flag
Channel
Type
DB 1 Min
DB 1 Max
DB 2 Min
DB 2 Max
9
, 10 , 11 ,12 , 13
Declaration
* = all channels
Note Off – signal (note end)
all notes
all notes
all velocity values (hit strengths)
all velocity values (hit strengths)
originales MIDI Signal wird umgewandelt in:
* = all channels
Note Off – signal (note end)
all notes
all notes
all velocity values (hit strengths)
all velocity values (hit strengths)
Explanation :
All incoming “MIDI Note Off "- signals will be converted in “MIDI Note Off" - signals
containing the same values. Thus, nothing happens.
SuperDrumFX
Software Drum Workstation 1.4
Side 33
Tips and tricks to produce basis samples
Requirements
The prerequisites for producing good drum samples is foremost a good tuned, high
quality drum set, a high quality microphone amplifier, high quality microphones and
a good sounding digital recorder. A drum set and some experience in producing
digital sound recordings are also of advantage. Familiarity with PC systems as well as
experience recording and producing sound signals with the help of sound
adjustment software are prerequisites for following tips and tricks. All produced
samples should be normalized (brought up to maximum level), so that the SDFX
standard parameter values can be a good starting point for your own drum sets.
Production of your own snare samples
Sampling of the snare
With a good dynamic microphone, use the microphone very close to the snare from
above. Hit the middle of the snare one time each in intervals of approximately 3
seconds soft, medium and strong. Repeat this procedure several times. This way you
can choose the best sample and still have enough sample material to be used for
the below explained cheap tricks.
Sampling of the snare carpet (alternating samples)
Variant 1
With a good dynamic microphone or a condenser microphone, use the microphone
very close to the snare from below. Hit the snare several times alternating (left/right)
in intervals of approximately 3 seconds. Use the hit strengths which would best suit
the carpet. At the end choose a left and a right sample with a strong carpet part.
However, be careful that they do not sound too much alike.
Variant 2 (cheap-trick)
With a good dynamic microphone or a condenser microphone, use the microphone
very close to the snare from below. Play a fast series to bring the carpet in good
swing. At the end, with a sound adjustment program of your choosing, cut two
consecutive hits and divide them into two individual samples. The samples are then a
little too short for use as carpet samples. To increase their lengths, just use the timestretch-function of your sound adjustment program. The end of the sample should
then be softly blended.
As an alternative you can also copy the end of a normal snare-sample and add it to
the sample that is too short. Be careful not to use the same snare sample that you
used here for a sample-slot of a future snare, because you would get an unpleasant
sounding flanging effect.
SuperDrumFX
Software Drum Workstation 1.4
Side 34
However, if you have to do this (because you don’t have enough samples), you can
slightly tune new created carpet sample different as the original snare-sample. To do
this you can use the pitch adjuster for each sample-slot.
Tip: Variant 2 is more involved, but could give you a more realistic sounding snare than
Variant 1.
Sampling of the snare position samples
With a good dynamic microphone, use the microphone very close to the snare from
above. Hit the rim of the snare head several times hard in intervals of 3 seconds.
Choose the best sample.
Sampling of the rim shot samples
With a good dynamic microphone, use the microphone very close to the snare from
above. In intervals of 3 seconds, hit simultaneously the middle and rim area of the
snare (rim). Choose the best sample.
Sampling of the cross stick samples
With a good dynamic microphone, use the microphone very close to the snare from
above. Place the drum stick diagonal over the snare, so that the top end sticks out
over the rim, but the back end touches the head on the other side. Lift the stick so
that the back end stays on the fur. Now in this position, hit the rim of the snare (rim).
With a little practice this will sound like the typical “Cross Stick” sound. Repeat this
several times in 3 second intervals. Choose the best sample.
Production of your own tom samples
Sampling of the toms
With a good dynamic microphone, use the microphone very close to the tom from
above. Hit in intervals of 3 seconds each soft and strong to the middle of the toms.
Repeat this several times to choose the best sample at the end. You will need a
sample that was hit soft and a sample that was hit strong. These samples are later
blended in each tom-slot (of the SDFX) depending on their hit strengths.
Sampling of the alternating tom samples
With a good dynamic microphone, use the microphone very close to the tom from
above. Hit the tom several times alternating (left/right) in intervals of approximately 4
seconds. Choose middle to strong hit strengths. At the end choose a left and a right
sample of the same tom. However, be careful that they do not sound too much
alike. Make sure you did not use the same tom-samples that you used for the normal
tom-samples.
You would get an unpleasant flanging effect. If you have to use the same samples
for the main and alternating drum slots (tom 1 + tom 1 alternate), make sure you use
the pitch adjuster to minimize the flanging effect.
SuperDrumFX
Software Drum Workstation 1.4
Side 35
Production of your own kick samples
Variant 1 (1 Microphone)
With a good dynamic microphone, use the microphone very close within the shell.
The microphone should also reach the bass area. Maybe you could use a special
bass microphone for this. Start the microphone in the middle of the shell. If you want
you can move the microphone around. When you find a good microphone position,
record in different positions and decide afterwards which sample to use. Recording
closer to the hit area makes a higher sound than recording further away where you
get a softer more bass sound. Kick in intervals of 2 seconds weak and hard the bass
drum pedal. Repeat this procedure several times to get the best samples. You need
a soft and strong kicked bass drum sample. These two samples are going to be softly
blended in the kick-drum-slot of the SDFX.
Variant 2 (2 Microphones)
This variant is more labor intensive, but gives you more flexibility in choosing or
making your final bass drum samples. You need 2 microphones for this. One
specialized for low sounds and has therefore a good coverage in the bass- and low
bass area. Position the microphone in the shell or even outside the sound area. The
other microphone is good recording high notes and therefore is placed in the shell
directly in front of and in the direction of the fur. Don’t mix both microphone signals
together, but adjust one of the signals extremely to the left and the other to the right.
The digital recorder will record in stereo and both microphone signals will be
available separate.
Use the bass drum pedal in intervals of 2 seconds one soft and strong. Repeat several
times and choose the 4 best samples (2 soft and 2 strong). With the sound
adjustment software you can mix the two separated samples to get different bass
drum sounds. In the end you will need one soft and one strong kicked bass drum
sample. Both samples are going to be over blended later in the kick-drum-slot of the
SDFX.
Production of your own hihat samples
With a good condense microphone, use the microphone very close to the hihat. The
microphone should cover the mid- and high area.
Sampling of the HH Foot samples (stepped hihat)
In intervals of 2 seconds step fast and slow onto the HiHat-Pedal, so that the upper
and lower cymbal of the HiHat hit together one time hard and one time soft. It
produces a “chick” like sound. Repeat this procedure several times and choose the
two best samples. You need one soft and one strong sample. Both samples are
going to be blended in “HH Foot”-slot of the SDFX.
SuperDrumFX
Software Drum Workstation 1.4
Side 36
Sampling of the HH Close samples (closed hihat)
Step strong on the HiHat-Pedal so that the upper and lower cymbal of the HiHat are
tight together. In intervals of 2 seconds hit one time soft and one time strong on the
rim of the closed HiHat. Repeat this procedure several times and choose the two
best samples. You need one soft and one strong sample. Both samples are going to
be blended in “HH Close”-slot of the SDFX.
Sampling of the HH Open samples (open hihat)
Take your foot off the HiHat-Pedal so that the upper and lower cymbals of the HiHat
can swing freely. In intervals of 4 seconds hit one time soft and one time strong on
the rim of the open HiHat. Repeat this procedure several times and choose the two
best samples. You need one soft and one strong sample. Both samples are going to
be blended in “HH Open”-slot of the SDFX.
Production of your own cymbal samples
Depending on preference choose a close or more medium distance of the
microphone to each cymbal. Recording is done from above with a good small- or
large- membrane condense microphone (depending on preference). The microphone should be able to cover the middle and high areas. In intervals of 5 seconds
hit one time soft and one time strong on the rim of each cymbal. Repeat this
procedure several times and choose the two best samples. You need one soft and
one strong sample. Both samples are going to be blended in the cymbal-slots of the
SDFX.
Production of your own ride samples
Depending on preference choose a close or more medium distance of the
microphone to the ride-cymbal. Recording is done from above with a good small- or
large- membrane condense microphone (depending on preference). The microphone should be able to cover the middle and high areas.
Sampling of the ride rim samples (outer rim of the ride cymbals)
In intervals of 5 seconds hit one time soft and one time strong on the rim of the ride
cymbals. Repeat this procedure several times and choose the two best samples. You
will need one soft and one strong sample. Both samples are going to be blended in
“Ride Rim”-slot of the SDFX.
Sampling of the ride bell samples (cup of ride cymbals)
In intervals of 5 seconds hit one time soft and one time strong on the bell of the ride
cymbals. Repeat this procedure several times and choose the two best samples. You
will need one soft and one strong sample. Both samples are going to be blended in
“Ride Bell”-slot of the SDFX.
SuperDrumFX
Software Drum Workstation 1.4
Side 37
Epilogue
I hope you have as much fun playing the SuperDrumFX as I do. From the idea, the
first steps until the program development took almost 3 years. Support my work in the
support-forum of the SuperDrumFX on the web site www.superdrumfx.com by
offering to other users your own produced drum samples and sound programs. Also
support other users in the forum by answering their questions. You also can donate a
small amount of money. I would love any kind of recognition of my project.
Greetings
Denis Eismann
SuperDrumFX
Software Drum Workstation 1.4
Side 38
Appendix
MIDI Number to MIDI Note Conversation Table
MIDI Number
MIDI Note
MIDI Number
MIDI Note
35
B1
54
F# 3
36
C2
55
G3
37
C# 2
56
G# 3
38
D2
57
A3
39
D# 2
58
A# 3
40
E2
59
B3
41
F2
60
C4
42
F# 2
61
C# 4
43
G2
62
D4
44
G# 2
63
D# 4
45
A2
64
E4
46
A# 2
65
F4
47
B2
66
F# 4
48
C3
67
G4
49
C# 3
68
G# 4
50
D3
69
A4
51
D# 3
70
A# 4
52
E3
71
B4
53
F3
72
C5
MIDI Message Types and Data Bytes (DB)*
Message Type
DH_MIDI Munger
Abbreviation
Note Off
NoteOff
MIDI Note Number
Velocity
Note On
Polyphonic Key
Pressure
Control Change
NoteOn
MIDI Note Number
Velocity
KeyAft
MIDI Note Number
Pressure
Ctrl
Controller Number
Data Value
Program Change
ProgChg
Program Number
Not Used
Channel Aftertouch
ChanAft
Pitch Bend
PitchB
Pressure
Least Significant Byte
(LSB)
Not Used
Most Significant Byte
(MSB)
Data1 (values 0 - 127) Data2 (values 0 - 127)
*by Dave Haupt, www.dehaupt.com
SuperDrumFX
Software Drum Workstation 1.4
Side 39