1
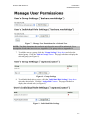
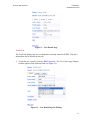
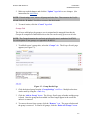
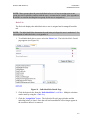
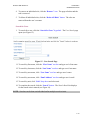
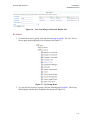
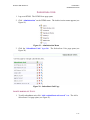
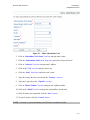
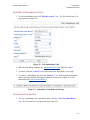
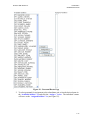
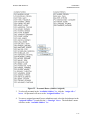
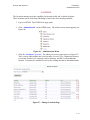
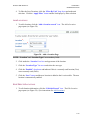
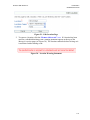
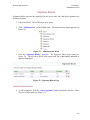
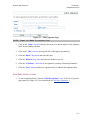
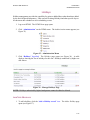
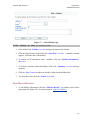
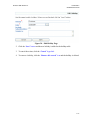
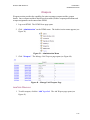
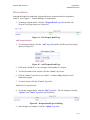
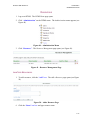
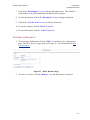
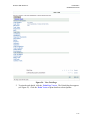
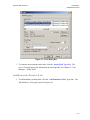
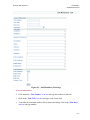
CHAPTER 4
ADMINISTRATION
The Administration menu provides a method for performing various unit administrative
functions such as managing users, locations, holidays, and weapons.
Chapter Topics
Page
USER MANAGEMENT ......................................................................................................... 1
ADD USERS ............................................................................................................................ 1
MANAGE USER ROLES ........................................................................................................... 3
BY NAME ............................................................................................................................... 6
Profile Tab ........................................................................................................................ 7
Groups Tab........................................................................................................................ 8
Roles Tab .......................................................................................................................... 9
Search for Users .............................................................................................................. 10
BY GROUP ........................................................................................................................... 11
SUBORDINATE UNITS ...................................................................................................... 13
ADD SUBORDINATE UNITS ................................................................................................... 13
EDIT/DELETE SUBORDINATE UNITS ..................................................................................... 15
VIEW PERSONNEL ROSTER................................................................................................... 15
LOCATIONS......................................................................................................................... 19
ADD LOCATIONS .................................................................................................................. 20
EDIT/DELETE LOCATIONS .................................................................................................... 20
SIGNATURE BLOCKS ....................................................................................................... 22
ADD NEW SIGNATURES ....................................................................................................... 22
EDIT/DELETE SIGNATURES .................................................................................................. 23
HOLIDAYS ........................................................................................................................... 25
ADD NEW HOLIDAYS ........................................................................................................... 25
EDIT/DELETE HOLIDAYS...................................................................................................... 26
WEAPONS ............................................................................................................................ 28
ADD NEW WEAPONS............................................................................................................ 28
EDIT/DELETE WEAPONS ...................................................................................................... 29
WEAPON DETAIL ................................................................................................................. 30
Add Weapon Details ....................................................................................................... 30
Edit/Delete Weapon Details ............................................................................................ 30
RESOURCES ........................................................................................................................ 32
ADD NEW RESOURCES ......................................................................................................... 32
Updated as of 8/13/2008
DTMS USER MANUAL
CHAPTER 4
ADMINISTRATION
EDIT/DELETE RESOURCES ................................................................................................... 33
TASKS ................................................................................................................................... 34
VIEW MANDATORY TRAINING TASKS .................................................................................. 34
ADD MANDATORY TRAINING TASK ..................................................................................... 36
General Information ........................................................................................................ 37
Task Data ........................................................................................................................ 38
Task Attributes ................................................................................................................ 38
EDIT/DELETE MANDATORY TRAINING TASKS ..................................................................... 39
TABLE OF FIGURES .......................................................................................................... 40
DTMS USER MANUAL
CHAPTER 4
ADMINISTRATION
User Management
User Management provides the capability to add new users, edit users, and assign/manage
roles/permissions for individual and group roles. Managing users and their roles is done by
utilizing the submenus for Users, By Name, and By Group.
1. Log-on to DTMS. The DTMS Home page opens.
2. Click “Administration” on the DTMS menu. The Administration menu appears (see
Figure 1).
Figure 1 – Administration Menu
3. To view additional Users submenus, click the “plus” icon. The submenu appears
showing “By Name” and “By Group” (see Figure 2).
Figure 2 – Users Submenu
ADD USERS
Each unit should have an assigned System Administrator who is responsible for creating and
managing user accounts. System Administrators also create and manage group and
individual roles/permissions.
NOTE: An Army Knowledge Online (AKO) User ID and password is required to access
DTMS. Each user is required to attend DTMS training prior to receiving a user id.
1. To add users, click “Users” hyperlink. The User Management page opens (see
Figure 3).
4-1
DTMS USER MANUAL
CHAPTER 4
ADMINISTRATION
Figure 3 – User Management Page
2. Click the “Add a user” hyperlink. The Add a New User page opens (see Figure 4).
Figure 4 – Add a New User Page
NOTE: “User Name”, “Email Address”, and “Unit” are required fields.
3. Click inside the “User Name” text box. Type the AKO user name (i.e. joe.smith). If
the user is already in DTMS, a warning message appears (see Figure 5). (See
instructions for Profile tab to edit a user.)
Figure 5 – Add a New User with Warning
NOTE: The system automatically refreshes and inserts the users AKO email in the “Email”
text box when the “User Name” is entered (i.e. [email protected]).
4-2
DTMS USER MANUAL
CHAPTER 4
ADMINISTRATION
4. Click in “First Name” text box and type user’s first name.
5. Click in “Last Name” text box and type user’s last name.
6. To select the user’s unit, click the unit in the “Unit” list box.
7. If the user’s AKO e-mail address is different, enter it the “Email Address” text box.
NOTE: The “Email” text box automatically populates with the user [email protected]
when the “User Name” is entered.
8. To activate the user’s DTMS account, click the “Is Active” check box.
9. To save the new user, click the “Save” button.
10. To cancel entries, click the “Back” button.
11. Add the group and individual roles the user needs to use DTMS by going to the
Groups and Roles tabs. (For instructions, see Group Tab and Roles Tab.)
MANAGE USER ROLES
Managing user roles allows users to edit a user’s profile, add/edit individual roles, and
add/edit group roles.
1. Click the “Manage user roles” hyperlink. The Manage User Permissions section
appears and displays search criteria and a list of users assigned to the unit (see Figure
6).
4-3
DTMS USER MANUAL
CHAPTER 4
ADMINISTRATION
Figure 6 – Manage User Permissions Section
2. To search by user name, click “Username” text box and type user’s name.
3. To search by first name, click the “First Name” text box and type user’s first name.
4. To search by last name, click the “Last Name” text box and type user’s last name.
5. To complete the search, click the “Search” button. The list displays for the search
criteria entered.
NOTE: Searches can be done on individual and/or multiple search criteria.
6. To view the groups and individual role settings assigned to a user, click the “Details”
icon. The Manage User Permission page changes to show the settings for the
selected user (see Figure 7).
4-4
DTMS USER MANUAL
CHAPTER 4
ADMINISTRATION
Figure 7 – Manage User Permissions for a Selected User
NOTE: The Role determines the read/write privileges the user will be authorized. For a
description of individual user roles see Appendix A, for group roles see Appendix B.
7. To add the user to a group, click the “Group Settings” drop down and select the
desired group. Click the “Add to Group” button. The page refreshes to display the
selected group (see Figure 8).
Figure 8 – Group Settings
8. To add individual roles to a user, click the “Individual Role Settings” drop down
select the desired role. Click the “Assign Role” button. The page refreshes to
display the selected role (see Figure 9).
Figure 9 – Individual Role Settings
4-5
DTMS USER MANUAL
CHAPTER 4
ADMINISTRATION
9. To remove Group or Individual Role Settings from a user’s account, click the
“Remove” icon for the desired role.
10. When all selections or changes have been made, click the “Done” button.
BY NAME
1. To search for a user by name, click the desired alpha-character hyperlink (i.e. A-B, CD). The User Search Results page opens displaying selected list of users (see Figure
10).
Figure 10 – User Search Results Page
NOTE: If the user’s name is not in the selected list, the user can still be added by clicking
the “Add User” hyperlink. (See instructions for Add Users.)
2. To view/edit user details, click the “Details” icon at the end of the row of the desired
user. The User Details page appears (see Figure 11). Three tabs are available for
viewing/editing the user: Profile, Groups, and Roles.
4-6
DTMS USER MANUAL
CHAPTER 4
ADMINISTRATION
Figure 11 – User Details Page
Profile Tab
The Profile tab displays the user’s information as already entered in DTMS. The user’s
information can be edited from this tab.
1. To edit the user’s profile, click the “Edit” hyperlink. The User Details page changes
to allow updates to the different fields (see Figure 12).
Figure 12 – User Details Page for Editing
4-7
DTMS USER MANUAL
CHAPTER 4
ADMINISTRATION
2. Make any needed changes and click the “Update” hyperlink to save changes. (See
instructions for Add Users.)
NOTE: If inactivating a user, remove all groups and roles first. Then return to the Profile
tab and click the “Is Active” check box to remove the check mark.
3. To cancel entries, click the “Cancel” hyperlink.
Groups Tab
The Groups tab displays the groups a user is assigned and is managed from this tab.
Groups are comprised of individual roles so the user can be easily given a set of roles.
NOTE: The Groups determine the read/write privileges the user is authorized in DTMS.
For a description of user groups, see Appendices B and B-1.
1. To add/edit a user’s group roles, select the “Groups” tab. The Groups Details page
appears (see Figure 13).
Figure 13 – Group Details Page
2. Click the desired group from the “Group Settings” scroll box. Multiple selections
can be made by using the <Ctrl> key.
3. Click the “Add to Group” button. The Groups Details page refreshes and the group
is listed. Once the group has been added it will no longer appear in the scroll box
unless it is removed.
4. To remove the user from a group, click the “Remove” icon. The page refreshes and
the group is removed. To remove all groups, click the “Delete All Groups” button.
4-8
DTMS USER MANUAL
CHAPTER 4
ADMINISTRATION
NOTE: Many groups share the same individual roles so it is best to assign users to one
group at a time or possible conflicts with the user’s account can be created. (See Appendices
B and B-1 to assist in deciding the best group for the user to assigned to.)
Roles Tab
The Roles tab displays the individual roles a user is assigned and is managed from this
tab.
NOTE: The Individual Roles determine the read/write privileges the user is authorized. For
a description of individual roles, see Appendix A.
1. To add individual roles to a user select the “Roles” tab. The Individual Role Details
page appears (see Figure 14).
Figure 14 – Individual Role Details Page
2. Click the desired roles from the “Individual Roles” scroll box. Multiple selections
can be made by using the <Ctrl> key.
3. Click the “Assign Role” button. The Individual Details page refreshes and the
individual role(s) is listed. Once the role has been added it will no longer appear in
the scroll box unless it is removed.
4-9
DTMS USER MANUAL
CHAPTER 4
ADMINISTRATION
4. To remove an individual role, click the “Remove” icon. The page refreshes and the
role is removed.
5. To delete all individual roles, click the “Delete All Roles” button. The roles are
removed from the user’s account.
Search for Users
1. To search for a user, click the “Search for Users” hyperlink. The User Search page
opens (see Figure 15).
Figure 15 – User Search Page
11. To search by first name, click the “First Name” text box and type user’s first name.
12. To search by last name, click the “Last Name” text box and type user’s last name.
13. To search by user name, click “User Name” text box and type user’s name.
14. To search by user name, click “Email Address” text box and type user’s email.
15. To search by unit, click “Unit” drop down and select unit.
16. To complete the search, click the “Search” button. The Search Result list displays
for the search criteria entered (see Figure 16).
NOTE: Searches can be done on individual and/or multiple search criteria.
4-10
DTMS USER MANUAL
CHAPTER 4
ADMINISTRATION
Figure 16 – User Search Page with Search Results List
BY GROUP
1. To search for a user by group, click the desired group hyperlink. The User Search
Results page opens displaying a list of groups (see Figure 17).
Figure 17 – By Group Menu
2. To view the list of users by a group, click the desired group hyperlink. The Group
table displays with the users assigned to the group (see Figure 18).
4-11
DTMS USER MANUAL
CHAPTER 4
ADMINISTRATION
Figure 18 – Group Table
3. To view/edit user details, click the “Details” icon at the end of the row of the desired
user. The User Details page appears (see Figure 11). (See instructions for
viewing/editing users By Name).
4-12
DTMS USER MANUAL
CHAPTER 4
ADMINISTRATION
Subordinate Units
1. Log-on to DTMS. The DTMS Home page opens.
2. Click “Administration” on the DTMS menu. The Administration menu appears (see
Figure 19).
Figure 19 – Administration Menu
3. Click the “Subordinate Units” hyperlink. The Subordinate Units page opens (see
Figure 20).
Figure 20 – Subordinate Unit Page
ADD SUBORDINATE UNITS
1. To add a subordinate unit, click “Add a subordinate unit record” icon. The Add a
Subordinate Unit page opens (see Figure 21).
4-13
DTMS USER MANUAL
CHAPTER 4
ADMINISTRATION
Figure 21 – Add a Subordinate Unit
2. Click in “Subordinate Unit Name” text box and type unit’s name.
3. Click the “Subordinate Unit Level” drop down and select closest unit level.
4. Click in “Address1” text box and type unit’s address.
5. Click in the “City” text box and type unit’s city.
6. Click the “State” drop down and select unit’s state.
7. Type the country the unit is located in the “Country” text box.
8. Type unit’s zip code in the “Zipcode” text box.
9. Click in “Phone Number” text box and type unit’s phone number.
10. Click in the “Email” text box and type the email address for the unit.
11. Once all entries are completed, click the “Save” button.
12. To cancel entries, click the “Cancel” button.
NOTE: Currently, to add a subordinate unit all fields are mandatory fields.
4-14
DTMS USER MANUAL
CHAPTER 4
ADMINISTRATION
EDIT/DELETE SUBORDINATE UNITS
1. To edit a subordinate unit, click “Edit this record” icon. The Edit Subordinate Unit
page opens (see Figure 22).
Figure 22 – Edit Subordinate Unit
2. Make desired changes/updates (see Add Subordinate Units) and click “Save”.
3. To cancel, click the “Cancel” button and return to the Subordinate Units page.
4. To remove a subordinate unit, click the “Remove” icon. If the unit has a personnel
roster a message displays indicating it cannot be removed (see Figure 23). (See
instructions on View Personnel Roster.)
Figure 23 – Subordinate Unit Removal Message
VIEW PERSONNEL ROSTER
1. To view a subordinate unit’s personnel roster, click the “View Personnel Roster”
icon. The Personnel Roster page opens (see Figure 24).
4-15
DTMS USER MANUAL
CHAPTER 4
ADMINISTRATION
Figure 24 – Personnel Roster Page
2. To select personnel for assignment to the subordinate unit, select the desired name in
the “Available Soldiers” list and click the “Assign >” button. The individual’s name
will move to the “Assigned Soldiers” list (see Figure 25).
4-16
DTMS USER MANUAL
CHAPTER 4
ADMINISTRATION
Figure 25 – Personnel Roster (Soldiers Assigned)
3. To select all personnel in the “Available Soldiers” list, click the “Assign All >>”
button. All personnel will move to the “Assigned Soldiers” list.
4. To remove assigned personnel from a subordinate unit, select the desired name in the
“Assigned Soldiers” list and click the “< Unassign” button. The individual’s name
will move to the “Available Soldiers” list.
4-17
DTMS USER MANUAL
CHAPTER 4
ADMINISTRATION
5. To remove all personnel from the “Assigned Soldiers” list, click the “<< Unassign
All” button. All personnel will move to the “Available Soldiers” list.
NOTE: To make multiple selections of individual soldiers, hold the <Ctrl> key as
selections are made.
4-18
DTMS USER MANUAL
CHAPTER 4
ADMINISTRATION
Locations
The Locations manager provides capability for the unit to add, edit, or delete locations.
These locations can be used when scheduling events for the unit’s training schedule.
1. Log-on to DTMS. The DTMS Home page opens.
2. Click “Administration” on the DTMS menu. The Administration menu appears (see
Figure 26).
Figure 26 – Administration Menu
3. Click the “Locations” hyperlink. The Manage Locations page opens (see Figure 27).
The Locations table displays the Location name, Location Type, whether the location
is currently Enabled (is is currently used for training), and the Unit that added the
location. Locations are available for use by the creating unit and its subordinate units.
Figure 27 – Manage Locations Page
4-19
DTMS USER MANUAL
CHAPTER 4
ADMINISTRATION
4. To filter the list of locations, click the “Filter By Unit” drop down and make unit
selection. Click the “Apply Filter” button and the list displays by filter selection.
ADD LOCATIONS
1. To add a location, click the “Add a Location record” icon. The Add a Location
page opens (see Figure 28).
Figure 28 – Add a Location Page
NOTE: “Location” and “Location Types” are mandatory fields.
2. Click inside the “Location” text box and type name of the location.
3. Click the “Location Type” list arrow and select the area type.
4. Click the “Enabled” drop down and indicate if this is a currently used location (True)
or not currently used (False).
5. Click the “Save” button and the new location is added to the Location table. The new
location is automatically enabled.
EDIT/DELETE LOCATIONS
1. To edit location information, click the “Edit this Record” icon. The Edit Location
page opens (see Figure 29). (See instructions for Add Locations.)
4-20
DTMS USER MANUAL
CHAPTER 4
ADMINISTRATION
Figure 29 – Edit Location Page
2. To remove a location, click the “Remove this record” icon. If a location has been
used for a scheduled training event a warning statement appears at the top of the
Manage Locations page (see Figure 30). The location cannot be deleted as long as it
is associated with a training event.
Figure 30 – Location Warning Statement
4-21
DTMS USER MANUAL
CHAPTER 4
ADMINISTRATION
Signature Blocks
Signature Blocks provides the capability for the unit to add, edit, and delete signatures for
training schedules.
1. Log-on to DTMS. The DTMS Home page opens.
2. Click “Administration” on the DTMS menu. The Administration menu appears (see
Figure 31).
Figure 31 – Administration Menu
3. Click the “Signature Blocks” hyperlink. The Signature Blocks page opens (see
Figure 32). The Signature Blocks table opens with list of individuals identified as
approval authorities.
Figure 32 – Signature Blocks Page
ADD NEW SIGNATURES
1. To add a signature, click the “Add a signature” icon located below title bar. Add a
Signatures page opens (see Figure 33).
4-22
DTMS USER MANUAL
CHAPTER 4
ADMINISTRATION
Figure 33 – Add a Signature Page
NOTE: “Name” and “Rank” are mandatory fields.
2. Click in the “Name” text box and type the name as it should appear in the signature
block for the training schedule.
3. Click in the “Title” text box and type the title of the approving authority.
4. Click the “Rank” drop down and select the rank.
5. Click the “Branch” drop down and select the branch of service.
6. Click the “Is Primary” check box if the signature is primary for training schedules.
7. Click the “Save” button and the new signature block is added to the signature table.
EDIT/DELETE SIGNATURES
1. To edit a signature block, click the “Edit this signature” icon. The Edit a Signature
page opens (see Figure 34). (See instructions for Add New Signatures ).
4-23
DTMS USER MANUAL
CHAPTER 4
ADMINISTRATION
Figure 34 – Edit a Signature Page
2. To save the changes, click the “Save” button and the change appears.
3. To remove a signature block, click the “Remove this signature” icon and the
signature block is removed.
4-24
DTMS USER MANUAL
CHAPTER 4
ADMINISTRATION
Holidays
Holiday management provides the capability for units to add holidays other than those added
by the unit’s higher headquarters. Units can add Training Holidays and other special days to
be shown on unit calendars to aid in scheduling events.
1. Log-on to DTMS. The DTMS Home page opens.
2. Click “Administration” on the DTMS menu. The Administration menu appears (see
Figure 35).
Figure 35 – Administration Menu
3. Click “Holidays” hyperlink. The Holidays page opens (see Figure 36). A table
displays showing the list of holidays for the unit. Holidays authorized by higher are
also shown.
Figure 36 – Manage Holidays Page
NOTE: Holidays authorized by higher headquarters cannot be edited or deleted.
ADD NEW HOLIDAYS
1. To add a holiday, click the “Add a Holiday record” icon. The Add a Holiday page
opens (see Figure 37).
4-25
DTMS USER MANUAL
CHAPTER 4
ADMINISTRATION
Figure 37 – Add a Holiday Page
NOTE: “Holiday” and “Date” are mandatory fields.
2. Click inside of the “Holiday” text box and type the name of the holiday.
3. Click the ellipsis button at the end of the “Start Date” text box. A monthly calendar
appears. Select the date of the holiday.
4. To include on all subordinate units’ calendars, click the “Include Subordinates”
check box.
5. To include a summary about the holiday, click in the “Summary” text box and type
summary.
6. Click the “Save” button and the new holiday is added to the holiday table.
7. To cancel the action, click the “Cancel” hyperlink.
EDIT/DELETE HOLIDAYS
1. To edit holiday information, click the “Edit this Record” icon and the Edit Holiday
page opens (see Figure 38). See instructions for Add New Holidays.
4-26
DTMS USER MANUAL
CHAPTER 4
ADMINISTRATION
Figure 38 – Edit Holiday Page
2. Click the “Save” button and the new holiday is added to the holiday table.
3. To cancel the action, click the “Cancel” hyperlink.
4. To remove a holiday, click the “Remove this record” icon and the holiday is deleted.
4-27
DTMS USER MANUAL
CHAPTER 4
ADMINISTRATION
Weapons
Weapons section provides the capability for units to manage weapons and the weapon
details. Once weapons and their details have been added, soldier weapon qualifications and
weapon assignments can be entered into DTMS.
1. Log-on to DTMS. The DTMS Home page opens.
2. Click “Administration” on the DTMS menu. The Administration menu appears (see
Figure 39).
Figure 39 – Administration Menu
3. Click “Weapons”. The Manage Unit Weapons page opens (see Figure 40).
Figure 40 – Manage Unit Weapons Page
ADD NEW WEAPONS
1. To add a weapon, click the “Add” hyperlink. The Add Weapon page opens (see
Figure 41).
4-28
DTMS USER MANUAL
CHAPTER 4
ADMINISTRATION
Figure 41 – Add Weapon Page
2. Click the “Weapon” drop down and select the weapon.
3. Click inside the “Number Authorized” text box and type the number of weapons the
unit is authorized.
4. To save the weapon, click the “Insert” hyperlink.
5. To cancel the entries, click the “Cancel” hyperlink.
EDIT/DELETE WEAPONS
1. To edit weapon information, click the “Edit” hyperlink on the Manage Unit Weapons
page. The Unit Weapon Detail page opens (see Figure 42).
Figure 42 – Edit Weapon
2. To change number of authorized weapons in the unit, click in the “Number
Authorized” text box and type new number.
3. Click the “Update” hyperlink to save changes.
4. To cancel entries, click the “Cancel” hyperlink.
5. To remove a weapon, click the “Delete” hyperlink and the weapon is removed. If the
weapon has any details added, an error message displays (see Figure 43). The
weapon’s details must be removed before the weapon can be deleted (see Edit/Delete
Weapon Details for instructions).
Figure 43 – Delete Weapon Error Message
4-29
DTMS USER MANUAL
CHAPTER 4
ADMINISTRATION
WEAPON DETAIL
Entering the details for authorized weapons allows the weapons to then be assigned to
soldiers. (See Chapter 7 – Soldier Manager for instructions.)
1. To manage weapon details, click the “Weapon Detail” hyperlink and the Unit
Weapon Detail page opens (see Figure 44).
Figure 44 – Unit Weapon Detail Page
Add Weapon Details
2. To add weapon details, click the “Add” hyperlink and the Add Weapon Detail page
opens (see Figure 45).
Figure 45 – Add Weapon Detail Page
3. Click in the “Serial #” text box and type serial number of a weapon.
4. To select the status of the weapon, click the “Status” drop down.
6. Click the “Insert” hyperlink to save details. Continue adding details for each
authorized weapon.
7. To cancel entries, click the “Cancel” hyperlink.
Edit/Delete Weapon Details
8. To edit the weapon details, click the “Edit” hyperlink. The row changes to include
“Update” and “Cancel” hyperlinks (see Figure 46).
Figure 46 – Weapon Detail Page for Editing
9. Once changes are complete, click the “Update” hyperlink.
4-30
DTMS USER MANUAL
CHAPTER 4
ADMINISTRATION
10. To cancel entries, click the “Cancel” hyperlink.
11. To remove the details for a weapon, click the “Delete” hyperlink. If the weapon has
been assigned to a soldier and error message displays and a list of the soldiers who
have been assigned this weapon (see Figure 47). The assignment(s) must be removed
(see Chapter 7 – Soldier Manager for instructions).
Figure 47 – Delete Weapon Detail Error Message
4-31
DTMS USER MANUAL
CHAPTER 4
ADMINISTRATION
Resources
1. Log-on to DTMS. The DTMS Home page opens.
2. Click “Administration” on the DTMS menu. The Administration menu appears (see
Figure 48).
Figure 48 – Administration Menu
3. Click “Resources”. The Resource Management page opens (see Figure 49).
Figure 49 – Resource Management Page
ADD NEW RESOURCES
1. To add a resource, click the “Add” icon. The Add a Resource page opens (see Figure
50).
Figure 50 – Add a Resource Page
6. Click the “Name” text box and type resource name.
4-32
DTMS USER MANUAL
CHAPTER 4
ADMINISTRATION
7. Click in the “Item Number” text box and type the number item. This could be a
serial number or any other numbering convention for the resource.
8. To add a description, click in the “Description” text box and type description.
9. Click in the “Cost Per Item” text box to add cost of resource.
10. To save the weapon, click the “Insert” hyperlink.
11. To cancel the entries, click the “Cancel” hyperlink.
EDIT/DELETE RESOURCES
1. To edit resource information, click the “Edit” icon on the Resource Management
page. The Edit a Resource page opens (see Figure 51). (See instructions for Add
New Resources.)
Figure 51 – Edit a Resource Page
2. To remove a resource, click the “Remove” icon and the resource is removed.
4-33
DTMS USER MANUAL
CHAPTER 4
ADMINISTRATION
Tasks
1. Log-on to DTMS. The DTMS Home page opens.
2. Click “Administration” on the DTMS menu. The Administration menu appears (see
Figure 52).
Figure 52 – Administration Menu
3. Click “Tasks”. The Mandatory Tasks page opens (see Figure 53). The page displays
a table that includes the Task Number, Task Title, MaxDays, who the task is Required
By, Task Type, and capability to view the task details.
Figure 53 – Mandatory Tasks Page
VIEW MANDATORY TRAINING TASKS
1. To view the training task details, click the “View Task” icon. The View Task page
opens displaying the selected task’s General Information, Task Data, Task Attributes,
and other task information (see Figure 54).
4-34
DTMS USER MANUAL
CHAPTER 4
ADMINISTRATION
Figure 54 – View Task Page
2. To print the task details, click the “Print Page” button. The Print dialog box appears
(see Figure 55). Click the “Print” button to print details to selected printer.
4-35
DTMS USER MANUAL
CHAPTER 4
ADMINISTRATION
Figure 55 – Print Dialog Box
3. To complete an assessment on the task, click the “Assess Task” hyperlink. The
Assess Task page opens (for information on assessing tasks, see Chapter 8 – Unit
Manager – Assess Task).
ADD MANDATORY TRAINING TASK
1. To add mandatory training tasks, click the “Add Mandatory Task” hyperlink. The
Add Mandatory Task page opens (see Figure 56).
4-36
DTMS USER MANUAL
CHAPTER 4
ADMINISTRATION
Figure 56 – Add Mandatory Task Page
General Information
2. Click inside the “Task Number” text box and type the number for the task.
3. Click in the “Task Title” text box and type a title for the task.
4. To include the maximum number of days between training, click in the “Max Days”
text box and type number.
4-37
DTMS USER MANUAL
CHAPTER 4
ADMINISTRATION
5. Click the “Proponent” drop down and select the proponent for the task.
Task Data
6. To add conditions for the task, click in the “Conditions” text box and type the
conditions. This is a mandatory field.
7. Click in the “Standards” text box and type the standards for the task. This is a
mandatory field.
8. Click in the “Degraded Standards” text box and type the degraded standards for the
task.
9. Click in the “Description” text box and type the description for the task.
10. Click in the “Notes” text box and type any special notes about the task.
11. To include the task purpose, click in the “Purpose” text box.
12. To include the task outcome, click in the “Outcome” text box.
13. To include the task guidance, click in the “Guidance” text box.
14. Click in the “Task Evaluation” text box and type any task evaluation.
15. Click in the “Task feedback” text box and type any feedback for the task.
16. Click in the “Safety Notes” text box and type any safety notes for the task.
17. To include the task’s environment, click in the “Environment” text box.
Task Attributes
18. To indicate MOPP, click the “Train in MOPP?” drop down and select A (Always),
S (Sometimes), or N (Never).
19. If the task is a critical task, click the “Critical Task” check box.
20. If the task is a night task, click the “Night Task” check box.
21. If the task is a staff task, click the “Staff Task” check box.
22. If the task is a common task, click the “Common Task” check box.
4-38
DTMS USER MANUAL
CHAPTER 4
ADMINISTRATION
23. Once all entries are made, click the “Save” button. The task is added and the View
Task page opens (see Figure 54). The task is available in the Tasks list and through
searching.
EDIT/DELETE MANDATORY TRAINING TASKS
1. To edit a mandatory training task, click the “Manage Task” icon. The Edit Task
page opens (see Figure 56). (See instructions for Adding Mandatory Training Tasks.)
2. To delete a mandatory training task, click the “Remove” icon.
NOTE: The user can only edit and delete tasks created by the user’s unit.
NOTE: Any problems with this chapter, contact your System Administrator or the DTMS
Help Desk (E-mail: [email protected], Commercial: 913-684-2700, or DSN: 5522700).
4-39
DTMS USER MANUAL
CHAPTER 4
ADMINISTRATION
Table of Figures
Figure
Page
Figure 1 – Administration Menu............................................................................................... 1
Figure 2 – Users Submenu ........................................................................................................ 1
Figure 3 – User Management Page ........................................................................................... 2
Figure 4 – Add a New User Page.............................................................................................. 2
Figure 5 – Add a New User with Warning ............................................................................... 2
Figure 6 – Manage User Permissions Section .......................................................................... 4
Figure 7 – Manage User Permissions for a Selected User ........................................................ 5
Figure 8 – Group Settings ......................................................................................................... 5
Figure 9 – Individual Role Settings .......................................................................................... 5
Figure 10 – User Search Results Page ...................................................................................... 6
Figure 11 – User Details Page .................................................................................................. 7
Figure 12 – User Details Page for Editing ................................................................................ 7
Figure 13 – Group Details Page ................................................................................................ 8
Figure 14 – Individual Role Details Page ................................................................................. 9
Figure 15 – User Search Page ................................................................................................. 10
Figure 16 – User Search Page with Search Results List ......................................................... 11
Figure 17 – By Group Menu ................................................................................................... 11
Figure 18 – Group Table ......................................................................................................... 12
Figure 19 – Administration Menu........................................................................................... 13
Figure 20 – Subordinate Unit Page ......................................................................................... 13
Figure 21 – Add a Subordinate Unit ....................................................................................... 14
Figure 22 – Edit Subordinate Unit .......................................................................................... 15
Figure 23 – Subordinate Unit Removal Message ................................................................... 15
Figure 24 – Personnel Roster Page ......................................................................................... 16
Figure 25 – Personnel Roster (Soldiers Assigned) ................................................................. 17
Figure 26 – Administration Menu........................................................................................... 19
Figure 27 – Manage Locations Page ....................................................................................... 19
Figure 28 – Add a Location Page ........................................................................................... 20
Figure 29 – Edit Location Page .............................................................................................. 21
Figure 30 – Location Warning Statement ............................................................................... 21
Figure 31 – Administration Menu........................................................................................... 22
Figure 32 – Signature Blocks Page ......................................................................................... 22
Figure 33 – Add a Signature Page .......................................................................................... 23
Figure 34 – Edit a Signature Page........................................................................................... 24
Figure 35 – Administration Menu........................................................................................... 25
Figure 36 – Manage Holidays Page ........................................................................................ 25
Figure 37 – Add a Holiday Page ............................................................................................. 26
Figure 38 – Edit Holiday Page ................................................................................................ 27
Figure 39 – Administration Menu........................................................................................... 28
Figure 40 – Manage Unit Weapons Page ............................................................................... 28
Figure 41 – Add Weapon Page ............................................................................................... 29
Figure 42 – Edit Weapon ........................................................................................................ 29
4-40
DTMS USER MANUAL
CHAPTER 4
ADMINISTRATION
Figure 43 – Delete Weapon Error Message ............................................................................ 29
Figure 44 – Unit Weapon Detail Page .................................................................................... 30
Figure 45 – Add Weapon Detail Page .................................................................................... 30
Figure 46 – Weapon Detail Page for Editing .......................................................................... 30
Figure 47 – Delete Weapon Detail Error Message ................................................................. 31
Figure 48 – Administration Menu........................................................................................... 32
Figure 49 – Resource Management Page................................................................................ 32
Figure 50 – Add a Resource Page ........................................................................................... 32
Figure 51 – Edit a Resource Page ........................................................................................... 33
Figure 52 – Administration Menu........................................................................................... 34
Figure 53 – Mandatory Tasks Page ........................................................................................ 34
Figure 54 – View Task Page ................................................................................................... 35
Figure 55 – Print Dialog Box .................................................................................................. 36
Figure 56 – Add Mandatory Task Page .................................................................................. 37
4-41