1
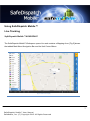
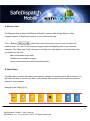
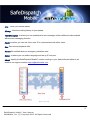
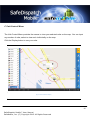
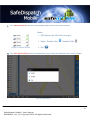
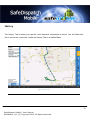
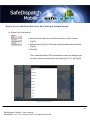
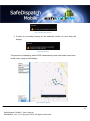
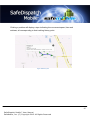
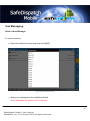
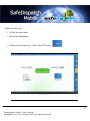
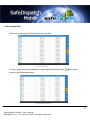
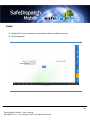
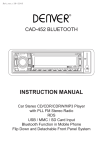
User Manual 1 SafeDispatch Mobile™ User Manual SafeMobile, Inc. (C) Copyright 2012 All Rights Reserved Welcome to SafeDispatch Mobile™ SafeDispatch Mobile™ Software provides remote access to your MOTOTRBO® (DMR) and/or TETRA™ radio fleets via IP networks and is designed primarily to function as an Android-based mobile dispatch center, with a number of voice and data capabilities including: SafeMobile® provides an easy to understand user interface, modular suites with integrated tools to track employees and vehicles, real-time location information, routing, scenario analysis, tracking information and enhanced reporting. This guide assumes that you have already successfully installed and set=up your SafeDispatch Mobile™ software and that you are familiar with Android Operating Systems. It does not explain things such as how to use dialogue boxes, wizards, or the Android Market. This guide shows you how to get started with SafeDispatch Mobile™. It explains: • Important concepts related to the integrated tool sets within SafeDispatch™ software. • The overall processes you must perform to set up your selected suites. • Basic information about the most important tasks you must perform to set-up and run. Full details about advanced tasks and specific dialogue boxes are available in the online help forum or one-on-one through your Technical Consulting Service Package. SafeDispatch Mobile™ is your first Androidbased mobile command and control center. Copyright © 2012 SafeMobile® All rights reserved. No part of this publication may be copied, distributed, stored in a retrieval system, translated into any human or computer language, or transmitted, in any form or by any means, without the prior written consent of SafeMobile®. SafeMobile® and SafeDispatch Mobile™ are registered trademarks of SafeMobile®. Any other brand names and trademarks appearing in this guide are the property of their respective holders. Comments? Please email all comments on this document to: [email protected]. 2 SafeDispatch Mobile™ User Manual SafeMobile, Inc. (C) Copyright 2012 All Rights Reserved Table of Contents 3 SafeDispatch Mobile™ User Manual SafeMobile, Inc. (C) Copyright 2012 All Rights Reserved Installation Below are quick steps to install the SafeDispatch Mobile™ App: 1. Copy the APK file to your Android based tablet’s memory card and insert the card into your phone. 2. Click and install your APK files. Figure 1 IP& Port Settings Prior to launching the SafeDispatch Mobile, you will need to install the Application Server on a 4 remote PC; this program will come as an add-on to your SafeDispatch Application already SafeDispatch Mobile™ User Manual installed onInc. your(C) PC.Copyright 2012 All Rights Reserved SafeMobile, Prior to launching the SafeDispatch Mobile™ App, you will need to install the Application Server on a remote PC; this program will come as an add-on to your SafeDispatch™ Application already installed on your PC. 1. You need to insert the IP and the port where the Application Server Mobile is installed. 2. Click OK. If you have inserted a wrong IP or you have no wireless connection, you will be prompted with the following error: Figure 2 TCP connection down 5 SafeDispatch Mobile™ User Manual SafeMobile, Inc. (C) Copyright 2012 All Rights Reserved Starting SafeDispatch Mobile™ In the Log-in window, enter a Username and Password. Both are created when you have installed the Administrative Module. Figure 3 Starting Screen SafeDispatch Mobile Select the language setting you prefer. The default language is English. Figure 4Select language 6 SafeDispatch Mobile™ User Manual SafeMobile, Inc. (C) Copyright 2012 All Rights Reserved Using SafeDispatch Mobile™ Live Tracking SafeDispatch Mobile™ WORKSPACE The SafeDispatch Mobile™ Workspace opens Live and contains a Mapping Area. [Fig.5],shows the tabbed Main Menu Navigation Bar and the Unit Control Menu. Figure 5Live Unit Display 7 SafeDispatch Mobile™ User Manual SafeMobile, Inc. (C) Copyright 2012 All Rights Reserved A. MAPPING AREA The Mapping Area is where SafeDispatch Mobile™ interacts with Google Maps or other mapping options, to display the location of your units on the map. The +/- Buttons within this screen allow you to zoom in and out within the selected map. You can Pan the map by dragging within the Mapping Area to your desired viewpoint. The “Map View Tools” allow you to change your view based on the information that you need from the map. Map: shows street map detail Satellite: shows satellite imagery Hybrid: shows street map with terrain information B. Main Menu The Main Menu contains tabs where your specific settings and configurations will be stored. You will utilize the tabs to access your data, communicate with your fleet, and to report information related to your business. Navigation Bar Tabs:[Fig. 6] Figure 6 Navigation Bar Tabs 8 SafeDispatch Mobile™ User Manual SafeMobile, Inc. (C) Copyright 2012 All Rights Reserved Live - Track your mobile assets. History - View the tracking history of your assets. Text Messaging - is where you can send/receive text messages to/from different units enabled with the text messaging function. Radio –is where you can use Voice over IP to communicate with other users. Rec –Record and playback calls. Alarms –Be notified when an emergency situation arise. Setup - is where you can select language and set up IP and port. About - specify the SafeDispatch Mobile™ version running on your Android based tablet in an email to our support contact [email protected]. Figure 7 Live Tab 9 SafeDispatch Mobile™ User Manual SafeMobile, Inc. (C) Copyright 2012 All Rights Reserved C. Unit Control Menu The Unit Control Menu provides the means to view your selected units on the map. You can input any number of units; select to view each individually on the map. Click the Display button to see your units. Figure 8 Live Vehicle Display 10 SafeDispatch Mobile™ User Manual SafeMobile, Inc. (C) Copyright 2012 All Rights Reserved I. The Status Indicators are the colored signs next to each unit in the Unit list. Status: GPS Status- On/ Off (In/Out of range) Radio - Enabled (On) Figure 9 Status Vehicle / Disabled (Off) Poll II. The Unit Options Menu can be accessed by long clicking the desired unit to select status Figure 10 Vehicle Options 11 SafeDispatch Mobile™ User Manual SafeMobile, Inc. (C) Copyright 2012 All Rights Reserved History The History Tab is where your specific unit's historical information is stored. You will utilize this tab to access the route data. Locate the History Tab on the Main Menu. Figure 11 History Tab 12 SafeDispatch Mobile™ User Manual SafeMobile, Inc. (C) Copyright 2012 All Rights Reserved How to Access the Route Data for a Unit, During a Defined Period A. Select Unit (s) & Interval Select the Unit name for the historical data you wish to view Fig[12] Select interval Fig[13] : End date must be greater than start date Fig[14] Click OK. The routes with all the GPS transmission points are displayed on the map. Arrows indicating the unit heading (N, S, E, W) Fig[15] Figure 12 Select Username 13 SafeDispatch Mobile™ User Manual SafeMobile, Inc. (C) Copyright 2012 All Rights Reserved Figure 13 Select interval Error If there is no tracking history for the selected vehicle, an error data will display: Figure 14 Data Error The process of displaying all the GPS transmission points could take some time; in this case, a pop-up will display: Figure 15HIstory Display 14 SafeDispatch Mobile™ User Manual SafeMobile, Inc. (C) Copyright 2012 All Rights Reserved Clicking a position will display a tape indicating the movement speed, time and address, all corresponding to that tracking history point. Figure 16HIstory info 15 SafeDispatch Mobile™ User Manual SafeMobile, Inc. (C) Copyright 2012 All Rights Reserved Text Messaging Write a New Message To send a new text, Select the vehicle from the drop down list Fig[20] Figure 17 Select Vehicle Text Tab Write your message into the available edit field. Note: Messages are limited to 140 characters. 16 SafeDispatch Mobile™ User Manual SafeMobile, Inc. (C) Copyright 2012 All Rights Reserved Figure 18 Writing message Click Send button. Figure 19 Text message sent 17 SafeDispatch Mobile™ User Manual SafeMobile, Inc. (C) Copyright 2012 All Rights Reserved After you have sent a text message, you’ll receive a sending confirmation. You will also be notified if the other user has not yet received your message. Figure 20 Message not ACK If the unit has received your message, the conversation window will appear as below: Figure 21 Message with ACK 18 SafeDispatch Mobile™ User Manual SafeMobile, Inc. (C) Copyright 2012 All Rights Reserved Radio - VoIP The Radio Tab allows you to communicate with other unit(s) in the field. This feature lists all units that are configured to send and receive Voice Communication. Figure 22Select Radio Gateway Figure 23Select Zone 19 SafeDispatch Mobile™ User Manual SafeMobile, Inc. (C) Copyright 2012 All Rights Reserved Figure 24 Set Channel A. Initiate a call In this example, we are on Channel 3, with contact name Demo1. - Select the user name from the drop down list. Figure 25 Select User Radio 20 SafeDispatch Mobile™ User Manual SafeMobile, Inc. (C) Copyright 2012 All Rights Reserved - Select the Call Type: All Call: the entire fleet Group Call: fleet groups Private Call: individual unit Then, Click PTT button. Figure 26 Private Call 21 SafeDispatch Mobile™ User Manual SafeMobile, Inc. (C) Copyright 2012 All Rights Reserved Figure 27Radio Tab Status ON Figure 28 Radio Tab Status OFF 22 SafeDispatch Mobile™ User Manual SafeMobile, Inc. (C) Copyright 2012 All Rights Reserved Figure 29 Private call ended B. Receiving a Call When you have an incoming call, select the PTT button to talk. To clear the channel, or disconnect, click the DeKey button . 23 SafeDispatch Mobile™ User Manual SafeMobile, Inc. (C) Copyright 2012 All Rights Reserved Figure 30 Receive a call 24 SafeDispatch Mobile™ User Manual SafeMobile, Inc. (C) Copyright 2012 All Rights Reserved C. Recording Calls Calls received through the Radio Suite are recorded. Figure 31 Recordings You can review recorded messages by selecting the blue Play button next to each record in the Recordings Menu. Figure 32 Play Recording 25 SafeDispatch Mobile™ User Manual SafeMobile, Inc. (C) Copyright 2012 All Rights Reserved Alarms The Alarms Tab provides a list of alarms sent for units listed in the Unit Control menu. Alarms signal after: Geo-fencing / Landmarks Policy (when a subscriber leaves a region or a particular location, the system sends a message and generates an alarm signal for the dispatcher), Speed Policy (when and where a defined speed limit has been exceeded), Emergency Situations that have arisen/ Lone Worker Policy (the dispatcher can set a time interval in which a communication with the radio station user is expected in MOTOTRBO® Customer Programming Software - CPS ). *In the Administrative Module, Telemetry Tab, you can set up the way SafeDispatch Mobile™ notifies you of new alarms on the screen, in a separate window, with sound. Figure 33 Alarms 26 SafeDispatch Mobile™ User Manual SafeMobile, Inc. (C) Copyright 2012 All Rights Reserved A. Delete an Alarm You can delete an alarm by clicking the unit. Figure 34 Acknowledge Alarm 27 SafeDispatch Mobile™ User Manual SafeMobile, Inc. (C) Copyright 2012 All Rights Reserved Setup A. Setup the IP and port where your Application Server mobile is running; B. Select language. Figure 35 Setup 28 SafeDispatch Mobile™ User Manual SafeMobile, Inc. (C) Copyright 2012 All Rights Reserved About Tab Figure 36 About If you are in need of assistance with your SafeDispatch Mobile™ Application, please contact [email protected] and provide the version information as shown on the about tab. 29 SafeDispatch Mobile™ User Manual SafeMobile, Inc. (C) Copyright 2012 All Rights Reserved The Power of SafeDispatch™ In The Palm of Your Hand 30 SafeDispatch Mobile™ User Manual SafeMobile, Inc. (C) Copyright 2012 All Rights Reserved