1
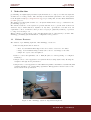
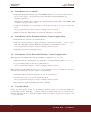
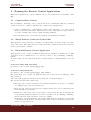
picoFlamingo Alpha 0.0. User Manual
Codename: “The Pink Egg”
Edition 0 Rev 1 DRAFT by DMO
August 20, 2009
[email protected]
http://www.papermint-designs.com/picoflamingo
http://www.papermint-designs.com/community/?q=blog/3
(c) Papermint Designs, 2009
This document is distributed under a Creative Commons License SA-BY.
This work is licenced under the Creative Commons Attribution-Share Alike 3.0 Unported License.
To view a copy of this licence, visit http://creativecommons.org/licenses/by-sa/3.0/ or
send a letter to Creative Commons, 171 Second Street, Suite 300, San Francisco, California
94105, USA.
picoFlamingo
PROJECT
Last Updated
August 20, 2009
.
3
The Pink EGG — UserManual
Last Updated
August 20, 2009
picoFlamingo
PROJECT
Contents
1 Introduction
1.1 Release Features . . . . . . . . . . . . . . . . . . . . . . . . . . . . . . . . . . . .
5
5
2 System Overview
2.1 Software Components . . . . . . . . . . . . . . . . . . . . . . . . . . . . . . . . .
2.2 Tested Hardware . . . . . . . . . . . . . . . . . . . . . . . . . . . . . . . . . . . .
2.3 Software Requirements . . . . . . . . . . . . . . . . . . . . . . . . . . . . . . . . .
6
6
6
7
3 Installation
3.1 Installation on Beagle Board . . . . . . . . . . . . . . . .
3.2 Installation in an x86 PC . . . . . . . . . . . . . . . . . .
3.3 Installation of the Symbian Remote Control application .
3.4 Installation of the Extended Remote Control Application
3.5 User Feedback . . . . . . . . . . . . . . . . . . . . . . . .
.
.
.
.
.
8
8
9
9
9
9
4 Running The Pink Egg
4.1 Command Line Interface Magic . . . . . . . . . . . . . . . . . . . . . . . . . . . .
4.2 Adding Text Styles . . . . . . . . . . . . . . . . . . . . . . . . . . . . . . . . . . .
10
10
10
5 Running the Remote Control Applications
5.1 Command Line Control . . . . . . . . . . . . . . . . . . . . . . . . . . . . . . . .
5.2 Simple Remote Control for Python S60 . . . . . . . . . . . . . . . . . . . . . . .
5.3 Extended Remote Control Application . . . . . . . . . . . . . . . . . . . . . . . .
12
12
12
12
6 Creating Presentations
6.1 Comments . . . . . . . . . . .
6.2 Slide Items . . . . . . . . . .
6.2.1 BACKGROUND . . .
6.2.2 ADD TEXT . . . . .
6.3 ADD IMAGE . . . . . . . . .
6.4 ADD CUBE . . . . . . . . . .
6.5 General Item Properties . . .
6.5.1 POSITION . . . . . .
6.5.2 ROTATION . . . . . .
6.5.3 COLOR . . . . . . . .
6.6 Other Commands . . . . . . .
6.6.1 INCLUDE . . . . . . .
6.6.2 SET FOCUS . . . . .
6.7 Controlling the Presentation .
14
14
14
14
14
15
15
16
16
16
17
17
17
17
18
7 Known Issues
The Pink EGG — User Manual
.
.
.
.
.
.
.
.
.
.
.
.
.
.
.
.
.
.
.
.
.
.
.
.
.
.
.
.
.
.
.
.
.
.
.
.
.
.
.
.
.
.
.
.
.
.
.
.
.
.
.
.
.
.
.
.
.
.
.
.
.
.
.
.
.
.
.
.
.
.
.
.
.
.
.
.
.
.
.
.
.
.
.
.
.
.
.
.
.
.
.
.
.
.
.
.
.
.
.
.
.
.
.
.
.
.
.
.
.
.
.
.
.
.
.
.
.
.
.
.
.
.
.
.
.
.
.
.
.
.
.
.
.
.
.
.
.
.
.
.
.
.
.
.
.
.
.
.
.
.
.
.
.
.
.
.
.
.
.
.
.
.
.
.
.
.
.
.
.
.
.
.
.
.
.
.
.
.
.
.
.
.
.
.
.
.
.
.
.
.
.
.
.
.
.
.
.
.
.
.
.
.
.
.
.
.
.
.
.
.
.
.
.
.
.
.
.
.
.
.
.
.
.
.
.
.
.
.
.
.
.
.
.
.
.
.
.
.
.
.
.
.
.
.
.
.
.
.
.
.
.
.
.
.
.
.
.
.
.
.
.
.
.
.
.
.
.
.
.
.
.
.
.
.
.
.
.
.
.
.
.
.
.
.
.
.
.
.
.
.
.
.
.
.
.
.
.
.
.
.
.
.
.
.
.
.
.
.
.
.
.
.
.
.
.
.
.
.
.
.
.
.
.
.
.
.
.
.
.
.
.
.
.
.
.
.
.
.
.
.
.
.
.
.
.
.
.
.
.
.
.
.
.
.
.
.
.
.
.
.
.
.
.
.
.
.
.
.
.
.
.
.
.
.
.
.
.
.
.
.
.
.
.
.
.
.
.
.
.
.
.
.
.
.
.
.
.
.
.
.
.
.
.
.
.
.
.
.
.
.
.
.
.
.
.
.
.
.
.
.
.
.
.
.
.
.
.
.
.
.
.
.
.
.
.
.
.
.
.
.
.
.
.
.
.
.
.
.
.
.
.
.
.
.
.
.
.
.
.
.
.
.
.
.
.
.
19
4
picoFlamingo
PROJECT
1
Last Updated
August 20, 2009
Introduction
picoFlamingo is a lightweight presentation system intended to be deployed on embedded systems
and therefore be really portable. The currently chosen hardware platform for the development
is the BeagleBoard (http://beagleboard.org), as processing unit, and the Texas Instruments
picoDLP projector.
The small power fingerprint and size of booth system makes them a very good tandem for the
picoFlamingo project.
The intended audience of the system are professional that need to present their works in an
attractive way to small audiences, anywhere at any time. Specially the ones that need 3D
capabilities to show, for instance, their product concepts (no physically available) or products
too huge for a meeting room.
This document covers the release of the early first alpha version of the system (code name “The
Pink Egg”), including system installation, configuration and operation.
1.1
Release Features
The features of picoFlaming alpha 0.0, “The Pink Egg”, release are:
• The following slide items are allowed:
– Text. Several different True-Type fonts can be used to add text to the slides.
– Image. Several different image formats can be used to add images to the slide
– Simple 3D objects, cubes and spheres.
• Remote control through Bluetooth or TCP/IP (wired or wifi depending on configured
hardware).
• Simple remote control application for Symbian Devices using Python S60, allowing the
navigation throughout the presentation
• Simple remote control application for FreeRunner OpenMoko and Linux boxes with X11/SDL
graphics and Bluetooth or Networking capabilities. This application allows rotation of the
selected item in the presentation.
Figure 1: The “Pink Egg” system at Papermint Designs Lab
5
The Pink EGG — UserManual
Last Updated
August 20, 2009
2
picoFlamingo
PROJECT
System Overview
This section describes the hardware and software environment required by the system as well as
the installation process for the “The Pink Egg” different components.
2.1
Software Components
The picoFlamingo “Pink Egg” is composed of the following software components:
• The NetKitty communications tool. This is an small program that allows Bluetooth
and TCP connectivity. The picoFlamingo application uses it and the redirection of the
standard input to get remote commands. The extended remote control application, uses it
and the redirection of standard output to send control messages to the presentation.
• The picoFlamingo application. This is the main application in charge of controlling
the presentation. The picoFlamingo application renders the slides and exposes remote
commands to control the navigation through the presentation.
This application needs the Netkitty communication tool for remote operation.
• The simplified remote control application for Python S60. This is a simple python
script that can be executed in Symbian S60 devices and uses the Bluetooth interface for
navigating a picoFlamingo “Pink Egg” presentation remotely. This application only supports moving to the next and previous slide.
This application needs the Netkitty communication tool for remote operation.
• The extended remote control application for OpenMoko FR and Linux Boxes.
This is an SDL application providing extended functionalities for remote controlling the
picoFlamingo “Pink Egg”. In addition to forward and backward slide navigation, this
application allows to rotate a given object (this is defined in the presentation itself) within
the presentation in real-time.
This application needs the Netkitty communication tool for remote operation.
2.2
Tested Hardware
The “Pink Egg” has been tested using the following hardware:
• BeagleBoard Revisions B6 and C3.
Runs the picoFlamingo “Pink Egg” application.
• x86 PC compatible computers.
Can run the picoFlamingo “Pink Egg” application and also the Extended Remote Control
application for testing.
• Nokia N70 Symbian device
Runs the simplified remote control application for Python S60.
• FreeRunner OpenMoko Run the Extended Remote Control application.
• picoDLP projector
Used for portable projection of the presentation from the BeagleBoard.
• USB Bluetooth dongle.
Used for remote wireless Bluetooth connectivity.
As an alpha release no extensive testing has been done, however the system should work with
other configurations without major problems.
The Pink EGG — User Manual
6
picoFlamingo
PROJECT
2.3
Last Updated
August 20, 2009
Software Requirements
The “Pink Egg” needs the following additional software components to run.
• OpenGL ES 2.0 support. The OpenGL ES 2.0 user libraries (and hardware drivers) for
the Beagle board are required. To run the application in a x86 PC an OpenGL ES 2.0
emulation layer, as for instance the Imagination Technologies SDK, is also required.
• The freetype library.
• The SDL library for PC and OpenMoko to run the extended remote control application on
these platforms.
• The Python S60 Interpreter to use the Remote Symbian remote control.
• The OM.2008 OpenMoko distribution. For using the extended remote contrl application
with the OpenMoko FR.
The “Pink Egg” has been tested with the following BeagleBoard software environment in order
to get the different components (USB, SGX, etc...) working all together:
• X-Loader 1.4.2
• U-Boot 2009.01-dirty
• Linux Kernel 2.6.28
For supporting on installation check the picoFlamingo forums in the Papermint Designs Community (http://community.papermint-designs.com).
The U-Boot configuration testes is shown below:
bootcmd=if mmcinit; then if run loadbootscript; then run bootscript; else if run loaduimage; then if run loadramdisk; then r
bootdelay=10
baudrate=115200
loadaddr=0x80200000
rdaddr=0x81600000
console=ttyS2,115200n8
mmcargs=setenv bootargs console=${console} ${optargs} root=/dev/mmcblk0p2 rw rootfstype=ext3 rootwait
ramargs=setenv bootargs console=${console} ${optargs} root=/dev/ram0 rw ramdisk_size=32768 initrd=${rdaddr},32M
ubifsargs=setenv bootargs console=${console} ${optargs} root=ubi0:beagleroot ubi.mtd=4 rw rootfstype=ubifs
jffs2args=setenv bootargs console=${console} ${optargs} root=/dev/mtdblock4 rw rootfstype=jffs2
loadbootscript=fatload mmc 0 ${loadaddr} boot.scr
bootscript=echo Running bootscript from mmc ...; autoscr ${loadaddr}
loaduimage=fatload mmc 0 ${loadaddr} uImage.bin
loadramdisk=fatload mmc 0 ${rdaddr} ramdisk.gz
ramboot=echo Booting from ramdisk.gz ...; run ramargs; bootm ${loadaddr}
mmcboot=echo Booting from mmc ...; run mmcargs; bootm ${loadaddr}
nandboot=echo Booting from nand ...; run jffs2args; nand read ${loadaddr} 280000 400000; bootm ${loadaddr}
usbtty=cdc_acm
serial=5ac400030000000004013f8901001001
optargs=video=omapfb:vram:4M omapfb.video_mode=640x480MR-16@60
stdin=serial
stdout=serial
stderr=serial
Environment size: 1333/131068 bytes
7
The Pink EGG — UserManual
Last Updated
August 20, 2009
3
picoFlamingo
PROJECT
Installation
The installation processes for the different system components are described below:
3.1
Installation on Beagle Board
There is several options to install the picoFlamingo “Pink Egg” system in the BeagleBoard,
depending on what else the system is intended to. This sections describes the installation of the
minimal system needed by the application to run in the BeagleBoard.
The process at this point is fully manual but, hopefully will be automated very soon when some
issues get solved.
• Prepare and SD card as described in http://elinux.org/BeagleBoardBeginners
• In the first partition copy the files MLO, uboot.bin and uImage.bin available at:
http://papermint-designs.com/picoflamingo/download.html.
Be sure that MLO is the first file copied.
Note that if you have already flashed to NAND Xload and U-Boot you only need to add the
uImage.bin kernel in the first partition.
• Download the file console-image-beagleboard.tar.bz2 from
http://papermint-designs.com/picoflamingo/download.html
and uncompress it to the second partition.
tar -xjvf console-image-beagleboard.tar.bz2 -C path_to_2nd_pat
• Download the file modules-2.6.28-r17-beagleboard.tgz and gpu-drivers.tgz from
http://papermint-designs.com/picoflamingo/download.html
and uncompress it to the second partition.
tar xzvf modules-2.6.28-r17-beagleboard.tgz -C path_to_2nd_part
tar xzvf gpu_drivers.tgz -C path_to_2nd_part/lib/modules/2.6.28-omap1/kernel/drivers
Current picoFlamingo “Pink Egg” has only be tested with kernel 2.6.28, however, the only
root filesystem image available at this moment if for kernel 2.6.29. Therefore the kernel
drivers for 2.6.28 have to be added to the file system.
• Install the OpenGL user space libraries. This can be done producing the appropriated
OpenEmbedded package, but a more straightforward way of doing that is following the
instructions in this web page:
http://elinux.org/BeagleBoardUbuntu#SGX_Video_Acceleration
An alternative init script (pvr-etc.tgz) can be found in
http://papermint-designs.com/picoflamingo/download.html
Do not forgot to add the proper links to /etc/rcX.d for boot initialisation. Also note that
the file !/etc/powervr.ini! has to be created and pvrinit executable has to be copied to
/usr/bin instead of /usr/local/bin. This is a deviation from the process described in
the website above.
• Untar the “Pink Egg” tarball into the root filesystem. The application will become available
at /home/root/pink-egg.
The Pink EGG — User Manual
8
picoFlamingo
PROJECT
3.2
Last Updated
August 20, 2009
Installation in an x86 PC
• Install the Imagination Technologies POWERVR SDK. It can be downloaded from here:
http://www.imgtec.com/powervr/insider/sdk/KhronosOpenGLES2xSGX.asp
Requires registration.
Make sure the libraries can be found by the dynamic linker (add the path to LD_LIBRARY_PATH
or update your /etc/ld.so.conf.
• Untar the “Pink Egg” for x86 tarball in your preferred location. It can be downloaded
from:
http://papermint-designs.com/picoflamingo/download.html
• Make sure that the libfreetype.so library is available in your system
3.3
Installation of the Symbian Remote Control application
• Install Pyhton for S60 in your Symbian Device
• Edit the 000-pf.py script to update the Bluetooth address you want to connect to (yes,
this is an early alpha release). This file is available for downloading from here:
http://papermint-designs.com/picoflamingo/download.html
• Install the script in your Symbian Device.
3.4
Installation of the Extended Remote Control Application
This application uses SDL and needs the NetKitty communication tool to run.
• Make sure that the SDL libraries are available for your platform (OpenMoko, Pc, etc...)
• Copy the right binary for the chosen platform from:
http://papermint-designs.com/picoflamingo/download.html
This application is also distributed as source code and, therefore can be recompiled for the users
if the provided binary files does not work for their platforms.
• Install the SDL development packages for your chosen platform
• Download the source code for the application from:
http://papermint-designs.com/picoflamingo/download.html
• Recompile the application issuing the make command.
3.5
User Feedback
Please, let us know the details of your hardware platform and if you could successfully run
picoFlamingo 0.0 the “Pink Egg”, or any problem or troubleshooting action you performed to
make the system work. You can use the forums in http://community.papermint-designs.com/
to report any issue.
9
The Pink EGG — UserManual
Last Updated
August 20, 2009
4
picoFlamingo
PROJECT
Running The Pink Egg
This section explains how to use the “Pink Egg” and how to produce your own presentation.
4.1
Command Line Interface Magic
This alpha release of picoFlamingo supports the following command line flags:
• --w. Specifies the width of the screen by default it is set to 640.
• --h. Specifies the height of the screen by default it is set to 480.
• --slideshow. Activates the slideshow mode. In this mode, the “Pink Egg” will cycle
through all the presentation slides automatically, waiting arounf 10 secs on each one.
• --dir dirname. Specifies the directory where the slide files can be found. Normally these
directories will hang from the “Pink Egg” installation directory.
• --reload slide_num. Activates the autoload mode. In this mode the slide slide num will
be reloaded each 4 seconds. This mode is intended for basic editing of slides.
The “Pink Egg” doesn’t includes networking code. The different commands used to control
the presentation are read from the standard input. Therefore, to support remote operation
throughout the network, the “Pink Egg” uses netkitty to take care of network connections.
The typical execution commands for the “Pink Egg” are:
• Unattended slide show
./picoFlamingo_beagle --slideshow --dir my_presentation
• Edition of slide 5
./picoFlamingo_beagle --dir my_presentation --reload 5
• Simple stdin control.
./picoFlamingo_beagle --dir my_presentation
• Remote BlueTooth RFComm Connections on channel 4
./nk --server B,4 | ./picoFlamingo_beagle --dir my_presentation
• Remote TCP/IP Control accepting connections on port 5000
./nk --server T,5000 | ./picoFlamingo_beagle --dir my_presentation
• Remote TCP/IP and Bluetooth Control together
./nk --server T,5000 B,4 | ./picoFlamingo_beagle --dir my_presentation
4.2
Adding Text Styles
The “Pink Egg” provides a very simplistic style management system to allow the users include
their own fonts in their presentations.
Adding a new style to the presentation is a very simple process.
• Add your True-Type font file (.ttf) into the fonts directory.
The Pink EGG — User Manual
10
picoFlamingo
PROJECT
Last Updated
August 20, 2009
• Update the font_list.txt file. This file is in the same directory that the “Pink Egg”
main application. The format for this file is as follows:
FontPointSize StyleName TruTypeFile
where:
– FontPointSize is the size in points of the font. The bigger this number the better
the quality of the text in the presentation, but also, the most memory used. A value
of 32 is normally enough to achieve an affordable quality.
– StyleName is the user name for this style. This name will be used in the slides to
select the text style for the text items.
– TrueTypeFile is the name of the ttf file in the fonts directory to use for this style.
11
The Pink EGG — UserManual
Last Updated
August 20, 2009
5
picoFlamingo
PROJECT
Running the Remote Control Applications
This section explains how to run the different remote control solutions for picoFlamingo “Pink
Egg”.
5.1
Command Line Control
The picoFlamingo “Pink Egg” can be controlled from the command line using the commands
described in section 6.7. These commands can be issued in the following ways.
• Using a communication tool like Netkitty or Netcat and connecting to one of the external
interfaces provided by the system. These interfaces can be a TCP (wired or wifi) connection
or a bluetooth RFComm connection (this only using NetKitty).
• Directly typing in the console where the application was launched if available.
5.2
Simple Remote Control for Python S60
This application connects directly to the Bluetooth address hard coded in the script. It read the
device cursor keys. The right cursor key sends a next slide command, and the left cursor key
sends a previous slide command.
5.3
Extended Remote Control Application
This application can be executed in different platforms once installed as explained in 3.4. This
application needs a communication tool to remotely connect to the picoFlamingo “Pink Egg”
system.
To achieve this goal, the application should be launched using a command similar to the ones
below:
Connection using TCP networking
pf-control | nk -client T:pink_egg_ip:port
Connection using BlueTooth
pf-control | nk -client B:pink_egg_bt_addr:channel
The specific TCP port or Bluetooth channel will depend on the way the picoFlamingo “Pink
Egg” is started.
Once started the application will show an screen like the one shown in Figure 2.
The screen is divided in three main zones.
• The upper part of the screen shows some descriptive information about the tool. Clicking
or touching is part of the screen will close it.
• The lower part of the screen provides two navigations buttons to move forward and backwards through the presentation.
• Finally, the central part of the screen is used to interact with the slide item having the
focus. Pressing in this area will send a rotation command to the picoFlamingo “Pink Egg”
and the current focused item will be rotated accordingly.
The interface only sends X and Y rotation angles. This angles are calculated proportionally
to the distance in the X and Y axis between the center of the screen and the point the user
clicked or touched the screen.
The Pink EGG — User Manual
12
picoFlamingo
PROJECT
Last Updated
August 20, 2009
Figure 2: Extended Remote Control Application
This interface is being extended to support several new features that are being added and will
change in future, including more different operational models.
This interface has been successfully tested with the picoFlamingo “Pink Egg” from an x86 PC
and from a Free Runner OpenMoko phone.
13
The Pink EGG — UserManual
Last Updated
August 20, 2009
6
picoFlamingo
PROJECT
Creating Presentations
In this release, a presentation is a sequence of slides. Each slide is stored in a separated file
named as ‘slideN.pfs, where N is the slide number. In order to create a presentation, the user
has to create a subdirectory and put on it one of these slideN.pfs files for each slide s/he wants
to show.
As explained above, the --reload command line flag is very useful when creating a presentation
as it will show the changes made in the slide file as they are made.
Therefore, in order to create a presentation the format of the slides (the .pfs file formats) needs
to be known.
The rest of this section describes this file format.
6.1
Comments
The .pfs file formats considers a comment any line starting with the character ’;’. Note that this
character HAS TO be in the first column of the line to comment out (no other character before
it).
Example
; This is a .pfs comment.
6.2
Slide Items
This section describes the main items that can be added to a slide.
6.2.1
BACKGROUND
The command BACKGROUND sets up the presentation background. The background have to be an
image in one of the supported formats and, to avoid distortion, should match the aspect ratio
chosen for the presentation.
Syntax
BACKGROUND image_file
where
• image_file, image file to add as a presentation background.
The background item has the additional property of not being affected for the transition effects.
Example
; Background
BACKGROUND background3.png
6.2.2
ADD TEXT
The ADD_TEXT command adds a text line to the current slide.
Syntax
ADD_TEXT text_style
where
The Pink EGG — User Manual
14
picoFlamingo
PROJECT
Last Updated
August 20, 2009
• text_style is one of the valid text styles defined in the font_list.lst file for the current
presentation.
To change general properties for this item check the section 6.5.
The ADD_TEXT command supports the following subcommands to add extra information to the
item:
• ADD_DATA. This subcommand adds a new text line to a text item.
• SET_TEXT_INTERLNE. This subcommand modifies the inter line separation for the current
text item.
• SCALE. This subcommand modifies the size of the current text item. The expected value
is the divisor for the text sizes.
Example
ADD_TEXT text01
; Text Data
SET_TEXT_INTERLINE 0.6
SCALE 100.0
ADD_DATA SLIDESHOW:
ADD_DATA EDIT SLIDE 5:
; General Item Properties
POSITION -3.0 1.2 -3.5
COLOR 0.9 0.9 0.9 0.9
6.3
ADD IMAGE
The ADD_IMAGE command adds an image to the current slide.
Syntax
ADD_IMAGE scale imagefile
where
• scale is the size of the image and
• imagefile is the image file to add.
To change general properties for this item check the section 6.5.
Example
; Image
ADD_IMAGE 2.5 beagle.png
POSITION -2.8 -2.2 -3.0
6.4
ADD CUBE
The ADD_CUBE command adds a 3D cube model to the current slide.
Syntax
ADD_CUBE sizeX sizeY sizeZ
where
15
The Pink EGG — UserManual
Last Updated
August 20, 2009
picoFlamingo
PROJECT
• sizeX is the cube size in the X axis.
• sizeY is the cube size in the Y axis.
• sizeZ is the cube size in the Z axis.
To change general properties for this item check the section 6.5. Note: The color property cannot
be changed for 3D Models in this version
Example
;Interactive Cube
ADD_CUBE 1.5 1.0 1.0
SET_FOCUS
POSITION -0.0 -0.2 -3.0
ROTATION 0.7 0.2 0.0
6.5
General Item Properties
This section describes the commands used to set general item properties.
6.5.1
POSITION
The POSITION command allows the user to set the position in the slide for the current item.
Syntax
POSITION X Y Z
where
• X Y Z are the 3D position for the current item.
Example
ADD_CUBE 1.5 1.0 1.0
POSITION -0.0 -0.2 -3.0
6.5.2
ROTATION
The ROTATION command allows the user to set the rotation in the slide for the current item.
Syntax
ROTATION A B C
where
• A B C are the 3D rotation w.r.t. the X, Y, Z axis for the current item. Angles are in
radians.
Example
ADD_CUBE 1.5 1.0 1.0
POSITION -0.0 -0.2 -3.0
ROTATION 0.7 0.2 0.0
The Pink EGG — User Manual
16
picoFlamingo
PROJECT
6.5.3
Last Updated
August 20, 2009
COLOR
The COLOR command allows the user to change the color of a given item. Note: this command
doesn’t work on 3D models in this release.
Syntax
COLOR R G B ALPHA
where:
• R G B, ALPHA is a 4D vector specifying the color to apply, including the alpha channel.
Example
ADD_TEXT text07
ADD_DATA ... much more coming soon!!!
POSITION -2.0 -2.6 -3.5
SCALE 100.0
COLOR 0.1 0.1 0.1 0.8
6.6
Other Commands
This section introduce other commands not directly related to the slide items.
6.6.1
INCLUDE
The INCLUDE command allows the inclusion of an external file containing picoFlamingo “Pink
Egg” commands in the current slide.
Syntax
INCLUDE template_file
where:
• template_file is the file to include in the current slide.
Example
; Include common header for presentation
INCLUDE header.pfi
6.6.2
SET FOCUS
The SET_FOCUS command, when applied to a slide item, indicates to the system that such an
item has the focus and will receive any interactive command from the remote system interfaces.
Syntax
SET_FOCUS
Example
; Remote Controlled Spining Cube
ADD_CUBE 1.5 1.0 1.0
SET_FOCUS
POSITION -0.0 -0.2 -3.0
ROTATION 0.7 0.2 0.0
17
The Pink EGG — UserManual
Last Updated
August 20, 2009
6.7
picoFlamingo
PROJECT
Controlling the Presentation
The “Pink Egg” release only supports three control commands. This commands can be issued
directly from the console (if netkitty is not used), or remotely through bluetooth or TCP/IP
networking (using netkitty or netcat).
The available commands are:
• NEXT: Goes to next slide in presentation.
• PREV: Goes to previous slide in presentation.
• SLIDESHOW: Switches ON/OFF slideshow mode.
• ROT X Y Z: Rotates the current presentation item with respect to the three main axis.
The Pink EGG — User Manual
18
picoFlamingo
PROJECT
7
Last Updated
August 20, 2009
Known Issues
This is a very early alpha version that is very buggy and it is only intended to give future users a
feeling of what picoFlamingo can offer. This version is simply a quick integration of the different
tests carried out so far and, therefore should be considered as a macro test.
In any case, there are some already know issues with this version.
• There is no proper error management. If something is wrong (a very big image, a wrong
scale value or an improper SGX configuration) the application will simply crash.
• The specific configuration for U-Boot and Linux kernel seems to be a bit tricky and we
were only able to make it work with the configuration stated above.
• The ROTATION command has some issues with image transparency and doesn’t rotates
properly text items.
• The texture manager object has not yet been added so a texture is created for each single
image used (even when used several times), so images should be used carefully.
• It is possible to have aspect ration distortions when using different presentation width and
heights that the default 640x480 intended to be used with the picoFlamingo.
• U-Boot 2009.1-dirty is required for USB Host operation on BeagleBoard C3. This version
seems to no longer take the environment from NAND so a simple saveenv do not work,
when using U-Boot from the SD card.
In order to pass the proper command line to the kernel to initialise the graphics in 16bpp
mode, the U-Boot booting process can be interrupted from the console, the proper variable
set and the boot command used for one-time booting. This has to be done each time the
system is rebooted.
The easiest way to avoid this is to Flash U-Boot to NAND so the saveenv command will
work properly.
19
The Pink EGG — UserManual