1
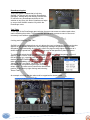
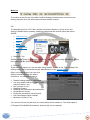
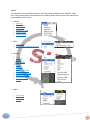
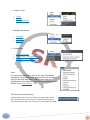
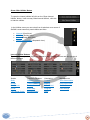
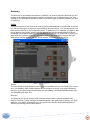
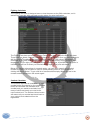
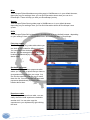
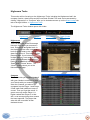
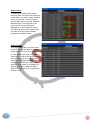
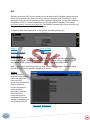
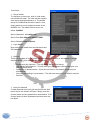
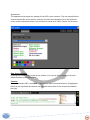
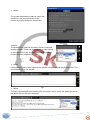
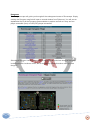
Introduction to SwiftKit Welcome to SwiftKit, a RuneScape Toolkit formerly known as SwiftSwitch. SwiftKit was designed to help RuneScape players by conveniently bringing together all common RuneScape tools and features from all over into one single application. The easiest way to describe SwiftKit is to imagine a special browser (Internet Explorer or Firefox). This special browser however isn’t designed for browsing websites. It’s designed for playing RuneScape in and is full of RuneScape specific utilities, bookmarks to popular guides/websites and anything else required to give you the edge in RuneScape whilst still remaining within the RuneScape rules. SwiftKit will be able to assist you in whatever skill you may be working on in RuneScape. Whether your task is doing a quest, following a clue scroll or just levelling up your favourite skill. SwiftKit will even be able to assist you to plan your next task with its multiple planning utilities such as the Quest Planner, Calculators and Highscore tools. This manual will aid you in understanding SwiftKit by covering in detail all current features within SwiftKit, allowing you to manage and utilise its features efficiently. Revisions to this manual are carried out regularly and the latest manual can be downloaded via our website http://www.SwiftKit.net Strider3282 SwiftKit Creator 2 Contents Introduction to SwiftKit .......................................................................................................... 2 SwiftKit User Manual – Information and Guidance ................................................................ 4 SwiftKit User Manual – Editorial Staff .................................................................................... 4 Launcher and Profiles ........................................................................................................... 5 Main Window ........................................................................................................................ 8 Armoury .............................................................................................................................. 20 Calculators .......................................................................................................................... 22 Databases........................................................................................................................... 26 Guides ................................................................................................................................ 30 Highscore Tools .................................................................................................................. 33 IRC ..................................................................................................................................... 35 Maps ................................................................................................................................... 41 Miscellaneous Utilities ......................................................................................................... 44 Quest Center ...................................................................................................................... 47 Screenshots ........................................................................................................................ 49 Themes ............................................................................................................................... 51 Timers and Counters........................................................................................................... 53 Treasure Trails .................................................................................................................... 55 3 SwiftKit User Manual – Information and Guidance This Manual has been designed to enable the reader to find information about SwiftKit in a number of different ways, with the primary one being an intuitive approach. If the reader searches through the manual (by following the built in links) following the same steps as they do when actually using SwiftKit they will be given detailed explanations of all the functions and tools that they will meet along the way. Of course some users may know exactly what information they are looking for and the comprehensive indexing of the manual should make that search quick and painless. The Manual has been put together by SwiftKit Staff and SwiftKit Beta Testers, who have collectively used SwiftKit for 1000’s of hours. We are all RuneScape players and we have tried to make sure that this manual is as user friendly as possible. It is strongly recommended to get the maximum functionality out of this manual that it is viewed on screen and not printed, that way the reader can benefit from the 100’s of links built in to it. You will see this symbol in the bottom right corner of every page of the User Manual, simply click on it to return to the main index at the front of the manual. If you have any feedback or corrections that you would like us to hear about please email the Editorial Staff at [email protected] Skinny H Editor SwiftKit User Manual – Editorial Staff Publisher and Owner Strider3282 Editor Skinny H Graphics and Artwork Zpoon Contributors Branin R Mak Green Eye S Samdestroyer Ikkikke Sgt Shankers Ile89 T3h n00b pwn3r Jlattouf Towelie 9 Pur2 str 4 The SwiftKit Client and this manual are not affiliated in any way with Jagex Ltd. RuneScape is a registered trademark of Jagex Ltd and the staff of SwiftKit are in no way linked to the staff of Jagex Ltd. Copyright (c) 2008 SwiftKit Publications. All rights reserved Launcher and Profiles SwiftKit Launcher SwiftKit differs from SwiftSwitch its predecessor by benefiting from a bespoke launcher. Everytime a player starts SwiftKit the launcher automatically starts first. The launcher performs four key functions; Version Check The launcher checks that the version of Swiftkit that the user is using and that all the components such as maps are the most up to date, If they are not the launcher will then prompt the user to update SwiftKit. Patch Notes It allows the user to see the patch notes that accompany each version of SwiftKit when released that detail new features and changes to the program. Server Selection The launcher allows the user to choose which server to use when downloading any updates for SwiftKit. It is recommended that users use the default server unless they experience difficulties with it. 5 Launching SwiftKit One the version checks and any required updates are complete, the launcher allows the user to launch the main SwiftKit program. Profiles As SwiftSwitch did, SwiftKit allows players to have multiple profiles saved. This is especially useful in situations where more than one person has access to the computer and wishes to use SwiftKit without having to reset all the preferences everytime they use it. The information that SwiftKit saves against a profile include; Username – The users RuneScape name for checking Highscores Previous History – Previous searches the user has made. These include item and monster lookups and also usernames of other players that the user has looked up IRC Settings – Favourite servers, favourite channels, user nick and IRC password Themes – The colour scheme that the user has chosen Layout – How the user has organised their tabs Character Data – Saved stats and skill targets Quests – Details of all completed quests Once the launcher has completed it actions it will open the profile selection window. This allows the user to select a previously created profile, create a new profile or open SwiftKit in default mode with no saved settings. This step can be bypassed by users who wish to always open SwiftKit on a single profile by checking the ‘Always Use Selected’ box when the desired profile is highlighted. If this is done the user can still return to this window in the future by selecting File > Switch Profiles from the SwiftKit main menu. SwiftKit will have to close and relaunch for this feature to function. 6 Creating a profile To set up a new profile simply click the ‘Create New’ box on the Profile Selection Window. This will then open a new window in which the user can create a new profile. The user is given the option of setting a profile password at this stage. This is not required and if no password is wanted simply leave the box blank. If a password is desired please DO NOT USE YOUR RUNESCAPE PASSWORD, think of another one. RuneScape passwords should only ever be used on www.runescape.com and nowhere else. The user is also given the option to import settings from SwiftSwitch if that was previously used on that computer. On both of the profiles windows there is a small help ‘?’, when pressed this opens an information window that details some of the functions that the profile can save details of and the reasons for having profiles. 7 Main Window The Main Window is the heart of SwiftKit; it is this window that remains open at all times when SwiftKit is being used. The Main window includes the RuneScape Applet, calculator, world clock and web links. This will be your main screen for SwiftKit and accordingly the utilities immediately available on it are the most commonly used tools and allow you to retrieve basic information on prices, shops, monsters, other players and clans. It is also from the Main Window that access is gained to all the other utilities within SwiftKit. The Main Window is also the access point for all the user settings which allow you to personalise your copy of SwiftKit including the appearance or “theme” of the Main Window (and all the other SwiftKit windows) as detailed in the Themes section of this manual. • • • • 8 RuneScape Applet Tool Tabs Menu bar o File o RuneScape o Utilities o Links o Take Screenshot (PrintScreen) o Help Show / Hide Utilities Button RuneScape Applet This is the “game” window that is built into SwiftKit. On this you will see all the RuneScape gameplay. SwiftKit does not directly interact with or influence any RuneScape activities in this window at any time, this lack of interference helps to ensure that SwiftKit remains fully within the RuneScape rules. Tool Tabs To the right of the RuneScape game window there are two areas one above each other, each containing three tabs. These tools tabs provide quick access to some of the most commonly used utilities within SwiftKit. Locking and Unlocking Tool Tabs SwiftKit has a unique feature that not only allows the user to change the order that the tabs appear on the SwiftKit Window but also completely redesign the positioning of the tabs altogether. This functionality is particularly useful for players using higher resolution as it allows them to “spread out” the tabs and utilise more of the space they have on screen. To unlock and relock the tabs simply right click on a tab and a small dropdown menu will appear. Select ‘Unlock’ and then whilst holding down the left mouse key, reposition the tab wherever desired within the SwiftKit window. Alternatively the tabs can be moved by right clicking and selecting ‘Move Tab Left’ and ‘Move Tab Right’. To then lock the tab into its new position again right click and select ‘Lock’. The tabs can be returned to their default position at any time by right clicking and selecting ‘Reset Tabs’. An example of a way that the tabs could be organised is shown below. 9 • • Top Tab Set Play RuneScape Calculator World Clock Bottom Tab Set Stats Lookup Quick Lookups Quick Links Top Tab Set Play RuneScape This is the tab with the 2 swords icon. On this tab you will see the Play RuneScape button, which will load the RuneScape homepage in the main game window. If you are a RuneScape Classic player you can tick the check box in user settings to make this button launch Classic instead of RuneScape 2. There is a Disable Play RuneScape check box that will disable that button so you can’t accidentally click it and get logged out of RuneScape. The Play Duration timer is shown in the top right of this tab. It will tell you how long you have been playing Runescape and will start once you load the main page. Right clicking on this gives you the option of pausing or starting the timer, as well as resetting it. Calculator On the tab with a icon of a calculator there is a basic calculator for your every day needs. You have two options to enter your values; you can either click the buttons or click in the text box and use the keypad numbers on your keyboard. To backspace simply click in the text box and hit the backspace key on your keyboard. World Clock The tab with an icon of a clock contains a simple digital clock to keep up with time and date; it can be set to any time-zone available in the drop down list and works just like the clock on your operating system. This can be used for many things such as finding out what time your clans events may be if they're in a different time-zone as you. Several of the major time-zones are listing here in the drop down menu. The clock will automatically remember whatever time-zone you have it set on the next time you launch SwiftKit. 10 Bottom Tab Set Stats Lookup The tab with a icon of a bar graph is used to check players stats. Simply enter a username into the text box and either press enter on your keyboard or click the search button adjacent to the username text box. Once you have initiated the search SwiftKit will grab the specified players latest stats and display below. SwiftKit will remember all usernames you enter so looking up the same players in the future is much easier. Double clicking on the username text box will revert it to the default username you have saved in settings. When the cursor is run over a skill, a progress bar appears at the bottom showing the player’s progress towards their next level in that skill. Other details about the skill are also shown such as rank, current XP and XP to next level. Double clicking on a skill icon will open up that skills calculator and automatically calculate to the next level for you. Below the username text box are two buttons, Highscores and Compare. The Highscores button will take you to the official RuneScape Highscores webpage for the user you just looked up. The Compare button however will open up the Highscore Tools form auto-filling in the first user on the compare utility with the user you just looked up on the Stats Lookup. Please remember, the player you are looking up must exist on the Highscores since all stats are taken directly from the RuneScape Highscores. You will also need to log out of RuneScape for any XP/Level changes to take effect. Quick Lookups The tab with the magnifying glass icon provides quick information on prices, clans, monsters, shops and items. Select which database it is that you want to search and type in what it is that you are looking for. You can then either press enter or click on the search button and your results will be displayed in the box below. Then click on the item you interested in and further details will be given in the area at the bottom. If you wish to have even more detail about whatever it is you have looked up, this can be achieved by then either pressing the “view more info” button or by double clicking on the desired item. SwiftKit will then either open the appropriate database or open a separate browser window and display further information about the subject of your search. 11 Quick Links To get to the Quick Links just click the tab that looks like a globe, you can then add links or shortcuts to various websites and applications, these do not have to be RuneScape related. To add a web link simply make sure the Web Link button is selected then put a title for the link in the box below followed by the URL or web address of the page in the box below that and click the Add button. To add an application, such as MSN messenger or Winamp, make sure the Application button is selected this time. Add in a title just like you did with the web link, then either type out a path for the file manually, or click on the "..." button to browse your computer for a file to open. Once you have found what you were looking for either click it then click the open button or just double click it. Then click the add button once again to add the application to the list. You can also use this method to open ANY type of file such as text files, video files or mp3 files, not just Applications. To remove an item from the Quick Links list simply click on whatever item it is that you want to remove and click on the Delete button below the list. 12 Menu bar The toolbar across the top of the Main SwiftKit Window provides access to both the user settings and also all of the utilities and tools that SwiftKit contains. File The dropdown list from “File” has a number of functions listed on it, these cover user settings, SwiftKit News, browsing, switching profiles and also an Exit option that closes SwiftKit. • Always on Top • Settings • News • SwiftBrowse • Switch Profiles • Exit Always on Top SwiftKit has the facility to make itself “Always On Top”, this can be easily activated by ticking the selection on the options dropdown menu. Settings There are many options you can set while using SwiftKit. As well as via “File > Settings” the settings menu can be accessed through ‘Miscellaneous’ in the Internal Utilities. When in the setting menu you can set a default username that will be used in calculators. You can also choose to: • • • • • • • • • Disable loading images in calculators. Use your default Internet browser (Firefox, Internet Explorer, etc.) Don’t prompt on exit. Disabling hotkeys. Disabling the Screenshot date watermark. Screenshot full screen. Enable the screenshot hotkey [Insert]. Play RuneScape Classic instead. Minimise to System Tray. You can also choose the path that your screenshots will be saved into. The default path is C:\Program Files\SwiftKit\Screenshots, however this can be changed. 13 You can also choose which file type to save your screenshots as, you can choose either: Bitmap (.bmp), Compuserve Gif (.gif ), Jpeg (.jpg), Portable Networks Graphic (.png) or Tagged Image Format (.tif). Again this can be changed in the user settings. You can also choose to delete your search history and there is an option that allows you to create themes, import themes, and save them. Full details of the themes are provided in the Themes section of this manual. News When you launch SwiftKit the game window displays the news page. The news page shows the latest RuneScape and SwiftKit news. It also mimics the colours of your theme! You can open the News page at any time you like either back in the “Game Window” (be warned if you are playing RuneScape when you choose this option, you will be logged out of the game) by selecting News page (internal). Alternatively you can open the news page in SwiftBrowse or your computer’s default browser by selecting “News Page”. SwiftBrowse This is SwiftKit’s own internet browser. It provides a simple way of accessing any websites whether they are RuneScape related or not. It has been designed to be extremely simple and offers basic browsing functionality. If you want to benefit from more comprehensive browsing capabilities it is recommended to use your computer’s default browser, however SwiftBrowse is there should you need it. SwiftBrowse will automatically import your homepage setting from Internet Explorer. Switch Profiles If you have several profiles set up on SwiftKit, this allows you to switch between them. It works in a similar way to changing user on Microsoft Windows and will require SwiftKit to relaunch. A message warning you of this is displayed before SwiftKit closes. 14 Exit Clicking on this will close SwiftKit. The default setting has a warning message asking if you really do want to close the program, this warning can be disabled in the user settings. RuneScape This dropdown menu contains features relating to the RuneScape Applet (Game window) and also links to other official RuneScape information. • Play RuneScape • Move Applet Up / Down • Forums • Highscores • Home Page Play RuneScape This performs the same function as the Play RuneScape Button. It should be noted though that the disable function available on the button does not affect this selection. Move Applet Up / Down You can choose to move the RuneScape Game window up and down, this can be of assistance to players on f2p worlds and also some players who are using certain screen resolutions Forums This opens the official RuneScape forums in a separate browser window (either SwiftBrowse or your computer’s default browser depending which you have chosen in user settings) Highscores This opens the official RuneScape Highscores page in a separate browser window (either SwiftBrowse or your computer’s default browser depending which you have chosen in user settings) Home Page This opens the official RuneScape Homepage in a separate browser window (either SwiftBrowse or your computer’s default browser depending which you have chosen in user settings) 15 Utilities This dropdown menu provides access to all of the utilities available within SwiftKit. These can in many cases also be accessed from the Utilities area however there are a few that are only available via this menu. Utilities • Armoury • Calculators • Databases • Highscore Tools • Quest Center • Server Status Misc. • To Do List • Username Availability Checker Guides • • • • • • • • • • • Cities Guilds Mini Games Misc. Quests Skills Fairy Ring Codes Gardener Payments Experience Table Full Fairy Rings Prices Maps • • • 16 World Map Dungeons Mining Treasure Trails • • • Guide Puzzles Treasure Locator Notepad and System • • • Notepad Calculator MS Paint Screenshots • • • Drag Screenshot Upload Last Taken Screenshot View/Upload Screenshots Links You can access the links to many of the major RuneScape related sites, simply click ‘Links’ and select the site you wish to visit from the drop down menu. This will either open in SwiftBrowse or your default browser depending which you have defined in your user settings. Take Screenshot (PrintScreen) It does what it says on the tin! Please be aware that unless the Screenshot full screen setting is selected, pressing the Take Screenshot button will only work if RuneScape is loaded. 17 Help • • • • • • • Comments Suggestions SwiftKit F.A.Q Help (Forums) Help (Knowledgebase) Diagnostics About Comments This links to the SwiftKit Official forums hosted by Zybez.net Suggestions This links to the SwiftKit Official forums hosted by Zybez.net SwiftKit F.A.Q TBC Help (Forums) This links to the SwiftKit Official forums hosted by Zybez.net Help (Knowledgebase) This Links to the SwiftKit online KnowledgeBase Diagnostics This produces a diagnostic report of the host computer, it is usually requested by SwiftKit Staff to try and identify and solve problems users are experiencing. About A list of the SwiftKit Staff 18 Show /Hide Utilities Button To open the internal utilities left click on the ‘Show Internal Utilities’ button, it will now say ‘Hide Internal Utilities’, click this to hide the utilities. In the Utilities menu you can select from 4 tabs that cover some of SwiftKit’s most commonly used utilities and links. • • • • Notepad (Scroll Icon) IRC Chat (Smiley Icon) Utilities (Bindle Stick Icon) Timers and Counters (Stopwatch Icon) Internal Utilities Buttons The Utility buttons provide single click access to many SwiftKit features and are split into 4 different groups. 19 Guides Treasure and Maps Calculators Miscellaneous Skills Treasure Guides Combat View Screenshots Quests Treasure Locator Fighting Drag Screenshot Mini Games Puzzles Pest Control Server Status Prices World Map Progress user settings Fairy Rings Codes Dungeon Maps Skills Armoury The Armoury is yet another new feature in SwiftKit, it is used to check the bonuses you will receive when wearing certain types of armour and to allow you to compare one “set” with another to see what will be the best to wear for whatever type of attack or defence you want to maximise. Profile The profile section of the armoury is used to get the stats bonuses of certain sets of armour, you can mix any types of armour to see what their bonuses will be. You can also hover over each piece of armour to see its bonuses alone. To add armour, for example you want to add a rune plate to your profile, simply click the appropriate armour tab and search for Rune Platebody in the search area to the left and click on it. If there is a certain set of armour you wear often you can save it for easy loading by clicking the small down arrow to the right, after simply add the armour with the above method, it will auto-save as you go. Search The item search is quite simple to use only you must make sure you are clicking the correct item, you wouldn't want to add a lobster as your weapon of choice. Just type in whatever armour it is you are looking for and make sure you adding it to the appropriate armour tab and everything will work fine. Bonuses The bonuses are shown at the bottom left hand of the screen, it shows all attack and defence bonuses. These numbers are added together from each piece of armour you have added to your profile. Alternatively you can get the bonuses for each individual piece of armour by hovering over the item picture. 20 Import/Export The Import/Export feature can be used for quick copy/paste use of the Armoury, first pick out the armour that set and then click Export Set, you can then double click the text you see to select it. After that right click the text and copy it, you can then give that text to anyone to use as their own. The same goes for you if there is a certain set of armour you like you can have someone send you there Exported Armour Set to you, simply click import set and paste the text there then hit save, it will save that set of armour to a new profile in the Armoury. Compare - One highly useful feature of the Armoury is the ability to compare two items, for example you can compare an abyssal whip with a dragon scimitar and see that the abyssal whip is clearly better in slash and strength bonus, yet lacking the stab bonus that the scimitar gives. To use this feature simply search for the item you are curious about and click "Add to slot 1" then using the same search method find the second item and click "Add to slot 2" these buttons are located at the bottom left side. 21 Calculators This section of the manual will give you an insight into the features and outputs that that the calculators provide. • Skills Calculator • Fighting Calculator • Combat Calculator • Pest Control Calculator • Progress Calculator Skills Calculator The Skills calculator is simple to use. Just input your username up in the top text box, and click Grab Data or press enter on your keyboard. SwiftKit will then collect all the information from the RuneScape High Scores. Once you have grabbed your player data, select the skill you wish to calculate by clicking on the corresponding skill icon. The Skills calculator supports all skills except combat stats and farming. After selecting a skill you will immediately see to the left your skill information such as current Experience, Experience required to target level and target level. By default SwiftKit will set your target level as current level plus one. You are free to change your target level, by doing so your Experience to target level will also change accordingly. Below this information and the skill icons is where your results are displayed. The results are pretty straight forward, you have in column order from left to right; Item Name, Members, Level, EXP and Amount. The Item Name and Members column are both self-explanatory, if the item is members only there will be a 'Yes' in the Members field. The Level column will tell you what level is required to make/use the item, should you not meet this requirement the row text will appear in the colour red. EXP will tell you how much Experience you get per item and last but more importantly the Amount column will tell you how many of the items you need to make or use. 22 Fighting Calculator The Fighting calculator is designed more or less the same as the Skills calculator, so it's advised you read the skills calculator section above for extra clarification. The Fighting calculator accommodates the combat stats missing from the Skills calculator. These stats are Attack, Strength, Defence, Hitpoints and Ranged. Once you have selected a skill (be sure to of grabbed your player data beforehand) you will notice it immediately calculates to your next selected skills level. You can change this by simply changing your target level. To your right you have your different combat styles, by default the first option is used but you are free to select your desired combat style pre or post calculation. Below the combat style options is a search option, you can easily search your desired monster by entering in it's name or close to it and pressing enter on your keyboard or clicking the search button. To get a full list of monsters back simply delete any text in the monster search text and run the search again. Combat Calculator The Combat calculator is used to theory craft combat levels. By entering in your combat stat levels the calculator will calculate what combat level you would be and also how many of which stat levels you need to the next combat level. The Restore Values button will restore all your combat stat levels back to your original levels obtained from the Highscores. 23 Pest Control Calculator The Pest Control calculator operates in two modes, calculating to your goal level or calculating to a goal amount of tickets. These two modes can be changed by selecting the appropriate option under 'Select Goal Type'. Just like all the calculators, before you make any calculations you should grab your player stats by entering in the desired username at the top and clicking Grab Stats. This will auto-fill your stat Experience fields and goal levels if your goal type is 'Goal Level'. To begin your calculation you should select how many tickets you'll be handing in at a time selecting one of the three(1, 10, 100) options in the drop down box. You then have the option of including in-game damage, if you choose to select this SwiftKit will add the Experience gained from doing damage to the monsters in pest control to the equation. The next step will differ depending on which goal type you are using, if you are using the goal level type simply enter in your desired goal level. If you're using the goal ticket type enter in the amount of tickets you think you'll be handing in to see what level or how much Experience it would get you. Unlike in some of the other calculators, you will need to click Calculate at the top in order for it to make the calculation. 24 Progress Calculator The main objective of the Progress calculator is to keep track of your skill goals and let you know how close you are to them. Unlike the other calculators the Progress Calculator does not have to be a once off type calculation. To begin with grab your player stats from the top section if you have not already, if you have click the Restore/Fill Values button. This will populate the fields below with the information gathered from the RuneScape Highscores. Go through the skills you wish to set goals for and enter or change your goal level. Once done you can then click calculate to see how far away from your goal. The Save and Load buttons mean that you don't have to enter this information every time you want to check your goal progress. Once you've entered all your goal levels and are happy with it, click the save button and it will save your information to the username you have in the top username text box. To load this information again, simply make sure your username is entered in the top username text box and click load. 25 Databases The database section of SwiftKit is a very useful section as it includes many databases which will help you on your RuneScape adventures. This section can be accessed either via the Quick Lookups on the Main Window or through the Utilities dropdown menu of the menu bar. The databases open in a separate window with 4 tabs one for each database. Items Monsters Shops Clans Items Database This is imported from Zybez's Item Database and contains information about all the items in Runescape. In this database you can find prices of items if they are tradeable if they are used in a quest and even if they are member-only or not. You can even find where and how to get this item and find they alchemy price and general store price. 26 Monsters Database This is imported from Zybez's Monster Database and contains information on Runescape's monsters and NPCs (Non Playing Characters). There are two views offered, the first gives a summary of all monsters that match whatever the searched for term was, and then when a monster is selected by either double clicking on it or by highlighting it and then pressing the Lookup Selected button, the second provides the high level of detail on that monster. In the second window you can find out many things about a monster including:Combat, Hitpoints,If it's aggressive,members and It's attack style. You can also find all it's drops,it's location and even tactics on how to kill it! 27 Shops Database This is imported from Zybez's Shops Database and allows you to find shops that sells a certain item , their locations shop keepers and notes about the shop. It also allows you to find out whether it is members or not. The first window identifies all of the shops selling any searched for item and when the desired shop is selected the second window provides more details on it. 28 Clans Database This database is imported from Runehead and allows you to look up clans and clan members find the clans overall Runescape find their combat average how many members they have and even find their clan site and actual memberlist. 29 Guides Guides are important to the RuneScape player. There are many kinds of guides: skills, quests, mini games, prices and many others. Following you will find explanations to these. You can find guides in two different places, first one is inside of Internal Utilities that open below the RuneScape applet and the other is Utilities menu. You can find these guides in the utilities menu: • • • • • • • • • • • Cities Guilds Mini games Misc. Quests Skills Fairy ring codes Gardener payments Experience table Full fairy rings Prices You can find these guides in the Internal Utilities menu: • • • • • Skills Quests Mini games Prices Fairy ring codes Cities This will open Zybez City guides page in SwiftBrowse or in your default browser, depending on your settings. Here you can find information about RuneScape’s many cities like Varrock or Falador. Guilds This will open Zybez Guild guides page in SwiftBrowse or in your default browser, depending on your settings. Here you can find information about RuneScape’s many guilds, like Warriors guild or Cooking guild. Mini games This will open Zybez Mini games page in SwiftBrowse or in your default browser, depending on your settings. Here you can find information about RuneScape’s Mini games, like Barrows or Fight pits. 30 Misc. This will open Zybez Miscellaneous guides page in SwiftBrowse or in your default browser, depending on your settings. Here you can find information about what you can do in RuneScape. These will help you with your RuneScape journey. Quests This will open Zybez Quest guides page in SwiftBrowse or in your default browser, depending on your settings. Here you can find information about all RuneScape’s new quests. Skills This will open Zybez Skill guides page in SwiftBrowse or in your default browser, depending on your settings. Here you can find information about different skills in RuneScape. Fairy ring codes This will open fairy ring codes table where you can look up fairy codes for different locations. You can search the destination or scroll down the list. You can arrange the codes and locations alphabetically by clicking the header above them. Gardener payments This will open the gardener payments table where you can look up prices that you have to give gardeners to look after your crops. You can use the search to look the crop or scroll down the list. You can arrange the crops and payments alphabetically by clicking the header above them. Experience table This will open the experience table, uou can easily check the total experience needed to another skill. You can also copy the experience to your clipboard by right clicking the level. 31 Full fairy rings This will open Zybez Fairy rings guide page in SwiftBrowse or in your default browser, depending on your settings. Here you can find information about fairy rings, like the codes and locations. Prices This will open Zybez Price guide page in SwiftBrowse or in your default browser, depending on your settings. Here you can find price information about RuneScape’s items. 32 Highscore Tools This section will be focusing on the Highscores Tools, including the Highscores itself, the compare function, stats lookup and the new Rank Climber! The tools can be accessed by clicking” Highscores” or “Compare” after you’ve looked someone up on the Stats Lookup tab tab or through Utilities -> Highscores Tools. The Highscores Tools window opens with 4 tabs. Highscores Compare Highscores This is a direct link to the Runescape Hiscores, they show you someone’s level, Experience and global rank. In the top bar you can enter a name to look up and hit enter or the looking glass icon next to it. This bring you that person’s stats. If you looked up multiple people in one session you can quickly switch between them without having to re-enter their name with the “Back” and “Forward” button. The “Home” button returns you to the Hiscores main page. Compare This feature lets you compare yourself with your friends or enemies, or even your friends with your enemies! Just enter the 2 names you wish to see compared into the Player 1 and Player 2 field, each field a different name of course. Then you’ll get the result! A green arrow up means Player 1 is higher ranked then Player 2 in that skill, a red arrow pointing down means the exact opposite. The player that wins with the most skills is then declared winner. 33 Stats Lookup Rank Climber Stats Lookup This tab does exactly what it says, it looks up stats. Just enter the username of the player you want to look up and hit enter, or press the “Look Up” button and the stats will be returned. Rank will also be shown. The progress to the next level will be calculated and displayed in a percentage bar and in XP. This tool gives you the opportunity to review all of your stats and their progress in a single window. Rank Climber This nifty feature lets you find out how much XP you need to gain to reach a certain rank. That rank is to be entered into the “Rank Goal” field. You then double click a skill to find out how much more XP that is. If you don’t enter a Rank Goal then it will display the XP needed to gain at least 1 rank. In the case of overall levels, it will display the amount of levels to obtain the Rank Goal or the amount of XP to again gain at least 1 rank. 34 IRC SwiftKit has a built in IRC client to allow you to chat with other RuneScape players and also fellow Clan members even when you are not active in the game itself. Following is a brief description of the client itself and the process of getting it operational. For far more detailed information on IRC it is recommended that you visit the SwiftIRC website’s FAQ’s page http://www.swiftirc.net/index.php?page=faq The SwiftIRC site also has a forum on which you can get further help on virtually any IRC problem. To open the IRC client simply click on the tab with the talking smiley on it. Options Quick Connect New server window Connect Quick Connect If you wish to quickly enter an IRC channel put your IRC nick in the Nickname box, the channel name in the Channel box and press connect. You will then be connected immediately to the chosen channel. Channel names must always begin with # Note: To enjoy the full benefits of IRC you must register your Nickname. Details on doing this can be found on the SwiftIRC website (see above). Options When Options is selected a new window opens that allows the user to set IRC connections preferences such as preferred servers and channel details and also appearance settings. Once a server is configured it can be connected to from this window by highlighting it and pressing Connect. Connection Appearance 35 Connection Server details To configure a new server, click on ‘Add’ and a new window will open. The user will then need to enter server and login details for it. The default server for SwiftKit that should be used if a user simply wants to set up multiple channels is the SwiftIRC one. The details for this server are; Name: SwiftIRC Server Hostname: irc.swiftirc.net Server Port: Can differ but default is 6667 Server Password: Not Required Login details Enter all the user details such as nicknames and IRC password. Options There are a number of check boxes options available to the user on this window to set the way that the IRC client interacts with the server. - Enable auto join channels – This will enable the auto join feature. Auto-identify with Nickserv – This will send your password to Nickserv and give your nick registered status. Reconnect on disconnection – If you time-out from irc this feature reconnects you automatically. Auto-retry connecting if unsuccessful – This will auto-retry you if you failed to connect first time. Auto join channels To add channels to the Auto join list click on the ‘Add’ button and a new window will open. Simply enter the channel name and any password for that channel. If the channel does not have a password set then leave this box blank. 36 Appearance The appearance tab opens the settings for the IRC colour schemes. The user can define the colours that the IRC client uses for a variety of modes and messages. Once the preferred colour scheme has been chosen, this can then be saved as a ‘Colour Theme’ for the future. New Server Window Pressing this button opens a new server window. You can use this to connect to several different servers at the same time. Connect Once connected to IRC a new window will open for each connected channel. A highlighted button at the top shows the channel name and all active users on the channel are listed to the right. 37 There are a number of functions that the SwiftKit IRC client has built into it to make using IRC easier; Channel Central To allow channel owners and users to set preferences for their IRC channels the SwiftKit IRC client has a built in feature called ‘Channel Central’. Topic The topic tab contains all the details of the channel topic that is set by the channel owner and displayed to all users when they first join the channel. The preview box allows all users to view the current topic. Channel owners can also use the controls contained in this tab to edit the existing topic, review old topics and also to set new topics. Bans It is also possible to ban users from IRC channels and the ban tab allows the Channel Operators to manage the list of currently banned users. 38 Modes The modes tab allows the channel owner and operators to set the preferences for the channel by simply ticking the check boxes. Controls The SwiftKit IRC client has a number of built in functions relating to users. These can be accessed by right clicking on the name of the user and then selecting the required function from the dropdown list. Query Clicking on the Query option opens a new private conversation with the selected user. This conversation is in a new window. Whois To find out more details about another IRC user select ‘whois’ and all the details the server has about the user are then displayed. 39 Controls Channel Operators and owners control the users on each IRC channel by granting them certain access levels, they also can force users to leave channels by ‘kicking’ them and banning. Selecting the ‘Controls’ option from the dropdown menu then gives all of these options. Console (Server channel) The server channel will remain open all the time a user is connected to the server. The window is used to display server messages. 40 Maps Runescape maps are the key to getting around Runescape and exploring all the locations available to both free and pay to play members. • • • World Map Dungeons Mining World Map The world map is the best way to find cities, training areas, shops, and virtually anything else in RuneScape. In the center you will see a large map of Runescape and all the shops, stores, etc. You can hold your mouse button down and moving your mouse around, you can quickly move the map to the location you wish to see. There are several search options to find your way around the map. The FIND box is a searchable box where you can enter a city or location name, and the map will center in on the place you are searching. On the bottom left you can click on the KEY button and open up a list of shop types. If you click on the shop you are looking for, the map will flash a yellow dot on both the overview map as well as the larger more detailed main map, indicating the shops lactation. Keep in mind the KEY has several pages you can access via the NEXT PAGE button. Along the middle bottom of the map are several percentage sizes. Those will allow you to enlarge, or zoom in for more detail, as well as zoom out for a broader look at Runescape. The OVERVIEW button on the bottom right is a small full map of Runescape to help you guide your map around quickly. Clicking on any portion will move your main large map to that spot. 41 Dungeons The Dungeon maps will guide you through all the underground areas of Runescape. Simply clicking the Dungeon map link will open a second window from Zybez.net. You will see an alphabetical list of all the Dungeon areas available to explore as well as if they are free player accessible (free) or Paid (P2P) player accessible. Selecting a Dungeon link will open a map of that dungeon, and show details of that area, including monster locations, levels, etc as well as any other information relating to that dungeon. 42 Mining The Mining maps will guide you through the areas available to mine ores in Runescape. Simply clicking a Mining map link will open a second window from Zybez.net. You will see an alphabetical list of all the Mining areas available to explore as well as If they are free (free) player accessible or paid (P2P) player accessible. Selecting a mining link will open a map of that mine, and show details of that area, including available ore, nearest banks, and any dangers or risks to mining in those areas. 43 Miscellaneous Utilities This section will cover the use of SwiftKit’s Miscellaneous Utilities. SwiftKit includes many utilities to optimise your game play experience. This section covers the following: • • • • • • Server Status Username Availability Checker To Do List Notepad MS Calculator MS Paint Server Status The server status tool shows you information about the RuneScape servers. If you are looking for a specialty world to do X activity in, you can use the ‘Filter’ tool, to quickly filter out worlds that are not X activity themed. Let’s say I wanted to go to the Fishing Trawler, I would click the dropdown menu for Filter, and select Fishing Trawler from the list. The server information will not automatically update, you will need to click the Refresh button to do so. If you only want to view the server information for Member worlds, click the ‘Members’ tab. If you only want to view the server information for Free worlds, click the ‘Free’ tab. The ‘Always on Top’ tick-box will make the Server Status window appear on-top of every other SwiftKit window (only while SwiftKit is the active application). 44 Username Availability Checker This tool is used to check if a RuneScape username is available or unavailable. Simply enter the name you wish to lookup, and click the search button. SwiftKit will return the results. To Do List The To Do List allows you to store notes for game play. You can tick the boxes beside each note as you complete them. The Clear List button wipes the list, and the Save and Exit button saves your work and closes the window. Notepad This is a simple notepad. You can write anything you like, save it, and refer to it at any time. There are many features available. Such as: - Inserting the time or date (or both!) - Changing colours and fonts - Alignment - Copy/Paste - Find / Replace - Save / Open notes To access these features, right click in the notepad area. 45 Calculator This link opens the windows default calculator should you prefer to use this rather than the one built into SwiftKit’s main window. MS Paint By clicking on this you open the MS Paint program. 46 Quest Center The Quest Center is a new feature in SwiftKit that will help keep track of your quest plans and also give helpful information on the Rewards and Requirements for all Free and Member Quests. The Quest Planner will help you remember what Quests you can or can’t do and will give information on what else you need to be eligible to do the Quests you haven't done. If your ready to start a quest you can click it to read that Quest Guide in the Quest Center, provided by Zybez. • • • Quest Planner Rewards Quest Guides Quest Planner The Quest Planner is used to help you keep track of the quests you have completed, it also tells you which quests you are eligible to start. The first time you use the Quest Center you should make sure you check all of the quests you have done and enter your username and press grab data. SwiftKit will then load your stats. Then click “Show Stats” and check that all of your levels have been loaded. It is important that any stats not shown (SwiftKit will only auto-load stats listed on the RuneScape Highscores) are entered and that you then press save. The next time you open the Quest Center you will have your quests saved and they will auto-load for you. The green highlights on the quests show that you have completed and checked that quest off in the planner, the reds show quests that you have not done and are not eligible to start yet, and the yellows are quests that you have the appropriate skill stats and quest requirements to start. At anytime you can double click one of these quests to view it in Zybez Guides. You can filter out your completed quests in order to only see the eligible and the uncompleted quests, or you can choose to only view the Quests you are eligible for. To do this click the filter button on the top right hand side of the planner, you can then select what you would like to filter out. 47 Rewards This tab basically shows you a list of quests and there rewards, it has a search function so if you were searching for Agility exp you would type agility into the search and it will show you a list of quests that give Agility exp. If you happen to be a nonmember then you can check the box that says "Hide Members Quests". Quest Guides The top right tab can be selected to view all Quest Guides provided by Zybez, These guides can show you exactly what you need to do in your quest of choice. There is a guide for any quest you may need help on, free or members. On the left hand side you will see the buttons labeled "back" and "forward" these will simply take you to the previous page or take you back to a page you had previously visited. The Home button will take you strait to the Zybez Guides main page. 48 Screenshots Screenshots are the way to go if you want to share or save a moment in your RuneScape adventures. They are simply a quick snapshot of whatever you see on your computer screen, saved into a picture file. Screenshots are very useful in the RuneScape game, and that is why SwiftKit has a colourful array of screenshot features. • • • • • • • Screenshot Hotkey Drag Screenshot Automatic frame detection Upload Screenshot Screenshot Viewer Date Watermarking Extension Chooser Screenshot Hotkey With the click of a keyboard shortcut of your choice, SwiftKit will take a snapshot of the RuneScape window, and save the image instantly without any hassle. This is extremely helpful if you need to take multiple screenshots within a short time. Drag Screenshot Like the Screenshot Hotkey, this feature freezes the RuneScape screen temporarily and allows you to drag a box-like shape around the area you would only like to be saved. This feature eliminates the need for an outside program such as Microsoft Paint to crop your screenshot. Automatic frame detection SwiftKit will automatically detect the RuneScape applet and only take a screenshot of that area. This feature can be turned off. Upload Screenshot If you want to share a screenshot with a friend or want to post your screenshot on a forum, you need to upload it to the Internet. SwiftKit features a screenshot uploading tool that will upload a screenshot automatically to a free image hosting provider. At the time of writing, SwiftKit supports ImageShack and ImageCloset. Screenshot Viewer SwiftKit includes a screenshot viewer feature where you can easily browse and view the screenshots you have taken with SwiftKit. The viewer allows the user to view images held in the SwiftKit default image file and also any others held on the host computer. To assist with navigating and also managing screenshots there are several control buttons built into the viewer. 49 Home – Returns to the default Screenshot folder Refresh – If a screenshot is taken while the viewer is open, refresh allows you to see the new image. Delete – Delete the highlighted screenshot. Edit – Opens the highlighted screenshot for editing. The default editing program is MS Paint but this can be changed by right clicking on the edit button and setting a new default path to another editor. Date Watermarking To help those uses who wish to keep their screenshots nice and organized, SwiftKit features the option to watermark the screenshots with the current date. The date blends in with the picture flawlessly covering the ‘Report Abuse’ button. Watermarks are formatted DD/MM/YY. This feature can be disabled. Extension Chooser SwiftKit allows the user to choose the type of image extension for the screenshots. Currently it supports png, jpeg, gif, bmp, and tif. 50 Themes The themes in SwiftSwitch have always been limited. We have decided to improve the theme engine in SwiftKit, and we have done so severely. Instead of having to choose between 7 or 8 themes that were preloaded, we have given the users to pick from literally unlimited amount of themes, as well as exciting new features. • • • • • Entire program is globally themed Colour-picker Import/Export themes Save Themes Ability to download themes Entire program is globally themed Unlike SwiftSwitch, SwiftKit has all of its windows correspond with the global theme that you have selected. No more having one window black then when you load something else, it’s pink! Colour-picker You have the ability to fully customize the colour of the SwiftKit program. Going from changing the form back colours to changing the colour of the button borders, you are in control. Access to a colour picker not only allows you to change the colour, but the saturation of the colour, giving you light colours and dark colours! 51 Import/Export Imagine being able to create a theme and easily send it to a friend only by copying and pasting some text! When you create a theme, you have the ability to export it in the form of a short code and give it to someone else so they may use the exact same theme you created. This also works in reverse, allow other people to send you their favourite themes so you may enjoy them. No downloads or uploads required, its plain text! Save Themes SwiftKit gives you the option to save as many themes as you want. It gives users a little dynamic feeling to the SwiftKit program. Ability to download themes If you go to www.swiftkit.net, you will find a list of popular/unique themes that are available for importing. 52 Timers and Counters Timers and Counters are a useful feature of SwiftKit. You can use them in many different ways, to counting bones for your next pray level to timing the next spawn of a rune rock. Timers and Counters are located in the bottom tab of SwiftKit’s internal utilities. Currently there are four different timers and counters; • • • • Gravestone Timer Countdown Timer Counter Stopwatch Gravestone Timer The Gravestone timer should let you know an approximate time of when your items are going to disappear after you die. All you have to do is select your gravestone from the dropdown (default is memorial plaque) and click the “start” button. Pressing the Stop button will pause the timer and reset it. The Pause button will simply stop it until you press the start button again. Countdown Timer The Countdown timer has a limitless number of uses. You can use it to time the next spawn of a item or when stealing from a stall. All you have to do is click the enter time button and enter the time for it to countdown from in HH:MM:SS format then press the start button. Pressing the “Stop” button will stop the timer and set the time to 0. The “Restart” button will set the time to the last entered time. The “Pause” button will simply pause the timer. Counter The Counter is a useful tool with many uses. It can be used to count the number of monsters left in your slayer assignment. All you have to do is either enter a number in the box, or use the hotkeys (ctrl + and ctrl -) on the numberpad of your keyboard(right side). Pressing the “C” button will clear the number you have entered. 53 Stopwatch The Stopwatch is a tool you can use to time how long something takes. If you want to figure out how long it takes for you to cut a full inventory of yew logs the stopwatch is what you’d use. Simply press the “Start” button, then use the “Pause” button for when you’re done. The “Stop” button will set the time back to 0. Tips -Remember to hit the gravestone timer when you die, if you wait for too long it won’t be accurate and you might lose your items. -Remember to increase\decrease the number on the counter, it’s purely based on user input. -The Countdown Timer is really useful, try using it for skills. -All times are in HH:MM:SS format, Hours:Minutes:Seconds. -If you leave a part of the Countdown Timer blank it is presumed to be 0. 54 Treasure Trails Treasure Trails are one of the most fun and rewarding parts of Runescape. If you are having trouble with these Treasure Trails, don’t fret, SwitKit can help you out! To access the ‘Treasure Trails’ feature of SwiftKit please complete the following steps 1. Click ‘Utilities’ on the SwiftKit utility bar (the bar that displays File, Runescape, Utilities etc.) 2. On the Utilities drop down menu, click ‘Treasure Trails.’ 3. Clicking Treasure Trails on the Utilities menu will display 3 options :Guide, Puzzles, Treasure Locator. These three features are explained below. Please note that the features Guide, Puzzles, Treasure Locator can be accessed via the utilities underbar. Follow these steps to access the features Guide, Puzzles, Treasure Locator via the underbar. 1. Click the third icon down on the internal utilities, this displays the Utilities underbar. 2. Under the heading ‘Treasure and Maps’ the features Guide, Puzzles, Treasure Locator can be accessed. Guide Clicking ‘Guide’ will open the Zybez Treasure Trail Guide in a browser window. This guide provides you with access information on: • • • • • • • • • • • • Introduction Obtaining A Clue Coordinates Speak to... Anagrams Challenges Sliding Puzzles Maps Other Clues Emote & Outfit Clues Treasure Trail Rewards Frequently Asked Questions Puzzles Clicking ‘Puzzles’ will display the final result of a completed slider puzzle. You can use this picture of a completed puzzle to help you complete your own puzzle box! 55 Treasure Locator Clicking ‘Treasure Locator’ displays the Treasure Locating device. This device can be used when you recieve a co-ordinate clue. You simply input the first degree number, time and direction, then input the second the second degree number, time and direction and click ‘Find.’ The Treasure Locator will then provide you with a location on the world map of where exactly you need to go for your clue scroll. The exact location is where the two red lines meet. 56