1
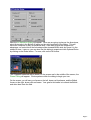
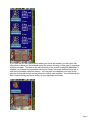
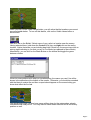
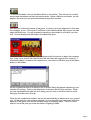
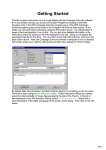
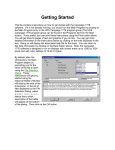
Getting Started This file contains instructions on how to get started with the War of 1812 software. If it is not already running, you should run the Main Program by clicking on the Main Program entry in the HPS War of 1812 program group (The HPS War of 1812 program group can be found in the Programs list from the Start button). If you prefer, you can print these instructions using the Print button above. You will get about 8 pages of text and graphics if you do this. You can get more detailed information in the instructions below by clicking on the links displayed in the text. Doing so will display the associated help file for this topic. You can return to this help information by clicking on the Back button above. Note: the War of 1812 software is designed to run on displays with screen areas up to 1280 by 1024 pixels and with color settings of 16-bit or higher. By default, after the introduction, the Main Program begins by prompting you for the name of the file to open using the File Selection Dialog. These instructions will get you started using the historical Battle of Chippawa playing the side of the Americans. In the list of files displayed by the File Selection Dialog, select 00 Getting Started.scn. Notice that a short description of the battle will appear at the bottom of the dialog. Then click on the OK button. Page 1 Next, the A/I Selection Dialog will appear. Since we are going to play as the Americans, select Automatic in the British A/I group on the right hand side of the dialog. This will cause the computer to play as the British side. If we want to give the computer an advantage, we could move the Advantage slider towards British side, but leave it in the middle for now. Later on, you can also use this dialog to experiment with Optional Rules by clicking on the Rules button. For now, click on the OK button. The Chippawa battlefield will be drawn on the screen and in the middle of the screen, the Phase Dialog will appear. Click anywhere within the dialog to begin your turn. On the screen, you will see your forces on the left, drawn on blue bases, and the British forces on the right, drawn with red bases. Your goal in this battle is to attack the British and drive them from the field. Page 2 If you click with the left mouse button where your forces are located, you will notice that information is drawn on the left hand side of the screen showing you the type of units there and their strength. This area on the left hand side of the screen is called the Unit List. It enables you to determine information about your forces, the terrain that the forces are in, and some information about the enemy. You may wish to investigate your army at this point by clicking with the left mouse button on various map locations. You will see that you have various infantry and some artillery at your disposal in this battle. Page 3 You may notice that you have some leaders on horseback in this battle. Leaders perform various functions in the game such as maintaining command and raising morale. They are beneficial when used in combat, but you want to keep them out of harms way to avoid losing them. During your turn, you can perform three basic functions: moving, firing, and meleeing. Each of these will be covered in these help notes. We will begin with moving. Find some of your forces on the map on the blue bases and left-click on their location. This will place a blinking red hexagon around those forces. Note: there are various display zoom modes in the game and you can zoom in or out using these, but for now we will keep the display at the initial setting. Notice that when you click on a unit picture in the Unit List, that this toggles the unit from Selected (bright) to Unselected (normal). Experiment with this selection process if you like, but then make sure that all of the units are Selected. Note: selecting all of the units in a location is also possible by double-clicking on the map location. Page 4 Once you have selected the units, then you can move them to an adjacent location by right-clicking in that location. If you do this successfully, the units will move to the new location and an arrow will be drawn on the map showing your path up to that point. Also notice that based on random chance, you may be fired upon by the British as you move. If this should happen, you will see a Fire Report on the screen showing you the results of that fire. If you are unable to move the units you have selected, the reason for this will be shown in the status bar at the bottom of the screen. Note that in this movement mode, you are only able to move units one location at a time. There are more sophisticated methods you can learn about later for facilitating movement. Once you get the hang of moving, you probably will want to advance several of your units towards the enemy so you can fire on them. You will also notice some British units in the woods at the top of the screen (You may have to use the scroll bars on the edge of the map to see these units). Be sure to move some of your units next to these British units so we can also try some meleeing during your turn. Again, randomly your movement may cause firing by the British side and you simply click OK if you should get a Fire Report as a result. There are several requirements that must be met before you can fire on enemy units. In particular, you must be within range, you must be able to see the enemy units, and you must be facing them. To determine what you can see from any location, click on the Visible Hexes button in the toolbar. Page 5 When you click on the Visible Hexes button, you will notice that the locations you cannot see are shaded darker. To turn off this feature, click on the Visible Hexes button a second time. Now let’s fire on the British! Select some of your units in a location near the enemy. Having selected them, hold down the Control (Ctrl) key and right click on the enemy location. Notice that while you are holding down the Control key, the mouse turns into an aiming sight indicating to you that you are in Fire Mode (as opposed to Move Mode). Alternatively, you can click on the Mode Button on the toolbar and toggle the game between modes. If there is some problem with what you are attempting, the reason you can’t fire will be shown in the status bar at the bottom of the screen. Otherwise, you should be rewarded with the blast of musket fire and then a report should appear on the screen letting you know what effect the fire had. You should notice that you also have some artillery down by the waters edge, already unlimbered and ready to fire. You may want to select these units and fire on the enemy position as well. Page 6 When the location you are firing on has more than one enemy unit, then the Target Dialog will be displayed allowing you to pick which of the enemy units you wish to fire upon. Notice that when a unit fires, the Unit List indicates this. The Unit List will also indicate to you loses you have suffered from enemy fire and possible Fatigue that has resulted from this. Once you fire a unit, you won’t be able to move that unit again until your next turn so be sure to advance as far as you want to that turn before firing. Now let’s try a Melee. The purpose behind a melee is not only trying to cause enemy casualties, but also attempting to take the enemy location. You must be adjacent to the enemy location before you can melee that location. If you have moved your forces adjacent to the enemy in the woods at the top of the map, then select your forces and right click (in normal Move Mode) the enemy location. If you do this correctly, you should see the Melee symbol appear on the enemy location and a dialog will appear letting you know the odds associated with this melee. Note that you can take several of your units and as long as they are all adjacent to the enemy location, add them together into a single melee, thus improving your chances. Page 7 To resolve the Melee, click on the Melee Button in the toolbar. This will result in combat sounds and animations and then the melee results. When a Melee is successful, you will displace the enemy forces and automatically occupy their location. Now that you’ve done the basics of the game, it’s time to give your opponent, in this case the computer, a turn. Click on the Turn Button in the toolbar and this will end your turn and begin the British turn. You will be asked to save the current battle in a file after your first turn. You can simply save this battle in the default file given. When the Phase Dialog appears, click anywhere within the picture to begin the computer turn. Note: if you click on the Close Button, this will cause the computer turn to pause. If this should happen, to resume the computer turn, click on the A/I Button (next to the Melee button) in the toolbar. As the A/I performs each of its actions, the A/I Action Dialog will appear explaining to you what the A/I is doing. Click on the Step button to advance the A/I to its next step. When you feel comfortable with what the A/I is doing, you can click on the Run button to avoid having to click after each A/I step. When the A/I completes its actions, the turn will automatically be advanced to your second turn. At this point you can continue the battle, or save the battle and experiment with other aspects of the game, such as the scenario editor or campaign game. There is a lot to explore, but at this point you know the basics of fighting a battle. Page 8 To get more help, you should investigate the on-line help files. In each program, these are accessible using the Help button in the toolbar, by selecting General Help from the Help menu, or by pressing the F1 key. Also remember that you can generate printed copies of the documentation by displaying these from the War of 1812 program group and printing them on your printer. The best results here are obtained by printing using a current version of Microsoft Word instead of WordPad which has a problem with the indexes and table of contents. Now on with the battle! Your goal in this battle is to take the British Objective while not allowing the British to take yours. You can see where these Objectives are on the map by clicking on the Objectives button in the toolbar or by selecting the Objectives menu item in the Display menu. The British Objective will be indicated by a British flag on the map. Furthermore, when you click on an Objective, the value of that Objective will be displayed at the bottom of the screen in the brown box. Try to cause as many British casualties as you can while avoiding casualties of your own. At the end of the battle, the Victory Dialog will be displayed indicating the outcome of the battle. Feel free to save this battle and come back to it later if you want to do more exploring at this point or if you would really prefer to play the British side. Whatever file you save the battle in will be displayed when you select the Old button in the File Selection Dialog. To get more information, see the following help files: User Manual Main Program Help File Scenario Editor Help File Campaign Editor Help File Page 9