1
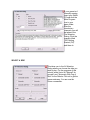
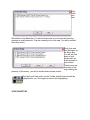
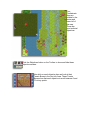
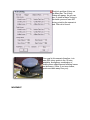
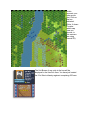
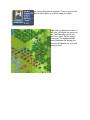
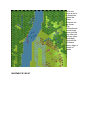
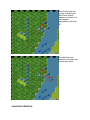
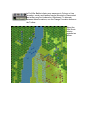
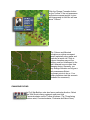
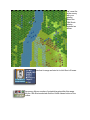
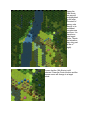
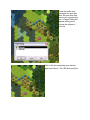
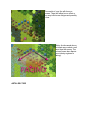
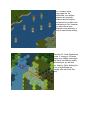
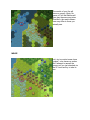
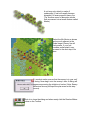
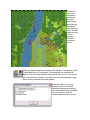
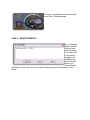
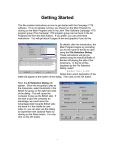
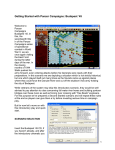
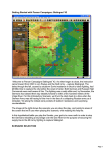
SHILOH GETTING STARTED
Welcome
to Civil
War
Battles
Shiloh. It
is April
1862 and
on the
shores of
the
Tennessee River, at the site of a church from which the action will take its name, the
fate of the Confederacy in the west will be decided. It will be the largest battle of the
War Between the States to date, with casualties measured in the tens of thousands,
where the reputations of future key commanders will be won or lost. It will be a
campaign borne of chaos where both sides will see victory and defeat within their
grasp. This guide will get you playing immediately.
SELECT A SCENARIO
If your game isn’t
currently running,
insert your Shiloh
CD and click the
Main Program
icon in your
game folder.
After the
introductory
cinematic you will
be taken to the
File Selection
Dialog. Click the
scenario titled
"000 Getting
Started (FH)"
and then ok.
SELECT A SIDE
This takes you to the AI Selection
Dialog where you choose the side you
wish to play. For the purposes of this
tutorial, select Union AI "Manual" for
yourself, and "Automatic With Fog of
War" for the Rebels. Click ok to get the
game underway. You are now the
Union commander.
TURN 1
A New Scenario Message Dialog will pop up
announcing the release of some of your forces.
Click ok to close it.
The map will then appear along with a dialog
announcing the current turn. Click to close it
as well. (Tip: A turn in Civil War Battles
represents 20 minutes of real time and a
hex covers 125 yards across).
MAP VIEWS
Click the Zoom-In and Zoom-Out buttons on the Toolbar. You will cycle
through four map views – two 3D and 2D.
Feel free to
use these
views
according to
your taste in
order to better
see your
objectives,
your forces
and the action
around you as
you play. (Tip:
To scroll the
map use the
scroll bars or
click Settings
and Auto
Scroll in the
Menu Bar).
YOUR FORCES
Look at the
map. Your
forces in this
scenario are
deployed in
the north.
Some of the
enemy’s
forces are
located in the
south. (Tip:
With fog of
war active,
enemy units
you can’t see
will be hidden
from you).
Click
Units
and
then
Scheduled on the Menu Bar. You will see that some of your forces will enter the
scenario as reinforcements. They are currently not on the map. You will be notified
when they arrive.
Click Units and
then Releases on
the Menu Bar.
You will see that
some of your
forces have yet
to be released to
your control.
These forces are
currently on the
map. Barring the
proximity of the enemy, you will be notified when release occurs.
Click the Fixed Units button on the Toolbar and all fixed units will be
highlighted for you. Click again to remove this highlighting.
YOUR OBJECTIVE
Four
Confederate
flags are
located in the
center and
lower left of
the map.
These are
your territorial
objectives.
Click the Objectives button on the Toolbar to show and hide these
objective markers.
Now click on each objective hex and look at their
Terrain Boxes in the Hex Info Area. These Terrain
Boxes show that each objective is worth between 5 and
75 victory points.
Click Info and then Victory on
the Menu Bar. The Victory
Dialog will appear. As you can
see, to obtain a Major Victory in
this battle you must earn 400
victory points by the scenario’s
end. Click ok to close it.
Your goal in this scenario therefore, is to
earn 400 victory points in the 10 turns
available, through any combination of
holding these objectives and inflicting losses
on the enemy. (Note: If you incur losses,
points are taken away from you).
MOVEMENT
In this
scenario your
side moves
first. Click on
the hex
indicated.
(Note: It doesn
’t matter
which map
view you
choose, in
this case we
are using
normal 2D).
The Unit Boxes of any units in the hex will be
displayed in the Hex Info Area. You have just located
the 31st Illinois infantry regiment comprising 835 men.
Let’s move this infantry regiment. To do so click its Unit
Box so that it lights up. It is now ready for orders.
Right click any adjacent location. If
able, the 31st Illinois will move one
hex. The Status Bar will tell you
why if not. (Note: Did the enemy
fire at you? The system handles
enemy defensive fire during your
turn and will likewise fire your units
during its turn).
Let’s now
move a unit to
a distant hex.
Select the
Essex
Gunboat unit
as shown.
(Tip:
Gunboats and
mortar boats
move just like
any other unit
but may never
enter land).
Now with the
left button
down, drag it a
couple of
hexes.
MOVEMENT BY BOAT
Some
units
are
capable
of boat
movement. These units are designated by the letter "B" adjacent to their movement
points in their Unit Boxes. (Note: Boat movement capability does not represent boats
being manhandled overland. Rather, it symbolizes the existence of non-combat
transport-steamers on call in the vicinity).
Let’s move a unit by
boat. Select the 25th
Indiana infantry
regiment and the 1st
Mo. Arty "D" as shown.
Their boat capabilities
are reflected in their
Unit Boxes. Using either
movement method you
know, move them into
the river. If able, these
units will comply. The
Status Bar will tell you
why if not. (Note: A unit
will automatically leave
its boats once ordered
onto land).
Now select
Brigadier
General
Paine as
shown. A
leader may
only use
boats if
stacked with a
boat-capable
unit.
Move the General into
the hex containing the
49th Illinois infantry
regiment as shown. It is
boat capable,
designated by the letter
"B".
Now with both units
selected, move them into
the river as a stack.
CHANGING FORMATION
In Civil War Battles infantry may maneuver in Column or Line
formation, cavalry and leaders may be Mounted or Dismounted
and artillery may be Limbered or Unlimbered. To alternate
between these formations, use the Change Formation button on
the Toolbar.
Select the
30th Illinois
infantry
regiment as
shown.
Click the Change Formation button
on the Toolbar. If the unit possesses
sufficient movement points, its icon
will change and its Unit Box will now
show "Column".
(Tip: Column and Mounted
formations provide a movement
benefit especially along paths and
roads but at some risk. Units in
Column formation may not fire.
Artillery must be Unlimbered to fire
and Limbered to move other than
changing facing. Generally, you
may change formation so long as a
unit possesses sufficient
movement points to do so. Your
artillery batteries start this scenario
Limbered for movement).
CHANGING FACING
In Civil War Battles, units also face a particular direction. Select
the 30th Illinois infantry regiment again and click
Counterclockwise on the Toolbar as shown. (Tip: Three facing
buttons exist; Counterclockwise, Clockwise and About Face).
If it possesses sufficient
movement points, the 30th Illinois’
icon will turn reflecting its new
facing and its Unit Box will show
"Column" but this time, pointing
south. (Tip: Facing is important
during combat. Fire taken outside
a unit’s facing causes a severe
"enfilade" penalty, as does any fire
taken by units in Column or
Limbered formation).
INFANTRY FIRE
Let’s now fire
at the enemy
with your
infantry.
Select the
18th Illinois
infantry
regiment as
shown.
Note that its range as listed in its Unit Box is 5 hexes.
The enemy offers a number of potential targets within this range.
With the 18th Illinois selected click the Visible Hexes button on the
Toolbar.
Hexes the
18th Illinois
can see will
be highlighted
on the map.
The stack of
enemy units
directly to its
southwest
occupies one
such hex. It is
therefore a
valid target.
(Note: Terrain
and elevation
play a big part
in line of
sight).
Ensure that the 18th Illinois is still
selected. Press the Control button and the
mouse cursor will change to a target
reticle.
Place the reticle over
the target hex and right
click. As more than one
enemy unit occupies the
hex, a Target Dialog will
appear asking you to
choose the subject of
your fire.
Click on the line containing your desired
target and then ok. The 18th Illinois will fire.
The results of your fire will show on
screen. There will either be no effect or
you may inflict some fatigue and possibly
a loss.
(Note: As discussed above,
to initiate any combat a unit
must face the enemy. The
colored hexes here denote
your infantry regiment’s
facing).
ARTILLERY FIRE
Let’s conduct some
long-range fire. As
mentioned, your artillery
batteries are currently
limbered and will require
movement into position and
unlimbering to fire. However
you also have at your
disposal some gunboats, a
form of water-borne artillery.
Select the St. Louis Gunboat as
shown. It’s range is 18 hexes.
Check your visibility once again
and fire on the leftmost enemy
unit exactly as you did with
your infantry. (Note: Artillery fire
is line of sight based too.
Friendly units can block this
view).
The results of your fire will
show on screen. (Note: No
game of Civil War Battles will
ever play the same way twice.
Therefore, the results shown
here may differ to those you
actually see.
MELEE
Let’s try to conduct some close
combat – also known as melee.
We’ll attempt to assault the
enemy unit you just attacked via
the St. Louis and try to take its
hex.
A unit may only attack in melee if
undisrupted. A unit will usually become
disrupted if it faces powerful enemy fire.
(Tip: Another cause of disruption results
from movement into a terrain feature called
Abatis).
Select the 8th Illinois as shown
and move it adjacent to the
Rebel target. Enemy fire will
likely ensue. If your unit
remains undisrupted it may
proceed to the next step in its
plan.
To conduct melee, ensure that the enemy is in your unit’
s facing. Now drag it onto the enemy’s hex. A dialog will
appear announcing the initiation of melee. (Note: Enemy
defensive fire may still spoil the plan even as this step
occurs).
Click ok to close the dialog and when ready click the Resolve Melee
button on the Toolbar.
The results of the melee will be
shown with your losses followed
by the enemy’s. If the enemy
retreats you will occupy its hex.
In this case the enemy’s
survivors have retreated to their
left. (Tip: This is how you
capture an enemy-occupied
objective).
FINISH YOUR TURN
Continue to
move your
units about
and fire as
you wish,
both directly
and indirectly.
Remember
that units may
move, fire and
melee so long
as they
possess
sufficient
movement
points.
When you have finished your actions click the Next Turn button on the
Toolbar and click ok if prompted. A Confederate turn indicator will
appear, click it to close and the computer will take its turn. The enemy
will move and fire its forces. Your units may fire automatically in reply.
Some enemy movement may be spotted.
Once the enemy’s turn has
finished a Union Command
Report will appear announcing
any reinforcements and releases
for your next turn. Note its
contents and click ok to close it.
Your next turn will be announced once the
Union Turn 2 Dialog appears.
TURN 2 – REINFORCEMENTS
Your Command
Report advised
that you have
reinforcements.
Let’s see check
to see what’s
available. On
the Menu Bar
click Units and
Arrived. An
Arrived Dialog
will appear. As you can see some Union cavalry has joined the periphery of the
action.
Click the cavalry’s line in
the dialog and then ok.
Your cavalry reinforcements
will appear on map at hex
28,0 and these forces are
now fully ready for orders.
(Tip: Hex locations are
shown in the bottom right
corner of the game screen).
FINISH THE GAME
You now know how to move, fire and melee with your forces. With the victory
conditions in mind keep maneuvering your forces in the manner you see fit. The end
of the game will be announced at the conclusion of the enemy’s final turn at which
time, the final victory tally will be shown.
To restart the scenario click File then Selection in the Menu Bar. A list of scenarios
will appear and you may select any by double clicking its entry.
FURTHER INFORMATION
This guide is designed to make you feel comfortable with what’s going on in
Civil War Battles but it is no substitute for the User Manual, which is the
series’ rulebook. The User Manual will expand upon everything discussed here and
cover the issues of campaign play, leadership, morale and supply amongst others
that will allow you to fully enjoy the game.
The Main Program Manual discusses the various elements of the interface
in helpful detail. You can see this while playing by pressing F1.
If you wish to delve inside the game designer’s head, press F3 while
running the game and the Designer’s Notes will be yours.
Pressing F2 invokes a feature called the Parameter Data
Dialog. It provides a host of information including
movement costs, terrain benefits and stacking limits
amongst other things.
Documentation for the game’s editors may be found in the following help files:
Scenario Editor Help Manual
Campaign Editor Help Manual
For updates, downloads and the latest information visit HPS
at www.hpssims.com or email [email protected].
Veterans of the system be sure to check out the What’s New section that follows.
WHAT’S NEW IN SHILOH
1. GUNBOATS
Shiloh sees the introduction of Union mortar boats and Confederate gunboats to
the series. Gunboat stacking is now limited to 2 units per hex, a gunboat may only
be sunk if its entire compliment of artillery is destroyed and such artillery losses
are now counted as victory points.
2. PDT
It is now possible to create 2-hour night turns in design your own scenarios. The
6.5 Inch rifled cannon has also been added to the PDT file.