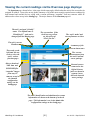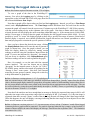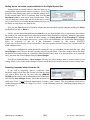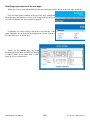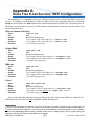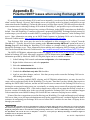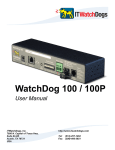
1
WatchDog 15 / 15P User Manual ITWatchDogs, Inc. 7600 N. Capital of Texas Hwy. Suite B-345 Austin, TX 78731 USA http://www.itwatchdogs.com Tel: (425)-223-4311 Fax: (877)-FAXIECI Copyright Information © Copyright 2009-2012 ITWatchDogs All Rights Reserved. No part of this document may be used or reproduced for commercial benefit in any form or by any means, or stored in a database or retrieval system, without prior written permission of ITWatchDogs, except in case of brief quotations embodied in articles or reviews. Making copies of this document for any purpose other than your own individual use is a violation of United States copyright laws and international treaty provisions. For further information, contact ITWatchDogs as directed below. Warning and Disclaimer This publication is provided as-is, without warranty of any kind, either express or implied. While every precaution has been taken in the preparation of this publication, and the information contained within was believed to be correct at the time it was written, ITWatchDogs assumes no responsibility for errors or omissions. Neither is any liability assumed for damages resulting from the use of the information or instructions contained herein. It is further stated that the publisher and authors are not responsible for any damage or loss to your data or equipment that may result, directly or indirectly, from your use of this publication and the related software or hardware. Nothing in this documentation shall be construed as conferring any license under any of ITWatchDogs’ or any third party’s intellectual property rights, whether by estoppel, implication, or otherwise. This equipment has been tested and found to comply with the limits for a Class A digital device, pursuant to part 15 of the FCC Rules. These limits are designed to provide reasonable protection against harmful interference when the equipment is operated in a commercial environment. This equipment generates, uses and can radiate radio frequency energy and, if not installed and used in accordance with the instruction manual, may cause harmful interference to radio communications. Operation of this equipment in a residential area may cause harmful interference, in which case the user may be required to correct the interference at his own expense. Modifications to this product not authorized by ITWatchDogs could void the FCC approval and negate your authority to operate the product. Trademark Acknowledgements ITWatchDogs, the ITWatchDogs logo, the “Digger” mascot character, itwatchdogs.com, WeatherGoose, SuperGoose, MiniGoose, MicroGoose, RelayGoose, WatchDog, are trademarks or registered trademarks of ITWatchDogs. Any other trademarks, products, or company names mentioned herein are the property of their respective owners, and are used strictly for the purposes of identifying compatibility and/or providing examples of the proper use of ITWatchDogs’ products in conjunction with the identified product(s) or service(s). In no case should the use of such trademarks be regarded as affecting the validity of any trademark or service mark; neither should it be construed either as an endorsement by ITWatchDogs of the trademarked product(s) or service(s), or as an endorsement of ITWatchDogs or its products by the trademark or service mark’s owner(s). Sales, Support & Contact Information To receive further information or assistance regarding this publication, or with any ITWatchDogs products, please contact: Headquarters: ITWatchDogs 7600 N. Capital of Texas Hwy. Suite B-345 Austin, TX 78731 USA Phone: Fax: (877)-9022979 (877)-FAXIECI (3294324) E-mail: sales inquiries, price quotes: [email protected] technical assistance, RMA requests: [email protected] Web: www.interworldna.com Contents Preface .................................................................................................................................................................2 Introducing your WatchDog-15 .............................................................................................................................3 Unpacking your WatchDog-15 .........................................................................................................................................4 Specifications .......................................................................................................................................................6 Hooking up the WatchDog-15 ..............................................................................................................................7 Connecting the external power supply ............................................................................................................................8 Connecting the Ethernet network cable ..........................................................................................................................8 Connecting external Digital Bus Sensors ........................................................................................................................9 Initial Setup (A “quick-start” guide to giving the unit an IP address) .................................................................10 Configuring the WatchDog-15 ............................................................................................................................12 Getting to the Configuration page .................................................................................................................................13 Restoring the default settings ........................................................................................................................................13 Assigning an IP Address (Network configuration settings) ............................................................................................14 Setting the real-time clock .............................................................................................................................................14 Setting an E-mail server & addresses ...........................................................................................................................15 SNMP events and managers (SNMP configuration settings) ........................................................................................16 Access control (User Accounts configuration settings) .................................................................................................16 Setting unit-identification and contact information .........................................................................................................17 IP Camera configuration settings ..................................................................................................................................17 Syslog-based Diagnostics settings ................................................................................................................................18 Installing firmware updates ............................................................................................................................................18 Choosing Fahrenheit or Celsius temperature scales ....................................................................................................19 Enabling the RPM-X2’s relays as alarm actions ...........................................................................................................19 Using the WatchDog-15......................................................................................................................................20 Viewing the current readings via the Overview page displays ......................................................................................21 Assigning “friendly” names to the sensor devices .........................................................................................................22 To change the “friendly-name” label of the WatchDog-15 ......................................................................................22 To change the “friendly-name” labels of attached Digital-Bus sensors ..................................................................22 Disconnected, or “unplugged” sensors ..........................................................................................................................23 “Unavailable” sensors? ...........................................................................................................................................24 Applying an offset to the internal temperature reading ..................................................................................................24 Viewing the logged data as a graph ..............................................................................................................................25 Managing the WatchDog-15’s data-logging ..................................................................................................................26 To download logged data from the WatchDog-15 ..................................................................................................26 To clear the WatchDog-15’s logging memory .........................................................................................................26 Getting the current sensor & device status via XML .....................................................................................................26 Downloading the .MIB files for SNMP ...........................................................................................................................27 Setting alarm thresholds and actions ............................................................................................................................27 Setting alarms on the WatchDog-15’s built-in temperature & humidity sensors .....................................................27 Setting alarms on remote sensors attached to the Digital Sensor Bus ...................................................................29 Removing unwanted alarms from the list ................................................................................................................29 Identifying tripped alarms on the web page ............................................................................................................30 Appendix A: Some free E-mail services’ SMTP configurations ..........................................................................31 Appendix B: Potential SMTP issues when using Exchange 2010 .....................................................................32 Preface About this Manual: This manual is designed to help you set up and use your WatchDog-15 Monitor. The first chapter will provide you with a basic introduction to the WatchDog-15 itself, along with instructions on how to properly install and connect it; subsequent chapters will explain each of the WatchDog-15’s functions in detail. Note: this manual assumes that the user has at least some basic familiarity with connecting Internetcapable devices to an internal network or LAN, including how to properly configure any routers or switches to allow the monitoring unit to be reached via a web browser on a host PC within that network, and to allow the unit to reach other devices or services (i.e. IP cameras, e-mail servers, NTP services, etc.) which your application may require. Obtaining Related Documentation: This manual is specifically concerned with the WatchDog-15 monitoring unit itself. For more information concerning the various sensors and accessories available for the monitoring unit, refer to the appropriate manual for the specific accessory in question. These manuals can be downloaded from our web site, in the Support→Documentation section here: http://www.itwatchdogs.com/documentation.aspx Document Conventions: This document uses some or all of the following conventions: system messages Messages which the unit displays to the user are shown in monospaced italic “Courier” user-typed commands Information you must enter is shown in monospaced “Courier” [KEY] Square brackets are used to indicate that the user should press a specific key or keys on the user’s PC keyboard; i.e. [ENTER] means the user should hit the “Enter” key, as opposed to typing the word “enter”. [CTRL][C] means to hit the “control” and “c” keys together. web page controls The names of buttons or control boxes on the unit’s web page are shown in Arial italic. <user setting> Elements which the user must fill in with their own specific information are shown in italics between angle brackets; i.e. <ip address>, <account name> Note: Text highlighted in yellow means reader take note. Notes contain suggestions or cautions which the reader should keep in mind when trying to use a particular feature of the product. Warning: Text highlighted in red means reader be careful! Warnings indicate situations where equipment damage, malfunction, or data loss could result if the highlighted information or instructions are not followed by the user. ►Modelspecific ►information Information which only applies to one or more specific models will be highlighted in grey, with an ►arrow preceding the text. WatchDog-15 User Manual [2] rev. A1.02 – Sept.24, 2012 Introducing your WatchDog-15 Designed specifically for small-scale applications, the WatchDog-15 provides web-enabled temperature and humidity monitoring in a compact, low-cost unit with a simple, easy-to-use web interface. Two Digital Sensor Bus ports provide connections for additional sensors, allowing one WatchDog-15 unit to monitor conditions at multiple locations within a room. This makes the WatchDog-15 ideal for applications where space is at a premium, such as small-office server closets, remote telecommunications-equipment sites, or climate-controlled storage facilities. The WatchDog-15 comes in two models: The standard “WatchDog-15” model, and the enhanced “WatchDog-15P” model which includes Power-over-Ethernet (PoE) capability. Aside from the PoE option, both models function identically, so in general the term “WatchDog-15” or “monitoring unit” will refer generically to both models in this manual. If it is necessary to point out behavior or information which only applies to a specific model, such model-specific information (and the model it applies to) will be highlighted in grey. In this introductory section, you will find illustrations of the WatchDog-15 and its side-panel connections, along with brief explanations of the unit’s various features and a summary of its specifications. NOTE: The information provided in the following sections applies to WatchDog-15 units running at least firmware version v1.4.2. Earlier firmware versions may not have all of the capabilities described, while later versions may have additional capabilities not included in this version of the manual. If in doubt, please consult our web site for change-logs, manual updates, or errata sheets which may apply to your particular model and firmware revision. WatchDog-15 User Manual [3] rev. A1.02 – Sept.24, 2012 Unpacking your WatchDog-15: When you first open up the box your WatchDog-15 came in, you should find the following items. (Note that the actual appearance of the devices you received may vary slightly from the sample illustrations shown here.) WatchDog-15 WatchDog-15 IT Dogs Default IP: 192.168.123.123 IP Address: +6VDC power supply • Input voltage range: • Output voltage: • Operating temperature range: 100 ~ 240VAC, 50/60Hz +6VDC, 2A (max.) 0 – 40°C / 32 – 104°F (typ.) This power supply is capable of worldwide-voltage (120~240VAC, 50/60Hz) operation, and connects to the WatchDog-15 via a standard 2.1mm center-positive DC barrel plug. WARNING: Using any DC power supply other than the model(s) supplied or approved by ITWatchDogs may damage your WatchDog-15 and void your warranty! If the standard +6VDC wall transformer-style power supply is not suitable for your application, please contact ITWatchDogs’ sales & service department to discuss possible alternatives. The standard +6VDC power supply normally supplied with the WatchDog-15 comes with a U.S.-style (NEMA 5-15, ungrounded) plug. Power supplies with a U.K.-style (BS 1363) plug, or with a “universal” kit of interchangeable U.S. / U.K. / European (CEE 7/4) / Australian (AS 3112) plugs, are available as an option. Below is a quick overview of the physical connections and indicators on the side panels of the WatchDog-15. (Note: the sample diagrams shown below have been simplified for clarity, and are not to scale; the actual physical appearance of the unit may vary.) ETHERNET DIGITAL SENSORS WatchDog-15 IT Dogs 6VDC Default IP: 192.168.123.123 F IP Address: RESET A C D B WatchDog-15 User Manual [4] E rev. A1.02 – Sept.24, 2012 A Digital Sensor jacks: These 6P6C modular jacks allow you to connect one or more Digital Bus-type sensors to the WatchDog-15. Note that while only two physical jacks are provided, the WatchDog-15 can support up to four external sensors via the use of a passive port splitter to multiply the number of physical connection points. (This will be illustrated in the sample hookup diagrams later in this section.) The Digital Bus-type sensors used by the WatchDog-15 are the same as those used by the WeatherGoose series. The WatchDog-15 supports all of the existing single-function sensors, such as RT-series temperature sensors, RTAFHD3 temperature/airflow/humidity probes, and the RPM-X2 Remote Power Manager. Complex multifunction accessories such as the IOE I/O Expander, however, are not supported due to their large datastorage requirements; generally, these devices are better suited to the WeatherGoose-II series. Also note that the WatchDog-15 does not support discontinued “legacy” devices such as the RTAF2 or RTAFH2 airflow probes, or the PowerEgg series of AC power monitors. NOTE: the WatchDog-15 has a maximum limit of 600 ft. of total cable length on the Digital Sensor Bus; i.e. you can have a single external sensor 600ft away from the unit, or two sensors with 300 ft. cables, or two at 100 ft. plus two at 200ft., or any other combination of cable lengths as long as (A) the number of sensors does not exceed four, and (B) the cable lengths do not add up to more than 600 ft. total. B Temperature/Humidity sensor tab: The WatchDog-15’s built-in temperature and humidity sensors are mounted here, protected by a metal cage around the circuit-board tab. The unit should be mounted in such a way that this tab is exposed to the environment to be monitored. C DC power jack: The +6VDC power supply’s 2.1mm, center-positive barrel plug fits into this socket to provide power to the WatchDog-15. D Ethernet jack: This jack features two green LEDs indicating the connection status. The LED on the right indicates “link/active”; it will light up solidly when the unit is physically connected to the network (“link”), and blink when the unit is being accessed (“active”). The left-hand LED indicates the link speed; when lit, it indicates a 100Mbit connection. E RESET pinhole: Holding down the switch behind this pinhole for approximately 15 seconds, until both the Active and Idle LEDs light up solidly (no blinking pattern), will reset the unit’s IP address to the factory default of 192.168.123.123. It will also clear any User Accounts username/password settings on the Config tab, allowing you to regain access to the unit even if you’ve forgotten your passwords or accidentally misconfigured the unit. If this pinhole switch is held down for at least 5 seconds while powering up the unit, it will completely erase all settings and return the WatchDog-15 to its “out-of-the-box” factory configuration. F Active / Idle LEDs: Located below the Ethernet jack on either side of the RESET pinhole, these serve as indicators that the WatchDog-15 is operating properly and communicating with the sensor-bus controller and external sensors (if any). The “Idle” LED will normally blink approximately once a second while the WatchDog-15 is operating, while the “Active” LED will light up when the main CPU is actively exchanging data with the internal or external sensors via the bus controller. WatchDog-15 User Manual [5] rev. A1.02 – Sept.24, 2012 Specifications • Power requirements – WatchDog-15 unit: +6VDC 140mA (0.84W) typ. (no external sensors,) 350mA (2.1W) max. (4x RTAFHD3 sensors) • Power requirements – AC Power Adapter: (included w/unit) 100 ~ 240VAC, 50/60Hz • Power requirements – Power-over-Ethernet: IEEE 802.3af-compliant (48VDC, 1W typ.) (WatchDog-15P model only) • Inputs: 2 Digital Sensor Bus connections (2x 6P6C modular jacks) • Log-Data Capacity: 1Mb (1024Kb) • Log-Data Rate: (built-in sensors only*): 20Kb/day (approx.) • Maximum Digital Sensor Bus cable length: 600ft (182m) • Operating Temperature Range: –20° ~ +85°C (–4°F ~ +185°F)† • Supplied Accessories: (1x) AC Power Adapter, 100~240VAC in, +6VDC out * Remote Digital Bus sensors will require an additional 3 ~ 12Kb per day, approximately, depending on the sensor type. Note: typical operating range of the included AC power supply is 0 – 40°C (32 – 104°F). For operation outside of this temperature range, ITWatchDogs recommends using either Power-over-Ethernet, or using a power supply designed specifically to operate at extended temperature ranges instead of the included power supply. † WatchDog-15 User Manual [6] rev. A1.02 – Sept.24, 2012 Hooking up the WatchDog-15 Once you have unpacked the WatchDog-15 and verified that all of the accessories are in the box, the next step is to mount the unit in an appropriate location and connect it to your network. The following sections will provide illustrated examples of how to: • Connect the external power supply • Connect the unit to your network via the Ethernet jack • Connect external Digital Sensor Bus sensors to the sensor jacks WatchDog-15 User Manual [7] rev. A1.02 – Sept.24, 2012 Connecting the external power supply: The 6VDC power supply’s barrel-plug connector fits into the matching socket, marked “6VDC”, on the WatchDog-15 as shown below. ►Note: even if you purchased the PoweroverEthernet capable WatchDog15P model, and intend to use the PoE feature to power the unit instead, it may still be necessary to connect the 6VDC power supply while performing the initial setup and configuration, as the built-in Ethernet ports on most desktop and laptop PCs are generally not equipped to power external devices via PoE. The WatchDog-15 contains internal protection circuitry to prevent both power-supply sources from getting cross-connected if both PoE power and the 6VDC power supply are connected simultaneously. ETHERNET WatchDog-15 IT Dogs 6VDC Default IP: 192.168.123.123 IP Address: RESET Connecting the Ethernet network cable: Connecting the WatchDog-15 to your network is as simple as plugging a standard Ethernet cable into the Ethernet jack, as shown here. If the connection is successful (and the WatchDog-15 has power, of course), the right-hand LED (“link/data”) will illuminate. The “link/data” LED will also blink when the unit is actively transferring data across the network connection. The left-hand LED (“speed”) illuminates whenever the unit is connected to a 100Mbit network connection. If the network connection is only 10Mbit-capable, the “speed” LED will remain unlit. ETHERNET WatchDog-15 IT Dogs 6VDC Default IP: 192.168.123.123 IP Address: RESET WatchDog-15 User Manual [8] rev. A1.02 – Sept.24, 2012 Connecting external Digital Bus Sensors: Connecting Digital Sensor Bus devices is as simple as plugging the sensor’s 6P6C plug into the Digital Sensor jack located on the far right side of the WatchDog-15, as shown here. DIGITAL SENSORS WatchDog-15 IT Dogs Default IP: 192.168.123.123 IP Address: RT-series temperature sensor The WatchDog-15 can support up to four external Digital-Bus sensors – however, it only has two physical sensor jacks. To attach multiple sensors, a passive splitter is required, as shown in the diagram below. As mentioned previously, the cable length of all sensors combined must not exceed 600 ft (200m). DIGITAL SENSORS WatchDog-15 IT Dogs Default IP: 192.168.123.123 IP Address: passive 5-port bus splitter RTAFHD3 probe RT-series temperature sensor RTAFHD3 probe CCAT bridge converter This example shows an RT-series temperature sensor, an RTAFHD3 temperature/airflow/humidity probe, and a CCAT analog-to-digital “bridge” converter attached to the WatchDog-15 via a passive splitter, plus an additional RTAFHD3 probe connected directly to the unit. Note that although the splitter is the standard 5-port model sold by ITWatchDogs, only four sensors will be acknowledged by the WatchDog-15; if you attempt to connect more than four, either via splitter or via the built-in ports, the additional sensors will simply be ignored. (Note: connecting more than four sensors may also cause unpredictable operation if the device is rebooted or power-cycled, since the order in which the sensors are “re-discovered” during the initial bus scan may not be the same as the order in which you initially connected them, and the unit will stop discovering sensors once all four entries in its device memory are occupied. This can have the effect of causing previously-known sensors to seemingly “vanish” or display as “unplugged” even though they may still be physically connected to the unit.) WatchDog-15 User Manual [9] rev. A1.02 – Sept.24, 2012 Initial Setup (A “quick-start” guide to giving the unit an IP address) As shipped from the factory, the WatchDog-15 is configured with the following default network settings: • IP ADDRESS: • SUBNET MASK: • DEFAULT GATEWAY: 192.168.123.123 255.255.255.0 192.168.123.1 Therefore, the first time you set up the unit, you will generally need to connect it directly to a laptop or desktop PC via a crossover Ethernet cable, and configure the PC's network card to match the 192.168.123.xxx subnet, in order to access the unit. 192.168.123.xxx is a common “local” subnet for small LANs and internal networks, so your PC may already be set up on this subnet; if it isn’t, simply follow these directions to temporarily change your PC’s network settings to match those of the WatchDog-15, so you can perform the initial networking setup on the unit. (Note: the following screenshots illustrate the process on a PC running Windows XP; however, the process is similar for most other operating systems.) 1. For versions of Windows up to and including XP, click START, “Settings”, then “Network Connections". For Windows 7, right-click the system tray, click “Network Sharing Center”, then “Change Adapter Settings”. 2. Locate the entry under “LAN or High-Speed Internet” which corresponds to the network card you're using to connect to the WatchDog-15. (Most PCs only have a single network card installed, but if you have more than one, you can determine which connection is the correct one to change by simply disconnecting the cable from the WatchDog-15, and watching to see which network adapter's status changes from “Connected” to “Network Cable Unplugged.”) 3. Double-click on the appropriate network adapter's entry in the Network (fig.1) Connections list to open its status dialog box, then click the “Properties” button to open the Properties dialog. (see fig.1, at left.) 4. Find the entry titled “Internet Protocol (TCP/IP)” in the list, then click the “Properties” button. (see fig.2, at left.). If you see more than one TCP/IP entry, your PC may be configured for IPv6 support as well as IPv4; make sure you select the entry for the IPv4 protocol. (The IPv6 entry will specifically mention “v6” somewhere in its name, to help distinguish them.) NOTE: Before changing any of the properties on this page, be sure to write down their current settings, so that you can restore them afterwards! (fig.2) WatchDog-15 User Manual [ 10 ] rev. A1.02 – Sept.24, 2012 5. Set the properties so that your PC has a fixed address on the 192.168.123.xxx subnet. (see fig.3, at left.) The last three digits can be any value from 1~254 – except, of course, for .123, which is the WatchDog-15 itself! – as long as that address isn’t currently occupied by anything else on your network. Note that for this initial setup, it isn’t necessary to specify addresses for “Default Gateway” or “DNS servers”, and these fields can be left blank. (Some versions of Windows may ask you to confirm the settings changes before you can close the dialogs; go ahead and do so.) 6. The WatchDog-15 should now be accessible. If it isn’t, you may need to reboot your PC for the changes to the TCP/IP settings to take effect. (This generally only applies to the older Windows 95/98/ME versions; Windows 2000, XP, and beyond normally do not require a reboot to change TCP/IP settings.) To configure the network settings on your WatchDog-15, type the 192.168.123.123 address into your web browser’s address bar. The “Overview” page (fig.3) should come up by default. 7. Click on the Config button on the left-hand side of the page to bring up the configuration settings (see fig.4, at left), then set the various parameters as necessary to assign it an address on your network. You can either assign it a static address, or have it acquire an address from your network router via DHCP. (See the following section, “Configuring the WatchDog-15”, for more details on these settings if needed.) (fig.4) Note: once you click the Save Changes button, the new settings will take effect instantly, so your browser will no longer be able to reload the web page from the 192.168.123.123 address and will probably display a “page not found” or “host unavailable” message. This is normal. 8. After you have finished configuring the WatchDog-15, simply repeat steps 1 through 5 to restore the TCP/IP settings you wrote down in step 5. This will put your PC's network card back to the proper settings for your network. Once you have completed this quick-start setup, you can connect the WatchDog-15 to your network and it should be accessible at the IP address you set, above. If you are unable to bring up the unit’s web page, and think you may have made an error in configuring the settings, you can reset the unit back to its default 192.168.123.123 address by using a paperclip or a pin to press the IP Reset switch behind the pinhole under unit’s Ethernet jack for approximately 15 seconds, until both of the red LEDs underneath the jack light up simultaneously. Then, repeat the setup procedure as above. WatchDog-15 User Manual [ 11 ] rev. A1.02 – Sept.24, 2012 Configuring the WatchDog-15 Once you have performed the initial “quick-start” setup as described in the previous section, you can configure the unit by: • Changing the WatchDog-15’s TCP/IP network settings. • Resetting the default TCP/IP network and access-account settings to their factory defaults. • Erasing all of the unit’s current settings and restore then to factory default. • Setting the time and date on the WatchDog-15’s real-time clock, manually or via NTP time service. • Configuring the WatchDog-15 to log in to a designated SMTP mail server, and specify the addresses which alerts should be sent to. • Specifying up to two SNMP managers to receive trap events when alarms are tripped, along with the appropriate community string(s) and trap types for your SNMP manager(s). • Controlling access to the WatchDog-15 by setting user-names and passwords for the Admin, Control, and View accounts. • Configuring the “Admin Info” shown at the bottom of the WatchDog-15’s web pages to display the appropriate location and contact information for your facility, as a convenience to other users viewing the device. • Specifying up to four IP cameras to be displayed on the Overview page alongside the current sensor information. • Enabling Syslog-based diagnostics for troubleshooting. • Updating the WatchDog-15’s firmware. • Making the WatchDog-15 display temperature readings in either Fahrenheit or Celsius. • Enabling the RPM-X2’s relays for use with the WatchDog-15’s alarm system. Note that this section is concerned primarily with global system configurations, such as the ones described above. For information on setting alarm thresholds, assigning “friendly” names to internal or external devices, managing the logged data, or other such functions, refer to the following section, “Using the WatchDog-15”. WatchDog-15 User Manual [ 12 ] rev. A1.02 – Sept.24, 2012 Getting to the Configuration page: The majority of the settings covered in this section will be found on the WatchDog-15’s Config page. By default, when the unit is accessed by its IP address, the Overview page is the first one to come up; to get to the configuration page, simply click the tab marked Config from the list on the left-hand side, as shown. This will bring up the Configuration page, where the majority of the global system settings can be found. Restoring the unit’s default settings: At the top of the Configuration page, in the section marked General, there are two buttons: Restore System Default Values, and Restore Network & Account Default Values. The first button, Restore System Default Values, will erase all user settings except for the IP address and network settings, restoring the device to its out-of-thebox factory state while still allowing you to access the device at the IP address you assigned it previously. Restore Network & Account Default Values, on the other hand, initiates a “soft” reset of the unit, equivalent to holding down the IP Reset button on the front panel. The Admin, Control, and View accounts’ login credentials will be cleared, and the unit will revert to the factory-default IP address of 192.168.123.123, but all of your other settings (alarm thresholds, e-mail settings, etc.) will be preserved. If you find yourself unable to access the unit’s configuration page due to a misconfigured network setting or a forgotten password, the default settings can also be restored by using the RESET pinhole underneath the Ethernet connector, as shown here: ETHERNET WatchDog-15 IT Dogs 6VDC Default IP: 192.168.123.123 IP Address: RESET Using a bent paperclip or a push-pin, hold down the switch behind the pinhole for about 20 seconds, until both of the red Active/Idle LEDs light up simultaneously. This will perform the same function as the Restore Network & Account Default Values button, as above, resetting the IP address to the 192.168.123.123 default and clearing the access passwords If you find it necessary to completely reset the unit to an “out-of-the-box” state, disconnect power from the unit, then hold down the pinhole switch while re-applying power. Keep the button held for at least 5 seconds, then release. This will perform a “hard” reset which encompasses both the Restore Network & Account Default Values and Restore System Default Values functions described above, resetting everything and erasing all user data and settings. WatchDog-15 User Manual [ 13 ] rev. A1.02 – Sept.24, 2012 Assigning an IP Address (Network configuration settings): The Network block of settings is where you configure the WatchDog-15’s IP address and network settings. The unit’s MAC address is also shown here. As shipped from the factory, the unit defaults to a static IP address of 192.168.123.123, using the public DNS servers operated by Google at 8.8.8.8 and 8.8.4.4. Any of these settings can be changed to suit your particular network and internet service’s requirements. Once you have typed in the desired address settings, click the Save Changes button to make them take effect. Note that once you click Save Changes, any changes you made to these settings will take effect instantly. If you changed the IP Address setting, your browser will not be able to reload this page from the “old” address any more, and will probably display a “page not found” or “host unavailable” message. This is normal; just type the unit’s new address into the browser’s address field and the WatchDog-15’s display should return as usual. If you prefer, you can also use DHCP to have the WatchDog-15 acquire the IP address and DNS settings from your network router automatically. (Note that you must have at least one router on your network which is configured to hand out IP addresses via DHCP lease for this feature to work.) To enable this feature, simply set the Enable DHCP checkbox and click Save Changes. Note that once the WatchDog-15 has been told to get its address via DHCP, it will keep trying endlessly to acquire an address via this method and will no longer be accessible on any previously-set IP address; if no DHCP service is available on your network and the WatchDog15 is unable to acquire a new address, you will need to use the IP Reset button to regain access to the unit. Setting the real-time clock: The Time settings block is where you can set the unit’s real-time clock. The clock can either be set manually, or it can automatically sync itself to an NTP time server, depending on the Mode setting. In Manual mode, the time is set by filling in the Date, Month, Year, Hour, Minutes, and Seconds fields, as shown here. The time is shown in a 24-hour format; i.e. 8AM would be represented as 08:00:00, while 8PM Clicking Save Changes would be 20:00:00. immediately sets the clock to the values typed into these fields. In NTP mode, the WatchDog-15 will try to keep its clock synchronized to an NTP time server. This server can either be on your internal network, or it can be a publicly-accessible NTP service such as ntp.pool.org. In this mode, the manual time-setting fields described above are greyed out and ignored. The Server field specifies the NTP time server to be used, while the Sync Period field determines how frequently the WatchDog15 will poll the NTP service to keep the clock synchronized. In either mode, the time is always set in GMT (Greenwich Mean Time). To convert this to your local time, set the appropriate GMT Offset (specified as + or – the appropriate amount in hours and minutes, i.e. –05:00 for U.S Eastern Standard Time, +10:00 for East Australia Time, etc.) for your particular time zone. Note: the WatchDog-15 does not automatically compensate for Daylight-Savings Time changes, so you will need to change the GMT Offset manually if you wish to have the unit show the correct local time when DST is in effect. Also note that the unit will not begin logging data to memory until the clock is set. WatchDog-15 User Manual [ 14 ] rev. A1.02 – Sept.24, 2012 Setting an E-mail server & addresses: The e-mail server, login credentials, and recipients for alarmmessage e-mails are configured via the Email settings block. • Server specifies the SMTP e-mail server to be used for sending messages. This can specified either by IP address or URL. • Port is the TCP port used for the SMTP service. The default SMTP port is 25, but some e-mail services require you to use an alternate port. (Ports 465 and 587, for example, are common alternates for SMTP servers using TLS/SSL sessions.) • The Use SSL checkbox determines whether or not SSL encryption should be used during the e-mail session. (Most 3rd-party e-mail services, such as Gmail, will require SSL.) Note: The WatchDog-15 does not support the less-common “Start-TLS” method, where the session starts out as unencrypted and then switches to SSL encryption partway through the transaction. Only full TLS sessions, where the entire transaction is SSL-encrypted from beginning to end, are supported. • Sender is the name and e-mail address which the WatchDog-15’s generated e-mails should appear to come from. Many customers, especially those with several monitoring units deployed at different sites, prefer to set this to something descriptive for each unit, such as “[email protected]”. Note, however, that not all e-mail servers will accept an arbitrary sender name in this field; they may require that the sender’s address is that of a “known” user, or that the sender’s name matches the User Name login. If in doubt, check with your e-mail server’s administrator. • User Name and Password are the login credentials required by the SMTP server. If yours does not require login credentials, leave these fields blank. Note: The WatchDog-100 does not support the older “POP3-before-SMTP” authentication method, where these settings would be used to log in to a POP3 mailbox on the same server to verify the sender’s identity before logging in to the SMTP server. Only “none” (i.e. no username/password) and “SMTP AUTH(plain)”methods are supported. ►As of v1.4.3, passwords can be 39 characters long; firmware versions prior to v1.4.3 are restricted to 19 characters. • The Destination fields allow you to specify up to five e-mail recipients for alarm messages. Once these are set, they will each be shown as potential alarm actions on the Alarm Settings page, where you can selectively determine who receives e-mails for each particular alert. If you do not need to specify that many separate recipients, just leave the unneeded ones blank. • Email Status shows the result of the most recent attempt to send e-mail, so that you can see if an error occurred. In most cases, these settings are fairly straightforward – however, the exact settings will depend upon whose SMTP server you’re trying to use and how its security settings are configured, especially if you are using an external 3rd-party service rather than your own internally-maintained server. Once you have entered the appropriate settings for your SMTP server, click Save Changes. To test the e-mail configuration, click the Send Test E-mail button. The unit will try to log in to the server and send a test message to all of the recipients specified in the Destination fields, then display the results in the Email Status field. If the test e-mails don’t seem to go through, check the Email Status line to see if there is a message indicating at what point the attempt failed. In general, failure to send e-mails is caused either by incorrect SMTP login credentials, or else the WatchDog-100 is unable to reach the specified SMTP server. In either case, your network administrator or e-mail service provider should be able to assist you in verifying the correct settings. WatchDog-15 User Manual [ 15 ] rev. A1.02 – Sept.24, 2012 SNMP events and managers (SNMP configuration settings): The WatchDog-15 can also send alerts to an SNMP-based management system using SNMP Trap events. • Trap IP 1 and Trap IP 2 specify the destinations for trap events to be sent to. As with e-mail recipients, each alarm threshold you set can be made to send traps to either, or both, of these destinations, depending on your requirements. If you are only sending events to a single SNMP manager, put its address into Trap IP 1 and leave Trap IP 2 set to 0.0.0.0. • Trap Type specifies which type of SNMP events should be sent when an alarm occurs. The supported types are V1 Trap and V2C Notify. The trap type must be set to the type expected by your particular SNMP manager for this function to work. • The Read Community, Write Community, and Trap Community fields are used for authenticating SNMP client-to-manager communications; the WatchDog-15 and the SNMP manager(s) must belong to the same community in order to exchange messages. These settings will be determined by the type of SNMP manager being used, and its configuration. Once you have configured the appropriate settings for your SNMP manager(s), click Save Changes. (Note: the SNMP .MIB file and OID list can be downloaded from the unit; refer to “Downloading the .MIB files for SNMP” for more information.) To test the SNMP configuration, click the Send Test Trap button. The unit will attempt to send a trap (or notify) event to both SNMP managers. Access control (User Accounts configuration settings): The WatchDog-15 provides three different User Accounts, with different privilege levels, enabling you to restrict access to some or all of the unit’s features. The accounts, in decreasing order of privilege, are: • Admin account: This account has complete access to all of the unit’s functions and settings. • Control account: This account has access to all of the unit’s functions – adding or changing alarm thresholds, modifying “friendly names”, etc. – except for the administrative system controls on the Config page. • View account: This account can only view the main Overview page to see the current status of the unit and sensors. It cannot access any other pages, and cannot alter any settings on the unit. It is not required to set up all three accounts; however, if an account’s user name is left blank, that access level will be openly available to anyone who gets the unit’s IP address, so it is strongly recommended that you at least set up the Admin account. Accounts with lower privilege cannot be set unless the account(s) with higher privilege are also set; i.e. you cannot set the Control account without also setting an Admin account. If you lose your passwords, you will need to use the IP RESET button to clear the account passwords and regain access to the unit. Note that this will also reset the unit’s IP address to 192.168.123.123. ►As of v1.4.3, passwords can be 39 characters long; firmware versions prior to v1.4.3 are restricted to 19 characters. WatchDog-15 User Manual [ 16 ] rev. A1.02 – Sept.24, 2012 Setting unit-identification and contact information (Admin Info configuration settings): Admin Info allows you to change the descriptive contact information seen at the bottom of the unit’s web pages. The Contact Name, Contact Email, and Contact Phone fields allow you to provide contact information for the person responsible for administrative issues concerning the unit or facility being monitored, while Device Location and Device Description are provided to help identify both the individual monitoring unit and the facility in which it’s located. This information can be particularly useful to you (or your users) if you have multiple units installed at several different physical sites. Note that these settings are purely for your own use; the WatchDog-15 does not make use of any of these settings for itself. It will not, for example, attempt to send alert e-mails to the address specified in the Contact Email field. IP Camera configuration settings: The WatchDog-15 can integrate up to four (4) IP cameras into its front-page Overview display. These cameras’ IP addresses and access credentials (if any) are configured via the Cameras block on the Config page. Each camera has four parameters: • URL: The address of the camera to be integrated into the display. This can be specified either by numeric IP address or by URL. • Model: Different models of camera require different methods to fetch a static image for web-page integration. The WatchDog-15 is already programmed with the correct methods for several popular camera models; if your model is not listed, you can also select the Enter URL Above option and specify the full address to the camera’s still-image link directly, if you know the correct URL to get a thumbnail image from that camera. (Typically, you would have to get this information from the manufacturer.) Username and Password: if your camera is configured to require an access password to view it, you can put those credentials here, and the WatchDog-15 will submit them to the camera automatically any time you try to view the Overview page so that your browser doesn’t continually ask for the cameras’ login credentials every time the page refreshes. ►Note that as of v1.4.3, passwords can be 39 characters long; firmware versions prior to v1.4.3 are restricted to 19 characters. Note that the image data from the cameras does not pass through the WatchDog-15 and is not manipulated, seen, or stored by the unit itself. The unit is simply embedding an image-tag link to the camera, which directs your browser to fetch the image from the camera. Therefore, the cameras’ IP addresses must also be accessible from whichever PC you’re using to view the WatchDog-15, or they will not be displayed in the browser window. WatchDog-15 User Manual [ 17 ] rev. A1.02 – Sept.24, 2012 Syslog-based Diagnostics settings: If, after configuring the unit, something doesn’t function as expected, the WatchDog-15 can send Diagnostics messages via Syslog to assist in certain troubleshooting situations. To enable the Syslog diagnostics, simply type in the IP address of the PC running a Syslog daemon (such as Kiwi Syslog, which is a popular, and free, syslog monitor for Windows-based PCs), then click Save Changes. Note that the WatchDog-15 always uses the standard Syslog UDP port of 514, and sends messages via the “Local0” facility; these parameters are fixed and cannot be changed, so your Syslog daemon will need to be configured accordingly. To turn off Syslog diagnostics, simply change the IP address back to 0.0.0.0. Note: under normal circumstances, this feature should be left turned off, unless you’re specifically requested to enable it by ITWatchDogs’ technical support. Installing firmware updates: From time to time, ITWatchDogs may issue firmware updates to enhance the WatchDog-15’s capabilities. These updates can be applied simply by uploading the firmware file into the unit directly from your PC and web browser. Typically, these firmware updates will be downloaded from the support area of our web site, and will come as a .ZIP “archive” file containing both the binary firmware package and one or more additional informational files. (Typically, the actual firmware package file will be the largest file in the set, with a .BIN or .BB015 extension at the end of the file name.) Simply unzip the downloaded file into a temporary directory, then use the Upload System Firmware controls on the Config page to install it into the unit. The upload procedure is very similar to uploading a picture to a photo-sharing web site. Just click the Choose... button next to the Firmware package file text-box to bring up your PC’s file browser, then locate the .BIN or .BB015 firmware package file you extracted from the downloaded .ZIP archive and click Open (or OK, depending on your OS version). The path to the file will appear in the Firmware package file box. (If you know the path and filename already, you can also type it directly into the box, but it’s usually more convenient to use the file browser.) Then, click Upload New Firmware to send the new firmware package to the WatchDog-15. Once the file has been successfully transferred, the WatchDog-15 will run a check on the data to make sure it’s a valid firmware image. If the check passes, it will be installed into main memory, the unit will display a message indicating a successful update, and then reboot automatically. After the reboot, the unit will be running the newly-installed firmware. If the check fails, the unit will discard the uploaded image and continue running on the existing firmware version. (Note that on some browsers, the page won’t automatically refresh back to the Overview page after firmware installation, and you may need to manually reload the page after the unit reboots.) WatchDog-15 User Manual [ 18 ] rev. A1.02 – Sept.24, 2012 Choosing Fahrenheit or Celsius temperature scales: Select the Display page by clicking on the appropriate tab on the left-hand side of the web page, then find the section titled General. The topmost control in this section, named Temperature Unit, provides two available options: Fahrenheit and Celsius. Simply set the control to the desired temperature scale, and then click Save Changes. Note that if you have already set some temperature-related alarm thresholds, you will not have to reprogram them after changing the Temperature Unit scale; the thresholds will be converted to the appropriate scale automatically. Note also that this is a global setting; i.e. all temperature sensors, internal or external, will report in the chosen scale. It is not possible to choose different scales for different sensors, or to display both °C and °F simultaneously. This setting will affect the web-page display, the logged data, and temperatures reported via XML or SNMP. Enabling the RPM-X2’s relays as alarm actions: ►Note: this feature requires firmware revision 1.4.0 or higher, and also requires at least one RPM-X2 Remote Power Manager to be connected to the WatchDog-15. If you have connected one of the RPM-X2 Remote Power Managers to the WatchDog-15, you will also see a settings box similar to this one, titled RPM X2 Disclaimer, on the Config page. As of firmware version v1.4.0, the low-cost WatchDog series also supports the RPM-X2 power manager, including its ability to automatically energize and de-energize either (or both) of its two power sockets in response to alarm events as well as being triggered manually by the user. To enable this feature, however, you will need to read the disclaimer, then accept its terms by setting the I accept checkbox and then clicking the Enable button. The default state is Disabled, meaning that the RPM-X2’s relays can only be operated manually by the user from the Control tab, any settings related to automatic control will be greyed out or struck through, and any attempt to select the relays as alarm actions on the Alarms tab will be ignored. Clicking the acceptance checkbox and the Enable button with switch this feature to the Enabled state, allowing you to use the relays as alarm actions. For more detailed information on how to use the RPM-X2 in conjunction with the WatchDog-15’s alarmthreshold settings, please refer to the RPM-X2 Remote Power Manager User’s Guide, which is available for download from our web site in the same support-documentation area as this manual. If, for any reason, you wish to disable this feature again, clicking the Disable button underneath the disclaimer will clear the disclaimer-acceptance checkbox and switch this feature back to the Disabled state. WatchDog-15 User Manual [ 19 ] rev. A1.02 – Sept.24, 2012 Using the WatchDog-15 This section of the manual will explain in more detail how to use each of the WatchDog-15’s features, including how to: • View the current sensor readings and camera images from the Overview page. • Assign “friendly” names to the unit and attached sensors. • Manage connected and disconnected, or “unplugged”, sensors. • Change the unit of temperature measurement between Fahrenheit and Celsius. • Download the logged sensor data, and (optionally) clear the log memory. • Set, change, and remove alarm thresholds and actions on both internal and external sensors. • Determine which alarm thresholds are currently tripped via the web-page display. Note that since some of these features are interrelated, it is highly recommended that users who are new to the WatchDog-15 read this section in its entirety before trying to set up external sensors and alarm thresholds or actions. WatchDog-15 User Manual [ 20 ] rev. A1.02 – Sept.24, 2012 Viewing the current readings via the Overview page displays: The Overview page, shown below, is the page which comes up by default when the unit is first accessed at its assigned IP address. It provides an at-a-glance summary of all of the most recently-acquired sensor readings for both internal and external devices, along with a current still-image “snapshot” from any cameras whose IP addresses have been set up in the Config page. The major features of the Overview page are: The unit’s assigned “friendly” name. The default name is “WatchDog15”, and can be changed from the Display page. The current time. If the clock has not yet been set, this will read “Clock Not Set”. The unit’s model and current firmware revision The unit’s current IP address A summary of the current alarm states These tabs on the left-hand side are used to select the unit’s various function pages The current measurements from the unit’s internal sensor package. links to download XML data and SNMP MIB files External sensors connected to the Digital Sensors jacks are shown in separate boxes, below the internal sensor package “snapshot” images from any IP cameras set up in the Camera configuration settings on the Config page. The unit’s identification and administrative-contact information are shown at the bottom of each web page. This information is set via the Admin Info configuration settings on the Config page. WatchDog-15 User Manual [ 21 ] rev. A1.02 – Sept.24, 2012 Assigning “friendly” names to the sensor devices: To assist you in identifying the device and its attached sensors, the WatchDog-15 permits you to assign your own labels (a.k.a. “friendly names”) to the WatchDog-15 itself and to any attached Digital Sensors. These names are assigned via the Display page. These names can be anything you wish; the only restriction is that there is a maximum length of 24 characters per name. To change the “friendly-name” label of the WatchDog-15: Select the Display page, by clicking on the tab marked “Display” on the left-hand side of the web page, then scroll down to the section titled Devices. The Devices section shows all of the sensors attached to the unit via the Digital Sensors jack, plus the WatchDog-15 itself. If there are no sensors attached, as in the example shown here, then the WatchDog-15 will be the only entry in the list. (If there are sensors attached, as shown in the following example on assigning names to external sensors, the WatchDog-15 will always be the first entry, at the top of the list.) To change the unit’s name, simply type a suitable name for the unit into the Friendly Name field and click the Save Changes button. (Note that the Save Changes buttons only act on the settings contained within their particular block, not on the entire page; i.e. if you also make changes to the General settings on this page, then click the Save Changes button inside the Devices block, only the Devices settings will be saved; any changes you made to General will be lost.) Once you have saved the new name, it will be shown at the top of the web pages, and the WatchDog-15 will use it to identify itself to any external application which requests data from the unit via XML or SNMP. The new name will also appear at the top of the “internal sensors” block on the Overview page, to differentiate it from any subsequent blocks associated with external digital sensors. To change the “friendly-name” labels of attached Digital-Bus sensors: Select the Display page, by clicking on the tab marked “Display” on the left-hand side of the web page, then scroll down to the section titled Devices. The Devices section shows all of the sensors attached to the unit via the Digital Sensors jack, plus the WatchDog-15 itself. (The WatchDog-15 itself will always be the first entry at the top of the list.) In the example shown here, there are four external sensors attached: two RT-series temperature sensors, an RTAFHD3 temperature/airflow/humidity “combo” sensor, and a CCAT analog-todigital converters programmed for use with a water sensor such as the ITWatchDogs WD-1 kit. Currently, all four sensors are set to their respective default names. These names are the ones used to identify the sensors across all of the unit’s pages; consequently, there are two sensor blocks on the Overview page (seen here at right) which both identify themselves as “Temp Sensor.” WatchDog-15 User Manual [ 22 ] rev. A1.02 – Sept.24, 2012 Here, the names of the four external sensors have been changed to better identify them. Now, when you look at the sensors on the Overview page, or try to set thresholds on the Alarms page, it’s easy to tell the two temperature sensors apart, and to know which one is located where in the room being monitored. Changing the sensor names is done in the same manner as changing the unit’s name; simply type the desired names into the sensor’s Friendly Name field, and click the Save Changes button when finished. The new names will immediately appear throughout the WatchDog-15’s displays, and will be used to identify the sensors to any external application which requests data from the unit via XML or SNMP. Disconnected, or “unplugged” sensors: There are three reasons why a sensor may show up as “unplugged” on the web-page interface: • The sensor has, in fact, been physically disconnected from the unit, either from being unplugged from the Digital Sensors jacks, or due to wiring damage that has severed one or more of the signal wires; • Excessive cable lengths or EM interference that is disrupting the serial-data communications between the sensor and the host unit; • A malfunction of the sensor itself which has caused it to stop communicating with the host. Should any of these occur, the WatchDog-15 will flag the sensor as being “unplugged” after it has failed to find and communicate with the sensor on ten consecutive bus scans (or about 1 minute). Once this happens, the following events will occur: First, the alarm-status summary at the top of the page, underneath the model name and firmware revision, will change from green text to red, and will indicate how many alarm thresholds (not how many sensors!) are affected by the unplugged state. In addition, any sensor which has gone “unplugged” will have that status displayed next to all of its measurements, as shown here. On the Alarms page, any alarm threshold which is affected by the apparent disconnection of its sensor will display an “unplugged” status in red, rather than a “clear” status in green, as shown here. WatchDog-15 User Manual [ 23 ] rev. A1.02 – Sept.24, 2012 Finally, on the Display page, any sensors which are unplugged will have UNPLUGGED displayed in red text next to their position in the Devices section. If the device in question is still connected to the unit (or is supposed to be), then you should begin by inspecting the wiring and the sensor itself to make sure they are intact and properly connected, before assuming a fault in the sensor itself. However, if this sensor device was deliberately disconnected (to be replaced by a new one, or moved and reconnected to a different monitoring unit at another physical location, for example), and you don’t want it to show up on the unit’s web page at all any more, set the Remove all unplugged devices checkbox, as highlighted above, then click Save Changes. The WatchDog-15 unit then will “forget” the sensor by removing it from its device table, and begin reclaiming any memory blocks used by its logged data. “Unavailable” sensors?: Occasionally, you may see a sensor described as “unavailable” rather than unplugged. This typically indicates that communications with the sensor aren’t (yet) failing enough to declare the device unplugged, but that the unit is still failing to communicate with the sensor for multiple bus-scan cycles. The usual causes are, again, excessive EM interference, sensor malfunction, or wiring and connector problems. Applying an offset to the internal temperature reading: ►Note: this feature requires firmware revision 1.3.0 or higher. While the temperature sensor in the WatchDog-15 is factory-calibrated, sometimes the readings can appear to be higher than they should be due to the sensor picking up some of the heat generated by the rest of the unit’s circuitry. This typically happens when the unit is mounted in an enclosed area with little or no airflow, such as inside an enclosed cabinet or a small closet. If this should occur, you can apply a correction to subtract this “self-heating” effect from the displayed and logged readings. Select the Display page by clicking on the appropriate tab on the left-hand side of the web page, then find the section titled General. Find the control named Internal Temperature Offset, then select the desired correction and click Save Changes. Note that changing the offset will not alter any data already stored in the log, so if you apply a large correction factor, you will see what appears to be a large, sudden drop in temperature. Changing the offset also does not recalculate your alarm thresholds for you, so if you apply a large correction factor, it may set off one or more of your alarms if the offset causes the corrected temperature reading to dip below any “low trip” alarm thresholds you’ve set. Also note that just because the WatchDog-15’s sensor shows a different reading than the room’s wall thermostat does not necessarily mean that the unit’s readings are incorrect and in need of an offset correction. The air temperature in a room is almost never uniform; convection currents, differences in airflow, and relative proximity to cooling vents and/or heat-generating equipment can cause the temperature to vary by several degrees between different spots within the same room. To determine whether the WatchDog-15 is truly reading higher than the “real” ambient temperature due to self-heating, it is necessary to place another temperature probe within less than 1 inch (2.5cm) of the unit’s sensor tab and compare readings. Also, it is necessary to take both sensors’ accuracies into account; if two sensors each have an accuracy of +/-0.5C (0.9F), it is possible for their readings to be as much as 1C (1.8F) apart and still be within their rated accuracies. WatchDog-15 User Manual [ 24 ] rev. A1.02 – Sept.24, 2012 Viewing the logged data as a graph: ►Note: this feature requires firmware revision 1.3.0 or higher. To view a graph of the data in the WatchDog-15’s memory, first select the Logging page by clicking on the appropriate on the left-hand side of the web page, then find the section titled Sensor Data Graph. Note that no graph will be shown when you first load the Logging page. Instead, you will see a Time Range control, and a Display/Refresh button. The Time Range control determines how far back from the current moment the graph will extend, from the most-recent 15 minutes up to the WatchDog-15’s full 30-day capacity, with the current reading always at the rightmost side of the graph. Note that no matter which time range is selected, the unit will only display the most recent data within that range; i.e. if the current time is 09:00 (9AM), and the 1-hour range is selected, then the graph will display the data logged between 08:00~09:00. It is not possible to “scroll” or “zoom” the displayed graph to show only a specific time range of interest; if that kind of detailed display is required, users should download the logged data and use an external spreadsheet or other data-analysis program to examine the specific portions of interest. Once you have chosen the desired time range, clicking the Display/Refresh button will cause the unit to generate a graph, as shown here. Once the graph is shown, you can refine the display further by selectively turning certain readings on and off using the checkboxes shown below the graph. If you are not interested in “dewpoint”, for example, you can un-set its checkbox, click Display/Refresh again, and those readings will not be used to generate the graph. Here, for example, we see the unit with four external sensors attached. The user has chosen not to display “dewpoint” for the internal sensor or for the “AC Unit 1” RTAFHD3 sensor, and has also turned off graphing for the “Storage 4 floor” water sensor. Note how each external sensor has its own group of controls, along with a color key to help differentiate its graph lines. ►Note: in firmware versions prior to v1.4.3, if you had more than one external sensor of the same type attached, and had not changed their “friendly” names from the default values, the data-graph display tended to group them all together instead of differentiating between them due to the way sensor names and values were passed to the Javascript-driven graph generator on the web page. This can be resolved either by giving the sensors individually-descriptive “friendly” names, or (preferably) by upgrading the unit to firmware version v1.4.3 or higher. Note that if the unit does not have enough data in memory to display the requested time range in full, it will adjust the time range to the nearest time range which it can display in full. For example, if a 1-day time range is requested when there are only 3 hours’ worth of data in the log, the unit will change to the 8-hour range instead. When this happens, the unit will display a message indicating that the time range has been adjusted to one that better suits the amount of data available. ►Note: in firmware versions prior to v1.4.3, it was necessary to have at least 15 minutes’ worth of data logged in memory before a graph could be generated. If a graph is requested when the log is empty, or has less than 15 minutes of data available, the unit would display the message “Insufficient data to produce chart”. This limitation was removed in v1.4.3. WatchDog-15 User Manual [ 25 ] rev. A1.02 – Sept.24, 2012 Managing the WatchDog-15’s data-logging: The sensor data recorded by the WatchDog-15 can be downloaded directly from the unit as a .CSV (Comma-Separated Values) file, or as a JSON (JavaScript Object Notation) file (requires firmware v1.3.0 or higher). These files can then be imported into a variety of applications, to be plotted as graphs and compared against previously-saved logs to examine historical trends. .CSV files, for example, are easily imported into spreadsheets, while JSON files can be used by numerous web-based data-display tools to integrate the WatchDog15’s data into web-based applications outside of the device itself. To download logged data from the WatchDog-15: Select the Logging page by clicking on the appropriate on the left-hand side of the web page, then find the section titled Sensor Data Log. In this section, there are two links: CSV and JSON. Simply click on the desired format, and the browser will begin downloading data from the WatchDog-15 and saving it to your hard drive. (The exact location it will be saved to depends on your particular browser and OS combination; some will ask you to specify a location, others will automatically save everything to your desktop or to a default “downloads” folder.) Depending on the amount of data in the log, this may take several minutes. Note that downloading the logs does not clear the data from memory; the unit will continue to add new readings to the end of the existing data, up to the limit of the unit’s memory capacity, after which it will begin discarding the oldest data in memory to make room for new readings. To clear the WatchDog-15’s logging memory: Select the Logging page by clicking on the appropriate on the left-hand side of the web page, then find the section titled Sensor Data Log. Then, simply click the Clear the Log button, and the unit will clear its logged data. Note: This action is irreversible! There is no “undo” feature to recover erased log data, so users are cautioned to be certain that they have saved any important data from the device before erasing the log memory. Getting the current sensor & device status via XML: The unit’s current status, including all of the most recently-acquired sensor readings, can be obtained by clicking the XML link located underneath the page-tab column on the left side of the WatchDog-15’s web interface. The XML can also be accessed directly, simply by adding /data.xml to the unit’s IP address. This allows the unit to be “polled” by an external application running on a client PC. An example of such an application would be ITWatchDogs’ WatchDog Console, which can poll the data from up to 200 monitoring units and log the readings into an SQL database for long-term analysis and auditing. This data could also be used by a client-PC script to take action based on the readings; for example, a script or background service which can initiate a smooth shutdown of some (or all) of your servers if a temperature sensor exceeds a particular threshold. WatchDog-15 User Manual [ 26 ] rev. A1.02 – Sept.24, 2012 Downloading the .MIB files for SNMP: To obtain the .MIB (Management Information Base) file containing the OIDs (object identifiers) to configure your SNMP manager to receive event notifications from the WatchDog-15, simply click the MIB link located underneath the page-tab column on the left side of the WatchDog-15’s web interface. This will cause your browser to download a ZIPped archive file from the WatchDog-15; inside this .ZIP will be the .MIB file, along with some supplementary informational files about the available OIDs for the WatchDog-15 and its sensor devices. Setting alarm thresholds and actions: Clicking the Alarms tab from the page-tab column on the left side of the WatchDog-15’s web interface will bring up the Alarm Settings page. Here, you can set alarm thresholds for both the built-in sensors and remote sensors (if any), and determine which action(s) will be taken if the thresholds are exceeded. Shown at right is a typical example of the alarmsettings page before any alarms have been set. In this example, two remote sensors have been attached to the Digital Sensor Bus port: an RT-series Temperature Sensor, and an RTAFHD3 Temperature/Airflow/ Humidity Sensor. Note how the two remote digital sensors each have their own individual settings blocks, independent of the WatchDog-15’s built-in sensors, and that each block has its own independent Save Changes and Add New Alarm buttons. Note that these buttons only act on settings within their own individual blocks; i.e. if you were to click Add New Alarm on both the “WatchDog-15” and “Temp Sensor” blocks, as shown here, make changes to both of these new alarm entries, then click the Save Changes button in the “Temp Sensor” block, only the changes to the Temp Sensor alarm would be saved; any changes you’d made to the WatchDog-15 entry would be lost. Setting alarms on the WatchDog-15’s built-in temperature & humidity sensors: To create a new alarm-threshold entry, click the Add New Alarm button. Then, click the drop-box control at the top-left of the newly-created entry to show the list of available sensor measurements which you can set alarms on, and choose one from the list. The list will show the available readings from the WatchDog-15’s internal sensor package: Temperature, Humidity, and Dewpoint. Choose the desired sensor reading from the list. WatchDog-15 User Manual [ 27 ] rev. A1.02 – Sept.24, 2012 Next, use the Trips if control to determine whether the alarm should be tripped when the reading goes Above the threshold you set, or Below it. Finally, type the desired threshold into the Limit box, then choose the action(s) you wish the unit to take when this particular alarm threshold is tripped by setting the appropriate checkboxes from the list. Optionally, you can also set a delay time via the Alarm must remain tripped for [ ](min) before notification setting; if this parameter is set to any number other than 0, then once the sensor reading being monitored has exceeded the threshold limit you set above, the unit will wait for the specified number of minutes before sending an alarm message or taking any other actions. If, at the end of the specified delay period, the limit is still exceeded, then the alarm messages will be sent. If the sensor reading returns to normal and the alarm condition clears before the delay runs out, then the delay will be reset and no alarm messages will be sent. The maximum delay time is 240 minutes, or 4 hours. You can also make the unit send alerts for as long as the alarm threshold limit is exceeded, by setting a Repeat every: [ ] (min) interval. Once the threshold limit is exceeded, and after any delay time (see above) has expired, the unit will begin sending repeat alarm messages at the interval specified until the sensor reading returns to normal and the alarm condition clears. The maximum repeat interval is 240 minutes. If the Repeat every interval is set to 0, the repeat function is disabled for that alarm entry and the unit will only send a single alarm message. In the example shown here, e-mails will be sent to recipients #1 and #2 if the temperature exceeds 85°F for more than 5 minutes, and will then continue to send repeated e-mails every 5 minutes after that until the temperature drops below 84°F, or 1 full degree below the threshold. Once you’ve configured the alarm-threshold’s settings the way you want them for this particular entry, click Save Changes to save them to the unit’s memory and activate the alarm. If you later wish to change the alarm threshold or associated actions in a particular alarm-threshold entry, there is no need to delete or re-create the entry; just make the desired changes and click Save Changes. Note that as mentioned above, Save Changes will only save those changes made to entries within its own settings block; if you wish to make changes to entries for both the built-in sensors and those of an external sensor, you must make those changes separately one at a time. Note: if you add more than five alarm thresholds to the WatchDog15, the page will begin dividing itself into groups of five alarms each, as shown here. Each group will have its own Add New Alarm and Save Changes buttons. If any Add New Alarm button is selected, a new entry will be added; however, once the page has divided into groups like this, each Save Changes button will only save changes to alarms within its 5-alarm group. This example illustrates a WatchDog-15 with six alarm thresholds set on its internal sensors, with the groups highlighted in different colors to illustrate how the alarms are divided. The Save Changes button highlighted in orange will only save changes to the five alarm-threshold settings also highlighted in orange, while the one highlighted in blue will only save changes to the sixth alarm, shown here. If the user tries to make changes to any of the first five alarms (the orange-highlighted ones) and then clicks the Save Changes button in the blue-highlighted section at the bottom, those changes will be lost. WatchDog-15 User Manual [ 28 ] rev. A1.02 – Sept.24, 2012 Setting alarms on remote sensors attached to the Digital Sensor Bus: Setting alarms on external sensors is done the same way as setting alarms on the internal sensors (see above). First, scroll down the Alarm Settings page until you find the settings block for the external sensor device in question, then click the Add New Alarm button to create a new entry for that sensor. Then, click the drop-box control at the top-left of the newly-created entry to show the list of available measurements which you can set alarms on, and choose one from the list. Next, use the Trips if control to determine whether the alarm should be tripped when the reading goes Above the threshold you set, or Below it. Finally, type the desired threshold into the Limit box, set any desired alarm-delay or repeat times, then choose the action(s) you wish the unit to take when this particular alarm threshold is tripped by setting the appropriate checkboxes from the list. (For details on these settings, see Setting alarms on the WatchDog-15’s built-in sensors, above.) In the example shown here, e-mails will be sent immediately (no “alarm must remain tripped” delay) to recipients #1 and #2 if the temperature recorded by this remote RTAFHD3 Temperature/Airflow/Hunidity Sensor exceeds 80°F, and will repeat the alarm messages every 5 minutes until the alarm condition clears. Once you’ve configured the alarm-threshold’s settings the way you want them for this particular entry, click Save Changes to save them to the unit’s memory and activate the alarm. If you later wish to change the alarm threshold or associated actions in a particular alarm-threshold entry, there is no need to delete or re-create the entry; just make the desired changes and click Save Changes. Note that as mentioned above, Save Changes will only save those changes made to entries within its own settings block; if you wish to make changes to entries in both the built-in sensors and one or more external ones, Removing unwanted alarms from the list: If you wish to completely remove a particular alarm threshold, simply scroll down the list until you find the alarm you wish to delete from the list, then select the (REMOVE ALARM) option from the sensor-measurement list for that entry and click the Save Changes button. (Note that the green box which says “Clear” is not a clickable button which is used to “clear” alarms! This is an indicator which shows whether this particular alarm is “tripped” or “clear”; see the following section on “identifying tripped alarms on the web page.”) WatchDog-15 User Manual [ 29 ] rev. A1.02 – Sept.24, 2012 Identifying tripped alarms on the web page: When one or more alarm thresholds have been exceeded, they will be shown on the web page as follows: First, the alarm-status summary at the top of the page, underneath the model name and firmware revision, will change from green text to red, and will indicate how many alarms are tripped. In addition, any sensor value(s) which have exceeded any of the alarm theshold(s) set on them will be displayed in red text, instead of the usual black text, as shown here. Finally, on the Alarms page, any alarm threshold which has been exceeded will display a “tripped” status in red, rather than a “clear” status in green, as shown here. WatchDog-15 User Manual [ 30 ] rev. A1.02 – Sept.24, 2012 Appendix A: Some Free E-mail Services’ SMTP Configurations The WatchDog-15 is compatible with several web-based e-mail services which offer SMTP e-mail relay services*. To configure your WatchDog-15 to use one of these services as its outgoing e-mail server, click on the Config tab, scroll down to the Email options block, and set the parameters as follows for your preferred service. (Note that to use any of these services, you will first need to visit their main web site and create an account, if you do not already have one.) : AOL.com (America OnLine): • Server: smtp.aol.com • Port: • Use SSL: • Sender: • Username: • Password: 465 ■ enabled (checkboxset) your complete AOL e-mail address (i.e. [email protected]) your complete AOL e-mail address (i.e. [email protected]) your AOL login password Google GMail: • Server: • Port: • Use SSL: • Sender: • Username: • Password: GMX.com: • Server: • Port: • Use SSL: • Sender: • Username: • Password: Yahoo! • Server: • Port: • Use SSL: • Sender: • Username: • Password: smtp.gmail.com 465 ■ enabled (checkboxset) your complete Gmail e-mail address (i.e. [email protected]) your complete Gmail e-mail address (i.e. [email protected]) your Gmail login password smtp.gmx.com 465 ■ enabled (checkboxset) your complete GMX e-mail address (i.e. [email protected]) your complete GMX e-mail address (i.e. [email protected]) your GMX login password smtp.mail.yahoo.com 465 ■ enabled (checkboxset) your complete Yahoo! e-mail address (i.e. [email protected]) your Yahoo! username without the “@yahoo.com” extension your Yahoo! login password Note: as of the date this manual was prepared, Microsoft’s free e-mail services (Hotmail, “Outlook Live!”, and Outlook.Com) are known to not be compatible with the WatchDog-15. * Please note: this information was believed to be accurate at the time this manual was prepared, and is provided solely as a convenience to those WatchDog-15 owners and customers who may find it useful for their intended application. ITWatchDogs has no connection with any of the companies or services described; no recommendation or endorsement of these services is intended or implied; nor does ITWatchDogs make any claims or guarantee of these services’ reliability, quality of service, or fitness for any given application, or that they will continue to offer SMTP services in future. WatchDog-15 User Manual [ 31 ] rev. A1.02 – Sept.24, 2012 Appendix B: Potential SMTP issues when using Exchange 2010 If your facility uses an Exchange 2010 e-mail server internally, it can be used by the WatchDog-15 to send alarm e-mails if desired. However, the Exchange server will typically need to be properly configured to accept connections from the WatchDog-15 before the unit can use it to relay alarm e-mails. The following notes describe some common issues with using Exchange 2010 with the WatchDog-15, and possible ways to overcome them.* First, Exchange 2010 differs from previous versions of Exchange, in that SMTP connections are disabled by default. Since the WatchDog-15 cannot use Microsoft’s proprietary MAPI/RPC Exchange/Outlook protocol to send messages, you will need to re-enable SMTP by setting up an “SMTP Send Connector” in the Exchange 2010 server. More information on setting up an SMTP Send Connector in Exchange 2010 can be found at this Microsoft TechNet article: http://technet.microsoft.com/en-us/library/aa997285.aspx Your Exchange 2010 server may also need to be configured to allow messages to be “relayed” from the WatchDog-15. Typically, this will involve turning on the “Reroute incoming SMTP mail” option in the server’s Routing properties, then adding the WatchDog-15’s IP address as a domain which is permitted to relay mail through the Exchange server. More information about enabling and configuring SMTP relaying in Exchange 2010 can be found at this Microsoft TechNet article: http://technet.microsoft.com/en-us/library/dd277329.aspx The SMTP-AUTH(plain) authentication method for logging in to the server is also no longer enabled by default in Exchange 2010; only Microsoft’s proprietary NTLM authentication method is enabled. According to information provided by Microsoft, SMTP-AUTH(plain) logins can be re-enabled as follows: 1. In the Exchange 2010 console under server configuration, select hub transport. 2. Right click the client server, and select properties. 3. Select the authentication tab. 4. Check the Basic Authentication checkbox. 5. Uncheck the Offer Basic only after TLS checkbox 6. Apply or save these changes, and exit. Note that you may need to restart the Exchange 2010 service after making these changes. Finally, once you have enabled SMTP, relaying, and AUTH(plain) authentication, you may also need to create a user account specifically for the WatchDog-15 to log into. Note that if you have already done so prior to enabling the SMTP Send Connector, and the unit still cannot seem to connect to the Exchange 2010 server, try deleting the account and creating a new one; occasionally, an existing user account will not properly inherit new permissions under Exchange 2010. (This tends to happen more often with accounts that already existed on a previous version of Exchange prior to the server being upgraded to Exchange 2010, but can sometimes happen with accounts that created under Exchange 2010 before the new connectors and plug-ins were added.) If none of the above suggestions succeed in allowing your WatchDog-15 to send mail through your Exchange 2010 server, then you or your network administrator may need to contact Microsoft’s technical support for further assistance in configuring your Exchange 2010 server to allow SMTP e-mails to be sent from a 3rd-party device through your network. * Please note: this appendix is based on knowledge-base articles provided by Microsoft, and was believed to be accurate at the time this manual was prepared. It is provided solely as a convenience to those WatchDog-15 owners and customers who may find it helpful in getting their units to work with their existing Exchange 2010 servers; however, ITWatchDogs makes no guarantee that this information will work in all cases, or that future versions or service packs for Microsoft Exchange or Windows might not invalidate some or all of these instructions. WatchDog-15 User Manual [ 32 ] rev. A1.02 – Sept.24, 2012 Revision history: • A1.02 – v1.4.3 firmware improves data graphing on Logging page, expands the allowable length of passwords. • A1.01 – Some typos corrected. Updated Appendix A information concerning free SMTP services that are compatible with the WatchDog-15. Added sections about how to identify tripped alarms on the web page, and explaining “unplugged” sensors (and the removal of unplugged sensors from the device) in more detail. (27 Aug. 2012) • A.100 – Initial release (17 Aug. 2012) WatchDog-15 User Manual [ 33 ] rev. A1.02 – Sept.24, 2012