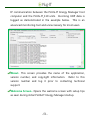
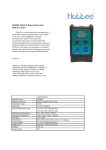
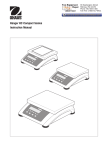
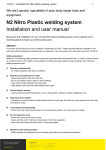
1
Energy Systems Technologies 126-A Sandy Drive Newark, DE 19713 302-368-0567 PLUG-IT_110/110m Devices Energy Manager Software User Manual Energy Systems Technologies Document # 95S80100 Rev 10 Plug_IT February 5, 2014 Technical Support Information E-mail: [email protected] FCC Notice: This equipment has been tested and found to comply with the limits for Class B digital devices pursuant to Part 15, Subpart B of the FCC Rules. These limits are designed to provide reasonable protection against harmful interference in a residential environment. This equipment generates, uses, and can radiate radio frequency energy, and if not installed and used in accordance with the instruction manual, may cause harmful interference to radio communications. However, there is no guarantee that interference will not occur in a particular installation. If this equipment does cause harmful interference to radio or television reception, which can be determined by turning the equipment off and on, the user is encouraged to try and correct the interference by one or more of the following measures: Reorient or relocate the receiving antenna. Energy Systems Technologies Further separation between the equipment and the receiver. Connect the equipment into an outlet on a circuit different from that to which the receiver is connected. Consult the dealer or radio/TV technician for help. Warranty Information Your PLUG-IT Device will be repaired or replaced, at Energy Systems Technologies option, if it proves to be defective in material or workmanship under normal use, during warranty period (“Warranty Period”) set forth below, effective from the date (“Date of Purchase”) of original purchase of the product. This warranty is good only to the original purchaser of the product and effective only when used in the United States. Energy Systems Technologies -ii- Warranty Period: How Service is Handled: Parts: One Year from the Please retain dealer’s dated bill of Date of Purchase. sale or delivery ticket as evidence of the Date of Purchase for proof Replacement Units and of warranty, and submit a copy of Repair Parts may be new or the bill of sale along with any remanufactured. returned units. Replacement Units and Please call our customer support Repair Parts are warranted line at 302-368-0567 for details for the remaining portion of and on where to send returned the original unit’s warranty units for replacement. period. Energy Systems Technologies -iii- WARRANTY: Seller warrants that the products which it manufactures and supplies hereunder shall conform to Seller’s published specifications and shall be free from defects in materials and workmanship under normal use and service for the a period of twelve (12) months from the date of purchase (the "Warranty Period"). Seller's warranties shall not extend (i) to any items subjected to accident, misuse, neglect, alteration, improper handling, improper transport, improper storage, improper use or application, improper installation, improper testing or unauthorized repair or (ii) cosmetic problems or defects which result from normal wear and tear under ordinary use of the products. Seller makes NO WARRANTY as to experimental or developmental goods or goods not manufactured by Seller. Seller's warranties extend to Buyer only and to no other person or entity. Seller’s warranties as hereinabove set forth shall not be enlarged, diminished or affected by, and no obligation or liability shall arise or grow out of, Seller’s rendering of technical advice or services in connection with furnishing products. Seller must be notified of any warranty claims by no later than the end of the Warranty Period. Seller’s sole and exclusive liability for any breach of warranty will be, at its expense, to either repair, replace or credit Buyer’s account with nonconforming products returned to Seller. Energy Systems Technologies -iv- respect to any THE FOREGOING ARE IN LIEU OF ALL WARRANTIES, EXPRESS, IMPLIED OR STATUTORY IN CONNECTION WITH FURNISHING GOODS BY SELLER, INCLUDING, BUT NOT LIMITED TO, ANY IMPLIED WARRANTY OF MERCHANTABILITY OR FITNESS FOR A PARTICULAR PURPOSE AND ANY OTHER IMPLIED WARRANTY OBLIGATION ON THE PART OF SELLER. NONCONFORMING GOODS/WARRANTY RETURNS. Where Buyer timely and rightfully rejects acceptance of nonconforming goods and/or notifies Seller of a breach of warranty relating to goods supplied by Seller hereunder, Seller’s sole and exclusive liability will be (at Seller’s option) to repair, replace or credit Buyer’s account (which credit may be applied by Seller against outstanding amounts owed by Buyer to Seller) with respect to any such goods returned to Seller during the applicable acceptance or warranty period, as the case may be, upon the following conditions: (a) Goods may not be returned without a return material authorization (“RMA”) and will be refused and returned freight collect to the sender; (b) Goods returned shall be packed securely and shall be shipped freight prepaid (with duties, taxes and brokerage fees (if applicable), risk of loss and all other charges associated with the return of such goods being the responsibility of Buyer), together with a statement setting forth the claimed defect; (c) All returns under this paragraph shall be shipped in accordance with all other Energy Systems Technologies -v- instructions (if any) contained in the RSA; and (d) All return shipments will clearly indicate the RSA number on the mailing label. All goods returned under this paragraph shall be subject to examination by Seller. The failure of Buyer to comply with the provisions of this paragraph shall, at Seller’s election, void Buyer’s rights and remedies with respect to any such goods, and such goods may be returned by Seller to Buyer for full payment in accordance with the provisions of Buyer's order. In such an event, all freight, insurance, duties, taxes, brokerage fees and all other charges associated with the transportation of such goods (collectively “Transportation Charges”) back to Buyer, including risk of loss, shall be the responsibility of Buyer. If Seller elects to keep any goods returned to Seller by Buyer which are determined by Seller to be free of defect or otherwise conforming to the warranties hereunder, such goods shall be subject to a restocking fee. Seller reserves the right to withhold Buyer’s remedy hereunder with respect to nonconforming goods until Buyer has fully paid any past due amounts owed to Seller. SOFTWARE LICENSES AND WARRANTIES. Seller may supply certain firmware, software and/or related documentation (the Energy Systems Technologies -vi- “Software”) with the goods provided hereunder. If any firmware and/or related documentation is furnished with the goods, Seller hereby grants to Buyer and Buyer hereby accepts a nontransferable, nonexclusive license to use such firmware and/or related documentation solely in connection with Buyer’s use and/or operation of the goods in which such firmware is originally installed. Any other Software is provided in accordance with a separate license agreement which Seller may require Buyer to execute in connection with the furnishing of the Software. Notwithstanding the foregoing, if no separate license agreement is provided by Seller in connection with the furnishing of the Software, then (i) the Software is licensed to Buyer and not sold, (ii) Seller warrants that the Software, as delivered, will perform substantially in accordance with Seller’s then-current user manual in all material respects; however, Seller does not warrant that the Software will meet Buyer’s needs, be error free, or operate without interruption, (iii) all warranty claims with respect to the Software must be made by the Buyer in writing not later than ninety (90) days after delivery of the Software by Seller to Buyer, (iv) SELLER MAKES NO WARRANTIES WHATSOEVER REGARDING ANY SOFTWARE AND/OR COMPONENTS OF THE SOFTWARE CREATED OR OWNED BY ANY THIRD PARTY, (v) THE FOREGOING WARRANTIES ARE IN LIEU OF ALL OTHER WARRANTIES EXPRESSED, IMPLIED OR STATUTORY Energy Systems Technologies -vii- RELATING TO THE SOFTWARE, INCLUDING BUT NOT LIMITED TO, IMPLIED WARRANTIES OF FITNESS FOR A PARTICULAR PURPOSE AND WARRANTIES OF MERCHANTABILITY AND NON- INFRINGEMENT, AND (vi) any unauthorized use or modification of the Software by Buyer shall void any and all warranties. No other right or license relating to the Software, express or implied, is granted except as provided herein. Buyer shall not sell, assign, sublicense, transfer, or otherwise make available the Software to any other person or entity, without the prior written consent of Seller. All copies of Software shall be clearly marked by Buyer with the same proprietary and copyright restrictions which appear on the Software as originally supplied to Buyer. Technical support Please call or email our technical support line at 302-368-0567 or [email protected] for product support. Energy Systems Technologies -viii- Safety Notice PLUG-IT Device is not designed, authorized, or warranted to be suitable for use in life-support devices or life-support systems or other critical applications involving potential risks of death, personal injury, or property or environmental damage. Energy Systems Technologies -ix- Contents 1 INTRODUCTION ........................................................ 1 2 PLUG-IT_110 OVERVIEW .......................................... 2 2.1 2.2 2.3 2.4 2.5 PLUG-IT_110 POWER CONTROL OF LOAD ........................3 PLUG-IT_110M (MEASURING) ...........................................5 PLUG-IT_110VEND (VENDING MACHINES) ......................8 PLUG-IT_110 NETWORKING OVERVIEW ...........................9 PLUG-IT_110 MULTIPLE NETWORK USERS ..................... 11 3 PLUG-IT ENERGY MANAGER SOFTWARE INSTALLATION ............................................................. 13 3.1 PLUG-IT ENERGY MANAGER SOFTWARE DOWNLOAD . 13 3.2 BEGIN PLUG-IT ENERGY MANAGER SOFTWARE INSTALLATION 13 3.3 PLUG-IT ENERGY MANAGER INITIAL CONFIGURATION SETUP (BASIC) 14 3.4 PLUG-IT ENERGY MANAGER INITIAL CONFIGURATION SETUP (ADVANCED) ................................................................................ 16 3.5 COMPREHENSIVE PRIORITY SETTINGS (ADVANCED) ........ 18 4 CONFIGURE PLUG-IT_110 WITH SETUP WIZARD20 4.1 PLUG-IT SETUP WIZARD (WINDOWS 7/WINDOWS 8) 21 Energy Systems Technologies -x- 5 USING PLUG-IT ENERGY MANAGER .................... 26 5.1 OPERATIONAL OVERVIEW .................................................. 26 5.2 LAUNCH PLUG-IT ENERGY MANAGER ........................... 26 5.3 PLUG-IT ENERGY MANAGER DASHBOARD .................... 28 5.3.1 FUNCTION TAB - DEVICE CONTROL ........................... 29 5.3.2 FUNCTION TAB - GROUP CONTROL ........................... 32 5.3.3 FUNCTION TAB –POWER SAVINGS ............................. 33 5.3.4 Function Tab – Metering .............................................................. 35 TASKBAR - CONFIGURE COMMAND(S) ......................... 37 5.3.5 TASKBAR - PLUG-ITS COMMAND(S) ......................... 40 5.3.6 TASKBAR - SCHEDULES COMMAND ............................ 45 5.3.7 TASKBAR - HELP COMMAND ....................................... 49 6 BASIC TROUBLESHOOTING ................................... 52 Energy Systems Technologies -xi- 1 . Introduction You will soon be experiencing the latest in Wi-Fi enabled energy saving and control devices! Use these PLUG-IT_110 plugs to turn your lights and office equipment off and on automatically and also the option to meter usage. You will soon enjoy the convenience, safety and savings of home and office automation in ways that were previously reserved for expensive automation systems. PLUG-IT products with integrated Wi-Fi automation controls are paving the way for a new automation evolution. The figure below highlights a basic PLUG-IT_110 system. PLUG-IT_110 plugs are managing power to many devices found in most offices. A Microsoft Windows® computer is running the PLUG-IT™Energy Manager application managing on/off schedules, managing remote on/off controls and optional metering of the PLUG-IT_110 plugs across the wireless network. -1- 2 PLUG-IT_110 overview The PLUG-IT_110 is an elegant self-contained smart wall plug that inserts into any common U.S. or Canadian 3-prong 120VAC wall socket. The PLUG-IT_110 plug provides a standard 3-prong 120VAC power output plug for the power control of any desired device. The PLUG-IT_110 is rated for a load current of 15 Amps @ 120 VAC and is not intended for outdoor use or in harsh environments. Plug the PLUG-IT_110 plug into a wall socket and then plug any load device into the PLUG-IT_110 that you wish to power on or off automatically. -2- 2.1 PLUG-IT_110 power control of load When the PLUG-IT_110 load device power control is turned off, the load device is electrically disconnected as if the load device was unplugged from the wall. When the PLUG-IT_110 power control is turned on, the PLUG-IT_110 provides power to the plugged load device as if the load device was plugged into the wall. Example # 1 - If a device’s main power switch is on before being shut down by a PLUG-IT_110 then the device will light up when the PLUG-IT_110 powers it back on. Example #2 - If a device is in standby mode prior to being powered down then the device will power back up in standby mode. Example #3 - If a device's power is switched off before being controlled by the PLUG-IT_110 then the device won't respond whether the PLUG-IT_110 powers the device off or on. -3- The PLUG-IT_110 can control the power to devices in three ways: From a preloaded schedule downloaded from PLUG-IT Energy Manager A user can create and load a custom schedule onto a PLUG-IT_110 using the PLUG-IT Energy Manager application. The preloaded schedule may include anything from one OFF and ON cycle per week to dozens of OFF and ON cycles per day. By using the PLUG-IT Energy Manager application Device Control The PLUG-IT Energy Manager application includes a Device Control window that allows users to cycle individual PLUG-IT_110 units or groups of PLUG-IT_110 units OFF or ON from their computer. The Device Control operations do not interfere with the PLUG-IT_110 units' preloaded ON/OFF cycle schedule, i.e. the PLUG-IT_110 units will commence an ON or OFF cycle at their next scheduled time. -4- By pressing the power button on the top of the PLUG-IT_100 The plugged load device can be powered on by pressing the load device power button for 5 seconds. Pressing this load device ON button doesn't interfere with the PLUG-IT_110 unit's preloaded ON/OFF cycle schedule, i.e. the PLUG-IT_110 will commence an ON or OFF command at its next scheduled time. 2.2 PLUG-IT_110m (measuring) The PLUG-IT_110m has the same elegant self-contained smart wall plug that inserts into any common U.S. or Canadian 3-prong 120VAC wall socket. The PLUG-IT_110m plug provides a standard 3-prong 120VAC power output plug for the power control and metering of any desired device(s). The PLUG-IT_110m is also rated for a load current of 15 Amps @ 120 VAC and is not intended for outdoor use or in harsh environments. -5- The Power of PLUG-IT 110m Measurement Plug The PLUG-IT® Plug 110m Load Management System now allows realtime measurement and analysis of actual energy use at the plug level. With our comprehensive reporting system, facilities/energy managers have an unprecedented ability to measure, analyze and control plugbased load throughout the enterprise. Measure: Create Savings Benchmarks: The combination of the PLUG-IT® measurement software and a measurement-enabled PLUG-IT® allows the creation of a savings benchmark with the actual energy use of all your plug load devices, both individually and in user-defined groups. To create a savings benchmark, simply plug your device into a measurement-enabled PLUG-IT® and keep it in an 'always on' mode during the benchmark period. You determine the appropriate benchmark period: day, week, month, etc. Once your benchmark period is complete, run a report of monthly, weekly, and hourly energy use. -6- Analyze: Energy Use Reporting The PLUG-IT® Plug Load System includes a full reporting database that allows you to capture and analyze historical usage of power by hour, day, month, year or any user defined period. Plug load consumption can be measured and analyzed by device(s); i.e. individual water coolers, all water coolers, or just waters coolers in a particular building. Consumption can also be measured by location, floor, building(s) or a specific type of building such as elementary school(s). Since all of the energy usage is collected by the PLUG-IT® and stored in our PLUG-IT® software application, historical comparison of plug load can be viewed by hour, day, week, month, or year. PLUG-IT® can also be used as a data logger to establish the base level of plug load consumption for savings calculations and even investment grade audits. Measuring and verifying energy savings for performance management contracts is now a simple task that can be done remotely. -7- 2.3 PLUG-IT_110vend (vending machines) The PLUG-IT_110vend has the same elegant self-contained smart wall plug that inserts into any common U.S. or Canadian 3-prong 120VAC wall socket. The PLUG-IT_110vend plug provides a standard 3-prong 120VAC power output plug for the power control and metering of any desired device(s). The PLUG-IT_110v is also rated for a load current of 15 Amps @ 120 VAC and is not intended for outdoor use or in harsh environments. PLUG-IT® Vend has special intelligence that protects your vending equipment from turning off while the compressor is running. Since PLUG-IT® continuously measures energy use; PLUG-IT® knows whether a compressor is on or off. When PLUG-IT® receives an off command as part of the daily schedule, PLUG-IT® delays the ‘off’ command until after the compressor has completed its cycle. Just run your PLUG-IT® for a few weeks to establish your base power usage case, for a few weeks to establish your base power usage case, and then begin scheduling to measure actual savings. -8- 2.4 PLUG-IT_110 networking overview PLUG-IT_110 units have an integrated Wi-Fi wireless networking module similar to wireless modules found in laptops, smartphones and gaming consoles. These Wi-Fi devices don't come preprogrammed to work with specific wireless routers out of the box. Each wireless router has a custom name and security code that needs to be provided to any Wi-Fi device prior to use. PLUGIT_110 units are configured with this network information by using the PLUG-IT Setup Wizard within the PLUG-IT Energy Manager application. PLUG-IT_110 system requirements Computer with integrated Wi-Fi running Windows 7 or Windows 8, with Internet access Wireless Wi-Fi router that supports WEP (64-bit or 128-bit), WPA/WPA2 or unsecured network setup Wireless Wi-Fi router network name (SSID) and security key NOTE: PLUG-IT Energy Manager Software installation packages are available for Microsoft Windows 7/Windows 8. It is strongly recommended to initially configure PLUG-IT_110 units with a Windows 7 or Windows 8 computer due to enhancements in wireless networking capabilities. For example, PLUG-IT_110 units can be configured automatically using Windows 7 or Windows 8. -9- The following 6 steps highlight how a PLUG-IT_110 plug is prepared for use. These steps are covered in the installation section (Section 3) and PLUG-IT Energy Manager operation section (Section 5). It is recommended to read this manual in full. However, users can refer -10- to the PLUG-IT_110 Quick Start Guides for Windows 7 or Windows 8 to immediately configure and begin using PLUG-IT_110 units. 2.5 PLUG-IT_110 multiple network users After PLUG-IT_110 units are configured, any computer that 1) has PLUG-IT Energy Manager software installed and 2) is on the same network as the PLUG-IT_110 units, can access, control and program schedules into the PLUG-IT_110 units. PLUG-IT Energy Manager can be installed to run with built in priority levels for each PLUG-IT user in order to minimize PLUG- -11- IT_110 scheduling conflicts among users. For example, an office manager may have power control access to a printer or water cooler that an office assistant may not. -12- 3 PLUG-IT Energy Manager Software installation PLUG-IT Energy Manager software is available for computers running Microsoft Windows Vista/Windows 7 or 8. Follow the directions below to download and install PLUG-IT Energy Manager onto the desired computer. As a reminder, the computer intended to be used for PLUG-IT_110 configuration must be able to access the WLAN as the PLUG-IT’s, illustrated as USER1 & USER2 above. A computer without integral Wi-Fi capability cannot configure the PLUG-IT_110 plugs while in ADHOC mode. 3.1 PLUG-IT Energy Manager Software download Contact Energy Systems Technologies for the latest Version available. 3.2 Begin PLUG-IT Energy Manager Software installation Follow the on screen prompts to install PLUG-IT Energy Manager. Use the table below as a guide during the PLUG-IT Energy Manager installation. -13- Microsoft .NET Framework 4 is required by PLUG-IT Energy Manager. PLUG-IT Energy Manager will install .NET Framework 4 onto the computer as part of the standard installation. Security Warning / User Account Control message Click Run or Yes WinZip Self-Extractor - PLUG-IT Energy Manager prompt Click Setup SQL Server Compact license (if necessary) Click Accept The computer will download and install SQL Server Compact if needed Welcome to PLUG-IT Energy Manager Setup Wizard Click Next Select installation folder for PLUG-IT Energy Manager Click Next Confirm installation settings Click Next The computer will proceed with the PLUG-IT Energy Manager installation 3.3 PLUG-IT Energy Manager Software initial configuration setup (basic) A 'PLUG-IT Energy Manager - Initial Configuration’ window will appear during the PLUG-IT Energy Manager installation. A basic setup should be used when the PLUG-IT_110 plugs will be -14- controlled from a single computer. It is recommended to leave all advanced options at their default settings. Basic recommended settings - Initial Configuration Enter a computer or user name (optional) Enter Name Select Yes to Auto-Start PLUG-IT Energy Manager Select Yes Leave advanced options at default Click Ok The computer will then complete the PLUG-IT Energy Manager installation. The computer will finish installation automatically Click Close Installation complete prompt Continue to the PLUG-IT_110 setup process in Section 4. -15- 3.4 PLUG-IT Energy Manager Software initial configuration setup (advanced) An advanced configuration setup is only necessary when administrators want to establish a priority hierarchy among users in order to mitigate conflicting schedules between multiple PLUG-IT Energy Manager users. Most users will not need to configure these settings. The advanced settings are explained below. -16- PLUG-IT Clock This setting ensures that the PLUG-IT_110 will execute its ON/OFF schedule in sync with the PLUG-IT Energy Manager computer's time. Available synchronization options are: Select Synchronize Select Hourly hourly, every 4 hours, every 12 hours, daily or weekly. PLUG-IT Multi-User Access If all PLUG-IT Energy Manager users on a network are permitted to have equal scheduling access to PLUG-IT_110 units then leave the setting at Simple. In some situations, office administrators or managers will want to limit PLUG-IT Energy Select Simple Click OK Manager user scheduling access to certain PLUGIT_110 units. If this is the case, select Comprehensive. Refer to Section 3.5 for further discussion on Comprehensive priority settings. The computer will then complete the PLUG-IT Energy Manager installation. The computer will finish installation automatically Click Close Installation complete prompt Continue to the PLUG-IT_110 setup process in Section 4. -17- 3.5 Comprehensive priority settings (advanced) Establishing a range of priorities for each user prevents conflicts in PLUG-IT_110 scheduling throughout an office. Each PLUG-IT Energy Manager user may have different scheduling requirements from PLUG-IT_110 units. The tables below highlights some users and what their key concerns may be around the office. PLUG-IT Energy Manager administrators can set higher priorities to PLUG-IT_110 devices that address their requirements. -18- Once the maximum and initial priority levels are assigned and entered, the minimum priority level required for a change should be assigned. It is recommended to leave the minimum priority level the same as the current priority level. -19- 4 Configure PLUG-IT_110 with Setup Wizard PLUG-IT Energy Manager includes a PLUG-IT_110 Setup Wizard that takes users step by step through the configuration process. The setup wizard configures the PLUG-IT_110 units for network use. As previously stated, it is strongly recommended to initially configure PLUG-IT_110 units with a Windows 7 or Windows 8 computer due to enhancements in wireless networking capabilities found in Windows 7/Windows 8. For example, PLUG-IT_110 units can be configured automatically and in groups using Vista/Windows 7. Prior to running the PLUG-IT Setup Wizard, the PLUG-IT Energy Manager user will need the Service Set Identification (SSID) of their wireless router and the security key or code. PLUG-IT_110 units only support the following network security protocols: WEP (64-bit and 128-bit) WPA/WPA2 Unsecured (no security key or code) SSID and security information for wireless routers can be obtained several ways: From a label affixed to the wireless router From the office IT administrator -20- The illustration below highlights a typical wireless router label. The SSID and security code are printed on the label. Write the SSID and security key down. Double check the security key because letters and numbers are used and can be easily mixed up. Note the type of security that is listed on the label. In the example above, the security type is WPA. Proceed to run the PLUGIT Setup Wizard. 4.1 PLUG-IT Setup Wizard (Windows 7/Windows 8) Vista/Windows 7 incorporates wireless networking improvements to make configuring PLUG-IT_110 units easy. -21- The PLUG-IT Setup Wizard can automatically find and process multiple PLUG-IT_110 units. Locate and run PLUG-IT Energy Manager from the Wi-Fi enabled computer. Start Menu > Programs Desktop shortcut icon The congratulations screen will appear after PLUG-IT Energy Manager is launched. Note that the link to the PLUG-IT Setup Wizard is located within Step 4. Click the link to proceed. Use the tables below to assist during the PLUG-IT_110 configuration. PLUG-IT Setup Wizard - Enter Network Parameters Enter SSID Select Security Mode Specify Network Parameters- SSID & Security Enter Security Key Reenter Security Key Click Next -22- Network parameters are gathered from the wireless router as shown above in Section 4. PLUG-IT Setup Wizard - setting PLUG-IT_110 into ad hoc mode Place PLUG-IT_110 units in ad hoc mode Follow the onscreen instructions. Press and hold the button on the top of the PLUGIT_110 for 20 seconds. A green LED under the right side of the button will begin to light continuously. After the LED is steady lit, the PLUG-IT_110 is ready to configure. -23- Click Next Multiple PLUG-IT_110 units can be configured with the Windows 7 PLUG-IT Setup Wizard. Plug each PLUG-IT_110 unit into a wall outlet and hold the power button on each unit for 20 seconds. PLUG-IT Setup Wizard - Automatic PLUG-IT_110 setup Begin Automatic PLUG-IT_110 setup End Automatic PLUG-IT_110 setup If done with PLUG-IT_110 configuration Click Start Automatic Setup Click Stop Automatic Setup Click Close Once the automatic setup begins, the setup wizard will continually scan for PLUG-IT_110 units set in ad hoc mode. After a PLUG- IT_110 is detected, the setup wizard will automatically process the unit. This automatic setup will continue until the user stops the setup. -24- As PLUG-IT_110 units are successfully processed they will be displayed in the processed window. Any PLUG-IT_110 units that have successfully processed are now ready for use with PLUG-IT Energy Manager. Continue to run the automatic setup until all PLUG-IT_110 units are configured. -25- 5 Using PLUG-IT Energy Manager Software 5.1 Operational overview PLUG-IT Energy Manager permits single and multi-user access to all configured PLUG-IT_110 units. PLUG-IT Energy Manager allows users to schedule PLUG-IT_110 ON and OFF times for each unit or in unit groups. Users can also directly turn PLUG-IT_110 units ON and OFF individually or in groups and create and view power saving reports. Any user with PLUG-IT Energy Manager installed and network access to the wireless router connected to PLUG-IT_110 units can see and operate the units. 5.2 Launch PLUG-IT Energy Manager Software Locate and run PLUG-IT Energy Manager from any computer on the same network as the configured PLUG-IT_110 units. Start Menu > Programs Desktop shortcut icon -26- PLUG-IT Energy Manager will review the host computer's network connectivity after the software is launched. Manager should report PLUG-IT Energy 1 network active (or more networks active) if network connections are available on the computer. Double check your computer's network cables and configuration if the Network Status on the PLUG-IT Energy Manager main page reports No networks active. No networks active means that PLUGIT Energy Manager cannot find any active network connections on the computer. PLUG-IT Energy Manager network configuration settings are available through the Configure\Network Settings link on the taskbar. The user can select which adapter among the multiple computer network connections has network access to the PLUGIT_110 units. Refer to an IT administrator for more information. After the network on the computer is setup properly, PLUG-IT Energy Manager will begin listening for PLUG-IT_110 units on the network connection over UDP (User Datagram Protocol) port 8255 (default). PLUG-IT_110 units should begin appearing in the main PLUG-IT Energy Manager Device Control window if the computer is on the proper network and the PLUG-IT_110 units are correctly configured. -27- There may be firewall settings on your wireless router that prevent PLUG-IT_110 units from appearing in PLUG-IT Energy Manager. Some firewall settings may block incoming UDP packets from the PLUG-IT_110 units. 5.3 PLUG-IT Energy Manager Software dashboard Updating the firmware of the PLUG-ITs® -28- *Prior to the PLUG-IT Energy Manager software presentation, the software will recognize if a firmware upgrade to the PLUG-IT is required. You have the option to update the current PLUG-IT or Update ALL of the PLUG-ITs as they are recognized by PLUG-IT sw. The PLUG-IT dashboard is segmented into 3 parts: Taskbar Function tabs PLUG-IT_110 status area 5.3.1 Function Tab - Device Control The Device Control tab provides a running list of all PLUG-IT_110 units currently detected by PLUG-IT Energy Manager. This list includes information for each PLUG-IT_110 unit: the PLUG-IT 110 -29- unit name, unit MAC address, ON/OFF status, ON/OFF power controls, programmed schedule status, group affiliation and load information (i.e. device plugged into PLUG-IT_110). The 2 PLUG-IT_110 units below are freshly configured and one has an assigned name, group affiliation, schedule or load. This is how PLUG-IT_110 units will appear in the Device Control window. PLUG-IT Energy Manager checks the software of each PLUG-IT_110 unit. PLUG-IT Energy Manager may automatically perform software updates on PLUG-IT_110 units with older software. PLUG-IT Energy Manager will notify the user when the PLUG-IT_110 software is being updated. PLUG-IT Energy Manager provides a real time update status percentage in the Device control screen and notifies the operator when the update is complete. -30- If the programming fails, the reason for failure is displayed for 30 seconds and another attempt is made to program after another 5 minutes. A maximum of 10 PLUG-ITs are programmed concurrently in order to regulate the network load. Users can explore the different features of the Device Control tab. Users can confirm PLUG-IT function by switching the unit off and then on using the Power OFF and Power ON buttons. Note that the current power state field of the devices update as they switch OFF and ON. A Power OFF or Power ON command may take several seconds to initiate due to network latency and because the PLUG-IT_110 may first need to wake up from its sleep mode before executing the command. -31- The PLUG-IT_110 status area provides numerous ways to filter, display and select PLUG-IT_110 units. Users can display several series of PLUG-ITs: ALL, ON (units), OFF (units), Non-communicating (units) and Requires Attention (if applicable) by clicking the check boxes in the DISPLAY row. Various PLUG-IT_110 unit status counters are located at the bottom of the status area. A shortcut PLUG-IT_110 configuration menu opens by clicking the RH mouse button over one PLUG-IT_110 unit. This function can also be reached by the PLUG-ITs\Configure PLUG-ITs and Groups\Configure link on the taskbar. 5.3.2 Function Tab - Group Control Group controls allow users to manage the control of PLUG-ITs together and eliminates the hassle of individually managing units. Click the link on the screen to set up the first group. This menu can also be accessed through the PLUG-ITs\Configure PLUG-ITs and Groups\ link on the taskbar. Once a group is formed, the group of PLUG-IT_110 units will be displayed in the PLUG-IT_110 Group Control status area window. Users can select the group they want to control and power PLUGIT_110 units ON or OFF as a group. -32- 5.3.3 Function Tab –Power Savings PLUG-IT provides three different reports: Single PLUG-IT, Monitored Power Savings and Estimated Power Savings. It is recommended to first enter your KWh cost with the Configure\Settings\Reporting setting in the PLUG-IT Energy Manager taskbar (Section 5.3.4). The reports will use this value to calculate cost savings from your PLUG-IT_110 units. Accurate reports are dependent on the correctness and completion of information contained within the user created load devices. Refer to Configure\My Load Devices on the PLUG-IT taskbar to setup load devices (Section 5.3.4). Start by clicking one of the three report types after the KWh cost and load device information is in place. Next, choose either ALL PLUG-ITs, a Selected Group of PLUG-ITs (including or excluding subgroups) or choose specific PLUG-ITs. If ALL PLUG-ITs are selected, choose to report in a Group-by-Group or PLUG-IT-by-PLUG-IT list. Choose whether to report in PLUG-IT-by-PLUG-IT list if Selected Group of PLUG-ITs are selected. Click a Date Range spanning a week to a year or use a custom Date-Time range and finally click Create Report. A savings report can be viewed or printed with the Print tab. -33- The accuracy of the reports depends on the length of time that PLUG-IT Energy Manager has been running and if PLUG-IT Energy Manager has maintained connectivity with the PLUG-IT_110 units. PLUG-IT_110 units do not independently collect reporting data. Leave PLUG-IT Energy Manager running on a computer with network connectivity to the PLUG-IT_110 units to collect the most information for these reports. -34- 5.3.4 Function Tab – Metering The metering function of PLUG-IT Energy Manager allows for the selection on a single period, all PLUG-ITs by group or individual and also the selection of Report Period. The metering function of PLUG-IT Energy Manager allows for the selection on multiple periods, all PLUG-ITs by group or individual and also the selection of Report Period. -35- Once create report is selected you will see the interactive page. On this screen you have the option to print or export to a .csv for review or sharing with other team members. … or export to a .csv -36- 5.3.4 Taskbar - Configure command(s) Settings- Users can modify the following PLUG-IT Energy Manager settings: General- Provides options to Change PLUG-IT startup and exit behavior. These are customer preference options. Network (advanced)- The user can select between available networks connections on the computer to communicate with the PLUG-IT_110 units. Refer to Section 5.2 for more networking information. Customer- Allows users to customize title information on the PLUG-IT Energy Manager dashboard and add an icon. -37- Scheduling- This allows users to change priority scheduling settings made during installation except that users cannot change the maximum priority level assigned during installation. Scheduler name, current and minimum priority levels assignments can be changed. Reporting- Users can enter their average cost of electricity (per kWh). This value will be used to calculate cost savings in the reports. My Load Devices- A Load Device is defined as any device that plugs into the PLUG-IT. This can vary from an office lamp to a water cooler to fans to TVs and more. Users can create their own local database by entering information for their specific load devices here. The power value specified for a load device is used to calculate the power savings in the reports. This information must be entered if cost or energy savings reports are desired. Click Add load device to create a load device. Next, add load device information. Select a standard category or make your own. Next, select a manufacturer or add your own. Follow up with device name, model and description. Power information is often available on the device's label, manual or online. -38- This is an example of an LED TV load device being added. Click Create when finished. After adding your load device(s), the My Load Devices table will show the device(s). The table below shows the LED TV added. Users can add more load devices or modify or delete load devices. -39- 5.3.5 Taskbar - PLUG-ITs command(s) Users can add, configure and delete PLUG-ITs and PLUG-IT groups from this task. This is the main task selection used to manage PLUG-ITs. Click PLUG-ITs\Configure PLUG-ITs and Groups or double click the mouse over a PLUG-IT_110 unit in Device Control to enter the menu. Configure PLUG-ITs and Groups- After confirming that PLUG-IT sees the PLUG-IT_110 units, the PLUG-ITs can be configured. Select a PLUG-IT from the PLUG-ITs list and click the Configure button on the bottom left hand corner of the PLUG-ITs box. The upper section of the PLUG-IT configuration is shown below. -40- MAC Address/IP Info SW version Enter PLUG-IT Name Enter PLUG-IT Description Enter Load Device info The Load Device can either be a preloaded device or a device created in Section 5.3.4. The lower section of the PLUG-IT configuration is shown below. Apply predefined schedule Schedule this PLUG-IT Enable schedule Disable schedule -41- Apply predefined schedule- Select between schedules made in Section 5.3.6. After selecting a schedule, click Yes to confirm schedule. The schedule will then download into the PLUG-IT. Schedule this PLUG-IT- Users can create and name schedules on the spot. Schedules can be single ON/OFF events or any desired combination of ON/OFF events during any day of the week. Click Add On or Off Event to add an event, and then select ON or OFF, the day(s) of the week and the time. Click the arrows to move events up/down the list and click the X to remove. Click Ok and Yes to confirm loading the schedule onto the then PLUG-IT_110. The schedule download status is available on the Device Control screen. -42- Enable schedule- Enables the last schedule loaded into the PLUG-IT. Disable schedule- Disables the last schedule loaded into the PLUG-IT. PLUG-IT Groups- Grouping PLUG-IT_100 units is an easy way to manage and schedule units. As an example, floor 1 office lights may be in a group and floor 2 printers are in another group. Rather than creating and managing schedules for 20 individual PLUG-ITs, users can create groups to manage them. Start by adding and naming a group. In this example a new group 'Floor 1 office lights' was added. After adding a group, drag and drop PLUGITs from the PLUG-IT row to the desired group folder. Use the additional functions to manage rename groups: or Configure, remove groups and/or Remove Single PLUGITs or ALL PLUG-ITs from the selected group. -43- Groups will now display in the Group Control function tab. PLUG-IT Setup Wizard- Click this link to kickoff the PLUG-IT Setup Wizard. Refer to Section 4 for a full writeup on using the PLUG-IT Setup Wizard. PLUG-IT Advanced Setup Wizard- These commands can only be run from a computer that has Wi-Fi access to the PLUGIT_110 units. There are three advanced setup options available: Direct connection (ad-hoc connection between Wi-Fi computer and PLUG-IT_110)- This option is for a user that wishes to establish a 1:1 ad-hoc connection with a PLUG-IT_110 unit instead of going over a wireless network. This is the same ad-hoc connection that is used to connect to PLUG-IT_110 units during the PLUG-IT Setup Wizard. Factory setup connection- PLUG-ITs are preprogrammed from the factory to operate with a router using a specific SSID (Service Set Identifaction) and WPA passphrase. The SSID is GPT and the WPA passphrase is PLUG-IT. The PLUG-IT units will immediately connect to this network as they come from the factory. If a user configures a router with those specific SSID and WPA parameters, the PLUG-IT_110 units can be easily configured for other network settings using this wireless router. -44- Change PLUG-IT_110 network configuration- This tool enables users to migrate PLUG-IT_110 units that are accessible by this computer, to a new wireless router or update the parameters of the existing router without going through the PLUG-IT Setup Wizard. Follow the steps and add the new SSID and/or security key. The PLUG-IT_110 units will be updated with the new network information. 5.3.6 Taskbar - Schedules command Users can add, modify, duplicate and delete schedules and push schedules out to individual PLUG-IT_110 units or groups of PLUGIT_110 units. Manage Predefined Schedules- This provides an easy way to manage all existing schedules saved on PLUG-IT. The main screen lists existing Predefined Schedules. -45- Click Add Schedule to create a new schedule. -46- From here, users can add events, change events to be ON or OFF events and set the days and time. Providing descriptive a name and description can help distinguish schedules as more and schedules more are defined. Click Ok and the schedule is saved. The schedule will now appear in the Predefined Schedule list: This new schedule can now be duplicated, deleted or modified in the main Schedule menu. -47- Scheduled ON and OFF times are trigger points. Users can manually power the load device ON or OFF with the power button or with the Device Control window of PLUG-IT Energy Manager. These actions do not interfere with the scheduled events loaded into PLUG-IT_110 units. Apply Schedule to PLUG-IT(s)- This screen provides an easy way to apply, enable and disable schedules for individual PLUG-ITs or groups of PLUG-ITs. To apply a schedule to specific PLUG-ITs: Select the PLUG-ITs and then click APPLY, ENABLE OR DISABLE schedule to modify the selected PLUG-ITs schedules. -48- To apply a schedule to groups of PLUG-ITs: Select the PLUG-IT GROUP and then click APPLY, ENABLE OR DISABLE schedule to to modify the PLUG-IT_110 schedule. 5.3.7 Taskbar - Help command -49- selected group The help command provides help and troubleshooting for the user. Help command tasks include: PLUG-IT User Manual (Hotkey F1)- Opens the companion PLUG-IT_110 User Manual with Adobe® Acrobat® or Adobe® Acrobat® Reader. PLUG-IT Event log (advanced)- This provides a common log of events pertaining to PLUG-IT. Events include PLUG-IT events, group additions/removals, IP changes, etc. This is primarily an advanced monitoring tool and unneccessary for most users. Service Utilities\New disclosure window for 192.168.x.x (IP address of active network) (advanced)- This provides a list of -50- IP communication between the PLUG-IT Energy Manager host computer and the PLUG-IT_110 units. Incoming UDP data is logged as demonstrated in the example below. This is an anvanced monitoring tool and unneccessary for most users. About- This screen provides the name of the application, version number, and copyright information. Refer to this version number and log it prior to contacting technical support. Welcome Screen- Opens the welcome screen with setup tips as seen during initial PLUG-IT Energy Manager startup. -51- 6 Basic troubleshooting Refer to the previous Section 5.3.7 for monitoring tools. Event logs and networking tools are available to assist advanced users troubleshoot system challenges. Here are basic troubleshooting tips: Problem Possible Solution Confirm that the PLUG-IT is within range of PLUG-IT plug reports your wireless router. This can be done by “No Communication” moving the unit to a known-good location Status. to test communication. Verify that SSID and Password are correct in the PLUG-IT Setup Wizard configuration. Both parameters are case sensitive. Verify that the PC wireless is connected to the proper wireless network. Check firewall settings of wireless router. PLUG-IT_110 unit Wireless router may be preventing PLUG-IT does not appear on Energy Manager computer from receiving PLUG-IT Energy UDP packets from PLUG-IT_110s. Manager. Confirm that correct network connection is selected in PLUG-IT Energy Manager for computers with multiple network connections. Ensure Wireless Network is IPv4 enabled. Verify a Web Proxy or Enterprise-level encryption (AAA server) is not required to authenticate. -52- * END OF DOCUMENT *