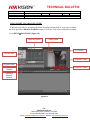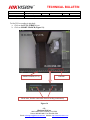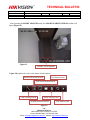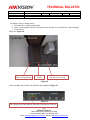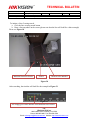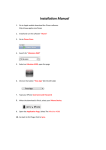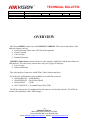
1
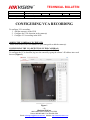
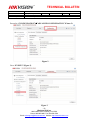
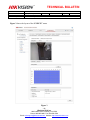
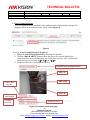
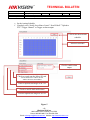
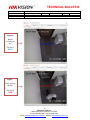
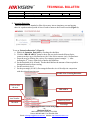
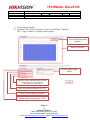
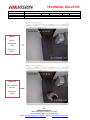
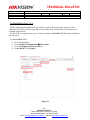
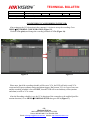
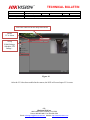
TM Title: Date: Product: Action Required: TECHNICAL BULLETIN VCA 10/20/2014 Version: 1.0 PRO Series IP cameras with optional serial Information only Pages OVERVIEW HikVision 4 SERIES cameras are called SMART CAMERAS. This is due to the built-in video analytics features, such as: Facial Detection (Please note: NOT Facial Recognition) People Counting Line Crossing Intrusion Detection 2 SERIES (Value Series) cameras also have video analytics capabilities with the latest firmware v5.2.0 release. The value series cameras have only two (2) types of analytics: Line Crossing Intrusion Detection The video analytics features are called VCA (Video Content Analytics). So far the only NVRs that have the capability to record VCA events are: DS-90xxHWI-ST (960H Hybrid) DS-90XXHFI-ST (Real-Time Hybrid) DS-96xxNI-ST (NVR) DS-7716NI-SP/16 (16 channel Plug-n-Play NVR) The VCA events need to be configured from the camera’s web interface directly. The NVRs do not have the capability to make VCA changes. -1Hikvision USA, Inc. 908 Canada Court, Industry, CA 91748 Phone: 909-895-0400 Fax: 909-595-0788 Email: [email protected] Website: http://www.hikvision.com TM Title: Date: Product: Action Required: TECHNICAL BULLETIN VCA 10/20/2014 Version: 1.0 PRO Series IP cameras with optional serial Information only Pages CONFIGURING VCA RECORDING To configure VCA recording: 1. Add the camera(s) to the NVR 2. Configure the VCA detection in the camera(s) 3. Configure VCA recording in the NVR ADDING THE CAMERA(S) TO THE NVR: Please refer to the NVR’s user manual or quick start guide to add the camera(s). CONFIGURING THE VCA DETECTION IN THE CAMERA(S) VCA detection can be configured from the camera(s)’s web GUI only. To configure the VCA detection, log in to the camera by typing the camera’s IP address into a web browser (Figure 1). Figure 1 -2Hikvision USA, Inc. 908 Canada Court, Industry, CA 91748 Phone: 909-895-0400 Fax: 909-595-0788 Email: [email protected] Website: http://www.hikvision.com TM Title: Date: Product: Action Required: TECHNICAL BULLETIN VCA 10/20/2014 Version: 1.0 PRO Series IP cameras with optional serial Information only Pages Proceed to “CONFIGURATION””ADVANCED CONFIGURATION” (Figure 2). Figure 2 Go to “EVENTS” (Figure 3). Figure 3 -3Hikvision USA, Inc. 908 Canada Court, Industry, CA 91748 Phone: 909-895-0400 Fax: 909-595-0788 Email: [email protected] Website: http://www.hikvision.com TM Title: Date: Product: Action Required: TECHNICAL BULLETIN VCA 10/20/2014 Version: 1.0 PRO Series IP cameras with optional serial Information only Pages Figure 3 shows the layout of the “EVENTS” menu. Figure 3 -4Hikvision USA, Inc. 908 Canada Court, Industry, CA 91748 Phone: 909-895-0400 Fax: 909-595-0788 Email: [email protected] Website: http://www.hikvision.com TM Title: Date: Product: Action Required: TECHNICAL BULLETIN VCA 10/20/2014 Version: 1.0 PRO Series IP cameras with optional serial Information only Pages 1. Line Crossing Detection: Line crossing detection is intended to filter unidirectional or bidirectional crossing of an imaginary line in order to narrow down search results (Figure 4). Figure 4 To set up “Line Crossing Detection” (Figure 5): a. Enable the Line Crossing Detection by checking the checkbox b. Click the “DRAW AREA” button to draw the line (to be crossed).Smart Series cameras can have up to 4 defined lines, the Value Series cameras- only 1 defined line. c. Set the direction of crossing. AB, BA or AB d. Set the sensitivity level (recommended 60-80). Enable Line Crossing Detection Area “A” THE LINE Click to draw the line Area “B” Line Number Crossing Direction Sensitivity Level Figure 5 (Continues on the next page) -5Hikvision USA, Inc. 908 Canada Court, Industry, CA 91748 Phone: 909-895-0400 Fax: 909-595-0788 Email: [email protected] Website: http://www.hikvision.com TM Title: Date: Product: Action Required: TECHNICAL BULLETIN VCA 10/20/2014 Version: 1.0 PRO Series IP cameras with optional serial Information only Pages e. Set the Arming Schedule f. If needed, select “Notify Surveillance Center”/“Send E-Mail”/”Upload to FTP”/”Trigger Channel” or Trigger an alarm output Click to edit the detection schedule Detection Schedule Check to enable alarm output Check to record onto the Micro SD card *Not all models have a Micro SD slot *Micro SD card is not included Check to upload still images to an FTP Check to send E-Mail notifications Check to upload still images to an FTP Figure 5 -6Hikvision USA, Inc. 908 Canada Court, Industry, CA 91748 Phone: 909-895-0400 Fax: 909-595-0788 Email: [email protected] Website: http://www.hikvision.com TM Title: Date: Product: Action Required: TECHNICAL BULLETIN VCA 10/20/2014 Version: 1.0 PRO Series IP cameras with optional serial Information only Pages Figure 6 Before crossing the line. The line is BLUE Figure 7 After crossing the line. The line is RED -7Hikvision USA, Inc. 908 Canada Court, Industry, CA 91748 Phone: 909-895-0400 Fax: 909-595-0788 Email: [email protected] Website: http://www.hikvision.com TM Title: Date: Product: Action Required: TECHNICAL BULLETIN VCA 10/20/2014 Version: 1.0 PRO Series IP cameras with optional serial Information only Pages 2. Intrusion Detection: Intrusion detection is intended to filter object entry into an imaginary area and staying there for a predetermined period of time in order to narrow down search results (Figure 6). To set up “Intrusion Detection” (Figure 8): a. Enable the Intrusion Detection by checking the checkbox b. Click the “DRAW AREA” button to draw the area (to be intruded).Smart Series cameras can have up to 4 defined areas, the Value Series cameras- only 1 defined area. c. Draw the area by defining the vertices of a tetragon (square/rectangle….). After defining the 4th vertex- right-click to finalize the definition. d. Set the threshold (0-10 seconds). The threshold defines the amount of time required to distinguish intrusion from crossing e. Set the sensitivity level. f. Set the percentage (0-100%). Percentage defines the size of the object in comparison with the selected intrusion area. Enable Line Crossing Detection Click to draw the area THE AREA Area Number Sensitivity Level Threshold Percentage Figure 8 (Continues on the next page) -8Hikvision USA, Inc. 908 Canada Court, Industry, CA 91748 Phone: 909-895-0400 Fax: 909-595-0788 Email: [email protected] Website: http://www.hikvision.com TM Title: Date: Product: Action Required: TECHNICAL BULLETIN VCA 10/20/2014 Version: 1.0 PRO Series IP cameras with optional serial Information only Pages g. Set the Arming Schedule h. If needed, select “Notify Surveillance Center”/“Send E-Mail”/”Upload to FTP”/”Trigger Channel” or Trigger an alarm output Click to edit the detection schedule Detection Schedule Check to enable alarm output Check to record onto the Micro SD card *Not all models have a Micro SD slot *Micro SD card is not included Check to upload still images to an FTP Check to send E-Mail notifications Check to upload still images to an FTP Figure 8 -9Hikvision USA, Inc. 908 Canada Court, Industry, CA 91748 Phone: 909-895-0400 Fax: 909-595-0788 Email: [email protected] Website: http://www.hikvision.com TM Title: Date: Product: Action Required: TECHNICAL BULLETIN VCA 10/20/2014 Version: 1.0 PRO Series IP cameras with optional serial Information only Pages Figure 9 Before intruding the area The area is BLUE Figure 10 After intruding the area The area is RED - 10 Hikvision USA, Inc. 908 Canada Court, Industry, CA 91748 Phone: 909-895-0400 Fax: 909-595-0788 Email: [email protected] Website: http://www.hikvision.com TM Title: Date: Product: Action Required: TECHNICAL BULLETIN VCA 10/20/2014 Version: 1.0 PRO Series IP cameras with optional serial Information only Pages CONFIGURING DUAL VCA: All the configurations mentioned above will be accessible directly from the camera(s) (if the camera(s) have a Micro SD slot and a Micro SD card has been installed. Micro SD cards are not included with cameras). For the NVR to recognize these types of events, a feature called DUAL VCA has to be enabled in the camera(s). To enable DUAL VCA: a. Go to Configuration. b. Go to Advanced ConfigurationVideo/Audio c. Go to the Display Info. On Stream tab d. Enable DUAL VCA (Figure ) Figure 11 - 11 Hikvision USA, Inc. 908 Canada Court, Industry, CA 91748 Phone: 909-895-0400 Fax: 909-595-0788 Email: [email protected] Website: http://www.hikvision.com TM Title: Date: Product: Action Required: TECHNICAL BULLETIN VCA 10/20/2014 Version: 1.0 PRO Series IP cameras with optional serial Information only Pages CONFIGURING VCA RECORDING IN THE NVR: After setting up the VCA detection in the camera(s), it is time to set up the recording. Go to MENURECORDING CONFIGURATION (Figure 15). Click on VCA (pink) and change the recording schedule to VCA (Figure 16). Figure 12 Figure 13 Please note, that if the recording schedule will be set to VCA, the NVR will only record VCA events and will ignore ordinary motion and alarm triggers. But because VCA is a type of an event and the recording schedule is set to EVENT, then the NVR will record ordinary events (motion and alarm) as well as VCA events. After the Recording schedule is set, the VCA detection of the camera has to be enabled (just like motion detection). Go to MENUCAMERAS SETUP then go to VCA (Figure 17). - 12 Hikvision USA, Inc. 908 Canada Court, Industry, CA 91748 Phone: 909-895-0400 Fax: 909-595-0788 Email: [email protected] Website: http://www.hikvision.com TM Title: Date: Product: Action Required: TECHNICAL BULLETIN VCA 10/20/2014 Version: 1.0 PRO Series IP cameras with optional serial Information only Pages Select the camera from the drop-down menu Enable VCA Alarm Set up E-Mail linkage, Schedule, PTZ linkage… Figure 14 After the VCA has been enabled in the camera, the NVR will record upon VCA events. - 13 Hikvision USA, Inc. 908 Canada Court, Industry, CA 91748 Phone: 909-895-0400 Fax: 909-595-0788 Email: [email protected] Website: http://www.hikvision.com TM Title: Date: Product: Action Required: TECHNICAL BULLETIN VCA 10/20/2014 Version: 1.0 PRO Series IP cameras with optional serial Information only Pages USING SMART PLAYBACK FEATURE If the camera(s) with VCA features have been recording continuously or on an event schedule, the NVR provides a SMART SEARCH feature to locate the VCA events within the recording. Go to MENUPLAYBACK (Figure 18). Select the camera Smart Search Full Screen Selected Date Playback Footage Playback Status Playback Controls Timeline Additional Playback Controls Figure 15 - 14 Hikvision USA, Inc. 908 Canada Court, Industry, CA 91748 Phone: 909-895-0400 Fax: 909-595-0788 Email: [email protected] Website: http://www.hikvision.com TM Title: Date: Product: Action Required: TECHNICAL BULLETIN VCA 10/20/2014 Version: 1.0 PRO Series IP cameras with optional serial Information only Pages To find VCA recording in playback: a. Click on the FULL SCREEN icon. b. Click on SMART SEARCH (Figure 19). SMART Search (VCA) Timeline Please note, that the camera has been recording continuously Figure 16 - 15 Hikvision USA, Inc. 908 Canada Court, Industry, CA 91748 Phone: 909-895-0400 Fax: 909-595-0788 Email: [email protected] Website: http://www.hikvision.com TM Title: Date: Product: Action Required: TECHNICAL BULLETIN VCA 10/20/2014 Version: 1.0 PRO Series IP cameras with optional serial Information only Pages After pressing the SMART SEARCH button, the SMART SEARCH OPTIONS toolbar will apear (Figure 19). Figure 19 SMART Search Options Figure 20 explains the icons in the Smart Search Options. Exit Smart Search Intrusion Detection Search Full Screen Motion Search Line Crossing Search Delete Selected Area Motion Detection Search Exit Smart Search Figure 17 - 16 Hikvision USA, Inc. 908 Canada Court, Industry, CA 91748 Phone: 909-895-0400 Fax: 909-595-0788 Email: [email protected] Website: http://www.hikvision.com TM Title: Date: Product: Action Required: TECHNICAL BULLETIN VCA 10/20/2014 Version: 1.0 PRO Series IP cameras with optional serial Information only Pages To initiate a Line Crossing search: a. Click the line crossing search button b. Draw a line anywhere on the screen (please note that the line will look like a thin rectangle) c. Press Search Please see Figure 18. Line Crossing Search Search The line to be crossed Figure 18 After searching, the timeline will look like the example in Figure 19. Figure 19 The choppy green lines indicate when line crossing has occurred - 17 Hikvision USA, Inc. 908 Canada Court, Industry, CA 91748 Phone: 909-895-0400 Fax: 909-595-0788 Email: [email protected] Website: http://www.hikvision.com TM Title: Date: Product: Action Required: TECHNICAL BULLETIN VCA 10/20/2014 Version: 1.0 PRO Series IP cameras with optional serial Information only Pages To initiate a Line Crossing search: a. Click the line crossing search button b. Draw a line anywhere on the screen (please note that the line will look like a thin rectangle) Please see Figure 18. Intrusion Detection Search Search The area to be intruded Figure 20 After searching, the timeline will look like the example in Figure 21 Figure 21 The choppy green lines indicate when intrusion has occurred - 18 Hikvision USA, Inc. 908 Canada Court, Industry, CA 91748 Phone: 909-895-0400 Fax: 909-595-0788 Email: [email protected] Website: http://www.hikvision.com