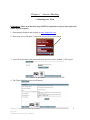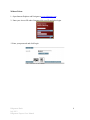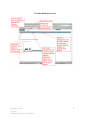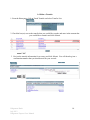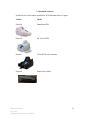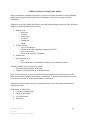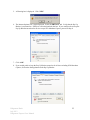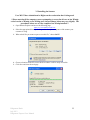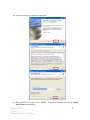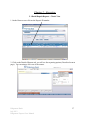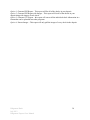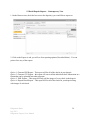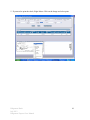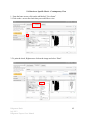
1
Ridgestone Express Internet Banking and Remote Deposit Capture User Manual Version 3.0 July 2012 Ridgestone Bank July 2012 Ridgestone Express User Manual 1 (This page intentionally left blank) Ridgestone Bank July 2012 Ridgestone Express User Manual 2 TABLE OF CONTENTS CHAPTER 1 – INTERNET BANKING 5 SECTION 1.1 – ENABLING YOUR TOKEN SECTION 1.2 – LOGGING INTO ONLINE BANKING SECTION 1.3 – ONLINE BANKING OVERVIEW SECTION 1.4 – MAKE A TRANSFER 5 7 9 10 CHAPTER 2 – SCO - MERCHANT INFORMATION AND RESPONSIBILITIES 11 SECTION 2.1 – WORKSTATION REQUIREMENTS SECTION 2.2 – QUALIFIED SCANNERS SECTION 2.3 – SCANNER MAINTENANCE SECTION 2.4 – REMOTE DEPOSIT CAPTURE SECURITY RECOMMENDATIONS SECTION 2.5 – INCIDENT RESPONSE PLAN GUIDANCE FOR RDC MERCHANTS SECTION 2.6 – RDC MERCHANT CONTINUITY PLAN OUTLINE 11 12 13 14 16 20 CHAPTER 3 – INSTALLING SCO (REMOTE DEPOSIT CAPTURE) 21 SECTION 3.1 – CUSTOMER WORKSTATION CONFIGURATION SECTION 3.2 – INSTALLING THE SCANNER SECTION 3.3 – UNINSTALLING RANGER DRIVER 21 25 28 CHAPTER 4 – MAKING A DEPOSIT 29 SECTION 4.1 – CREATE A DEPOSIT SECTION 4.2 – EXCEPTION ITEMS SECTION 4.3 – DUPLICATE ITEMS SECTION 4.4 – DELETING A CHECK FROM A DEPOSIT SECTION 4.5 – DELETING A DEPOSIT SECTION 4.6 – SWITCHING BETWEEN CLASSIC/CONTEMPORARY VIEW 29 32 33 34 35 36 CHAPTER 5 - REPORTING 37 SECTION 5.1 – DETAILED DEPOSIT REPORT – CLASSIC VIEW SECTION 5.2 – DETAILED DEPOSIT REPORT – CONTEMPORARY VIEW SECTION 5.3 – RETRIEVE SPECIFIC CHECK – CLASSIC VIEW SECTION 5.1 – RETRIEVE SPECIFIC CHECK – CONTEMPORARY VIEW 37 39 40 42 CHAPTER 6 - TROUBLESHOOTING 43 SECTION 6.1 – TROUBLESHOOTING FAQ 43 Ridgestone Bank July 2012 Ridgestone Express User Manual 3 (This page intentionally left blank) Ridgestone Bank July 2012 Ridgestone Express User Manual 4 Chapter 1 – Internet Banking 1.1 Enabling your Token Enablement: (Please note that these steps MUST be completed even if you only login to the remote deposit program.) 1: Open Internet Explorer and navigate to www.ridgestone.com. 2: Enter your Access ID under Commercial Access ID and select login. 3: You will need to enter your password before the token can be enabled. Click Log In. 4: The Token Enablement screen will appear. Ridgestone Bank July 2012 Ridgestone Express User Manual 5 The Token Serial Number is the 10 digit number found on the back of token above the barcode (do not include hyphens). Click the Grey button on the front of the token to produce a one time passcode, enter it in the “One Time Passcode” box. The PIN is a number of your choice that will be used to login going forward. Please choose something that you can remember. Please enter in your email address, a secret question and the answer to the secret question. These will help us verify who you are if you need to call the bank for online assistance. Once you have entered in all the information, click Submit. 5: You will be taken to the online banking home screen and will receive a message that the token has been enabled successfully. **A fee will be assessed to replace a lost token.** Ridgestone Bank July 2012 Ridgestone Express User Manual 6 1.2 Logging into Online Banking: With Token 1: Open Internet Explorer and Navigate to www.ridgestone.com. 2: Enter your Access ID under Commercial Access ID and select login. 3: Click the grey button on your token to produce a one time passcode. Enter this passcode, followed by your 4 digit PIN into the password box and click Log In. 4: The Site Authentication Screen will appear. Click the grey button on your token again to produce the Site Authentication Value. If the value on the token matches what has been produced on the screen, click submit. (If they do not match, do not continue with login and call the bank for assistance.) 5: You are now successfully logged in to Internet Banking. Ridgestone Bank July 2012 Ridgestone Express User Manual 7 Without Token: 1: Open Internet Explorer and Navigate to www.ridgestone.com. 2: Enter your Access ID under Commercial Access ID and select login. 3: Enter your password and click Login. Ridgestone Bank July 2012 Ridgestone Express User Manual 8 1.3 Online Banking Overview Ridgestone Bank July 2012 Ridgestone Express User Manual 9 1.4 Make a Transfer 1. From the Homepage, click on Funds Transfer and select Transfer List. 2. Check the box(es) next to the transfer that you would like to make and enter in the amount that you would like to transfer and click Submit. 3. Review the transfer information for accuracy and click Submit. You will then be given a confirmation number that you should retain for your records. Ridgestone Bank July 2012 Ridgestone Express User Manual 10 Chapter 2 – Merchant Information and Responsibilities 2.1 Workstation Requirements Disk Space 10 GB of available disk space on the system drive recommended Hardware 2.0 GHz (or higher) processor recommended 2 GB of RAM (or higher) recommended (1 GB minimum) Operating System Windows XP Service Pack 3, Vista (32 bit or 64 bit), and Windows 7 (32 bit or 64 bit) Note – Macs are not compatible with SCO Merchant Capture Software Microsoft Internet Explorer 7.0, 8.0, and the 32-bit version of IE9.0 Appropriate Ranger Device Driver – varies depending on the scanner in use and will be obtained from the UFS SCO Drivers Link Note: * The workstation (and server if applicable) on which Branch Source Capture is installed must be defined as a trusted site: https://sco-web.ufsdata.com * User must be a Local Administrator on the PC when installing SCO Merchant Capture * Internet connection/Wired Ethernet Network Interface Card connection/DSL, ASDL, Cable, T-1 (with Internet access of 1.5 megabits per second (MBPS) connection or higher) Internet access * If client PC must connect to the Internet through a corporate firewall, the firewall must be configured to allow HTTPS requests (port 443) to the Merchant Capture web server and receive corresponding HTTPS responses. This is a secure Internet connection over port 443 using 128 bit encryption. * If a proxy server is being used, it may need to be configured to allow access for the Merchant Capture application. *Uninstall third party toolbars such as Yahoo, Google, Bing, etc. they have caused issues in installing the merchant capture software *If problems arise during installation, it may be necessary to disable spyware or antivirus temporarily Ridgestone Bank July 2012 Ridgestone Express User Manual 11 2.2 Qualified Scanners Listed below are all scanners qualified for SCO Merchant Source Capture. Vendor Model Unisys® SmartSourceTM Unisys® My Vision XTM Panini® Vision XTM series scanners Unisys® Smart Source Micro Ridgestone Bank July 2012 Ridgestone Express User Manual 12 2.3 Scanner Maintenance Scanner MUST be cleaned weekly to ensure proper images and ease of scanning. To Clean the Scanner: 1. 2. 3. 4. Remove both top covers of the scanner. Use canned air to blow out the track that the check travels through the scanner. Identify the scanning panel (near the end of the check track) Using the tab with the green dot, gently open the scanning panel to reveal both front and back panels. 5. Using a cotton swab dipped lightly in rubbing alcohol, wipe down both scanning panels and let air dry. 6. Once dry, close the scanning panels. 7. Replace both covers. The scanner is now clean and ready to scan! **Note: Keep scanner covered when not in use to avoid excess dust exposure** Ridgestone Bank July 2012 Ridgestone Express User Manual 13 2.4 Remote Deposit Capture Security Requirements and Recommendations The following security requirements and recommendations have been compiled from industry best practices and the Payment Card Industry Data Security Standards. We recommend consideration and implementation of the following to help safeguard the integrity, confidentiality, and availability of the information and information systems. Physical Security - REQUIRED 1. Restrict physical access to workstation and scanner. Locate workstation and scanner, where feasible, in an area that has restricted traffic flow. Ideally, the equipment would be in an office with access by only those authorized to access the application. 2. Secure physical checks prior to, during, and post scanning and transmission. Physical security over the checks should include limited access and protection from unauthorized access to the checks prior to being scanned. If the scanning process is interrupted, the checks should physically be secured and the user logged out of the application. Once the scanning process is complete and the files have been transmitted, the checks should be stored in a secure (under lock and key) location under dual control until they are destroyed. 3. The physical items are to be shredded under dual control after 30 days. An audit log that records the date of destruction, batch numbers, and initials of those performing the shredding should be maintained. 4. The detailed reports retrieved from the SCO system should be kept either secured with the physical checks or in a secured file on the computer. The detailed reports need to be destroyed, if physical, and removed from the system, if electronic, after 30 days. 5. The detailed reports must be kept and destroyed in the same manner as the checks. They contain sensitive information that must be handled securely. Logical Security – Recommended To achieve logical security, it may be necessary to engage an outside network consultant to configure network and workstation security. 1. Install and maintain a firewall on the network. Consideration should also be given to installing a personal firewall on the workstation or enabling the Windows firewall if utilizing a Windows operating system. The firewall should be configured to disallow traffic from untrusted networks and restrict inbound and outbound Internet traffic. Direct public access must be prohibited. The firewall should be kept up to date and monitored. Ensure the firewall has audit logging capabilities. 2. Install and maintain anti-virus and anti-spyware tools on the workstation. The tools should be kept up to date and are capable of generating audit logs. 3. If wireless networks are deployed, must ensure wired equivalent privacy (WEP) is enabled, default service set identifier (SSID) broadcasts are disabled, and vendor default settings are changed. WiFi protected access (WPA and WPA2) encryption and authentication should also be enabled. Ridgestone Bank July 2012 Ridgestone Express User Manual 14 4. Restrict use of peer to peer (P2P) networks and file sharing capabilities. 5. Restrict remote access, if remote software is installed ensure it is secure or prohibit installation – PC Anyware, GoToMyPC, etc. 6. Do not allow outside software to be loaded on the workstation, restrict or prohibit Internet downloads. 7. Vendor supplied default system passwords must be changed. This includes Windows and RDC application software. 8. Ensure that each user of the system has their own ID and password, log on credentials should never be shared since it negates any audit trail. 9. Strong password parameters are encouraged – minimum length of 8 characters and must include alpha/numeric and special characters for both the network and RDC application. 10. Network passwords should expire within 30 to 60 days. 11. Network settings should log users off after 10 minutes of inactivity. Ideally the workstation should have a password protected screen saver enabled. 12. Consider multi-factor authentication by installing biometric readers. 13. Network and workstations should have the latest vendor supplied security patches installed. Industry practice is to install relevant security patches within one month of release (or sooner, following testing to ensure interoperability [Windows updates should be researched prior to installation]); however, anti-virus, anti-spyware, and firewall definitions should be automatically installed immediately upon release . 14. Establish a process to identify newly discovered security vulnerabilities: subscribe to alert services available on the Internet, run an automated application on the network to identify vulnerabilities. 15. Consider annual penetration testing. 16. Limit Internet access and restrict webmail access for added protection against potential viruses, Trojans, and key loggers. 17. Review system event logs and user activity logs, especially those with administrator profiles. 18. Maintain system backup. 19. Consider segregation of duties between initial scanning of items, edits to images, and transmission of the files. 20. At a minimum, a review of all manual adjustments to check images should be reviewed by someone other than the person making the changes to ensure accuracy. Ridgestone Bank July 2012 Ridgestone Express User Manual 15 2.5 Incident Response Plan Guidance for RDC Merchants This section provides information about the Incident Response Plan and is not intended to be a definitive guide to responding to a breach. The merchant should tailor the plan to their business and use their own judgment about how to handle their own breaches. An Incident Response Plan defines the response to a security incident such as viruses, malicious code, network intrusion, abuse of a computer system or other situations. The plan should define the information flow to the appropriate personnel, assessment of the incident, minimizing damage and response strategy, documentation, and preservation of evidence. The incident response plan should define areas of responsibility and establish procedures for handing various security incidents. This document discusses the considerations required to build an incident response plan Incident Response Goals 1. 2. 3. 4. 5. 6. 7. 8. Verify that an incident occurred. Maintain or Restore Business Continuity. Reduce the incident impact. Determine how the attack was done or the incident happened. Prevent future attacks or incidents. Improve security and incident response. Prosecute illegal activity. Keep management informed of the situation and response. Incident Definition An incident is any one or more of the following: 1. Loss of information confidentiality (data theft) 2. Compromise of information integrity (damage to data or unauthorized modification). 3. Theft of physical IT asset including computers, storage devices, printers, etc. 4. Damage to physical IT assets including computers, storage devices, printers, etc. 5. Denial of service. 6. Misuse of services, information, or assets. 7. Infection of systems by unauthorized or hostile software. 8. An attempt at unauthorized access. 9. Unauthorized changes to organizational hardware, software, or configuration. 10. Reports of unusual system behavior. 11. Responses to intrusion detection alarms. Ridgestone Bank July 2012 Ridgestone Express User Manual 16 Incident Planning In the incident response plan, do the following: 1. Define roles and responsibilities 2. Establish procedures detailing actions taken during the incident. 1. Detail actions based on type of incident such as a virus, hacker intrusion, data theft, system destruction. 2. Procedures should consider how critical the threatened system or data is. 3. Consider whether the incident is ongoing or done. 4. Implement policies with security tools including firewalls, intrusion detection systems, and other required items. 5. Post warning banners against unauthorized use at system points of access. 6. Establish Response Guidelines by considering and discussing possible scenarios. 7. Train users about computer security and train IT staff in handling security situations and recognizing intrusions. 8. Establish Contacts - Incident response team member contact information should be readily available. An emergency contact procedure should be established. There should be one contact list with names listed by contact priority. 9. Test the process. 3. Discovery - Someone discovers something not right or suspicious. This may be from any of several sources: 1. Intrusion detection system 2. A system administrator 3. A firewall administrator 4. A business partner 5. A monitoring team 6. A manager 7. The security department or a security person. 8. An outside source. 4. Notification - The emergency contact procedure is used to contact the incident response team. 5. Analysis and Assessment - Many factors will determine the proper response including: 1. Is the incident real or perceived? 2. Is the incident still in progress? 3. What data or property is threatened and how critical is it? 4. What is the impact on the business should the attack succeed? Minimal, serious, or critical? 5. What system or systems are targeted, where are they located physically and on the network? 6. Is the incident inside the trusted network? 6. Response Strategy - Determine a response strategy. 1. Is the response urgent? 2. Can the incident be quickly contained? 3. Will the response alert the attacker and do we care? Ridgestone Bank July 2012 Ridgestone Express User Manual 17 7. Containment - Take action to prevent further intrusion or damage and remove the cause of the problem. May need to: 1. Disconnect the affected system(s) 2. Change passwords. 3. Block some ports or connections from some IP addresses. 8. Prevention of re-infection 1. Determine how the intrusion happened - Determine the source of the intrusion whether it was email, inadequate training, attack through a port, attack through an unneeded service, attack due to unpatched system or application. 2. Take steps to prevent an immediate re-infection which may include one or more of: 1. Close a port on a firewall 2. Patch the affected system 3. Shut down the infected system until it can be re-installed 4. Re-install the infected system and restore data from backup. Be sure the backup was made before the infection. 5. Change email settings to prevent a file attachment type from being allow through the email system. 6. Plan for some user training. 7. Disable unused services on the affected system. 9. Restore Affected Systems - Restore affected systems to their original state. Be sure to preserve evidence against the intruder by backing up logs or possibly the entire system. Depending on the situation, restoring the system could include one or more of the following 1. Re-install the affected system(s) from scratch and restore data from backups if necessary. Be sure to preserve evidence against the intruder by backing up logs or possibly the entire system. 2. Make users change passwords if passwords may have been sniffed. 3. Be sure the system has been hardened by turning off or uninstalling unused services. 4. Be sure the system is fully patched. 5. Be sure real time virus protection and intrusion detection is running. 6. Be sure the system is logging the correct items 10. Documentation - Document what was discovered about the incident including how it occurred, where the attack came from, the response, whether the response was effective. 11. Evidence Preservation - Make copies of logs, email, and other documentable communication. Keep lists of witnesses. 12. Notifying proper external agencies - Notify the police if prosecution of the intruder is possible. 13. Assess damage and cost - Assess the damage to the organization and estimate both the damage cost and the cost of the containment efforts. 14. Review response and update policies - Plan and take preventative steps so the intrusion can't happen again. 1. Consider whether an additional policy could have prevented the intrusion. Ridgestone Bank July 2012 Ridgestone Express User Manual 18 2. Consider whether a procedure or policy was not followed which allowed the intrusion, then consider what could be changed to be sure the procedure or policy is followed in the future. 3. Was the incident response appropriate? How could it be improved? 4. Was every appropriate party informed in a timely manner? 5. Were the incident response procedures detailed and cover the entire situation? How can they be improved? 6. Have changes been made to prevent a re-infection of the current infection? Are all systems patched, systems locked down, passwords changed, anti-virus updated, email policies set, etc.? 7. Have changes been made to prevent a new and similar infection? 8. Should any security policies be updated? 9. What lessons have been learned from this experience? Ridgestone Bank July 2012 Ridgestone Express User Manual 19 2.6 RDC Merchant Continuity Plan Outline In the event that the merchant experiences an adverse event that precludes it from continuing normal remote deposit capture operations, an alternative plan for processing should be established. An adverse event can include the failure to scan and transmit images from any of the following categories (but not limited to these events): Natural event o Hurricane o Tornado o Snow storm o Ice storm o Earthquake o Flood Technical event o Loss of the Internet o Malfunction of the equipment (scanner and/or PC) o Loss of electricity o Virus, malicious code infestation Human error Environmental issue o Fire o Evacuation due to circumstances outside of the companies control Alternate methods of processing may include: o Physically taking deposits to the bank o Going to a remote location to scan and transmit In the event an alternate location is used the merchant should ensure that security over the physical documents and the transmissions is maintained. Transmissions should never be sent over unsecure wireless or using a public Internet connection. Written procedures for processing at an alternate site need to be developed which include security procedures. Notification or Calling Tree Customer’s management Financial Institution Law enforcement Employees Ridgestone Bank July 2012 Ridgestone Express User Manual 20 Chapter 3 – Installing Source Capture Optimization (SCO) Remote Deposit System 3.1 Customer Workstation Configuration This must be completed on the workstation that will run the SCO Software. 1. Open Internet Explorer and select “INTERNET OPTIONS” from the Tools Menu. 2. The Internet Options box is displayed. Select the “SECURITY” tab, highlight “TRUSTED SITES” and click the “SITES” button. 3. The Trusted sites box is displayed. Enter the website shown below and click the “ADD” button. Click “CLOSE”. https://sco-web.ufsdata.com 4. The Internet Options box is again displayed. Click the "Custom Settings" button. Ridgestone Bank July 2012 Ridgestone Express User Manual 21 The Security Settings – Trusted Sites Zone box is displayed. Change the following: Automatic Prompting for ActiveX controls -- Select the "Enable" option. Download signed ActiveX controls -- Select the "Prompt" option. Ridgestone Bank July 2012 Ridgestone Express User Manual 22 5. A Warning box is displayed. Click “YES”. 6. The Internet Options box is again displayed. Select the PRIVACY tab. Verify that the Pop Up Blocker is not turned on. If this box is checked, uncheck the box. If you would prefer to keep the Pop Up Blocker turned on for all sites except SCO Merchant Capture, proceed to Step 8. 7. Click “OK”. 8. If you would prefer to keep the Pop Up Blocker turned on for all sites excluding SCO Merchant Capture, click on the Settings button under Pop Up Blocker. Ridgestone Bank July 2012 Ridgestone Express User Manual 23 9. When the Settings screen appears, add the following site https://sco-web.ufsdata.com to the Address of website to allow and click “ADD”. Then select “CLOSE”. This means that for only these sites listed will Pop Ups be allowed. For all other sites, they will be blocked. 10. The Internet Options box will be displayed. Click on “APPLY”. Then select “OK”. 11. Close the Internet Explorer window. Ridgestone Bank July 2012 Ridgestone Express User Manual 24 3.2 Installing the Scanner User MUST have Administrative Rights on the workstation that is being used. **Please note that if the computer you are attempting to access the drivers on has Winzip, a trial version of Winzip, or no Winzip at all, the procedures below may vary slightly. The procedures below are as if the computer has Winzip installed.** 1. Open Internet Explorer and access the following page: https://sco-web.ufsdata.com/drivers/ 2. Select the appropriate driver by clicking on the description or picture of the scanner your customer is using. 3. When asked “Do you want to open or save this file,” choose SAVE. 4. Choose a location on the PC to save the driver where it will be easily accessible. 5. Click Save and close the web page. Ridgestone Bank July 2012 Ridgestone Express User Manual 25 6. Access the location on your PC that you saved the driver. Open the folder containing the zipped driver. a. Note: The location listed below is for example purposes only. You may not have saved in a similar location. 7. Right click on the zip file and choose WinZip – Extract to here. a. NOTE: If the PC does not have Winzip, then you should see an option to “Extract All.” 8. After the zip file has extracted the contents to the path you indicated, you should now see the folder which will contain the executable file (.exe) that you will use to launch the installation of the driver 9. Choose the Executable file (.exe) for the scanner being installed. Ridgestone Bank July 2012 Ridgestone Express User Manual 26 10. Follow the prompts to complete the installation. 11. When installation is complete, select “FINISH”. Plug in the scanner and proceed to the Launch Web Capture documentation. Ridgestone Bank July 2012 Ridgestone Express User Manual 27 3.3 Uninstalling the Ranger Driver It is possible that you may need to uninstall your ranger driver at some point. Please do not do this unless absolutely necessary. 1. Go to Control Panel 2. Double Click on Add or Remove Programs 3. Scroll Down to find the Ranger Driver for…(will vary depending on which scanner you have installed) 4. Click Change/Remove and follow the instructions to complete the uninstall. Ridgestone Bank July 2012 Ridgestone Express User Manual 28 Chapter 4 – Making a Deposit 4.1 Creating a Deposit Be sure the scanner is plugged in and the drivers installed before completing these steps. Also, be sure that the Pop Up Blocker is turned off when running Merchant Capture. 1. On the merchant capture workstation, open Internet Explorer and open the following link: https://sco-web.ufsdata.com/WebCaptureWeb/MerchantCapture.do?appId=EBI1450&FID=075912819 **You MUST copy and paste this link, typing it in will not allow you to properly login! ** 2. Our recommendation is that you add the above site to your internet favorites and name it “Ridgestone Deposit”. (in Internet Explorer, Click on Favorites and select Add to Favorites) 3. The Merchant Capture Login box is displayed. Enter your Premier Ecorp Access ID and (Token Number+PIN) and click “LOGIN”. 4. The scanner will turn itself on and the Silver Bullet window is displayed. (this will be displayed every time you login) Ridgestone Bank July 2012 Ridgestone Express User Manual 29 5. After login, the screen below will appear. Click “OK”. 6. The Home Screen is displayed. Select the “Create Deposit” tab.. 7. The Create New Deposit box is displayed. Enter the deposit amount and select the appropriate deposit account. Click the “Continue” button. Ridgestone Bank July 2012 Ridgestone Express User Manual 30 8. Place your checks to be scanned in the scanner and click the Gold Scan button in the lower left corner of your screen (you may need to scroll down to locate the SCAN button). Let the check(s) scan. When finished click “Capture Complete”. Your image(s) will appear as they are scanned, notice the virtual endorsement. There is no longer a need to endorse the back of your checks. 9.If there are no exceptions, click on Submit Deposit, and your deposit is complete and you will return to the main screen. To log out, click on Logout on the information bar. Ridgestone Bank July 2012 Ridgestone Express User Manual 31 4.2 Exception items It is possible that when a check is scanned, for some reason there might be an image quality error. This can be caused by the check being torn, bent, busy background, dust, etc. If you receive an Image Quality exception, you will see a red “X” with a pink background letting you know that there was an issue with the image was that scanned. Click on the check in the list to view the document. Upon reviewing the image, if it is straight and legible, click on Accept Image. The screen will refresh itself approving the image quality and allowing you to continue with your deposit. If the dollar amount is not read correctly, enter in the correct amount in the bottom right hand box that is highlighted pink and hit Enter. (The dollar amount is the only amount that you can change. If any other information is incorrect, it will be fixed during processing) Now that there are no exceptions, you can continue with your deposit as normal and submit the deposit. Ridgestone Bank July 2012 Ridgestone Express User Manual 32 4.3 Duplicate Items The system will automatically check for duplicate check entries. If you happen to scan a duplicate item, the View Exceptions tab will be highlighted pink and you will also see that the item you scanned will be highlighted in pink indicating that this might be a duplicate deposit item. 1. If you wish to accept the item (only accept the item if you have verified that the check has not been deposited in a previous deposit), click Accept Duplicate and proceed with the deposit as normal. 2. If you choose to delete an item, make sure that you highlight the correct check 3. Click on Delete Item. 4. Once you hit Delete Item, the system will ask verify that you really want to delete this item. 5. Click OK. 6. The screen will refresh and the duplicate item will be removed. Continue as many times as necessary. Once you have removed all the necessary items, proceed with your deposit at normal. Ridgestone Bank July 2012 Ridgestone Express User Manual 33 4.4 Deleting a Check While scanning a deposit, it is possible that you will have to delete a check that you have scanned. Please follow the direction below to do so properly. 1. While in the View All Items screen, Click the red X in the same line as the check you wish to delete. 2. A box will pop up verifying that you really want to delete this item, if you do, click Yes. 3. You can then finish your deposit. Click this red X to delete a check Ridgestone Bank July 2012 Ridgestone Express User Manual 34 4.5 Deleting a Deposit **If you are not going to Submit your deposit, for any reason, it MUST be deleted!** 1. Select the deposit you wish to delete from the deposit list by checking the box next to the deposit. 2. Click the Remove button. OR 3. A box will pop up verifying that you want to delete the deposit. If you do, click OK. 4. Once you click OK, you will be taken back to the Home screen. Ridgestone Bank July 2012 Ridgestone Express User Manual 35 4.6 Switching between Classic and Contemporary View The latest upgrade to Merchant Capture allows for you to choose which view you prefer. In order to switch back and forth, simply click on the link in the upper right hand corner. Below are examples of the home pages of each view. Contemporary View Classic View Ridgestone Bank July 2012 Ridgestone Express User Manual 36 Chapter 5 – Reporting 5.1 Detail Deposit Reports – Classic View 1. On the Home screen click on the Deposit ID number 2. Click on the Detailed Reports tab, you will see four reporting options (Described on next page). You can print or Save any of the reports. Ridgestone Bank July 2012 Ridgestone Express User Manual 37 Option 1: Generate PDF Report – This report will list all of the checks in your deposit. Option 2: Generate PDF Report with Images – This report will list all of the checks in your deposit along with images of each check. Option 3: Generate CSV Report – this report will extract all the individual check information in a format that can be uploaded into other programs. Option 4: Extract Images – This report will only pull the images of every check in the deposit. Ridgestone Bank July 2012 Ridgestone Express User Manual 38 5.2 Detail Deposit Reports – Contemporary View 1. On the Home screen, check the box next to the deposit(s) you would like to report on. 2. Click on the Export As tab, you will see four reporting options (Described below). You can print or Save any of the reports. Option 1: Generate PDF Report – This report will list all of the checks in your deposit. Option 2: Generate CSV Report – this report will extract all the individual check information in a format that can be uploaded into other programs. Option 3: XML Extract – This report will only pull the images of every check in the deposit. Option 4: Deposit Detail Report – This report will list all of the checks in your deposit along with images of each check Ridgestone Bank July 2012 Ridgestone Express User Manual 39 5.3 Retrieve a Specific Check – Classic View 1. On the Home Screen, click on Query and select Item Query. 2. You will be taken to the item query screen. Enter in the dates you would like to search and any other identifying check information. Amount and account number are the best. 3. Click Search. This will bring up a list of checks. 4. Click on the check in the list to display the image. Ridgestone Bank July 2012 Ridgestone Express User Manual 40 5. If you need to print the check, Right Mouse Click on the Image and select print. Ridgestone Bank July 2012 Ridgestone Express User Manual 41 5.4 Retrieve a Specific Check – Contemporary View 1. From the home screen, click on the tab labeled “View Items”. 2. Click on the + next to the check that you would like to view. 3. To print the check, Right mouse click on the image and select “Print”. Ridgestone Bank July 2012 Ridgestone Express User Manual 42 Chapter 6 - Troubleshooting 6.1 Troubleshooting FAQ Submit Deposit Button does not After ALL Exceptions have been appear. corrected, click on the Update Item button. The Submit Deposit button should appear. Verify with an Account Owner that you have been given access to submit deposits, if you have, contact Deposit Operations to verify your user settings. You may need to scroll down using the left hand scroll bar to view the Submit Deposit Button. When I try to login, the webpage Verify that you are running Internet closes. Explorer 6 or 7. This is a common problem when IE is upgraded to Version 8. Consult your IT Provider to verify that your Virus Protection will allow the SCO program. (some security programs need to be disabled during install). It is possible that a Google or Yahoo toolbar is blocking pop-ups. Consult your IT provider to uninstall these toolbars. I receive a CHECK JAM error When you are in the scanning screen, message when trying to scan certain uncheck the Detect Double Feed button checks. (located next to the green SCAN button). Verify that there are no bent edges or tears on any of the checks that are being scanned. Clean Scanner and check to make sure no paper or any other foreign object is not lodged in the scanning track. Scanner will not Power ON. If you have a Unisys Smart Source scanner, check that the power button, located on the back of the scanner, is in the ON position. Check to make sure that the power cord is securely plugged into the wall and the back of the scanner. Scanner will not Power ON. Verify that the 2 parts of the power cord (the box and the plug) are correctly attached. Make sure that the USB cord is securely Ridgestone Bank 43 July 2012 Ridgestone Express User Manual I receive multiple exceptions when scanning checks. SCO takes a long time to open. When I sign in, a pop-up appears telling me that my Silver Bullet License is going to expire. When I sign in a pop-up appears and asks me for a product/serial number for Silver Bullet. I am not able to install the Medical Informatics Engineering Program. I am receiving an error message that says “Transport API is dead.” plugged into the computer and the scanner. The user that installed the scanner driver must be a local administrator on the computer (refer to Section 2.1 – System Requirements). The scanner is designed to read each number dollar amount, if the check is dark colored or the amount is skewed, the scanner may not properly read the check. Clean the scanning panels as indicated in Section 2.3 – Scanner Maintenance. Check your internet connections and make sure that it complies with Section 2.1 - Workstation Requirements. This message appears when the drivers were not properly “unzipped”. Refer to section 3.4 for help on uninstalling and 3.2 for reinstalling the Ranger Driver. This message appears when the drivers were not properly “unzipped”. Refer to section 3.4 for help on uninstalling and 3.2 for reinstalling the Ranger Driver. Verify that your Internet Explorer settings match those specified in Section 2.1 – Customer Workstation Configuration. It is possible that a Google or Yahoo toolbar is blocking pop-ups. Consult your IT provider to uninstall these toolbars. Ridgestone Bank July 2012 Ridgestone Express User Manual If you have a Unisys Smart Source scanner, check that the power button, located on the back of the scanner, is in the ON position. Check to make sure that the power cord is securely plugged into the wall and the back of the scanner. Verify that the 2 parts of the power cord (the box and the plug) are correctly attached. Make sure that the USB cord is securely plugged into the computer and the scanner. The scanner driver may need to be 44 I am receiving the error “Ranger cannot connect to API” When I click the “Scan” button, a box pops up that says “Uploading” and will not go away. I receive the prompt to run “SetupZiptrc.exe” every time I login. I receive the following pop-up after installing the scanner driver and logging in. When I try to open SCO, I get an error that “Internet Explorer cannot display the webpage” Ridgestone Bank July 2012 Ridgestone Express User Manual reinstalled. Refer to Section 3.4 Uninstalling Ranger Driver and 3.2 Installing the scanner. The scanner driver may need to be reinstalled. Refer to Section 3.4 Uninstalling Ranger Driver and 3.2 Installing the scanner. Refer to Section 2.1 Workstation requirements to ensure that your internet connection is the correct speed. Refer to Section 3.1 Customer Workstation Configuration to ensure that you have properly configured the Internet Explorer settings. To prevent this message from appearing upon login, access the SCO drivers link at https://scoweb.ufsdata.com/drivers/ and select the following: “SCO1251 Install Documentation” and “SCO1251 Install Package”. The install documentation will provide the instructions for running the SCO1251 Install package. This pop-up means that you attempted to install the driver without extracting the driver from the zip file. To correct, uninstall the driver. Extract the contents of the zip file and make sure that the executable file and the .dat file are present in the same folder. Then reinstall the driver. In Internet Explorer, click on Tools – Internet Options. Click on the Advanced Tab. Under the “Security” section, either check or uncheck the box next to “Do not save encrypted pages to disk”. If the option is checked, uncheck it. If it is unchecked, check it. 45