1
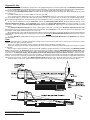
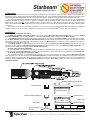
Starbeam
TM
advanced telescope pointer
Introduction:
Starbeam is a precision unit power finder designed to make pointing your astronomical telescope easy. Viewing through Starbeam, a
transparent "red-star" appears projected against the sky background. The "star" is actually a small pinhole illuminated by a red L.E.D. Placed
at the focus of a beam-splitting mirror/lens, the star is projected to infinity. Starbeam is effectively a reverse Herschelian telescope.
The size of the pinhole and focal length of the mirror result in a 0.4° red-star, about the diameter of the moon. Its size, color, and adjustable
brightness and blink rate make it easy to see against any twilight to dark sky background. With a mirror aperture of 39mm, the projected
image can be easily seen at any distance behind the mirror, whether 2 inches or 2 feet! Because the mirror surface is uncoated, and a
multi-coated compensating curve is designed into the back of the mirror, the normal sky background appears through the almost invisible
"mirror-lens."
There are three mounting bases available for Starbeam, one for Tele Vue scopes, one for Newtonian/Dobsonians with a 4" or larger tube
diameter, and one for SCTs 8" or larger. Adjustment screws and lock screw make StarbeamTM easy to align to your telescope.
Installation:
For Tele Vue Telescopes (SFT-2003)
1) Removing Starbeam from Base Channel - First, back out the Horizontal Adjustment Screws until they clear the Optical
Assembly Support Bar. While holding Starbeam, remove the Lock Screw and lift Starbeam from the Base Channel.
2) Installing Base Channel - Drop the button head screw through the clearance hole in the Base Channel. Using the Allen key (provided),
lock the Base Channel (with the Horizontal Adjustment Screws oriented towards the front of the telescope) into the preferred mating
channel of the telescope mount ring. If the screw bottoms out before the Base Channel is locked down, use the supplied lock-washer as a
spacer by putting it under the screw head.
3) Installing Starbeam - Position Starbeam so the holes in the sides of the Optical Assembly Support Bar align with the horizontal
adjustment screws. Tighten the Horizontal Adjustment Screws until the tips enter the holes in the Optical Assembly Support Bar. You
can now lock the Starbeam down gently with the Vertical Lock Screw.
For Open Tube Telescopes (SFU-2004)
To attach Starbeam to any open telescope tube over 4" diameter, simply drill matching holes in your tube and use the supplied machine
screws and nuts to fasten the Base Channel to your telescope tube. Follow the instructions above for mounting Starbeam in its Base Channel.
For Schmidt Cassegrain Telescopes (SFC-2009)
The Starbeam model for 8" or larger diameter SCTs installs on the rear cell of the telescope. First, mount the Attachment Bracket
to the telescope's rear cell. The screw slots in the Attachment Bracket are sized and spaced to accommodate the wide variety of accessory
attachment points on popular SCTs. However, due to the different screw sizes and lengths, attachment screws are not provided with the
Starbeam. Slide the Dove Tail into the Attachment Bracket until it hits the Screw Stop. Tighten the thumb screw on the side of the
Attachment Bracket.
Button Head Attachment screw
Tele Vue Base
Base Channel
Machine Screws
Universal Open Tube Base
Base Channel
Stop Screw
Nuts
SCT Base
SCT Attachment
Bracket
Tele
Vue 32 Elkay Dr., Chester, New York
Vi s i o n a r y
Base Channel
Dovetail
Attachment Slots
10918 Ph. (845) 469 - 4551 www.televue.com
Alignment & Use:
1) Thread Illuminator into Starbeam. Compression of the rubber O-ring allows convenient positioning of the Blink Adjustment Knob.
2) Turn on Illuminator by rotating the black knob on the end clockwise. Continuing to rotate the knob clockwise increases the brightness.
Adjust the intensity of the illuminator so the red-star appears comfortably bright without disturbing your night vision.
Rotate the white Blink Adjustment Knob on the side of the housing to adjust the pulse rate of the LED. Rotate the knob fully clockwise
for continuous on.
3) At 50x to 100x, place a star in the middle of your telescope field.
4) To view through the Starbeam locate your eye above the Illuminator and a foot or two back from the beamsplitter. Even though
you can be further back or off to the side a little and still see the "red-star," it is easiest to first see the dot in this straight through position.
While viewing through Starbeam, use the horizontal and vertical adjustment screws to overlay the "red-star" onto a test star in the sky. That's
it!
To raise or lower Starbeam, loosen the Lock Screw and turn the Vertical Adjustment Screw. Starbeam will pivot vertically on the
Horizontal Adjustment Screws. The Lock Screw works "against" the Vertical Adjustment Screw to lock the assembly. It is only
necessary to lightly snug the Optical Assembly Support Bar against the Lock Screw. Tightening it too much will interfere with horizontal
movement.
The Horizontal Adjustment Screws are meant to work against each other. Loosening one Horizontal Adjustment Screw while
tightening the other moves Starbeam smoothly in the horizontal plane. The Lock Screw acts as a pivot for this horizontal adjustment. The
movements sound complicated but in practice are easy to do.
Once aligned to your scope and locked, Starbeam should not need further adjustment. Incidentally, Starbeam is prefocused (collimated)
and designed so that little image shift is visible between a real star seen through the Beamsplitter Mirror/Lens and the projected "red-star"
overlaying it.
To use the Flip-Mirror, simply tilt it back until you can see the reflection of the Beamsplitter Mirror/Lens in the Flip Mirror as the diagram
below illustrates.
Care:
Although Starbeam has a durable anti-reflection coating on the convex outside (sky side) surface, if dew occurs, it's best to use a dewzapper or hair dryer gun to warm the dew away.
There is no coating on the inside (concave) surface of the mirror lens so cleaning is especially easy.
Starbeam is made of precision CNC machined aluminum, black-anodized for a lifetime of field use and needs no special care to maintain
its fine finish.
When it is time to replace the battery, use a Duracel XL DL 1/3N lithium or equivalent battery. To install, pull the white Blink Adjustment
Knob out from the side of the Illuminator. Gently pull out the electronic assembly by holding the ON/OFF Brightness Control Knob. Take
note of the polarity of the battery. The negative (-) side is toward the LED. Insert the new battery into the receptacle in the same orientation
as the old one. Installing the battery with the polarity reversed will damage the circuitry and void the warranty. Remove the antirattle foam from the old battery and press it on to the new battery. Compress the foam and slide the electronic assembly into the Illuminator
housing. You may have to rotate the circuit board to get the LED to slip into the hole in the front end and also to align blink potentiometer
with the hole in the housing. Insert the white Blink Adjustment Knob through the side of the body and into the hole on the potentiometer.
Starbeam helps you find your celestial favorites quickly and easily with any scope. We wish you years of pleasure with it.
You must remember to switch off the illuminator when not in
use to avoid draining the battery.