1
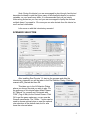
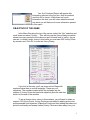
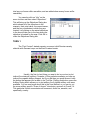
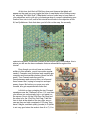
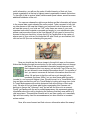
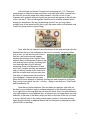
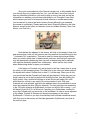
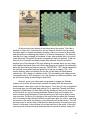
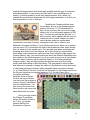
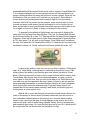
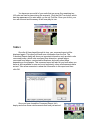
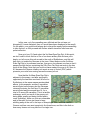
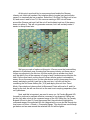
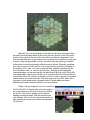
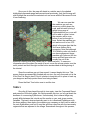
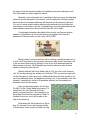
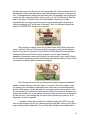
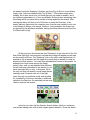
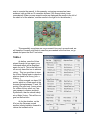
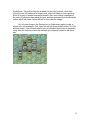
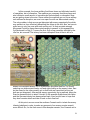
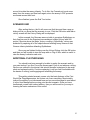
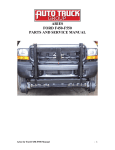
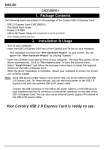
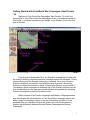
Getting Started with First World War Campaigns: East Prussia
‘14
Welcome to First World War Campaigns: East Prussia ‘14. In this, the
second title in of the First World War Campaigns series of operational combat in
World War I, we will be experiencing the battles on the Eastern Front in the first
year of the war.
From August to September 1914, the Russians invaded East Prussia with
the intent of winning a quick and decisive campaign against the Germans. Victory
seemed likely given the Russian superiority in numbers, but a host of flaws in
Russian command, coordination, and with their army in general, allowed the
Germans to defeat the invasion in detail. Following the German victory battle of
Tannenberg, which succeeded in rendering half of the Russian invasion force as
non-combat effective, the Germans counter attacked and pushed the remaining
Russian forces back to the East Prussian border.
While veterans of the Panzer Campaigns and Modern Campaigns series
may feel familiar with the mechanics in First World War Campaigns series, and
while it might be tempting for them to skip the introductory scenario, it is still
advisable that non-veterans of this series briefly read over this document to
observe the differences between this and Panzer Campaigns and Modern
Campaigns.
1
Note: During this tutorial, you are encouraged to play through it as the text
describes but keep in mind that since many of the situations depend on random
variables, so your results may differ. It is recommended that you just simply
follow along as best as you can, and you are encouraged to replay the scenario
multiple times if you need to. Of course you can also deviate from this tutorial as
much as feel comfortable.
Let’s move on with this introductory scenario!
SCENARIO SELECTION
After installing East Prussia '14, start up the program and after the
introductory cinematic you will be taken to the File Selection Dialog. Click the
scenario #00_Started and then OK.
This takes you to the AI Selection Dialog
where you choose the side you wish to play. For
the purposes of this tutorial select Allied Powers
A/I "Manual" for yourself and "Automatic with
FOW" (Fog of War) for the Central Powers. Click
OK to get the game underway, you are now the
German commander. The “Rules…” button can be
used to choose optional rules or reset the optional
rule selections to the default state, but for now
leave the rules set alone.
2
Your first Command Report will appear with
information relevant to the first turn. Note its contents
and click OK to close it. While there isn’t much
information this time, you will notice when the second
turn starts you will have much more information present
in this report.
OBJECTIVE OF THE GAME
In the Menu Bar along the top of the screen, select the “Info” selection and
scroll down and select “Victory…” This will bring up the Victory Dialog box which
shows how many points the first side must earn for each level of victory. As you
can see, to obtain a major victory in this battle you must earn 550 Victory Points
by scenario end. Click OK to close the Victory Dialog.
If you look at the map, you’ll see some colorful flags with
numbers below them in a small rectangle. These are your
objectives. The numbers located within the rectangle are the
number of Victory Points that particular objective gives the side that
holds it at the end of the scenario.
To win at least a minor victory in this scenario, you will need to obtain or
surpass 125 Victory Points. Victory Points are calculated by adding up the total
points awarded from objectives (Objective Points) and then adding the balance of
points from friendly and enemy losses (Victory Points are taken away from your
3
total as your forces suffer casualties, and are added when enemy forces suffer
casualties).
You can also click on “Info” on the
menu tool bar and then select “Objectives”.
This will bring up the Objectives Dialog box
which shows all of the objectives in the
scenario, their point value, the current owner,
and the hex coordinates in which they are
located. Left clicking on the actual objectives
in the box will take you to the hex where the
objective is located on the map. Click OK to
close the Objectives Dialog box.
TURN 1
The “First Contact” started scenario covers an initial Russian cavalry
skirmish with German troops on the East Prussian border.
Usually, the first (or last) thing you want to do in your turn is plot
indirect fire missions (artillery). However, in this particular scenario you have no
indirect fire capable artillery support, but if you did then you would access it with
the button that appears like a radio in the Tool Bar. Clicking that button opens the
Artillery Dialog which allows you to plot artillery fire if eligible artillery units were
available. You can read more about this in the User Manual, or you can try out
the more artillery specific "Guns of August" introductory scenario in France '14.
This particular tutorial concentrates on movement, direct fire, assaults, and
specifically, cavalry.
4
At this time, hold the Left Shift key down and observe that labels will
appear on the map (you may toggle the style of map labels in the Settings menu
by selecting "Alt Label Style"). Map labels can be a useful way to keep track of
your objectives, and to give you your bearings when it comes to determining your
location from turn to turn, and in this tutorial we will refer to the objective at hex
8,6 as Eydtkuhnen. Note that when you left click on the map, the currently
selected map hex's coordinate is shown in the bottom right of the window: this is
where you will see the hex coordinates that are referenced throughout this
tutorial.
Even though you do not have any indirect
artillery in this scenario, you do have some regular
cavalry, Cossacks, and a division level machine gun
company and horse artillery battery (direct fire field
guns). Your Cossack units are good for
reconnaissance and not much else, so let's send
them forward first, hoping to bump into and spot
enemy forces. But before you move your units
forward, let's get acquainted with them first.
Left click on hex containing the two Cossack
squadrons near the "Railhead" at hex 11,6, and then
you will see two unit portraits (a.k.a. unit cards) on
the screen. One is for the 2/3rd Don Csk Regt and
the other is for the 1/3rd Don Csk Regt. Take this
time to look at the details of the two units; as you
can see they are both comprised of 153 men, they
have 0 fatigue, and their quality (morale) is D (which
is not very good since the scale is from A to F). You
5
can also see that they currently have 23 Movement Points, and since the number
is white then that means that they currently have their full movement allowance
available. To the right of their movement is a capital T, which stands for Travel
Mode, which essentially means the unit is in high mobility mode. Units in this
mode will move quicker in most circumstances, but are also more vulnerable. For
infantry units, Travel Mode means that they are in march column, for cavalry it
means that they are mounted and moving by horse, for artillery it means that they
are limbered up, and for mortars and machine guns it means that the weapons
are disassembled for carrying. Keep in mind that cavalry units that melee while in
Travel Mode are considered to be conducting a cavalry charge or cavalry
skirmish. In the upper left of their portrait you can see a symbol that looks like the
silhouette of a pair of binoculars, this signifies that these two units are currently
spotted by the enemy. Below these units you will see various bits of information
about the terrain within the hex that they occupy and visibility limits and supply
levels.
As you can see, the Cossack units are in a village, the elevation is 0m
(sea level), and visibility is currently 3km (3 hexes), and the local supply level of
that hex is 59%. Basically, this means that the Russians are providing a 59%
chance of resupply to that particular hex and this level is determined by supply
sources and the hex's access to roads. This is very important because the
control of roads and road junctions are keys to successful campaigns and
offensives during World War One. Note that the Local Supply feature is part of
the Virtual Supply Trucks optional rule, and this rule is recommended for normal
play (it is a default rule). Please read more about this and supply in the User
Manual.
Now put the mouse pointer over one of the
units and hold the right mouse button. When you do
this, you will see a lot more information "behind the
curtain". This information you now see might seem
overwhelming, but let's quickly go over the basics. In
the bottom area, you can now see additional
information about the hex these units occupy. A hex
symbol is shown and text specifies what type of
hexside features are in that hex. For example, in this
hex a stream borders the north, northwest and
southwest hexsides, there is a medium bridge to the
northwest and heavy bridge to the southwest, and a
secondary road enters the hex from southeast. RAIL
OUT means that a damaged rail line passes through
that part of the hex. In the center of the hex is a
number showing the current stacking level of the force
located within the hex, and this determines how many
units may occupy the same hex. Above this area you
will see the unit cards again. To the left side of the
6
unit's information, you will see the order of battle hierarchy of that unit, from
lowest organization at the top to highest parent organization towards the bottom.
To the right of this is various attack, defense and speed values, as well as some
additional attributes of the unit.
You can now release the right mouse button and the information will return
to the normal data, again showing the unit's portrait. Take a moment to left click
on other hexes on the map that contain your units and look at those as well. You
will see that some of your units are "HQ" units, these are some of your most
important units which maintain command and supply to your subordinate units;
please read more about them in the User Manual. All you need to know at the
moment is that you should try to keep the HQ 1st Cavalry Bde in the center of
where most of your units are, but keep the HQ safe! Once you are finished, left
click on hex 8,4 (the one containing the gray unit).
Now you should see the above image in the unit info area on the screen.
Notice that holding the right mouse button on this unit's portrait does not change
the data to the more detailed information mentioned previously,
that is because this is an enemy unit and with Fog of War on you
are not allowed to see detailed information about it. As a matter of
fact, you cannot see even all the basic information about the unit
either. All we know is that the unit has a unit strength in the
hundreds (the three XXXs), but you don't know what its quality
(morale) is, nor how much fatigue it has. We also know it is in Travel Mode, and
you can also see that the unit is in Travel Mode by looking at its map icon (units
in Travel Mode appear with a white horizontal line at the bottom of their map
icon). We also do not yet know what higher organization this German unit
belongs to (hence the "Unknown" text), but we will find this out in a moment.
Finally, get familiar with the unit's portrait/appearance, this represents gaining
information about the unit by observing the uniforms that they wear which is of
vital importance. This particular German unit is an Ulan cavalry unit, essentially
light and fast cavalry used for reconnaissance, but also effective in mounted
melee combat.
Now, let's move forward and find out more information about the enemy!
7
Left click back on the two Cossack units occupying hex 11,6. There are
several ways to select units and move them, and each one will be covered here,
but first let's cover the single-click select method. Left click on one of your
Cossack unit's portraits and you should now see a red tab appear to the left side
of the "unit card". This red tab signifies that this unit is currently selected and is
waiting for instructions. We are just selecting one unit, but you may select
multiple units in the same hex like this to give the same order to all selected units
(useful for group moves or group firing).
Now, with the unit selected, move the mouse to the map and right click the
adjacent hex that is to the northwest of the hex it is currently occupying. When
you do this, you will see the unit move to
that hex, and a red arrow will appear
showing the direction that it moved. Also,
observe that your Movement Points on the
unit card are now in yellow, signifying that
you have less than your full amount
remaining. Once your Movement Points
are in red, it means that they are depleted
and you will not be able to do much more
with the unit after that until your next turn.
Now that you have moved into the hex to
your northwest, observe that you have
taken the 50 point objective in that hex (the flag has now changed to a Russian
flag), and you can check the Info -> Victory... dialog to see that your Total Points
has increased by 50.
Now that you have advanced 1km and taken an objective, right click on
the hex to your northwest again to advance adjacent to the German cavalry unit.
If you right click on the map and the unit does not move, then it is either because
you right clicked on a non-adjacent hex, or because you no longer have any units
selected. In the case of the latter, simply left click on the hex of the unit you want
to move, and left click on the unit's portrait again to select it, then start moving
again by right clicking on adjacent hexes (the unit becomes unselected any time
you left click on the map).
8
Once you move adjacent to the German cavalry unit, it will probably fire at
you through the use of opportunity fire. If so, you will hear it shoot and you will
see any casualties inflicted on your unit via pop up text on the map, as well as
information on whether you have been disrupted or not. Disruption is an effect
which causes your unit to be temporarily less effective in combat and causes
your movement to slow in the face of enemy forces (although your rearward
movement is unaffected). Please read more about Disruption effects in the User
Manual, as well as the other unit statuses (such as Isolated, Broken, Fixed, Low
Ammo, Low Fuel, etc.).
Now that we are adjacent to the enemy, left click on the enemy's map icon
and observe that in the unit info area we can now see that this unit belongs to the
"1.Infanterie-Div" organization. This can be useful to know during larger battles
when you want to keep track of where certain units are, and how your opponent
may be strategically redeploying them (as well as determining that a particular
unit might be extremely spread over a wide area -- which can be very useful
when determining where to press your attacks!).
Let's leave our Cossack unit, and go back to the hex it came from to move
the other unit still remaining there. This time let's try the other unit select method,
the double-click select. Double click on hex 11,6 on the map. When you do this,
you should see that the Cossack unit there will get selected. In this way you can
quickly select a unit in the hex without left clicking the hex, then left clicking the
unit's portrait. Also, double left clicking on a hex like this will select ALL units
within that hex, which is very useful for moving stacks of units. With your
Cossack unit now selected, right click the adjacent hex to the southwest to move
there and capture the other 50 point objective. The only objective now remaining
is the 150 point objective at Eydtkuhnen, but this one will not fall so easily -- you
will have to fight for it! So, let's find out if anything is in Eydtkuhnen; continue to
move the Cossack unit one more hex to the southwest, in order to move adjacent
to the village. Contact! A German unit should now appear on the map in
Eydtkuhnen. If it fired on you then it would likely have inflicted substantial losses.
Left click now on the enemy unit that has appeared in Eydtkuhnen, and look at
the unit info area.
9
At this point we can observe a few things about the enemy. First, this is
another unit from the 1.Infanterie-Div, and we can see that this is not a cavalry
formation and it is instead an infantry formation (there is no horse in the portrait,
and the soldier in is wearing the uniform of a German infantryman). We can also
see that it too has a strength of hundreds of men, and we know that it is in good
order (because "Disrupted" text does not appear on their unit portrait). If the unit
fired on your Cossacks and heavy losses were inflicted, then this would be
another clue of the strength of the unit (effective fire means that it is a very large,
well supplied and good order unit). Below the German unit card is the information
about the hex and in particular we can see "IMPROVED -10%" which means that
the unit has constructed improved positions in this hex (scrapes). The -10%
means that any direct and indirect fire on this unit will have its effectiveness
reduced by -10%, which is in addition to the -10% provided by the village terrain
(cumulative total of -20% protection). So, this German unit will be a problem, and
we will have to bring up something to deal with it.
Now let's move your other units and prepare to engage the German
infantry unit, but first let's move that Cossack unit away from the enemy and
break contact: it has done its job for the moment. To do this, let's try an expedient
movement type, the click and drag method. First, select the Cossack unit that is
adjacent to Eydtkuhnen. Do this either with the double left click on the map icon
or the left click on the unit portrait methods. Observe that your Cossack unit
does not have many Movement Points remaining so it will only be able to move
one more hex. Do this by left clicking on the map in the hex where the Cossack
unit is currently located and hold the left mouse button after you click it, now drag
the mouse to the south any distance, and release the left mouse button. The unit
will now move as far as it can in that direction and stop when it cannot move any
further. In this case, it should have only moved one hex to the south. In this way,
you can move units across large areas quickly but a word of caution: using this
10
method will always select the shortest path possible and this type of movement,
although expedient, is very clumsy and can result in you stumbling upon an
enemy, or moving forward in a less than optimal manner. Also, where you
release the mouse button determines the unit's target destination, so it will try as
best as possible to move to that spot.
Now that the Cossack unit has been
moved away, let's go to the Russian regular
cavalry unit in hex 11,7 (3rd Smolensk Lcr
Rgt). As you can see, this unit is a very large
cavalry unit: it is a full cavalry regiment of 942
men. You can also see that the unit has "+++"
after its name, which signifies that the unit is a
combined unit of several smaller units and it
can be broken down into smaller parts
(squadrons in the case of cavalry, companies in the case of infantry, and
batteries in the case of artillery). If you hold the right mouse button on its portrait
you can see a "[6]" in the area to the right of the formations name, which means
that it is made up of six smaller units. You can read more about combining and
breaking down units in the User Manual, but in this tutorial you should leave
these larger units combined as a whole so that it can effectively fight against the
German infantry. Also, you should read more about the different nationalities and
their cavalry in the Notes document, but all you need to know now is that despite
this unit's name (Lancers), all Russian line cavalry of 1914 were essentially
dragoon cavalry: they can fight mounted but they are best used by moving
quickly and dismounting to fight like infantry. This unit needs to move forward
and dismount to prepare to engage the infantry in Eydtkuhnen, but we don't want
to ride forward and get shot down while vulnerable (when mounted on horses,
i.e. in Travel Mode). First let's move the 3rd Smolensk Lcr Rgt forward one hex to
the 50 point objective you captured earlier at 10,6. Do this by any of the
previously described
methods. Once in the hex,
left click the top row button
icon that looks like a wheel in
order to change Travel Mode
(see the image below). You
can hover your mouse over
these icons to see popup text
about what each icon does.
Once you have clicked
the Change Travel Mode
button (the hotkey for this is
the T key), you should
observe that the 3rd
Smolensk Lcr Rgt has
11
expended additional Movement Points and is now no longer in Travel Mode (the
T is no longer displayed next to its movement on the unit card and there is no
longer a horizontal white line along the bottom of its map symbol). Since the 3rd
Smolensk Lcr Rgt is a cavalry unit, now that it is no longer in Travel Mode it
means that the unit is dismounted and is ready to fight on foot like infantry.
However, let's hold our position for the moment, since we don't want to move
forward and come under enemy fire with nothing left to do for the turn but sit
there and get shot at (and it would mean that at the enemy would be able to fire
on us again on their turn). Better to keep our distance for the moment.
To prepare for our attack on Eydtkuhnen, we now need to bring up the
other units: the 3rd New-Russ Dgn Rgt (hex 12,6), the 1st Cavalry Bde HQ and
the 3rd Horse Artillery Bn in hex 13,7. Starting with the 3rd New-Russia Dragoon
Regiment, select the unit and move it to the other unoccupied 50 point objective
at 10,5 then press T (or left click on the Change Travel Mode icon) to dismount
the unit. Now select the 1st Cavalry Bde's HQ at 12,6 and move it one hex to the
northwest of where it is. Finally, select the 3rd Horse Artillery Bn in hex 13,7.
Looking at the artillery unit's info, we can see that it contains 12 field guns
and it is in Travel Mode, meaning that it is limbered up and able to move. Field
artillery (direct fire artillery) and machine gun units cannot fire while in Travel
Mode. One thing important to know is that in order for these units to deploy from
Travel Mode, they require their full movement allowance, so once you move
these types of units this turn, then you will not be able to exit Travel Mode until
your next turn and this represents the time it takes for them to get into position,
setup and ready themselves to conduct effective offensive fire, and it relegates
these units to their historical defensive roles. That said, these units do not
expend their full movement when entering Travel Mode, so limbering up and
moving away is much quicker to do.
With all this in mind, the field gun unit must be moved forward but not too
close to the enemy so that we avoid a situation where the guns are shot at in
their vulnerable limbered state on the enemy's turn. In some cases it makes
sense to risk it and send the guns to setup adjacent to the enemy, but in this
case we will play it safe to avoid losing valuable Victory Points to unnecessary
and expensive gun losses. So, move the field gun unit to hex 10,6, which should
be occupied by the now dismounted 3rd Smolensk Lcr Rgt.
12
You have now moved all of your units that can move (the remaining two
HQ units are fixed in place during this scenario). Click the End Turn button, which
has the appearance of a wrist watch, on the top Tool Bar. Once you do this, your
turn will now end and the enemy AI will now play its turn.
TURN 2
Once the AI has played through its turn, your command report will be
displayed again. This report will have more information than the first. The
Command Report dialog will show you important information such as which units
recovered losses, which units recovered from disruption, gained fatigue,
recovered from fatigue, constructed fortifications, and many other things
depending on the scenario. This command report will also let you know when you
have air units available for use and, most importantly, when reinforcements have
arrived. Take a few moments to review the information in this report and then
click OK.
Once you have closed the Command Report, let's
deploy and move those reinforcements that have just arrived.
13
In the top icon bar, left click on the button icon that looks like a downward
pointing red arrow over a yellowish map. This button will open up the Arrived
Dialog.
With the Arrived Dialog open, you can see that the 3rd Cav Div MG Co
has arrived at hex 17,8. Double left click on this unit to place it on the map. Note
that in cases where you receive a large amount of reinforcements, you can press
the Place All button to quickly place all reinforcements on the map with a single
press of a button.
Once you double click on the unit, it will then appear on the map in hex
17,8 (on the map edge). This unit will be handy in our attack on Eydtkuhnen, so
we should move it in that direction. But first, let's leave this unit where it is and
come back to it later.
Now select the 3rd Smolensk Lcr Rgt located in the same hex and move it
one hex to the southwest, up onto the ridge overlooking Eydtkuhnen. When the
movement is made, the Germans will likely fire on you with opportunity fire and
our hope is that they do not disrupt the lancer regiment (if they did disrupt your
unit then just read the following for future reference). Now that the unit is
adjacent to the enemy, fire on the German infantry unit located in Eydtkuhnen;
make sure that the 3rd Smolensk Lcr Rgt is selected and hold the Ctrl key. While
holding the control key, notice that your mouse pointer will change to an icon of a
crosshair. Place this crosshair over the German unit in Eydtkuhnen and right
click. Once you do this, you will hear the sound of the unit firing rifles at the
enemy and some text will appear on the screen displaying the results of the
engagement.
14
In this case, only five casualties were inflicted and the unit was not
disrupted (if it were disrupted, then a D would have been displayed in the result).
On the attack, your goal should always be to disrupt the enemy before assaulting
to take the hex, so let's proceed with further attacks since this initial one was
quite ineffective.
Now go to hex 10,5 and select the 3rd New-Russ Dgn Rgt. At this point,
we don't want to block the line of fire of our horse artillery that we have yet to
deploy, so let's move this unit around to the north of Eydtkuhnen, and this will
help us try to isolate the Germans in the town. Select and move the 3rd NewRuss Dgn Rgt to its northwest one hex, then move it southwest one hex so that it
passes through the hex containing the 2/3rd Don Csk Regt and ends in the hex
north of the village. Note that you could not have made your move to 9,6 then to
8,5 because the German infantry unit exerts a zone of control (ZOC) which
prevents your units from moving across the enemy's front.
Now that the 3rd New-Russ Dgn Rgt is
adjacent to the enemy, and after any enemy
opportunity fire has been resolved, let's fire on
Eydtkuhnen in the same manner as described
above. In this example, another 5 casualties
were inflicted on the enemy but the Germans
returned fire twice, the first time 15 casualties
were inflicted and the second time 14, for a
total of 5 versus 29 casualties. This is a terrible
exchange, and it is a result of the enemy unit
being better quality and being fortified and in
cover (buildings), while our units are vulnerable
and in the open, but we just have to keep
whittling away at the unit in the hope of disrupting it. Also, we know that the
German unit has now used opportunity fire three times, and this is the limit on
how many times a unit may use fire in a single turn.
15
At this point, we should try to move around and isolate the German
infantry unit, which will weaken it by isolation effects (morale loss) and will also
cause it to eventually be low on ammo. Select the 1/3rd Don Csk Regt unit in hex
9,8 and move it west to hex 7,8. We now are exerting a ZOC into all hexes
around the German unit and it will be cut off and isolated next turn if the enemy
does not relieve it. This will not guarantee success, but it will certainly make it
easier to disrupt them later.
We have a couple of options at this point. We can move the horse artillery
adjacent to Eydtkuhnen now, knowing that the enemy infantry unit there can no
longer use opportunity fire this turn, but this would give up another turn that it
may be able to fire, at the expense of trying to have it exercise more effective fire
later. On the other hand, moving the unit closer will also make it vulnerable to
enemy fire on the enemy's turn, so the safer choice is still to keep away from the
enemy and deploy so that it can fire on the next turn. Left click on the hex
containing the 3rd Horse Artillery Bn (10,6) and deploy this unit from Travel
Mode. Once deployed, observe that its Movement Points will now be 0, and it is
done for the turn; we will use this unit on the next turn to employ preparatory fires
on Eydtkuhnen.
Next, and this is important, we need to move our 1st Cavalry Brigade HQ
forward to continue to maintain effective command of our dragoons. Before we
do this, let's take a look at the command range of the HQ. Select the 1st Cavalry
Brigade HQ unit in hex 12,6 and then press the H key which will highlight the
command range of the selected HQ unit (alternatively you can do this through top
level menu via View -> Shade -> Command Range. You should now see the map
get darker and an area around the selected HQ unit will be lighter.
16
Basically, all units subordinate to this HQ unit will be in command if they
are within the command radius at the end of the turn, and all of this HQ's units
outside of the circle at the end of the turn will be considered "detached". Units
that are detached have a one step morale loss and are more difficult to rally (and
in some cases are impossible to rally), and when they are spotting for indirect
artillery then the artillery barrage's effectiveness is halved. Generally speaking,
you want to move your HQ units in such a way that they maintain command of
the majority of its units, or in such a way that they maintain command on the
most important units (i.e. units on the front line). Looking at the highlighted
command radius, we can see that the 3rd New-Russ Dgn Rgt is out of the HQ's
command radius, and as such will be out of command next turn if the situation is
not rectified. Move the HQ unit southwest one hex in order to push the command
radius west by one more kilometer, and when you have done this, press the H
key again to stop shading the command radius. Please read more about
detached units and command effects in the User Manual.
Finally, the only thing left to do is to move the
3rd Cav Div MG Co forward (the unit we brought in
as a reinforcement at the start of this turn). Before
we do this, let's explore another useful feature:
shading movement range. With the machine gun
unit selected, left click on the button that has an upright pointing red arrow over a black background in
top icon bar.
17
Once you do this, the map will shade in a similar way to the shaded
highlighted command range feature mentioned previously, only that the map will
now highlight the area that the selected unit can move with the Movement Points
it has remaining.
We can now see that
the machine gun unit can
move very quickly down the
road, and we need to bring it
within firing range of
Eydtkuhnen this turn or we will
not be able to utilize it since
the scenario will be over
before it can be brought to
bear. Select the machine gun
unit and move it to hex 10,6
which is the same hex that the
3rd Horse Artillery Bn is
occupying. Note that although
1914 infantry units only have a
one hex engagement range,
machine gun units can fire two
hexes and field gun units can
usually fire out to the
maximum visibility level limit (usually up to 5 hexes as best). To see more
information about the direct fire range of a unit, move the mouse pointer over the
unit's portrait and hold the right mouse button as described at the beginning of
the tutorial.
Since the machine gun unit has moved, it cannot deploy this turn. This
means that we are essentially finished with our turn, the only unmoved unit is the
2/3rd Don Csk Regt in hex 9,5 but it is better to keep this unit in place to back up
your dragoons and help protect them from being isolated.
Press the Next Turn button now to end the turn.
TURN 3
Once the AI has played through its turn again, view the Command Report
and press the OK button again. No reinforcements this turn, so let's get down the
business of overrunning Eydtkuhnen. Unfortunately, this is where things may
greatly differ between this tutorial and the results on your end, given random
variables. That said, what we basically want to do is bombard Eydtkuhnen with
the horse artillery, then deploy the machine gun company so that it will be able to
fire onto Eydtkuhnen next turn if need be, and then open fire with the two cavalry
regiments that are adjacent to the village. Somewhere throughout this process,
18
the hope is that the German battalion in Eydtkuhnen becomes disrupted, and
then that makes it a prime target for assault.
Basically, once a disrupted unit is assaulted, then as long as the attacking
units are not also disrupted in the assault, then the defender is will get pushed
back and the non-disrupted attackers will advance into the hex and capture it.
You can of course assault without disrupting the defender first, and there are
times when you will want to do this, but assaulting a non-disrupted defender will
mean heavier losses and a chance that the hex will not be taken.
Continuing the situation described in this tutorial, the German infantry
battalion in Eydtkuhnen is surrounded and is now isolated. We know this
because the German unit's unit card says "ISOLATED".
Being isolated, we know that this unit is suffering a quality/morale loss of 1 level, and it may also be low on ammo (we never really know if an enemy unit
is low on ammo other than by getting it to fire at our units and observing the
effectiveness of its fire). All of these things should combine to make it much
easier to disrupt the unit with fire.
Starting with the 3rd Horse Artillery Bn at 10,6, let's fire on the German
unit. Do this by selecting the artillery unit, hold the CTRL key and then right click
on the German unit. After firing once, additional Movement Points remain to fire
two more additional times. Go ahead and do this now. In this example, each shot
caused 3 casualties for a total of 9 casualties inflicted, but unfortunately no
disruption result on the enemy.
Next, go ahead and deploy the 3rd Cav
Div MG Co from Travel Mode by pressing T (it
should be in the 10,6 hex that the horse
artillery unit just fired from. Once deployed, its
Movement Points will be reduced to 0 and it is
finished for the turn, but it will be able to fire
fully on the final turn.
Now select the 3rd Smolensk Lcr Rgt in
hex 9,7 and open fire on the German infantry
in Eydtkuhnen, three times if possible (as long
19
as the enemy does not disrupt you with opportunity fire). In this example, the 3rd
Smolensk Lcr Regt fired three times, and suffered three instances of opportunity
fire. 19 casualties were inflicted on the enemy and 18 casualties were suffered in
return, but still no disrupted effect. Next, move on to the 3rd New-Russ Dgn Rgt
and do the same. Success! In the first rifle fusillade, the enemy unit was
disrupted! We know this occurred by the on-map casualty report text being in
yellow and having a "D" at the end of the result. Also, the German infantry unit
now has "DISRUPTED" listed on its unit card.
We now have a choice. Since the 3rd New-Russ Dgn Rgt has only fired
once, it still has 2/3rds of its Movement Points remaining, and can still assault
this turn if we want to (we know it has 2/3rds of its Movement Points remaining
because its Movement Points level is in green in its unit card. Generally
speaking, dismounted cavalry and infantry can only assault if they have 2/3rds of
the movement remaining, and mounted cavalry can assault with just 1/3rd of their
movement remaining (which represents charging).
Even though we have only one dismounted cavalry regiment available to
assault, and the German unit is no doubt 1:1 in size to this unit or larger, since
the enemy unit is isolated and disrupted then if we have a successful assault a
portion of the enemy unit will be forced to surrender since it cannot retreat. If we
do not assault this turn then we risk a chance that the AI may move forward and
relieve the isolated unit or the enemy unit may actually recover from its disruption
by the next turn. It just seems like too good of an opportunity to pass up, so fix
bayonets --its time to assault!
To assault, select the unit and then, without holding the CTRL key, right
click on the German unit as if you were moving into that hex. When you do this, a
pop up dialog will be displayed. If Fog of War were off then some details about
20
the assault would be displayed. However, we have Fog of War on so the dialog
simply says "Unknown assault odds (Fog Of War)". This window might seem
useless, but it does serve to let you know that you just setup an assault, and if
two different organizations (i.e. from two different divisions) were assaulting, then
this dialog will let you know that a penalty is being applied to the assault. After
viewing the dialog, left click on the OK button or press the Enter key. If the
enemy had any opportunity fire remaining then it would most certainly use it now
in an attempt to disrupt your assault. However, in this example, the enemy has
no opportunity fire allowance available, having fired three times previously at the
3rd Smolensk Lcr Rgt.
At this point you should see the word "Attacking" in the lower left of the 3rd
New-Russ Dgn Rgt's unit card and a red and white target will appear on the map
on the enemy unit's hex. The "Attacking" text on the unit's card signifies that it is
queued up for an assault, and the target icon shows that an assault is ready for
execution at that location. You could now add additional forces to the assault, for
example from other hexes around the target
enemy's hex, until you are satisfied that sufficient
forces have been committed to the assault (or you
have committed all you can). In this case, this is
the only unit that can assault; we will keep the two
relatively weak Cossack units out of the fight
since they will not contribute much, and we allow
for a possibility of follow on assaults or additional
options in the final turn. So essentially we are now
ready to execute the assault.
In the top icon bar, find the Resolve Assault button, which is a red arrow
over a black background, with a white impact graphic behind it. Press this button
21
now to execute the assault. In this example, a stunning success has been
achieved, with as little as 15 casualties suffered, 385 enemy infantry have
surrendered! (When on-map assault results are displayed the results to the left of
the slash is for the attacker, and the results to the right is for the defender.)
This essentially completes are very successful turn and, as mentioned, we
will keep the Cossack units fresh in case they are needed in the final turn, so go
ahead and press the End Turn button.
TURN 4
As before, once the AI has
played through its turn again, your
command report will be displayed
again for turn 4. This is the final turn
so we only have this turn to achieve
victory. This is a good time to view
the Victory Dialog again to check on
what we need for a victory (Info ->
Victory...).
In this example, we have 122
points, which is a Draw result at the
moment (being between 75 and 125
points). We need only 3 more points
for a Minor Victory result, so if we
can manage to capture and hold
Eydtkuhnen, then we should safely
win a Major Victory. This will be our
goal on the final turn.
As for the situation, on the
AI's turn the Germans moved
another infantry battalion forward to
relieve the isolated unit in
22
Eydtkuhnen. This will not help the isolated unit this turn however, other than
giving the unit in Eydtkuhnen a retreat route, which will keep us from capturing
more of its men in another successful assault. Also, upon further investigation,
the unit in Eydtkuhnen has rallied this turn, and has recovered from its disruption
status, which will make it more difficult for us to take the village!
So, let's start firing on the German unit in Eydtkuhnen again in order to
disrupt it for a final assault. First, open fire with the horse artillery unit at 10,6 (fire
all three times). If the German infantry are not disrupted by the time it completes
firing, then fire three times with the machine gun company located in the same
hex.
23
In this example, the horse artillery fired three times and inflicted a handful
of casualties, but no disruption. The machine gun company fired three times and
also inflicted a small amount of casualties but unfortunately no disruption! Now
we are getting down to the wire. Since neither the machine gun nor horse artillery
unit achieved a disruption, we must now open fire with our dismounted cavalry.
The only problem is that we may get disrupted with enemy opportunity fire which
may prevent us from effectively assaulting the village in the end. Also, we have to
make sure to only fire once with each cavalry unit, so that we retain enough
Movement Points for these dismounted cavalry to assault. In this example the
3rd Smolensk Lcr Rgt (9,7) opens fire first. Only a few casualties inflicted by the
rifle fire, but success! The enemy has been disrupted! Now all that is left is to
assault the disrupted enemy unit in Eydtkuhnen and push them out. Do this by
selecting one dismounted cavalry unit and right clicking on the enemy's hex, then
do the same for the other cavalry unit so that both are committed (as long as
both are not disrupted). After any/all enemy opportunity fire is resolved, press the
Resolve Assault button to attack. Hurrah! In this example Eydtkuhnen has fallen
and the German infantry has been pushed back. Now we just have to hope that
they don't counter attack and take it back on their final turn.
At this point, we can move the southern Cossack unit to isolate the enemy
infantry battalions in order to make any prospect of an enemy counter assault
more difficult. So, for the final move in this example scenario, the Cossack unit is
24
moved to isolate the enemy infantry. To do this, the Cossack unit must move
away from the enemy and then back again, since the enemy's ZOC prevents
movement across their front.
Once finished, press the End Turn button.
SCENARIO END
After ending the turn, the AI will move one final time and then a pop up
dialog will let you know that the scenario is over. Click the OK button and then a
victory screen will the Victory Dialog will be displayed.
In this example, the Germans were not able to recapture Eydtkuhnen on
their final turn and so the Russians have achieved a Major Victory with 268
points (18 points above the Major Victory condition). Specifically, victory was
achieved by capturing all of the objectives and inflicting heavy losses on that
German infantry battalion defending Eydtkuhnen.
Once you are finished looking over the Victory Dialog, click the OK button
and then you will be able to view the map with no Fog of War, which is useful to
view the enemy's situation and units.
ADDITIONAL PLAYTHROUGHS
You should now know enough to be able to replay the scenario and try
your own tactics if you like. Do not be discouraged if you do not achieve a victory
like the one outlined in the tutorial; this tutorial scenario is designed to be small,
short and replayed quickly. Continue replaying it until you feel comfortable with
the basics of moving, and engaging and assaulting the enemy.
This getting started scenario covers only the basic features of the First
World War Campaigns series, but it does not cover everything. Most notably,
indirect fire artillery is not discussed here and you are encouraged to read about
it in the User Manual before moving onto the next scenario. Once you have
familiarized yourself with indirect artillery, then you will be well on your way to
learning the basic mechanics of this series!
25
FURTHER INFORMATION
This guide is designed to make you feel comfortable with what’s going on
in First World War Campaigns, but it is no substitute for the User Manual, which
is the series’ rulebook. You can access the User Manual while playing by
pressing F2.
The General Help manual, (also known as the Main manual) discusses
the various elements of the interface in helpful detail. You can access the
General Help while playing by pressing F1.
If you wish to delve inside the game designer’s head, you can access the
Campaign Notes while playing by pressing F3.
Pressing F4 while playing will bring up the Parameter Data Dialog. This
dialog has all the values and variables that are set to make the game play out a
certain way, and are usually the subtle details of the gaming experience. You can
view these information in the Parameter Data Dialog, which includes movement
costs, terrain benefits, stacking limits, and many other things.
26