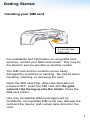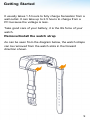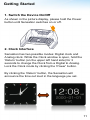
1
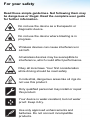
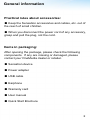
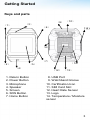
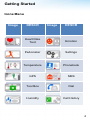
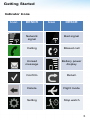
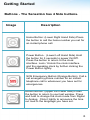
Sensation 2.0 Sensor Phone
User Manual
Please read this manual thoroughly before using the device.
For your safety
Read these simple guidelines. Not following them may
be dangerous or illegal. Read the complete user guide
for further information.
Do not use the device as a therapeutic or
diagnostic device.
Do not use the device where blasting is in
progress.
Wireless devices can cause interference in
aircraft.
All wireless devices may be susceptible to
interference, which could affect performance.
Obey all local laws. Your first consideration
while driving should be road safety
In industrial, dangerous areas like oil rigs do
not use this product.
Only qualified personnel may install or repair
this product.
Your device is water-resistant, but not water
proof. Keep it dry.
Use only approved enhancements and
batteries. Do not connect incompatible
products.
Contents
General Information. . . . . . . . . . . . . . . . . .. . . .. . . . . . . . . . . . . . . . . . . . . 1
Getting started . . . . . . . . . . . . . . . . . . . . . . . . . . . . . . . . . . . . . . . . . . . . . . . 5
Functions-Call . . . . . . . . . . . . . . . . . . . . . . . . . . . . . . . . . . . . . . . . . . . . . . 15
Functions-Messaging . . . . . . . . . . . . . . . . . . . . . . . . . . . . . . . . . . . . . . . .. 16
Functions-Contact List . . . . . . . . . . . . . . . . . . . . . . . . . . . . . . . . . . . . . . . . 19
Functions-Call Log . . . . . . . . . . . . . . . . . . . . . . . . . . . . . . . . . . . . . . . . . . .20
Heart Rate Measurement . . . . . . . . . . . . . . . . . . . . . . . . . . . . . . . . . . . . . .21
Body Temperature Measurement . . . . . . . . . . . . . . . . . . . . . . . . . . . . . . . .22
Humidity Measurement . . . . . . . . . . . . . . . . . . . . . . . . . . . . . . . . . . . . . . . 23
Pedometer Measurement . . . . . . . . . . . . . . . . . . .. .. . . . . . . . . . . . . . . . . .24
Emotional States . . . . . . . . . . . . . . . . . . . . . . . . . . . . . . . . . . . . . . . . . . . . 27
GPS Positioning . . . . . . . . . . . . . . . . . . . . . . . . . . . . . . . . . . . . . . . . . . . . .28
Tool Box . . . . . . . . . . . . . . . . . . . . . . . . . . . . . . . . . . .. . . . . . . . . . . . . . . . 29
Settings . . . . . . . . . . . . . . . . . . . . . . . . . . . . . . . . . . . . . . . . . . . . . . . . . . . 32
Battery Information . . . . . . . . . . . . . . . . . . . . . . . . . . . . . . . . . . . . . . . . . . .36
Care and Maintenance . . . . . . . . . . . . . . . . . . . . . . . . . . . . . . . . . . . . . . . .38
Additional Safety Information . . . . . . . . . . . . . . . . . . . . . . . . . . . . . . . . . . . .40
Certification Information . . . . . . . . . . . . . . . . . . . . . . . . . . . . . . . . . . . . . . . 42
Product Specifications . . . . . . . . . . . . . . . . . . . . . . . . . . . . . . . . . . . . . . . . ..43
General information
About your device:
The wireless device described in this guide is approved for use
on GSM/EDGE 850, 900, 1800 and 1900 MHz networks. Contact
your service provider for more information about networks.
When using the features in this device, obey all laws and respect
local customs, privacy and legitimate rights of others, including
copyrights.
Only use Sensation for the Permitted Use herein. Do not use the
Product for diagnosis or treatment of health conditions. In the
case of illness immediately seek professional medical advise.
Network services:
You have to purchase a SIM card from your local telecom carrier.
To use the device you must have service from your local GSM
telecom carrier. Many of the features require special network
service. These features are not available on all networks. Other
networks may require that you make specific arrangements with
a different service provider before you can use the network
services.
Your service provider can give you instructions and explain what
charges will apply. Some networks may have limitations that
affect how you can use network services. Your service provider
may have requested that certain features be disabled or not
activated in your device. Please contact your service provider for
more information. The Sensation can receive data from the
internet through the GPRS.
1
General information
Practical rules about accessories:
● Keep the Sensation accessories and cables, etc. out of
the reach of small children.
● When you disconnect the power cord of any accessory,
grasp and pull the plug, not the cord.
Items in packaging:
After opening the package, please check the following
components. If any are missing or damaged, please
contact your OneMedia dealer or retailer.
● Sensation device
● Power adapter
● USB cable
● Earphone
● Warranty card
● User manual
● Quick Start Brochure
2
Getting Started
Keys and parts
(9) (10)
(3)
(1)
(6)
(8)
(7)
(5)
(2)
(4)
1. Return Button
2. Power Button
3. Microphone
4. Speaker
5. Screen
6. SOS Button
7. Home Button
(14)
(12) (13)
8. USB Port
9. Watchband Groove
10. Certification Icon
11. SIM Card Slot
12. Heart Rate Sensor
13. Logo
14. Temperature / Moisture
sensor
3
Getting Started
Icons Menu
Image
DESCR
Image
DESCR
Heart Rate
Test
Emotion
Pedometer
Settings
Temperature
Phonebook
GPS
SMS
Tool Box
Dial
Humidity
Call History
4
Getting Started
Indicator Icons
Icon
DESCR
Icon
DESCR
Network
signal
Bad signal
Calling
Missed call
Unread
message
Battery power
display
Confirm
Return
Delete
Flight mode
Setting
Stop watch
5
Getting Started
Buttons - The Sensation has 4 Side buttons.
Image
Description
Home Button: (Lower Right Hand Side) Press
the button to call the home number you set for
an instant phone call.
Power Button:(Lower Left Hand Side) Hold
the button for 3 seconds to power On/Off.
Press the button to return to the clock
interface. Lock / Unlock the clock interface
and the speaking clock by further clicking the
Power Button lightly.
SOS Emergency Button:(Orange Button) Call a
set emergency phone number for an instant
telephone call to whomever you have set for
emergencies.
Return Button: (Upper Left Hand Side) Press
the button to return to your last window. Press
and hold to change the clock mode from Digital
to Analog. Click it lightly to announce the time
out loud in the language you have set.
6
Getting Started
Installing your SIM card
A normal size
SIM card
For availability and information on using SIM card
services, contact your SIM card vendor. This may be
the telecom service provider or another vendor.
The SIM card and its contacts can be easily
damaged by scratches or bending. Be careful when
handling, inserting, or removing the card.
Open the SIM card Flap. When the Sensation is
powered OFF, insert the SIM card with the goldcolored chip facing up into the holder. Close the
SIM card holder.
Use only compatible SIM cards approved by
OneMedia. Incompatible SIM cards may damage the
card and the device; and corrupt data stored on the
card.
7
Getting Started
Charging the Battery
Various charging methods are available.
Use the USB charger that has been provided to you to
charge the Sensation. Your battery has been partially
charged at the factory. You should recharge the battery
before you switch the Sensation "ON" for the first time.
Make sure you use a compatible USB charger to charge
your Sensation.
First connect the USB data line to the wall plug. Then
insert the wall plug into a wall electrical outlet. Next
connect the micro-USB end of the cable to the Sensation.
Charge your Sensor Sensation. The silver insert on the
power adapter cable should face silver side up when
inserting into the Sensation.
• When the battery is full, disconnect the charger from the
Sensation. Then remove the charger from the wall outlet.
You can use a USB data-line charging from a laptop or a
PC when an electrical wall outlet is not available. The
battery cannot be removed nor replaced.
The efficiency of USB charging power varies significantly
from country to country depending on the voltage.
Connect the USB data line to the PC before connecting it
to the Sensation. When the battery finishes charging,
disconnect the USB data line from the Sensation before
removing it from the PC.
8
Getting Started
It usually takes 1.5 hours to fully charge Sensation from a
wall outlet. It can take up to 2.5 hours to charge from a
PC because the voltage is less.
Take good care of your battery, it is the life force of your
watch.
Remove/Install the watch strap
As can be seen from the diagram below, the watch straps
can be removed from the watch slots in the forward
direction shown.
9
Getting Started
Antenna
Your device has an internal antenna.
Please note: As with any other radio transmitting
device, do not touch the antenna unnecessarily when
the device is powered on. Contact with the antenna
affects call quality.
To optimize antenna performance and battery life,
avoid contact with the antenna area when operating
the device.
Headset
Warning: Continuous exposure to high
volume sounds may damage your hearing.
Pay special attention to volume level if you
connect any other headsets to the device.
Warning: When you use the headset, your ability to
hear outside sounds may be affected. Do not use the
headset where it can endanger your safety. Do not
connect products that create an output signal as this
may cause damage to the device.
Please pay attention to the level of sound volume when
connecting other external device or headsets other
than those approved by OneMedia to the AV connector
of Sensation.
10
Getting Started
1. Switch the Device On/Off
As shown in the picture display, please hold the Power
button until Sensation switches on or off.
2. Clock Interface
Sensation has two possible modes: Digital clock and
Analog clock. While the Clock window is open, hold the
‘Return’ button (on the upper left hand side) for 3
seconds to change the Clock from a Digital to Analog.
Lock the Clock mode by clicking the ‘Power’ button.
By clicking the ‘Return’ button, the Sensation will
announce the time out loud in the language you set.
11
Getting Started
3. Locking / Unlocking the Clock Interface
As shown in the diagram below, push the ‘Power’ button to
either lock or unlock the clock interface.
4. Flight mode
Use the Flight Mode in radio sensitive environments,
onboard aircraft, or in hospitals in order to deactivate all
radio frequency functions. You will still have access to
offline games, calendar, and phone numbers.
Go to the Settings Window to activate or set up the Flight
Mode. Select Settings > Watch Settings > Flight Mode >
Flight Mode.
Warning: With the flight mode activated, you cannot
make or receive any calls, including emergency calls, or
use other features that require network coverage.
To make calls, you must first activate the phone function
by changing the Flight Mode settings, select Settings >
Watch Settings > Flight Mode > Normal Mode.
12
Getting Started
5. APN Setting - Data Account Window (Under
Settings Section)
The Sensation requires a SIM card to access the internet
and transmit data.
Only use services that you trust and that offer adequate
security and protection against harmful software.
For the availability of these services, pricing, and
instructions, contact your service provider.
To activate or set up the service, select Settings > Data
Account. Manually add the APN information to the Web
Portal under "Options" in the "Edit" section.
.
6. Physiological data uploading settings
You can set up the uploading functions in your
Sensation to the Web Portal for: Heart Rate,
Temperature, Humidity, GPS Positioning, Pedometer,
etc.
To set the method, select the Tool Box icon > Server
Config.
13
Getting Started
7. Function Menu
In Standby Mode, simply swipe left or right to enter the
function menu. Swipe right to enter the first page menu,
and swipe again to enter the second page menu. Swipe
left to enter the third page menu.
The first page menu:
Heart Rate Test, Pedometer,
Temperature and Humidity.
The second page menu: Tool
Box, GPS, Emotion and
Settings.
The third page menu:
Call History, Messaging, Calls
and Phone Book.
14
Getting Started
8. Battery Saving.
The Sensation screen will power down automatically
after 10 seconds when not in use in order to save
power. To relight the Sensation, press any button or
wave your arm up and down.
Calling and Setting
1. Make a Call
In the function menu, go the third page menu and
click
.
to enter the Dial pad.
Enter the phone number, including the area code, and
hold the phone icon 2 seconds. To re-call the number you
just called, click the phone icon on the dial pad.
For international calls, enter the country code, the area
code without the leading 0, and the phone number. Long
press 0 switch to * or #.
To access the list of Missed Calls, Dialed Calls and
Received Calls, press Call History in the third page Menu.
Select a number or name, and press the Call key.
15
Functions-Messaging
1. Text messages
You can read, write, send, receive, edit and save text
messages. You can write text messages using the
keyboard. Or, use the handwriting recognition function
using your finger to write letters or characters. On the
upper left hand you can select the language you desire.
Text messaging services can only be used if they are
supported by your network or service provider.
The Sensation supports the sending of text messages
beyond the space limit for a single message. Longer
messages are sent as two or more messages. Your
service provider may charge accordingly. You can edit by
typing over error messages.
Characters with accents or other marks, and characters
from some language options, take up more space, and
limit the number of characters that can be sent in a single
message.
Indicators on the top of screen will show the remaining
number of characters that can be input in a single
message and the number of messages needed to send
them.
16
Calling and setting
2. Answer or end a call
To answer an incoming call, press the call key. To end the
call, press the End key. To reject an incoming call, press the
End key. To change the volume or mode of ringing tone,
select Settings > Sounds.
3. Emergency Call
Hold the orange SOS button (located on the upper right
hand side of the Sensation) until the set SOS number
automatically dials. To set up emergency calls in the watch,
select
Tool Box > SOS Number, as shown in the window:
4. Home Number Call
Press the main menu button on the lower right hand side of
watch to return to the main menu.
Hold the Main Menu button (located on the lower right hand
side) until it automatically dial the set Home number.
To set up the Home numbers in Sensation, select
Tool Box > Home Number, as shown in the window:
17
Functions-Messaging
2. Create a text message
1. Select Messaging > Write message, as shown in the
following picture:
2. Write your message in the message field.
3. Enter one or more phone numbers in the message
recipient field: To retrieve a phone number from the
Phonebook click ‘√’
4. To send the message, select ‘Send’.
3. Read and reply a message
Your Sensation will send you an "Envelope" notification
when it receives a message. Press view to show the
message. If multiple messages are received, select the
required message from inbox, then press ‘Open’.
Use the scroll key to view the entire contents of the
information. Select ‘Reply’ to create a reply message.
18
PHONEBOOK-Contact List
You can save names with several phone numbers as
contacts in the PHONEBOOK and the SIM card memory.
They can be used to make a phone call or text a message.
There are two ways to access the Phone Book. From the
dial pad hold the phone icon. The window will switch to the
Phonebook. Or just click the Phonebook directly.
In the contact list menu, new phone numbers can be
added by selecting “Add New Contact”, sliding the menu to
view all the phone numbers in the contact list. You can edit
by inserting and deleting.
To quickly search for a
contact in the contact list,
click "UP" to show the virtual
board. Enter the name of a
contact to quickly locate it.
Press "BACK" to clear the current input. Long press to
clear all input. Press the button to return to the last menu if
no content is inputted. Press "abc" to switch input
method.
The first contact number stored under each PHONEBOOK
name will be automatically set as the default Number for
that contact. It will be highlighted with a square in the
number type indicator.
When you select a name from the PHONEBOOK, the first
contact number will be used unless you select another one.
19
Call History
To view the Call History, click the icon below:
● Missed calls--- Shows call you received and did not
answer.
● Dialed calls--- Show calls you dialed.
● Received calls--- Shows calls you received and
answered.
● Delete call logs--- Select to delete the call history.
20
Heart Rate Measurement
Use the Sensation to monitor heart rate. Click the icon
below:
The Sensation starts automatic measurement of heart
beat rate or pulse. The bottom of the Sensation where
the heart rate sensor is located must be placed flush
against the skin. There must be no distance between the
Sensation and the skin where light can enter. Tighten the
Sensation snugly to prevent outs hide light from entering
for an accurate reading. Placing the device on the wrist
bone itself may push the device up, allow light to enter
and create interference for the heart rate sensor.
Attention: The heart rate measurement may take up to 15
seconds to calibrate and provide an accurate reading,
depending on the placement and movement of the
Sensation on the skin.
After the data is calibrated, click upload to upload data to
the web portal.
Attention: It is a normal phenomenon for heart rate to
change rapidly due to hand movement, exercise, stress
and high temperature conditions. Normal adult resting
heart rate ranges between 50 to 100 beats per minute.
21
SKIN TEMPERATURE Measurement
Use the Sensation to measure skin temperature. Select
Temperature on the first page of the function menu. The
temperature shows both the real skin temperature and
the change (or delta) of temperature since the last
change
As shown in the following icon:
The Sensation shows the skin temperature and the
amount of the last changes in temperature.
Attention: Skin temperature can be 2 to 3 degrees
different than body temperature
Attention: It is a normal phenomenon of body temperature
to increase or change during exercise, stress, and high
temperature conditions. Normal skin temperature
fluctuates within ±1℃ while at rest.
22
SKIN MOISTURE Measurement
Select SKIN MOISTURE As shown in the following
window:
The Sensation starts automatically measures wrist
surface moisture.
Attention: The Sensation will only display values
captured while that window is set..
Attention: It is a normal phenomenon of moisture levels
of the skin surface area to increase during exercise and
rainy conditions.
23
Pedometer Measurement
The pedometer measurement starts automatically when
the Sensation is turned on. Measure the total amount of
calories consumed performing various basic activities.
You can easily measure the calories consumed doing
various activities including walking movement, housework,
aerobics, etc.
To view the current sports data in pedometer
measurement, select the Pedometer icon below:
The value in red shows the number of steps moved. The
value underneath represents calorie consumption.
To view historical Pedometer data, press
You can set parameters include weight, height, gender
and etc, by selecting the following icon:
Click the little heart icon on the screen to display the
heart rate, temperature, and moisture as well as the
number of steps taken plus calories burned.
The pedometer uploads data regularly to the web portal
with the number of steps walked per hour.
24
Stop Watch (Chronometer) Window
• On the PEDOMETER window there are 3 icon buttons
located on the bottom. The white, lower center icon
portrays a running woman with a stop watch. Click the
lower running woman icon with with the stop watch to
begin the that function. In this STOP WATCH window,
click the green button to start the time running or to
pause the time.
• Click the Temperature and Humidity icon to initiate
those 2 measurements. Click the Hear Rate Icon icon
to initiate the Heart Rate measurements.
• If you hit Return icon at anytime to go to another page
the Stop Watch will automatically Pause. The Stop
Watch time will stop running but not reset.
• Press the "R" icon on the center top of the window to
reset the Clock and begin the Stop Watch counting of
seconds all over again.
• The Stop Watch window provides support for sports
activities as well as walking. It combines data from
different watch windows all on one screen. The
features include Stop Watch, Pedometer, Calorie
Counter, Skin Temperature, Skin Moisture and Heart
Rate.
25
Web portal
Users and Administrators can select settings to upload a
variety of data regularly to the web portal from the
Sensation including Heart Rate, Skin Temperature,
Humidity, GPS, Pedometer, Emotion Status data, “Power
On” status, Low Battery Alert, and a designated range of
notifications available via email or Skype. The Web Portal
even provides a local weather report.
Create a personal account for the web portal by entering
http://107.22.199.104/Account/LogOn in your internet
browser from your computer. Enter personal settings of the
User in the new web portal account. Manage the data in
the web portal to monitor the status of the User.
In order to first create a new account click “Create Account”
on the right side of the Log On web page. After logging in
to the web portal, Users or their administrators will be able
to check information and status online and set up a variety
of functions to manage including GPS, Pedometer, Pulse,
Temperature, etc.
On the pages for functions such as GPS, Pedometer,
Pulse and Temperature, Users can not only view data in
both table and graph form, but they also can print out a
report in a PDF format.
On the GPS page, Users and their Administrators will be
able to track the User record of locations showing where
the User has been. Users and administrators can easily set
up the notification functions for GPS, Pedometer, Pulse,
Off Status, Low Battery, Alerts, etc…
Other Web Portal functions include On/Off Status for the
User, Low battery and a Wellness Diary
26
Emotion states
Use the Sensation to upload information on your
emotional states to the web portal. Select EMOTION
as shown in the window below:
Upload emotional states data to the web portal:
anytime and anywhere.
There are three emotional options listed for users to
select. They include Pain, Cravings and Mood. These
in turn are divided into sub categories.
(E.g. In the pain option, users can choose Head, Neck,
Shoulders and Abdomen, etc.)
To designate feelings accurately Users can select the
intensity levels: Low, Medium and High.
27
GPS Positioning
The key features of GPS:
1. The GPS function works in any weather conditions,
anywhere in the world, 24 hours per day. The GPS
displays shows longitude, latitude, altitude, and speed of
the User if he is moving. It provides Users with
continuous and real-time three - dimensional positioning
and velocity. The GPS function should best be used out
of doors.
When restarting the Sensation after it has been turned off,
the GPS response time will take about 3 minutes. After
that, the response time will take around one minute.
2. High positioning accuracy:
The GPS positioning accuracy is accurate within 10
meters.
To view the GPS Positioning, click icon below:
Users can upload the GPS data to the web portal in the
setting menu. An exact street location can be determined
by uploading this information to the web portal.
28
Tool Box
Enter Tool Box Menu , By clicking "EXTRAS" Users can
access the Calculator, Calendar, Alarm, FM Rradio,
Bluetooth, Authorization Number, Home Number, SOS
Number .and Server Config as shown in the window
below:
1. Calculator
Select Tool Box > Calculator, as shown in the following picture:
2. Calendar
Select Tool Box > Calendar, as shown in the following
picture:
Click left/right arrow to check other years and months.
29
Tool Box
3. Alarm function
Select Tool Box > Alarm Clock.
As shown in the following graph:
Enter alarm function, click “ON/OFF” button to set the
alarm on , click the time to set the alarm time. Click
'Once' to set the alarm type, alarms can be set as once
only, everyday and workday.
Everyday means the alarm will repeat at the set time
everyday. Workday means the alarm will repeat from
Monday to Friday. After setting , click
button to
save all the settings.
4. FM radio function
Select Tool Box > FM radio. The FM Radio can only be
used with the ear plugs and wire. The wire serves as
the FM radio antenna. (The radio will not work with a
blootooth ear piece.)
As shown in the following picture:
30
Tool Box
Click the FM radio function. Click
to start listening,
Click
to return to the last channel. Click
to
change to the next channel.
To fine tune, click
or
. This will move the tracker
plus or minus 0.1Hz to find the station that you desire.
Enter ‘Options’ then ‘Auto Search’ menu when fine tuning
stations to save to the memory.
When selected the radio will search for FM channels
automatically based on availability in the User’s current
location.
Alternatively, enter ‘Options.’ Then select ‘Manual Input’
to manually input an FM channel. This will not save the
station to the memory.
5. Bluetooth function
Select Tool Box > Bluetooth,as shown in the following
window:
Enter Bluetooth function,
select ‘Power’ to turn on
the Bluetooth. Select ‘My
device’ then select ‘Search
New Device’ to search for a
Bluetooth device nearby.
Connect by pairing to the device to be connected . The
Sensation will search until connected successfully.
You can use Bluetooth to transfer files, make calls
from other devices, and other functions.
31
Settings
1. Time/date setting
Select Setting > Set Date/ Set Time, as shown in
the windows below:
2. Priority input method
Select Setting > Pref.Input Method, as shown in the
window below :
Priority input methods can be selected based on
individual usage habits. All editing interfaces will appear
this input method after selection..
3. Data account
Select Setting > Data Account, as shown in the window
below :
32
Settings
4. Authorization Number setting
Select Tool Box > Authorization Number setting as shown
in the window below:
The Sensation can be controlled by SMS messages from
two separate authorization phone numbers. Set up the two
authorization numbers, each with full authorization to
check the information and control the watch. The
Sensation can receive an inquiry by SMS message sent
by an authorized number in the specific format as follows
(Commands are not case-sensitive):
Receive GPS data now: gps
Receive GPS data once every 10 minutes: gps10 (Values
range between 5 to 1440)
To turn off the function of receiving GPS data regularly
type: gps0
Receive Heart Rate data now: pulse
Receive Heart Rate data once every 10 minutes: pulse10
(Values range between 5 to 1440)
33
Settings
To turn off the function of receiving Heart Rate data
regularly type: Pulse0
Receive Pedometer data now: pedo
Receive all data now (Includes Heart Rate, GPS, Skin
Moisture and Pedometer Measurement): status
Receive all data once every 10 minutes: status 10 (Values
range between 5 to 1440)
To turn off the function of receiving all data regularly type:
status 0
Receive Humidity and Temperature data now: temp
Receive Humidity and Temperature data once every 10
minutes: temp10 (Values range between 5 to 1440)
To turn off the function of receiving Humidity and
Temperature data regularly type: temp0
5. Uploading settings
Enter uploading setting: You can set up whether you need
to upload data regularly including heart rate, temperature,
humidity, GPS, and pedometer to the servers.
Select Tool Box > Server Config, as shown in the following
picture:
34
Settings
6. Other Settings
• Sound setting: Set the Sensation to either Mute, Low
Volume or High Volume. Or you can set the Sensation to
Vibrate mode.
• GPS setting: Set up the GPS network service and
automatic time calibration.
• Clock type: Set up digital clock /analog clock in standby
mode.
• Handwriting: Set up handwriting speed, color, etc.
• Language: Set up the Sensation language in one of 4
languages: English, Chinese, Spanish and Portuguese.
• Restore factory settings: To restore the setting
Specifications of the Sensation to factory settings.
• When the Sensation is idle for a selected time period
the screen backlight will automatically turn off to save
battery power. You have the option to use this battery
power saving feature or not in the Setting Section by first
clicking "Idle backlight." and then selecting "ON" or
"OFF"
• After clicking "LCD Backlight" then select the number of
seconds time frame that you desire for the automatic turn
off function of the screen backlight. Adjust the desired
setting to the value you desire by scrolling left or right.
35
Battery information
• Set the desired LCD backlight brightness in the LCD
backlight section in the Sensation setting. Click "LCD
Backlight." Adjust the desired brightness of the screen
by scrolling left or right.
Charging and discharging
Your device is powered by a rechargeable battery.
The battery can be charged and discharged hundreds of
times, but it will eventually wear out.
If your system requires more and more frequent
charging, please contact the OneMedia customer
support phone number at +1(312) 685-1822.
Generally, it is a good idea to unplug the charger from
the wall outlet and the device when not in use.
Unplug the charger from the electrical plug and the
device when not in use. Do not leave a fully charged
battery connected to a charger. Overcharging may
shorten its lifetime. If left unused, a fully charged battery
will lose its charge over time.
If the battery is completely discharged, it may take
several minutes before the charging indicator appears
on the display or before any calls can be made.
36
Battery information
Use the battery only for its intended purpose. Never use
any charger or battery that is damaged.
Leaving the device in hot or cold places, such as in a
closed car in summer or winter conditions, will reduce
the capacity and lifetime of the battery.
Always try to keep the battery between 15°C and
25°C (59°F and 77°F). A device with a hot or cold
battery may not work temporarily, even when the battery
is fully charged.
Battery performance is particularly limited in
temperatures well below freezing.
Do not dispose of batteries in a fire as they may explode.
Batteries may also explode if damaged. Dispose of
batteries according to local regulations.
Please recycle when possible. Do not dispose of
batteries as household waste.
37
Care and maintenance
Your device is a product of superior design and
craftsmanship. It should be treated with care.
The following suggestions will help you protect your
warranty coverage.
● Keep the device dry. Precipitation, humidity, and all
types of liquids or moisture can contain minerals that
will corrode electronic circuits.
● Do not use or store the device in dusty, dirty areas.
Its moving parts and electronic components can be
damaged.
● Do not store the device in hot areas. High
temperatures can shorten the life of electronic devices,
damage batteries, and warp or melt certain plastics.
● Do not store the device in cold areas. When the
device returns to its normal temperature, moisture can
form inside the device and damage electronic circuit
boards.
● Do not attempt to open the device other than as
instructed in this guide.
● Do not drop, knock, or shake the device. Rough
handling can break internal circuit boards and fine
mechanics.
38
Care and maintenance
● Simply use a damp cloth, to lightly clean the screen. Do
not use harsh chemicals, cleaning solvents, or strong
detergents to clean the device.
● Do not paint the device. Paint can clog the moving parts
and prevent proper operation.
● Use a soft, clean, dry cloth to clean any lenses,
proximity sensor, and light sensor lenses.
● Use only the supplied or an approved replacement
antenna. Unauthorized antennas, modifications, or
attachments could damage the device; and may violate
regulations governing radio devices.
● Use chargers indoors.
● Always create a backup of data you want to keep, such
as contacts and calendar notes.
● To reset the device from time to time for optimum
performance, power off the device.
These suggestions apply equally to your device, battery,
charger, or any enhancement.
If any device is not working properly, take it to the nearest
authorized service facility or service.
39
Additional safety information
Small children
Your device and its enhancements may contain small
parts.
Keep them out of the reach of small children.
Operating environment
This device meets RF exposure guidelines when used
either in the normal use position against the ear or when
positioned at least 2.2 centimeters (7/8 inches) away from
the body.
To transmit data files or messages, this device requires a
quality connection to the network.
In some cases, transmission of data files or messages
may be delayed until such a connection is available.
Ensure the above separation distance instructions are
followed until the transmission is completed.
Parts of the device are magnetic. Metallic materials may
be attracted to the device.
Do not place credit cards or other magnetic storage
devices near it.
40
Additional safety information
Potentially explosive environments
Switch off your device when in any area with a
potentially explosive atmosphere. Obey all signs and
instructions.
Potentially explosive atmospheres include areas where
you would normally be advised to turn off your vehicle
engine. Sparks in such areas could cause an explosion
or fire resulting in bodily injury or even death.
Switch off the device at refueling points such as near
gas pumps at service stations.
Observe restrictions on the use of radio equipment in
fuel depots, storage, and distribution areas; chemical
plants; or where blasting operations are in progress.
Areas with a potentially explosive atmosphere are often,
but not always, clearly marked.
You should check with the manufacturers of vehicles
using liquefied petroleum gas (such as propane or
butane) to determine if this device can be safely used in
their vicinity.
Disposal
The crossed-out wheeled-bin symbol on your
product, literature, or packaging reminds you that
in the European Union all electrical and
electronic products, batteries, and accumulators
must be taken to separate collection at the end of
their working life.
Do not dispose of these products as unsorted
municipal waste.
41
Certification information
Hereby, OneMedia declares that this
product is in compliance with the
essential requirements and other
relevant provisions of Directive
1999/5/EC.
This equipment has been tested and
found to comply with the limits for a
Class B digital device, pursuant to part
15 of the FCC Rules.
This device has been tested by China
National Laboratory with a report to
show the device works correctly and
meet the request of customers.
42
Product Specification
Operational Specifications
1. Size: 53*48*14.5mm
2. Weight: 70g
3. PCBA size: 43.6*41.6*0.8 mm
4. Touch screen: Capacitive
5. OLED size: 1.8inch
6. Transmission mode: GSM/GPRS
7. USB interface: 12PIN Micro USB interface
8. Earphone jack: 12PIN Micro earphone
9. Battery: Lithium Polymer
10.Display language: English, Chinese, Spanish.
Portuguese.
Technical Specifications
1.Operating voltage: 3.0~5.0V
2.Battery capacity: 500mAh
3.Antenna frequency: GSM850/900/1800/1900 (Quad
Band)
4.Standby operating current: ≤3mA
5.Operating temperature: ﹣20 ~﹢55℃
43
One Media Partners Inc.
608 S Washington Street, Suite 207
Naperville, IL 60540
+1 (312) 685-1822
[email protected]
www.onemediapartners.com