1
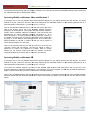
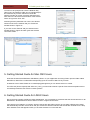
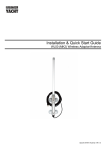
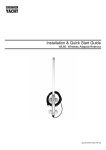
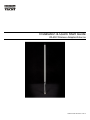
Installation & Quick Start Guide
WL400 Wireless Adaptor/Antenna
QUICK START WL400-01- VR1.2
DIGITAL YACHT
WL400 Quick Start Guide
1. Introduction
Congratulations on the purchase of your WL400 Wireless Adaptor/Antenna. This unit is designed for permanent or semipermanent installation on sail or motor vessels. The base of the WL400 is threaded and designed to be screwed in to a
suitable 1” x 14 TPI threaded VHF antenna mounting bracket (not supplied).
Before operating the unit you should familiarise yourself with this Quick Start Guide and the User Manual
of the computer equipment you wish to connect this product to
2. Before you start
The WL400 comes complete with a USB Memory Stick that includes all necessary Realtek drivers/software for the
following operating systems;
®
®
®
• Microsoft Windows XP , Windows Vista and Windows 7
• Apple Mac OS X 10.3, 10.4, 10.5, 10.6 and 10.7 (for Snow Leopard and Lion see Tech Note)
Note:
Compatible drivers for the WL400 are also included with some LINUX distributions such as the latest version of
Ubuntu. However, due to the wide variety of LINUX distributions available we cannot guarantee that the WL400
will work on all LINUX computers and suggest that users search for compatibility with the Realtek wireless
chipsets that the WL400 uses.
Do not plug in the WL400 to the USB port of your computer until you have inserted the driver USB
Memory Stick or CD-ROM.
3. Mounting the WL400 Antenna
The WL400 should be mounted at deck level, on the wheel house roof or radar arch. Unlike VHF, Wifi signals do not
benefit from being mounted at the top of a mast and this is not to be recommended. The WL400 is designed to be
screwed on to a standard 1” x 14 TPI threaded VHF mounting bracket (not supplied).
Ensure the USB lead is not connected and is coiled before attempting to attach the WL400 to the threaded mounting
bracket. Holding the coiled USB against the WL400, carefully screw the WL400 to the bracket, ensuring that the USB
lead does not become twisted.
The WL400 is supplied with a 5m USB cable. This is the maximum recommended length of USB cable and should not be
extended. If you do need to extend the cable, use a powered USB extension cable and only use one of these. Adding
multiple powered extensions has been found to affect the timing and power to the WL400 and can result in very poor
performance.
Getting the USB cable in to the boat can either be done in a temporary manner; feeding the cable through a partially
opened window or in a more permanent manner; drilling a hole through the boat’s wall or deck and fitting a suitable multipin connector – not supplied. This more permanent installation method should only be conducted by a suitably qualified or
experienced installation engineer.
Route the USB lead through to the computer that you wish to connect the WL400 to but DO NOT plug the USB lead in to
the computer. Proceed to the relevant “Getting Started Guide” section of this guide, that is applicable to the operating
system you are using.
DIGITAL YACHT
WL400 Quick Start Guide
4. Getting Started Guide for Windows Users
The WL400 is supplied with Windows compatible drivers that allow it to be used as a second Wireless Network Adaptor
on your laptop. You can either install the drivers and use the normal Windows Wireless Connection function to scan,
select and connect to a wireless hotspot or you can use the free Realtek Wireless Lan Utility software which is also
supplied on the memory stick.
For simplicity, we would recommend just installing the drivers and not using the Realtek utility, but for older Windows XP
systems (prior to Service Pack 3) the Realtek utility can sometimes provide better performance than the Windows
Wireless Zero Configuration manager that Microsoft provided.
It is very important that you do not plug the WL400 in to a USB port on your computer unless you have the WL400 Drivers
USB Memory Stick inserted in your PC. By plugging in the WL400 you will initiate the Windows “Found New Hardware
Wizard” which will not be able to complete correctly without the Drivers on the USB Memory stick being present. The
installation process varies depending upon which Operating System your computer has, so please ensure that you follow
the correct procedure.
Installation for Windows Vista and Windows 7 (On-Line)
By far the easiest method of installation, if your PC is running
Windows Vista or Windows 7, is to connect the PC to the internet, as
you would normally do, using the internal wireless adaptor and then
plug the WL400 in to a spare USB port on the laptop.
Figure 1
Windows will detect the new hardware and display the message
shown in Figure 1. It will then automatically search the on-line
Windows Update server for the correct drivers. Depending upon the
speed of your PC and internet connection this should take between 20
seconds and a couple of minutes to complete.
At any time, you can click on the message and the Window in Figure 2
will be displayed giving you the status of the driver installation.
Figure 2
After the correct driver has been found, downloaded and installed the
Window in Figure 3 should be displayed. The drivers are now installed
correctly and you are ready to use the WL400 to find and connect to a
wireless hotspot. Proceed to the “Operating WL400 on Windows Vista
and Windows 7” section.
Installation for Windows Vista and Windows 7 (Off-Line)
Figure 3
If you cannot connect to the internet, you can install the drivers from the supplied Digital Alltek USB memory stick.
Insert the USB memory stick and then insert the WL400 in to a spare USB port on your PC. Windows will detect the new
hardware but because the PC is not on-line, it will fail to install the device and display the message shown in Figure 4.
In order to install the drivers correctly from the memory stick, it is
necessary to go to the Windows “Device Manager”. To access the
Device Manager, click on the Windows “Start” button and then type
Device Manager in the Search bar directly above the Start button –
see Figure 5. At the top of the search results should be a “Device
Manager” entry, click on this and Windows will open the Device
Manager window.
Figure 4
The Windows Device Manager is basically a list of every component that makes up the PC. The devices are categorised
in to various types and because Windows did not know what type of device WL400 was, it has placed it in the Other
Devices section with a Yellow Exclamation Mark symbol next to it – see Figure 6.
WL400 Quick Start Guide
DIGITAL YACHT
Figure 6
Figure 5
To force Windows to search for the drivers again, right click on the “RTL8187_Wireless_LAN_Adaptor” entry in the list
and select “Update Driver Software” – see Figure 7. You should now see the window shown in Figure 8 – click on the
“Browse my Computer for Driver Software” option.
Figure 8
Figure 7
You should now be taken to the window shown in Figure 9. Click on the “Browse” button and then select the USB Memory
Stick from the list of locations – See Figure 10. Click OK, and you will be returned to the window in Figure 9. Ensure the
“Include Subfolders” is ticked and then click the “Next” button.
Figure 10
Figure 9
WL400 Quick Start Guide
DIGITAL YACHT
Windows will now search the USB Memory stick for the correct drivers and install them. While it is searching and
installing, you will see the window shown in Figure 11. When it has completed and the drivers are successfully installed,
you will be shown the window in Figure 12.
Figure 12
Figure 11
You can now close this window and the Device Manager window and you are ready to use the WL400 to find and connect
to a wireless hotspot. Proceed to the “Operating WL400 on Windows Vista and Windows 7” section.
Installation for Windows XP
The easiest method of installing the drivers on a
Windows XP computer is to run the Setup.Exe file that is
on the USB Memory Stick. This installs both the drivers
and the Realtek Utility that can be used in place of the
normal Windows Wireless Zero Configuration program
that came with Windows XP. The same Setup.Exe
program can be used for installing the WL400 on
Windows Vista or Windows 7 PCs but we would always
recommend following the On-Line or Off-Line procedures
detailed in the previous sections.
Navigate to the Setup.Exe file on the USB Memory Stick,
by clicking the Start button and then clicking on “My
Computer”. Click on the USB Memory Stick and then
click on the “WL400 (+Pro) Drivers” folder. Finally run the
Setup.Exe program by double clicking on it – see Figure
13.
Figure 13
When the Setup program runs you will see the initial window shown in Figure 14. Click the “Next” Button and you will see
the progress bar window in Figure 15. Once everything has been installed, you will see the Wizard Complete window in
Figure 16. Click the “Finish” button to complete the installation.
Figure 14
Figure 15
Figure 16
WL40
WL400 Quick Start Guide
DIGITAL YACHT
You should now plug the WL400 in to a spare USB port on the PC and the driver should automatically install. Proceed to
the “Operating WL400 on Windows XP” section.
Operating WL400 on Windows Vista and Windows 7
It is always best to turn off (disable) the internal wireless adaptor on your laptop before using the WL400. The exact
method to do this, varies from PC to PC, but some laptops have a dedicated button in or around the keyboard area or a
special keyboard combination e.g. pressing the Fn + F8 keys.
Click on the Wireless Networks icon in the task bar (lower right hand
side of the screen) and a list of the availab
available wireless networks
(hotspots) will be displayed. Your laptops internal wireless adaptor is
usually named “Wireless Network Connection” and the WL400 will
automatically be named “Wireless Network Connect
Connection 2”, as is
shown in Figure 17. This shows that the
e WL400 is working correctly. It
is possible to rename this connection to something more meaningful
by going in to the “Network and Sharing Center” and renaming the
Network Adaptor to “WL400” or similar, so that you can be certain of
which wireless adaptor you are using.
Click on the wireless network you wish to connect to and click the
“Connect” button that will appear. You may be asked to enter a
password or confirm if the network is a Public, Work or Private
network (to set security levels) and then the wireless connection
should be made and you will be able to connect to the internet.
Figure 17
Operating WL400 on Windows XP
It is always best to turn off (disable) the internal wireless adaptor on your laptop before using the WL400. The exact
method to do this, varies from PC to PC, but some laptops have a dedicated button in or around the keyboard area or a
special keyboard combination e.g. pressing the Fn + F8 keys.
To connect to a wireless network, you must run the “Realtek USB Wireless LAN Utili
Utility”
ty” which will now be one of the
programs listed in the Start>All Programs menu. The first time you run this program, you will see the
t window displayed in
Figure 18 which shows that you are not connected to a wireless network.
Click on the “Available Network” tab and
nd the window shown in Figure 19 will appear which lists all of the available wireless
networks that the WL400 can detect. Select the wireless network that you wish to connect to and click the “Add to Profile”
button.
Figure 18
Figure 19
WL400 Quick Start Guide
DIGITAL YACHT
You will now be prompted to enter the Network Key
(also known as Password, WEP key or Passphrase) for
the network that you have selected. Consult the
network operator to get the necessary password and
enter this in the two boxes at the bottom of the window
shown in Figure 20. Click “OK”.
Assuming that the password was correct, the WL400
should connect to the network and you will see the
window shown in Figure 21.
If you click on the “General” tab you should see the
window shown in Figure 22 which gives the wireless
connection status.
.
Figure 20
Figure 5
Figure 21
Figure 22
5. Getting Started Guide for Mac OSX Users
Insert the WL400 Drivers/Software USB Memory Stick in to your Apple Mac and using Finder open the folder called
MacOS10.3, MacOS10.4 or MacOS10.5 depending upon the version of Mac OS X you have.
Included in each of these folders is an Install.mpkg package that you can double click on to install.
For OSX 10.6 (Snow Leopard) and OSX 10.7 (Lion), you will need to follow a special Tech Note that explains how to
successfully install the 10.5 drivers on these systems.
6. Getting Started Guide for LINUX Users
Due to the large number of different LINUX distributions, it is not possible to guarantee that the WL400 will work on all
distributions. All distributions that have Kernel V2.6.24 or higher should work.
If the drivers are included in your distro, simply insert the WL400 USB connector in to a spare USB port and LINUX
will automatically load the correct driver and you will see the wireless networks that the WL400 can detect in the drop
down wireless menu that appears when you click the wireless icon in the task bar.