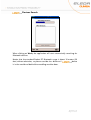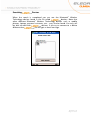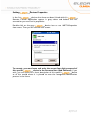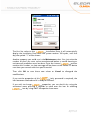
1
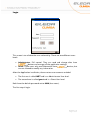
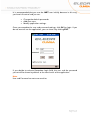
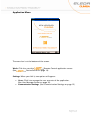
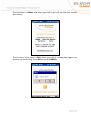
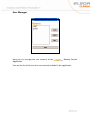
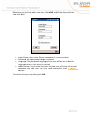
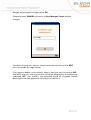
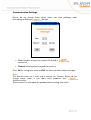
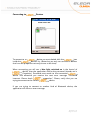
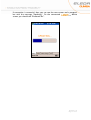
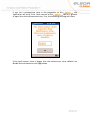
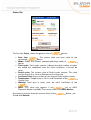
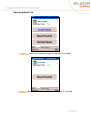
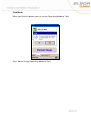
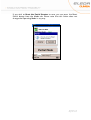
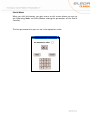
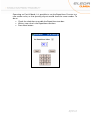
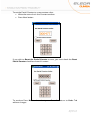
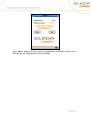
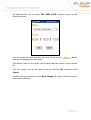
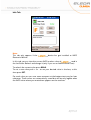
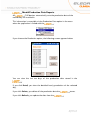
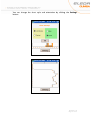
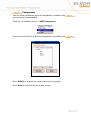
REMOTE CONTROL APPLICATION FOR
POCKET PC
USER MANUAL
(Release 1.42)
Index
INTRODUCTION................................................................................................ 3
SOFTWARE INSTALLATION GUIDE ................................................................. 4
SOFTWARE USER GUIDE.................................................................................. 5
Start
Remote Control Application............................................... 5
Welcome ........................................................................................................ 5
Login............................................................................................................... 6
Application Menu ........................................................................................... 8
User Manager............................................................................................... 10
Communication Settings .............................................................................. 13
Devices Search........................................................................... 14
Searching
Devices .................................................................. 15
Setting
Device Properties ...................................................... 16
Connecting to
Devices........................................................... 18
Working with
.......................................................................... 21
Status Tab ................................................................................................. 23
Date Change Tab...................................................................................... 31
Operating Mode Tab................................................................................ 24
Info Tab..................................................................................................... 31
Mould Production Data Reports................................................ 34
Production Detail...................................................................................... 35
Components .............................................................................. 37
Release 1.42
Page 2 of 37
INTRODUCTION
First of all, we want to thank you for buying an
manual will enable the successful installation of the
Control Application software.
device. This user
Remote
This document will provide you with the information to manage
devices with
Remote Control Application for Pocket PC, using
Bluetooth® Wireless Technology.
Release 1.42
Page 3 of 37
SOFTWARE INSTALLATION GUIDE
This software is designed to run under Windows Mobile 2003 and later
versions with Microsoft .NET Compact Framework 1.0 Installed.
This application uses Bluetooth® Wireless Technology to communicate, so
please ensure Bluetooth® Wireless Technology is supported by your Pocket
PC device.
Remote Control Application, the first step is to copy
To install the
the file IMET_PPC_RELEASE_1.42.ARM.CAB provided with this manual in
your Pocket PC device.
After file is copied, you only need to click on it, using the File Browser, and
the installation process will automatically start.
After a few seconds you will get the
StartÆPrograms location of your Pocket PC device.
icon
inside
Release 1.42
Page 4 of 37
SOFTWARE USER GUIDE
Start
Remote Control Application
If the installation procedure has been successfully completed, you will find
icon
Click it and
inside StartÆPrograms of your Pocket PC device.
Remote Control Application will automatically start.
Welcome
After several seconds the login screen will automatically appear, during this
time the application enables Bluetooth® communications and the rest of the
program requested settings from your Pocket PC device.
Release 1.42
Page 5 of 37
Login
This screen is to validate the user authenticity. There are two different users
levels:
•
•
Administrator: Full control. They can read and change data from
devices and manage all the application settings.
Guest: These users only read information from
devices, but
are not allowed to modify any information.
After the Application installation, there are two user accounts enabled.
•
•
The first one is called IMET and is an Administrator User level.
The second one is called guest and is a Guest User level.
Both have the default password set to 0000 (four zeros).
The first step is login.
Release 1.42
Page 6 of 37
It is recommended that you use the IMET user initially because in this way,
you have full control and you can:
•
•
•
Change the default passwords.
Add new users.
Modify application settings.
Once you complete the user and password settings, click OK for login. If you
do not want to use the application, you can close it by clicking EXIT.
If you decide to activate Remember login field, the user and the password
you set will be shown by default at the next launch of the application.
Note:
User and Password are not case sensitive.
Release 1.42
Page 7 of 37
Application Menu
The menu bar is at the bottom of the screen.
Work: Click it to start the
Remote Control application access.
Device Search on page 14)
(See
Settings: When you click it, two options will appear:
•
Users: Click it to manage the user accounts of the application.
(See User Manager Screen on page 10).
• Communication Settings. (See Communication Settings on page 13)
Release 1.42
Page 8 of 37
The third item is About, and when you click it you will see the next contact
data screen:
The last item in the menu is Exit, when you click it a dialog box appears to
confirm you are leaving. Press OK to exit or CANCEL.
Release 1.42
Page 9 of 37
User Manager
Here you can manage the user accounts of the
Application.
Remote Control
You see the list of all users that are currently enabled in the application.
Release 1.42
Page 10 of 37
Whenever you wish to add a new user, click ADD and fill the form with the
new user data.
•
•
•
•
Login Name: User name. Please remember it is case sensitive.
Password: 20 alphanumeric digits maximum.
Language: The preferred language of the user will be set as default
language when a user starts its session.
Administrator: If you check this box, the new user will have full control;
otherwise the new user can only read information from
devices.
To confirm the new user data press OK.
Release 1.42
Page 11 of 37
Re-type the password and again press OK.
Otherwise press CANCEL and return to User Manager Screen without
changes.
To edit an existing user account, select it from the user list and click EDIT.
(You cannot edit the Login Name).
If you want to delete a user account, select it from the user list and click DEL.
(the IMET account is the only one that cannot be deleted, but to avoid future
undesired IMET user sessions, the password should be changed). Before
deleting the user the application will ask you to confirm it.
Release 1.42
Page 12 of 37
Communication Settings
Please, do not change these values unless you have problems when
connecting to different
devices.
•
Tries: Number of times the system will resend an
command.
•
Timeout: Waiting time in seconds for each try.
Press OK for saving new values or EXIT for return to menu without changes.
Note:
The default values are 3 tries and 3 seconds for Timeout. Please do not
change these values if you don’t have problems with
communications.
Please contact us and report the problem before setting new values.
Release 1.42
Page 13 of 37
Devices Search
When clicking on Work, the application will start automatically searching for
Bluetooth devices.
Notice that the standard Pocket PC Bluetooth range is about 10 meters (30
feet) without obstacles, so please consider less distance if
device
is in the mould and behind the moulding machine door.
Release 1.42
Page 14 of 37
Searching
Devices
When the search is completed you can see the Bluetooth® Wireless
devices. Note that
Technology devices found in the list called
®
other different Bluetooth Wireless Technology devices such as mobile
phones, laptops, personal assistants, etc… may also be found. You only will
be able to work with
devices, if you try to connect to a device
different than
, you will get an error message.
Release 1.42
Page 15 of 37
Setting
Devices Properties
In the list,
devices that have not been linked with this
Remote Control Application appear in grey colour and before the first
connection you must set its properties.
Double click on the grey
device icon or use i-METÆProperties
from menu. Then you will see the next screen:
To connect, you must know and write the correct four digit password of
device in the Password box (Red Coloured), if you
this specific
wish, you can write also a short description of this specific
device
or of the mould where it is placed to ease the recognition/identification
process in the future.
Release 1.42
Page 16 of 37
The first line refers to the
Installation Date; it will automatically
display the Installation Date when the system reaches 100 cycles, until that
day the symbol “?” will be shown.
Another property you could use is the Maintenance alert. You just write the
number of parts you want to be manufactured before a mould cleaning or
maintenance procedure must be done. Once the internal
counter
matches this number, an alert message will be shown at the Pocket PC device
next time you connect with that specific mould.
Then click OK to save these new values or Cancel to disregard the
modifications.
If you set the properties of this
(only password is required), the
icon becomes coloured and it is ready for connect.
properties, you can do this by using the
If you wish to change
contextual menu pressing 2 seconds or more over the icon or selecting
icon by using i-METÆProperties from menu.
Release 1.42
Page 17 of 37
Connecting to
Devices
device you must double click the
icon
To connect to an
inside the
devices list. (Note that you only can connect to devices
that have the properties set and just one at the time).
When connecting you will see a blue light switched on in the frontal of
device, then the application verifies the password (already set in
Properties), Password must match to the connected
device and otherwise you receive the next error message “Password
incorrect. Please check
properties”. Please, verify that you are
trying to connect to the correct
device.
If you are trying to connect to another kind of Bluetooth device, the
application will show an error message.
Release 1.42
Page 18 of 37
If connection is successful, then you can see the new screen and a progress
bar with the message “Updating”. On the connected
device
screen you should see “Bluetooth Rx”.
Release 1.42
Page 19 of 37
If you set a maintenance value in the properties of this
, the
application will verify if the total counter of this
device is greater
or equal than the maintenance value, if so, the following message will show:
If the total counter value is bigger than the maintenance value, delete it to
disable the maintenance value application.
Release 1.42
Page 20 of 37
Working with
At this moment you are linked with
device and ready to retrieve
and/or update different information/parameters.
At the bottom menu you can: (Administrator users only)
•
Change
Name:
You can change your
Bluetooth name to simplify the
recognition process in the future just writing the new name and clicking
OK, to discard changes, click Cancel.
Release 1.42
Page 21 of 37
•
Production: This option enables your access to the stored production
data of this particular mould. (See
Production Control
Section on page 34)
•
i-MET Components: This option enables you to consult the i-MET
components currently installed in this specific l
(See
Components on page 37)
To return to
Search Devices, click Exit from the menu bar.
Release 1.42
Page 22 of 37
Status Tab
The first tab, Status, shows the general view of
•
•
•
•
•
•
•
•
device.
Date time
: The current date and time value of the
connected
device.
Mode: Shows the current selected operating mode of
device.
Total cycles: Total cycles counter, indicates the total number of cycles
the mould has completed since the initial installation. It cannot be
reset.
Partial cycles: The current value of Partial cycles counter. This value
can be reset to 0 or set to a different value at any time.
Last Reset Date: Date and time of last reset of Partial cycles counter.
Temperature: Temperature in Celsius and Fahrenheit of the
Control Unit.
Working: Total time in hours since the initial installation of the
.
INFO: (This value only appears if the
has an INFO
Electronic Marker installed). The current value of the INFO Marker.
Any time you want to know the current status of the
should click Refresh.
device, you
Release 1.42
Page 23 of 37
Operating Mode Tab
(
(
device with Numeric Electronic Marker is installed)
device without Numeric Electronic Marker is installed)
.
Release 1.42
Page 24 of 37
Total Mode
When you click this button you can set the Operating Mode to Total.
Press Yes to change Operating Mode to Total.
Release 1.42
Page 25 of 37
If you wish to Reset the Partial Counter to cero, you can press the Reset
Partial button from the Mode tab. Please note that this action does not
change the Operating Mode in any way.
Release 1.42
Page 26 of 37
Partial Mode
When you click this button, you gain access to this screen where you can set
the Operating Mode to Partial (before setting the parameters of the Partial
Counter).
The first parameter that you can set is the repetitions value:
Release 1.42
Page 27 of 37
Operating on Partial Mode, it is possible to set the Repetitions Counter to a
new custom value, so that quantity of parts would show the same number. To
do so:
• Check the check box to enable the Repetitions text box.
• Write a new value in the Repetitions text box.
• Press Next button.
Release 1.42
Page 28 of 37
To set the Partial Counter to a new custom value:
• Write the new value in the Counter text box.
• Press Next button.
If you wish to Reset the Partial Counter to cero, you must check the Reset
Partial Counter check box from this screen.
To continue Press Next and to abort press Cancel to return to Mode Tab
without changes.
Release 1.42
Page 29 of 37
Press Yes to accept the new values for Repetitions and Partial counter , the iMET device will now operate in Partial Mode.
Release 1.42
Page 30 of 37
Date Change Tab
In this tab you can view the current date, time value and the week number of
the
device read in the last Status Refresh. It can be changed, only
if you are an Administrator user, by clicking SET I-MET DATE.
Release 1.42
Page 31 of 37
An administrator user can press SET I-MET DATE, and gain access to the
following screen:
You can select the date and time you wish to set on the
from the arrow boxes on the screen.
device
The default values in this screen are the date and time values of your Pocket
PC.
You can accept and set the date values by clicking OK, otherwise click
Cancel.
In both cases you will return to the Date Change tab and can view the new or
prior dates and times.
Release 1.42
Page 32 of 37
Info Tab
Note:
This tab only appears if the
Electronic Marker.
device has got installed an INFO
In this tab you can view the current INFO marker value of
read in
the last Status Refresh and change it (only if you are an Administrator user).
To refresh the current value press READ.
To set a new value push + or - to set your desired value in the box, at this
time press SET.
For each value you can save some comment at the bottom text area for later
reference. These values are automatically saved but will be only legible when
the INFO value where you wrote them appears on the text box.
Release 1.42
Page 33 of 37
Mould Production Data Reports
All
CUP devices automatically save the production data of the
mould they are installed in.
This information is accessible via the Production Data option in the menu
when the application is linked with the
.
If you choose the Production option, the following screen appears below:
You can view the last ten days of the production data stored in the
.
If you click Detail, you view the detailed hourly production of the selected
day.
If you click Delete, you delete all the production data the
If you click Refresh, you update the data from the
stores.
.
Release 1.42
Page 34 of 37
Production Detail
The Detail Screen enables you to view the daily production selected in hour
increments.
You can view graphically this data by clicking the Chart button.
Release 1.42
Page 35 of 37
You can change the chart style and orientation by clicking the Settings
button.
Release 1.42
Page 36 of 37
Components
You can check all different types of components installed in the
you are actually connected to.
To do so: From Menu click on i-MET Components.
The next screen will list all different components installed in the
.
Press Refresh to request the same information once again.
Press Back for return to the main work screen.
Release 1.42
Page 37 of 37