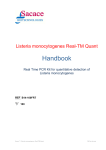
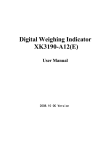
1
SYSTRONIK
Elektronik u. Systemtechnik GmbH
Description and
User Manual for
Gas Analysis Computer
New Generation
Read the instructions before using the instrument!
Consider security advice!
Keep instructions for further questions!
Version:
Part-No.:
03.2007
22636
Subject to availability and technical changes!
DIN EN ISO 9001:2000
Zertifikat: 01 100 050394
Contents
1. General instructions ...............................................1
2. Safety instructions ..................................................1
3. Battery and device disposal ...................................2
4. Application area .....................................................2
5. Product description.................................................3
5.1 Measurement and calculation parameters ...........3
5.2 Measuring procedure ...........................................4
5.3 Description of the device – technical data ............6
6. Physical specifications ...........................................7
7. Calculation formulae (extract) ..............................10
8. Button arrangement..............................................12
9. Keyboard function ................................................13
10. User guide ..........................................................14
10.1 Programme start menu.....................................14
10.1.1 Starting screen ..............................................15
10.1.2 Selecting a programme .................................17
10.2 Programme group „Measure“ ...........................19
10.2.1 Programme „Flue gas“ ..................................21
10.2.1.1 Measuring menu “Flue gas” .......................22
10.2.1.2 Extra menu “Draft” ......................................26
10.2.1.3 Extra menu „Info“........................................27
10.2.1.4 Extra menu „Draught detection“ .................28
10.2.1.5 Extra menu „Units“ .....................................29
10.2.1.6 Extra menu „O2-reference“ ........................30
10.2.1.7 Extra menu „Enter Data“ ............................32
10.2.1.8 Additional menu „Graphic“..........................36
10.2.1.9 „Fuel“ Menu ............................................... 37
10.2.1.10 Configurations menu „Config.“................. 38
10.2.1.10.1 Configuration „Readings“.......................39
10.2.1.10.2 Configuration „Fuel “ ..............................41
10.2.1.10.3 Configuration „Settings“ .........................44
10.2.1.10.4 Configuration „Set Default“ ....................49
10.2.1.11 Register buttons „Programme Macros“.... 50
10.2.1.12 Function „HOLD“ ..................................... 51
10.2.1.13 Function „Zoom“ ...................................... 52
10.2.1.14 Function „CO protect“ .............................. 53
10.2.1.15 Function „Print“ ........................................ 54
10.2.1.15 Function „Print“ ........................................ 54
10.2.2 Programme „Temperature“ ........................... 55
10.2.3 Programme „Pressure“ ................................. 56
10.2.4 Programme „CO (O2) Measurement“ ........... 57
10.3 Programme Group „Macro Start“ ..................... 58
10.4 Programme group „Time-Date“ ....................... 59
10.5 Programme group „Configure“......................... 61
10.6 Programme group „Memory“ ........................... 62
11. Info menu „Charge control“................................ 64
12. Maintenance ...................................................... 65
13. USB-Interface .................................................... 66
14. Battery / Line Voltage Operation ....................... 66
15. Watertrap........................................................... 68
16. Notice concerning measurement of SO2/NO2 .. 70
17. Notes ................................................................. 73
1. General instructions
1
Please read this user’s manual carefully and make sure to know how the instrument works before using it. Keep the user’s manual to read up on details when required.
Note!
2. Safety instructions
Avoid danger due to electricity
-
2
Do not touch parts under voltage with the instrument or the sensor!
Protection of the measuring instrument
-
Keep the instrument away from paint, solvent and glue and store it in a dry place.
Safety measures in order to maintain product warranty
1
-
The instrument can only be used within the specified data.
Treat the instrument according to its purpose.
Do not use force!
-
Only authorised staff is allowed to repair the instrument, otherwise the manufacturer is not
responsible for functioning. This is the same for the validity of licence.
1
3. Battery and device disposal
U
P
=
Empty or damaged batteries are to deliver to authorised collection points.
After removal from service, the instrument has to be disposed of eco-friendly.
=
4. Application area
This high-quality instrument is only suitable for the use in the following application areas:
The instrument is for professional settings and for control-measurements at all small-firings-facilities (low temperature- and
burner-value-boilers and -thermal) for gas and oil applicable. If you have the appropriate option you can also use the instrument for facilities for solid fuels (wood, coal etc.).
Furthermore the MAXILYZER NG is best suitable for measurements at bivalent and power modulatory communal heating stations.
This instrument is for measurement appropriate the German "1. BundesImmissionsSchutzVerordnung" (1. BImSchV) and
the European Norm DIN EN 50379-2.
2
5. Product description
The Gas Analysis Computer is a multiple -function analyser with integrated calculating functions.
Measurements are in accordance with the general regulations set forth by the German “BIMSchV” and the European
“EN 50379” at all kinds of combustion plants within the framework of the monitoring of exhaust systems.
5.1 Measurement and calculation parameters
Readings
T.Gas
T.Room
O2
CO
NO
SO2
Draft
Waste or flue gas temperature
Air or ambient temperature
Oxygen content
Carbon monoxide
Nitrogen monoxide (option)
Sulphur dioxide (option)
Draft or Pressure
°F or °C
°F or °C
% Volume
ppm - mg/m³ - mg/kWh
ppm - mg/m³ - mg/kWh
ppm - mg/m³ - mg/kWh
inches of H2O (iWC)
Calculated values
CO2
CO 0%
Effi.
Ex.air
qA
Dewpnt
T.Diff
NOx
Carbon dioxide
Carbon monoxide, undiluted
Combustion efficiency
Excess air value
Waste gas losses
Fuel specific dew point
Differential temperature (TG-TA)
Nitride oxides (option)
% Volume
ppm
%
λ
%
°C or °F
°C or °F
ppm - mg/m³ - mg/kWh - mg/MJ
3
NO ref.
NOx ref.
SO2 ref.
NO2 ref.
Nitrogen monoxide, undiluted (option)
Nitric oxides, undiluted (option)
Sulphur dioxide, undiluted (option)
Nitrogen dioxide, undiluted (option)
ppm
ppm
ppm
ppm
5.2 Measuring procedure
Temperature Measurem.:
K-type thermocouple NiCr-Ni
O2-Measurem.:
Electrochemical measuring cell.
CO-Measurem.:
Electrochemical measuring cell.
NO-Measurem. (option):
Electrochemical measuring cell.
SO2-Measurem. (option):
Electrochemical measuring cell.
NO2-Measurem. (option):
Electrochemical measuring cell.
Pressure/Draft Measurem.:
Measuring Duration:
Piezo-resistive sensor with internal temperature compensation.
Short-term memory measurements of max. 60 minutes are possible, followed by a
new calibration phase with ambient air.
Waste Gas Measurem.:
Via an external water separator and filter, the waste gas is fed to the sensors by
means of a gas feed pump.
4
Sensor Calibration
After having switched on the instrument there is a calibration phase that takes 60
seconds after a cold start. For repetition measurements it takes 10 seconds (restart).
CO-Sensor Protection
The standard equipped CO-Sensor with dynamic H2-compensation is protected
automatically by means of a separate flushing pump when the upper boundary of
the measurement range is reached (> 4.000 ppm).
By doing so the sensor is supplied with sufficient fresh air from the environment of
the device.
The measurement starts again automatically as soon as the value falls below 1.600
ppm.
During the active flushing phase the other readings aren’t influenced.
Waste Gas Sampling
This is done by means of a suitable probe which enables either a “One-PointMeasurement” (combi probe) or a “Multi-Point-Measurement” (multi-hole probe).
5
5.3 Description of the device – technical data
Display
Hi-res LCD-Module that can show graphical items. Either 5 or 10 readings plus menu line
can be displayed at a time.
Data communication
USB-interface
optional: radio-interface (Bluetooth-Interface)
Printer
internal infrared-thermo printer
Memory
max. 100 memory blocks including dynamic memory management and directory/file structure
Electrical Supply
NiCd-battery 6V/4Ah, external power adapter and charger
Adm. Operating Temp.:
+ 5°C to + 40°C (+40°F to +104°F)
Adm. Storage Temp.:
- 20°C to + 50 °C (-4°F to 140°F)
Mech. Dimensions
275 x 250 x 115 mm (L x W x D)
Weight
approx. 2950 g to 3100 g (115 oz.-120 oz.) (depends on equipment with sensors)
6
6. Physical specifications
Waste or flue gas temperature measurement
Range
Accuracy
Resolution
Sensor
-20°C ... +1.000°C (-4°F to 1,832°F)
± 2°C + 1 digit (-20°C to 0°C / -4°F to 32°F)
± 1°C (0°C to 200°C / 32°F to 392°F)
± 0.5 % of reading (above 200°C / 392°F)
1°C
K-Type thermocouple NiCr-Ni
Combustion air temperature measurement
Range
Accuracy
Resolution
Sensor
- 20°C ... + 1.000°C (-4°F to 1,832°F)
± 2° C + 1 digit (-20.0°C to 0.0° C / -4°F to 32°F )
± 0.5° C + 1 digit (0.0°C to 200.0°C / 32°F to 392°F)
± 0.5 % of reading (above 200°C / 392°F)
0.1 °C
K-Type thermocouple NiCr-Ni
Pressure measurement
Range
Accuracy
Resolution
Sensor
± 70 hPa (nominal) / ± 130 hPa (maximal)
± 0.02 hPa + 1 digit ( 0 to ± 2.00 hPa)
± 1 % of reading ( ± 2.01 to ± 70.0 hPa)
± 2 % of reading ( ± 70.1 to ± 130.0 hPa)
0.01 hPa (up to 20.99 hPa); 0.1 hPa (above 21.0 hPa)
semiconductor sensor
7
Oxygen (O2) measurement
Range
Accuracy
Resolution
Sensor
Response time (T90)
0 ... 21.0 vol.-%
± 0.2 vol.-% of reading
0.1 vol.-%
electro-chemical cell
≤ 50 sec
Carbon dioxide (CO2) calculation
Range
Accuracy
Resolution
Sensor
Response time (T90)
0 ... CO2 max (fuel-specific)
± 0.2 vol.-% of reading
0.1 vol.-%
calculated from O2 measurement
≤ 50 sec
Carbon monoxide (CO) measurement (with H2 compensation)
Range
Accuracy
Resolution
Sensor
Response time (T90)
0 ... 4.000 ppm
3 ppm (up to 20 ppm)
5 % of reading (above 20 ppm)
1 ppm
electro-chemical cell
≤ 60 sec
Options:
Nitrogen monoxide (NO) measurement
Range
Accuracy
0 ... 2.000 ppm
5 ppm (up to 50 ppm)
8
Resolution
Sensor
Response time (T90)
5% of reading (above 50 ppm)
1 ppm
electro-chemical cell
≤ 60 sec
COhigh measurement (without H2 compensation)
Range
Accuracy
Resolution
Sensor
Response time (T90)
0 ... 2.0 vol.-% (20.000 ppm)
5 % of reading (± 1 digit)
0.001 vol.-%
electro-chemical cell
≤ 60 sec
SO2-measurement
Range
Accuracy
Resolution
Sensor
Response time (T90)
0 ... 2.000 ppm
10 ppm (up to 200 ppm)
5 % of reading (above 200 ppm)
1 ppm
electro-chemical cell
≤ 120 sec
NO2-measurement
Range
Accuracy
Resolution
Sensor
Response time (T90)
0 ... 200 ppm
10 ppm (up to 50 ppm)
10 % of reading (above 50 ppm)
1 ppm
electro-chemical cell
≤ 120 sec
9
7. Calculation formulae (extract)
Calculation of the CO2 value:
CO2max:
O2:
21:
O2
= CO2max. * (1 - -------)
21
in % Volume
Max. CO2-value (fuel-specific) in % Volume.
Measured oxygen content in % Volume.
Measured oxygen content in % Volume.
Calculation of the waste gas loss:
T.Gas:
T.Air:
A2, B:
CO2
A2
qA = (T.Gas - T.Air) * (---------- + B)
21 - O2
in %
Waste / flue gas temperature in °F or °C.
Combustion / ambient temperature in °F or °C.
Fuel-specific factors.
10
Calculation of the excess air value (Lambda):
CO2max.
21
Lambda = ----------- = ----------CO2
21-O2
Calculation of the combustion efficiency value (Eta): Eta = 100 - qA in %
Calculation of CO 0% (undiluted):
CO und.:
content of carbon monoxide, undiluted
CO:
reading for CO
CO und. = CO * Lambda
11
8. Button arrangement
12
9. Keyboard function
F1
ON/OFF
F2
ON/OFF (Shift button)
START
STOP
Gas pump ON/OFF
ENTER
Change function line
CLEAR
F3
Function buttons
(register buttons)
Confirmation button
Close/cancel function or programme
Change alignment of lines
with reading
Backlight ON/OFF
13
10. User guide
10.1 Programme start menu
Switch on device ______________________________________
Pict 1
ON/OFF
The picture that appears on the screen in the beginning includes
information about version, part-no., hours in use, etc.
To keep this picture on the display press the ENTER-button during
the starting routine.
Press the CLEAR-button to close it.
Then the implemented company symbol appears on the display
and afterwards the programme starting screen appears.
It is already possible to switch the backlight on/off (press backlight button).
The other buttons have no function at this stage.
14
10.1.1 Starting screen
Status Line
This line continuously shows the status of certain information such as
remaining battery power, HOLD-function, sensor-alerts, operation of
the pump, chosen fuel, time, etc.
Pict 2
The priority of the information shown thereby depends on the mode
and function-specific criteria respectively.
Programme Menu
Out of this menu programmes can be chosen and started.
Menu Line
The functions shown on the display can be selected with the register buttons (F-buttons).
In some menus the F-buttons have several functions that can be rotated by pressing the
button in the centre of the keypad.
(see p. 16 for explanation)
15
Pict 1
Producer
information
Version of
software
Part-no.
Hours in use
Date of next calibration
Status line
Pict 2
Box for choosing
programmes
Function buttons
(register buttons)
16
Pict 3
10.1.2 Selecting a programme
The starting screen enables to select the programmes
shown in the following:
Available programmes
Programme „Measure“ ___________________________________
(see chapt. 10.2)
ENTER
Pict 4
Individual measuring programmes
(programme-macros)
Programme „Macro Start“ ________________________________
(see chapt. 10.3)
17
Pict 5
Programme „Time-Date“ ______________________________________
(see chapt. 10.4)
F1
Pict 6
Programme „Configure“ ___________________________________
(see chapt. 10.5)
F2
18
Pict 7
Programme „Memory“ _______________________________________
(see chapt. 10.6)
F3
Pict 2
10.2 Programme group „Measure“
The programme „Measure” can be selected out of the starting screen (10.1.1):
Measure __________________________________________________
ENTER
19
Out of the programme-menu „Measure“ the programmes shown
below can be selected:
Pict 3
Flue gas ____________________________________________
(start flue gas programme)
Temperature ______________________________________________
(start temperature measurement programme)
Pressure __________________________________________________
(start measurement of pressure difference)
F1
F2
CO ambient Measurement _________________________________
F3
20
Pict 8
10.2.1 Programme „Flue gas“
Flue gas ____________________________________________
After the calibration the last used fuel appears on the screen.
Now either the fuel in the framed box can be chosen or any
other fuel. The selected fuel has to be in the framed box.
Pict 9
Confirm fuel ______________________________________
ENTER
Select new fuel ________________________________
1
Note!
After a cold start the calibration phase takes 60 seconds.
If a restart is done out of the measuring programme the
calibration phase takes only 10 seconds.
21
10.2.1.1 Measuring menu “Flue gas”
In the measuring menu the following button combinations are available:
Main buttons
Pict 11
Change the way in which the readings are shown line by line _
(uni directional line change)
Change the layout of the register buttons _____________________________
(new function buttons)
Gas pump (ON/OFF) ________________________________
START
STOP
Backlight (ON/OFF) _______________________________
Reset COmax-value_________________________________
CLEAR
22
Function buttons
With this keypad additional functions can be activated. In addition
to the fixed main buttons there are now three more functions available
(depends on the selected function line).
Choose programme function ____________
with the register buttons
F1
F2
F3
Available function buttons within
the measurement menu „Flue gas“.
23
Button functions and programmes that are linked with the register buttons:
Hold readings
Start draft measurement programme (flue-measurement)
Print readings
Change layout of readings (5 or 10 lines)
Start information menu (shows data about fuels and condition of sensors)
Go to the memory section
Start main gas flow detection programme
24
Activate flushing function (manual CO-Sensor protection)
Change units of readings
Change reference value for O2
Enter additional data (enlarge measurement protocol)
Start analysis software (graphic representation of values)
Change fuel (selection of fuels)
Start settings menu (set programme data)
Save measurement combinations as macros
(customised measurement programmes)
25
10.2.1.2 Extra menu “Draft”
From the flue gas menu:
Pict 30
Start draft measurement
From the draft measurement menu the following functions are available:
Hold reading for draft_______________________________________
Carry out zero point calibration _______________________________
F2
Transfer draft value to the___________________________________
flue gas menu
F3
1
To determine the zero point in relation to the surrounding
air pressure unplug the air tube (with the blue connector)
before every draft measurement. Then press the F2 button
and connect the air tube again.
Note!
Change representation of readings in the main menu ______________
line by line (multi-tasking-function)
26
Pict 27
10.2.1.3 Extra menu „Info“
Out of the flue gas menu:
Start Info-Menu
After having started the Info-Menu the most important fuel parameters and
the O2-reference value are shown.
Change representation of readings in the main menu __________________
line by line (multi-tasking-function)
Show current status of the gas sensors __________________________
Pict 28
Sensor quick-diagnosis:
O2-value > 50 %
Oxygen cell OK
CO- and H2-value: 0 to 1 %
)
CO-sensor with H2-compensation OK*
CO%-value: 0 to 1 %
)
CO-sensor for upper range OK*
NO- and/or SO2-value: 0 to 1%
)
NO- and/or SO2-value OK*
)
* resp. sensor option disabled
27
1
Note!
Are other values found the corresponding sensor is
either strongly impaired or used up.
If so please contact the service point.
Close Info menu _____________________________________________
CLEAR
Pict 31
10.2.1.4 Extra menu „Draught detection“
From the flue gas menu:
Start function „Draught detection“
The function “Draught detection” shows tendencies in a graphical way.
Slightest changes in the temperature of the flue gas are shown with a black bar.
If temperature is constant no bar appears.
28
Pict 32
1
The „Draught detection“ is only available for the
measurement of the flue gas temperature in the “flue gas”
menu.
Note!
Change representation of readings in the main menu __________________
line by line (multi-tasking-function)
10.2.1.5 Extra menu „Units“
Out of the menu „flue gas“:
Start menu „Units“
Pict 35
The required conversion of the units of the gas and temperature sensors can
be selected by the function buttons (F1 to F3)
and/or
Move cursor
Confirm selected unit
Change representation of readings in the main menu __________________
line by line (multi-tasking-function)
29
Pict 36
Close menu „units“ ______________________________________
and/or cancel operation
1
CLEAR
If the unit selection gets cancelled the units used
before will be kept.
Note!
Accept selected units _____________________________________
1
Note!
ENTER
After the selected units have been confirmed they are
available in the flue gas menu from now on.
This configuration is kept until new units are selected,
no matter whether the device is switched off- and on.
Pict 38
Bild 38
10.2.1.6 Extra menu „O2-reference“
From the menu „flue gas“:
Change O2 reference
In order to convert the measured gas values the so called O2 reference value
can be modified in accordance with the current regulations and the chosen
fuel respectively. For gas and oil fuels a value of 3% is preset. For solid fuels
a value of 13% is preset.
30
The values are entered by means of an editor that can be used with the buttons
F1 to F3.
and/or
Select figure
Confirm
Change representation of readings in the main menu ______________
line by line (multi-tasking-function)
Close/cancel input menu _____________________________________
„O2 reference“
1
CLEAR
If the input gets cancelled the “O2 reference
value” used before will be kept.
Note!
Confirm new „O2 reference value“ _____________________________
ENTER
31
10.2.1.7 Extra menu „Enter Data“
From the menu „Flue gas“
Enter extra data
Pict 39
The following data can be entered and transferred to the measurement protocol:
Found out Smoke-no. ______________________________________
(soot content according to the Bacharach scale)
Found out oil derivatives _____________________________________
Temperature of boiler and heat carrier__________________________
F1
F2
F3
Change representation of readings in the main menu ______________
line by line (multi-tasking-function)
32
Pict 40
Smoke-no. input menu
The value that was determined through the mechanical soot pump can be
entered by the function buttons F1 to F3.
and/or
Select figure
Confirm Smoke-no.
Close input menu_________________________________________
without keeping new data
CLEAR
Confirm Smoke-no. input ___________________________________
(without transferring data to the measurement protocol)
ENTER
33
Oil derivatives input menu
In this menu there is a choice between “Yes” (oil derivatives existent) and
“No” (no oil derivatives existent).
Pict 42
Oil derivatives existent _______________________________________
F1
No oil derivatives existent _____________________________________
F3
Cancel input _______________________________________________
CLEAR
Confirm input ______________________________________________
ENTER
34
Pict 43
Temperature and heat carrier
The read temperature can be entered through the editor (buttons F1 to F3).
and/or
Select figure
Confirm input of temperature
Close input menu ___________________________________________
without keeping data
CLEAR
Confirm input ______________________________________________
(Transfer data to the measurement protocol)
ENTER
Pict 39
Change representation of readings in the main menu ______________
line by line (multi-tasking-function)
Close input menu for additional data ____________________________
CLEAR
35
1
Note!
When the input menu for the additional data (Smoke-no., oil derivatives
and boiler temperature) is closed all data that has been confirmed with
the ENTER-button so far will be stored in the measurement protocol. Inputs of
data that have been cancelled will not be taken account of.
10.2.1.8 Additional menu „Graphic“
Pict 45
From the menu „Flue gas“
Start combustion graphic menu
This functions uses graphs to show the numerical values according to the
chosen fuel. The remaining content of oxygen (O2) and the calculated waste gas
losses (qA) are thereby set in a relation to the excess air value (λ) and to the
classical combustion diagram.
1
If both bars extend to the optimal fuel-air relation (the gap indicated
by “λopt”) the firing facility in question is set in the correct way.
Note!
Close graphic menu _________________________________________
Change representation of readings in the main menu _______________
line by line (multi-tasking-function)
36
10.2.1.9 „Fuel“ Menu
From the menu “Flue gas”:
Start menu „Fuel“
Pict 9
Select new fuel _____________________________________________
1
Note!
In this menu the required fuel can be selected out of the
list of available fuels.
In order to select the new fuel it must appear in the framed
box.
Confirm selected fuel________________________________________
ENTER
Cancel___________________________________________________
(without selecting new fuel)
CLEAR
37
10.2.1.10 Configurations menu „Config.“
From the menu „Flue gas“:
Start Configuration menu
In this menu customised measuring programme settings can be set. After being
transferred into the active measurement programme these settings will be saved
lastingly and are therefore producer-independent i.e. customised settings.
Pict 6
The settings shown below can be transferred:
Change order of measured _________________________________
values on the screen
F1
Reduce/expand list of fuels _________________________________
F2
Change general settings____________________________________
F3
Restore factory settings_____________________________________
ENTER
38
Pict 48
10.2.1.10.1 Configuration „Readings“
From the configuration menu:
Start menu „Display" __________________________________________
F1
The underline that appears on the screen can be regarded as a
“line cursor” that highlights the line to be changed on the display.
and/or
Move line cursor
upwards or downwards
Pict 49
Move line cursor in one direction ________________________________
After the required display line is highlighted it has to be activated
in order to move it on the display.
Activate highlighted display line
Now the activated line can be moved to the required position.
and/or
Move activated line
39
Pict 50
Move activated line in one direction only _________________________
Confirm position of line
Confirm setting _____________________________________________
ENTER
Pict 51
Cancel procedure ___________________________________________
1
Note!
CLEAR
The sequencing of the measured parameters can be
altered in an arbitrary way.
The same line can’t be displayed more than once.
40
Pict 53
10.2.1.10.2 Configuration „Fuel “
From the configuration menu:
Open list of fuels __________________________________________
F2
Remove framed fuel from list
1
The removed fuel can be reactivated later on by opening
the complete list of available fuels again.
Note!
Pict 54
Include all available fuels again
The available list of fuels can be expanded as shown below:
Insert new fuel
1
There is a maximum of 5 more slots for fuels available that
can be parameterised accordingly.
Note!
41
and/or
Move bar cursor
Pict 55
upwards or downwards
Confirm selected location of fuel
Cancel procedure ___________________________________________
1
Note!
CLEAR
In order to create a new fuel the first three fuel-specific
factors (CO2max, A2 and B) have to be entered!
If other units than ppm or % are used the other factors
should be entered as well as otherwise a conversion to
3
3
mg/m , mg/kWh or MJ/m is not possible.
HW
BW
H2O
Vatr
= heating value without
condensation content
= heating value with
condensation content
= content of water
= quantity of flue gas (dry)
Edit/change name of fuel
42
Pict 56
The name of the new fuel can be entered via the editor.
and/or
Select required character
Confirm selected character
Pict 58
Finish input______________________________________________
ENTER
Cancel input procedure ____________________________________
CLEAR
Use the same procedure for the input of the fuel specific factors.
43
Pict 59
10.2.1.10.3 Configuration „Settings“
From the configuration menu:
Start menu „Settings“_______________________________________
F3
This menu is for general settings that represent programme
independent functions.
Select line _______________________________________________
1
The bar cursor can only be moved in one direction.
Note!
44
Pressure / Draft
Here the unit for the pressure and draft measurement within the flue gas
measurement programme can be preselected.
and/or
Select unit
Pict 60
Sound
Switches on/off the sound when a button on the keypad is pressed.
and/or
Sound Yes/No
Printer
The infrared printer that is used for the proceedings of the readings
(print-out) can be selected at this point.
Available printers:
EUROprinter (Euro-Ir) and HP84420B (HP-Ir)
and/or
Select printer
45
Pict 67
User address
In this menu the adress of the user can be entered.
There are 8 lines available with 16 characters each (minuscules
and capital letters, numbers and symbols).
1
Unless indicated by a „dot“-character empty lines
aren’t printed.
Note!
and/or
Select line
for input
Pict 68
Activate input
Available editing functions:
Accept input and __________________________________________
close input mask
ENTER
Select type of character ____________________________________
(minuscules and capital letters, numbers and symbols)
Cancel procedure (CLR) ____________________________________
(without saving data)
CLEAR
In the entry mask (editor) only one line can be edited at a time!
This entry mask is comparable to common mobile phone editors.
46
Automatic
In this configuration menu two time values can be set.
„Auto off“
1
Note!
Attention!
„Illum. off“
Time after which the device switches off automatically
if no button is pressed.
The auto off time can be set in intervals of 5 minutes.
Maximum: 60 minutes
Pict 60
If set to „0 min“ the auto off function is disabled and
the device has to be switched off by hand via the
ON/OFF button.
This function can cause irritations if the „Auto off“
is forgotten and the device switches off automatically
as configured.
Please check the “Auto off” setting.
Time interval for the backlight. This can be set in intervals
of one second with a maximum length of 30 seconds.
47
Functions of the buttons in the submenu „AUTOMATIC“:
Decrease time interval
Increase time interval
Cancel input ______________________________________________
(without saving settings)
CLEAR
Finish input _______________________________________________
and save settings
ENTER
48
10.2.1.10.4 Configuration „Set Default“
From the configuration menu
Activate „Set Default“ ________________________________________
ENTER
This function restores factory settings.
1
Pict 75
The restoration of the factory settings will cause a lost of
all individual settings and can’t be undone!
The data memory is not affected!
Attention!
Confirm „Set Default“ ___________________________________________
Cancel procedure ___________________________________________
ENTER
CLEAR
49
Pict 61
10.2.1.11 Register buttons „Programme Macros“
From the menu „Flue gas“:
Up to three customised measuring configurations can be created.
They can be started directly out of the starting menu. The operation
of these macros can be reduced to a few button inputs only.
Programme macros can have configurations as shown below:
1
Note!
- order of the readings that are shown on the screen
- font size of the readings (5 or 10 characters)
- predefined fuel
- preset measuring units
Pict 62
Apart from that the list of available fuels is not shown after the
calibration phase.
Save preset measurement configuration
as programme macro
Cancel saving procedure ____________________________________
CLEAR
Save macro ______________________________________________
ENTER
50
10.2.1.12 Function „HOLD“
The “Hold”-function is used to keep measured data.
Pict 11_1
If the HOLD-Function is activated all displayed measured data at the time
the button was pressed will be kept.
Keep readings
1
If the HOLD-Function is activated the alert “HOLD” appears
in the top left corner of the status line (in exchange with
the name of the fuel).
Note!
51
Pict 21
10.2.1.13 Function „Zoom“
There are two fonts and therefore types of layout available:
10-lines layout
The 10-lines layout is the standard layout set by the producer.
Measured parameters are shown on the left whereas readings
and units are shown on the right.
Change layout (5 or 10 lines)
Pict 22
5-lines layout
This layout reduces the number of displayed lines but it facilitates the reading of
the display from a bigger distance.
This time measured parameters and units are on the left whereas readings
are on the right.
1
After the device is switched off and on again the display resets
to the 10-lines layout automatically unless the 5-lines layout was
a measurement configuration activated by a macro.
Note!
52
Pict 33
10.2.1.14 Function „CO protect“
Every device is equipped with a second pump (CO-flushing-pump) in order
to protect the quite sensitive CO-sensors from CO-overload.
The CO-flushing-pump can either be started manually or it switches on
automatically when necessary, i.e. when the admitted CO-range is exceeded.
Switch ON/OFF CO-flushing-pump
When the CO-flushing-pump is activated a scored out CO-symbol appears
in the status line.
If the CO-flushing-pump starts automatically due to
an excess concentration of CO it can’t be switched off
manually until the high CO-concentration is no danger
for the CO-Sensor anymore.
If the CO-concentration has reached the lower range
Note!
again the CO-flushing-pump will shut off.
1
If the device is equipped with two CO-sensors the result of the higher range
sensor will be displayed when the lower range sensor is flushed.
1
The active CO-flushing-pump doesn’t influence any other
sensors within the device.
Note!
53
10.2.1.15 Function „Print“
The measured data can be printed out by means of a wireless
infrared printer.
Pict 11
Bild 11_2
Print measured data
The printer in use can be selected from the configuration menu.
The rate of printing depends mostly on the type of
printer selected.
Please activate the correct type to avoid possible failures
while printing.
Note!
1
Because of the modern multi-tasking-operating the device can be used
without restrictions during the printing procedure. Printing takes place
simultaneously to the other operations in order to avoid delays.
54
10.2.2 Programme „Temperature“
The programme „Temperature“ can be started out of the programme
group “Measure” (see chapt. 10.2)
Temperature Measurement Programme _________________________
F1
Pict 69
For temperature measurement there are two measurement channels
(T1 and T2) available.
Measurement channel T1 is displayed with a resolution of 0.1°C whereas
channel T2 has a resolution of 1°C.
Keep all temperature readings
Reset readings
Print measurement protocol
Change units (°C or °F) ______________________________________
55
10.2.3 Programme „Pressure“
The programme „Pressure“ can be started out of the programme group
“Measure” (see chapt. 10.2).
Start pressure measurement programme___________________________
Pict 72
Keep all readings for pressure
Reset readings
Print measurement protocol
Change units _______________________________________________
Reset to zero _______________________________________________
ENTER
The units shown below can be selected:
1
Note!
hPa, mbar, mmWC (millimeter water column), mmHg
(Millimeter Mercury Column), inWC (Inch Water Column),
inHg (Inch Mercury Column), Psi (Pounds Per Square Inch).
The conversion takes place in the active measurement
programme as well as in the HOLD-mode.
56
Pict 8
10.2.4 Programme „CO (O2) Measurement“
This is a reduced measurement (without temperature measurement) that can
be carried out in the environment of the heating facility especially in the area
of the flue gas channels.
Pict 74
For this measurement programme the same keypad functions apply as
described in chapter 10.2.1.1.
Apart from that the number of readings is reduced to five significant
flue gas values.
The font size of the readings can be changed with the
register buttons (function: “Zoom”).
57
Pict 2
10.3 Programme Group „Macro Start“
The programme „Macro Start“ can be selected from the starting screen (10.1.1):
The handling of the device can be facilitated enormously by means of customised
measuring programme configurations that can be saved as programme-macros.
(see chapt. 10.2.1.11)
Up to three different and customised macros can be used.
Macro Start ________________________________________________
1
Note!
Requirement for the use of macros are customised sets
of measurement programme settings that can be started
in an efficient way (see chapt. 10.2.1.11).
Start required macro _________________________
F1
F2
Pict 4
F3
After having started the macro the settings it is based on will be activated
automatically after the calibration phase and without showing the list of fuels
(see chapt. 10.2.1.11 for macro settings).
1
Note!
If a „Confi.-reset“ (see chapt. 10.2.1.10.4) is carried out all
macro-settings will be lost. Without customised settings the
settings for the fuel gas analysis will be used.
58
Pict 2
10.4 Programme group „Time-Date“
Choose the programme „Time-Date“ from the starting screen (10.1.1):
The integrated clock (time and date) can be set at every time as shown below:
Time-Date ________________________________________________
F1
The time will be displayed in the top left corner of the status line if not
replaced by superior information.
Time and date will be saved together with the corresponding data and therefore
appear on the print-outs of measured data protocols as well.
Change/set time ___________________________________________
F1
Change date ______________________________________________
F2
1
Pict 5
Bild 5_2
In contrast to changes between winter and summer time and
vice versa leap years will be considered automatically.
Note!
59
Pict 63
Change time
and/or
Set new time
Confirm
Close menu _________________________________________________
(without setting time)
Confirm time-change _________________________________________
1
Note!
CLEAR
ENTER
During time setting the clock in the editor will be
stopped and not restarted until the new time is
confirmed.
Pict 64
Change date
and/or
Change date
Confirm input
CLEAR
Close menu ______________________________________________
(without correcting time)
Confirm time _____________________________________________
ENTER
60
Pict 6
10.5 Programme group „Configure“
Start programme group “Configure” from the starting screen (10.1.1):
Start menu „Configure“ ____________________________________
F2
See chapt. 10.2.1.10 configuration menu „Configure“!
1
Note!
The configuration menu can be started directly after having
switched on the device or from the measurement programmes
“Flue gas” and “COambient”.
61
10.6 Programme group „Memory“
Data memory: Menu structure
menu
memory
select
directory
directory
selected
select
file
file
selected
new
directory
directory
created
new
file
create
file
delete
memory
memory
deleted
delete
directory
delete
folder
save
data
display
data
delete
file
62
Pict 7
The data memory is structured according to the menu structure shown above.
The organisation of the memory is dynamic, i.e. only already existing directories
and files are available for saving data.
Additional directories and files can be created at any time.
Names of both directories and files can be defined by the user. Directories could for
instance be used for the names of clients or facilities (or client numbers).
Files could be named after the types of measurement.
1
New devices are delivered without preset directories and files.
Note!
Pict 12
63
11. Info menu „Charge control“
The batteries are charged automatically when the device is switched on and off after
being connected with the device specific recharger. Batteries will be recharged as well when the
device is switched on.
During active recharging some parameters related to the battery and the recharging process
are displayed on the charge control screen:
U batt.
I Bat
T Bat
Cap.
=
=
=
=
current voltage
current amperage
measured battery temperature
current battery capacity
Start measurement ________________________________________
1
Note!
Pict 66
ENTER
From the charge control menu measuring can be started
immediately without having to interrupt the process of
recharging.
During measuring the battery will be recharged continuously
and monitored by the system.
As soon as the battery is full the device switches to the passive recharging mode
(trickle charging) automatically and the charge control screen disappears.
When (active) recharging is finished the charger can remain connected to the
device without damaging the battery.
1
Note!
The use of non-device-specific or non-authorised
chargers is forbidden and can cause damage to the battery and/or the device
in the worst case.
64
12. Maintenance
Waste Gas Cleaning System:
1
Attention!
see drawing on page 70.
Empty the condensate reservoir completely after each measuring operation.
Water residues within the measuring instrument will destroy the pumps and
sensors!
Damage of the filter and / or improperly fitted filter will greatly decrease or
eliminate the filter function and will eventually destroy pumps and sensors.
Check the micro filter for contaminations and replace as necessary.
If the pump capacity is reduced, exchange the diaphragm filter.
Make sure that threaded parts are straight when placed on and tighten them
moderately. Ensure sufficient sealing by means of O-rings.
Plug-type elements and flanges: Remove any gas residues. Grease with Vaseline.
Storage:
Store in a cool and dry environment at a temperature of approx. 20°C (60 °F).
Damages:
Guarantee and warranty obligations do not apply to damages caused by improper handling, negligence and grave external influences.
65
13. USB-Interface
Connection for special service and data communication via PC, laptop, notebook, etc.
14. Battery / Line Voltage Operation
Battery operation:
Maximum of 36 hours of continuous measuring (with backlight).
Battery charger:
External Charger 230 V~/50 Hz.
Intelligent monitoring by means of an integrated charge-management-system.
To maintain the service life and performance of the NiNd battery, please observe
the instructions 'Information on charging the battery' (see next page).
66
Information on Charging the Battery
MAXILYZER is equipped with an NiCd storage battery. The service life and capacity of the battery are considerably
affected by the way the instrument is charged and used. In order to make the handling safer, the instrument has an
efficient and battery saving load management unit for all purposes.
The service life of the NiCd battery can be significantly reduced when the instrument is operated at temperatures below
5°C (40 °F).
The graphic charge-level indicator of the MAXILYZER NG (consisting of 5 elements of a battery symbol) helps the user
to estimate correctly the capacity of the battery.
During normal use it is recommended not to recharge the battery until it is run down completely.
The battery can be recharged at any time given the load management unit recognises the need of recharging the battery. If the battery is too full already the load management unit can deny a further recharging of it.
If the device is used outside the permitted temperature range, if the battery is quite old or if incomplete charging cycles
(charging/discharging) are carried out the charge-level indicator can possibly not show the true charge-level anymore.
In this case the indicator can be corrected as explained in the following:
Discharge batteries by switching on the device until it runs out of battery power and switches off automatically. Now
connect the device to the charger and start the charging function (recharging completely takes approx. 5 hours, depending on surrounding temperature). After having finished active recharging the MAXILYZER NG switches off automatically. This so called “reconditioning cycle” can be repeated as necessary.
U
Used or dead Battery
=
For replacement of a used or dead battery, the analyser has to be sent back to the supplier /
manufacturer.
67
15. Watertrap
68
Replacement and spare parts
01 Inlet piece
02 O-Ring 23 x 2 mm
03 Glass piston with arrow mark
04 Outlet piece with cylinder
05 Outlet piece middle
06 Glass piston with logo
07 Infiltec mirco filter
08 Connection piece
09 Teflon membran 23,5 mm
11 Outlet piece
12 Silikon tube 3x2 mm
Maintenance / Care
part-no.
20594
20370
20596
22017
21954
20595
20919
20592
20921
20591
20636
- Empty condensate trap after use.
- Check micro filter for cntamination, replace if required.
- Exchange teflon membran filter in case of degrading pump
flow.
If damaged or inserted improdperly, the filtering function will
be lost!
- Grease all O-Rings with vaseline or silicongrease as required!
69
16. Notice concerning measurement of SO2/NO2
Important notice concerning measurement of SO2 and NO2
(option)
SO2 and NO2 gases have a high solubility in water. For measurement of SO2 and NO2
concentrations it is therefore necessary to remove the condensate residues form the gas
filtration and drying system. These residues can absorb SO2 and NO2 which could cause
measurement deviations.
Furthermore, when carrying out SO2 and NO2 relevant measurements no additional desiccant should be used. Even when it is dry this filter material can absorb significant parts
of the SO2 and NO2 content.
70
71
72
17. Notes
73
SYSTRONIK
Elektronik u. Systemtechnik GmbH
Gewerbestraße 57
D-88636 Illmensee
Tel:
+49 (0) 7558 / 9206-0
Fax:
+49 (0) 7558 / 9206-20
E-Mail: [email protected]